Northern Ridge 8999039 Le manuel du propriétaire
- Catégorie
- Pistolets à chaleur
- Taper
- Le manuel du propriétaire

V1.0 8999039
Please read and understand all instructions before use. Retain this manual for
future reference.

8999039 Soft-Shell Vehicle Rooftop Tent V1.0
2 For technical questions call 1-800-665-8685
SPECIFICATIONS
Size 4-5/8 x 10-3/16 x 4-5/16 ft
Material PVC shell, polyester tent, foam mattress, aluminum ladder
Colour/Finish Grey
Standards CPAI-84 fire retardant
HAZARD DEFINITIONS
Please familiarize yourself with the hazard notices found in this manual. A
notice is an alert that there is a possibility of property damage, injury or
death if certain instructions are not followed.
DANGER! This notice indicates an immediate and specific hazard that
will result in severe personal injury or death if the proper
precautions are not taken.
WARNING! This notice indicates a specific hazard or unsafe practice that
could result in severe personal injury or death if the proper
precautions are not taken.
CAUTION! This notice indicates a potentially hazardous situation that
may result in minor or moderate injury if proper practices are
not taken.
NOTICE! This notice indicates that a specific hazard or unsafe practice
will result in equipment or property damage, but not
personal injury.

V1.0 Soft-Shell Vehicle Rooftop Tent 8999039
Visit www.princessauto.com for more information 3
INTRODUCTION
The soft-shell vehicle rooftop tent is ideal for quick camping set-up
regardless of the location. Unfold the tent, set the crossbar and tent
awnings and you’re ready to relax.
Attaching the tent to the roof rails requires openings. Flush-mount rails are
not compatible with the tent.
SAFETY
WARNING! Read and understand all instructions before using this tool.
The operator must follow basic precautions to reduce the risk of
personal injury and/or damage to the equipment.
Keep this manual for safety warnings, precautions, operating or inspection
and maintenance instructions.
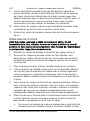
SPECIFIC SAFETY PRECAUTIONS
WARNING! DO NOT let comfort or familiarity with product (gained from
repeated use) replace strict adherence to the tool safety rules. If you
use this tool unsafely or incorrectly, you can suffer serious personal
injury.
1. Use the correct tool for the job. This tool was designed for a specific
function. Do not modify or alter this tool or use it for an
unintended purpose.
2. Do not use the tool if any parts are damage broken or misplaced.
Repair or replace the parts.
3. Installing the tent on the roof rails will affect the vehicle’s handling.
Drive carefully until you feel comfortable with the changes.
4. Prior to beginning any trip with the rooftop tent installed on your
vehicle, ensure that all nuts and bolts that attach the rooftop tent are
tight and in good repair. During the trip, regularly check that all
fasteners continue to be tight and have not become loose.
5. Replace any cracked or damage components before driving. Remove
the tent from the vehicle until the repairs are complete. Damaged
components may cause a failure and the tent may break away, causing
a driving hazard to other vehicles on the road.
6. The tent material is flammable. Keep away from flame or heat sources.
7. Consult your vehicle’s owner’s manual to verify the roof’s weight
capacity. The assembled rooftop tent weights 117 lb (53 kg). Include the

8999039 Soft-Shell Vehicle Rooftop Tent V1.0
4 For technical questions call 1-800-665-8685
weight of all people in the tent and any equipment. Do not exceed the
vehicle railing’s weight capacity.
8. DO NOT transport additional items inside, attached to, or on top of the
rooftop tent.
UNPACKING
WARNING! Do not operate the tool if any part is missing. Replace the
missing part before operating. Failure to do so could result in a
malfunction and personal injury.
Remove the parts and accessories from the packaging and inspect for damage.
Make sure that all items in the contents are included.
Contents:
• Mounting hardware (see Parts Breakdown)
• Ladder
• Cover with crossbars
• 50 mm foam mattress
• Rain Fly
• Flexible rods (6 pc)
ASSEMBLY & INSTALLATION
WARNING! Do not install the tent on a truck bed rack or any system that
allows more than a few inches of space between the vehicle roof and
bottom panel. The additional airflow can cause the mounting hardware
to fail while the vehicle is in motion.
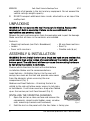
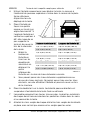
Choose which direction the tent will unfold before
installation. Below are the recommendations.
Large Vehicles - Unfolding the tent to the rear will
occupy less room on the roof and provide some cover
from the elements when accessing the rear
compartment (Fig. 1).
Medium and Small Vehicles – Orienting the tent to
unfold to the side will allow easier access to tail gates
or hatchbacks. It will also cause less drag when folded
up as the narrow part will face forward (Fig. 2).
INSTALLING THE MOUNTING CHANNELS
1. Open the tent on a clean surface and remove the
components stored inside (ladder, cover, window
rods, mounting channels and hardware).
2. Fold the tent so the panel with the four holes is facing you.
Fig.
1
Fig. 2

V1.0 Soft-Shell Vehicle Rooftop Tent 8999039
Visit www.princessauto.com for more information 5
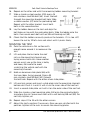
3. Determine which way the mounting channels will be installed, based
on the tent orientation you’ve chosen. Measure and note the distance
between the mounting channels.
4. Transfer the measurements to determine where both mounting
channels will sit on the rooftop rails.
5. Measure the distance between each roof rail at each point, from the
outer edge on each side, Measure both spots where the mounting
channels (#12) will cross the rails as the gap may be different.
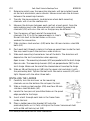
6. Trim the excess off each end of the mounting
channels (Fig. 3) to fit the measurements in step 5.
Do not trim next to the bolt holes as this can
weaken the connection.
7. Slide stainless steel washers (#10) onto four 40 mm stainless steel M6
bolts (#3).
8. Push each bolt through a hole in the face-up panel from inside the tent.
You may need to push the mattress aside to do so.
9. Slide each mounting channel over two of the bolts. The direction will
depend on the tent’s orientation when opening.
Open to rear – The mounting channels (#12) are parallel with the tent’s hinge.
Open to side - The mounting channels (#12) are perpendicular (90°) to the
tent’s hinge. Make sure the end of the channel doesn’t overlap the hinge.
10. Slide an M6 self-locking nut (#9) into the upper slot and align it with
the protruding bolt. Tighten the bolt with the metric wrench (#11) until
tight. Repeat with the other three bolts.
INSTALLING THE LADDER
11. Carefully turn the tent over so the mounting
channels are on the bottom. Do not open the tent.
12. Slide a stainless-steel washer (#10) over four 40 mm
stainless steel M6 bolts (#3).
13. Locate the two pairs of pre-drilled holes on the panel
edge parallel to the hinge.
14. Insert a bolt through each hole in the frame from
inside the tent.
15. Place a ladder mounting bracket (#1) onto the
protruding bolts so it is fully sitting on the frame. Secure each bolt
with an M6 self-locking nut (#9).
Fig. 3
Fig.
4

8999039 Soft-Shell Vehicle Rooftop Tent V1.0
6 For technical questions call 1-800-665-8685
16. Repeat on the other end with the remaining ladder mounting bracket.
17. Slide a stainless-steel washer (#10) over a 16
mm stainless steel M6 bolt (#4). Insert the bolt
through the mounting bracket bolt hole. Slide
a rubber washer (#7) onto the protruding bolt.
Repeat with the other bracket. Insert both
bolts in the same direction.
18. Lay the ladder down on the tent and align the
bolt holes on top with the protruding bolts. Slide the ladder onto the
bolts, then secure each bolt with an M6 self-locking nut (#9).
19. Check that the ladder can easily pivot on the brackets. If it is too stiff,
loosen the nut by 1/8 of a turn and retest until it pivots freely.
MOUNTING THE TENT
20. Park the vehicle on a flat surface with
enough room around it to maneuver the
tent.
21. Lift and place the tent onto the roof
rails so the mounting channels are
laying across both rails. Have another
person assist you as the item is bulky
and heavy. Be careful to avoid
scratching the vehicle roof with the
mounting channels.
22. Hold an aluminum slide plate (#6) with
the two ridges facing upward. Drop a 55
mm stainless steel M8 bolt (#2) through
the bolt hole. Repeat with the other seven slide plates.
23. Lift one tent corner and insert a slide plate into the mounting channel’s
bottom slot. Push it in until it will sit on the inner side of the roof rail.
24. Insert a second slide plate so it will sit on the outer side of the roof rail.
25. Slide the stainless-steel mounting plate (#5) onto the protruding bolts
to enclose the rail. Secure each bolt with a self-locking M8 nut (#8). Do
not fully tighten yet.
26. Repeat steps 22 to 24 with the other corners.
27. Adjust the tent’s position if necessary. Once you are satisfied with the
position, tighten all the nuts to secure the mounting plates.
Fig.
6
Fig.
5

V1.0 Soft-Shell Vehicle Rooftop Tent 8999039
Visit www.princessauto.com for more information 7
OPERATION
1. Park the vehicle on a flat surface and set the parking brake.
2. Remove the tent cover and release the hold down straps.
3. Slide the lower half of the ladder out until the lock pins click into place.
4. Use the ladder as a lever to unfold the tent. There is a ridge on the end
of the top panel that fits into a groove in the bottom platform. Align
these when unfolding the tent.
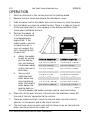
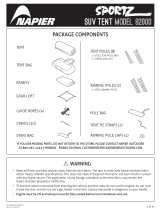
5. Position the ladder so
it rests on the ground
at an approximate
angle of 60°. If the
ladder angle is vertical
or more than 60°, it
may not support the
tent, causing the tent
hinge to fail.
a. Adjust the ladder
height by pulling
out the locking
pins and moving
the bottom ladder
to the next set of
bolt holes.
b. You can drill
additional bolt
holes above the
existing locking
holes. Do not drill
holes below the
locking holes as
this will weaken the ladder and may lead to structural failure.
6. Place the rain fly over the tent. The end with the grommets hangs off
the end of the tent connected to the vehicle.
7. There are three crossbars. Insert the ends of each crossbar into the
pouches in the corners and at the top of the tent.
8. Clip the three straps on each side and the three straps on the end into
place, but do not cinch the straps yet.
Vehicle Height (c)
Ladder Length (b)
5 ft 1-1/2 in. (1.56 m) 5 ft 10-3/4 in. (1.80 m)
5 ft 3 in. (1.60 m) 6 ft 1 in. (1.85 m)
5 ft 5 in. (1.65 m) 6 ft 2.-3/4 in. (1.90 m)
5 ft 6-1/2 in. (1.69 m) 6 ft 4-3/4 in. (1.95 m)
5 ft 8 in. (1.73 m) 6 ft 6-3/4 in. (2.00 m)
5 ft 10 in. (1.78 m) 6 ft 8-3/4 in. (2.05 m)
5 ft 11-1/2 in. (1.82 m) 6 ft 10-1/2 in. (2.10 m)
6 ft 1-1/4 in. (1.86 m) 7 ft 0-1/2 in. (2.15 m)
Table 1
Fig. 7

8999039 Soft-Shell Vehicle Rooftop Tent V1.0
8 For technical questions call 1-800-665-8685
9. Insert the hooked end of a flexible rod into the grommet of a window
awning. Insert the straight end into the hole in the base panel. There is
a reinforced slot in the fabric concealing each hole. Repeat for both
side awnings and the front awning. Tension will hold the awnings in
place. The flexible rods will bow outward if installed properly.
10. Tighten all straps until the fly is under tension. The fly should not
touch the tent.
11. Attach the guide ropes in each corner of the entrance to ground stakes.
PACKING THE TENT
NOTICE! Pack the tent when dry if possible. If not possible, unpack the
tent and allow to dry at the earliest opportunity. Allowing the tent to
remain wet may damage the tent or allow mold to grow.
1. Loosen the guide ropes and remove from the ground stakes.
2. Loosen the cinch straps, remove the flexible rods, then unclip the
straps. Pull the crossbars from the pouches. Roll the fly up, being
careful to avoid catching the material on the crossbars.
3. Fold the tent panel over. Use the ladder for leverage as needed.
4. Pull the ladder’s knobs out and push the lower ladder upward until it is
even with the upper part. Allow the knobs to snap back into place to
secure both parts together. Fold the ladder up and over and gently lay
it on top of the tent panel.
5. Pass the holding straps on the bottom side-panels through the loop on
the top panel. Pull down on the top panel with your hand and press the
hook and loop strap together. Do not pull down on the hook and loop
strap as this can damage it. Repeat with the other hook-and-loop strap.
6. Position the cover over the folded tent. It is shaped to fit over the
tent’s ladder. Slide all corner down to cover the tent. Close the two
hook-and-loop tabs to secure the sides.
a. A poor cover fit indicates the tent needs to be further compacted.
Repeat step 5. If necessary, unfold the tent and carefully lay the
fabric between the inner bars to minimize piling the material.
7. Pass the two long straps under the tent platform, but above the
mounting channels. Pass the remainder of the straps over the top of
the cover, parallel to the ladder. Pass the ends through the loops and
cinch together until both straps are tight.

V1.0 Soft-Shell Vehicle Rooftop Tent 8999039
Visit www.princessauto.com for more information 9
CARE & MAINTENANCE
1. The seams and fabric may weep at first. This will cease once the fabric
cures.
2. Time and use may wear away the waterproof coating. Apply a coating
of waterproofing to restore.
3. Apply a dab of oil on metal components that rub together as needed.
4. Check and retighten all nuts from time-to-time or after a trip.
CLEANING
Clean the fabric only with cold water and a soft brush. Do not use any soaps
or detergents as this can damage the coating.
STORAGE
1. Disassemble the mounting plates (#5) from the bolts by removing the
self-locking nut.
2. Slide the aluminum slide plates (#6) from the mounting channels.
3. Replace the mounting plates onto the bolts and secure with a self-
locking nut.
4. Store the assembled plates in a dry location.
5. Remove the tent from the vehicle with the help of another person.
6. Move the tent to a dry storage location. Do not drag the tent as it can
damage the fabric, panels or the mounting channels.
7. Avoid laying the tent directly on the ground or concrete. Use wood
blocks to prevent direct contact.
TROUBLESHOOTING
Visit a Princess Auto Ltd. location for a solution if the tool does not function
properly or parts are missing. If unable to do so, have a qualified technician
service the tool.

8999039 Soft-Shell Vehicle Rooftop Tent V1.0
10 For technical questions call 1-800-665-8685
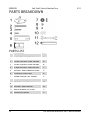
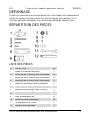
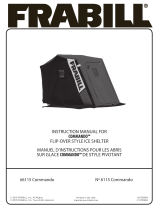
PARTS BREAKDOWN
PARTS LIST
# DESCRIPTION QTY
1 Ladder Mounting Bracket 2
2 55 mm Stainless Steel M8 Bolt 8
3 40 mm Stainless Steel M6 Bolt 8
4 16 mm Stainless Steel M6 Bolt 2
5 Stainless Steel Mounting Plate 4
6 Aluminum Slide Plate 8
7 Rubber Washer (for Ladder) 4
8 M8 Self-Locking Nut 8
9 M6 Self-Locking Nut 10
10 Stainless Steel Washer 20
11 Metric Wrench 10/13 mm 2
12 Mounting Channel 2

V1.0 Soft-Shell Vehicle Rooftop Tent 8999039
Visit www.princessauto.com for more information 11

8999039 Soft-Shell Vehicle Rooftop Tent V1.0
12 For technical questions call 1-800-665-8685

V1,0 8999039
Vous devez lire et comprendre toutes les instructions avant d'utiliser l'appareil.
Conservez ce manuel afin de pouvoir le consulter plus tard.

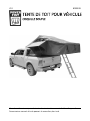
8999039 Tente de toit à coquille souple pour véhicule V1,0
2 En cas de questions techniques, appelez le 1-800-665-8685
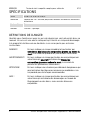
SPÉCIFICATIONS
Taille 4 5/8 x 10 3/16 x 4 5/16 pi
Matériau Coquille en PVC, toile en polyester, matelas en mousse, échelle en
aluminium
Couleur/fini Gris
Normes CPAI-84 – ignifuge
DÉFINITIONS DE DANGER
Veuillez-vous familiariser avec les avis de danger qui sont présentés dans ce
manuel. Un avis est une alerte indiquant qu'il existe un risque de dommage
à la propriété, de blessure ou de décès si on ne respecte pas certaines
instructions.
DANGER ! Cet avis indique un risque immédiat et particulier qui
entraînera des blessures corporelles graves ou même la
mort si on omet de prendre les précautions nécessaires.
AVERTISSEMENT ! Cet avis indique un risque particulier ou une pratique non
sécuritaire qui pourrait entraîner des blessures
corporelles graves ou même la mort si on omet de
prendre les précautions nécessaires.
ATTENTION ! Cet avis indique une situation possiblement dangereuse qui
peut entraîner des blessures mineures ou modérées si on
ne procède pas de la façon recommandée.
AVIS ! Cet avis indique un risque particulier ou une pratique non
sécuritaire qui entraînera des dommages au niveau de
l'équipement ou des biens, mais non des blessures
corporelles.

V1,0 Tente de toit à coquille souple pour véhicule 8999039
Visitez www.princessauto.com pour plus d'informations 3
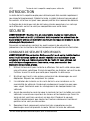
INTRODUCTION
La tente de toit à coquille souple pour véhicule peut être montée rapidement,
peu importe l’emplacement. Dépliez la tente, installez la barre transversale et
les auvents, et le tour est joué, vous pouvez profiter d’un moment de détente.
La fixation de la tente aux rails de toit nécessite des ouvertures. Les rails qui
sont affleurants au toit ne sont pas compatibles avec cette tente.
SÉCURITÉ
AVERTISSEMENT ! Veuillez lire et comprendre toutes les instructions
avant d'utiliser cet outil. L'utilisateur doit respecter les précautions de
base lorsqu'il utilise cet outil afin de réduire le risque de blessure ou de
dommage à l'équipement.
Conservez ce manuel qui contient les avertissements de sécurité, les
précautions, les instructions de fonctionnement ou d'inspection et d'entretien.
CONSIGNES DE SÉCURITÉ SPÉCIFIQUES
AVERTISSEMENT! Ne permettez PAS au confort ou à votre familiarisation
avec l'outil (obtenus après un emploi répété) de se substituer à une
adhésion stricte aux règles de sécurité de l'outil. Si vous utilisez cet
outil de façon dangereuse ou incorrecte, vous pouvez subir des
blessures corporelles graves.
1. Utilisez le bon outil pour la tâche à effectuer. Cet outil a été conçu pour
une utilisation spécifique. Évitez de modifier ou d'altérer cet outil ou de
l'utiliser à une fin autre que celle pour laquelle il a été conçu.
2. N’utilisez pas l’outil si des pièces présentent des dommages ou sont
déplacées. Réparez ou remplacez les pièces.
3. L’installation de la tente sur les rails de toit a une incidence sur la
maniabilité du véhicule. Conduisez prudemment jusqu’à ce que vous
vous soyez familiarisé avec les changements de comportement du
véhicule.
4. Avant de prendre la route lorsque la tente de toit est installée sur votre
véhicule, assurez-vous que tous les écrous et les boulons qui fixent la
tente de toit sont bien serrés et en bon état. Pendant le voyage,
vérifiez régulièrement que toutes les fixations demeurent serrées et
qu’elles ne se sont pas desserrées.
5. Remplacez tout composant présentant des craquelures ou des
dommages avant de prendre la route. Retirez la tente du véhicule

8999039 Tente de toit à coquille souple pour véhicule V1,0
4 En cas de questions techniques, appelez le 1-800-665-8685
jusqu’à ce que les réparations aient été effectuées. Des composants
endommagés peuvent causer une défaillance et la tente risquerait
d’être éjectée pendant la conduite, posant ainsi un risque pour les
autres véhicules circulant sur la route.
6. Le matériau de la tente est inflammable. Tenez-là à l’écart des flammes
et des sources de chaleur.
7. Consultez le manuel du propriétaire du véhicule pour connaître la
capacité pondérale du toit. La tente une fois assemblée pèse 53 kg (117
lb). Incluez le poids de tous les occupants et de tout équipement. Ne
dépassez pas la capacité pondérale du système de rails de votre
véhicule.
8. Ne transportez PAS d’autres articles dans la tente, ne fixez aucun objet
à la tente et ne mettez aucun objet sur la tente.
DÉBALLAGE
AVERTISSEMENT ! Ne faites pas fonctionner l'outil si des pièces sont
manquantes. Remplacez les pièces manquantes avant l'utilisation. Le
non-respect de cet avertissement peut entraîner une défectuosité et des
blessures graves.
Retirez les pièces et les accessoires de l'emballage et vérifiez s'il y a des
dommages. Assurez-vous que tous les articles du contenu sont présents.
Contenu :
• Quincaillerie de montage
• Échelle
• Housse avec barres transversales
• Matelas en mousse de 50 mm
• Double-toit
• Flexible rods (6 pc)
ASSEMBLAGE ET INSTALLATION
AVERTISSEMENT! N’installez pas la tente sur un support de plate-forme
de camion ni sur tout autre système qui laisse un espace de plus de
quelques pouces/centimètres entre le toit du véhicule et le panneau
inférieur. Le débit d’air supplémentaire peut provoquer le bris de la
quincaillerie de montage lorsque le véhicule est en mouvement.

V1,0 Tente de toit à coquille souple pour véhicule 8999039
Visitez www.princessauto.com pour plus d'informations 5
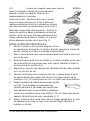
Avant l’installation, décidez de la direction dans
laquelle la tente sera dépliée. Observez les
recommandations ci-dessous.
Grands véhicules – Déplier la tente vers l’arrière
nécessite moins d’espace sur le toit et offre une
meilleure protection contre les intempéries lorsque
vous devez accéder au compartiment arrière (fig. 1).
Véhicules compacts/de taille moyenne – Orienter la
tente afin qu’elle se déplie latéralement permet de
faciliter l’accès au hayon. Elle cause également une
traînée moindre lorsqu’elle est repliée, car la partie
étroite demeure orientée vers l’avant (fig. 2).
INSTALLATION DES PROFILÉS EN U
1. Ouvrez la tente sur une surface propre et retirez
les composants entreposés à l’intérieur (échelle, couverture, barres de
fenêtre, profilés en U pour le montage et quincaillerie).
2. Pliez la tente de façon à ce que le panneau pourvu de quatre trous soit
en face de vous.
3. Déterminez dans quel sens les profilés en U seront installés en fonction
de l’orientation de la tente que vous avez choisie. Mesurez et notez la
distance entre les profilés en U.
4. Reportez les mesures pour déterminer l’emplacement des deux profilés
en U sur les rails du toit.
5. Mesurez la distance entre chaque rail de toit, à chaque point, à partir
du bord extérieur de chaque côté. Mesurez les deux endroits où les
profilés en U (no 12) traverseront les rails, car l’écart peut être différent.
6. Coupez l’excédent de chaque extrémité des profilés
en U (fig. 3) à la longueur correspondant aux
mesures de l’étape 5. Ne coupez pas trop près des
trous de boulon pour ne pas affaiblir la connexion.
7. Insérez une rondelle en acier inoxydable (no 10) sur chacun des quatre
boulons M6 de 40 mm en acier inoxydable (no 3).
8. Depuis l’intérieur de la tente, faites passer chaque boulon dans un trou
du panneau avant. Pour ce faire, vous pourriez devoir déplacer le
matelas sur le côté.
Fig.
1
Fig. 2
Fig. 3

8999039 Tente de toit à coquille souple pour véhicule V1,0
6 En cas de questions techniques, appelez le 1-800-665-8685
9. Faites glisser chaque profilé en U sur deux des boulons. Le sens dépend
de l’orientation de la tente à l’ouverture.
Ouverture à l’arrière – les profilés en U (no 12) sont parallèles à la
charnière de la tente.
Ouverture sur le côté – les profilés en U (no 12) sont perpendiculaires
(90°) à la charnière de la tente. Assurez-vous que l’extrémité du profilé
en U ne chevauche pas la charnière.
10. Faites glisser un écrou autobloquant M6 (no 9) dans la fente supérieure
et alignez-la avec le boulon en saillie. Serrez le boulon à l’aide de la clé
métrique (no 11) jusqu’à ce qu’il soit bien serré. Procédez de la même
façon avec les trois autres boulons.
INSTALLATION DE L’ÉCHELLE
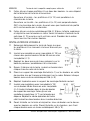
11. Retournez délicatement la tente de façon à ce que
les profilés en U se trouvent à la base. N’ouvrez pas
la tente.
12. Insérez une rondelle en acier inoxydable (no 10) sur
chacun des quatre boulons M6 de 40 mm en acier
inoxydable (no 3).
13. Repérez les deux paires de trous prépercés sur le
bord du panneau, parallèlement à la charnière.
14. Depuis l’intérieur de la tente, insérez un boulon dans
chaque trou du cadre de la tente.
15. Placez un support de montage d’échelle (no 1) sur les boulons en saillie
de manière à ce qu’il repose entièrement sur le cadre. Retenez chaque
boulon avec un écrou autobloquant M6 (no 9).
16. Répétez l’opération avec le support de montage d’échelle restant.
17. Insérez une rondelle en acier inoxydable (no 10)
sur un boulon M6 de 16 mm en acier inoxydable
(no 4). Insérez le boulon dans le trou de boulon
du support de montage. Faites glisser une
rondelle en caoutchouc (no 7) sur le boulon qui
dépasse. Répétez la même opération de l’autre
côté. Insérez les deux boulons dans la même direction.
18. Posez l’échelle sur la tente et alignez les trous de boulon sur le dessus
avec les boulons en saillie. Placez l’échelle sur les boulons, puis fixez
chaque boulon avec un écrou autobloquant M6 (no 9).
Fig. 4
Fig. 5

V1,0 Tente de toit à coquille souple pour véhicule 8999039
Visitez www.princessauto.com pour plus d'informations 7
19. Vérifiez que l’échelle peut facilement pivoter sur les supports. Si elle
est trop serrée, desserrez l’écrou de 1/8 de tour et vérifiez de nouveau
si elle peut pivoter librement.
MONTAGE DE LA TENTE
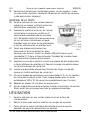
20. Garez le véhicule sur une surface plane en
prévoyant un espace suffisant autour du
véhicule pour manipuler la tente.
21. Soulevez et placez la tente sur les rails de
toit de façon à ce que les profilés en U
soient placés perpendiculaires aux deux
rails. Demandez l’aide d’une autre personne,
car cet article est volumineux et lourd.
Procédez avec soin pour éviter d’égratigner
le toit du véhicule avec les profilés en U.
22. Tenez une plaque de glissement en
aluminium (no 6) en orientant les deux
nervures vers le haut. Insérez un boulon M8 de 55 mm en acier
inoxydable (no 2) dans le trou de boulon. Procédez de la même façon
avec sept autres plaques de glissement.
23. Soulevez un coin de la tente et insérez une plaque de glissement dans
la fente inférieure du profilé en U. Poussez-la jusqu’à ce qu’elle repose
sur le côté intérieur du rail de toit.
24. Insérez une deuxième plaque de glissement de façon à ce qu’elle
repose sur le côté extérieur du rail de toit.
25. Glissez la plaque de montage en acier inoxydable (no 5) sur les boulons
en saillie pour entourer le rail. Fixez chaque boulon avec un écrou
autobloquant M8 (no 8). Ne serrez pas complètement pour l’instant.
26. Répétez les étapes 22 à 24 pour les autres coins.
27. Ajustez la position de la tente au besoin. Une fois la tente dans sa position
finale, serrez tous les écrous pour fixer les plaques de montage.
UTILISATION
1. Garez le véhicule sur une surface plane et serrez le frein de
stationnement.
2. Retirez la housse de tente et relâchez les sangles de maintien.
3. Faites glisser la moitié inférieure de l’échelle jusqu’à ce que les
goupilles de sécurité s’enclenchent en position.
Fig. 6

8999039 Tente de toit à coquille souple pour véhicule V1,0
8 En cas de questions techniques, appelez le 1-800-665-8685
4. Utilisez l’échelle comme levier pour déplier la tente. La nervure à
l’extrémité du panneau supérieure s’insère dans la rainure de la plate-
forme inférieure.
Alignez-les lors du
dépliage de la tente.
5. Placez l’échelle de
façon à ce qu’elle
repose sur le sol à un
angle d’environ 60°. Si
l’angle de l’échelle est
vertical ou supérieur à
60°, elle risque de ne
pas supporter la
tente et de causer le
bris de la charnière
de la tente.
a. Réglez la
hauteur de
l’échelle en
tirant sur les
goupilles de
sécurité et en
déplaçant la
partie
inférieure de
l’échelle vers la série de trous de boulon suivante.
b. Vous pouvez percer des trous de boulon supplémentaires au-
dessus des trous existants. Ne percez aucun trou sous les trous
existants, car cela affaiblirait l’échelle et pourrait causer un bris
de la structure.
6. Placez le double toit sur la tente. L’extrémité pourvue d’œillets est
suspendue à l’extrémité de la tente fixée au véhicule.
7. L’ensemble comprend trois barres transversales. Insérez les extrémités
de chaque barre transversale dans les pochettes situées dans les coins
et au sommet de la tente.
8. Attachez les trois sangles de chaque côté et les trois sangles de l’extrémité
en place, mais ne tirez pas encore sur les sangles pour les serrer.
Hauteur du véhicule (c)
Longueur de l’échelle (b)
5 pi 1 1/2 po (1,56 m) 5 pi 10 3/4 po (1,80 m)
5 pi 3 po (1,60 m) 6 pi 1 po (1,85 m)
5 pi 5 po (1,65 m) 6 pi 2 3/4 po (1,90 m)
5 pi 6 1/2 po (1,69 m) 6 pi 4 3/4 po (1,95 m)
5 pi 8 po (1,73 m) 6 pi 6 3/4 po (2,00 m)
5 pi 10 po (1,78 m) 6 pi 8 3/4 po (2,05 m)
5 pi 11 1/2 po (1,82 m) 6 pi 10 1/2 po (2,10 m)
6 pi 1 1/4 po (1,86 m) 7 pi 0 1/2 po (2,15 m)
Tableau 1
Fig. 7
La page est en cours de chargement...
La page est en cours de chargement...
La page est en cours de chargement...
La page est en cours de chargement...
-
 1
1
-
 2
2
-
 3
3
-
 4
4
-
 5
5
-
 6
6
-
 7
7
-
 8
8
-
 9
9
-
 10
10
-
 11
11
-
 12
12
-
 13
13
-
 14
14
-
 15
15
-
 16
16
-
 17
17
-
 18
18
-
 19
19
-
 20
20
-
 21
21
-
 22
22
-
 23
23
-
 24
24


Northern Ridge 8999039 Le manuel du propriétaire
- Catégorie
- Pistolets à chaleur
- Taper
- Le manuel du propriétaire
dans d''autres langues
Autres documents
-
Dometic TENT211 Guide d'installation
-
-
Powerfist 9028051 Le manuel du propriétaire
-
Thule Tepui Low-Pro 2 Mode d'emploi
-
Woods 076-2936-2 Le manuel du propriétaire
-
 Napier Outdoors 82000 Guide d'installation
-
 Frabill Commando 6115 Manuel utilisateur
-
Power Fist 8900698 Le manuel du propriétaire
-
-

