SCS Sentinel HCN0045 Le manuel du propriétaire
- Taper
- Le manuel du propriétaire


TEST
B
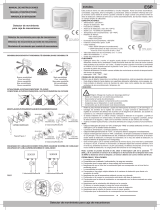
1- Placer le bouton de réglage sur « ON ».
Placer le réglage « TIME » au minimum en tournant dans le sens inverse des aiguilles d’une montre.
Placer le réglage « LUX » sur la position (si vous effectuez le test en journée).
Set the function switch to «ON»
Turn the « TIME » knob anti-clockwise on the minimum after taking the board-face off.
Turn the « LUX » knob clockwise on position (if you test it in daylight).
2- Allumer le courant, votre lampe doit s’allumer
Switch on the power, the lamp should be on.
3- Placer le bouton de réglage sur « OFF », votre lampe doit s’éteindre immédiatement
Set the function switch to « OFF », the lamp should be off immediately.
4- Placer le bouton de réglage sur « PIR », après 30 secondes la lampe s’allume.
Set the function switch to “PIR”, after 30 seconds later, it enters into working position.
NOTE : Lorsque le test est realisé en journée, placer le bouton de réglage sur sinon le capteur ne
fonctionnera pas.
When testing in daylight, please turn LUX knob to position, otherwise the sensor lamp could not
work.
- Ne pas perturber la zone de détection
Check there aren’t hinder or unrest objects effecting detection in front of the detection window
- Eviter de l’installer à proximité de zones ayant des changements importants de température, par exemple:
air conditionné, chauffage central, etc.
Avoid installing it near temperature alteration zones, for example: air conditioning, central heating, etc.
- Pour votre sécurité ne pas ouvrir le boîtier lorsque le courant n’est pas coupé
For your safety, do not open the case if the power is not disconnected.
GARANTIE : 2 ANS / WARRANTY : 2 YEARS
SENTINEL
Hotline assistance technique
horaires hotline,voir sur le site internet
scs-laboutique.com
FR
0 892 350 490 0,35 €
/ min
Adresse : SCS Sentinel FRANCE
Route de St Symphorien BP 69 85130 LES LANDES GENUSSON
RECOMMANDATIONS / RECOMMENDATIONS
C
D
FR
EN
Manuel d’installation et d’utilisation /
Installation and operating manual
-
 1
1
-
 2
2
SCS Sentinel HCN0045 Le manuel du propriétaire
- Taper
- Le manuel du propriétaire
dans d''autres langues
- English: SCS Sentinel HCN0045 Owner's manual
Autres documents
-
KPS DETELUX 360 PIR LED PC 110-220 Le manuel du propriétaire
-
 C-LOGIC 645-MD Le manuel du propriétaire
-
Renkforce 4016139070186 Le manuel du propriétaire
-
GTV CR-CR16000-00 Mode d'emploi
-
THEBEN ECO-IR 180A@ECO-IR 360A Le manuel du propriétaire
-
Robus RPR360IP44-01 Manuel utilisateur
-
 home zone MK-SC0108 Manuel utilisateur
-
koban KDP7 180 Manuel utilisateur
-
Robus RPR360PIRS-01 Manuel utilisateur
-
STEINEL IS 3180 Guide d'installation


