KALORIK Black Diamond Electric Griddle Manuel utilisateur
- Catégorie
- Petits appareils de cuisine
- Taper
- Manuel utilisateur
Ce manuel convient également à

3
www.KALORIK.com
GR 46752 - 200624
ELECTRIC GRIDDLE
GRIL ÉLECTRIQUE
GR 46752
EN……....3
ES….......12
FR….......22
120V~60Hz 1200W (10A)
PLANCHA ELÉCTRICA

3
www.KALORIK.com
GR 46752 - 200624
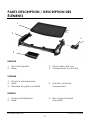
PARTS DESCRIPTION / DESCRIPTION DES
ÉLÉMENTS
ENGLISH
1. Non-stick griddle
2. Base
3. Removable drip tray
4. Temperature control dial
SPANISH
1. Plancha antiadherente
2. Base
3. Bandeja de goteo extraíble
4. Dial de control de
temperatura
FRENCH
1. Plaque antiadhésive
2. Base
3. Bac d’égouttement
amovible
2
1
3
4

3
www.KALORIK.com
GR 46752 - 200624
4. Bouton de réglage de
température

3
www.KALORIK.com
GR 46752 - 200624
IMPORTANT SAFEGUARDS
When using electrical appliances, basic safety precautions should
always be followed, including the following:
1. Read all instructions before use.
2. Check that the voltage in your home corresponds to that stated on
the appliance.
3. Do not touch hot surfaces. Use handles or knobs.
4. To protect against electrical shock, fire or personal injury, do not
immerse cord, plugs, or the appliance in water or other liquid.
5. Close supervision is necessary when any appliance is used by or
near children. As a rule, this appliance is not intended to be used by
children.
6. Unplug from outlet when not in use and before cleaning. Allow to
cool before putting on or taking off parts.
7. Do not operate any appliance with a damaged cord or plug or
after the appliance malfunctions or has been damaged in any
manner. Return the appliance to the nearest authorized service
facility for examination, repair, or adjustment.
8. The use of accessory attachments not recommended by the
appliance manufacturer may cause injuries.
9. Do not use outdoors.
10. Do not let the cord hang over the edge of a table or counter. Do
not let it touch hot surfaces.
11. Do not place on or near a hot gas or electric burner, or in a heated
oven.
12. Extreme caution must be used when moving an appliance
containing hot oil or other hot liquids.
13. Always attach temperature control probe to appliance first, and
then plug cord into wall outlet. To disconnect, turn temperature
control dial to OFF, then remove plug from wall outlet.
14. Do not use the appliance for anything other than intended use.
15. Do not place cooking utensils on the griddle when the griddle is hot,
while cooking, keeping warm or reheating.
16. Make sure the griddle, drip tray, and the outside of base are clean
and dry before putting plug in power outlet.

4
www.KALORIK.com
GR 46752 - 200624
17. Do not clean with metal scouring pads. Pieces can break off the
pad and touch electrical parts resulting in a risk of electric shock.
18. Use only on properly grounded outlet.
19. Do not place any of the following materials on the appliance:
paper, cardboard, plastic.
20. Do not cover any part of the griddle with metal foil. This will cause
the appliance to overheat.
21. Do not operate this appliance in an appliance garage or directly
under a wall cabinet.
22. Before you switch on the griddle, remove any objects on top of it
and any flammable objects close to it.
23. Do not place any food or objects on the drip tray when the griddle
is switched on.
24. Do not place food directly on the heating element.
25. This appliance is not intended to be operated by means of an
external timer or a separate remote-control system.
26. Use on a flat stable, heat-resistant surface with sufficient open
space around it and away from water or any heat source.
27. This appliance operates at high temperatures which may cause
burns. Do not touch hot surfaces, parts or inside of appliance while
operating. Allow appliance to cool down completely before you
remove the grid or drip tray, or before moving, handling, cleaning
or storing the appliance.
28. This appliance is for household use only. It is not intended for use in
environments such as staff kitchens of shops, offices, farms or other
work environments. It is not intended to be used in hotels, motels,
bed and breakfasts and other commercial environments.
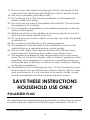
SAVE THESE INSTRUCTIONS
HOUSEHOLD USE ONLY
POLARIZED PLUG
This appliance has a polarized plug (one blade is wider than the other).
To reduce the risk of electric shock, this plug is intended to fit into a

5
www.KALORIK.com
GR 46752 - 200624
polarized outlet only one way. If the plug does not fit fully into the
outlet, reverse the plug. If it still does not fit, contact a qualified
electrician. Do not attempt to modify the plug in any way.
SHORT CORD INSTRUCTIONS
A short power supply cord is provided to reduce the hazards resulting
from becoming entangled in or tripping over a longer cord. Extension
cords may be used if care is exercised in their use.
• The electrical rating of the extension cord should be at least that of
the appliance. If the electrical rating of the extension cord is too
low, it could overheat and burn.
• The resulting extended cord should be arranged so that it will not
drape over the countertop or tabletop where it can be pulled on by
children or tripped over.
BEFORE THE FIRST USE
• Carefully unpack the griddle and remove all packaging materials.
• Before cooking for the first time, wash the griddle with mild
dishwashing soap. Wipe and allow to dry.
OPERATING INSTRUCTIONS
• Place appliance on a flat, heat resistant, stable surface in a
ventilated area.
NOTE: Some countertop and table surfaces are not designed to
withstand the prolonged heat generated by this griddle. It’s
recommended to place a hot pad or trivet under the griddle
beforehand to avoid possible damage to the surface. Be sure the sides
and back of the griddle are at least 4 inches away from any walls,
cabinets, or objects on the counter or table.
• Coat the non-stick surface with vegetable shortening before
heating. If necessary, remove excess oil with paper towel.

6
www.KALORIK.com
GR 46752 - 200624
• Make sure the temperature control is in OFF position. Insert the
temperature control probe into the side of the grill, then insert plug
into electrical outlet.
• Adjust the temperature control to desired setting. NOTE: The
indicator light on the control dial indicates the heat setting. When
desired setting is reached, the light will turn off. It will continue to
cycle on and off during use to indicate heat setting is being
automatically maintained.
• Preheat the grill for 10 minutes or until the indicator light goes out.
NOTE: The cooking temperatures listed in this user manual are
estimates. Adjust the cooking temperature slightly up or down to
achieve the results you prefer.
• Place food directly onto cooking surface and cook to desired
doneness. You can adjust the temperature during cooking by using
the control knob if necessary.
CAUTION: Do not use cooking sprays. They can cause a build-up on the
cooking plates and may affect the non-stick performance of the
product.
NOTE:
‒ During cooking, the light will go on and off indicating that the
griddle is maintaining selected temperature.
‒ When cooking bacon or foods containing large quantities of
grease, it may be necessary to check the drip tray to make sure
it is not full. Remove drip tray; empty contents and wash if
needed.
• When finished cooking, turn the temperature control OFF and
remove plug from power outlet.
IMPORTANT: To avoid burn injury, wait until the appliance has cooled
before removing the temperature control.
NOTE: Use medium to low heat for best cooking results. Very high
temperatures can cause discoloration and shorten the life span of any
non-stick surface. If higher temperatures are necessary, preheat on
medium for a few minutes.

7
www.KALORIK.com
GR 46752 - 200624
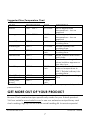
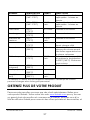
Suggested Time/Temperature Chart
FOOD
TEMPERATURE
TIME
DIRECTIONS
Bacon
325° - 350° F
8-14 min.
Set to appropriate
temperature – turn as
required
Sausage
325° - 350° F
20-30
min.
Set to appropriate
temperature – turn as
required
French Toast
350° F
6-10 min.
Rotate halfway into
cooking time
Hamburger
350° F
3-14 min.
Rotate halfway into
cooking time
Ham Slices
350° F
14-18
min.
Rotate halfway into
cooking time
Sandwiches
350° F
6-10 min.
Butter outside and brown
both sides
Pancakes
400° F
2-6 min.
Pour batter onto griddle –
when bubbles appear on
top side, turn
Pork Chops
350° F
20-30
min.
Brown both sides then
reduce temperature to
325° F Rotate halfway into
cooking time
Steak (Rare)
400° F
4-6 min.
Flip halfway into cooking
time
Steak (Medium)
400° F
7-12 min.
Steak (Well-
done)
400° F
13-18
min.
*The table above is for reference only. Cooking times may vary and depend on
personal taste.
GET MORE OUT OF YOUR PRODUCT
Browse Chef-created recipes specifically made for your Kalorik product.
Visit our website www.kalorik.com to see our extensive recipe library and
start cooking. Sign up for the Kalorik email mailing list to receive special

8
www.KALORIK.com
GR 46752 - 200624
offers and recipes, and connect with us on social media for daily
inspiration.
CLEANING AND MAINTENANCE
• Turn the temperature control to OFF and unplug cord from power
outlet.
• Always allow appliance to cool completely before cleaning and
removing temperature controller.
• If necessary, wipe temperature control case and probe with a
damp, soft cloth. Dry temperature control probe completely. NEVER
IMMERSE TEMPERATURE CONTROL IN WATER OR ANY OTHER LIQUID.
CAUTION: The temperature control may become hot after use. Allow to
cool before handling.
• Remove the drip tray; empty contents. The drip tray can be washed
in the dishwasher or in warm soapy water. Wash the griddle with
warm soapy water; rinse and dry thoroughly.
NOTE:
‒ For stubborn food particles, loosen with a plastic cleaning pad.
Avoid hard scouring of the nonstick finish as this may cause
surface scratches. Do not use steel wool, scouring pads, or
abrasive cleaners on any part of the griddle.
• Store in a cool, dry place.
Hints for Care and Use of Non-Stick Surface
• To avoid scratching the non-stick surface, do not stack objects on
the grill or griddle cooking plates.
CAUTION: Do not use cooking sprays. They can cause a build-up on the
cooking plates and may affect the non-stick performance of the
product.
• Use medium to low heat for best cooking results. Very high
temperatures can cause discoloration and shorten the life span of
any non-stick surface. If higher temperatures are necessary,
preheat on medium heat for a few minutes.

9
www.KALORIK.com
GR 46752 - 200624
• For best results and preserve the non-stick coating longer, use nylon,
plastic, wooden or rubber utensils. Never cut food on the Griddle.
• Remove stubborn stains with a plastic scouring pad and mild dish
washing liquid; do not use steel wool as it will damage the non-stick
surface of the cooking plates.
Steps for Stain Removal and Proper Care of Ceramic Non-Stick Coating
1. Identify stained areas on the cooking surface and sprinkle some
baking soda on the stains.
2. Moisten the baking soda to get a paste like texture by adding some
water.
3. Let the paste stand for a few minutes on the stains (not more than
an hour).
4. Rub with a soft damp cloth or lightly scrub with a plastic scouring
pad, wipe clean and dry thoroughly.
NOTE: Do not rub vigorously when using a plastic scouring pad and
NEVER use a metal scouring pad as this may damage the non-stick
coating.
5. Repeat the cycle once again if necessary. The performance and
non-stick property of the ceramic non‑stick coating will not be
affected due to stains.

10
www.KALORIK.com
GR 46752 - 200624
WARRANTY
We suggest that you complete and return the enclosed Product
Registration Card promptly to facilitate verification of the date of
original purchase. However, return of the Product Registration Card is
not a condition of these warranties. You can also fill out this warranty
card online, at the following address: www.KALORIK.com
This KALORIK product is warranted in the U.S.A. and in Canada for 1
year from the date of purchase against defects in material and
workmanship. This warranty is not transferable. Keep the original sales
receipt. Proof of purchase is required to obtain warranty performance.
During this period, if the KALORIK product, upon inspection by KALORIK,
is proven defective, it will be repaired or replaced, at Kalorik’s option,
without charge to the customer. If a replacement product is sent, it will
carry the remaining warranty of the original product.
This warranty does not apply to any defect arising from a buyer's or
user's misuse of the product, negligence, failure to follow KALORIK
instructions noted in the user’s manual, use on current or voltage other
than that stamped on the product, wear and tear, alteration or repair
not authorized by KALORIK, or use for commercial purposes. There is no
warranty for glass parts, glass containers, filter basket, blades and
agitators. There is also no warranty for parts lost by the user.
ANY WARRANTY OF MERCHANTABILITY OR FITNESS WITH RESPECT TO THIS
PRODUCT IS ALSO LIMITED TO THE ONE YEAR LIMITED WARRANTY
PERIOD.
Some states do not allow limitation on how long an implied warranty
lasts or do not allow the exclusion of incidental or consequential
damages, so the above limitations may not apply to you. This warranty

11
www.KALORIK.com
GR 46752 - 200624
gives you specific legal rights, and you may also have other rights
which vary from state to state.
If the appliance should become defective within the warranty period
and more than 30 days after date of purchase, do not return the
appliance to the store: often, our Customer Service Representatives
can help solve the problem without having the product serviced. If
servicing is needed, a Representative can confirm whether the product
is under warranty and direct you to the nearest service location.
If this is the case, send the product via your pre-paid postage back to
Kalorik, along with proof of purchase and a return authorization number
indicated on the outer package, given by our Customer Service
Representatives. Send to the authorized KALORIK Service Center
(please visit our website at www.KALORIK.com or call our Customer
Service Department for the address of our authorized KALORIK Service
Center).
When sending the product, please include a letter explaining the
nature of the claimed defect.
If you have additional questions, please call our Customer Service
Department (please see below for complete contact information),
Monday through Thursday from 9:00am - 5:00pm (EST) and Friday from
9:00am - 4:00pm (EST). Please note hours are subject to change.
If you would like to write, please send your letter to:
KALORIK Customer Service Department
Team International Group of America Inc.
16175 NW 49th Avenue
Miami Gardens, FL 33014 USA
Or call:
Toll Free: +1 888-521-TEAM / +1 888-KALORIK
Only letters can be accepted at this address above. Shipments and
packages that do not have a return authorization number will be
refused.

12
www.KALORIK.com
GR 46752 - 200624
PRECAUCIONES IMPORTANTES
Al usar aparatos eléctricos, siempre se deben seguir las precauciones
básicas de seguridad, incluidas las siguientes:
1. Lea todas las instrucciones antes de usar.
2. Compruebe que el voltaje en su hogar corresponde al indicado en
el electrodoméstico.
3. No toque las superficies calientes. Use manijas o perillas.
4. Para protegerse contra descargas eléctricas, incendios o lesiones
personales, no sumerja el cable, los enchufes o el aparato en agua
u otro líquido.
5. Es necesaria una supervisión estricta cuando cualquier
electrodoméstico es usado por niños o cerca de ellos. Como regla
general, este aparato no está destinado a ser utilizado por niños.
6. Desenchufe del tomacorriente cuando no esté en uso y antes de
limpiarlo. Dejar enfriar antes de poner o quitar piezas.
7. No opere ningún electrodoméstico con un cable o enchufe
dañado o después de que el electrodoméstico no funcione
correctamente o haya sido dañado de alguna manera. Devuelva
el aparato al centro de servicio autorizado más cercano para su
examen, reparación o ajuste.
8. El uso de accesorios no recomendados por el fabricante del
electrodoméstico puede causar lesiones.
9. No utilizar en exteriores.
10. No permita que el cable cuelgue del borde de una mesa o
mostrador. No permita que toque superficies calientes.
11. No lo coloque sobre o cerca de un quemador de gas o eléctrico
caliente, o en un horno caliente.
12. Se debe tener extrema precaución al mover un aparato que
contenga aceite caliente u otros líquidos calientes.
13. Siempre conecte primero la sonda de control de temperatura al
electrodoméstico y luego enchufe el cable a la toma de corriente.

13
www.KALORIK.com
GR 46752 - 200624
Para desconectar, gire el dial de control de temperatura a la
posición OFF, luego retire el enchufe de la toma de corriente.
14. No utilice el aparato para nada que no sea el uso previsto.
15. No coloque utensilios de cocina sobre la plancha cuando la
plancha esté caliente, mientras cocina, manteniéndola caliente o
recalentando.
16. Asegúrese de que la plancha, la bandeja de goteo y el exterior de
la base estén limpios y secos antes de conectar el enchufe a la
toma de corriente.
17. No limpiar con estropajos metálicos. Las piezas pueden
desprenderse de la almohadilla y tocar las partes eléctricas, lo que
conlleva un riesgo de descarga eléctrica.
18. Use solo en un tomacorriente con conexión a tierra.
19. No coloque ninguno de los siguientes materiales sobre el aparato:
papel, cartón, plástico.
20. No cubra ninguna parte de la plancha con papel de aluminio. Esto
hará que el aparato se sobrecaliente.
21. No opere este electrodoméstico en un garaje para
electrodomésticos o directamente debajo de un gabinete de
pared.
22. Antes de encender la plancha, retire cualquier objeto que se
encuentre encima y cualquier objeto inflamable cercano.
23. No coloque ningún alimento u objeto sobre la bandeja de goteo
cuando la plancha esté encendida.
24. No coloque alimentos directamente sobre el elemento calefactor.
25. Este aparato no está diseñado para funcionar mediante un
temporizador externo o un sistema de control remoto separado.
26. Úselo en una superficie plana estable, resistente al calor, con
suficiente espacio abierto a su alrededor y lejos del agua o
cualquier fuente de calor.
27. Este aparato funciona a altas temperaturas que pueden causar
quemaduras. No toque las superficies calientes, las piezas o el
interior del electrodoméstico mientras esté funcionando. Deje que
el electrodoméstico se enfríe por completo antes de quitar la rejilla
o la bandeja de goteo, o antes de mover, manipular, limpiar o
almacenar el electrodoméstico.
28. Este aparato es solo para uso doméstico. No está diseñado para su
uso en entornos como el personal de cocinas de tiendas, oficinas,

14
www.KALORIK.com
GR 46752 - 200624
granjas u otros entornos de trabajo. No está destinado a ser
utilizado en hoteles, moteles, cama y desayuno, y otros entornos
comerciales.
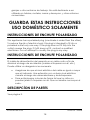
GUARDA ESTAS INSTRUCCIONES
USO DOMÉSTICO SOLAMENTE
INSTRUCCIONES DE ENCHUFE POLARIZADO
This appliance has a polarized plug (one blade is wider than the other).
To reduce the risk of electric shock, this plug is intended to fit into a
polarized outlet only one way. If the plug does not fit fully into the
outlet, reverse the plug. If it still does not fit, contact a qualified
electrician. Do not attempt to modify the plug in any way.
INSTRUCCIONES DE ENCHUFE POLARIZADO
El cable de alimentación del aparato es un cable corto a fin de
disminuir el riesgo de accidentes (caídas al tropezar con él, etc.)
Puede utilizar un alargador si es necesario.
• Asegúrese de que el nivel eléctrico del cable es igual o mayor
que el indicado. Una extensión con un bajo nivel eléctrico
correría el riesgo de sobrecalentarse y de estropearse.
• Para evitar riesgos colocar de forma tal que los niños no
puedan jalarlo o tropezar con él. Que no arrastre nunca por el
suelo.
DESCRIPCÍON DE PARTES
Vea página 2.

15
www.KALORIK.com
GR 46752 - 200624
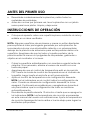
ANTES DEL PRIMER USO
• Desembale cuidadosamente la plancha y retire todos los
materiales de embalaje.
• Antes de cocinar por primera vez, lave la plancha con un jabón
suave para lavar platos. Limpie y deje secar.
INSTRUCCIONES DE OPERACIÓN
• Coloque el aparato sobre una superficie plana, resistente al calor y
estable en un área ventilada.
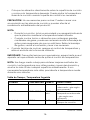
NOTA: Algunas superficies de encimeras y mesas no están diseñadas
para soportar el calor prolongado generado por esta plancha. Se
recomienda colocar una almohadilla caliente o un salvamanteles
debajo de la plancha de antemano para evitar posibles daños a la
superficie. Asegúrese de que los lados y la parte posterior de la
plancha estén al menos a 4 pulgadas de las paredes, gabinetes u
objetos en el mostrador o la mesa.
• Cubra la superficie antiadherente con manteca vegetal antes de
calentar. Si es necesario, elimine el exceso de aceite con una
toalla de papel.
• Asegúrese de que el control de temperatura esté en la posición
OFF. Inserte la sonda de control de temperatura en el costado de
la parrilla, luego inserte el enchufe en el tomacorriente.
• Ajuste el control de temperatura a la configuración deseada.
NOTA: La luz indicadora en el control indica la configuración de
calor. Cuando se alcanza la configuración deseada, la luz se
apagará. Continuará encendiéndose y apagándose durante el
uso para indicar que la configuración de calor se mantiene
automáticamente
• Precaliente la parrilla durante 10 minutos o hasta que se apague la
luz indicadora. NOTA: Las temperaturas de cocción enumeradas
en este manual del usuario son estimaciones. Ajuste la temperatura
de cocción ligeramente hacia arriba o hacia abajo para lograr los
resultados que prefiere.

16
www.KALORIK.com
GR 46752 - 200624
• Coloque los alimentos directamente sobre la superficie de cocción
y cocine a la temperatura deseada. Puede ajustar la temperatura
durante la cocción usando la perilla de control si es necesario.
PRECAUCIÓN: No use aerosoles para cocinar. Pueden causar una
acumulación en las placas de cocción y pueden afectar el
rendimiento antiadherente del producto.
NOTA:
‒ Durante la cocción, la luz se encenderá y se apagará indicando
que la plancha mantiene la temperatura seleccionada.
‒ Cuando cocine tocino o alimentos que contengan grandes
cantidades de grasa, puede ser necesario revisar la bandeja de
goteo para asegurarse de que no esté llena. Retire la bandeja
de goteo; vaciar el contenido y lavar si es necesario.
• Cuando termine de cocinar, apague el control de temperatura y
retire el enchufe de la toma de corriente.
IMPORTANTE: Para evitar lesiones por quemaduras, espere hasta que el
aparato se haya enfriado antes de quitar el control de temperatura.
NOTA: Use fuego medio a bajo para obtener mejores resultados de
cocción. Las temperaturas muy altas pueden causar decoloración y
acortar la vida útil de cualquier superficie antiadherente. Si son
necesarias temperaturas más altas, precaliente a temperatura media
durante unos minutos.
Tabla de Tiempo / Temperatura Sugerida
COMIDA
TEMPERATURA
TIEMPO
DIRECCIONES
Tocino
325° - 350° F
8-14 min.
Ajuste a la temperatura
adecuada – gire según
sea necesario
Salchicha
325° - 350° F
20-30
min.
Establecer a la
temperatura adecuada
– gire según sea
necesario
Tostada francesa
350° F
6-10 min.
Girar hasta la mitad del
tiempo de cocción

17
www.KALORIK.com
GR 46752 - 200624
Hamburguesa
350° F
3-14 min.
Girar hasta la mitad del
tiempo de cocción
Rebanadas de
jamón
350° F
14-18
min.
Girar hasta la mitad del
tiempo de cocción
Sándwiches
350° F
6-10 min.
Mantequilla afuera y
dorar ambos lados
Panqueques
400° F
2-6 min.
Vierta la masa en la
plancha: cuando
aparezcan burbujas en
el lado superior, gire
Chuletas de cerdo
350° F
20-30
min.
Dore ambos lados y
luego reduzca la
temperatura a 325 ° F
Filete (Raro)
400° F
4-6 min.
Girar hasta la mitad del
tiempo de cocción
Filete (Medio)
400° F
7-12 min.
Filete (Bien Hecho)
400° F
13-18
min.
*La tabla anterior es solo para referencia. Los tiempos de cocción pueden
variar y dependen del gusto personal.
OBTENGA MÁS DE SU PRODUCTO
Explore recetas creadas por chefs específicamente para su producto
Kalorik. Visite nuestro sitio web www.kalorik.com para ver nuestra extensa
biblioteca de recetas y empezar a cocinar. Regístrese en la lista de correo
electrónico de Kalorik para recibir ofertas y recetas especiales, y
conéctese con nosotros en las redes sociales para obtener inspiración
diaria.
LIMPIEZA Y MANTENIMIENTO
• Apague el control de temperatura y desconecte el cable de la
toma de corriente.
• Siempre permita que el aparato se enfríe por completo antes de
limpiar y quitar el controlador de temperatura.
• Si es necesario, limpie la caja de control de temperatura y la sonda
con un paño suave y húmedo. Sonda de control de temperatura

18
www.KALORIK.com
GR 46752 - 200624
en seco por completo. NUNCA SUMERJA EL CONTROL DE
TEMPERATURA EN AGUA O CUALQUIER OTRO LÍQUIDO.
PRECAUCIÓN: El control de temperatura puede calentarse después del
uso. Dejar enfriar antes de manipular.
• Retire la bandeja de goteo; vaciar el contenido La bandeja de
goteo se puede lavar en el lavavajillas o en agua jabonosa tibia.
Lave la plancha con agua jabonosa tibia; enjuague y seque
completamente.
NOTA: Para partículas de comida rebeldes, afloje con una almohadilla
de limpieza de plástico. Evite fregar con fuerza el acabado
antiadherente, ya que esto puede causar arañazos en la superficie. No
use lana de acero, estropajos ni limpiadores abrasivos en ninguna
parte de la plancha.
• Guardar en un lugar fresco y seco.
Consejos para el cuidado y uso de la superficie antiadherente
• Para evitar rayar la superficie antiadherente, no apile objetos sobre
la parrilla o las placas de cocción.
PRECAUCIÓN: No use aerosoles para cocinar. Pueden causar una
acumulación en las placas de cocción y pueden afectar el
rendimiento antiadherente del producto.
• Use fuego medio a bajo para obtener mejores resultados de
cocción. Las temperaturas muy altas pueden causar decoloración
y acortar la vida útil de cualquier superficie antiadherente. Si son
necesarias temperaturas más altas, precaliente a fuego medio
durante unos minutos.
• Para obtener mejores resultados y conservar el revestimiento
antiadherente por más tiempo, use utensilios de nylon, plástico,
madera o caucho. Nunca corte alimentos en la plancha.
• Elimine las manchas difíciles con un estropajo de plástico y un
líquido suave para lavar platos; no use lana de acero ya que
dañará la superficie antiadherente de las placas de cocción.
Pasos para la eliminación de manchas y el cuidado adecuado del
revestimiento antiadherente de cerámica

19
www.KALORIK.com
GR 46752 - 200624
1. Identifique las áreas manchadas en la superficie de cocción y
espolvoree un poco de bicarbonato de sodio sobre las manchas.
2. Humedezca el bicarbonato de sodio para obtener una textura
similar a la pasta agregando un poco de agua.
3. Deje reposar la pasta durante unos minutos sobre las manchas (no
más de una hora).
4. Frote con un paño suave y húmedo o frote ligeramente con una
esponja plástica, limpie y seque completamente.
NOTA: No frote vigorosamente cuando use una esponja de plástico y
NUNCA use una esponja de metal ya que esto puede dañar el
revestimiento antiadherente.
5. Repita el ciclo una vez más si es necesario. El rendimiento y la
propiedad antiadherente del revestimiento cerámico
antiadherente no se verán afectados debido a las manchas.
La page est en cours de chargement...
La page est en cours de chargement...
La page est en cours de chargement...
La page est en cours de chargement...
La page est en cours de chargement...
La page est en cours de chargement...
La page est en cours de chargement...
La page est en cours de chargement...
La page est en cours de chargement...
La page est en cours de chargement...
La page est en cours de chargement...
La page est en cours de chargement...
La page est en cours de chargement...
La page est en cours de chargement...
-
 1
1
-
 2
2
-
 3
3
-
 4
4
-
 5
5
-
 6
6
-
 7
7
-
 8
8
-
 9
9
-
 10
10
-
 11
11
-
 12
12
-
 13
13
-
 14
14
-
 15
15
-
 16
16
-
 17
17
-
 18
18
-
 19
19
-
 20
20
-
 21
21
-
 22
22
-
 23
23
-
 24
24
-
 25
25
-
 26
26
-
 27
27
-
 28
28
-
 29
29
-
 30
30
-
 31
31
-
 32
32
-
 33
33
-
 34
34


KALORIK Black Diamond Electric Griddle Manuel utilisateur
- Catégorie
- Petits appareils de cuisine
- Taper
- Manuel utilisateur
- Ce manuel convient également à
dans d''autres langues
Documents connexes
-
KALORIK Pro Double Griddle and Cooktop Manuel utilisateur
-
KALORIK FT 47477 SS Manuel utilisateur
-
KALORIK FHG 43302 SS Manuel utilisateur
-
-
-
-
-
-
-
Autres documents
-
Bella Copper Titanium XL 22″ Griddle Le manuel du propriétaire
-
-
BETTY CROCKER 29420015 Mode d'emploi
-
-
-
Kenmore KKNSEGGrey Manuel utilisateur
-
-
Nostalgia Electrics NGD-200 Mode d'emploi
-
Westinghouse WST3006ZE Manuel utilisateur
-
 High One HO-P43 - 43x23cm Le manuel du propriétaire
