
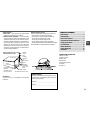
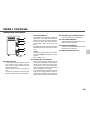
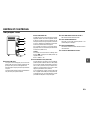
For assistance and information
(United States and Puerto Rico)
En (English)
E (Español)
F (Français)
MODE D'EMPLOI
MANUAL DE INSTRUCCIONES
OPERATING INSTRUCTIONS
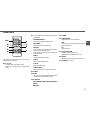
Compact Disc
Stereo System
U
XR-MG9
8B-CLR-903-01
010601AYK-H-B

2
En
PRECAUTIONS
WARNING
To reduce the risk of fire or electric shock, do not expose
this appliance to rain or moisture.
“CAUTION:TO REDUCE THE RISK OF
ELECTRIC SHOCK,
DO NOT REMOVE COVER (OR BACK).
NO USER-SERVICEABLE PARTS INSIDE.
REFER SERVICING TO QUALIFIED
SERVICE PERSONNEL.”
CAUTION
RISK OF ELECTRIC SHOCK
DO NOT OPEN
Explanation of Graphical Symbols:
The lightning flash with arrowhead
symbol, within an equilateral triangle, is
intended to alert the user to the presence
of uninsulated "dangerous voltage" within
the product’s enclosure that may be of
sufficient magnitude to constitute a risk
of electric shock to persons.
The exclamation point within an
equilateral triangle is intended to alert the
user to the presence of important
operating and maintenance (servicing)
instructions in the literature
accompanying the appliance.
Read these Operating Instructions carefully and completely
before operating the unit. All precautions in this booklet and
on the unit should be strictly followed.
Keep the Operating Instructions for future reference.
Installation
1Water and moisture — Do not use this unit near water,
such as near a bathtub, washbowl, swimming pool, or the
like.
2Heat — Do not use this unit near sources of heat, including
heating vents, stoves, or other appliances that generate heat.
It also should not be placed in temperatures less than 5°C
(41°F) or greater than 35°C (95°F).
3 Mounting surface — Place the unit on a flat, even surface.
4Ventilation — The unit should be situated with adequate
space around it so that proper heat ventilation is assured.
Allow 10 cm (4 in.) Clearance from the rear and the top of
the unit, and 5 cm (2 in.) from each side.
- Do not place the unit on a bed, rug, or similar surface that
may block the ventilation openings.
- Do not install the unit in a bookcase, cabinet, or airtight
rack where ventilation may be impeded.
5Objects and liquid entry — Make sure that objects or
liquids do not get inside the unit through the ventilation
openings.
6Carts and stands — When placed or
mounted on a stand or cart, the unit should
be moved with care. Quick stops, excessive
force, and uneven surfaces may cause the
unit or cart to overturn or fall.
7Condensation — Moisture may form on the CD pickup
lens when:
- The unit is moved from a cold spot to a warm spot
- The heating system has just been turned on
- The unit is used in a very humid room
- The unit is cooled by an air conditioner
When this unit has condensation inside, it may not function
normally. Should this occur, leave the unit for a few hours,
then try to operate again.
8Wall or ceiling mounting — The unit should not be
mounted on a wall or ceiling, unless specified in the
Operating Instructions.
Electric Power
1 Power sources — Connect this unit only to power sources
specified in the Operating Instructions, and as marked on
the unit.
2Polarization — As a safety feature, some units are
equipped with polarized AC power plugs which can only be
inserted one way into a power outlet. If it is difficult or
impossible to insert the AC power plug into an outlet, turn
the plug over and try again. If it still does not easily insert
into the outlet, please call a qualified service technician to
service or replace the outlet. To avoid defeating the safety
feature of the polarized plug, do not force it into a power
outlet.
3AC power cord
- When disconnecting the AC power cord, pull it out by the
AC power plug. Do not pull the cord itself.
- Never handle the AC power plug with wet hands, as this
could result in fire or shock.
- Power cords should be firmly secured to avoid being
severely bent, pinched, or walked upon. Pay particular
attention to the cord from the unit to the AC outlet.
- Avoid overloading AC outlets and extension cords beyond
their capacity, as this could result in fire or shock.
4Extension cord — To help prevent electric shock, do not
use a polarized AC power plug with an extension cord,
receptacle, or other outlet unless the polarized plug can be
completely inserted to prevent exposure of the blades of the
plug.
5When not in use — Unplug the AC power cord from the
AC outlet if the unit will not be used for several months or
more. When the cord is plugged in, a small amount of current
continues to flow to the unit, even when the power is turned
off.

3
En
System and accessories
Main unit CX-LMG9
Speakers SX-LMG9
Speakers cords
Remote control
Lithium battery (CR2025)
FM antenna
AM antenna
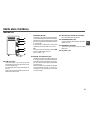
TABLE OF CONTENTS
PRECAUTIONS .................................... 2
PREPARATIONS ................................... 4
PARTS AND CONTROLS ......................... 5
ADJUSTMENTS BEFORE OPERATION.......... 8
SOUND ADJUSTMENTS.......................... 9
CD OPERATIONS................................ 10
RADIO OPERATIONS ........................... 12
TIMER OPERATIONS ........................... 13
REFERENCE ..................................... 14
OWNER'S RECORD
Record the model number and serial number of your set
(found at the rear of your set) below. Refer to them when
contacting your Aiwa dealer.
Model No. _____________________________
Serial No. _____________________________
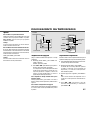
Outdoor Antenna
1Power lines — When connecting an outdoor antenna,
make sure it is located away from power lines.
2Outdoor antenna grounding — Be sure the antenna
system is properly grounded to provide protection against
unexpected voltage surges or static electricity build-up.
Article 810 of the National Electrical Code, ANSI/NFPA 70,
provides information on proper grounding of the mast,
supporting structure, and the lead-in wire to the antenna
discharge unit, as well as the size of the grounding unit,
connection to grounding terminals, and requirements for
grounding terminals themselves.
Antenna Grounding According
to the National Electrical Code
GROUND CLAMP
GROUND CLAMPS
ANTENNA
DISCHARGE
UNIT
(NEC SECTION
810-20)
GROUNDING
CONDUCTORS
(NEC SECTION
810-21)
ELECTRIC
SERVICE
EQUIPMENT
ANTENNA
LEAD IN
WIRE
POWER SERVICE
GROUNDING
ELECTRODE SYSTEM
(NEC ART 250 PART H)
NEC-NATIONAL ELECTRICAL CODE
Maintenance
Clean the unit only as recommended in the Operating
Instructions.
Damage Requiring Service
Have the unit serviced by a qualified service technician if:
- The AC power cord or plug has been damaged
- Foreign objects or liquid have gotten inside the unit
- The unit has been exposed to rain or water
- The unit does not seem to operate normally
- The unit exhibits a marked change in performance
- The unit has been dropped, or the cabinet has been damaged
DO NOT ATTEMPT TO SERVICE THE UNIT YOURSELF.

4
En
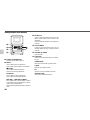
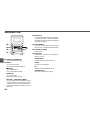
Remote control
While sliding the latch, pull out the battery holder from the
bottom of the remote control. Place the supplied battery on
the battery holder with correct polarity. Finally, insert the holder
back into position.
CR2025
•Replace the battery with new one when the operational
distance between the remote control and main unit becomes
shorter.
•Remove the battery if the unit is not going to be used for an
extended period of time.
•The remote control may not operate if it is used under intense
sunlight or if its line of sight is obstructed.
Caution!
•Do not keep the battery near metallic objects such as rings,
bracelets, and keys. It may cause the battery to short circuit.
•After removing the battery, be sure to keep it out of reach of
children. In case it is swallowed, consult a doctor
immediately.
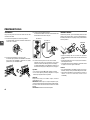
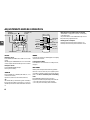
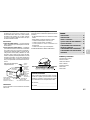
Connection
Plug in the AC power cord to the AC outlet after all other
connections are made.
1
Connect the speaker cords to the speakers.
Connect the amber cords to the + terminals and the silver
cords to the – terminals.
2
Connect the speakers to the main unit.
Connect the right speaker to the SPEAKERS R terminals
and the left to the SPEAKERS L terminals. The amber
speaker cords go to the ) terminals.
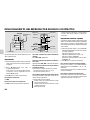
PREPARATIONS
3
Connect the supplied antennas.
Connect the FM antenna to the FM 75 Ω terminals and
the AM antenna to the AM LOOP jack.
4
Connect the AC power cord to an AC outlet.
When the AC power cord is connected to an AC power
outlet for the first time, DEMO appears on the display.
To deactivate the DEMO, press DEMO/ECO and the clock
will flash on the display. For setting the clock, see page 9.
Speakers
•Do not short-circuit the ) and ( speaker cord leads.
•Do not leave objects generating magnetism or objects
affected by magnetism near the speakers.
Antennas
Keep antennas away from metallic objects, electrical
equipment and cords.
FM antenna: Extend fully in a T-shape. If reception is poor,
connect an optional outdoor antenna to the FM 75 Ω terminals.
Be sure to connect the shield braid of the antenna to the 2
terminal.
AM antenna: Rotate to find the best reception.
AM antenna
FM antenna

5
En
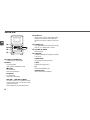
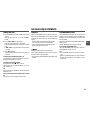
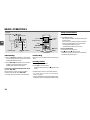
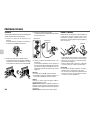
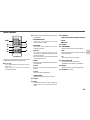
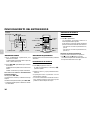
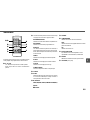
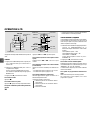
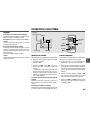
Main unit: rear
1 LINE OUT jacks
Analog sound signals for CD or radio can be output
through these jacks. Use a cable with RCA phono plugs
to connect audio equipment.
Connect the red plug to the R jack, and the white plug to
the L jack.
Signals input through the AUX/VIDEO IN jacks are not
output from the LINE OUT jacks.
1
3
2
6
4
5
PARTS AND CONTROLS
AUX/VIDEO IN jacks
Accept analog sound signals from external equipment.
Connect external equipment using an optional connecting
cable with RCA phono plugs (red plug to the R jack, white
plug to the L jack). Refer also to the operating instructions
for your equipment.
To switch function to external input, press FUNCTION
repeatedly to select the AUX (VIDEO or TV) function.
Tip:
To change a source name in the display, hold down g
and press POWER while the power is on.
AUX → VIDEO → TV
2 DIGITAL OUT (OPTICAL) jack
CD digital sound signals can be output through this jack.
Use an optical cable to connect digital audio equipment.
Remove the dust cap from the DIGITAL OUT (OPTICAL)
jack. Then connect an optical cable plug to the DIGITAL
OUT (OPTICAL) jack.
When you record the sound signals of this unit with digital
audio equipment (MD recorder, CD recorder, etc.)
connected to this jack, the beginning of the first track
may not be recorded.
3 AM LOOP jack and FM 75 Ω terminals
Plug in the supplied AM and FM antennas.
4 SUPER WOOFER3 jack
Connect an optional powered sub woofer with a built-in
amplifier to this jack.
5 SPEAKERS3 terminals
Connect the supplied speakers using the supplied
speaker cords.
6 AC power cord

6
En
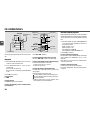
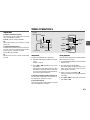
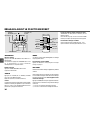
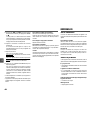
1 POWER 6STANDBY/ON
Switches the unit on and off (standby).
2 a/SET
CD: pauses playback.
Radio: stores the received station to preset.
s/CLEAR
CD: stops playback.
Radio: clears a preset station.
c/PRESET
CD: starts playback.
Radio: tunes in a preset station.
r/f/–, +/g/t ( TUNING)
CD: skips to a previous or a succeeding track when
pressed, searches a track in fast forward or reverse
playback when held down.
Radio: manually tunes up or down within the band.
Main unit: front
1
2
3
4
5
6
3 DEMO/ECO
When the unit is turned off: selects DEMO mode or
displays the clock (when ECO mode is deactivated).
When the unit is turned on: selects ECO mode on and
off.
4 PHONES jack
Plug in optional headphones set with a stereo mini plug
(ø3.5 mm,
1
/8 in.). Speaker output is canceled.
5 VOLUME UP, DOWN
Adjusts the volume.
6 FUNCTION
Switches the active function among FM/AM, AUX (VIDEO
or TV) and CD.
TUNER/BAND
Selects radio function and the radio band.
T-BASS
Emphasizes low frequency sound.
EQ
Selects a sound equalization curve.
zOPEN/CLOSE
Opens or closes the disc compartment.

7
En
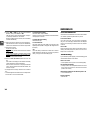
Remote control
Buttons with the same or similar names on the main unit
basically have the same function.
1 0–10, +10
CD: selects a track of the specified number.
Radio: tunes in the station with the specified preset
number.
2
The numbered buttons take on these functions when pressed with
SHIFT held down
:
RANDOM/REPEAT
Selects random or repeat CD playback mode.
PROGRAM
Selects programmed CD playback mode.
DISPLAY
CD: displays the track number being played, remaining
time of play and current volume level.
Radio: displays the frequency of the tuned station and
current volume level.
TIMER
Selects timer playback setting mode.
SLEEP
Selects sleep-timer setting mode.
CLOCK
Selects clock setting mode.
TUNER MONO
Switches between stereo or monaural FM reception.
3 T-BASS
4 SHIFT
Hold down when pressing a numbered button to change
its function to that printed above the number.
5 cPRESET
r/f, g/t (TUNING DOWN/UP)
aSET
sCLEAR
6 POWER
7 TUNER/BAND
Selects radio function and the radio band.
AUX
Selects the function of external equipment connected to
the AUX/VIDEO IN jacks.
CD
Selects CD function.
8 EQ/QSURROUND
EQ: selects a sound equalization curve.
QSURROUND: turns Q SURROUND on and off.
9 ENTER
Determines the mode and the time (clock and timer).
0 VOLUME (N,M)
6
9
4
3
1,2
5
7
8
0

8
En
ADJUSTMENTS BEFORE OPERATION
Power
Turning the unit on
Press POWER 6 STANDBY/ON (POWER on the remote
control).
Alternatively, press TUNER/BAND (AUX or CD on the remote
control). Playback will start automatically if a disc is inserted.
Turning the unit off
Press POWER 6STANDBY/ON again.
The unit goes into standby.
Volume
Press VOLUME (UP or DOWN) (VOLUME (N,M)
on the remote control).
Adjust from 0 (minimum) to 30 and MAX (maximum).
Tip:
Volume level setting is retained during power-off standby. If
the unit is turned off with the volume set to 17 or more, it is
automatically turned down to 16 the next time the unit is turned
on.
DEMO/ECO
TUNER/BAND
POWER
6STANDBY/ON
T-BASS
zOPEN/CLOSE
a
s
EQ
f,g
f,g
VOLUME UP/
DOWN
CLOCK
T-BASS
SHIFT
aSET
POWER
VOLUME
(N,M)
TUNER/BAND,
AUX, CD
EQ/
QSURROUND
ENTER
DEMO
If the clock has not been set, a DEMO appears on the display
when the unit is turned off.
To deactivate the DEMO
Press DEMO/ECO. The clock flashes. For setting the clock,
see page 9.
ECO mode
Reduces power consumption with the following operations.
After clock is set, this unit allows you to regulate its power
consumption by displaying nothing on the display while the
power is off. This is called the power economizing
mode.
Press DEMO/ECO while the unit is turned on.
Each press of this button changes the display status as follows:
1 ECO ON: power economizing mode is activated.
2 ECO OFF: power economizing mode is deactivated.
When the power economizing mode is activated
"GOOD-BYE" is displayed for 4 seconds, and everything
on the display clears.
Only the red indicator on the POWER button lights to show
that power is being supplied to the unit.
Standby power consumption
When the power economizing mode is activated: 1.0 W
When the power economizing mode is deactivated: 12.0 W

9
En
Setting the clock
1
Hold down SHIFT and press CLOCK on the remote
control.
When the unit is turned off, you can also press a or
ENTER.
2
Press f or g to set the time.
Each press changes the time in 1-minute steps.
Holding these buttons down will vary the time in 10-minute
units.
If f or g is not pressed within 4 seconds, setting
is canceled.
3
Press a or ENTER.
The time display stops flashing and the clock starts from
00 seconds.
To display the time while the power is on
Hold down SHIFT and press CLOCK on the remote control.
The time will be displayed for 4 seconds.
To switch to the 24-hour standard
Display the time and press s within 4 seconds.
With each press, the clock alternates between 12- and 24-
hour standard time.
Tip:
In the 12-hour standard, "AM12:00" indicates midnight and
"PM12:00" noon.
If the clock display flashes when the unit is turned
off
There has been a power interruption. Reset the clock.
Equalizer
Selects a sound equalization curve to match the music type.
Press EQ (EQ/QSURROUND on the remote control)
repeatedly to select one of the three equalization
curves.
- ROCK: Powerful sound emphasizing treble and bass
- POP: More presence in the vocals and midrange
- JAZZ: Accented lower frequencies for jazz-type music
- EQ OFF: Equalizer effect is canceled.
T-BASS
Emphasizes low frequencies for a powerful sound.
Press T-BASS repeatedly to select one of the three
emphasis levels or the off position.
•If the sound becomes distorted with the T-BASS effect, cancel
the effect.
SOUND ADJUSTMENTS
Q SURROUND system
The Q SURROUND system built into this unit uses only two
speakers at the left and right to create an atmosphere that
sounds as if you are surrounded by two front speakers and
two rear speakers.
Hold down SHIFT and press EQ/QSURROUND on the
remote control.
“ON QSURROUND” will flow from right to left.
To cancel the Q SURROUND effect
“OFF QSURROUND” flows from right to left and the
“QSURROUND” indicator goes off.
Tips:
•The Q SURROUND system does not work in monaural
mode.
•When the Q SURROUND system is on, the sound may be
distorted at higher volumes. If this happens, turn the
volume down.

10
En
This unit plays back finalized CD-R/RW discs as well as audio
CDs.
Playback
1
Press FUNCTION repeatedly (CD on the remote
control) to select the CD function.
2
Press z OPEN/CLOSE to open the disc
compartment.
Place a disc with the label side up.
Then close the disc compartment by pressing zOPEN/
CLOSE.
3
Press c to start play.
To stop playback
Press s.
To pause playback
Press a. Press again to resume playback.
To skip to the beginning of the current/preceding/
succeeding track
CD OPERATIONS
Press f or g repeatedly.
To search (playback in fast forward or reverse)
Hold down f or g. Release at the desired point.
To select a track with the remote control (Direct play)
Press the numbered buttons to select a track.
- To select track 25, press +10, +10 and 5.
- To select track 10, press 10.
To change the display in the playback mode
Hold down SHIFT and press DISPLAY on the remote control
during playback.
The display changes in the following order:
1 Track number being played and elapsed playing time
2 Track number being played and remaining time of play
3 Current volume level
•Remaining playback time cannot be displayed during
random playback or programmed playback.
Random/Repeat playback
Random playback plays all the tracks in random order. Repeat
playback plays all the tracks or the track being played repeatedly.
You can select random and repeat all playback at the same
time.
1
Hold down SHIFT and press RANDOM/REPEAT
on the remote control repeatedly to select one of
the following modes:
Repeat 1 playback: "
"
1"
Repeat all playback: "
"
"
Random playback: "RANDOM"
Random/Repeat all playback: "RANDOM
"
"
2
Press c to start play.
To cancel random/repeat playback
Hold down SHIFT and press RANDOM/REPEAT on the remote
control repeatedly until "RANDOM", "
"
1" or "
"
"
disappears.
Direct selection of the tracks with the numbered buttons
cancels the random mode.
To repeat a selected set of tracks
First select the tracks with programmed playback.
Then selects repeat playback. (See "Programmed playback"
on page 11.)
FUNCTION
zOPEN/CLOSE
a
s
c
f,g
VOLUME UP/
DOWN
DISPLAY
SHIFT
sCLEAR
aSET
VOLUME
(N,M)
RANDOM/
REPEAT
0-10,+10
PROGRAM
CD
f,g
cPRESET

11
En
Programmed playback
Plays back up to 30 selected tracks in programmed order.
1
Hold down SHIFT and press PROGRAM on the
remote control in stop mode.
"PRGM" flashes on the display.
2
Press the numbered buttons on the remote
control to program a track.
-To select the 25th track, press +10, +10 and 5.
-To select the 10th track, press 10.
The selected track number lights up on the display.
3
Repeat step 2 to program other tracks.
The total number of selected tracks and total playing time
will be displayed.
4
Press c to start play.
The track number for the current track flashes on the
display.
•During programmed playback, you cannot select a track with
the numbered buttons. "Can’t USE" is displayed when
you try to select a track .
•It is impossible to play a selected set of tracks in random
order.
•If the total playback time of the program exceeds 99 minutes
and 59 seconds, or if a track with a track number exceeding
30 is programmed, the playing time is displayed as
"- -:- -".
•You cannot program more than 30 tracks. "FULL" is
displayed.
To check the program
Press f or g repeatedly in stop mode. The track
number and program number are displayed in succession.
To clear the program
Press s in stop mode. "PRGM" disappears on the display.
To add tracks to the program
Repeat step 2 before starting playback. The tracks are added
to the end of the program.
To change the programmed tracks
Clear the program and repeat all the steps again.
Notes on CDs
•Do not place more than one disc.
•Do not tilt the unit with a disc inserted.
•The unit may not play CD-R/RW discs recorded on personal
computers or certain kinds of CD-R/RW recorders.
•Do not attach adhesive label to either side of CD-R/RW discs,
as doing so may cause malfunction.
•Do not load an unrecorded CD-R/RW disc. The disc may be
damaged.
•Do not use irregular-shaped CDs.

12
En
RADIO OPERATIONS
Manual tuning
1
Press TUNER/BAND repeatedly to select a band.
The unit switches to the radio from any other function
and alternates between FM and AM.
2
Press f or g repeatedly to tune in a station.
"TUNE" is displayed when a station is tuned in.
"1" lights up for FM stereo reception.
To search for a station automatically (Auto search)
Hold down f or g.
The unit searches for a station and stops at reception.
To stop the search manually, press for g.
•Auto search may not stop at stations with weak signals.
Preset tuning
Preset up to 32 of your favorite stations and tune them in
directly.
Presetting stations
1
Tune in the desired station.
2
Press a to store the station.
The preset number, beginning from "1", appears on the
display.
3
Repeat steps 1 and 2 to preset other stations.
•You cannot store more than 32 preset stations.
"FULL" is displayed.
•If power is interrupted for more than approximately 12 hours,
all settings stored in memory after purchase need to be reset.
Tuning in preset stations
1
Select the band.
2
Press c repeatedly.
With each press, the station with the succeeding preset
number is tuned in.
You can tune in the desired preset station directly by
pressing the numbered buttons on the remote control.
- To select preset number 10, press 10.
- To select preset number 15, press +10 and 5.
To clear a preset station
1 Tune in the station by preset tuning.
2 Press s, then press a within 4 seconds.
Preset station numbers in the band which are higher than
the cleared number decrease by one.
TUNER/BAND
a/SET
s/CLEAR
c/PRESET
f,gTUNING
(–,+)
POWER
6STANDBY/ON
SHIFT
TUNER MONO
POWER
sCLEAR
aSET
0-10,+10
TUNER/
BAND
f,g
cPRESET

13
En
Adjustments
To switch to monaural FM reception
Hold down SHIFT and press TUNER MONO on the remote
control so that "MONO" is displayed.
To cancel, press again to display "STEREO."
Tip:
When FM stereo reception is poor, switching to monaural
reduces noise.
To switch the AM tuning interval
The default setting of the AM tuning interval is 10 kHz/step. If
you use this unit in an area where the frequency allocation
system is 9 kHz/step, change the tuning interval.
Hold down c and press POWER.
Tip:
When the AM tuning interval is changed, all preset stations
are cleared.
TIMER OPERATIONS
Sleep timer
Turns off the unit automatically after a specified time.
1
Hold down SHIFT and press SLEEP on the remote
control.
"SLEEP" is displayed.
2
Press f or g repeatedly to set the sleep
timer duration.
With each press, the timer duration changes in 5-minute
steps between 5 to 240 minutes. If there is no button input
for 4 seconds, the current setting is entered automatically.
The unit turns off after the selected time.
To check the remaining time until the unit turns off
Hold down SHIFT and press SLEEP on the remote control.
The remaining time is displayed for 4 seconds.
To cancel the sleep timer
Hold down SHIFT and press SLEEP repeatedly on the remote
control until "SLEEPoFF" is displayed.
Timer playback
Turns on the unit at a specified time for the specified duration.
Make sure the clock is set correctly.
1
Press FUNCTION repeatedly to select the desired
playback source.
2
Hold down SHIFT and press TIMER.
"5" indicator lights up and "5 PLAY" appears on the
display. Then, the timer-on time and the source name
appear alternately on the display.
3
Within 7 seconds, press ENTER or a.
The timer-on time and the source name appear alternately
on the display.
4
Press f or g to set the timer-on time, then
press ENTER or a.
FUNCTION
a/SET
f,g
POWER
6STANDBY/ON
SHIFT
aSET
ENTER
SLEEP
f,g
TIMER
POWER
TUNER/BAND,
AUX, CD

14
En
Care and maintenance
Occasional care and maintenance of the unit and the software
are needed to optimize the performance of your unit.
To clean the cabinet
Use a soft and dry cloth. If the unit surfaces are extremely
dirty, use a soft cloth lightly moistened with mild detergent
solution. Do not use strong solvents such as alcohol, benzene
or thinner.
Care of CDs
When a CD becomes dirty, wipe it from the center out with a
cleaning cloth. After playing a CD, store it in its case. Do not
keep it in hot or humid places.
Troubleshooting
If your unit fails to perform properly, check the following guide
and the relevant sections of this manual.
There is no sound
•Are the speakers and AC power cord connected properly?
The unit shut off suddenly
•Possibly a short circuit in the speaker terminals. Disconnect
the AC power cord from the AC outlet and reconnect the
speaker cords correctly.
All the display lights turn off when the power is off
•Is ECO mode set to on?
Erroneous display
•Reset the unit.
REFERENCE
5
Press f or g to set the timer-activated
duration, then press ENTER or a.
With each press, the timer-activated duration changes in
5-minute steps between 5 to 240 minutes.
If there is no button input for 4 seconds, the current setting
is entered automatically.
6
Adjust the volume and tone for timer playback.
If the volume level is set to 17 or higher, it is automatically
turned down to 16 when the unit is turned on by the timer.
7
Prepare the source.
To play CD, insert a disc.
To play the radio, select the band and tune in the desired
station.
To play external equipment connected to the AUX/VIDEO
IN jacks, set an external timer for the equipment so that
its playback begins at the same time.
8
Press POWER 6STANDBY/ON to turn the unit
off.
"5" remains on the display to indicate the timer standby
mode (when the ECO mode is deactivated).
At timer-on time, the unit turns on and plays the selected
source. After the specified timer-activated duration, the
unit turns off again.
•Timer playback will not begin unless the unit is turned off
first.
•Connected equipment cannot be turned on or off by the built-
in timer of this unit. Use an external timer.
To check the timer setting
Hold down SHIFT and press TIMER.
The timer-on time, the source and the timer-activated duration
are displayed for 4 seconds.
To change the timer setting
Reset the timer again.
To cancel the timer
Hold down SHIFT and press TIMER on the remote control
repeatedly until "5 OFF" is displayed. "5" disappears from
the display.
Tip:
Your timer setting is retained even if the timer is canceled.
Next time the timer is activated, you can change your previous
setting, or simply use the same setting again.

15
En
Specifications
MAIN UNIT CX-LMG9
TUNER
FM tuning range 87.5 MHz to 108 MHz
FM usable sensitivity (IHF) 13.2 dBf
FM antenna terminals 75 ohms (unbalanced)
AM tuning range 530 kHz to 1710 kHz (10 kHz step)
531 kHz to 1602 kHz (9 kHz step)
AM usable sensitivity 350 µV/m
AM antenna Loop antenna
AMPLIFIER
Power output 50 W + 50 W (40 Hz - 20 kHz, THD
less than 1%, 6 ohms)
62 W + 62 W (1 kHz, THD 10%, 6
ohms)
Total harmonic distortion 0.15% (5 W, 1 kHz, 6 ohms, DIN
AUDIO)
Input AUX/VIDEO IN: 500 mV
Outputs SPEAKERS: 6 ohms or more
PHONES: 32 ohms or more
SUPER WOOFER 1.7 V
DIGITAL OUT (OPTICAL) jack
LINE OUT jack
CD PLAYER
Laser Semiconductor laser (λ = 780 nm)
D/A converter 1 bit dual
Signal-to-noise ratio 85 dB (1 kHz, 0 dB)
Harmonic distortion 0.08% (1 kHz, 0 dB)
Wow and flutter unmeasurable
GENERAL
Power requirements 120 V AC, 60 Hz
Power consumption 60 W
Power consumption With ECO mode on: 1.0 W
in standby mode With ECO mode off: 12.0 W
Dimensions (W × H × D) 176.6 × 256 × 348.7 mm
(7 × 10
1
/
8
× 13
3
/
4
in.)
Weight 4.9 kg (10 lbs 14 oz)
SPEAKER SYSTEM SX-LMG9
Speaker system 2 way, bass reflex (magnetic
shielded)
Speaker units Woofer: 120 mm (4
7
/8 in.) cone
Tweeter: 25 mm (1
1
/16 in.) dome
Impedance 6 ohms
Dimensions (W × H × D) 160 × 256 × 230 mm
(6
3
/8 × 10
1
/8 × 9
1
/8 in.)
Weight 3.2 kg (7 lbs 1 oz)
Specifications and external appearance are subject to change
without notice.
Poor radio reception
•Check antenna connection. Adjust the antenna to find the
best reception.
•Move unit and antenna away from other electric appliances
and cords.
The CD player works poorly
•Is the disc correctly inserted?
•Is the disc dirty?
•Is the lens affected by condensation? If so, wait
approximately one hour and try again.
Resetting the unit
If an unusual condition occurs in the display window, reset
the unit as follows:
1 Press POWER to turn off the power.
If the power cannot be turned off, disconnect the AC power
cord, then plug it in again.
2 Hold down s and press POWER.
Everything stored in memory after purchase is cleared.

16
E
PRECAUCIONES
ADVERTENCIA
Para reducir el riesgo de incendios o sacudidas eléctricas,
no exponga este aparato a la lluvia ni a la humedad.
CAUTION
RISK OF ELECTRIC SHOCK
DO NOT OPEN
Explicación de símbolos gráficos:
El símbolo del rayo dentro de un triángulo
equilátero está concebido para alertar al
usuario de la presencia de una "tensión
peligrosa" no aislada dentro del
receptáculo del producto que podría ser
de suficiente magnitud como para
constituir un riesgo de descarga eléctrica
para las personas.
El signo de exclamación dentro de un
triángulo equilátero está concebido para
alertar al usuario de la presencia de
instrucciones importantes de
funcionamiento y mantenimiento
(reparaciones) en la documentación que
acompaña al aparato.
Lea cuidadosamente y en su totalidad el Manual de
Instrucciones antes de utilizar la unidad. Deberán observarse
estrictamente todas las precauciones de este manual y de la
unidad.
Guarde el Manual de Instrucciones para referencia futura.
Instalación
1 Agua y humedad — No utilice esta unidad cerca del agua,
como al lado de una bañera, lavabo, una piscina, o similar.
2 Calor
— No utilice esta unidad cerca de fuentes de calor,
incluyendo salidas de aire caliente, estufas u otros aparatos
que generen calor. Tampoco deberá someterse a temperaturas
inferiores a 5˚C ni superiores a 35˚C.
3Superficie de montaje
— Sitúe la unidad sobre una
superficie plana y nivelada.
4 Ventilación
— La unidad deberá situarse en un lugar en el
cual exista suficiente holgura a su alrededor para poder
garantizar una ventilación adecuada. Deje una holgura de 10
cm desde la parte posterior y superior de la unidad y 5 cm
desde cada lado a cualquier otro objeto.
- No ponga la unidad sobre una cama, una alfombra o
superficies similares que puedan obstruir las aberturas de
ventilación.
- No instale la unidad en una librería, mueble o estantería
cerrada herméticamente donde la ventilación no sea la
adecuada.
5 Entrada de objetos y líquidos
— Tenga cuidado de que
objetos y líquidos no entren en la unidad a través de las
aberturas de ventilación.
6 Estantes fijos y con ruedas
— Cuando
coloque o monte la unidad en un estante fijo
o con ruedas, tenga mucho cuidado al
moverla a otro lugar. Las paradas repentinas,
la fuerza excesiva y las superficies irregulares
pueden hacer que la unidad o el estante con
ruedas vuelque o se caiga.
7 Condensación
— Puede formarse condensación en la lente
del fonocaptor del reproductor de discos compactos cuando:
- La unidad pase de un lugar frío a uno caliente
- El sistema de calefacción se acabe de encender
- La unidad se utilice en una habitación muy húmeda
- La unidad se enfríe mediante aire acondicionado
Esta unidad puede no funcionar debidamente cuando se forme
condensación en su interior. En este caso, deje en reposo la
unidad unas pocas horas y repita de nuevo la operación.
8 Montaje en pared o techo
— No ha de montarse la unidad
en una pared ni en el techo, a menos que se especifique lo
contrario en el Manual de Instrucciones.
Alimentación
1 Fuentes de alimentación — Conecte esta unidad
solamente a las fuentes de alimentación especificadas en el
Manual de Instrucciones y según está marcado en la unidad.
2 Polarización — Como medida de seguridad algunas
unidades van equipadas con enchufes de alimentación de
CA polarizados que sólo pueden introducirse en un sentido
en la toma de corriente. Si es difícil o imposible introducir
el enchufe de alimentación de CA en una toma, dé la vuelta
al enchufe e inténtelo de nuevo. Si todavía no se introduce
fácilmente en la toma, llame a un técnico cualificado en
reparaciones para modificar o cambiar la toma. Para no
anular la característica de seguridad del enchufe polarizado,
no fuerce su entrada en la toma de corriente.
3Cable de alimentación de CA
- Cuando desconecte el cable de alimentación de CA, tire
del enchufe. No tire del propio cable.
- Nunca manipule el enchufe con las manos mojadas ya
que podría producirse un incendio o una descarga
eléctrica.
- Los cables de alimentación deberán colocarse de forma
que no queden muy doblados, prensados y que nadie
pueda pisarlos. Preste especial atención al cable que va
de la unidad a la toma de CA.
- Evite sobrecargar los enchufes de CA y los cables de
extensión más allá de su capacidad porque ello podría
causar un incendio o una descarga eléctrica.
4 Cable de extensión — Para ayudar a evitar una descarga
eléctrica, no utilice un enchufe de alimentación polarizado
con un cable de extensión, receptáculo u otra toma a menos
que el enchufe polarizado pueda introducirse totalmente para
evitar que las clavijas del enchufe queden expuestas.
"PRECAUCIÓN: PARA REDUCIR EL RIESGO DE
DESCARGAS ELÉCTRICAS, NO QUITE LA
CUBIERTA (O PARTE TRASERA). NO HAY PIEZAS
REPARABLES POR EL USUARIO EN EL INTERIOR.
REFIERA TODO SERVICIO A PERSONAL DE
SERVICIO CUALIFICADO."

17
E
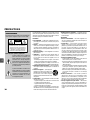
Sistema y accesorios
Unidad principal CX-LMG9
Altavoces SX-LMG9
Cables de los altavoces
Mando a distancia
Pila de litio (CR2025)
Antena de FM
Antena de AM
ÍNDICE
PRECAUCIONES ................................ 16
PREPARACIONES ............................... 18
PARTES Y CONTROLES ........................ 19
AJUSTES ANTES DEL FUNCIONAMIENTO... 22
AJUSTES DE SONIDO .......................... 23
FUNCIONAMIENTO DEL REPRODUCTOR
DE DISCOS COMPACTOS ...................... 24
FUNCIONAMIENTO DEL SINTONIZADOR .... 26
FUNCIONAMIENTO DEL TEMPORIZADOR... 27
REFERENCIA .................................... 28
FICHA DEL PROPIETARIO
Anote a continuación el número de modelo y el número
de serie de su aparato (que se encuentran en la parte
posterior de su aparato). Cuando se ponga en contacto
con su distribuidor Aiwa comuníquele estos números.
Nº de modelo _____________________________
Nº de serie _______________________________
5 Periodos de no utilización — Desconecte el cable de
alimentación de CA de la toma si la unidad no va a ser
utilizada durante varios meses o más. Cuando el cable de
alimentación esté conectado, por la unidad continuará
circulando una pequeña cantidad de corriente, aunque la
alimentación esté desconectada.
Antena exterior
1 Líneas del tendido eléctrico — Al conectar una antena
exterior, asegúrese de que se sitúa alejada de las líneas del
tendido eléctrico.
2 Toma a tierra de la antena exterior — Asegúrese de
que el sistema de la antena se conecta a tierra correctamente
para proteger contra picos de tensión inesperados o
acumulación de electricidad estática. El Artículo 810 del
Código Eléctrico Nacional (NEC), ANSI/NFPA 70, ofrece
información sobre la puesta a tierra correcta del mástil,
estructura de soporte y cable de bajada de antena a la unidad
de descarga de la antena, así como sobre el tamaño de la
unidad de puesta a tierra, la conexión a los terminales de
tierra y los requerimientos de los terminales de tierra en sí
mismos.
Puesta a tierra de la antena según el
Codigo Eléctrico Nacional
ABRAZADERA DE
TOMA A TIERRA
ABRAZADERAS DE
TOMA A TIERRA
UNIDAD DE
DESCARGA
DE LA ANTENA
(NEC,SECCIÓN
810-20)
CONDUCTORES
DE TOMA A
TIERRA (NEC,
SECCIÓN 810-21)
EQUIPO DEL
SERVICIO
ELECTRICO
CABLE DE
BAJADA
DE LA ANTENA
SISTEMA DE ELECTRODO DE
TOMA A TIERRA DEL
SERVICIO ELÉCTRICO
(NEC,ARTÍCULO 250,PARTE H)
NEC (CÓDIGO ELÉCTRICO NACIONAL)
Mantenimiento
Limpie la unidad sólo como se recomienda en el Manual de
Instrucciones.
Daños que necesitan ser reparados
Solicite que un técnico cualificado en reparaciones revise las
unidades si:
- El cable de alimentación de CA o su enchufe han resultado
dañados
- Objetos extraños o líquido han entrado en la unidad
- La unidad ha estado expuesta a lluvia o al agua
- La unidad no parece funcionar normalmente
- La unidad presenta un cambio considerable en su
funcionamiento
- La unidad se ha caído o la caja se ha estropeado
NO TRATE DE REPARAR LA UNIDAD USTED MISMO.

18
E
Mando a distancia
Mientras desliza la leva de enganche, saque el portapilas de
la parte inferior del mando a distancia. Ponga la pila
suministrada en el portapilas, prestando atención a que la
polaridad es la correcta. Finalmente, inserte el portapilas de
nuevo en su posición.
CR2025
•Cambie la pila por otra nueva cuando se acorte la distancia
operacional entre el mando a distancia y la unidad principal.
•Quite las pila si la unidad no va a utilizarse durante un
periodo de tiempo prolongado.
•El mando a distancia puede no funcionar si se utiliza bajo
una luz solar intensa o si se obstruye su línea de visión.
¡Precaución!
•No deje la pila cerca de objetos magnéticos, como anillos,
brazaletes o llaves. Puede provocar un corto circuito.
•Una vez sacada la pila, asegúrese de mantenerla lejos del
alcance de los niños. En caso de que alguien se la trague,
consulte con un doctor inmediatamente.
Conexión
Conecte el cable de alimentación de CA a la toma de CA después
de haber realizado todas las demás conexiones.
1
Conecte los cables de los altavoces a los
altavoces.
Conecte los cables de color ámbar a los terminales + y
los cables de color plateado a los terminales –.
2
Conecte los altavoces a la unidad principal.
Conecte el altavoz derecho a los terminales SPEAKERS R
y el izquierdo a los terminales SPEAKERS L. Los cables
de color ámbar de los altavoces van a los terminales ).
PREPARACIONES
3
Conecte las antenas suministradas.
Conecte la antena FM a los terminales FM 75 Ω y la antena
AM a la toma AM LOOP.
4
Conecte el cable de alimentación de CA a una
toma de CA.
Cuando el cable de alimentación de CA se conecte a una
toma de CA por vez primera, DEMO aparecerá en pantalla.
Para desactivar la DEMO, pulse DEMO/ECO y el reloj
parpadeará en la pantalla. Para ajustar el reloj, consulte
la página 23.
Altavoces
•No cortocircuite los cables ) y ( de los altavoces.
•No deje objetos que generen magnetismo ni objetos a los
que les afecte el magnetismo cerca de los altavoces.
Antenas
Mantenga las antenas alejadas de objetos metálicos,
equipamiento eléctrico y cables.
Antena de FM: Extiéndala en su totalidad en forma de T. Si
la recepción es mala, conecte una antena exterior opcional al
terminal FM 75 Ω. Asegúrese de conectar la trenza de la antena
al terminal 2.
Antena de AM: Gire para encontrar la mejor recepción.
Antena de AM
Antena de FM

19
E
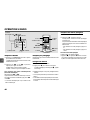
Unidad principal: parte posterior
1 Tomas LINE OUT
A través de estas tomas pueden obtenerse señales de
sonido analógicas de disco compacto o de la radio.
Utilice un cable con clavijas fonográficas RCA para
conectar el equipo de audio.
Conecte la clavija roja a la toma R y la clavija blanca a la
toma L.
Las señales que se introduzcan a través de las tomas
VIDEO/AUX no tendrán salida por las tomas LINE OUT.
1
3
2
6
4
5
PARTES Y CONTROLES
Tomas AUX/VIDEO IN
Acepta señales de sonido analógicas provenientes de
equipo externo. Conecte equipo externo utilizando un
cable de conexión opcional con clavijas fonográficas RCA
(clavija roja a la toma R, clavija blanca a la toma L).
Consulte también el manual de instrucciones de su
equipo.
Para cambiar la función a toma externa, pulse FUNCTION
repetidamente para seleccionar la función AUX (VIDEO
o TV).
Consejo:
Para cambiar el nombre de una fuente en pantalla,
mantenga pulsado g y pulse POWER con el equipo
encendido.
AUX → VIDEO → TV
2 Toma DIGITAL OUT (OPTICAL)
A través de esta toma pueden obtenerse señales de
sonido digital con calidad de disco compacto. Utilice un
cable óptico para conectar el equipo de audio digital.
Saque la tapa para polvo de la toma DIGITAL OUT
(OPTICAL). A continuación, conecte un enchufe de cable
óptico en la toma DIGITAL OUT (OPTICAL).
Cuando grabe las señales de sonido de esta unidad con
equipo de audio digital (grabadora de minidiscos,
grabadora de discos compactos, etc.) conectado a esta
toma, tal vez no se grabe el principio de la primera pista.
3 Toma AM LOOP y terminales FM 75 Ω
Conecte las antenas de AM y FM suministradas.
4 Toma SUPER WOOFER3
Conecte un altavoz realzador de graves opcional con un
amplificador integrado en esta toma.
5 Terminales SPEAKERS3
Conecte los altavoces suministrados utilizando los cables
de los altavoces que se suministran.
6 Cable de alimentación de CA

20
E
1 POWER 6STANDBY/ON
Enciende y apaga la unidad (en espera).
2 a/SET
Disco compacto: pausa en la reproducción.
Radio: guarda la emisora recibida en una presintonía.
s/CLEAR
Disco compacto: detiene la reproducción.
Radio: borra una emisora presintonizada.
c/PRESET
Disco compacto: comienza la reproducción.
Radio: sintoniza una emisora presintonizada.
r/f/–, +/g/t ( TUNING)
Disco compacto: salta a una pista anterior o posterior
cuando se pulsa, busca una pista en avance o retroceso
rápido cuando se mantiene pulsado.
Radio: sintoniza manualmente hacia abajo o arriba en la
banda.
Unidad principal: parte delantera
1
2
3
4
5
6
3 DEMO/ECO
Cuando la unidad está apagada: selecciona el modo
DEMO o muestra el reloj (cuando el modo ECO está
desactivado).
Cuando la unidad está encendida: activa o desactiva el
modo ECO.
4 Toma PHONES
Conecta un juego de auriculares opcional con una
miniclavija estéreo (ø3,5 mm). La salida por altavoces
se cancela.
5 VOLUME UP, DOWN
Ajusta el volumen.
6 FUNCTION
Cambia la función activa entre FM/AM, AUX (VIDEO o
TV) y CD.
TUNER/BAND
Selecciona la función de radio y la banda de radio.
T-BASS
Enfatiza el sonido de baja frecuencia.
EQ
Selecciona una curva de ecualización de sonido.
zOPEN/CLOSE
Abre o cierra el compartimento del disco.
La page est en cours de chargement...
La page est en cours de chargement...
La page est en cours de chargement...
La page est en cours de chargement...
La page est en cours de chargement...
La page est en cours de chargement...
La page est en cours de chargement...
La page est en cours de chargement...
La page est en cours de chargement...
La page est en cours de chargement...
La page est en cours de chargement...
La page est en cours de chargement...
La page est en cours de chargement...
La page est en cours de chargement...
La page est en cours de chargement...
La page est en cours de chargement...
La page est en cours de chargement...
La page est en cours de chargement...
La page est en cours de chargement...
La page est en cours de chargement...
La page est en cours de chargement...
La page est en cours de chargement...
La page est en cours de chargement...
La page est en cours de chargement...
-
 1
1
-
 2
2
-
 3
3
-
 4
4
-
 5
5
-
 6
6
-
 7
7
-
 8
8
-
 9
9
-
 10
10
-
 11
11
-
 12
12
-
 13
13
-
 14
14
-
 15
15
-
 16
16
-
 17
17
-
 18
18
-
 19
19
-
 20
20
-
 21
21
-
 22
22
-
 23
23
-
 24
24
-
 25
25
-
 26
26
-
 27
27
-
 28
28
-
 29
29
-
 30
30
-
 31
31
-
 32
32
-
 33
33
-
 34
34
-
 35
35
-
 36
36
-
 37
37
-
 38
38
-
 39
39
-
 40
40
-
 41
41
-
 42
42
-
 43
43
-
 44
44


Aiwa CX-LMG9 Operating Instructions Manual
- Catégorie
- Lecteur CD
- Taper
- Operating Instructions Manual
dans d''autres langues
- English: Aiwa CX-LMG9
- español: Aiwa CX-LMG9