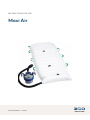
Arjo Maxi Air Instructions For Use Manual
- Taper
- Instructions For Use Manual

001-35001-EN Rev 7 • 12/2019
INSTRUCTIONS FOR USE
Maxi Air

Design Policy and Copyright
® and ™ are trademarks belonging to the Arjo group of companies.
© Arjo 2019.
As our policy is one of continuous improvement, we reserve the right to modify designs without
prior notice. The content of this publication may not be copied either whole or in part without the
consent of Arjo AB.
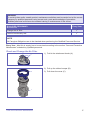
WARNING
To avoid injury, always read this Instructions for Use and accompanying documents before using
the product.
It is mandatory to read the Instructions for Use.
Refer to the Instructions for Use

Table of Contents iii
Table of Contents
Table of Contents
Foreword .................................................................................................................................. 1
Intended Use ........................................................................................................................... 2
Safety Instructions .................................................................................................................. 3
Preparations ............................................................................................................................ 4
3URGXFW6SHFL¿FDWLRQV........................................................................................................... 5
Parts Designation ................................................................................................................... 6
Product Description/Functions ............................................................................................. 7
Correct Placement of the Patient .......................................................................................... 8
Correct Placement of the Maxi Air air supply ...................................................................... 9
Transfer ................................................................................................................................. 10
Disinfection Instructions .....................................................................................................14
Care and Preventive Maintenance ...................................................................................... 16
Troubleshooting .................................................................................................................... 19
7HFKQLFDO6SHFL¿FDWLRQV ....................................................................................................... 20
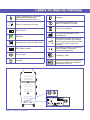
Labels on Maxi Air mattress ................................................................................................. 23
Labels on Maxi Air air supply ............................................................................................... 24
Approvals and List of Standards ......................................................................................... 25
Electromagnetic Compatibility ............................................................................................. 26
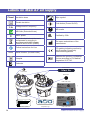
Parts and Accessories ..........................................................................................................30

Intentionally left blank

Foreword 1
Thank you for purchasing Arjo
equipment.
Your Maxi Air™ is a part of a series of quality
products designed for patient transfers,
especially for hospital and professional
healthcare facilities.
Please contact us if you have any questions
about the operation or maintenance of your Arjo
equipment.
Please read this Instructions for Use
thoroughly!
Please read this Instructions for Use (IFU) in its
entirety before using your Maxi Air. Information
in this IFU is crucial to the proper operation and
maintenance of the equipment. It will help to
protect your product, and make sure that the
equipment performs to your satisfaction. The
information in this IFU is important for your
safety and must be read and understood to help
prevent possible injuries.
8QDXWKRUL]HGPRGL¿FDWLRQVRQDQ\$UMR
equipment can affect its safety. Arjo will not be
held responsible for any accidents, incidents or
lack of performance that occur as a result of any
XQDXWKRUL]HGPRGL¿FDWLRQWRLWVSURGXFWV
Service and Support
A service routine must be performed on your
Maxi AirHYHU\\HDUE\TXDOL¿HGSHUVRQQHOWR
ensure the safety and operating procedures of
your product. See section, “Care and Preventive
Maintenance”.
If you require further information, please contact
Arjo for comprehensive support and service
programs to maximize the long-term safety,
reliability and value of the product.
Contact your local Arjo representative for
replacement parts. The telephone numbers
appear on the last page of this IFU.
Manufacturer Information
This product was manufactured by:
ArjoHuntleigh AB
Hans Michelsensgatan 10
211 20 Malmö
SWEDEN
'H¿QLWLRQV8VHGLQWKLV0DQXDO
WARNING:
Means: Failure to understand and follow this
instruction may result in injury to yourself and
others.
CAUTION:
Means: Failure to follow this instruction may
cause damage to the product(s).
NOTE:
Means: Important information regarding correct
use of the product.
Means: The name and address of the
manufacturer.
Means: Read the Instructions for use
Foreword
Foreword

Intended Use
2
This equipment should only be used for the
SXUSRVHVSHFL¿HGLQWKLVInstructions for
Use (IFU). Any other use is prohibited.
The Maxi Air is intended for lateral transfer or
repositioning of hospital and professional
healthcare facility patients. The equipment must
be used under the supervision of trained
caregivers with adequate knowledge of the care
environment, its common practices and
procedures, and in accordance with the
guidelines in this Instructions for Use (IFU).
The equipment must only be used for the
purposes stated above, and removable parts
must be mounted according to the
recommendations given in this IFU.
The System
The Maxi Air (air supply and mattress) is an air
assisted lateral patient transfer system for use in
lateral transfers and repositioning.
Patient Assessment
It is recommended that facilities establish
regular assessment routines. Caregivers must
assess each patient according to the following
criteria prior to use:
• This equipment is intended for patients
who are dependent, unable or not
required to participate in the transfer
activity.
• The equipment is intended for adult
patients.
• The patient safe working load (SWL) of the
Maxi Air mattress is 1200 lb / 544 kg. When
using allowed mattresses other than Maxi
Air PDWWUHVVREVHUYH6:/VSHFL¿HGE\
the manufacturer of the mattress.
• The weight, girth and body shape of the
patient should be assessed in terms of
the potential risk for the caregivers who
are to perform the patient transfer using
this equipment.
• Maxi Air is intended for use in hospital
and professional healthcare facilities.
If the patient does not meet these criteria, an
alternative equipment/system must be used.
Contraindications
This equipment can be unsuitable for patients
with thoracic, cervical or lumbar fractures. The
equipment can be unsuitable for patients whose
body shape is such that they do not comfortably
¿WEHWZHHQWKHERXQGDULHVRIWKHPDWWUHVV
Always make a clinical assessment to make
sure that the patient is suitable for the
equipment.
Expected Lifetime
The expected lifetime of the Maxi Air air supply,
LVXQOHVVRWKHUZLVHVWDWHG¿YH\HDUVLI
subject to preventive maintenance being carried
out in accordance with the instructions for “Care
and Preventive Maintenance” found in this IFU.
The expected lifetime of the Maxi Air mattress,
is twenty (20) transfers.
Intended Use
Intended Use

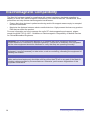
Safety Instructions 3
Safety Instructions
Safety Instructions
WARNING
Do NOT use the equipment for any type of
lifting of patients.
WARNING
Do NOT use the equipment if the power cord
is damaged. A damaged power cord may
cause serious injury to the patient and the
caregivers.
WARNING
7RDYRLGH[SORVLRQRU¿UHQHYHUXVHWKH
equipment in oxygen rich environment, in
SUHVHQFHRIKHDWVRXUFHRUÀDPPDEOH
anaesthetic gases.
WARNING
This equipment does not contain any HEPA-
¿OWHU7KLVPD\FDXVHSUREOHPVIRUSDWLHQWV
sensitive to contaminated air.
WARNING
To avoid bodily injuries to the patient, use the
Maxi Air in an environment where the
temperature is below 32 °C (90 °F).
Temperatures above 32 °C (90 °F) can cause
the Maxi Air mattress surface to reach a
temperature higher than 44 °C (111 °F).
If a serious incident occurs in relation to this
medical device, affecting the user, or the patient
then the user or patient should report the
serious incident to the medical device
manufacturer or the distributor. In the European
Union, the user should also report the serious
incident to the Competent Authority in the
member state where they are located.

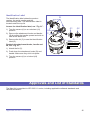
Preparations
4
Actions Before First Use
1) Visually inspect the Maxi Air system for
damage.
2) Check that all parts are supplied. Compare
with section Parts Designation in this IFU. If
any part is missing or damaged - do NOT
use the product!
3) Read the IFU.
4) Disinfect the Maxi Air air supply. See
Disinfection Instructions section.
5) Perform a functionality test. See Care and
Preventive Maintenance section.
6) Find a good ventilated dry area for storing
the Maxi Air.
7) Choose a designated area where the IFU
should be kept, accessible at all times.
8) Make sure to have a rescue plan ready in
case of a patient emergency.
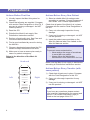
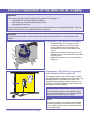
Below is the direction of the Maxi Air
mattress:
Actions Before Every New Patient
1) Select a suitable Maxi Air mattress size
according to sections “Correct Placement of
the Patient” and ³3URGXFW6SHFL¿FDWLRQV´.
Check that all parts of the Maxi Air is in place.
Compare with the section Parts Designation in
this IFU.
2) Carry out a thorough inspection for any
damage.
3) If any part is missing or damaged - do NOT
use the product!
4) Insert the patient name and date on the
Maxi Air mattress label. See Labels on the
Maxi Air Mattress section.
WARNING
To prevent cross-contamination:
• Never assign the usage of a mattress
to more than one patient.
• Always follow the disinfection
instructions in this Instructions for Use.
Make sure the Maxi Air air supply is disinfected
according to Disinfection Instructions section.
Actions Before Every Transfer (with
same patient)
1) Check that all parts are in place. Compare
with the Parts Designation in this IFU.
2) Carry out a thorough inspection for any
damage.
3) If any part is missing or damaged - do NOT
use the product!
NOTE
If you have any questions, please contact
your local Arjo representative for support and
service. The contact information (Arjo) is
listed on the last page of this IFU.
Head end
Foot end
RightLeft
Preparations
Preparations

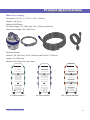
3URGXFW6SHFL¿FDWLRQV 5
Maxi Air air supply
Dimensions: 12,5 x 7 x 7”(317,5 x 178 x 178 mm)
Weight: 11 lb (5 kg)
Material: ABS Plastic
Air Hose Lengths: 78” (1980 mm), 300” (7620 mm) Optional
Power Cord Length: 180” (4570 mm)
Maxi Air mattress
Widths: L 34” (860 mm), XL 39” (990 mm) and XXL 50” (1270 mm)
Length: 78” (1980 mm)
Material: Non-woven top, nylon back
L (Green handles) XL (Blue handles) XXL (Orange handles)
3URGXFW6SHFL¿FDWLRQV
3URGXFW6SHFL¿FDWLRQV

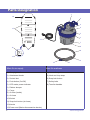
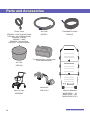
Parts Designation
6
1
2
3
4
5
6
7
16
8
15
9
11
12
17
18
14
10
13
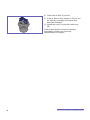
Maxi Air air supply Maxi Air mattress
1) Carrying handle
2) Attachment hooks
3) Socket inlet
4) Push button (On/Off)
5) LED mains power indicator
6) Rubber bumper
7) Cover
8) $LU¿OWHULQVLGH
9) Air hose
10) Socket
11) Snap lock button (air hose)
12) Nozzle
13) Power cord (Mains disconnection device)
14) Connection points
15) Hook and loop strap
16) Snap lock button
17) Safety belts
18) Transfer handles
Parts Designation
Parts Designation

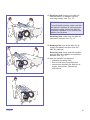
Product Description/Functions 7
Product Description/Functions
Product Description/Functions
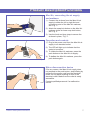
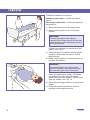
Fig. 1
Maxi Air, connecting the air supply
and mattress
1) Connect the air hose from the Maxi Air air
supply to either the left or right foot end
connection point of the Maxi Air mattress,
see “Fig. 1”.
2) Attach the snap lock button on the Maxi Air
mattress to the air hose snap lock button,
see “Fig. 2”.
3) Use the hook and loop strap to secure the
air hose in place, “Fig. 3”.
Fig. 2
Operation and controls
1) Plug in the power cord from the Maxi Air air
supply to an electrical outlet.
2) The LED will light up to indicate that the
mains is turned on.
3) 7RLQÀDWHWKHMaxi Air mattress, press the
push button on the Maxi Air air supply.
4) 7RGHÀDWHWKHMaxi Air mattress, press the
push button again.
Fig. 3
Mains disconnection device
If for any reason, the Maxi Air air supply does
QRWUHVSRQGWRWKHSXVKEXWWRQVWRSLQÀDWLQJE\
pulling out the power cord from the electrical
outlet. Do not place anything in front of the
electrical outlet. Make sure the outlet is easily
accessible.
&RQWDFWTXDOL¿HGSHUVRQQHOLIDPDOIXQFWLRQ
occurs.

Correct Placement of the Patient
8
Correct Placement of the Patient
Correct Placement of the Patient
WARNING
Always make sure the patient has the correct size of the Maxi Air mattress. If the Maxi Air
mattress is too narrow, the Maxi Air mattress can tip over during transfer causing serious injuries
to the patient and the caregivers
.
WARNING
To avoid bodily injuries, make sure the patient is correctly positioned on the Maxi Air mattress. If
the patient is incorrectly positioned, the Maxi Air mattress can tip over during the transfer.
Placement of the patient
• The patient safe working load (SWL) of the Maxi Air mattress is 1200 lb / 544 kg. When
using allowed mattresses other than Maxi Air mattress, observe.
• Make sure the patient’s body does NOT reach outside the boundaries of the Maxi Air
mattress. If the feet extend beyond the foot end, make sure there is enough space for the
transfer, see “Fig. 5”.
• The patient’s head should be placed approximately 6” (150 mm) from the top of the Maxi Air
mattress. Make sure the patient rests comfortably against the pillow during the transfer, see
“Fig. 6”.
Fig. 4 Fig. 5 Fig. 6

Correct Placement of the Maxi Air air supply 9
Correct Placement of the
Correct Placement of the
Maxi Air
Maxi Air
air supply
air supply
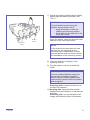
Fig. 7
Placement of the Maxi Air air supply
• Hang the Maxi Air air supply on the
receiving surface by the attachment
hooks. Make sure it is secured from
movement and from falling down, see
“Fig. 7”.
• Make sure the Maxi Air air supply is not
placed in front of the electrical outlet that
is being used.
• 0DNHVXUHWKHSRZHUFRUGRQWKHÀRRULV
rolled up.
Fig. 8
Placement of the Maxi Air air supply
with Extended Hose (optional)
If the lateral transfer can not be made outside
the MR (Magnetic Resonance) environment, the
extended hose is intended to be used. The
extended hose enables a lateral transfer of a
patient to the MR equipment, with the Maxi Air
air supply at a safe distance.
WARNING
To avoid bodily injuries to the patient, make
sure to place the Maxi Air air supply outside
the MR environment (A), see”Fig. 8”.
NOTE
The safety buckles on the Maxi Air mattress
should be placed to the sides during an MR
scan to prevent them from creating shadows
on the MR image.
WARNING
Before every transfer, always make sure the Maxi Air air supply is:
• Secured from movement and from falling.
• Not in the way of the electrical outlet in use.
• 1RWSODFHGRQWKHÀRRU
An incorrectly placed Maxi AirDLUVXSSO\FDQFDXVHKD]DUGVHJLQWHUUXSWHGLQÀDWLRQ7KLVFDQ
cause serious injuries to the patient and the caregivers.
WARNING
7RDYRLGWULSSLQJKD]DUGVPDNHVXUHWKDWWKHSRZHUFRUGRQWKHÀRRULVUROOHGXSEHIRUHWKH
transfer.

Transfer
10
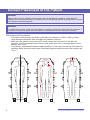
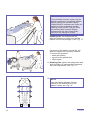
Fig. 9
Transfer between surfaces
Sending surface/side = surface the patient
lays on
Receiving surface/side = surface the patient is
transferred to
1) Apply the brakes on the sending surface.
2) Make sure the patient is in a horizontal
position.
WARNING
To avoid the patient from falling or
caregiver from being injured, ensure that
there are two or more caregivers present
during the transfer.
Position one caregiver on each side of the
patient, see “Fig. 9”.
3) Place the Maxi Air mattress with the labels
upwards, underneath the patient. Follow
local routines.
4) Make sure the patient is correctly placed on
the Maxi Air mattress.
Fig. 10
WARNING
To prevent patient from rolling off the
Maxi Air mattress, the safety belts must
be used during the entire movement.
Attach the safety belts loosely. If the belts
are attached too tight, they can cause
GLVFRPIRUWGXULQJWKHLQÀDWLRQ7LJKWHQWKHP
DIWHUWKHLQÀDWLRQVHH“Fig. 10”
5) Adjust the receiving surface to an ergonomic
height.
6) Place the receiving surface as close as
possible to the sending surface
Transfer
Transfer

Transfer 11
Fig. 11
7) Adjust the sending surface height slightly
higher than the receiving surface, see
“Fig. 11”.
WARNING
To avoid bodily injuries during the
transfer, always make sure to:
• Apply the brakes on both the
sending and receiving surface.
• Raise and lock the bed rail on the
receiving surface.
Apply the brakes, raise and lock the outer
bed rail on the receiving surface.
NOTE
If the receiving surface does not have
any bed rail, the caregiver on the
receiving side is responsible to make
sure the patient does not reach outside
the boundaries of the receiving surface.
8) Hang the Maxi Air air supply on the
receiving surface.
9) Plug the power cord into an electrical
outlet.
WARNING
7RDYRLGVXGGHQGHÀDWLRQPDNHVXUH
the air hose is properly connected
EHIRUHWUDQVIHU6XGGHQGHÀDWLRQFDQ
cause bodily injuries to both the patient
and caregivers.
Receiving side: connect the air hose to
the Maxi Air mattress.
10) Sending side¿UPO\KROGWKHWUDQVIHU
KDQGOHVGXULQJWKHLQÀDWLRQRIWKHMaxi Air
mattress.
Receiving side: turn on the Maxi Air air
VXSSO\DQGLQÀDWHWKHMaxi Air mattress.
Receiving
surface
Sending
surface

Transfer
12
Fig. 12
Fig. 13
Fig. 14
WARNING
To avoid bodily injuries, make sure the
Maxi AirPDWWUHVVLVFRPSOHWHO\LQÀDWHG
before starting the transfer. A partly
LQÀDWHGMaxi Air mattress can cause the
patient to hit the underlying surface,
causing bodily injuries. The pull force
ZLOOLQFUHDVHZLWKDSDUWLDOLQÀDWHG
mattress and this can cause bodily
injuries to the caregiver as well.
Sending side: feel underneath the
Maxi Air mattress to make sure that the
patient can’t be felt through it, see “Fig. 12”
If any part of the patient can be felt, the
Maxi AirPDWWUHVVLVRQO\SDUWO\LQÀDWHG
To correct this problem:
• DERUWWKHLQÀDWLRQ
• reposition the patient and
• LQÀDWHDJDLQ
11) Sending side: tighten the safety belts and
push the Maxi AirPDWWUHVV¿UPO\WRZDUGV
the receiving surface, see “Fig. 13”.
12)
NOTE
Use the transfer handles that are
closest to the widest parts of the
patient’s body, see “Fig. 14”.

Transfer 13
Fig. 15
Fig. 16
Fig. 17
13) Receiving side: meet up the Maxi Air
mattress when it is halfway over the
receiving surface, see “Fig. 15”.
WARNING
To avoid bodily injuries, make sure that
the Maxi Air mattress is centred on the
receiving surface, before the Maxi Air
PDWWUHVVLVGHÀDWHG,IQRWFHQWUHGWKH
patient can fall down.
Receiving side: make sure the Maxi Air
mattress is centred, see “Fig. 16”.
14) Sending side: turn off the Maxi Air air
supply and detach the hose from the
Maxi Air mattress.
Receiving side¿UPO\KROGWKHKDQGOHV
until the Maxi Air mattress is completely
GHÀDWHGVHH“Fig. 17”.
15) After the transfer is completed:
• unbuckle the safety belts,
• lock all side rails (if possible) and
• remove and disinfect the Maxi Air air
supply, see section “Disinfection
Instructions”.

Disinfection Instructions
14
Disinfection Instructions
Disinfection Instructions
WARNING
Do NOT wash the Maxi Air mattress! The
Maxi AirPDWWUHVVLVDSDWLHQWVSHFL¿FSURGXFW
and is not intended for use between patients.
If the Maxi Air mattress is washed, the paper
coating will disappear, revealing a DO NOT
REUSE sign.
WARNING
To prevent cross-contamination, always
follow the disinfection instructions in this
Instructions for Use.
WARNING
To avoid eye and skin damage, always use
protective glasses and gloves.
If contact occurs rinse with plenty of water. If
eyes or skin becomes irritated, contact a
physician. Always read the material safety
data sheet of the disinfectant.
WARNING
To avoid eye or skin irritation, never disinfect
in the presence of a patient.
CAUTION
To avoid damage on the equipment only use
Arjo branded disinfectants.
CAUTION
Do not lower down the Maxi Air air supply in
disinfectant solution. This could damage the
electrical components and cause internal
corrosion.
For the best results, only use Arjo
branded disinfectant.
If you have any questions regarding disinfecting
WKHHTXLSPHQWRUZLVKWRRUGHUGLVLQIHFWLRQÀXLG
(see section Parts and Accessories), contact
your local Arjo representative.
Accessories for disinfecting the
Maxi Air air supply
• Protective glasses
• Protective gloves
• 6SUD\ERWWOHZLWKFOHDQLQJÀXLGGHWHUJHQW
and disinfectant)
• Spray bottle with water
• Cloths – Wet and Dry
• Disposable Towles
• Soft bristled brush
Cleaning/Disinfection method
Step 1 – Removing visual residue
1) Disconnect the air supply from the power
supply and the air hose from the Maxi Air
mattress.
2) Remove the air hose from the air supply.
3) Plug the air outlet of the air supply with a
cloth or a disposable towel to prevent
PRLVWXUHZDWHUFOHDQLQJÀXLGWRHQWHUWKHDLU
supply.
4) Clean the air supply and hose from visible
residue using a cloth or soft brush soaked in
water alt. Spray with water and wipe with a
clean cloth. Start from top and move
downwards.

Disinfection Instructions 15
Step 2 - Cleaning
1) 6SUD\FOHDQLQJÀXLGRQDLUVXSSO\8VHD
brush or a cloth if need for cleaning (to
remove any deposits).
2) Use a new wet cloth to wipe off all traces of
FOHDQLQJÀXLGRULIPRUHVXLWDEOHE\VSUD\LQJ
water and wipe with a clean cloth. The cloth
should occasionally be rinsed in running
ZDWHUZKHQUHPRYLQJFOHDQLQJÀXLG
3) Roll up the air hose and lower it down into
FOHDQLQJÀXLG6FUXEWKHKRVHZLWKDEUXVK
4) Rinse the air hose with water (approx. 25°C)
WRUHPRYHFOHDQLQJÀXLG
5) ,IFOHDQLQJÀXLGFDQQRWEHUHPRYHGLQVWHS
2.2 and step 2.4 spray water on the affected
part and wipe off with disposable towels/
FORWK5HSHDWXQWLODOORIWKHFOHDQLQJÀXLG
has been removed.
Step 3 - Disinfection
1) 6SUD\FOHDQLQJÀXLGRQWKHDLUVXSSO\
2) Allow a disinfection time according to the
instructions on the disinfectant bottle label.
3) Roll up the air hose and lower it down into
QHZFOHDQLQJÀXLG
4) Allow a disinfection time according to the
instructions on the disinfectant bottle label
5) Use a new wet cloth to wipe off all traces of
FOHDQLQJÀXLGRQWKHDLUVXSSO\RULIPRUH
suitable by spraying water and wipe with a
clean cloth. The cloth should occasionally be
rinsed in running water when removing
FOHDQLQJÀXLG
6) Rinse the air hose with water (approx. 25°C)
WRUHPRYHFOHDQLQJÀXLG
7) ,IFOHDQLQJÀXLGFDQQRWEHUHPRYHGLQVWHS
3.5 and step 3.6 spray water on the affected
part and wipe off with disposable towels/
FORWK5HSHDWXQWLODOORIWKHFOHDQLQJÀXLG
has been removed.
8) Let the air supply dry.
9) Hang the air hose to drain water and air-dry.

Care and Preventive Maintenance
16
Care and Preventive Maintenance
Care and Preventive Maintenance
The Maxi Air system is subject to wear and tear, and the following actions must be performed to
PDNHVXUHWKDWWKHSURGXFWUHPDLQVZLWKLQLWVRULJLQDOPDQXIDFWXULQJVSHFL¿FDWLRQ
WARNING
To avoid malfunction resulting in injury, make sure to conduct regular inspections and follow the
recommended maintenance schedule. In some cases due to heavy use of the product and
exposure to aggressive environment more frequent inspections should be carried out. Local
regulations and standards may be more stringent than the recommended maintenance
schedule.
WARNING
Never proceed to maintenance or service while in use with a patient.
WARNING
To avoid injury to both patient and caregiver, never modify the equipment or use incompatible
parts.
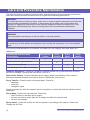
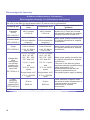
Preventive maintenance schedule for Maxi Air air supply and the Maxi Air
mattress.
CAREGIVER OBLIGATIONS
Action/Check
Before Each
Patient
Every
Transfer
Every
Week
Every
Month
Disinfect (only the Maxi Air air supply)
3
Visually check all exposed parts
3
Perform functionality test
3
&KHFNFKDQJHWKHDLU¿OWHUDFFRUGLQJO\
3
Caregiver Obligations : &DUHJLYHUREOLJDWLRQVVKDOOEHFDUULHGRXWE\SHUVRQQHOZLWKVXI¿FLHQW
Maxi Air knowledge, following the instructions in this IFU.
Before Each Patient : Disinfect the Maxi Air air supply. Make sure the Maxi Air air supply is
disinfected between patients according to section “Disinfection Instructions”.
Every Transfer : Visually check all exposed parts. Check for;
• damages,
• tears and
• unhygienic signs.
Check especially the Maxi Air mattress since it has been in contact with both the patient and the
caregivers.
Every Week : Perform functionality test. Check the;
• on/off function of the Maxi Air air supply,
• air hose connection at the Maxi Air air supply and Maxi Air mattress and
• air hose for damage.
Every month : &KHFNWKHDLU¿OWHUIRUGLUWDQGUHSODFHLWDFFRUGLQJO\6HHVHFWLRQ“Check and
Change the Air Filter”.
La page est en cours de chargement...
La page est en cours de chargement...
La page est en cours de chargement...
La page est en cours de chargement...
La page est en cours de chargement...
La page est en cours de chargement...
La page est en cours de chargement...
La page est en cours de chargement...
La page est en cours de chargement...
La page est en cours de chargement...
La page est en cours de chargement...
La page est en cours de chargement...
La page est en cours de chargement...
La page est en cours de chargement...
La page est en cours de chargement...
La page est en cours de chargement...
-
 1
1
-
 2
2
-
 3
3
-
 4
4
-
 5
5
-
 6
6
-
 7
7
-
 8
8
-
 9
9
-
 10
10
-
 11
11
-
 12
12
-
 13
13
-
 14
14
-
 15
15
-
 16
16
-
 17
17
-
 18
18
-
 19
19
-
 20
20
-
 21
21
-
 22
22
-
 23
23
-
 24
24
-
 25
25
-
 26
26
-
 27
27
-
 28
28
-
 29
29
-
 30
30
-
 31
31
-
 32
32
-
 33
33
-
 34
34
-
 35
35
-
 36
36


Arjo Maxi Air Instructions For Use Manual
- Taper
- Instructions For Use Manual
dans d''autres langues
- English: Arjo Maxi Air
Documents connexes
Autres documents
-
Apex Digital Pro-care 2 Manuel utilisateur
-
-
Arjohuntleigh MaxiSlide Operating And Product Care Instructions
-
Beta 1467LF/2 Mode d'emploi
-
Generic TR 125 Manuel utilisateur
-
Stryker 2872 Manuel utilisateur
-
EMS AirFlow Master Operating Instructions Manual
-
-
 Immedia 4WayGlide LPL Maxi Manuel utilisateur
-
Drive Harmony 14200 Le manuel du propriétaire
