Sony CSS-TNA Manuel utilisateur
- Catégorie
- Imprimantes d'étiquettes
- Taper
- Manuel utilisateur

2-634-266-12(1)
Cyber-shot Station
2005 Sony Corporation
CSS-TNA
Operating Instructions
GB
FR
Mode d’emploi

2-GB
English
Before operating the product, please read this manual thoroughly and retain it for future reference.
WARNING
To prevent fire or shock hazard, do not expose the unit to
rain or moisture.
For Customers in the U.S.A.
This symbol is intended to alert the user to the presence of uninsulated
“dangerous voltage” within the product’s enclosure that may be of sufficient
magnitude to constitute a risk of electric shock to persons.
This symbol is intended to alert the user to the presence of important operating
and maintenance (servicing) instructions in the literature accompanying the
appliance.
If you have any questions about this product, you may call:
Sony Customer Information Services Center 1-800-222-SONY (7669)
The number below is for the FCC related matters only.
Regulatory Information
Declaration of Conformity
Trade Name: SONY
Model No.: CSS-TNA
Responsible Party: Sony Electronics Inc.
Address: 16450 W. Bernardo Dr, San Diego, CA 92127 U.S.A.
Telephone No.: 858-942-2230
This device complies with Part 15 of the FCC Rules. Operation is subject to the following two
conditions: (1) This device may not cause harmful interference, and (2) this device must
accept any interference received, including interference that may cause undesired operation.

3-GB
CAUTION
You are cautioned that any changes or modifications not expressly approved in this manual could
void your authority to operate this equipment.
Note:
This equipment has been tested and found to comply with the limits for a Class B digital device,
pursuant to Part 15 of the FCC Rules. These limits are designed to provide reasonable protection
against harmful interference in a residential installation. This equipment generates, uses, and can
radiate radio frequency energy and, if not installed and used in accordance with the instructions,
may cause harmful interference to radio communications. However, there is no guarantee that
interference will not occur in a particular installation. If this equipment does cause harmful
interference to radio or television reception, which can be determined by turning the equipment
off and on, the user is encouraged to try to correct the interference by one or more of the following
measures:
– Reorient or relocate the receiving antenna.
– Increase the separation between the equipment and receiver.
– Connect the equipment into an outlet on a circuit different from that to which the receiver is
connected.
– Consult the dealer or an experienced radio/TV technician for help.
The supplied interface cable must be used with the equipment in order to comply with the limits
for a digital device pursuant to Subpart B of Part 15 of FCC Rules.
Notice on the supplied AC Adaptor for customers in the
United Kingdom
A moulded plug complying with BS1363 is fitted to this equipment for your safety and
convenience.
Should the fuse in the plug supplied need to be replaced, a fuse of the same rating as the supplied
one and approved by ASTA or BSI to BS1362, (i.e., marked with
or mark) must be used.
If the plug supplied with this equipment has a detachable fuse cover, be sure to attach the fuse
cover after you change the fuse. Never use the plug without the fuse cover. If you should lose the
fuse cover, please contact your nearest Sony service station.
For Customers in Europe
This product has been tested and found compliant with the limits sets out in the EMC Directive for
using connection cables shorter than 3 meters (9.8 feet).
Attention
The electromagnetic field at the specific frequencies may influence the picture and sound of the
camera used with this Cyber-shot Station.
Notice
If static electricity or electromagnetism causes data transfer to discontinue midway (fail), restart
the application or disconnect and connect the communication cable (USB, etc.) again.

4-GB
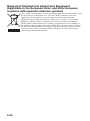
Disposal of Old Electrical & Electronic Equipment
(Applicable in the European Union and other European
countries with separate collection systems)
This symbol on the product or on its packaging indicates that this product shall
not be treated as household waste. Instead it shall be handed over to the
applicable collection point for the recycling of electrical and electronic
equipment. By ensuring this product is disposed of correctly, you will help
prevent potential negative consequences for the environment and human
health, which could otherwise be caused by inappropriate waste handling of
this product. The recycling of materials will help to conserve natural resources.
For more detailed information about recycling of this product, please contact
your local Civic Office, your household waste disposal service or the shop
where you purchased the product.

5-GB
Table of contents
Notes on using the Cyber-shot Station ............................................................................ 6
Features ................................................................................................................................ 7
Trademarks .......................................................................................................................... 7
Identifying the parts ...........................................................................................................8
Set up .................................................................................................................................... 9
Placing the camera on the Cyber-shot Station .............................................................. 10
Removing the camera from the Cyber-shot Station .................................................... 10
Charging the battery pack ................................................................................................ 11
Viewing images on a TV screen ...................................................................................... 12
Slide Show ......................................................................................................................... 12
Printing still images ......................................................................................................... 13
Connecting the camera to your computer via the Cyber-shot Station ..................... 14
Care and maintenance ..................................................................................................... 14
Changing the battery of the Remote Control ............................................................... 14
Troubleshooting ................................................................................................................ 15
Specifications ..................................................................................................................... 17

6-GB
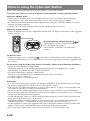
Notes on using the Cyber-shot Station
Refer to the operating instructions for your camera as well as this manual.
The Cyber-shot Station is not a dust-proofed, moist-proofed, or water proofed product.
About the Adaptor plate:
• Three types of Adaptor plates are included with the Cyber-shot Station. By changing the
Adaptor plates, the Cyber-shot Station allows you to attach three types of cameras.
• Be sure to attach the designated Adaptor plate before using the Cyber-shot Station, or it may
damage the multi connector.
• All the Cyber-shot Station images illustrate the Adaptor plate for DSC-N1.
About the remote control:
• There are buttons that are only compatible with the DSC-N1 digital still camera on the supplied
remote control.
For DSC-N1 users:
• While the camera is set to “Housing
”, the buttons on the remote control operates different
from the normal functions. For further details, refer to the operating instructions supplied with
the camera.
Do not use or keep the Cyber-shot Station in locations subject to the following conditions:
• Locations with extremes of temperature
The temperature in closed automobiles during summer may be extremely hot, causing
deformation or malfunction of the Cyber-shot Station.
• Locations under direct sunlight or near heaters
This may cause deformation or a malfunction of the Cyber-shot Station.
• Locations subject to vibration
• Locations subject to strong magnetism
Precautions:
• Use the nearest wall outlet to get the AC Adaptor plugged in. If any malfunctions occur using
the product, unplug the AC Adaptor to cut off the power source.
• The set is not disconnected from the AC power source (mains) as long as it is connected to the
wall outlet, even if the set itself has been turned off.
• Do not use the AC Adaptor placed in a narrow space, such as between a wall and furniture.
• Do not use the Cyber-shot Station in locations that are subject to strong radio waves or radiation.
Images may not be played back properly.
• Avoid other metalic objects to contact with the connecting parts of the Cyber-shot Station and
the power cord. It may cause a short circuit.
• Recording contents cannot be compensated for if playback is not possible due to damaged
“Memory Stick Duo”, a malfunction of your camera or the Cyber-shot Station, etc.
• Do not attempt to connect the supplied USB cable to the multi connector on the bottom of the
camera. It may cause a malfunction due to the damage of the multi connector.
• The screw hole on the bottom of the Cyber-shot Station is for retail display only.
Image back/Image forward buttons ( / )
These buttons are only compatible with the
DSC-N1 digital still camera.
These buttons cannot be used with other
cameras.

7-GB
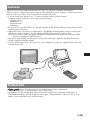
Features
The CSS-TNA can be used with the DSC-N1, DSC-T9, and DSC-T5 digital still cameras.
When you place a digital still camera (here in after referred to as the “camera”) on the Cyber-shot
Station, you can use the Cyber-shot Station in the following way.
• You can easily view images on a TV screen with the wireless remote control.
Using the remote control, you can operate the followings:
– Viewing images
– Slide Show
– Playback zoom
– Trimming
• You can easily start Slide Show by only pressing the SLIDE SHOW button on the remote control
or the Cyber-shot Station.
• When the Cyber-shot Station is connected to a PictBridge enabled printer, you can easily print
still images shown on the TV by pressing the PRINT button on the remote control.
Note: If you want to print one of the still images during Slide Show playback, cancel the Slide
Show first, then press PRINT button.
• The Cyber-shot Station can charge the battery pack inside the camera faster than the battery
charger supplied with the camera.
• You can connect the Cyber-shot Station to your computer by using the supplied USB cable and
transfer image data.
Trademarks
• and “Cyber-shot Station” are trademarks of Sony Corporation.
• “Memory Stick Duo” is a trademark of Sony Corporation.
• In addition, system and product names used in this manual are, in general, trademarks or
registered trademarks of their respective developers or manufacturers. However, the
TM
or ®
marks are not used in all cases in this manual.

8-GB
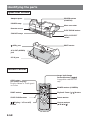
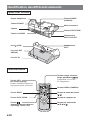
Identifying the parts
Cyber-shot Station
Remote Control
A
d
aptor p
l
ate
POWER
l
amp
Remote sensor
CHARGE
l
amps
POWER
b
utton
(CAMERA)
Mu
l
t
i
connector
SLIDE SHOW
b
utton
DISPLAY SELECT
switch
(
USB
)
j
ac
k
A/V OUT
(
MONO
)
jack
DC IN
j
ac
k
EJECT sw
i
tc
h
SLIDE SHOW
b
utton
PRINT
b
utton
(Display / LCD on/off)
button
Image
b
ac
k/
Image
forward buttons ( / )
POWER
b
utton
(
CAMERA
)
Playback Zoom ( / ) button
De
l
ete
b
utton
Contro
l
b
uttons
(v/V/b/B/ )
OSD
b
utton
(On Screen Display)
Displays Menu or Touch panel
on screen.
Compatible with DSC-N1
only.

9-GB
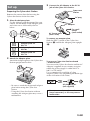
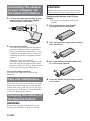
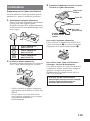
3 Connect the AC Adaptor to the DC IN
jack of the Cyber-shot Station.
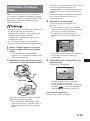
To remove the Adaptor plate
Slide the EJECT switch on the Cyber-shot
Station (1) and lift the Adaptor plate upright
(2).
To use your Cyber-shot Station abroad
- Power sources
You can use the Cyber-shot Station and the AC
Adaptor (supplied) in any country or region
where the power supply is within 100 V to
240 V AC 50/60 Hz.
Use a commercially available AC plug
adaptor, if necessary, depending on the design
of the wall outlet (wall socket).
Do not use an electronic transformer
(travel converter), as this may cause a
malfunction.
Set up
Preparing the Cyber-shot Station
Remove the caution sheet before using the
Cyber-shot Station for the first time.
1 Select the Adaptor plate.
Use the Adaptor plate designated for your
camera. See the mark on the Adaptor plate
and select one as followed by the list
below.
Adaptor plate for
DSC-T5
Adaptor plate for
DSC-N1
Adaptor plate for
DSC-T9
2 Attach the Adaptor plate.
Attach the Adaptor plate to the Cyber-shot
Station upright until it clicks.
– Be sure to attach the designated Adaptor
plate before using the Cyber-shot
Station.
– Using the Cyber-shot Station without
attaching the Adaptor plate may cause a
malfunction.
AC plug adaptor
(not supplied)
To a wall
outlet
(wall socket)
Cy
b
er-s
h
ot
Station
DC p
l
ug
AC A
d
aptor
AC Power cor
d
(mains lead)

10-GB
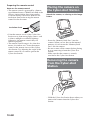
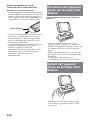
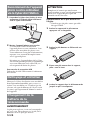
Placing the camera on
the Cyber-shot Station
Attach the camera, as refering to the image
below.
– Insert the “Memory Stick Duo” into the
camera. When you use data in the internal
memory, do not insert the “Memory Stick
Duo” into the camera.
– Be sure to turn off the camera before placing
it on or removing it from the Cyber-shot
Station.
– Make sure that the camera is securely
attached to the Cyber-shot Station.
Removing the camera
from the Cyber-shot
Station
– Hold the Cyber-shot Station down when you
remove the camera from the Cyber-shot
Station.
Insulation sheet
Preparing the remote control
Notes on the remote control
• The remote control is powered by a button
type lithium battery (CR2025) installed at the
factory. An insulation sheet is inserted to
avoid the battery exhaustion. Remove the
insulation sheet before using the remote
control for the first time.
• Point the remote sensor of the Cyber-shot
Station away from strong light sources such
as direct sunlight or overhead lightings.
Otherwise, the remote control may not
function properly.
• The remote control range is less than five
meters (for indoor use). Point the remote
control at the remote sensor of the Cyber-
shot Station. Try adjusting the angle of the
remote control if you cannot operate the
Cyber-shot Station.

11-GB
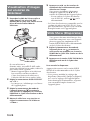
Charging temperature
The temperature range for charging is 0 °C
to +40 °C (+32 °F to +104 °F). However, to
provide maximum battery efficiency, the
recommended temperature range when
charging is +10 °C to +30 °C (+50 °F to
+86 °F).
On battery life
• The battery life is limited. Battery capacity
decreases little by little as you use it more
and more, and as time passes. If the battery
operating time seems shortened
considerably, a probable cause is that the
battery pack has reached the end of its life.
Buy a new battery pack.
• The battery life varies according to how it is
stored and the operating conditions and
environment in which each battery pack is
used.
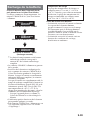
Charging the battery
pack
Place the camera with the battery pack
inserted on the Cyber-shot Station.
Charging starts automatically. The CHARGE
lamps of the Cyber-shot Station light up.
* Recording and playback time with Normal
charge
is
approximately
90% of Full
charge.
• The CHARGE lamps light up from the left.
• The battery level will be displayed in three
levels on the CHARGE lamps of the Cyber-
shot Station while charging the battery pack.
When charging is completed (Full charge),
the CHARGE lamps go off.
After the battery pack is completely used, the
full-charge time of the battery pack is
approximately 230 minutes with the DSC-
N1, and 160 minutes with the DSC-T9 and
the DSC-T5 at the temperature of +25 °C
(+77 °F). It may take longer to charge,
depending on the charging condition and
environment.
– When the camera is turned on, the Cyber-
shot Station stops charging the battery.
• It may take a few seconds to indicate an
accurate battery level.
• In case of the CHARGE lamps fail to light or
blink, refer to “Troubleshooting”.
Battery level: LOW
Battery level: MIDDLE
Battery level: HIGH
(Normal charge)

12-GB
Slide Show
You can playback a series of still images and
movies recorded with your camera by only
pressing the SLIDE SHOW button on the
remote control or the Cyber-shot Station.
1 Set the mode switch of the camera to
, and turn on the power by pressing
the POWER button on the Cyber-shot
Station or the remote control.
2 Press the SLIDE SHOW button on the
remote control or the Cyber-shot
Station.
To cancel Slide Show
Press the SLIDE SHOW button on the remote
control or the Cyber-shot Station again.
• You can change the settings of Slide Show
([Interval], [Image], and [Repeat] etc.) with
the settings on the camera. For further
details, refer to the operating instructions
supplied with the camera.
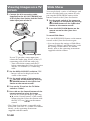
Viewing images on a TV
screen
1 Connect the A/V connecting cable
(supplied) to the A/V OUT (MONO) jack
of the Cyber-shot Station and the audio/
video input jacks of the TV.
If your TV provides stereo input jacks,
connect the audio plug (black) of the A/V
connecting cable to the left audio jack.
– Turn off both the camera and the TV
before connecting the Cyber-shot Station
and the TV with the A/V connecting
cable.
2 Set the DISPLAY SELECT switch to “TV”.
– Images will not be displayed on the
screen of the camera.
3 Set the mode switch of the camera to
, and turn on the power by pressing
the POWER button on the Cyber-shot
Station or the remote control.
4 Turn on the TV and set the TV/Video
switch to “Video”.
5 Press b/B on the Control buttons of the
remote control to select the image.
You can also select the image by pressing
b/B on the Control buttons of the camera.
– When using the Cyber-shot Station with
the DSC-N1, use
/ on the remote
control.
– The Cyber-shot Station is compatible with
both NTSC and PAL TV systems. For further
details, see the operating instructions
supplied with the camera.
A/V connect
i
ng ca
bl
e

13-GB
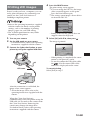
Printing still images
Even if you do not have a computer, you can
easily print still images by connecting your
camera via the Cyber-shot Station to a
PictBridge compliant printer.
• Refer to the operating instructions supplied
with the camera for details on the printer
settings, such as the number of printing
images, paper size, and USB setting.
• The available print functions may differ
depending on the printer.
1 Turn on your camera.
2 Set the USB mode on your camera.
– For further details, refer to the operating
instructions supplied with the camera.
3 Connect the Cyber-shot Station to your
printer by using the supplied USB cable.
After the connection is established, the
image select screen appears.
* About the image select, refer to the
operating instructions supplied with the
camera.
When the Cyber-shot Station is
communicating with your printer using the
USB cable, do not remove the camera from
the Cyber-shot Station. Removing the
camera may damage the image data.
For further details, refer to the operating
instructions supplied with the camera.
4 Press the PRINT button.
The print setting screen appears.
* If you are using the DSC-N1, the image
select screen disappears at this point.
Press the Print button again.
* The setting screen images shown below
are from the DSC-N1.
– Setting items that the printer does not
support cannot be displayed.
5 Select [OK] with V/B, then press .
The image is printed.
– When printing is completed, the screen
returns to the previous screen.
– Do not disconnect the USB cable while
the
(Not disconnect USB cable)
indicator is displayed on the screen.
To cancel printing
Select [Exit] in step 5.
USB ca
bl
e
Print
Quantity
1
Date
Off
Size
Default
OK
Printing
Exit

14-GB
Connecting the camera
to your computer via
the Cyber-shot Station
1 Connect the Cyber-shot Station to your
computer by the USB cable supplied
with the Cyber-shot Station.
2 Turn on your camera.
The USB connection between the camera
and your computer will be established.
Then you can transfer image data to your
computer. For further details, refer to the
operating instructions supplied with the
camera.
When the Cyber-shot Station is
communicating with your computer using
the USB cable, do not remove the camera
from the Cyber-shot Station. Removing the
camera may damage the image data.
To cancel the USB connection
Disconnect the USB cable or turn off the
computer.
Care and maintenance
Clean the Cyber-shot Station with a soft cloth
slightly moistened with water, and wipe the
surface with a dry cloth. Do not use any type
of solvent such as thinner, alcohol or benzine
as this may damage the surface.
Changing the battery of
the Remote Control
WARNING
Battery may explode if mistreated. Do not
recharge, disassemble, or dispose of in fire.
CAUTION
Replace the battery with the specified type
only. Otherwise, fire or injury may result.
Replacing the button type lithium
battery
* Do not use any batteries other than
CR2025.
1 Pull out the battery holder while
pushing the tab on the holder.
2 Take out the button type lithium battery
from the holder.
3 Put a new battery into the holder with
its + side facing upward.
4 Insert the holder into the remote control
until it clicks.

15-GB
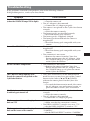
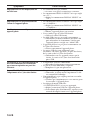
Troubleshooting
If any problems occur with your products, refer to the following solutions.
If the problem persists, contact your Sony dealer.
Symptom
Unable to charge the battery pack
(when the CHARGE lamps fail to light)
One of the CHARGE lamps blinks
All the CHARGE lamps blink
The CHARGE lamps light up even
though the camera is not placed on the
Cyber-shot Station
Unable to turn on the camera, or
it suddenly gets turned off
The images/sounds cannot be played
back on a TV
The images/sounds cannot be played
back on the screen of the camera
Cause/Solution
• The camera is turned on.
t Turn the camera off.
• The AC Adaptor is disconnected.
t Connect the AC Adaptor properly.
• The camera is not placed on the Cyber-shot Station
correctly.
t Place the camera correctly.
• The battery pack is not installed correctly.
t Install the battery pack correctly.
• The battery pack is completely charged.
• The battery pack installed into the camera is
inapplicable.
t Install the battery pack compatible with your
camera.
• The battery pack installed into the camera is
inapplicable.
t Install the battery pack compatible with your
camera.
• The connection is not correct.
t Remove the camera from the Cyber-shot
Station and reconnect the AC Adaptor. After
the CHARGE lamps go off, place the camera
on the Cyber-shot Station.
• The connection is not correct.
t Remove the camera from the Cyber-shot
Station and reconnect the AC Adaptor. After
the CHARGE lamps go off, place the camera
on the Cyber-shot Station.
• The Cyber-shot Station is in the demonstration
mode because you may have pressed the Control
buttons in the order of v/b/V/B/POWER,
without the camera placed on the Cyber-shot
Station.
t To cancel the demonstration mode, discconect
the AC Adaptor once and connect it again, or
place the camera on the Cyber-shot Station.
• The camera is not placed on the Cyber-shot Station
correctly.
t Place the camera correctly.
• The AC Adaptor is disconnected.
t Connect the AC Adaptor properly.
• The connection is not correct.
t Make sure that the connection is correct.
• The DISPLAY SELECT switch is not set to “TV”.
t Set the DISPLAY SELECT switch to “TV”.
• The DISPLAY SELECT switch is not set to
“CAMERA”.
t Set the DISPLAY SELECT switch to “CAMERA”.

16-GB
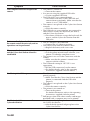
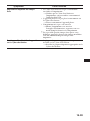
Symptom
Your computer does not recognize the
camera
Buttons on the Cyber-shot Station or
the remote control do not work, and no
operations can be performed
The connection between the printer
and the Cyber-shot Station cannot be
established
Unable to print still images
Unable to attach the camera on the
Cyber-shot Station
Cause/Solution
• The camera is turned off.
t Turn on the camera.
• You are not using the supplied USB cable.
t Use the supplied USB cable.
• The USB cable is not connected firmly.
t Disconnect both ends of the USB cable and
connect them again firmly. Make sure that the
camera is set to “USB Mode”.
• The camera is not placed on the Cyber-shot Station
correctly.
t Place the camera correctly.
• The USB jacks on your computer are connected to
other devices besides the keyboard, the mouse,
and the Cyber-shot Station.
t Disconnect all devices except the keyboard, the
mouse, and the Cyber-shot Station from the
USB jacks.
• The AC Adaptor is disconnected.
t Connect the AC Adaptor properly.
• The battery in the remote control is dead.
t Replace the battery with a new one.
• The printer may not be PictBridge-compliant.
t Ask the printer manufacturer whether your
printer is PictBridge-compliant or not.
• The printer is not set for the connection with the
camera.
t Make sure that the printer is turned on to
connect with the camera.
• The USB mode setting in “SET UP” is not
appropriate.
t Set the [USB connection] on the camera.
t For further details, refer to the operating
instructions supplied with the camera.
• The Cyber-shot Station is not connected to the
printer properly.
t Make sure that the Cyber-shot Station and the
printer is connected with the USB cable
properly.
• The camera is not placed on the Cyber-shot Station
correctly.
t Place the camera correctly.
• The printer is not turned on.
t Turn on the printer.
For further infomation, refer to the operating
instructions supplied with the printer.
* Still images taken with other cameras and images
modified with a computer may not be printed.
• The designated Adaptor plate is not attached to
the Cyber-shot Station.
t Attach the designated Adaptor plate to the
Cyber-shot Station.

17-GB
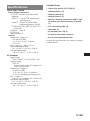
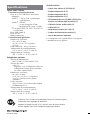
Specifications
Cyber-shot Station
Input/Output connectors
A/V OUT (MONO) jack (Monaural)
Minijack
Video
*:1 Vp-p, 75 Ω, unbalanced,
sync negative
Audio
*: 327 mV (47 kΩ loaded)
Output impedance: 2.2 kΩ
* When DSC-N1/DSC-T9/DSC-T5 is
connected.
USB jack: mini-B
DC IN jack
Multi connector
General
Dimensions (Approx.):
113 × 43 × 73 mm
(4 1/2 × 1 3/4 × 2 7/8 inches)
(w/h/d)
Mass (Approx.): 100 g (3.6 oz)
Operating temperature:
0 °C to +40 °C (+32 °F to +104 °F)
Storage temperature:
–20 °C to +60 °C (–4 °F to +140 °F)
AC Adaptor
Input rating:
100 V to 240 V, AC 50/60 Hz, 11W
Output rating:
4.2 V DC
See the label on the AC Adaptor for
other specifications.
Dimensions (Approx.):
48 × 29 × 81 mm
(1 15/16 × 1 3/16 × 3 1/4 inches)
(w/h/d, excluding projecting parts)
Mass (Approx.):
130 g (5 oz) excluding AC Power cord
Operating temperature:
0 °C to +40 °C (+32 °F to +104 °F)
Storage temperature:
–20 °C to +60 °C (–4 °F to +140 °F)
Included items
• Cyber-shot Station (CSS-TNA) (1)
• Adaptor plate A (1)
• Adaptor plate B (1)
• Adaptor plate C (1)
• Wireless Remote Commander (RMT-CSS4)
(A button type lithium battery installed)
(1)
• A/V connecting cable (1)
• USB cable (1)
• AC Adaptor (AC-LS5) (1)
• AC Power cord (mains lead) (1)
• Set of printed documentation
Design and specifications are subject to change
without notice.

2-FR
Français
Avant d’utiliser cet appareil, lisez attentivement ce mode d’emploi et conservez-le pour toute
référence ultérieure.
AVERTISSEMENT
Pour ne pas risquer un incendie ou une décharge
électrique, n’exposez pas cet appareil à la pluie ou à
l’humidité. Note pour les clients européens
Note pour les clients européens
Ce produit a fait l’objet d’essais ayant permis de constater qu’il respectait les limites prescrites par
la directive sur la
CEM
sur l’utilisation de câbles de raccordement de moins de 3 mètres (9,8 pieds).
Attention
Le champ électromagnétique à des fréquences particulières peut avoir une incidence sur l’image et
le son de l’appareil photo utilisé avec cette Cyber-shot Station.
Avis
Si des interférences électriques ou électromagnétiques entraînent une interruption du transfert des
données en cours (échec), relancez l’application ou débranchez et reconnectez le câble de
communication (USB, etc.).
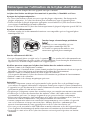
Traitement des appareils électriques et électroniques en
fin de vie (Applicable dans les pays de l'Union Européenne
et aux autres pays européens disposant de systèmes de
collecte sélective)
Ce symbole, apposé sur le produit ou sur son emballage, indique que ce
produit ne doit pas être traité avec les déchets ménagers. Il doit être remis à un
point de collecte approprié pour le recyclage des équipements électriques et
électroniques. En s'assurant que ce produit est bien mis au rebut de manière
appropriée, vous aiderez à prévenir lesconséquences négatives potentielles
pour l'environnement et la santé humaine. Le recyclage des matériaux aidera à
préserver les ressources naturelles. Pour toute information supplémentaire au
sujet du recyclage de ce produit, vous pouvez contacter votre municipalité,
votre déchetterie ou le magasin où vous avez acheté le produit.

3-FR
Table des matières
Remarques sur l’utilisation de la Cyber-shot Station .................................................... 4
Caractéristiques .................................................................................................................. 5
Marques commerciales ...................................................................................................... 5
Identification des différents éléments .............................................................................. 6
Installation ........................................................................................................................... 7
Placement de l’appareil photo sur la Cyber-shot Station ............................................. 8
Retrait de l’appareil photo de la Cyber-shot Station ..................................................... 8
Recharge de la batterie ....................................................................................................... 9
Visualisation d’images sur un écran de téléviseur ...................................................... 10
Slide Show (Diaporama) .................................................................................................. 10
Impression d’images fixes ................................................................................................ 11
Raccordement de l’appareil photo à votre ordinateur via la Cyber-shot Station.... 12
Nettoyage et entretien ...................................................................................................... 12
Changement de la batterie de la télécommande .......................................................... 12
Dépannage ......................................................................................................................... 13

4-FR
Remarques sur l’utilisation de la Cyber-shot Station
Consultez le mode d’emploi de votre appareil ainsi que ce manuel.
La Cyber-shot Station ne doit pas être soumise à la poussière, à l’humidité et à l’eau.
A propos de la plaque adaptatrice :
• La Cyber-shot Station est livrée avec trois types de plaques adaptatrices. En changeant les
plaques adaptatrices, la Cyber-shot Station peut accueillir trois types d’appareils photo.
• Veillez à installer la plaque adaptatrice appropriée avant d’utiliser la Cyber-shot Station. Sinon,
vous risquez d’endommager le multi-connecteur.
•
Toutes les illustrations de la Cyber-shot Station représentent la plaque d’adaptation pour le DSC-N1.
A propos de la télécommande :
• Certaines touches de la télécommande fournie ne sont compatibles qu’avec l’appareil photo
numérique DSC-N1.
Pour les utilisateurs du DSC-N1 :
• Lorsque l’appareil photo est réglé sur le « Logement
», les touches de la télécommande ont
des fonctions différentes de celles qu’elles ont habituellement. Pour obtenir plus d’informations,
reportez-vous au mode d’emploi fourni avec l’appareil photo.
N’utilisez pas et ne rangez pas la Cyber-shot Station dans les endroits suivants :
• Endroits soumis à des températures extrêmes
La température à l’intérieur d’une voiture fermée pendant l’été peut être très élevée et risque de
déformer la Cyber-shot Station ou d’entraîner un problème de fonctionnement.
• Endroits soumis à la lumière directe du soleil ou près de radiateurs
Cela risque de déformer la Cyber-shot Station ou d’entraîner un problème de fonctionnement.
• Endroits soumis à des vibrations
• Endroits soumis à des champs magnétiques puissants
Précautions :
• Branchez l’adaptateur secteur sur la prise murale la plus proche. En cas de problème lorsque
vous utilisez cet appareil, débranchez l’adaptateur secteur pour couper la source d’alimentation.
• L’appareil n’est pas déconnecté de la source d’alimentation secteur tant qu’il reste branché sur la
prise murale, même s’il a été mis hors tension.
• Ne placez pas
l’adaptateur secteur dans un endroit exigu
,
par exemple
entre un mur et un
meuble
.
• N’utilisez pas la Cyber-shot Station dans des endroits soumis à des ondes radio ou à des
rayonnements puissants. Les images risquent de ne pas pouvoir être lues correctement.
• Evitez tout contact entre des objets métalliques et les pièces de raccordement de la Cyber-shot
Station et le cordon d’alimentation. Cela pourrait entraîner un court-circuit.
• Aucune compensation relative au contenu de l’enregistrement ne sera accordée si la prise de
vues ou la lecture ne se font pas en raison d’un « Memory Stick Duo » endommagé, d’un
mauvais fonctionnement de votre appareil photo ou de la Cyber-shot Station, etc.
• N’essayez pas de raccorder le câble USB fourni au multi-connecteur au bas de l’appareil photo.
Vous risqueriez d’endommager le multi-connecteur et d’entraîner un dysfonctionnement.
• Le trou de vis situé au bas de la Cyber-shot Station est réservé pour l’exposition sur linéaire
seulement.
Touches image suivante/image précédente
(
/ )
Ces touches ne sont compatibles qu’avec
l’appareil photo numérique DSC-N1.
Ces touches ne peuvent être utilisées avec
aucun autre appareil photo numérique.
La page est en cours de chargement...
La page est en cours de chargement...
La page est en cours de chargement...
La page est en cours de chargement...
La page est en cours de chargement...
La page est en cours de chargement...
La page est en cours de chargement...
La page est en cours de chargement...
La page est en cours de chargement...
La page est en cours de chargement...
La page est en cours de chargement...
La page est en cours de chargement...
-
 1
1
-
 2
2
-
 3
3
-
 4
4
-
 5
5
-
 6
6
-
 7
7
-
 8
8
-
 9
9
-
 10
10
-
 11
11
-
 12
12
-
 13
13
-
 14
14
-
 15
15
-
 16
16
-
 17
17
-
 18
18
-
 19
19
-
 20
20
-
 21
21
-
 22
22
-
 23
23
-
 24
24
-
 25
25
-
 26
26
-
 27
27
-
 28
28
-
 29
29
-
 30
30
-
 31
31
-
 32
32


Sony CSS-TNA Manuel utilisateur
- Catégorie
- Imprimantes d'étiquettes
- Taper
- Manuel utilisateur
dans d''autres langues
- English: Sony CSS-TNA User manual
Documents connexes
-
Sony CSS-PHA Manuel utilisateur
-
Sony CSS-PHB Manuel utilisateur
-
Sony CSS-HD1 Manual de instrucciones / Manual de instruções Manuel utilisateur
-
-
-
-
-
Sony DSC-W390 Mode d'emploi
-