
1
Notice de montage
Assembly instructions
Montage-instructies

2
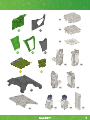
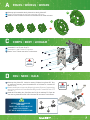
CONTENU • CONTENTS • INHOUD
B1
x2
x40
Moyenne
Medium
Gematigd
Eléments de jeux •Eléments de jeux • Game pieces Game pieces
Spel-elementenSpel-elementen
Autocollants • Stickers
Stickers
Courte
Short
Kort
x2
x5
B2
x2
F5 I5
L3 M3 F4 F3 D2
T1 T2 T3
D4 K4 I6
x2
Longue
Long
Lang

3
F1 F2
J1
J2
J3
E2 E4 E5
F6 E3
C1
C2
H1 H2
G1 G2
H4 G4 D1

4
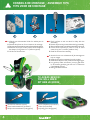
Conseils de montage • Assembly tips
Tips voor de montage
1. N’hésite pas à demander l’aide d’un adulte pour le
montage.
2. Détache les pièces au fur et à mesure du montage.
3. Découpe toutes les attaches avant d’assembler les pièces.
4. Attention aux vis que tu dois utiliser. Dans la majorité
des étapes, il s’agit des vis T1 (taille moyenne).
5. Lis bien les instructions.
1. Don’t hesitate to ask an adult for help with the
assembly.
2. Detach the parts as you need them during assembly.
3. Remove all the plastic lugs before assembling the parts.
4. Check which screws you need to use. In most
cases, they are T1 screws (medium size).
5. Read the instructions carefully.
Tournevis cruciforme (inclus)
Cross-head screwdriver (included)
Philips schroevendraaier (inbegrepen)
Pince coupante (non-incluse)
Pliers (not included)
Kniptang (niet inbegrepen)
FR
EN
NL
FR
EN
NL
1 3 4 5
Tu auras besoin :
You will need:
Dit heb je nodig:
FR
EN
1. Aarzel niet om een volwassene bij de montage om
hulp te vragen.
2. Maak de stukjes los naarmate je werk vordert.
3. Maak alle stukjes los voor je met de montage begint.
4. Let goed op welke schroeven je moet gebruiken.
In de meeste gevallen gaat het om T1-schroeven
(gemiddelde grootte).
5. Lees goed de instructies.
NL
T1

5
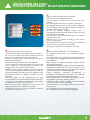
Installation des piles
Fitting the batteries • De batterijen inbrengen
Nécessite 4 piles LR06-AA non-incluses
L’installation des piles doit être effectuée par un adulte
En n de vie les piles doivent être remises au rebut de
façon sure. Les déposer dans un bac de collecte.
Consulter le schéma pour savoir comment enlever ou
mettre en place les piles.
Ne jamais recharger des piles non-rechargeables.
Les accumulateurs doivent être enlevés du jouet avant
d’être chargés et les accumulateurs ne doivent être
chargés que sous la surveillance d’un adulte.
Différents types de piles alcalines, standard (carbone
zinc) ou d’accumulateurs (nickel cadmium) ne doivent
pas être mélangés. Des piles neuves et usagées ou des
accumulateurs neufs et usagés ne doivent pas être
mélangés.
Seuls des piles ou des accumulateurs du type
recommandé ou d’un type similaire doivent être utilisés.
Les piles et les accumulateurs doivent être mis en place
en respectant la polarité (voir le schéma).
Retirer les piles avant rangement du jouet pour une
longue période ou bien si les piles sont usées.
Les bornes d’une pile ou d’un accumulateur ne doivent
pas être mises en court-circuit.
FR
Requires 4 LR03-AA batteries non-included.
Batteries are to be changed by an adult.
See the diagram to know how to remove and insert
batteries.
Non-rechargeable batteries must never be recharged.
Rechargeable batteries must be removed from toy before
being recharged and rechargeable batteries should be
charged under adult supervision.
Do not mix alkaline, standard (carbon zinc), or
rechargeable (nickel cadmium) batteries. Do not mix used
and new batteries together.
Only batteries of the recommended type or of a similar
type should be used.
Batteries must be inserted according to the correct
polarity (see diagram).
Remove batteries from toy when storing for an extended
period of time or if batteries are exhausted.
The supply terminals must not be short-circuited.
EN
Werkt op 4 LR03-AA batterijen - niet meegeleverd.
De batterijen moeten door een volwassene worden
vervangen
Op het einde van hun levenscyclus moeten batterijen op
een veilige manier weggegooid worden. Deponeer ze in de
inzamelbakken.
Wijze waarop vervangbare batterijen moeten worden
verwijderd en ingelegd.
Niet-oplaadbare batterijen mogen niet worden opgeladen.
Oplaadbare batterijen dienen vóór het opladen uit het
speelgoed te worden verwijderd en alleen onder toezicht
van een volwassene te worden opgeladen.
Gebruik alkalische, standaard- (zinkkoolstof) of
oplaadbare (nikkelcadmium) batterijen niet tesamen.
Gebruik oude en nieuwe batterijen niet tesamen.
Uitsluitend batterijen van het aanbevolen type of van een
vergelijkbaar type mogen worden gebruikt.
Batterijen moeten worden ingelegd met inachtneming
van de juiste polariteit (zie afbeelding).
Haal de batterijen uit het speelgoed wanneer het voor een
lange periode
niet wordt gebruikt of als de batterijen leeg zijn.
De voedingsklem mag niet worden kortgesloten
NL

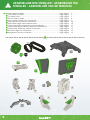
6
Assemblage des modules • Assembling the
modules • Assemblage van de modules
Roues • Wheels • Wielen .............................................................................................. Page / Pagina 7
Corps • Body • Lichaam ...............................................................................................Page / Pagina 7
Cou • Neck • Hals ..........................................................................................................Page / Pagina 7
Tête • E. Head • E. Hoofd ..............................................................................................Page / Pagina 8
Unité centrale • Central unit • Centraal stuk .............................................................Page / Pagina 9
Moteur gauche • Left motor • Linkse motor .............................................................. Page / Pagina 10
Moteur droite • Right motor • Rechtse motor ............................................................ Page / Pagina 10
Capteur infrarouge • Infrared sensor • Infraroodsensor .........................................Page / Pagina 11
Compartiment à piles • Battery compartment • Batterijvak ................................... Page / Pagina 11
Pieds du robot • Robot feet • Voeten van de robot ...................................................Page / Pagina 12
Bras droit • Right arm • Rechterarm ..........................................................................Page / Pagina 12
Bras gauche • Left arm • Linkerarm ..........................................................................Page / Pagina 12
BA
C
D
E
F
G
H
I
J
K
L
M
C
L
H
G
K
J
M
F
I
D
E
A
x4
B
x2
+

7
D2
D1
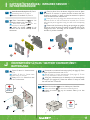
Corps • Body • Lichaam
C
Cou • Neck • Hals
D
Roues • Wheels • Wielen
A
FR
Découpe puis assemble les 4 pièces A1 et les 4 pièces A2.
EN
Detach and assemble the 4 A1 parts and the 4 A2 parts.
NL
Maak de vier A1-stukken en de vier A2-stukken los en steek ze ineen.
FR
Assemble C1 et C2 avec 8 vis T1.
EN
Assemble C1 and C2 with 8 T1 screws.
NL
Steek C1 en C2 ineen met acht T1-schroeven.
FR
Découpe les pièces D3. Insère le ressort D4 dans les pièces D3. Tout
en serrant le ressort, place l’ensemble D3 et D4 dans D1. Installe D2
avec 2 vis T1.
EN
Detach the D3 parts. Insert the D4 spring into the D3 parts. Compressing
the spring, place the D3 and D4 assembly into D1. Install D2 with 2 T1
screws.
NL
Maak de D3-stukken los. Schuif de veer D4 in de stukken D3. Span de
veer aan en plaats D3 en D4 in D1. Monteer D2 met twee T1-schroeven.
A1
A2
Attention au sens de
montage !
Take care to assemble the
right way round!
Let op de montagerichting!
C1
C2
D3
D3
D4
Moyenne
Medium
Gematigd
T1
x8
Moyenne
Medium
Gematigd
T1
x2

8
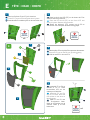
Tête • Head • Hoofd
FR
Place le circuit des LED (E3) sur le devant de E2 et
visse-le. Retire la protection.
EN
Place the LED circuit (E3) on the front of E2 and
screw it in place. Remove the protection.
NL
Plaats het ledcircuit (E3) vooraan op de E2 en
schroef het vast. Verwijder de beschermingstape.
FR
Place la pièce E5 sur la pièce E4 en pressant doucement.
EN
Place the E5 part on the E4 part, pressing gently.
NL
Klik het stuk E5 in het stuk E4.
FR
Assemble E2 et E4 en
utilisant 4 vis T1. Place
l’autocollant LED sur les
câbles pour l’identier.
EN
Assemble E2 and E4
with 4 T1 screws. Place the
LED sticker on the wires to
identify them.
NL
Steek E2 en E4 met
vier T1-schroeven ineen.
Kleef de LED-sticker op de
snoeren zodat je ze kan
herkennen.
FR
Place les 2 pièces E1 sur E2 puis visse-les.
EN
Fit the 2 E1 parts to E2 and screw them in place.
NL
Plaats de twee E1-stukken op E2 en schroef ze dan aan.
1
2
3
4
e
E
E4
E5
E2
E3
E1
Moyenne
Medium
Gematigd
T1
x2
Moyenne
Medium
Gematigd
T1
x2
Moyenne
Medium
Gematigd
T1
x4
1
2
3
4

9
Moyenne
Medium
Gematigd
T1
x4
F
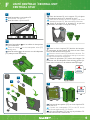
FR
Colle l’autocollant 1 sur la pièce F2.
EN
Place sticker 1 on part F2.
NL
Kleef de sticker 1 op het stuk F2.
FR
Place les boutons F4 sur le support F3, puis place
l’ensemble dans la pièce F2. Attention au sens.
EN
Place the F4 buttons on the F3 support, and insert
the assembly into part F2. Take care with the direction.
NL
Schuif de knoppen F4 in de basis F3 en pas het
geheel dan in het stuk F2. Let op de richting!
FR
Place le circuit imprimé (F6) derrière les boutons.
Le connecteur du haut-parleur doit être en haut. Place
deux vis dans les deux trous du bas.
EN
Place the circuit board (F6) behind the buttons. The
loudspeaker connection should be at the top. Insert two
screws into the holes at the bottom.
NL
Plaats de printkaart (F6) achter de knoppen. De
connector van de luidspreker moet omhoog gericht zijn.
Plaats twee schroeven in de onderste twee openingen.
FR
Connecte le haut-parleur (F5) au circuit imprimé F6.
Visse avec 4 T1.
EN
Connect the loudspeaker (F5) to the F6 circuit
board. Screw together with 4 T1 screws.
NL
Sluit de luidspreker (F5) aan op de printkaart F6.
Schroef vast met vier T1-schroeven.
FR
Place l’autocollant sur les câbles du haut-parleur
(F5) pour l’identier.
EN
Place the sticker on the loudspeaker wires (F5)
to identify them.
NL
Kleef de sticker op de snoeren van de luidspreker
(F5) zodat je ze kan herkennen.
1
3
4
5
2
F6
Unité centrale •Central unit
Centraal stuk
F
F5
F4
F1
F3
F2
Moyenne
Medium
Gematigd
T1
x2
3
4
5

10
T1
x2
Moyenne
Medium
Gematigd
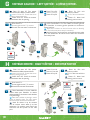
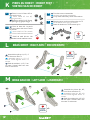
Moteur gauche • LefT motor • Linkse motor
G
FR
Place G4 dans G2. Fais passer
délicatement les câbles à travers la fente.
EN
Insert G4 into G2. Thread the wires
carefully through the hole.
NL
Plaats G4 in G2. Schuif de snoeren
behoedzaam door de opening.
FR
Place H4 dans H2. Fais passer
délicatement les câbles à travers la fente.
EN
Insert H4 into H2. Thread the wires
carefully through the hole.
NL
Plaats H4 in H2. Schuif de snoeren
behoedzaam door de opening.
FR
Place H3 sur H4.
EN
Insert H3 into H4.
NL
Plaats H3 op H4.
FR
Place H1. Fais très
attention aux câble.
EN
Fit H1. Take care with the
wires.
NL
Plaats G1. Wees heel
voorzichtig met het snoer.
FR
Visse avec 2 T1.
EN
Screw together with 2 T1 screws.
NL
Schroef vast met twee T1-schroeven.
FR
Place l’autocollant H sur les câbles du
moteur droite pour l’identier. Le moteur
droite possède un connecteur à trois broches
et un point rouge.
EN
Place the H sticker on the right motor
wires to identify them. The right motor
has a three-pin connector and a red dot.
NL
Kleef de sticker H op de snoeren
van de rechtse motor zodat je ze kan
herkennen. De rechtse motor heeft een
connector met drie pinnen en een rode
punt.
FR
Visse avec 2 T1.
EN
Screw together with 2 T1 screws.
NL
Schroef vast met twee T1-schroeven.
FR
Place l’autocollant G sur les câbles du moteur gauche
pour l’identier. Le moteur gauche possède un connecteur
à deux broches.
EN
Place the G sticker on the left motor wires to identify
them. The left motor has a two-pin connector.
NL
Kleef de sticker G op de snoeren van de linkse motor zodat
je ze kan herkennen. De linkse motor heeft een connector
met twee pinnen.
FR
Place G3 sur G4.
EN
Insert G3 into G4.
NL
Plaats G3 op G4.
FR
Place G1. Fais très
attention aux câbles.
EN
Fit G1. Take care with the
wires.
NL
Plaats G1. Wees heel
voorzichtig met het snoer.
1
1 2 3
4
5
4 5
2 3
Moteur droite • Right motor • Rechtse motor
H
G1
G3
G4
G2
H
G
1
2
3
H1
H3
H4
H2
1
2
3
Moyenne
Medium
Gematigd
T1
x2

11
Capteur infrarouge • Infrared sensor
Infraroodsensor
I
FR
Assemble ensemble les pièces I2, I5 et I1.
EN
Assemble parts I2, I5 and I1.
NL
Monteer de stukken I2, I5 en I1.
FR
Place J2 dans J1. Visse-les avec
4 vis T1.
EN
Insert J2 into J1. Screw them
together with 4 T1 screws.
NL
Plaats J2 in J1. Schroef ze vast
met vier T1-schroeven.
FR
Demande à un adulte d’insérer des piles (voir page 4). Place
le capot J3 puis xe-le avec une vis T3.
EN
Ask an adult to insert the batteries (see page 4). Fit the
cover (J3) and attach it with a T3 screw.
NL
Vraag een volwassene om de batterijen in het batterijbakje
te stoppen (zie pagina 4). Plaats het deksel J3 erop en maak
het vast met een T3-schroef.
FR
Place l’autocollant sur les
câbles du capteur pour l’identier.
EN
Place the sticker on the
sensor wires to identify them.
NL
Kleef de sticker op de
snoeren van de sensor zodat je ze kan
herkennen.
FR
Place la pièce I4 sur le dessus. Aligne les trous et place
la barre I6 au travers. La partie lisse de la barre doit être
insérée en premier. La barre va xer fermement les pièces
sans toutefois rentrer entièrement.
EN
Place part I4 on top. Align the holes and insert bar I6. The
smooth section of the bar should be inserted rst. The bar
will hold the parts together rmly, but will not t completely
inside.
NL
Plaats stuk I4 erbovenop. Breng de openingen op gelijke
hoogte en schuif de stang I6 erdoor. Het gladde deel van de
stang komt eerst. De stang zal de stukken op hun plaats
houden. Hij zal iets uitsteken.
1
1 2
FR
Place l’autocollant
sur les câbles pour l’identier.
EN
Place the sticker
on the wires to identify them.
NL
Kleef de sticker
op de snoeren zodat je ze kan
herkennen.
3
3
2
Compartiment à piles • Battery compartment •
Batterijvak
J
I1
I6
I4
I
1
2
3
T1
x4
Moyenne
Medium
Gematigd
T3
x1
Longue
Long
Lang
J1
J2
I5
I2

12
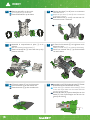
Pieds du robot • Robot feet •
Voeten van de robot
K
FR
Place la roue K3 dans K2 en
alignant les trous.
EN
Insert wheel K3 into K2,
aligning the holes.
NL
Plaats het wiel K3 in K2. Breng
de openingen op gelijke hoogte.
FR
Assemble les pièces L1, L2, L3
et L4. Visse avec deux T1.
EN
Assemble parts L1, L2, L3
and L4. Screw together with 2 T1
screws.
NL
Steek de stukken L1, L2, L3 en
L4 ineen. Schroef alles vast met
twee T1-schroeven.
FR
Assemble les pièces M1, M2,
M3 et M4. Visse avec deux T1.
EN
Assemble parts M1, M2, M3
and M4. Screw together with 2 T1
screws.
NL
Steek de stukken M1, M2, M3
en M4 ineen. Schroef alles vast
met twee T1-schroeven.
1
FR
Place la barre K4. La partie
lisse de la barre doit être insérée
en premier.
EN
Insert shaft K4. The smooth
part of the shaft should be inserted
rst.
NL
Schuif de staaf K4 erin. Het
gladde deel van de staaf komt eerst.
2
FR
Tu as deux roues à assembler.
EN
You have two wheels to assemble.
NL
Er zijn twee wielen die je ineen moet steken.
3
FR
Place les roues sur K1 en utilisant des vis T2.
EN
Fit the wheels to K1 using T2 screws.
NL
Plaats de wielen met T2-schroeven op K1.
4
T2
x2
Courte
Short
Kort
Bras droit • Right arm • Rechterarm
l
bras gauche • Left arm • Linkerarm
M
K2
K3
K1
K4
T1
x2
Moyenne
Medium
Gematigd
T1
x2
Moyenne
Medium
Gematigd
L3
M3
L1
M2
M1
L2
L4

13
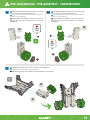
FR
Assemble le Module G avec une roue A et visse
avec une vis T3. Place un enjoliveur A3.
EN
Fit a wheel A to module G and screw with a T3
screw. Fit an A3 hubcap.
NL
Assembleer de Module G met een wiel A en
schroef vast met een T3-schroef. Zet er een A3-
wieldop op.
FR
Assemble le Module H avec une roue A et visse
avec une vis T3. Place un enjoliveur A3.
EN
Fit a wheel A to module H and screw with a T3
screw. Fit an A3 hubcap.
NL
Assembleer de Module H met een wiel A en
schroef vast met een T3-schroef. Zet er een A3-
wieldop op.
1
FR
Assemble les moteur G et H sur le corps C en les glissant.
EN
Slide the motors G and H into the body C.
NL
Monteer de motors G en H door ze op het lichaam C te schuiven.
3
2
PRE-ASSEMBLAGE • PRE-ASSEMBLY • VOORMONTAGE
T3
x1
Longue
Long
Lang
T3
x1
Longue
Long
Lang
A
A
G
H
A3
A3
G
H
C

14
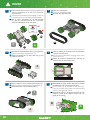
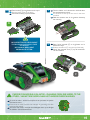
ROVER
FR
Assemble le compartiment à piles (J) en le glissant.
EN
Slide in the battery compartment (J).
NL
Steek het batterijvak (J) ineen door het op zijn
plaats te schuiven.
FR
Fixe les câbles par le dessous en les ramenant
à l’arrière du véhicule.
EN
Fix the wires underneath, bringing them to the
rear of the rover.
NL
Plaats de snoeren onderaan het voertuig en
maak ze aan de achterzijde vast.
FR
Place les chenilles B2.
EN
Fit the B2 caterpillar tracks.
NL
Monteer de rupsbanden B2.
FR
Fixe les deux roues avants (A) sur le corps (C)
avec un connecteur L4 et une vis T3. Place les
enjoliveurs A3.
EN
Fix the two front wheels (A) to the body (C) with an
L4 connector and a T3 screw. Fit the A3 hubcaps.
NL
Zet de twee voorwielen (A) op het lichaam
(C) met een L4-connector en een T3-schroef.
Schuif de wieldoppen A3 op hun plek.
1
3
FR
Place le capteur I sur le compartiment à piles (J).
EN
Place the sensor I on the battery compartment (J).
NL
Plaats de sensor I op het batterijvak (J).
5
FR
Assemble le cou (D) à l’arrière de la tête (E). Presse
les attaches du cou. Fais attention au sens.
EN
Fit the neck (D) to the back of the head (E).
Press in the neck clips. Make sure the head and
neck are the right way round.
NL
Monteer de hals (D) op de achterzijde van het
hoofd (E). Duw op de klepjes van de hals. Let
goed op de richting.
6
4
2
T3
x2
Longue
Long
Lang
B2
A
C
L4
A3
J
J
D
I
E

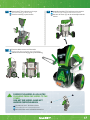
15
FR
Place la tête (E) en la glissant sur le corps.
EN
Slide the head (E) on to the body.
NL
Schuif het hoofd (E) op het lichaam.
7
FR
Du rover au robot : enlève les enjoliveurs en pressant les pattes.
Dévisse les roues
EN
From rover to robot: remove the hubcaps by pressing the tabs.
Unscrew the wheels.
NL
Van rover naar robot: verwijder de wieldoppen door op de klepjes
te drukken. Schroef de wielen los
FR
Fixe les câbles sur le dessus du véhicule dans
les emplacements prévus.
EN
Fix the wires to the top of the rover in the slots
provided.
NL
Maak de snoeren vast in de groeven bovenop
het voertuig.
8
FR
Place l’unité centrale (F) en la glissant sur le
dessus du corps.
EN
Slide the central unit (F) on to the top of the body.
NL
Schuif het centrale stuk (F) op de bovenkant
van het lichaam.
9
La partie étroite vers l’avant
The narrow end should face
outwards.
Het smalle deel komt
vooraan te zitten.
E
F
PASSER D’UN MODELE A UN AUTRE • CHANGING FROM ONE MODEL TO THE
OTHER • VAN HET ENE MODEL NAAR HET ANDERE OVERSCHAKELEN

16
T1
Robot
FR
Place les pneus B1 sur les roues.
EN
Fit the tyres (B1) to the wheels.
NL
Plaats de banden B1 op de wielen.
1
FR
Assemble le compartiment à piles (J) en le
glissant.
EN
Slide in the battery compartment (J).
NL
Steek het batterijvak (J) ineen door het op zijn
plaats te schuiven.
3
FR
5. Place le capteur (I) sur l’unité centrale.
EN
Place the sensor (I) on the central unit.
NL
Plaats de sensor (I) op het centrale stuk.
5
FR
Assemble le cou (D) à l’arrière de la tête (E). Presse
les attaches du cou. Fais attention au sens.
EN
Fit the neck (D) to the back of the head (E). Press
in the neck clips. Make sure the head and neck
are the right way round.
NL
Monteer de hals (D) op de achterzijde van het
hoofd (E). Druk op de klepjes van de hals. Let
goed op de richting.
6
FR
4. Place l’unité centrale (F) en la glissant sur le
dessus du corps.
EN
Slide the central unit (F) on to the top of the body.
NL
Schuif het centrale stuk (F) op de bovenkant
van het lichaam.
4
FR
Fixe les deux bras (L et M) avec un connecteur
L4 et une vis T1.
EN
Attach the two arms (L and M) with a connector
(L4) and a T1 screw.
NL
Maak beide armen (L en M) vast met een L4-
connector en een T1-schroef.
2

17
FR
Place la tête (E) en la glissant sur le corps.
EN
Slide the head (E) on to the body.
NL
Schuif het hoofd (E) op het lichaam.
7
FR
Assemble les pieds (K) à l’arrière sous les moteurs.
EN
Fit the feet (K) to the rear behind the motors.
NL
Monteer de voeten (K) aan de achterzijde onder de
motors.
8
FR
Place les câbles comme sur l’illustration.
EN
Position the wires as shown on the illustration.
NL
Plaats de snoeren zoals aangegeven op de afbeelding.
9
FR
Du robot au rover : dévisse les bras.
EN
From robot to rover: unscrew the arms.
NL
Van robot naar rover: schroef de armen los.
PASSER D’UN MODELE A UN AUTRE
CHANGING FROM ONE MODEL TO THE
OTHER
VAN HET ENE MODEL NAAR HET
ANDERE OVERSCHAKELEN

18
Comment jouer ? • How to play • Hoe ga je te werk?
ROBOT
Avant
Forward
Voorzijde
Gauche
Left
Links
Droite
Right
Rechts
Arriere • Back • Achterzijde
ON/OFF
ROVER
Avant • Forward • Voorzijde
Gauche
Left
Links
Droite
Right
Rechts
Arriere
Back
Achterzijde
ON/OFF
Bouton de contrôle
Control button
Controleknop
Bouton de contrôle
Control button
Controleknop
Ecran LED
LED screen
Ledscherm
Capteur
Sensor
Sensor
Moteur droite
Right motor
Rechtse motor
Moteur gauche
Left motor
Linkse motor
Piles
Batteries
Batterijen

19
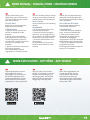
Mode Manuel • Manual mode • Manuele modus
Tu peux utiliser Mazzy sans
l’application grâce au panneau de
contrôle. Presse le bouton central
pour allumer Mazzy.
PILOTAGE DIRECT
Appuie sur les commandes pour
diriger directement Mazzy.
PROGRAMMATION
1. Appuie une fois sur le bouton
central. Un double Bip se fait
entendre.
2. Appuie sur les commandes
pour programmer des directions.
Tu peux programmer jusqu’à 50
mouvements. Lorsque tu as atteint
la limite, un triple Bip se fera
entendre.
3. Appuie sur le bouton central pour
lancer ton programme.
Pour éteindre Mazzy, appuie
longuement sur le bouton central.
You can use Mazzy without the app
using the control panel. Press the
central button to switch Mazzy on.
DIRECT CONTROL
Press the buttons to control Mazzy
directly.
PROGRAMMING
1. Press the central button once.
The robot will beep twice.
2. Press the buttons to program
directions. You can program up to
50 movements. The robot will beep
three times if you reach the limit.
3. Press the central button to run
your program.
To switch Mazzy off, press and
hold the central button for a few
seconds.
Dankzij het controlepaneel kan je
Mazzy ook zonder app gebruiken.
Druk op de centrale knop om Mazzy
aan te schakelen.
RECHTSTREEKSE BESTURING
Druk op de knoppen om Mazzy
rechtstreeks te besturen.
PROGRAMMERING
1. Druk één keer op de middelste
knop. Je hoort een dubbele Bip.
2. Druk op de knoppen om de
bewegingen te programmeren.
Je kan tot 50 bewegingen
programmeren. Als je het maximale
aantal bereikt, hoor je drie keer Bip.
3. Druk op de middelste knop om je
programma te starten.
Druk lang op de middelste knop om
Mazzy uit te schakelen.
FR NLEN
Exploite pleinement ton robot
avec l’application. Pour la
télécharger, tu peux scanner le
QR code correspondant à ton
système d’exploitation. Tu peux
aussi chercher sur la boutique
d’applications : Mazzy Smart APP.
Use your robot to the full with
the app. To download it, scan the
QR code corresponding to your
operating system. You can also
search for Mazzy Smart App in
Google Play or the App Store.
Benut alle mogelijkheden van
je robot met de app. Om die
te downloaden, kan je de QR-
code inscannen die met je
besturingssysteem overeenkomt.
Je kan ook in je App Store zoeken:
Mazzy Smart APP.
FR NLEN
Mode Application • App mode • App-modus

20
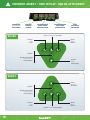
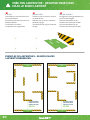
Crée ton labyrinthe • Creating your maze
Maak je eigen labyrint
Exemples de labyrinthes • Example mazes
Labyrintvoorbeelden.
IL TE FAUT :
la tuile Départ, la tuile Arrivée et les
13 tuiles obstacles.
Plie les découpes pour faire tenir les
obstacles debout.
Les obstacles s’utilisent
uniquement avec l’application.
YOU WILL NEED
The Start tile, the Finish tile and the
13 obstacle tiles.
Fold back the cut-outs to stand the
obstacles upright.
The obstacles can only be used with
the app.
WAT HEB JE NODIG?
De tegel Start, de tegel Aankomst en
de 13 hindernistegels.
Plooi de uitsteeksels om de
hindernissen rechtop te houden.
Plooi de uitsteeksels om de
hindernissen rechtop te houden.
FR NLEN
Distance minimum :
Minimum distance:
Minimale afstand:
25 cm
Distance minimum :
Minimum distance:
Minimale afstand:
25 cm
-
 1
1
-
 2
2
-
 3
3
-
 4
4
-
 5
5
-
 6
6
-
 7
7
-
 8
8
-
 9
9
-
 10
10
-
 11
11
-
 12
12
-
 13
13
-
 14
14
-
 15
15
-
 16
16
-
 17
17
-
 18
18
-
 19
19
-
 20
20


dans d''autres langues
- English: Buki Mazzy Owner's manual
- Nederlands: Buki Mazzy de handleiding
