BCM Advanced Research VNS-10W01 Manuel utilisateur
- Taper
- Manuel utilisateur

Part No. E2017VN10A7R
VNS-10W01
Panel PC
Quick Reference Guide
8th Ed – 01 February 2021
Copyright Notice
Copyright 2021, ALL RIGHTS RESERVED.

VNS-10W01
FCC Statement
THIS DEVICE COMPLIES WITH PART 15 FCC RULES. OPERATION IS
SUBJECT TO THE FOLLOWING TWO CONDITIONS:
(1) THIS DEVICE MAY NOT CAUSE HARMFUL INTERFERENCE.
(2) THIS DEVICE MUST ACCEPT ANY INTERFERENCE RECEIVED INCLUDING
INTERFERENCE THAT MAY CAUSE UNDESIRED OPERATION.
THIS EQUIPMENT HAS BEEN TESTED AND FOUND TO COMPLY WITH THE LIMITS
FOR A CLASS "B" DIGITAL DEVICE, PURSUANT TO PART 15 OF THE FCC RULES.
THESE LIMITS ARE DESIGNED TO PROVIDE REASONABLE PROTECTION AGAINST
HARMFUL INTERFERENCE WHEN THE EQUIPMENT IS OPERATED IN A
COMMERCIAL ENVIRONMENT. THIS EQUIPMENT GENERATES, USES, AND CAN
RADIATE RADIO FREQUENCY ENERGY AND, IF NOT INSTATLLED AND USED IN
ACCORDANCE WITH THE INSTRUCTION MANUAL, MAY CAUSE HARMFUL
INTERFERENCE TO RADIO COMMUNICATIONS.
OPERATION OF THIS EQUIPMENT IN A RESIDENTIAL AREA IS LIKELY TO CAUSE
HARMFUL INTERFERENCE IN WHICH CASE THE USER WILL BE REQUIRED TO
CORRECT THE INTERFERENCE AT HIS OWN EXPENSE.
A Message to the Customer
Customer Services
Each and every product is built to the most exacting specifications to ensure reliable
performance in the harsh and demanding conditions typical of industrial
environments. Whether your new device is destined for the laboratory or the factory floor,
you can be assured that your product will provide the reliability and ease of operation.
Your satisfaction is our primary concern. Here is a guide to our customer services. To
ensure you get the full benefit of our services, please follow the instructions below carefully.
Technical Support
We want you to get the maximum performance from your products. So if you run into
technical difficulties, we are here to help. For the most frequently asked questions, you can
easily find answers in your product documentation. These answers are normally a lot more
detailed than the ones we can give over the phone. So please consult the user’s manual
first.
2 VNS-10W01 Quick Reference Guide

Quick Reference Guide
VNS-10W01 Quick Reference Guide
3
Content
1. Getting Started ........................................................................................................ 5
1.1 Safety Precautions .................................................................................................... 5
1.2 Packing List ............................................................................................................... 5
1.3 System Specifications ............................................................................................... 6
1.4 System Overview ...................................................................................................... 9
1.4.1 Front View ................................................................................................................................ 9
1.4.2 Rear View .............................................................................................................................. 10
1.5 System Dimensions ................................................................................................ 11
1.6 VESA Mounting ....................................................................................................... 12
2. Hardware Configuration ....................................................................................... 15
2.1 VNS-10W01 connector mapping ............................................................................. 16
2.1.1 Serial port connector (COM) .................................................................................................. 16
2.2 Cleaning and Disinfecting ....................................................................................... 17
3. LED Instruction ..................................................................................................... 18
3.1 VNS-10W01 LED Programmer’s Reference manual ............................................... 19
3.1.1 Android Studio ....................................................................................................................... 19
3.1.2 Sample code .......................................................................................................................... 19
3.2 For win 10 LED instruction ...................................................................................... 20
3.2.1 GENERICEC Library API Programmer’s Reference ............................................................. 20
3.2.1.1 GENERICEC_Open ............................................................................................................. 20
3.2.1.2 GENERICEC_Close ............................................................................................................ 20
3.2.1.3 GENERICEC_Close ............................................................................................................ 20
3.2.1.4 GENERICEC_Write ............................................................................................................. 21
3.2.2 Standard Operating Procedures ............................................................................................ 22
3.2.2.1 Apps ..................................................................................................................................... 22
3.2.2.2 Bin ........................................................................................................................................ 23
3.2.2.3 Driver .................................................................................................................................... 23
3.2.2.4 Sample ................................................................................................................................. 23
3.2.2.5 Demo .................................................................................................................................... 24
3.3 For Ubuntu 19.04 LED instruction ........................................................................... 26
3.3.1 File list ................................................................................................................................... 26
3.3.2 Building .................................................................................................................................. 26
3.3.3 EC, I2C Definition on VNS device ......................................................................................... 26
3.3.4 Operation (vns_led) ............................................................................................................... 26

VNS-10W01
4 VNS-10W01 Quick Reference Guide
3.3.5 APP & API Introduction (vns_led.c, i2c-dev.h, i2cbusses.h) ................................................. 26
3.3.5.1 Open I2C driver .................................................................................................................... 26
3.3.5.2 Set I2C device/slave address .............................................................................................. 27
3.3.5.3 Write I2C command & data .................................................................................................. 27
4 Front Touch Button Function Instruction ........................................................... 29
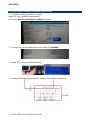
4.1 Front touch button function instruction .................................................................... 30
1. Front touch button function as Enable. .................................................................................. 30
2. Change Front touch Button item from Enable to “Disabled”. ................................................ 30
3. Press “F10” key to save BIOS setting ................................................................................... 30
4. Restart VNS system the front touch button function will be turned off. ................................. 30

Quick Reference Guide
VNS-10W01 Quick Reference Guide
5
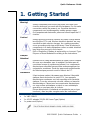
1. Getting Started
1.1 Safety Precautions
Warning!
Always completely disconnect the power cord from your
chassis whenever you work with the hardware. Do not make
connections while the power is on. Sensitive electronic
components can be damaged by sudden power surges.
Only experienced electronics personnel should open the PC
chassis.
Caution!
Always ground yourself to remove any static charge before
touching the CPU card. Modern electronic devices are very
sensitive to static electric charges. As a safety precaution,
use a grounding wrist strap at all times. Place all electronic
components in a static-dissipative surface or static-shielded
bag when they are not in the chassis.
Risk of Explosion if Battery is replaced by an Incorrect Type.
Dispose of Used Batteries According to the Instructions.
Français:
Attention!
Débranchez le câble d'alimentation de votre châssis chaque
fois que vous travaillez avec le matériel. Ne faites pas de
connexion lorsque le système est allumé. Les composants
électroniques sensibles peuvent être endommagés par les
surtensions soudaines. Seule les personnels expérimentés
de l'électronique peuvent ouvrir le châssis du PC.
Précaution!
Il faut toujours mettre à la masse pour éliminer l’électricité
statique avant de toucher la carte CPU. Les appareils
électroniques modernes sont très sensibles aux électricité
statique. Pour des raisons de sécurité, utilisez un bracelet
électrostatique. Placez tous les composants électroniques
sur une surface antistatique ou dans un sac antistatique
quand ils ne sont pas dans le châssis.
Risque d'explosion si la batterie est remplacée par un type
incorrect. Jetez les piles usagées selon les instructions
1.2 Packing List
1 x VNS-10W01
1 x AC/DC adapter 12V/5A 90 Screw Type (Option)
1 x power cord (Option)

VNS-10W01
6 VNS-10W01 Quick Reference Guide
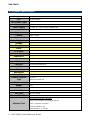
1.3 System Specifications
Component
CPU
Intel Atom Z8350
CPU Cooler (Type)
Heatsink
Memory
2GB/4GB DDR3L
Power Supply
DC Input, 12 ~ 24V/ Powered LAN 802.3AT
Microphone
1 x A-MIC
Speaker
2 x speaker(L & R)
Camera
2.0MP Camera
Wireless LAN
WIFI 802.11 b/g/n
Operating System
Windows10 IoT 2016 64bit / Android 5.1
Storage
Other Storage Device
32GB/64GB eMMC
Panel
LCD Panel
10.1": 1280x800 pixel
Touch Screen
PCAP
External I/O
Serial Port
1 x RJ45 for RS232 or RS422 or RS485
USB Port
2 x USB 2.0 Type A
LAN Port
1 x 10/100/1000 Ethernet
Wireless LAN Antenna
1 x PIFA Antenna
Others
1 x 4-Pin 3.5mm Audio Jack
Mechanical
Power Type
DC Input, 12 ~ 24V
Power Connector
Type
DC jack or
Powered LAN 802.3AT
Dimension
270 x 193 x 28 mm
Weight
1.1kg
Color
white
Reliability
EMI Test
CE/ FCC class B
Dust and Rain Test
Front Panel IP65
Vibration Test
Sine Vibration test (Non-operation)
Reference IEC60068-2-6 Testing procedures
Test Fc : Vibration sinusoidal
1 Test Acceleration : 2G
2 Test frequency : 5~500 Hz

Quick Reference Guide
VNS-10W01 Quick Reference Guide
7
3 Sweep:1 Oct/ per one minute. (logarithmic)
4 Test Axis : X,Y and Z axis
5 Test time :30 min. each axis
6 System condition : Non-Operating mode
Package Vibration Test
Reference IEC60068-2-64 Testing procedures
Test Fh : Vibration boardband random Test
1. PSD: 0.026G²/Hz , 2.16 Grms
2. Non-operation mode
3. Test Frequency : 5-500Hz
4. Test Axis : X,Y and Z axis
5. 30 min. per each axis
Random Vibration Operation
Reference IEC60068-2-64 Testing procedures
Test Fh : Vibration boardband random Test
1. PSD: 0.00454G²/Hz , 1.5 Grms
2. Operation mode
3. Test Frequency : 5-500Hz
4. Test Axis : X,Y and Z axis
5. 30 minutes per each axis
6. IEC 60068-2-64 Test:Fh
Mechanical Shock
Test
Bump Test
Reference IEC 60068-2-29 Testing procedures
Test Eb : Bump Test
1. Wave form:Half Sine wave
2. Acceleration Rate:10g for operation mode
3. Duration Time:11ms
4. No. of Shock:Z axis 300 times
5. Test Axis: Z axis
6. Operation mode
Drop Test
1. One corner , three edges, six faces
2. ISTA 2A, IEC-60068-2-32 Test:Ed
Operating
Temperature
0°C ~ 40°C
Operating Humidity
0% ~ 90% Relative Humidity, Non-condensing
Storage Temperature
-20°C ~ 60°C

VNS-10W01
8 VNS-10W01 Quick Reference Guide
Note: Specifications are subject to change without notice.

Quick Reference Guide
VNS-10W01 Quick Reference Guide
9
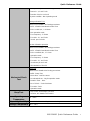
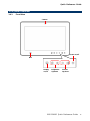
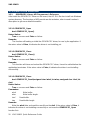
1.4 System Overview
1.4.1 Front View
Power on/off
Brightness
Up/down
Volume
Up/down
NFC
Display
on/off
Camera

VNS-10W01
10 VNS-10W01 Quick Reference Guide
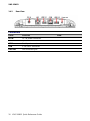
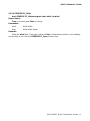
1.4.2 Rear View
Connectors
Label
Function
Note
DC IN
DC-IN power connector
LAN
RJ-45 Ethernet
COM
Serial port connector
USB
2 x USB2.0 connector
Line-out
Line-out audio jack

Quick Reference Guide
VNS-10W01 Quick Reference Guide
11
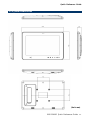
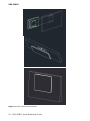
1.5 System Dimensions
(Unit: mm)

VNS-10W01
12 VNS-10W01 Quick Reference Guide
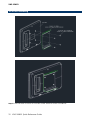
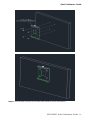
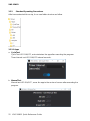
1.6 VESA Mounting
Step1. Insert and fasten 4 screws on each side of VNS-10W01 to secure VESA Mount.

Quick Reference Guide
VNS-10W01 Quick Reference Guide
13
Step2. Insert and fasten 4 screws on each side of the monitor to secure VESA Mount.

VNS-10W01
14 VNS-10W01 Quick Reference Guide
Step3. Slide VNS-10W01 onto the Monitor.


VNS-10W01
16 VNS-10W01 Quick Reference Guide
2.1 VNS-10W01 connector mapping
2.1.1 Serial port connector (COM)
RS-485
Signal
PIN
DATA-
1
DATA+
2
NC
3
NC
4
GND
5
NC
6
NC
7
NC
8
RS-232
Signal
PIN
DCD
1
RXD
2
TXD
3
DTR
4
GND
5
DSR
6
RTS
7
CTS
8
RS-422
Signal
PIN
TX-
1
TX+
2
RX+
3
RX-
4
GND
5
NC
6
NC
7
NC
8

Quick Reference Guide
VNS-10W01 Quick Reference Guide
17
2.2 Cleaning and Disinfecting
During normal use of VNS-10W01, the device may become dirty and should be regularly
cleaned.
Cleaning Instructions
1. Turn off the computer before starting clean up. This way, you can see any dirt on the
screen; the brightness of the monitor may make you miss some areas.
2. Wet a soft, lint-free or microfiber cloth with cleaning agent per manufacturer’s instructions
or hospital protocol. Wipe the VNS Panel PC in a gentle motion to remove dust, oil, or
fingerprint smudges.
3. Wipe any moisture excess with a dry lint-free cloth to finish cleaning before turning the
computer back on.
Cleaning Tools
Below is a list of some items that may be needed or used when cleaning the VNS Panel PC
or VNS Panel PC peripherals.
Please keep in mind that some components in VNS Panel PC components may only be
cleaned using a product designed for cleaning that component.
Cleaning agent list: chemical disinfectants which have been tested on the VNS Panel PC
No. Cleaning agent
1. Water
2. Alcohol 75%
Caution!
Do not immerse or rinse the VNS Panel PC or its peripherals. If you accidentally
spill liquid on the device, disconnect the unit from the power source. Contact
your Biomed Department regarding the continued safety of the unit before
placing it back in operation.
Do not spray cleaning agent on the chassis.
Do not use disinfectants that contain phenol. Do not autoclave or clean the VNS Panel PC or
its peripherals with strong aromatic, chlorinated, ketone, ether, or Esther solvents, sharp tools
or abrasives. Never immerse electrical connectors in water or other liquids.


Quick Reference Guide
VNS-10W01 Quick Reference Guide
19
3.1 VNS-10W01 LED Programmer’s Reference manual
3.1.1 Android Studio
●Put the ledlib.jar into the app "libs" folder
●Set the jar file as library
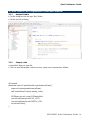
3.1.2 Sample code
●import this library in java file
●You can use the sample code to run any super user command as follows.
@Override
protected void onCreate(Bundle savedInstanceState) {
super.onCreate(savedInstanceState);
setContentView(R.layout.activity_main);
LEDlibrary mLed = new LEDlibrary(this);
//mLed.LedOpen(mLed.RED_LED);
//mLed.LedOpen(mLed.GREEN_LED);
mLed.LedClose();
}

VNS-10W01
20 VNS-10W01 Quick Reference Guide
3.2 For win 10 LED instruction
3.2.1 GENERICEC Library API Programmer’s Reference
After install the GENERICEC driver on the board, the API DLL file also install into Windows
system directory. The functions of API provide are list as below, refer to each function’s
description to get more detail information.
3.2.1.1 GENERICEC_Open
bool GENERICEC_Open()
Return Value:
True on success and False on failure.
Remarks:
The function will loading or initial the GENERICEC driver, for use by the application. If
the return value is False, it indicates the driver is not installing yet.
3.2.1.2 GENERICEC_Close
bool GENERICEC_Close()
Return Value:
True on success and False on failure.
Remarks:
This function will close and unload the GENERICEC driver, it must be called before the
application terminates. If the return value is False, it indicates the driver is not installing
successfully.
3.2.1.3 GENERICEC_Close
bool GENERICEC_Read(unsigned char *wbuf, int wlen, unsigned char *rbuf, int
rlen)
Return Value:
True on success and False on failure.
Parameters:
wbuf Write buffer.
wlen Write buffer length.
rbuf Read buffer.
rlen Read buffer length.
Remarks:
Write the wbuf data and read the result from the rbuf. If the return value is False, it
indicates the driver is not installing successfully or not uses the GENERICEC_Open
function first.
La page est en cours de chargement...
La page est en cours de chargement...
La page est en cours de chargement...
La page est en cours de chargement...
La page est en cours de chargement...
La page est en cours de chargement...
La page est en cours de chargement...
La page est en cours de chargement...
La page est en cours de chargement...
La page est en cours de chargement...
-
 1
1
-
 2
2
-
 3
3
-
 4
4
-
 5
5
-
 6
6
-
 7
7
-
 8
8
-
 9
9
-
 10
10
-
 11
11
-
 12
12
-
 13
13
-
 14
14
-
 15
15
-
 16
16
-
 17
17
-
 18
18
-
 19
19
-
 20
20
-
 21
21
-
 22
22
-
 23
23
-
 24
24
-
 25
25
-
 26
26
-
 27
27
-
 28
28
-
 29
29
-
 30
30


BCM Advanced Research VNS-10W01 Manuel utilisateur
- Taper
- Manuel utilisateur
dans d''autres langues
Documents connexes
Autres documents
-
ESAB 220 AMP Manuel utilisateur
-
Volvo 2009 Late Système de Navigation Volvo (VNS) avec RTT
-
 Tweco TWECO® FUSION™250 Air-Cooled Mig Gun 250 AMP Manuel utilisateur
-
ESAB FABRICATOR252i Manuel utilisateur
-
Volvo 2008 Guide de démarrage rapide
-
Volvo 2011 Late Système de Navigation Volvo (VNS) avec RTT
-
Volvo 2010 Système de Navigation Volvo (VNS) avec RTT
-
-
 Pfister 8P8-WSVNSK Mode d'emploi
-
 formlabs RS-F2-GPWH-04 Manuel utilisateur


