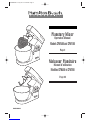
Hamilton Beach CPM700 Manuel utilisateur
- Catégorie
- Mélangeurs
- Taper
- Manuel utilisateur
Ce manuel convient également à


2
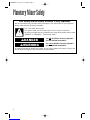
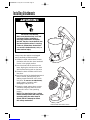
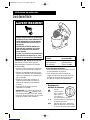
Planetary Mixer Safety
You will be killed or seriously injured if
you don’t follow instructions.
You can be killed or seriously injured if
you don’t follow instructions.
Your safety and the safety of others is very important.
We have provided many important safety messages in this manual and on your appliance.
Always read and obey all safety messages.
This is the safety alert symbol.
This symbol alerts you to hazards that can kill or hurt you and others.
All safety messages will be preceded by the safety alert symbol and the word
“DANGER” or “WARNING.” These words mean:
All safety messages will identify the hazard, tell you how to reduce the chance of injury, and
tell you what can happen if the instructions are not followed.
wDANGER
wWARNING
64384ENv04 11/9/01 11:10 AM Page 2

3
Planetary Mixer Safety
IMPORTANT SAFETY INSTRUCTIONS
WARNING – When using electrical appliances basic safety precautions should be
followed, including the following:
– SAVE THESE INSTRUCTIONS –
•Read the operation manual before using
mixer. Keep the manual handy.
•Plug into a grounded 3 prong outlet.
•Do not remove ground prong.
•Do not use an adapter.
•Do not use an extension cord.
•To reduce risk of personal injury, unplug
cord from outlet when not in use, and
before putting on or taking off parts.
•Do not store any kitchen utensils in the
bowl since the mixer would be damaged
if inadvertently turned on.
•To prevent possibility of serious personal
injury, keep hands out of mixing bowl
while operating mixer.
•Inspect bowl and attachments daily.
Check attachments for wear, nicks,
or damage. Replace bowl and
attachments if worn or damaged.
•Do not defeat the head lock mechanism.
•Do not use outdoors.
•Do not place in or near water or liquids.
•Only use the Hamilton Beach mixing
bowls and attachments as provided with
the unit. For replacement parts, see
page 15.
•To reduce risk of personal injury and
to prevent damage to mixer, bowl and
attachments DO NOT insert utensils into
mixer bowl while operating mixer.
•To prevent damage to mixer, bowl, or
attachments, DO NOT move or shake
mixer while in operation. If mixing action
stops during operation, turn mixer OFF,
raise the head and use a thin rubber
spatula to push mixture towards center
of bowl.
•Never exceed the maximum capacities
indicated in the operating instructions.
•Do not submerge in liquids or wash the
mixer base in a dishwasher.
•Do not spray the base with a high-
pressure spray gun.
•Do not carry the unit by the power cord.
•Disconnect power before cleaning.
•Only authorized service facilities should
repair the mixer.
•Do not operate any appliance with a
damaged cord or plug or after the
appliance malfunctions, or is dropped
or damaged in any manner.
64384ENv04 11/9/01 11:10 AM Page 3

4
Before You Begin
Electrical Requirements
Observe all governing
codes and ordinances.
A grounded, 3-prong 120
volt, 60 Hz, AC only, 15-
amp, fused electrical supply
is required. (A time-delay fuse is recommend-
ed.) It is recommended that a separate circuit
serving only this appliance be provided.
Setting up the base:
Always keep the appliance unplugged
during assembly and disassembly.
1. Check to make sure all parts for your
model are included, the machine
operates correctly, and that nothing
was damaged in shipping. Refer to
pages 5 and 6 for a list of included
parts. If anything is missing or
damaged, contact your machine
supplier immediately.
2. Place the base on a dry, sturdy, level
surface at a comfortable working
height, near a grounded 3 prong outlet.
3. Depending on the desired mixing task,
follow the instructions for selecting and
installing the appropriate attachments.
wWARNING
Electrical Shock Hazard
Plug into a grounded 3 prong outlet.
Do not remove ground prong.
Do not use an adapter.
Do not use an extension cord.
Failure to follow these instructions
can result in death, fire, or
electrical shock.
Preparing for use:
Always keep the appliance unplugged
during assembly and disassembly.
1. Wash all parts except for the base in
hot, soapy water. Rinse thoroughly
and dry.
2. Wipe the machine base with a
damp cloth.
64384ENv04 11/9/01 11:10 AM Page 4

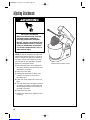
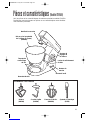
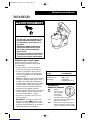
Parts and Features (Model CPM500)
5
The parts and features for planetary mixer model CPM500 are shown below. Become familiar
with all parts and features before using the planetary mixer.
CPM500 ATTACHMENTS
Beater
(KB500) Dough Hook
(DH500) Wire Whisk
(WW500) Plastic Spatula
(S100)
5 qt. Stainless
Steel Bowl
(BW500)
Speed
Control
Knob
Head
Release
Lever
Power OFF
Button
Power ON
Button
Bowl
Locking
Tabs
Attachment
Socket
Bowl Pad
64384ENv04 11/9/01 11:10 AM Page 5

6
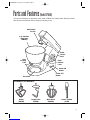
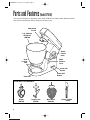
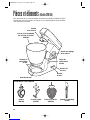
Parts and Features (Model CPM700)
The parts and features for planetary mixer model CPM700 are shown below. Become familiar
with all parts and features before using the planetary mixer.
7 qt. Stainless
Steel Bowl
(BW700)
Speed
Control
Knob
Head
Release
Lever
Power OFF
Button
Power ON
Button
Bowl
Locking
Tabs
Attachment
Socket
CPM700 ATTACHMENTS
Beater
(KB700) Dough Hook
(DH700) Wire Whisk
(WW700) Plastic Spatula
(S100)
Bowl Pad
64384ENv04 11/9/01 11:10 AM Page 6

7
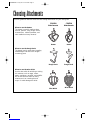
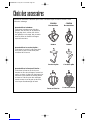
Choosing Attachments
Use the guidelines below to select the best mixing attachments for your mixing task.
When to use the beater:
The beater is used for making cakes,
biscuits, pastries, icing, fillings, éclairs,
cheesecakes, mashed potatoes, and
other medium to heavy mixtures.
When to use the dough hook:
The dough hook is used when kneading
bread doughs and other thick doughs
containing yeast.
When to use the wire whisk:
Use the wire whisk for whisking or mixing
thin mixtures, such as eggs, cream,
batter, meringues, mousses, and soufflés.
Do not use the wire whisk for heavy
mixtures such as creaming fat and
sugar—it could damage the whisk.
Beater
Dough Hook
Wire Whisk
Beater
Dough Hook
Wire Whisk
CPM500
Attachments CPM700
Attachments
64384ENv04 11/9/01 11:11 AM Page 7

8
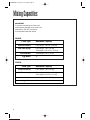
Mixing Capacities
IMPORTANT:
To prevent overloading the mixer and
avoid possible damage to the motor and
attachments, DO NOT exceed the
recommended capacities below:
Food Type Maximum Capacity
Shortcrust Pastry Flour weight: 1 lb 8 oz. (0.68 kg)
Stiff Yeast Dough Flour weight: 3 lbs (1.36 kg)
Total weight: 4 lbs 13 oz. (2.18 kg)
Fruit Cake Mix Total weight: 6 lbs (2.72 kg)
Egg Whites 12
CPM500
Food Type Maximum Capacity
Shortcrust Pastry Flour weight: 2 lbs (0.91 kg)
Stiff Yeast Dough Flour weight: 3 lbs 5 oz. (1.5 kg)
Total weight: 5 lbs 5 oz. (2.4 kg)
Fruit Cake Mix Total weight: 10 lbs (4.55 kg)
Egg Whites 16
CPM700
64384ENv04 11/9/01 11:11 AM Page 8

9
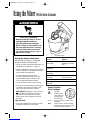
Always keep the appliance unplugged
during assembly and disassembly.
1.Rotate the head release lever counter-
clockwise and raise the mixer head until
it locks in the upright position.
2.Insert the bowl into the socket on the
base, aligning the notches on the bowl
with the bowl locking tabs on the base.
3.Rotate the bowl clockwise until it locks
into place.
4.Insert the shaft of the desired attachment
into the socket, pressing firmly and
rotating counterclockwise until it clicks
into place. To remove an attachment,
simply rotate it clockwise until it
disengages and pull it out.
5.Rotate the head release lever counter-
clockwise and gently lower the mixer
head until it locks in the operating
positon.
NOTE: The stand mixer has a safety
interlock that prevents the mixer from
operating when the mixer head is
raised. DO NOT attempt to defeat
this safety mechanism.
wWARNING
Pinch and Crush Hazard
Make sure that the mixer is off and
unplugged before installing or
removing attachments and parts.
DO NOT reach or insert utensils into
the bowl while the mixer is running.
Failure to follow these instructions
can result in broken bones, cuts, or
other serious injury.
Installing Attachments
CPM700 with wire whisk shown
64384ENv04 11/9/01 11:11 AM Page 9

1010
NOTE: It may be necessary to adjust the
attachments before initial use. If the wire
whisk or beater hits against the bottom of
the bowl, or does not extend far enough
into the bowl to mix ingredients properly,
follow the instructions below:
1.Insert the attachment to be adjusted in
the mixer, following the instructions and
precautions on page 9.
2.Raise the mixer head.
3.Holding the attachment in place, use
a wrench to loosen the lock nut on
the attachment.
4.Lower the mixer head until it locks into
place.
5.Turn the attachment clockwise (to lower)
or counter-clockwise (to raise) until the
desired height relative to the bottom of
the bowl is reached.
6.Raise the mixer head.
7.Holding the attachment, tighten the lock
nut firmly.
wWARNING
Pinch and Crush Hazard
Make sure that the mixer is off and
unplugged before installing or
removing attachments and parts.
DO NOT reach or insert utensils into
the bowl while the mixer is running.
Failure to follow these instructions
can result in broken bones, cuts, or
other serious injury.
Adjusting Attachments
CPM700 with wire whisk shown
64384ENv04 11/9/01 11:11 AM Page 10

11
Recommended
Action Speed
Creaming fat Start on min.,
and sugar gradually increase
to 5
Very small min. – 2
quantities
Beating fat, sugar, 4– max.
and eggs
Folding in flour, min. to 1
fruit, etc. Do not overmix.
Biscuit mix min. – 4
Rubbing fat min. –2
into flour
Using the Mixer With the Beater Attachment
Using the beater attachment
Always keep the appliance unplugged
during assembly and disassembly.
• Install the bowl and beater attachment by
following the instructions on page 9.
• Add the ingredients to the bowl, following
recipe instructions. Ingredients mix best
when liquids are added first.
• Set the speed control dial to the
minimum speed and ramp up to the
recommended speed (see the chart
of recommended speeds at right).
• Press the green button to start mixing.
• Stop the mixer frequently by pressing the
red button and scrape the sides of the
bowl clean with the plastic spatula.
IMPORTANT: Setting the control knob to
(standby) will minimize mixing but
does not shut off power to the motor.
Always press the red button to turn off
the mixer.
Tips and Hints:
• Use cold ingredients for pastries, unless
otherwise instructed in the recipe.
Speed Control
Knob Settings
Standby.
min. Slowest speed,
initial setting for
kneading thick
bread doughs.
1 – 6 Range of speeds used for most
operations.
max. Highest speed, used for beating
mixtures like fat, sugar, and eggs,
and for whisking operations.
wWARNING
Pinch and Crush Hazard
Make sure that the mixer is off and
unplugged before installing or
removing attachments and parts.
DO NOT reach or insert utensils into
the bowl while the mixer is running.
Failure to follow these instructions
can result in broken bones, cuts, or
other serious injury. CPM700 shown
64384ENv04 11/9/01 11:11 AM Page 11

12
Using the wire whisk attachment
Always keep the appliance unplugged
during assembly and disassembly.
• Install the bowl and wire whisk
attachment by following the instructions
on page 9.
• Add the ingredients to the bowl, following
recipe instructions. Ingredients mix best
when liquids are added first.
• Set the speed control dial to the
recommended speed (see the chart
of recommended speeds at right).
• Press the green button to start whisking.
IMPORTANT: Setting the control knob to
(standby) will minimize mixing but
does not shut off power to the motor.
Always press the red button to turn off
the mixer.
Tips and Hints:
• Eggs at room temperature work best
for whisking.
• When whisking egg whites, make sure
that there is no grease or egg yolk on the
whisk or bowl before you begin.
Recommended
Action Speed
Most whisking Gradually increase
operations to max.
wWARNING
Pinch and Crush Hazard
Make sure that the mixer is off and
unplugged before installing or
removing attachments and parts.
DO NOT reach or insert utensils into
the bowl while the mixer is running.
Failure to follow these instructions
can result in broken bones, cuts, or
other serious injury.
With the Wire Whisk Attachment
Using the Mixer
Speed Control
Knob Settings
Standby.
min. Slowest speed,
initial setting for
kneading thick
bread doughs.
1 – 6 Range of speeds used for most
operations.
max. Highest speed, used for beating
mixtures like fat, sugar, and eggs,
and for whisking operations.
64384ENv04 11/9/01 11:11 AM Page 12

13
Using the Mixer
Using the dough hook attachment
Always keep the appliance unplugged
during assembly and disassembly.
• Install the bowl and dough hook
attachment by following the instructions
on page 9.
• Add the ingredients to the bowl, following
recipe instructions. Ingredients mix best
when liquids are added first.
NOTE: Never exceed the maximum
capacities listed for your model on page 8.
You could overload and damage the
mixer. If the motor appears to be straining,
turn off the mixer and remove about half
the dough, and knead in smaller batches.
• Set the speed control dial to the
recommended speed (see the chart
of recommended speeds at right).
• Press the green button to start kneading.
IMPORTANT: Setting the control knob to
(standby) will minimize mixing but does
not shut off power to the motor. Always
press the red button to turn off the mixer.
Recommended
Action Speed
Most kneading Start at min.,
operations gradually increase
to 1.
wWARNING
Pinch and Crush Hazard
Make sure that the mixer is off and
unplugged before installing or
removing attachments and parts.
DO NOT reach or insert utensils into
the bowl while the mixer is running.
Failure to follow these instructions
can result in broken bones, cuts, or
other serious injury.
With the Dough Hook Attachment
Speed Control
Knob Settings
Standby.
min. Slowest speed,
initial setting for
kneading thick
bread doughs.
1 – 6 Range of speeds used for most
operations.
max. Highest speed, used for beating
mixtures like fat, sugar, and eggs,
and for whisking operations.
64384ENv04 11/9/01 11:11 AM Page 13

14
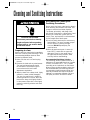
Preparing to clean
Always clean the stand mixer immediately
after use. Cleaning (and sanitizing) is also
recommended between batches when
processing different foods.
1.Make sure the unit is off and unplug
the unit.
2.Remove the bowl and any attachments.
The bowl and attachments should
be cleaned as instructed at right or
in accordance with local health
department regulations.
3.Wipe the base with a damp cloth, lightly
soaked in a water soluble detergent.
The use of a small brush is helpful in
removing food from crevices. Wipe the
base with a damp cloth lightly soaked
in clean water. Wipe with a cloth lightly
soaked in sanitizing solution and allow
to air dry.
Recommended Cleaning and
Sanitizing Procedures
Never use a wire brush, steel wool or bleach
when washing the stainless steel bowl. Use
vinegar to remove hard water deposits.
The beater, wire whisk, and dough hook
will discolor if washed in a dishwasher. Hand
washing in a three tank system pot sink
(wash, rinse, and sanitize) is recommended
for the longest life of these parts.
1.Pre-rinse each attachment to remove any
food residue. The use of a power sprayer
can be helpful in cleaning out tight
crevices. DO NOT powerspray the
machine base.
2.Wash all attachment parts in warm (at
least 120° F) water with an approved
detergent. Rinse in clear water then in
an approved sanitizing solution. Allow
to air dry before reassembling.
Recommended Sanitizing Solution:
The sanitizing solution should consist of 1
tablespoon of household bleach per 1 gallon
of clean, cool water (60° F, 16° C) mixed
according to the instructions on the bleach.
When using a sanitizing solution other than
that recommended, the sanitizing solution
concentration should be tested using com-
mercially available test strips and should
indicate a concentration between 100 and
200 parts per million of bleach to water.
wWARNING
Electrical Shock Hazard
Disconnect power before cleaning.
Replace all parts before operating.
Failure to do so can result in death
or electrical shock.
Cleaning and Sanitizing Instructions
64384ENv04 11/9/01 11:11 AM Page 14

15
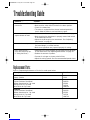
Troubleshooting Guide
Solution . . .
• Make sure the mixer is plugged in.
• Make sure the mixer head is locked in the down position.
• Check for a blown fuse.
• The motor is equipped with a thermal overload protection
circuit. Allow the motor to cool and then try again.
• Make sure bowl is seated properly and lock tabs are engaged.
• Make sure that the attachment is properly seated and locked
in the attachment socket.
• Adjust the shaft length on the attachment. See “Adjusting
Attachments” on page 10.
• Reduce the amount of product in the bowl. Mix thick products,
like bread dough, in smaller batches.
• Make sure ingredients are prepared properly for mixing.
• Attachment not reaching bottom of bowl. Adjust the shaft length
on the attachment. See “Adjusting Attachments” on page 10.
• Reduce the amount of product.
• Process for a longer or shorter period of time.
• Adjust the mixing speed. See the recommended speed charts.
Problem . . .
Planetary mixer will
not turn on
Beater or wire whisk hits
against bottom of bowl
Motor strains or stops
Poor mixing results
(See also Hints and Tips
in “Using the Mixer”)
Replacement Parts
All Models
Plastic Spatula
CPM500
5 quart Stainless Steel Bowl
Beater Attachment for 5 qt. bowl
Dough Hook for 5 qt. bowl
Wire Whisk for 5 qt. bowl
CPM700
7 quart Stainless Steel Bowl
Beater Attachment for 7 qt. bowl
Dough Hook for 7 qt. bowl
Wire Whisk for 7 qt. bowl
Description . . . Part Number . . .
S100
BW500
KB500
DH500
WW500
BW700
KB700
DH700
WW700
Refer to “Requesting Assistance or Service” to order parts below.
64384ENv04 11/9/01 11:11 AM Page 15

16
Recipes
English-Style Stiff White Bread
3 lbs (1.36 kg) strong plain flour 3 tsp (15 ml) salt
1⁄2oz. (12 g) dried yeast 1 tsp (5 ml) sugar
1 oz (25 g) lard 20 oz. (750 ml) warm water (110° F / 43° C)
1. If using dried yeast, pour the warm water into the bowl and add the yeast and sugar.
Let stand for 10 minutes until frothy. For other types of yeast, follow the manufacturer’s
instructions.
2. Pour the liquid into the bowl (if not already done in step 1). Then add the flour (with fresh
yeast, if used), salt and lard.
3. Knead at minimum speed for 45–60 seconds. Increase speed to 1, adding more flour if
needed, until a dough forms.
4. Knead for 3–4 minutes at speed 1 until the dough is smooth.
5. Place the dough in a greased plastic bag or in a bowl covered with a clean cloth, and
leave in a warm location to rise until it has doubled in size.
6. Knead again for 2 minutes at speed 1.
7. Half fill 1 lb (450 g) greased bread pans or shape into rolls. Cover with a clean cloth and
leave in a warm location to rise until it doubled in size.
8. Bake at 450° F (230 °C) for 30–35 minutes for loaves, or 10–15 minutes for rolls. When
ready, the bread should sound hollow when tapped on the bottom.
64384ENv04 11/9/01 11:11 AM Page 16

17
Recipes
Strawberry and Apricot Gâteau
Sponge cake:
3 eggs 3 oz. (75 g) caster sugar
3 oz. (75 g) plain flour
Filling and decoration:
1 cup (150 ml) heavy cream Sugar (to taste)
8 oz. (225 g) fresh strawberries 8 oz. (225 g) fresh apricots
1. Halve the apricots and remove the stones. Cook gently in very little water until soft,
adding sugar to taste.
2. Wash and halve the strawberries.
3. To make the sponge, whisk the eggs and sugar at maximum speed
until very pale and thick.
4. Remove the bowl and the whisk. Holding the whisk, fold in the flour by hand—do this
carefully to keep the sponge light.
5. Put the mixture into two 18 cm (7″) greased and lined sandwich pans.
6. Bake at 350° F (180° C) for about 20 minutes until the cake springs back
lightly when touched.
7. Turn out onto a wire rack.
8. Whisk the cream at maximum speed until stiff. Add sugar to taste.
9. Roughly chop the apricots and a third of the strawberries. Fold them into
half the cream.
10. Spread the cream mixture over one of the sponge cakes, then place the other sponge
cake on top.
11. Spread the remaining cream over the top of the cake and decorate with the
remaining strawberries.
64384ENv04 11/9/01 11:11 AM Page 17

18
Recipes
Meringues
4 egg whites 9 oz. (250 g) icing sugar, sieved
1. Line a baking tray with non-stick baking parchment.
2. Whisk the egg whites and sugar at maximum speed for about 10 minutes, until it stands
in peaks.
3. Spoon the mixture onto the baking tray (or use a piping bag with a 1″[2.5 cm]
star nozzle).
4. Bake at 225° F (110° C) for about 4–5 hours, until firm and crisp. If they start to brown,
leave the oven door slightly ajar.
5. Store meringues in an airtight canister.
Shortcrust Pastry
1 lb (450 g) flour 1 tsp (5 ml) salt
8 oz. (225 g) fat (mix lard and margarine 4 tbsp (80 ml) water
straight from the refrigerator)
Hint: Don’t overmix!
1. Sieve the flour with the salt.
2. Place the flour into the bowl. Chop the fat mixture up roughly and add to the flour.
3. Mix at speed min. to 1 until it resembles breadcrumbs. Do not overmix.
4. Add the water and mix at minimum speed. Stop as soon as the water is blended in.
5. Cook at about 400°F (200° C), depending on the filling.
64384ENv04 11/9/01 11:11 AM Page 18

19
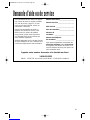
Requesting Assistance or Service
Call our toll-free customer service number
1-800-572-3331
8 a.m. – 5:30 p.m. EST Monday – Thursday, 8 a.m. – 5:15 p.m. EST Friday
Before calling for assistance or service,
please check the “Troubleshooting Guide”
on page 15. If you still need help, follow
the instructions below.
Whenever you call to request
assistance or service, you need to
know the complete model number. You
can find this information on the label on
the inside wall of your planetary mixer.
Please also record the purchase date of
your equipment and your dealer’s name,
address, and telephone number.
Model Number ____________________
Series Number ____________________
Purchase Date ____________________
Dealer Name ______________________
Dealer Address ____________________
Dealer Phone ______________________
You can also order replacement parts
and attachments by calling your nearest
Hamilton Beach Commercial Service
Center or your local dealer.
LIMITED WARRANTY
This product is warranted to be free from defects in material and workmanship for a period
of two (2) years from the date of original purchase, except as noted below. During this peri-
od, we will repair or replace this product, at our option, at no cost. THE FOREGOING WAR-
RANTY IS IN LIEU OF ANY OTHER WARRANTY, WHETHER EXPRESS OR IMPLIED,
WRITTEN OR ORAL INCLUDING ANY WARRANTY OF MERCHANTABILITY OR FIT-
NESS FOR A PARTICULAR PURPOSE. ANY LIABILITY IS EXPRESSLY LIMITED TO AN
AMOUNT EQUAL TO THE PURCHASE PRICE PAID, AND ALL CLAIMS FOR SPECIAL,
INCIDENTAL AND CONSEQUENTIAL DAMAGES ARE HEREBY EXCLUDED. There is no
warranty with respect to parts subject to wear supplied with or a part of this product (motor
brushes, container and cutter assembly, clutches, etc.). This warranty does not cover
defects resulting from abuse, neglect, or any use not in conformity with the printed direc-
tions. Always use this product in accordance with the Operation Manual.
If you have a claim under this warranty, please deliver or mail the product to the nearest
authorized service center which you can locate by calling our toll-free customer service
number 1-800-572-3331 or by looking in your local yellow pages for the nearest authorized
Hamilton Beach Commercial Service Center.
Product Warranty
Hamilton Beach/Proctor-Silex, Inc.
Commercial Customer Service
263 Yadkin Road
Southern Pines, NC 28387
This Warranty supercedes all other Product Warranties
11/01
64384ENv04 11/9/01 11:11 AM Page 19

20
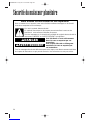
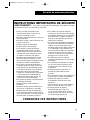
Sécurité du malaxeur planétaire
Vous décéderez ou serez sérieusement
blessé si vous ne respectez pas ces
instructions.
Vous risquez d’être tué ou d’être grave-
ment blessé si vous ne respectez pas
ces instructions.
Votre sécurité et celle d’autrui est très importante.
Dans ce manuel et sur l’appareil, nous avons listé de nombreux messages sur la sécurité.
Lisez-les et respectez-les en tout temps.
Ceci est le symbole d’alerte sécurité.
Ce symbole vous alerte sur les risques pouvant entraîner la mort ou des
blessures à vous-même et à d’autres personnes.
Tous les messages sur la sécurité sont précédés du symbole alerte sécurité et
des termes “DANGER” ou “AVERTISSEMENT” qui signifient :
Tous les messages de sécurité définissent quel est le risque, vous disent comment minimiser
les risques de blessures et ce qui pourrait survenir si les instructions ne sont pas suivies.
wDANGER
w
AVERTISSEMENT
64384FRv03 11/9/01 11:14 AM Page 20
La page charge ...
La page charge ...
La page charge ...
La page charge ...
La page charge ...
La page charge ...
La page charge ...
La page charge ...
La page charge ...
La page charge ...
La page charge ...
La page charge ...
La page charge ...
La page charge ...
La page charge ...
La page charge ...
La page charge ...
La page charge ...
La page charge ...
La page charge ...
-
 1
1
-
 2
2
-
 3
3
-
 4
4
-
 5
5
-
 6
6
-
 7
7
-
 8
8
-
 9
9
-
 10
10
-
 11
11
-
 12
12
-
 13
13
-
 14
14
-
 15
15
-
 16
16
-
 17
17
-
 18
18
-
 19
19
-
 20
20
-
 21
21
-
 22
22
-
 23
23
-
 24
24
-
 25
25
-
 26
26
-
 27
27
-
 28
28
-
 29
29
-
 30
30
-
 31
31
-
 32
32
-
 33
33
-
 34
34
-
 35
35
-
 36
36
-
 37
37
-
 38
38
-
 39
39
-
 40
40


Hamilton Beach CPM700 Manuel utilisateur
- Catégorie
- Mélangeurs
- Taper
- Manuel utilisateur
- Ce manuel convient également à
dans d''autres langues
- English: Hamilton Beach CPM700 User manual