EXPLORE RDC1008 Le manuel du propriétaire
- Catégorie
- Réveils
- Taper
- Le manuel du propriétaire
Ce manuel convient également à

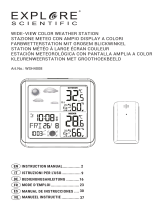
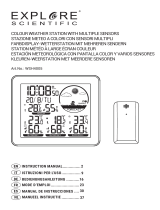
COMPACT RADIO CONTROLLED CLOCK WITH INDOOR TEMPERATURE S
OROLOGIO RADIOCONTROLLATO COMPATTO CON TEMPERATURA INTERNA
KOMPAKTER FUNKWECKER MIT INNENTEMPERATUR
HORLOGE RADIO-PILOTÉE COMPACTE AVEC TEMPÉRATURE INTÉRIEURE
RELOJ COMPACTO RADIOCONTROLADO CON TEMPERATURA INTERIOR
COMPACTE RADIOGESTUURDE KLOK MET BINNENTEMPERATUUR
ART.NO.:
RDC1008
IT
ISTRUZIONI PER L’USO ................
DE
BEDIENUNGSANLEITUNG
............
EN
INSTRUCTION MANUAL ..............
2
MODE D‘EMPLOI
FR
MANUAL DE INSTRUCCIONES
ES
NL
MANUEEL INSTRUCTIE
....
...........................
...............
10
18
26
34
42

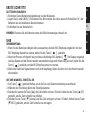
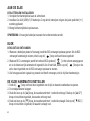
ABOUT THIS INSTRUCTION MANUAL
These operating instructions are to be considered a component of the device.
Please read the safety instructions and the operating instructions carefully before use.
Keep these instructions for renewed use at a later date. When the device is sold or given
to someone else, the instruction manual must be provided to the new owner/ user of the product.
The device is intended only for indoor use.
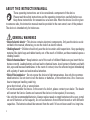
GENERAL WARNINGS
• Risk of electric shock — This device contains electronic components. Only use the device as de-
scribed in the manual; otherwise, you run the risk of an electric shock.
• Choking hazard — Children should only use the device under adult supervision. Keep packaging
material, like platic bags and rubber bands, out of the reach of children, as these materials pose a
choking hazard.
• Risk of chemical burn — Keep batteries out of the reach of children! Make sure you insert the ba-
tteries correctly. Leaking battery acid can lead to chemical burns. Avoid contact of battery acid with
skin, eyes and mucous membranes. In the event of contact, rinse the affected region immediately
with a plenty of water and seek medical attention.
• Risk of fire/explosion — Do not expose the device to high temperatures. Use only the recomme-
nded batteries. Do not short-circuit the device or batteries, or throw them into a fire. Excessive
heat or improper handling could trig-
ger a short-circuit, a fire, or an explosion.
• Do not disassemble the device. In the event of a defect, please contact your dealer. The dealer
will contact the Service Centre and can send the device in to be repaired, if necessary.
• Use only the recommended batteries. Always replace weak or empty batteries with a new, compl-
ete set of batteries at full capacity. Do not use batteries from different brands or with different
capacities. The batteries should be removed from the unit if it has not been used for a long time.
2

EN
IT
DE
FR
ES
NL
3
SCOPE OF DELIVERY
Clock, Operating instructions, 2x AAA batteries.
BEFORE YOU BEGIN
• We recommend using alkaline batteries. If temperatures regularly fall below 0°C (32°F), we rec-
ommend using lithium batteries.
• Avoid using rechargeable batteries. (Rechargeable batteries cannot maintain correct power req-
uirements.)
• Insert batteries before first use, matching the polarity in the battery compartment. 2x AAA Batt-
eries are required for the Clock.

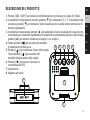
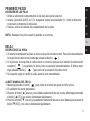
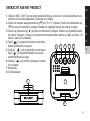
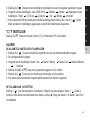
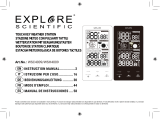
PRODUCT OVERVIEW
1. Press [ SNZ / LIGHT ] to activate the backlight or to activate the snooze function to delay thealarm
for 5 minutes.
2. While in normal display mode, press [ ] to select °C or °F. While in setting mode, press
[ ] to decrease one unit, press and hold to decrease rapidly.
3. While in time setting mode, press [ ] to increase one unit, press and hold to increase
rapidly. While in alarm time checking mode, press [ ] to turn on/off the Alarm 1 or Alarm 2.
4. Press and hold [ ] to enter time and date setting mode.
5. Press [ ] to check the alarm time. Press and
hold [ ] to enter alarm setting mode.
6. Press [ ] to initiate or stop RCC receiving.
7. Battery compartment.
8. Table stand.
1
2
7
8
3
4
5 6
4

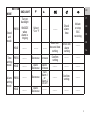
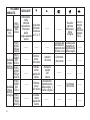
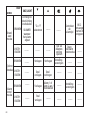
BUTTON
MODE
SNZ/LIGHT
Stand-
ard
mode
PRESS
Turn on
backlight
SNOOZE
when
alarm is
ringing
HOLD
Time
setting
mode
PRESS
_______
HOLD
_______
Alarm
setting
mode
PRESS
_______
HOLD
_______
_______
Decrease
_______
_______
_______
_______
_______
Increase
Quick
Increase
Check
alarm
time
Enter into
alarm
setting
Select
°C or °F
_______
Quick
Decrease
Decrease
Quick
Decrease
_______
Enter into
time and date
setting
Confirm
setting
_______
_______
_______
Confirm
setting
Initiate
or stop
RCC
receiving
_______
_______
_______
_______
_______
5
EN
IT
DE
FR
ES
NL
Turn
Alarm 1
or
Alarm 2
on/off
_______

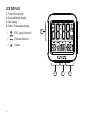
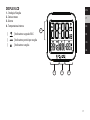
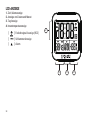
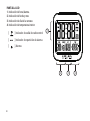
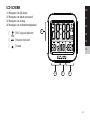
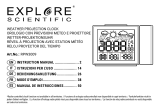
LCD DISPLAY
1. Time/Alarm display
2. Date and Month display
3. Day display
4. Indoor Temperature display
[ ] RCC signal indicator
[ ] Snooze indicator
[ ] Alarm
6
2
3 4
2

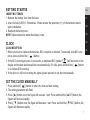
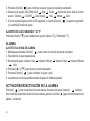
GETTING STARTED
INSERT BATTERIES
1. Remove the battery door from the back.
2. Insert 2x AAA (LR03)/1.5V batteries. Please ensure the polarities (+/-) of the batteries match
upon installation.
3. Reattach the battery door.
NOTE: Replace batteries when the display is dim.
CLOCK
CLOCK RECEPTION
1. When you insert or replace the batteries, RCC reception is initiated. To manually start RCC rece-
ption, press and hold the [ ] button.
2. If the RCC receiving process is successful, a completed RCC symbol [ ] will be shown in the
display and the date and time will be set automatically. If it fails, press and hold the [ ] button
to re-initiate RCC receiving.
3. If the device is still not receiving the signal, please proceed to set the time manually.
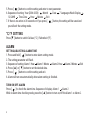
SET THE CLOCK MANUALLY
1. Press and hold [ ] button to enter into time and date setting.
2. The setting parameter will flash.
3. Press [ ] button once, the figure will increase 1 unit. Press and hold the [ /CF ] button, the
figures will increase rapidly.
4. Press [ ] button once, the figure will decrease 1 unit. Press and hold the [ /RCC ] button, the
figures will decrease rapidly.
7
EN
IT
DE
FR
ES
NL

5. Press [ ] button to confirm setting and enter to next parameter.
6. Sequence of setting: Year (2004-2054) Month Date 7 Languages Week Display
12/24HR Time Zone Hour Minute Exit
7. If there is no action in 30 seconds or If you press [ ] button, the setting will be saved and
you will exit the setting mode.
°C/°F SETTING
Press [ ] button to switch Celsius (°C) / Fahrenheit (°F).
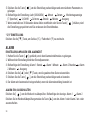
ALARM
SETTING/ADJUSTING ALARM TIME
1. Press and hold [ ] button to enter alarm setting mode.
2. The setting parameter will flash.
3. Sequence of setting: Alarm 1 Hour Alarm 1 Minute Alarm 2 Hour Alarm 2 Minute Exit
4. Press [ ] or [ ] button to set the desired data.
5. Press [ ] button to confirm setting and exit.
6. Alarm will turn on automatically when alarm setting is finished.
TURN ON/OFF ALARM
Press [ ] to check the alarm time. Sequence of display: Alarm 1 Alarm 2
While in alarm time checking mode, press the [ ] button to turn on/off the Alarm 1 or Alarm 2.
8

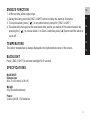
SNOOZE FUNCTION
1. At the set time, alarm signal rings.
2. During the alarm, press the [ SNZ / LIGHT ] button to delay the alarm by 5 minutes.
3. To stop the alarm, press [ ] or any other button, except for [ SNZ / LIGHT ].
4. The alarm will start again at the next alarm time, unless you switch off the alarm function by
pressing the [ ] to choose Alarm 1 or Alarm 2 and then press [ ] button until the alarm is
set to off.
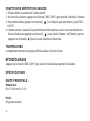
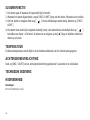
TEMPERATURE
The indoor temperature is always displayed in the right bottom corner of the screen.
BACKLIGHT
Press [ SNZ / LIGHT ] to activate backlight for 5 seconds.
SPECIFICATIONS
MAIN UNIT:
Dimensions
80 x 70 x 30 mm (L x W x H)
Weight
85 g (Exclude batteries)
Power:
2x AAA (LR03) 1.5V batteries
EN
IT
DE
FR
ES
NL
9

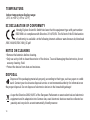
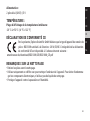
EC DECLARATION OF CONFORMITY
Hereby, Explore Scientific GmbH declares that the equipment type with part number:
RDC1008 is in compliance with Directive: 2014/53/EU. The full text of the EU declaration
of conformity is available at the following internet address: www.bresser.de/download
/RDC1008/CE/RDC1008_CE.pdf
NOTES ON CLEANING
• Remove the batteries before cleaning.
• Only use a dry cloth to clean the exterior of the device. To avoid damaging the electronics, do not
use any cleaning fluid.
• Protect the device from dust and moisture.
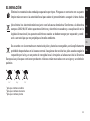
DISPOSAL
Dispose of the packaging materials properly, according to their type, such as paper or cardb-
oard. Contact your local waste-disposal service or environmental authority for information on
the proper disposal. Do not dispose of electronic devices in the household garbage!
As per the Directive 2002/96/EC of the European Parliament on waste electrical and electronic
equipment and its adaptation into German law, used electronic devices must be collected se-
parately and recycled in an environmentally friendly manner.
10
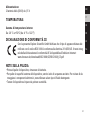
TEMPERATURE:
Indoor temperature display range:
-20°C to +50°C (-4°F to 122°F)

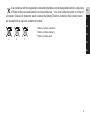
Cd ¹ Hg ² Pb ³
In accordance with the regulations concerning batteries and rechargeable batteries, disposing
of them in the your used batteries as required by law — at a local collection point or in the ret-
ail market. Disposal in domestic waste violates the Battery Directive. Batteries that contain toxins
are marked with a sign and a chemical symbol.
EN
IT
DE
FR
ES
NL
11
1
battery contains cadmium
2
battery contains mercury
3
battery contains lead

12
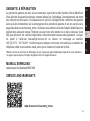
WARRANTY & SERVICE
The regular guarantee period is 2 years and begins on the day of purchase. To benefit from an ext-
ended voluntary guarantee period as stated on the gift box, registration on our website is required.
You can consult the full guarantee terms as well as information on extending the guarantee period
and details of our services at www.bresser.de/warranty_terms. Would you like detailed instructions
for this product in a particular language? Then visit our website via the link below (QR code) for
available versions. Alternatively you can also send an email to manuals@bresser.de or leave a
message on +49 (0) 28 72 – 80 74-220*. Please always state your name, precise address, a valid
phone number and email address, as well as the article number and name.
*
Number charged at local rates in Germany (the amount you will be charged per phone call will depend on the tariff
of your phone provider); calls from abroad will involve higher costs.
Errors and technical changes reserved.
MANUAL DOWNLOAD:
www.bresser.de/download/RDC1008
SERVICE AND WARRANTY:
www.bresser.de/warranty_terms

INFORMAZIONI SUL MANUALE DI ISTRUZIONI
Il presente manuale è parte integrante del prodotto. Non azionare il dispositivo prima
di aver letto attentamente le istruzioni di sicurezza e le istruzioni per l'uso in esso
contenute.Il manuale deve essere conservato in modo che sia possibile consultarlo
anche in seguito. Nel caso in cui il dispositivo venga venduto o ceduto a terzi, dovrà essere fo-
rnito al nuovo possessore del dispositivo.
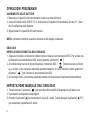
AVVERTENZE GENERALI
• Rischio di folgorazione — Questo apparecchio contiene componenti elettronici azionati da una so-
rgente di corrente (alimentatore e/o batterie). L’utilizzo deve avvenire in stretta conformità con
quanto prescritto nel presente manuale. In caso contrario, non sarà possibile escludere il rischio
di infortuni elet- trici.
• Pericolo di soffocamento — I bambini possono utilizzare il dispositivo solo sotto la vigilanza di un
adulto. I materiali di imballaggio, i sacchetti di plastica e le fasce in gomma possono causare sof-
foca- mento e, pertanto, devono essere conservati in modo che i bambini non riescano a raggiun-
gerli.
• Rischio di ustione chimica — Tenere le batterie fuori dalla portata dei bambini. Accertarsi di in-
stallare le batterie nel modo corretto. La fuoriuscita di acido dalle batterie può causare ustioni
chimiche. Evitare che l’acido venga a contatto con pelle, occhi e mucose. In caso, lavare immed-
iatamente le parti interessate con un’abbondante quantità di acqua e rivolgersi a un medico.
• Rischio di incendio/esplosione — Non esporre il dispositivo a temperature elevate. Utilizzare solo
le batterie consigliate. Evitare che possano verificarsi corto-circuiti a carico del dispositivo o delle
batterie. Non gettare il dispositivo o le batterie nel fuoco. Il surriscaldamento o l’impiego inapp-
ropriato potrebbe generare un cortocircuito, un incendio o un'esplosione.
13
EN
IT
DE
FR
ES
NL

14
• Non smontare il dispositivo. Qualora dovesse rilevarsi difettoso, rivolgersi al proprio rivenditore
autoriz- zato. Il rivenditore provvederà a contattare il Centro assistenza e, se necessario, spedirà
il dispositivo in riparazione.
• Utilizzare solo le batterie consigliate. Le batterie scariche o esaurite devono essere sempre sos-
tituite con una serie completa di batterie nuove di capacità massima. Non utilizzare batterie di
marche o capacità diverse. Rimuovere le batterie dall’unità se questa rimarrà inutilizzata per un
periodo prolungato.
CONTENUTO DELLA CONFEZIONE
Orologio, Istruzioni per l'uso, 2 batterie AAA.
PRIMA DI INIZIARE
• Si consiglia l'uso di batterie alcaline. Se le temperature tendono regolarmente a scendere sotto
0 °C (32 °F), tuttavia, potrebbe essere preferibile l’impiego di batterie al litio.
• Evitare di utilizzare batterie ricaricabili (le batterie ricaricabili non soddisfano i requisiti di aliment-
azione appropriati).
• L'orologio richiede 2 batterie AAA

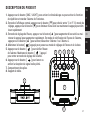
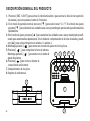
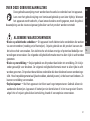
DESCRIZIONE DEL PRODOTTO
1. Premere [ SNZ / LIGHT ] per attivare la retroilluminazione o posticipare la sveglia di 5 minuti.
2. In modalità di visualizzazione normale, premere [ ] per selezionare °C o °F. In modalità di imp-
ostazione, premere [ ] per diminuire il valore visualizzato di una unità; tenerlo premuto per di-
minuirlo rapidamente.
3. In modalità di impostazione, premere [ ] per aumentare il valore visualizzato di una unità; ten-
erlo premuto per aumentarlo rapidamente. In modalità di visualizzazione dell'orario della sveglia,
premere [ ] per attivare o disattivare la sveglia 1 o la sveglia 2.
4. Tenere premuto [ ] per accedere alla modalità
di impostazione di data e ora.
5. Premere [ ] per visualizzare l'orario della sveglia.
Tenere premuto [ ] per accedere alla
modalità di impostazione della sveglia.
6. Premere [ ] per avviare o arrestare la
sincronizzazione RCC.
7. Vano batterie
8. Supporto per tavolo
1
2
7
8
3
4
5 6
15
EN
IT
DE
FR
ES
NL

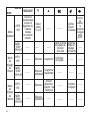
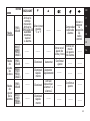
PULSANTE
MODALITÀ
Moda-
lità
normale
PRES-
SIONE
SIN-
GOLA
Attivazione
della
retroillu-
minazione.
Posticipo
della
sveglia quando
suona
PRES-
SIONE
PROLU-
NGATA
Modalità
impos-
tazione
orologio
Modalità
impos-
tazione
sveglia
Diminu-
zione
del valore
Visualiz-
zazione
dell'orario
della
sveglia
Accesso alla
modalità di
impostazione
della sveglia.
Selezione
dell'unità
di misura
tra °C e °F
Diminu-
zione
rapida del
valore
Conferma
del valore
Avvio o
arresto
della
sincroniz-
zazione
RCC.
Aumento
del valore
Aumento
rapido
del
valore
Attivazione/
disattivazione
della sveglia 1
o della sveglia 2
Accesso alla
modalità di
impostazione
di data e ora
Conferma
del valore
16
SNZ/LIGHT
_______
_______
_______
_______
_______
_______
_______
_______
_______
_______
_______
_______
_______
_______
_______
_______
_______
_______
_______
_______
_______
Diminu-
zione
del valore
Diminu-
zione
rapida del
valore
PRES-
SIONE
PROLU-
NGATA
PRES-
SIONE
PROLU-
NGATA
PRES-
SIONE
SIN-
GOLA
PRES-
SIONE
SIN-
GOLA

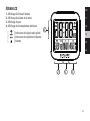
DISPLAY LCD
1. Orologio/Sveglia
2. Data e mese
3. Giorno
4. Temperatura interna
[ ] Indicatore segnale RCC
[ ] Indicatore posticipo sveglia
[ ] Indicatore sveglia
17
EN
IT
DE
FR
ES
NL
2
3 4
2

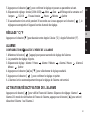
OPERAZIONI PRELIMINARI
INSERIMENTO DELLE BATTERIE
1. Rimuovere il coperchio del vano batterie situato sul retro dell'unità.
2. Inserire 2 batterie AAA (LR03)/1,5 V. Assicurarsi di rispettare l'orientamento dei poli (+/-) dura-
nte l'installazione delle batterie.
3. Riposizionare il coperchio del vano batterie.
NOTA: sostituire le batterie quando la luminosità del display si abbassa.
OROLOGIO
IMPOSTAZIONE AUTOMATICA DELL'OROLOGIO
1. Dopo aver inserito o sostituito le batterie verrà avviata la sincronizzazione RCC. Per avviare ma-
nualmente la sincronizzazione RCC, tenere premuto il pulsante [ ].
2. Al termine del processo di sincronizzazione, l'indicatore RCC [ ] rimarrà acceso sul displ-
ay, e la data e l'ora verranno impostate automaticamente. In caso contrario, tenere premuto il
pulsante [ ] per riavviare la sincr-onizzazione RCC.
3. Se l'orologio non si sincronizza automaticamente, sarà necessario impostarlo manualmente.
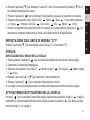
IMPOSTAZIONE MANUALE DELL'OROLOGIO
1. Tenere premuto il pulsante [ ] per accedere alla modalità di impostazione di data e ora.
2. Il parametro da impostare lampeggerà.
3. Premere il pulsante [ ] per aumentare il valore di 1 unità. Tenere premuto il pulsante [ /CF ]
per aumentare rapidamente il valore.
18

4. Premere il pulsante [ ] per diminuire il valore di 1 unità. Tenere premuto il pulsante [ /RCC ]
per diminuire rapidamente il valore.
5. Premere il pulsante [ ] per confermare l'impostazione e passare al parametro successivo.
6. Sequenza dei parametri: Anno (2004-2054) Mese Data Giorno della settimana
in 7 lingue Formato 12/24 ore Fuso orario Ore Minuti Uscita
7. Se non viene premuto alcun pulsante entro 30 secondi, o se viene premuto il pulsante [ ], le
impostazioni verranno memorizzate e l'unità uscirà dalla modalità di impostazione.
IMPOSTAZIONE DELL'UNITÀ DI MISURA °C/°F
Premere il pulsante [ ] per selezionare i gradi Celsius (°C) o Fahrenheit (°F).
SVEGLIA
IMPOSTAZIONE DELL'ORARIO DELLA SVEGLIA
1. Tenere premuto il pulsante [ ] per accedere alla modalità di impostazione della sveglia.
2. Il parametro da impostare lampeggerà.
3. Sequenza dei parametri: Ore sveglia 1 Minuti sveglia 1 Ore sveglia 2 Minuti sveglia
2 Uscita
4. Premere il pulsante [ ] o [ ] per impostare il valore desiderato.
5. Premere il pulsante [ ] per confermare l'impostazione e uscire.
6. La sveglia si attiverà automaticamente al termine dell'impostazione dell'orario della sveglia.
ATTIVAZIONE/DISATTIVAZIONE DELLA SVEGLIA
Premere [ ] per visualizzare l'orario della sveglia. Sequenza dei parametri: Sveglia 1 Sveglia 2
In modalità di visualizzazione dell'orario della sveglia, premere il pulsante [ ] per attivare o disa-
ttivare la sveglia 1 o la sveglia 2.
19
EN
IT
DE
FR
ES
NL

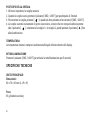
POSTICIPO DELLA SVEGLIA
1. All'orario impostato, la sveglia suonerà.
2. Quando la sveglia suona, premere il pulsante [ SNZ / LIGHT ] per posticiparla di 5 minuti.
3. Per arrestare la sveglia, premere [ ] o qualsiasi altro pulsante ad eccezione di [ SNZ / LIGHT ].
4. La sveglia suonerà nuovamente il giorno successivo, a meno che non venga disattivata preme-
ndo il pulsante [ ]: selezionare la sveglia 1 o la sveglia 2, quindi premere il pulsante [ ] fino
alla disattivazione.
TEMPERATURA
La temperatura interna è sempre visualizzata nell'angolo inferiore destro del display.
RETROILLUMINAZIONE
Premere il pulsante [ SNZ / LIGHT ] per attivare la retroilluminazione per 5 secondi.
SPECIFICHE TECNICHE
UNITÀ PRINCIPALE:
Dimensioni:
80 x 70 x 30 mm (L x P x H)
Peso:
85 g (batterie escluse)
20
La page charge ...
La page charge ...
La page charge ...
La page charge ...
La page charge ...
La page charge ...
La page charge ...
La page charge ...
La page charge ...
La page charge ...
La page charge ...
La page charge ...
La page charge ...
La page charge ...
La page charge ...
La page charge ...
La page charge ...
La page charge ...
La page charge ...
La page charge ...
La page charge ...
La page charge ...
La page charge ...
La page charge ...
La page charge ...
La page charge ...
La page charge ...
La page charge ...
La page charge ...
La page charge ...
La page charge ...
La page charge ...
La page charge ...
La page charge ...
La page charge ...
La page charge ...
La page charge ...
La page charge ...
La page charge ...
La page charge ...
La page charge ...
La page charge ...
La page charge ...
La page charge ...
La page charge ...
La page charge ...
La page charge ...
La page charge ...
-
 1
1
-
 2
2
-
 3
3
-
 4
4
-
 5
5
-
 6
6
-
 7
7
-
 8
8
-
 9
9
-
 10
10
-
 11
11
-
 12
12
-
 13
13
-
 14
14
-
 15
15
-
 16
16
-
 17
17
-
 18
18
-
 19
19
-
 20
20
-
 21
21
-
 22
22
-
 23
23
-
 24
24
-
 25
25
-
 26
26
-
 27
27
-
 28
28
-
 29
29
-
 30
30
-
 31
31
-
 32
32
-
 33
33
-
 34
34
-
 35
35
-
 36
36
-
 37
37
-
 38
38
-
 39
39
-
 40
40
-
 41
41
-
 42
42
-
 43
43
-
 44
44
-
 45
45
-
 46
46
-
 47
47
-
 48
48
-
 49
49
-
 50
50
-
 51
51
-
 52
52
-
 53
53
-
 54
54
-
 55
55
-
 56
56
-
 57
57
-
 58
58
-
 59
59
-
 60
60
-
 61
61
-
 62
62
-
 63
63
-
 64
64
-
 65
65
-
 66
66
-
 67
67
-
 68
68


EXPLORE RDC1008 Le manuel du propriétaire
- Catégorie
- Réveils
- Taper
- Le manuel du propriétaire
- Ce manuel convient également à
dans d''autres langues
- italiano: EXPLORE RDC1008 Manuale del proprietario
- English: EXPLORE RDC1008 Owner's manual
- español: EXPLORE RDC1008 El manual del propietario
- Deutsch: EXPLORE RDC1008 Bedienungsanleitung
- Nederlands: EXPLORE RDC1008 de handleiding
Autres documents
-
 Explore Scientific WSH4008000000 Le manuel du propriétaire
-
 Explore Scientific Weather Station Le manuel du propriétaire
-
Explore Scientific Slim Projection Radio-controlled Dual alarm clock Le manuel du propriétaire
-
Bresser Radio-controlled alarm clock Le manuel du propriétaire
-
 Explore Scientific WSH4009000000 Le manuel du propriétaire
-
Bresser RPW3008 Le manuel du propriétaire
-
Bresser Radio-controlled Weather station Le manuel du propriétaire
-
 Explore Scientific RPW3009 Le manuel du propriétaire
-
 Explore Scientific RDC1005000000 Le manuel du propriétaire
-


