CombiSteel 7178.0105 Manuel utilisateur
- Catégorie
- Kits de montage
- Taper
- Manuel utilisateur

User and Maintenance
Instructions
Pasta Cooker
(Electric)
Handleiding Voor
Bediening En Onderhoud
Pasta Koken
(Elektrisch)
Betriebs- und
Wartungsanleitung
Nudelkocher
(Elektrisch)
Manuel d’Utilisation et de
Maintenance
Cuiseur à
pâtes
(Électrique)

2
Table of Contents / Inhoudsopgave /
Inhaltsverzeichnis / Table des Matières
I. ENGLISH ………………………………………………………………. 3
A. Description
B. Products
C. Mounting Instructions
D. Operator Instructions and Attention Points
E. Figures
F. Product Drawings
G. Electrical Connection Drawing
II. NEDERLANS ………………………………………………………… 18
A. Beschrijving
B. Producten
C. Montage-Instructies
D. Instructies van de bediener en aandachtspunten
E. Figuur
F. Producttekeningen
G. Elektrische Aansluittekeningen
III. DEUTSCH …………………………………………………………….. 33
A. Beschreibung
B. Produkte
C. Installationsanleitung
D. Benutzerhinweise und zu Beachtende Punkte
E. Abbildung
F. Produktzeichnungen
G. Elektrische Anschlusszeichnung
IV. FRANÇAIS …………………………………………………………… 48
A. Explications
B. Des Produits
C. Instructions de Montage
D. Instructions a L’utilisateur et Points a Considérer
E. Les Figures
F. Dessins des Produits
G. Dessin de connexion électrique

3
User and Maintenance
Instructions
Pasta Cooker (Electric)

4
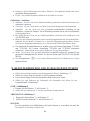
A. DESCRIPTION
Our dear customer,
Your preferred COMBISTEEL is nature and technology friendly. We thank you for your
choice.
COMBISTEEL has been produced with the understanding of "Total Quality" in modern
production facilities.
Important Safety Information
Carefully read this guide and keep it for future review.
WARNING: Installation of the devices must be done by an authorized service person.
WARNING: Equipment must be grounded.
Indicates that there is a risk of personal injury or property damage.
Explosion / fire hazard.
The instructions in this manual contain important information on the safe mounting,
usage, cleaning and maintenance of the device. Thus, keep the manual at a place easily
accessible by the person who will use the machine, and the technician.
Mounting, conversions for different gas groups or electrical inlet, and maintenance works
of the device should be performed by a specialist authorized in this subject and in
accordance with the instructions of the manufacturer company.
Gas and electrical connections of the device should be arranged according to the tables
and electrical diagram given in this manual.
Manufacturer company accepts no responsibility for the final damages that are caused by
any procedure not conforming to the instruction manual, or maintenance or technical
interventions that are not performed by authorized people.

5
B. PRODUCTS
BASKETS
C. MOUNTING INSTRUCTION
Placement
Installation and adjustment of the device should be carried out by experienced technical
staff.
Place the device beneath a filtered exhaust hood in order to eliminate smell and fume that
may be emitted during cooking.
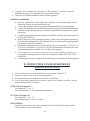
Device should be placed on a flat surface by suitably balancing on the four adjustable legs
(Figure A).
Place the device at a place min. 10 cm away from the side or back wall to prevent
excessive temperature rises.
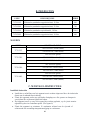
CODE
DESCRIPTION
SERIE
7178.0105
Electric pasta cooker on closed cabinet, 10 litres
600
7178.0540
Electric pasta cooker on closed cabinet, 22 litres
700
7178.0300
Electric pasta cooker on tabletop model, 14 litres
700-S
7178.3085
Electric pasta cooker on closed cabinet, 24 litres
900
CODE
STOCK CODE
7178.0105
020.03.08.001 / right (small)
020.03.08.169 / left (small)
7178.0540
095.100.0001 (big)
095.100.0143 / right (small)
095.100.0002 / left (small)
7178.0300
095.100.0030 (big)
095.100.145 / right (small)
095.100.0031 / left (small)
7178.3085
095.100.0005 (big)
095.100.146 / right (small)
095.100.0006 / left (small)

6
Remove the protective nylon on the device. Clean the adhesive particles left on the device
with a suitable cleaner.
Never leave flammable material near the device.
Electrical Connection
Connect the device to the electrical installation according to the electrical standards of
the relevant country.
Feed the device with suitable network voltage written on the information plate.
Connect to the electrical installation over a suitable automatic fuse. Fix the said fuse on a
place that is easily accessible in case of a danger.
The cable connecting the device to the electrical installation should be at least type H07
RNF.
Before connecting the electrical inlet cable to the inlet clamp on the device, connect the
cable by passing it through the inlet coupling. And then tighten the coupling cover in a
manner that does not allow cable return.
Electrical inlet clamp can be seen by disassembling 7178.0105 and 7178.0300 back cover,
7178.0540 and 7178.3085 front panel.
Electrical inlet is indicated with a label on the device.
If the device will be used in a commercial kitchen, apply a correct grounding system.
Here, consider DIN VDE D100 Article 540.
Grounding screw " " is indicated with a label behind the device
D. OPERATOR INSTRUCTIONS AND ATTENTION
POINTS
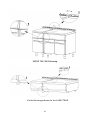
Fill water in the water chamber to the maximum level. Figure C "3"
Pay attention to have water in heating chamber.
Discharge and clean water chamber at the end of work every day.
In order to discharge Sauce Bain Marie chambers, you need to open cabinet cover and
pull ball valve arm 4 Figure C
STARTING-UP (Figure B)
Turn switch "1" to position "1".
Adjust thermostat "2" to desired temperature.
TURNING OFF (Figure C)
Turn switch "1" to position "0".
Turn the thermostat "2" to position "0".
IMPORTANT
It is recommended that you do not use lime and hard water; otherwise you will shorten
the heater lifetime.

7
MAINTENANCE
Do not perform maintenance when the device is loaded with electrical power.
Before it cools down completely, wipe the device with a cloth immersed in warm soapy
water.
Do not use cleaning substances and tools that may cause scratches on device surface.
If required, use chemical cleaners.
Do not clean the device with water or vapour pressure. Otherwise, you may cause
electrical resistor failure.
If the device will not be used for a long period, coat the surfaces with a thin layer of
Vaseline.
In case of any dangerous condition with the device, notify to the authorized service. Never
let unauthorized people to interfere in the device.
Compatibility Information
This device is designed and manufactured in accordance with the following directives and
standards.
marking directive, 93/68/EEC
TS EN 60335-1:2012/AC
TS EN 60335-2-47:2003
Related to CE Directive(s):
2014/35/EU (Low Voltage)
Limitation of Liability: All technical information contained in this manual, operating
instructions, operation and maintenance of the device, contains the latest information on your
device. The manufacturer accepts no responsibility for damage or injury which may result
from failure to follow the instructions in this manual, use outside of the intended use,
unauthorized repair, unauthorized modifications to the device, or use of spare parts not
approved by the manufacturer.

8
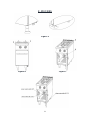
E. FIGURES
Figure A
Figure B Figure C

9
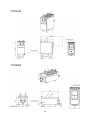
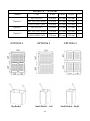
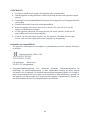
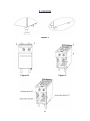
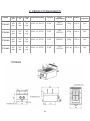
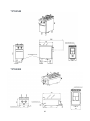
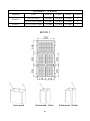
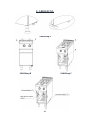
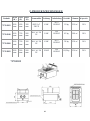
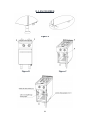
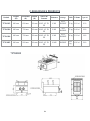
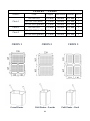
F.PRODUCT DRAWINGS
7178.0105
Product
Width
(W)
Depth
(D)
Height
(H)
Electrical
Inlet
Power
Cable
Sections
Weight
Volume
Capacity
7178.0105
400
mm
600
mm
300
mm
400V AC
3N PE
6 kW
5x2.5
H05RNF
19 kg
0.18
m³
10 lt
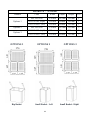
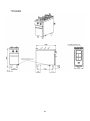
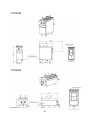
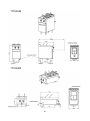
7178.0540
400
mm
700
mm
900
mm
400V AC
3N PE
9 kW
5x4
H05RNF
42 kg
0.44
m³
18 lt
7178.0300
400
mm
700
mm
300
mm
400V AC
3N PE
6 kW
5x2.5
H05RNF
24 kg
0.24
m³
14 lt
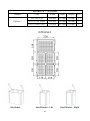
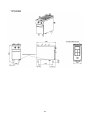
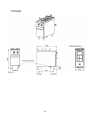
7178.3085
400
mm
900
mm
900
mm
400V AC
3N PE
10 kW
5x4
H05RNF
64,5 kg
0.56
m³
24 lt

10
7178.0540
7178.0300

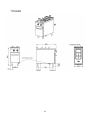
11
7178.3085

12
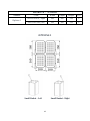
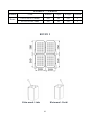
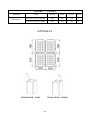
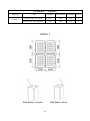
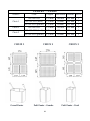
OPTIONS 1
Small Basket - Left Small Basket - Right
BASKETS – 7178.0105
Number
Code
Widht
Depht
Height
Pcs
Options 1
020.03.08.001 / right
100
160
135
2
020.03.08.169 / left
100
160
135
2

13
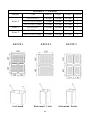
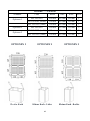
BASKETS – 7178.0540
Number
Code
Widht
Depht
Height
Pcs
Options 1
095.100.0001
220 mm
165 mm
210 mm
1
095.100.0143 (right)
110 mm
165 mm
210 mm
1
095.100.0002 (left)
110 mm
165 mm
210 mm
1
Options 2
095.100.0001
220 mm
165 mm
210 mm
2
Options 3
095.100.0143 (right)
110 mm
165 mm
210 mm
2
095.100.0002 (left)
110 mm
165 mm
210 mm
2
OPTIONS 1 OPTIONS 2 OPTIONS 3
Big Basket Small Basket - Left Small Basket - Right

14
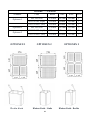
BASKETS – 7178.0300
Number
Code
Widht
Depht
Height
Pcs
Options 1
095.100.0030
270 mm
145 mm
150 mm
1
095.100.145 (right)
135 mm
145mm
150 mm
1
095.100.0031 (left)
135 mm
145mm
150 mm
1
Options 2
095.100.0030
270 mm
145 mm
150 mm
2
Options 3
095.100.145 (right)
135 mm
145 mm
150 mm
2
095.100.0031 (left)
135 mm
145mm
150 mm
2
OPTIONS 1 OPTIONS 2 OPTIONS 3
Big Basket Small Basket - Left Small Basket - Right

15
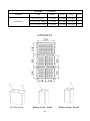
BASKETS – 7178.3085
Number
Code
Widht
Depht
Height
Pcs
Options 1
095.100.0005
220 mm
150 mm
210 mm
1
095.100.146 (right)
110 mm
150 mm
210 mm
2
095.100.0006 (left)
110 mm
150 mm
210 mm
2
OPTIONS 1
Big Basket Small Basket - Left Small Basket - Right

16
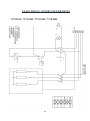
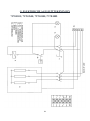
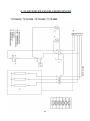
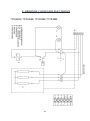
G.ELECTRICAL CONNECTION DRAWING
7178.0105 / 7178.0540 / 7178.0300 / 7178.3085

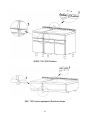
17
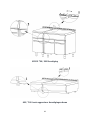
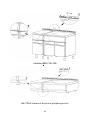
SERIE 700 / 900 Fixation
600 / 700-S series equipment fixation scheme

18
Handleiding Voor Bediening
En Onderhoud
Pasta Koken (Elektrisch)

19
A. BESCHRIJVING
Beste klanten,
Uw gewenste COMBISTEEL-product is natuur- en technologievriendelijk. Wij
danken u voor uw keuze.
COMBISTEEL is vervaardigd met het begrip ''Volledige Kwaliteit'' in zijn moderne
productiefaciliteiten.
Belangrijke veiligheidsinformatie
Lees deze handleiding aandachtig door en bewaar deze voor toekomstige
beoordelingen.
WAARSCHUWING: De apparaten moeten worden geïnstalleerd door een
gekwalificeerdeonderhoudsmonteur.
WAARSCHUWING: De apparatuur moet worden geaard.
Cela signifie qu'il existe un risque de blessure ou de dommage matériel.
Risque d’explosion et d’incendie.
De instructies in deze handleiding bevatten belangrijke informatie over de installatie
op een veillige manier, het gebruik, de reiniging en het onderhoud van het apparaat.
Houd de handleiding daarom binnen handbereik van de gebruiker en technicus.
De installatie, elektrische aansluiting en onderhoud van het apparaat moet worden
uitgevoerd door een gekwalificeerdeonderhoudsmonteurin overeenstemming met de
instructies van de fabrikant.
De elektrische aansluitingen van het apparaat moeten worden verstrekt volgens de
tabellen en het elektrisch schema in deze handleiding.
De fabrikant kan niet aansprakelijk worden gesteld voor schade die voortvloeit uit de
uitvoering van procedures die niet in overeenstemming zijn met de gebruiksaanwijzing,
of van onderhoud of technische interventies uitgevoerd door onbevoegde personen, met
schade aan personen of eigendommen tot gevolg.

20
B. PRODUCTEN
MANDEN
C. MONTAGE-INSTRUCTIES
Installatie Instructies
Installatie en afstelling van het apparaat moet worden uitgevoerd door de technische
dienst van de erkende servicedienst.
Plaats het apparaat onder een gefilterde afzuigkap om alle geuren en dampen te
verwijderen die vrijkomen tijdens het koken.
Het apparaat moet op een vlak oppervlak worden geplaatst, op de juiste manier
afgesteld op de vier verstelbare poten. (Zie figuur A)
Plaats het apparaat op minstens 10 centimeter afstand van de zijwand of
achterwand om overmatige temperatuurstijging te voorkomen.
CODE
BESCHRIJVING
SERIE
7178.0105
Elektrische pastakoker op gesloten kast, 10 liter
600
7178.0540
Elektrische pastakoker op gesloten kast, 22 liter
700
7178.0300
Elektrische pastakoker op tafelmodel, 14 liter
700-S
7178.3085
Elektrische pastakoker op gesloten kast, 24 liter
900
CODE
VOORRAAD CODE
7178.0105
020.03.08.001 / rechts (klein)
020.03.08.169 / links (klein)
7178.0540
095.100.0001 (grote)
095.100.0143 / rechts (klein)
095.100.0002 / links (klein)
7178.0300
095.100.0030 (grote)
095.100.145 / rechts (klein)
095.100.0031 / links (klein)
7178.3085
095.100.0005 (grote)
095.100.146 / rechts (klein)
095.100.0006 / links (kleine)
La page est en cours de chargement...
La page est en cours de chargement...
La page est en cours de chargement...
La page est en cours de chargement...
La page est en cours de chargement...
La page est en cours de chargement...
La page est en cours de chargement...
La page est en cours de chargement...
La page est en cours de chargement...
La page est en cours de chargement...
La page est en cours de chargement...
La page est en cours de chargement...
La page est en cours de chargement...
La page est en cours de chargement...
La page est en cours de chargement...
La page est en cours de chargement...
La page est en cours de chargement...
La page est en cours de chargement...
La page est en cours de chargement...
La page est en cours de chargement...
La page est en cours de chargement...
La page est en cours de chargement...
La page est en cours de chargement...
La page est en cours de chargement...
La page est en cours de chargement...
La page est en cours de chargement...
La page est en cours de chargement...
La page est en cours de chargement...
La page est en cours de chargement...
La page est en cours de chargement...
La page est en cours de chargement...
La page est en cours de chargement...
La page est en cours de chargement...
La page est en cours de chargement...
La page est en cours de chargement...
La page est en cours de chargement...
La page est en cours de chargement...
La page est en cours de chargement...
La page est en cours de chargement...
La page est en cours de chargement...
La page est en cours de chargement...
La page est en cours de chargement...
La page est en cours de chargement...
-
 1
1
-
 2
2
-
 3
3
-
 4
4
-
 5
5
-
 6
6
-
 7
7
-
 8
8
-
 9
9
-
 10
10
-
 11
11
-
 12
12
-
 13
13
-
 14
14
-
 15
15
-
 16
16
-
 17
17
-
 18
18
-
 19
19
-
 20
20
-
 21
21
-
 22
22
-
 23
23
-
 24
24
-
 25
25
-
 26
26
-
 27
27
-
 28
28
-
 29
29
-
 30
30
-
 31
31
-
 32
32
-
 33
33
-
 34
34
-
 35
35
-
 36
36
-
 37
37
-
 38
38
-
 39
39
-
 40
40
-
 41
41
-
 42
42
-
 43
43
-
 44
44
-
 45
45
-
 46
46
-
 47
47
-
 48
48
-
 49
49
-
 50
50
-
 51
51
-
 52
52
-
 53
53
-
 54
54
-
 55
55
-
 56
56
-
 57
57
-
 58
58
-
 59
59
-
 60
60
-
 61
61
-
 62
62
-
 63
63


CombiSteel 7178.0105 Manuel utilisateur
- Catégorie
- Kits de montage
- Taper
- Manuel utilisateur
dans d''autres langues
- English: CombiSteel 7178.0105 User manual
- Deutsch: CombiSteel 7178.0105 Benutzerhandbuch
- Nederlands: CombiSteel 7178.0105 Handleiding
Documents connexes


Autres documents
-
Bartscher 2853101 Mode d'emploi
-
Zanussi ZER325X Manuel utilisateur
-
Brandt DTE302XE1 Le manuel du propriétaire
-
 Key Automation 580BOXLED Manuel utilisateur
-
Indesit KN3C650A(X)/U S Mode d'emploi
-
-
Whirlpool KN3C650A(X)/U Mode d'emploi
-
-
Scholtes CI 55 V A Operating Instructions Manual
-
