Yamaha PSR-A3000 Le manuel du propriétaire
- Catégorie
- Synthétiseur
- Taper
- Le manuel du propriétaire

Thank you for purchasing this Yamaha Digital Workstation!
We recommend that you read this manual carefully so that you can fully take advantage of
the advanced and convenient functions of the instrument. We also recommend that you
keep this manual in a safe and handy place for future reference.
Before using the instrument, be sure to read “PRECAUTIONS” on pages 5 – 6.
Digital Workstation
Owner’s Manual
EN

2 PSR-A3000 Owner’s Manual
SPECIAL MESSAGE SECTION
This product utilizes batteries or an external power supply
(adapter). DO NOT connect this product to any power supply or
adapter other than one described in the manual, on the name
plate, or specifically recommended by Yamaha.
WARNING: Do not place this product in a position where any-
one could walk on, trip over, or roll anything over power or con-
necting cords of any kind. The use of an extension cord is not
recommended! If you must use an extension cord, the minimum
wire size for a 25’ cord (or less ) is 18 AWG. NOTE: The smaller
the AWG number, the larger the current handling capacity. For
longer extension cords, consult a local electrician.
This product should be used only with the components supplied
or; a cart, rack, or stand that is recommended by Yamaha. If a
cart, etc., is used, please observe all safety markings and instruc-
tions that accompany the accessory product.
SPECIFICATIONS SUBJECT TO CHANGE:
The information contained in this manual is believed to be correct
at the time of printing. However, Yamaha reserves the right to
change or modify any of the specifications without notice or obli-
gation to update existing units.
This product, either alone or in combination with an amplifier and
headphones or speaker/s, may be capable of producing sound
levels that could cause permanent hearing loss. DO NOT operate
for long periods of time at a high volume level or at a level that is
uncomfortable. If you experience any hearing loss or ringing in the
ears, you should consult an audiologist.
IMPORTANT: The louder the sound, the shorter the time period
before damage occurs.
Some Yamaha products may have benches and / or accessory
mounting fixtures that are either supplied with the product or as
optional accessories. Some of these items are designed to be
dealer assembled or installed. Please make sure that benches
are stable and any optional fixtures (where applicable) are well
secured BEFORE using.
Benches supplied by Yamaha are designed for seating only. No
other uses are recommended.
NOTICE:
Service charges incurred due to a lack of knowledge relating to
how a function or effect works (when the unit is operating as
designed) are not covered by the manufacturer’s warranty, and
are therefore the owners responsibility. Please study this manual
carefully and consult your dealer before requesting service.
ENVIRONMENTAL ISSUES:
Yamaha strives to produce products that are both user safe and
environmentally friendly. We sincerely believe that our products
and the production methods used to produce them, meet these
goals. In keeping with both the letter and the spirit of the law, we
want you to be aware of the following:
Battery Notice:
This product MAY contain a small non-rechargeable battery which
(if applicable) is soldered in place. The average life span of this type
of battery is approximately five years. When replacement becomes
necessary, contact a qualified service representative to perform the
replacement.
This product may also use “household” type batteries. Some of
these may be rechargeable. Make sure that the battery being
charged is a rechargeable type and that the charger is intended for
the battery being charged.
When installing batteries, never mix old batteries with new ones, and
never mix different types of batteries. Batteries MUST be installed
correctly. Mismatches or incorrect installation may result in over-
heating and battery case rupture.
Warning:
Do not attempt to disassemble, or incinerate any battery. Keep all
batteries away from children. Dispose of used batteries promptly
and as regulated by the laws in your area. Note: Check with any
retailer of household type batteries in your area for battery dis-
posal information.
Disposal Notice:
Should this product become damaged beyond repair, or for some
reason its useful life is considered to be at an end, please
observe all local, state, and federal regulations that relate to the
disposal of products that contain lead, batteries, plastics, etc. If
your dealer is unable to assist you, please contact Yamaha
directly.
NAME PLATE LOCATION:
The name plate is located on the bottom of the product. The
model number, serial number, power requirements, etc., are
located on this plate. You should record the model number, serial
number, and the date of purchase in the spaces provided below
and retain this manual as a permanent record of your purchase.
Model
Serial No.
Purchase Date
PLEASE KEEP THIS MANUAL
92-BP (bottom)
For PSR-A3000

PSR-A3000 Owner’s Manual 3
1. IMPORTANT NOTICE: DO NOT MODIFY THIS UNIT!
This product, when installed as indicated in the instructions
contained in this manual, meets FCC requirements. Modifica-
tions not expressly approved by Yamaha may void your author-
ity, granted by the FCC, to use the product.
2. IMPORTANT: When connecting this product to accessories
and/or another product use only high quality shielded cables.
Cable/s supplied with this product MUST be used. Follow all
installation instructions. Failure to follow instructions could void
your FCC authorization to use this product in the USA.
3. NOTE: This product has been tested and found to comply with
the requirements listed in FCC Regulations, Part 15 for Class
"B" digital devices. Compliance with these requirements pro-
vides a reasonable level of assurance that your use of this
product in a residential environment will not result in harmful
interference with other electronic devices. This equipment gen-
erates/uses radio frequencies and, if not installed and used
according to the instructions found in the users manual, may
cause interference harmful to the operation of other electronic
devices. Compliance with FCC regulations does not guarantee
that interference will not occur in all installations. If this product
is found to be the source of interference, which can be deter-
mined by turning the unit "OFF" and "ON", please try to elimi-
nate the problem by using one of the following measures:
Relocate either this product or the device that is being affected
by the interference.
Utilize power outlets that are on different branch (circuit breaker
or fuse) circuits or install AC line filter/s.
In the case of radio or TV interference, relocate/reorient the
antenna. If the antenna lead-in is 300 ohm ribbon lead, change
the lead-in to co-axial type cable.
If these corrective measures do not produce satisfactory
results, please contact the local retailer authorized to distribute
this type of product. If you can not locate the appropriate
retailer, please contact Yamaha Corporation of America, Elec-
tronic Service Division, 6600 Orangethorpe Ave, Buena Park,
CA90620
The above statements apply ONLY to those products distrib-
uted by Yamaha Corporation of America or its subsidiaries.
* This applies only to products distributed by YAMAHA CORPORATION OF AMERICA. (class B)
FCC INFORMATION (U.S.A.)
For AC adaptor and PSR-A3000
For PSR-A3000
COMPLIANCE INFORMATION STATEMENT
(DECLARATION OF CONFORMITY PROCEDURE)
Responsible Party : Yamaha Corporation of America
Address : 6600 Orangethorpe Ave., Buena Park, Calif. 90620
Telephone : 714-522-9011
Type of Equipment : Digital Keyboard
Model Name : PSR-A3000
This device complies with Part 15 of the FCC Rules.
Operation is subject to the following two conditions:
1) this device may not cause harmful interference, and
2) this device must accept any interference received including interference
that may cause undesired operation.
See user manual instructions if interference to radio reception is suspected.
* This applies only to products distributed by YAMAHA
CORPORATION OF AMERICA.
(FCC DoC)

4 PSR-A3000 Owner’s Manual
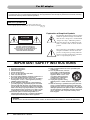
Explanation of Graphical Symbols
The lightning flash with arrowhead symbol
within an equilateral triangle is intended to
alert the user to the presence of uninsulated
“dangerous voltage” within the product’s
enclosure that may be of sufficient magni-
tude to constitute a risk of electric shock to
persons.
The exclamation point within an equilateral
triangle is intended to alert the user to the
presence of important operating and main-
tenance (servicing) instructions in the liter-
ature accompanying the product.
1 Read these instructions.
2 Keep these instructions.
3 Heed all warnings.
4 Follow all instructions.
5 Do not use this apparatus near water.
6 Clean only with dry cloth.
7 Do not block any ventilation openings. Install in accor-
dance with the manufacturer’s instructions.
8 Do not install near any heat sources such as radiators,
heat registers, stoves, or other apparatus (including
amplifiers) that produce heat.
9 Do not defeat the safety purpose of the polarized or
grounding-type plug. A polarized plug has two blades
with one wider than the other. A grounding type plug
has two blades and a third grounding prong. The wide
blade or the third prong are provided for your safety. If
the provided plug does not fit into your outlet, consult
an electrician for replacement of the obsolete outlet.
10 Protect the power cord from being walked on or
pinched particularly at plugs, convenience receptacles,
and the point where they exit from the apparatus.
11 Only use attachments/accessories specified by the
manufacturer.
12 Use only with the cart, stand, tri-
pod, bracket, or table specified by
the manufacturer, or sold with the
apparatus. When a cart is used,
use caution when moving the
cart/apparatus combination to
avoid injury from tip-over.
13 Unplug this apparatus during
lightning storms or when unused for long periods of
time.
14 Refer all servicing to qualified service personnel. Ser-
vicing is required when the apparatus has been dam-
aged in any way, such as power-supply cord or plug is
damaged, liquid has been spilled or objects have fallen
into the apparatus, the apparatus has been exposed to
rain or moisture, does not operate normally, or has
been dropped.
(UL60065_03)
CAUTION: TO REDUCE THE RISK OF
ELECTRIC SHOCK, DO NOT REMOVE
COVER (OR BACK). NO USER-SERVICEABLE
PARTS INSIDE. REFER SERVICING TO
QUALIFIED SERVICE PERSONNEL.
CAUTION
RISK OF ELECTRIC SHOCK
DO NOT OPEN
IMPORTANT SAFETY INSTRUCTIONS
WARNING
TO REDUCE THE RISK OF FIRE OR ELECTRIC SHOCK, DO NOT EXPOSE THIS APPARATUS TO RAIN OR MOISTURE.
For AC adaptor
This device complies with Part 15 of the FCC Rules. Operation is subject to the following two conditions:
(1) this device may not cause harmful interference, and (2) this device must accept any interference received, including
interference that may cause undesired operation.
CAN ICES-3 (B)/NMB-3(B)
• This applies only to products distributed by Yamaha Canada Music Ltd.
• Ceci ne s’applique qu’aux produits distribués par Yamaha Canada Musique Ltée.
(can_b_01)
(fcc_sengen)

PSR-A3000 Owner’s Manual 5
PRECAUTIONS
PLEASE READ CAREFULLY BEFORE PROCEEDING
Please keep this manual in a safe and handy place for future reference.
For AC adaptor
WARNING
• This AC adaptor is designed for use with only Yamaha electronic instruments. Do
not use for any other purpose.
• Indoor use only. Do not use in any wet environments.
CAUTION
• When setting up, make sure that the AC outlet is easily accessible. If some
trouble or malfunction occurs, immediately turn off the power switch of the
instrument and disconnect the AC adaptor from the outlet. When the AC adaptor
is connected to the AC outlet, keep in mind that electricity is flowing at the
minimum level, even if the power switch is turned off. When you are not using
the instrument for a long time, make sure to unplug the power cord from the wall
AC outlet.
For PSR-A3000
WARNING
Always follow the basic precautions listed below to avoid the possibility of serious injury or even death from electrical
shock, short-circuiting, damages, fire or other hazards. These precautions include, but are not limited to, the
following:
• Do not place the power cord near heat sources such as heaters or radiators. Also,
do not excessively bend or otherwise damage the cord, or place heavy objects on
it.
• Only use the voltage specified as correct for the instrument. The required voltage
is printed on the name plate of the instrument.
• Use the specified adaptor (page 215) only. Using the wrong adaptor can result in
damage to the instrument or overheating.
• Check the electric plug periodically and remove any dirt or dust which may have
accumulated on it.
• This instrument contains no user-serviceable parts. Do not open the instrument
or attempt to disassemble or modify the internal components in any way. If it
should appear to be malfunctioning, discontinue use immediately and have it
inspected by qualified Yamaha service personnel.
• Do not expose the instrument to rain, use it near water or in damp or wet
conditions, or place on it any containers (such as vases, bottles or glasses)
containing liquids which might spill into any openings. If any liquid such as
water seeps into the instrument, turn off the power immediately and unplug the
power cord from the AC outlet. Then have the instrument inspected by qualified
Yamaha service personnel.
• Never insert or remove an electric plug with wet hands.
• Do not put burning items, such as candles, on the unit. A burning item may fall
over and cause a fire.
• When one of the following problems occur, immediately turn off the power switch
and disconnect the electric plug from the outlet. Then have the device inspected
by Yamaha service personnel.
- The power cord or plug becomes frayed or damaged.
- It emits unusual smells or smoke.
- Some object has been dropped into the instrument.
- There is a sudden loss of sound during use of the instrument.
Power supply/AC adaptor
Do not open
Water warning
Fire warning
If you notice any abnormality
DMI-5 1/2

6 PSR-A3000 Owner’s Manual
CAUTION
Always follow the basic precautions listed below to avoid the possibility of physical injury to you or others, or damage
to the instrument or other property. These precautions include, but are not limited to, the following:
•
Do not connect the instrument to an electrical outlet using a multiple-connector. Doing
so can result in lower sound quality, or possibly cause overheating in the outlet.
• When removing the electric plug from the instrument or an outlet, always hold the
plug itself and not the cord. Pulling by the cord can damage it.
• Remove the electric plug from the outlet when the instrument is not to be used for
extended periods of time, or during electrical storms.
• Do not place the instrument in an unstable position where it might accidentally
fall over.
• Do not place objects in front of the instrument's air vent, since this may prevent
adequate ventilation of the internal components, and possibly result in the
instrument overheating.
• Before moving the instrument, remove all connected cables, to prevent damage to
the cables or injury to anyone who might trip over them.
• When setting up the product, make sure that the AC outlet you are using is easily
accessible. If some trouble or malfunction occurs, immediately turn off the power
switch and disconnect the plug from the outlet. Even when the power switch is
turned off, electricity is still flowing to the product at the minimum level. When
you are not using the product for a long time, make sure to unplug the power cord
from the wall AC outlet.
• Use only the stand specified for the instrument. When attaching it, use the
provided screws only. Failure to do so could cause damage to the internal
components or result in the instrument falling over.
• Before connecting the instrument to other electronic components, turn off the
power for all components. Before turning the power on or off for all components,
set all volume levels to minimum.
• Be sure to set the volumes of all components at their minimum levels and
gradually raise the volume controls while playing the instrument to set the desired
listening level.
• Do not insert a finger or hand in any gaps on the instrument.
• Never insert or drop paper, metallic, or other objects into the gaps on the panel or
keyboard. This could cause physical injury to you or others, damage to the
instrument or other property, or operational failure.
• Do not rest your weight on, or place heavy objects on the instrument, and do not
use excessive force on the buttons, switches or connectors.
• Do not use the instrument/device or headphones for a long period of time at a
high or uncomfortable volume level, since this can cause permanent hearing loss.
If you experience any hearing loss or ringing in the ears, consult a physician.
Always turn the power off when the instrument is not in use.
Even when the [ ] (Standby/On) switch is in standby status (display is off), electricity is still flowing to the instrument at the minimum level.
When you are not using the instrument for a long time, make sure you unplug the power cord from the wall AC outlet.
DMI-5
2/2
NOTICE
To avoid the possibility of malfunction/ damage to the product, damage to data, or damage to other property, follow the notices below.
Handling
• Do not use the instrument in the vicinity of a TV, radio, stereo equipment, mobile
phone, or other electric devices. Otherwise, the instrument, TV, or radio may
generate noise. When you use the instrument along with an application on your
iPad, iPhone or iPod touch, we recommend that you set “Airplane Mode” to “ON”
on that device in order to avoid noise caused by communication.
• Do not expose the instrument to excessive dust or vibrations, or extreme cold or
heat (such as in direct sunlight, near a heater, or in a car during the day) to prevent
the possibility of panel disfiguration, damage to the internal components or unstable
operation. (Verified operating temperature range: 5° – 40°C, or 41° – 104°F.)
• Do not place vinyl, plastic or rubber objects on the instrument, since this might
discolor the panel or keyboard.
Maintenance
• When cleaning the instrument, use a soft cloth. Do not use paint thinners,
solvents, alcohol, cleaning fluids, or chemical-impregnated wiping cloths.
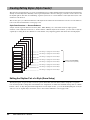
Saving data
• The edited Songs/Styles/Voices/Multi Pads and MIDI settings are lost when you turn
off the power to the instrument. This also occurs when the power is turned off by the
Auto Power Off function (page 17). Save the edited data to the instrument, or to a USB
flash drive (page 28). However, the data saved to the instrument may be lost due to
some failure, an operation mistake, etc. Save your important data onto a USB flash
drive. For information about the handling of USB flash drive, refer to page 95.
• To protect against data loss through USB flash drive damage, we recommend that
you save your important data onto spare USB flash drive or an external device
such as a computer as backup data.
Power supply/AC adaptor
Location
Connections
Handling caution
Yamaha cannot be held responsible for damage caused by improper use or modifications to the instrument, or data that is lost or destroyed.
(bottom_en_01)
The model number, serial number, power requirements,
etc., may be found on or near the name plate, which is
at the bottom of the unit. You should note this serial
number in the space provided below and retain this
manual as a permanent record of your purchase to aid
identification in the event of theft.
Model No.
Serial No.

PSR-A3000 Owner’s Manual 7
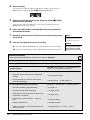
Included Accessories / About the Manuals
Included Accessories
• Owner’s Manual (this book)
• Online Member Product Registration
The “PRODUCT ID” on the sheet will be needed when you fill out the User Registration form.
•Music rest
• AC adaptor, power cord
May not be included depending on your area. Check with your Yamaha dealer.
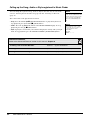
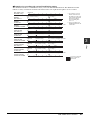
About the Manuals
This instrument has the following document and instructional materials.
Included Document
Owner’s Manual (this book)
Contains overall instructions for using your PSR-A3000. The function instructions are divided into the two following
sections for convenient use.
• Basic Operations:
Provides overall explanations of the PSR-A3000 basic functions.
• Advanced Features:
Explains advanced features of the instrument, not explained in the Basic Operations section. For example, you can
learn how to create original Styles, Songs or Multi Pads, or find detailed explanations of specific parameters.
* Each chapter in the Advanced Features section corresponds to the relevant chapters in the Basic Operations section.
Online Materials (PDF)
Data List
Contains various preset content lists such as Voices, Styles, Effects, as well as MIDI-related information.
Computer-related Operations
Includes instructions on connecting this instrument to a computer, and operations related to transmitting/receiving
MIDI data.
iPhone/iPad Connection Manual (only in English, French, German and Spanish)
Explains how to connect the instrument to smart devices, such as an iPhone, iPad, etc.
To obtain these materials, access the Yamaha Downloads website, then enter the model name for searching the desired files.
• The illustrations and LCD screens as shown in this manual are for instructional purposes only, and may appear somewhat different from
those on your instrument.
• iPhone, iPad and iPod touch are trademarks of Apple Inc., registered in the U.S. and other countries.
• The company names and product names in this manual are the trademarks or registered trademarks of their respective companies.
Yamaha Downloads http://download.yamaha.com/
Instruction conventions in this manual
Throughout this manual, instructions with multiple steps are given in convenient shorthand, with arrows indicating the proper sequence.
Example: [FUNCTION] TAB [ F] MENU 2 [G] SYSTEM TAB [E][F] BACKUP/RESTORE
The example above describes a four step operation:
1) Press the [FUNCTION] button.
2) Press the TAB [F] button to select the MENU 2 tab.
3) Press the [G] (SYSTEM) button.
4) Use the TAB [E][F] buttons to select the BACKUP/RESTORE tab.

8 PSR-A3000 Owner’s Manual
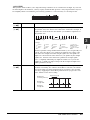
Formats
“GM (General MIDI)” is one of the most common Voice allocation formats. “GM System Level 2” is a standard specification
that enhances the original “GM” and improves Song data compatibility. It provides for increased polyphony, greater Voice
selection, expanded Voice parameters, and integrated effect processing.
XG is a major enhancement of the GM System Level 1 format, and was developed by Yamaha specifically to provide more
Voices and variations, as well as greater expressive control over Voices and effects, and to ensure compatibility of data well
into the future.
GS was developed by the Roland Corporation. In the same way as Yamaha XG, GS is a major enhancement of the GM spe-
cifically to provide more Voices and Drum kits and their variations, as well as greater expressive control over Voices and
effects.
The Yamaha XF format enhances the SMF (Standard MIDI File) standard with greater functionality and open-ended expand-
ability for the future. This instrument is capable of displaying lyrics when an XF file containing lyric data is played.
“SFF (Style File Format)” is an original Style file format by Yamaha which uses a unique conversion system to provide high-
quality automatic accompaniment based on a wide range of chord types. “SFF GE (Guitar Edition)” is an enhanced format of
SFF, which features improved note transposition for guitar tracks.
Information
About copyrights
• Copying of the commercially available musical data including but not limited to MIDI data and/or audio data is strictly prohibited except for
your personal use.
• This product incorporates and bundles contents in which Yamaha owns copyrights or with respect to which Yamaha has license to use others'
copyrights. Due to copyright laws and other relevant laws, you are NOT allowed to distribute media in which these contents are saved or
recorded and remain virtually the same or very similar to those in the product.
* The contents described above include a computer program, Accompaniment Style data, MIDI data, WAVE data, voice recording data, a score, score
data, etc.
* You are allowed to distribute medium in which your performance or music production using these contents is recorded, and the permission of Yamaha
Corporation is not required in such cases.
• The followings are the titles, credits and copyright notices for some of the songs pre-installed in this instrument:
Beauty And The Beast
from Walt Disney’s BEAUTY AND THE BEAST
Lyrics by Howard Ashman
Music by Alan Menken
©1991 Walt Disney Music Company and Wonderland Music Company, Inc.
All Rights Reserved Used by Permission
What Makes You Beautiful
Words and Music by Savan Kotecha, Rami Yacoub and Carl Falk
© 2011 EMI APRIL MUSIC INC., MR. KANANI SONGS, RAMI PRODUCTIONS AB and AIR CHRYSALIS SCANDINAVIA AB
All Rights for MR. KANANI SONGS Controlled and Administered by EMI APRIL MUSIC INC.
All Rights for RAMI PRODUCTIONS AB Administered by KOBALT SONGS MUSIC PUBLISHING
All Rights for AIR CHRYSALIS SCANDINAVIA AB Administered by CHRYSALIS MUSIC GROUP, INC., a BMG CHRYSALIS
COMPANY
All Rights Reserved International Copyright Secured Used by Permission
About functions/data bundled with the instrument
• Some of the preset songs have been edited for length or arrangement, and may not be exactly the same as the original.
• This device is capable of using various types/formats of music data by optimizing them to the proper format music data for use with the
device in advance. As a result, this device may not play them back precisely as their producers or composers originally intended.
• The bitmap fonts used in this instrument have been provided by and are the property of Ricoh Co., Ltd.

PSR-A3000 Owner’s Manual 9
Main Features
Main Features
Extraordinarily expressive and realistic Voices .............................................................page 36
The PSR-A3000 has a comprehensive and sonically stunning set of authentic Voices, and gives you the tools to play
these Voices more naturally and with greater expressiveness.
Play along with a backing band ..........................................................................................page 49
The Styles of the PSR-A3000 make it possible to perform in a wide variety of music genres with full instrumental
accompaniment, just by playing chords.
Voice and Style expandability..............................................................................................page 46
The PSR-A3000 is an open-ended instrument that lets you continually expand the available content for your creative
explorations. Featured on our special website (http://www.yamaha.com/awk/) are many Voices and Styles (called
Expansion Pack data) that you can get and load to the PSR-A3000. By using the “Yamaha Expansion Manager” software,
you can manage the variety of Expansion Packs and create your own custom Pack for installing on your instrument.
Powerful DSP effect for enhancing the sound................................................................page 42
The PSR-A3000 has new and high-quality effect types, including Real Distortion and Real Reverb. The DSP effects allow
you to play the keyboard dynamically with a distorted guitar sound, or sound like you are playing in a concert hall.
Audio playing and recording with a USB flash drive....................................................page 71
Audio files (WAV or MP3 format) saved to a USB flash drive can be played back on the instrument. You can also record
your performance as audio files (WAV format) to a USB flash drive—making it easy to edit your recordings on computer
as desired, and share them over the Internet, or burn your own original CDs. The instrument also provides a variety of
advanced, convenient audio playback and processing functions, including Time Stretch, which lets you slow down or
speed up an audio file without changing the pitch, and Pitch Shift, which allows you to change the pitch without affecting
the time. Moreover, a Vocal Cancel function effectively attenuates the vocals which may be positioned in the center of a
file, allowing you to sing “karaoke” style with just instrumental backing.
Versatile real-time controller — Joystick..........................................................................page 40
This expressive joystick lets you intuitively change the sounds during your performance in real-time. You can also freely
assign functions to it as desired. For example, you can use the joystick to adjust the filter, or to turn on/off playback of the
Style channels—easily applying variations to the sound without interrupting your performance.
Setting your Original Scales.................................................................................................page 88
The Oriental Scales feature lets you simply and easily change the pitches of specific notes and create your own scales.
The settings can be stored for instant recall, whenever you need them.
Playing with Arpeggios ..........................................................................................................page 44
You can play arpeggios (broken chords) by simply pressing the appropriate notes on the keyboard, allowing you to
instantly and automatically have complex and otherwise difficult-to-play phrases backing your performance.
These are just a few of the many functions that enhance your musical enjoyment and expand your
creative and performance possibilities. Try them out and enjoy your new keyboard!
The Demos (page 19) showcase the instrument’s high-quality sounds, the variety of advanced functions, and
provide helpful information for learning about your new keyboard.

10 PSR-A3000 Owner’s Manual
Table of Contents
Included Accessories............................................................7
About the Manuals................................................................7
Formats ................................................................................8
Information...........................................................................8
Main Features 9
Panel Controls and Terminals 12
Starting Up 16
Power Requirements ..........................................................16
Turning the Power On/Off...................................................16
Adjusting the Master Volume .............................................18
Changing the Display Language .........................................18
Playing the Demos..............................................................19
Display-based Controls.......................................................20
Calling Up the Desired Display Instantly — Direct Access..23
Messages Shown in the Display .........................................23
Main Display Configuration ................................................24
File Selection Display Configuration ...................................26
File Management ................................................................27
Entering Characters ............................................................32
Resetting to the Factory-programmed Settings ..................33
Data Backup .......................................................................34
Basic Operations 35
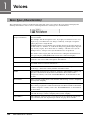
1Voices
– Playing the keyboard – 36
Playing Voices ....................................................................36
Changing the Pitch of the Keyboard ...................................39
Using the Joystick ..............................................................40
Applying Voice Effects ........................................................42
Creating Your Original Organ Flutes Voices ........................45
Adding New Contents — Expansion Packs.........................46
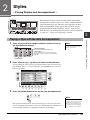
2Styles
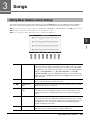
– Playing Rhythm and Accompaniment – 49
Playing a Style with the Auto Accompaniment....................49
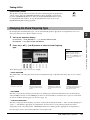
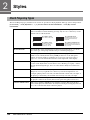
Operating Style Playback ....................................................51
Changing the Chord Fingering Type....................................53
Calling up Appropriate Panel Settings for the Current
Style (One Touch Setting)...................................................54
Finding Suitable Music Pieces for the Current Style
(Repertoire) ........................................................................55
Turning On/Off Each Channel of the Style...........................56
Adjusting the Volume Balance Between the Parts...............57
Setting the Split Point.........................................................58
Specifying Chords with Your Right Hand while Playing
Bass with Your Left Hand ...................................................59
Creating/Editing Styles (Style Creator) ...............................60
3 Songs
– Playing, Practicing and Recording Songs – 62
Playback of Songs ..............................................................62
Displaying Music Notation (Score) .....................................64
Displaying Lyrics/Text........................................................ 65
Turning Each Channel of the Song On/Off.......................... 65
One-handed Practice with the Guide Function ................... 66
Repeat Playback................................................................. 67
Recording Your Performance ............................................ 68
4 USB Audio Player/Recorder
– Playing Back and Recording Audio Files – 71
Playing Back Audio Files .................................................... 71
Recording Your Performance as Audio.............................. 74
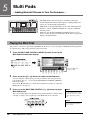
5 Multi Pads
– Adding Musical Phrases to Your Performance – 76
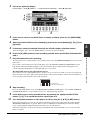
Playing the Multi Pads ....................................................... 76
Using Chord Match............................................................ 77
Using the Multi Pad Synchro Start Function ...................... 77
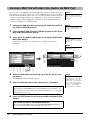
Creating a Multi Pad with Audio files (Audio Link Multi
Pad) ................................................................................... 78
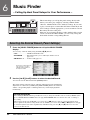
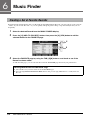
6 Music Finder
– Calling Up Ideal Panel Setups for Your Performance –
80
Selecting the Desired Record (Panel Settings)................... 80
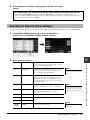
Searching for Records (Panel Settings)............................. 81
Downloading Records (Panel Settings) from the Website . 82
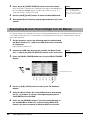
Registering a Song, Audio or Style File to a Record........... 83
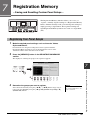
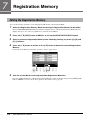
7 Registration Memory
– Saving and Recalling Custom Panel Setups – 85
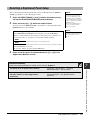
Registering Your Panel Setups .......................................... 85
Saving the Registration Memory as a Bank file.................. 86
Recalling a Registered Panel Setup.................................... 87
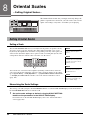
8 Oriental Scales
– Setting Original Scales – 88
Setting Oriental Scales....................................................... 88
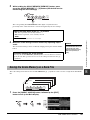
Saving the Scale Memory as a Bank File............................ 89
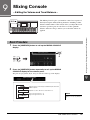
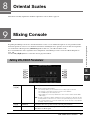
9 Mixing Console
– Editing the Volume and Tonal Balance – 91
Basic Procedure................................................................. 91
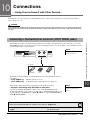
10 Connections
– Using Your Instrument with Other Devices – 93
Connecting a Footswitch/Foot Controller (FOOT PEDAL
jacks) ................................................................................. 93
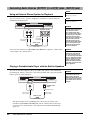
Connecting Audio Devices (OUTPUT [L/L+R]/[R] jacks,
[AUX IN] jack).................................................................... 94
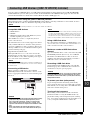
Connecting USB Devices ([USB TO DEVICE] terminal)...... 95
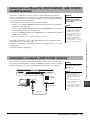
Connecting to an iPhone/iPad ([USB TO DEVICE], [USB
TO HOST] and MIDI terminals) .......................................... 97
Connecting to a Computer ([USB TO HOST] terminal)....... 97
Connecting External MIDI Devices (MIDI [IN]/[OUT]
terminals) .......................................................................... 98
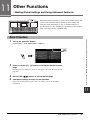
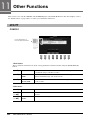
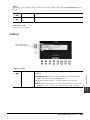
11 Other Functions
– Making Global Settings and Using Advanced Features –
99
Basic Procedure................................................................. 99

PSR-A3000 Owner’s Manual 11
Table of Contents
Advanced Features 101
1 Voices 102
Voice Types (Characteristics) ...........................................102
Selecting GM&XG or Other Voices ...................................104
Touch Response and Effect-Related Settings ...................105
Pitch-Related Settings ......................................................108
Editing Parameters Assigned to the Joystick....................110
Editing Voices (Voice Set) ................................................113
Editing Organ Flutes Voices ..............................................118
2 Styles 120
Chord Fingering Types......................................................120
Style Playback Related Settings........................................122
Memorizing Original Settings to One Touch Setting .........124
Creating/Editing Styles (Style Creator) .............................125
3 Songs 143
Editing Music Notation (Score) Settings...........................143
Editing Lyrics/Text Display Settings .................................145
Using the Auto Accompaniment Features with Song
Playback ...........................................................................146
Song Playback Related Parameters (Guide Function,
Channel settings, Repeat settings) ...................................147
Creating/Editing Songs (Song Creator).............................151
4 USB Audio Player/Recorder 168
5 Multi Pads 168
Creating Multi Pads (Multi Pad Creator) ...........................168
Editing Multi Pads ............................................................170
6 Music Finder 172
Creating a Set of Favorite Records ...................................172
Editing Records ................................................................173
Saving the Records as a Single File ..................................174
7 Registration Memory 176
Editing the Registration Memory ......................................176
Disabling Recall of Specific Items (Freeze).......................177
Calling Up Registration Memory Numbers in Order
(Registration Sequence) ...................................................178
8 Oriental Scales 181
9 Mixing Console 181
Editing VOL/VOICE Parameters ........................................181
Editing FILTER Parameters...............................................182
Editing TUNE Parameters .................................................183
Editing EFFECT Parameters ..............................................184
Editing EQ Parameters......................................................187
Editing Master Compressor (CMP) Parameters................189
Block Diagram ..................................................................190
10 Connections 191
Footswitch/Foot Controller Settings..................................191
MIDI Settings ...................................................................194
Connecting with an iPhone/iPad via Wireless LAN ...........200
11 Other Functions 202
UTILITY............................................................................ 202
SYSTEM........................................................................... 206
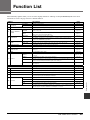
Function List 209
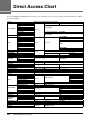
Direct Access Chart 210
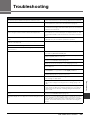
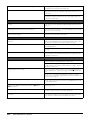
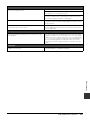
Troubleshooting 211
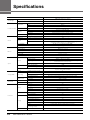
Specifications 214
Index 216

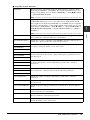
12 PSR-A3000 Owner’s Manual
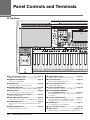
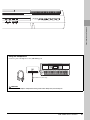
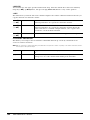
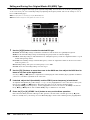
Panel Controls and Terminals
Top Panel
[ ] (Standby/On) switch ..............................Page 16
Turns on the instrument’s power or sets to standby.
[MASTER VOLUME] dial ................................Page 18
Adjusts the overall volume.
[DEMO] button ................................................Page 19
Calls up the display for selecting a Demo.
[MASTER EQ] button.................................... page 188
Calls up the display for setting the Master Equalizer type.
SONG buttons.................................................Page 62
Selects a Song and controls Song playback.
STYLE category selection buttons ...............Page 49
Selects a Style category.
[TAP TEMPO]/TEMPO buttons ......................Page 52
Controls the tempo for Style, Song and Metronome playback.
TRANSPOSE buttons .....................................Page 39
Transposes the entire pitch of the instrument in semitone
steps.
[METRONOME] button ...................................Page 38
Turns the metronome on or off.
[FADE IN/OUT] button.................................... Page 53
Controls fade in/out of Style/Song playback.
[OTS LINK] button .......................................... Page 55
Turns on/off the OTS Link function.
STYLE CONTROL buttons............................. Page 51
Controls Style playback.
SCALE SETTING buttons ............................. page 88
Lowers the pitches of specific notes by 50 cents.
SCALE MEMORY [MEMORY],
[1] – [5], [RESET] buttons.............................. page 89
Lets you memorize your scale settings, or reset them to fac-
tory default.
Joystick, [ASSIGN] button............................. page 40
For using pitch bend or modulation functions, or assigning
other functions to control sounds in real time.
[PHONES] jack ............................................... Page 15
For connecting a pair of headphones.
LCD and related controls .............................. Page 20
[BAL.] button .......................................... Pages 57, 74
Calls up settings for the volume balance among the parts.

PSR-A3000 Owner’s Manual 13
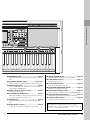
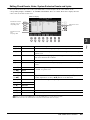
Panel Controls and Terminals
[MIXER/EQ] button .........................................Page 91
Calls up various settings for the keyboard, Style and Song
parts.
[CHANNEL ON/OFF] button...................Pages 56, 65
Calls up settings for turning Style/Song channels on or off.
[FUNCTION] button ........................................Page 99
Lets you make advanced settings and create your original
Styles, Songs and Multi Pads.
VOICE category selection buttons................Page 37
Selects a Voice category.
[USB AUDIO PLAYER] button........................Page 71
Calls up the display for playing back audio files and record-
ing your performance in audio format.
[USB] button ...................................................Page 96
Calls up the display for selecting a file in the USB flash
drive.
VOICE EFFECT buttons .................................Page 42
Applies various effects to the keyboard performance.
[MUSIC FINDER] button................................. Page 80
Calls up ideal panel setups for your performance.
PART SELECT buttons ..................................Page 37
Selects a keyboard part.
PART ON/OFF buttons ................................... Page 36
Turns the keyboard part on or off.
REGISTRATION MEMORY buttons ............... Page 85
Registers and recalls panel setups.
MULTI PAD CONTROL buttons ..................... Page 76
Selects and plays a rhythmic or melodic Multi Pad phrase.
ONE TOUCH SETTING buttons ..................... Page 54
Calls up the appropriate panel settings for the Style.
UPPER OCTAVE buttons ............................... Page 39
Shifts the pitch of the keyboard in octave steps.
Panel Setup (Panel Settings)
By using the controls on the panel, you can make various settings as
described here. These settings of the instrument are together referred to as
“panel setup” or “panel settings” in this manual.

14 PSR-A3000 Owner’s Manual
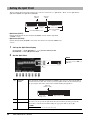
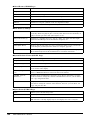
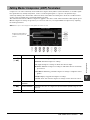
Rear Panel
DC IN jack........................................................Page 16
For connecting the AC adaptor.
FOOT PEDAL [1]/[2] jacks..............................Page 93
For connecting Footswitches and/or Foot controllers.
OUTPUT [L/L+R]/[R] jacks .............................Page 94
For connecting external audio devices.
[AUX IN] jack...................................................Page 94
For connecting an external audio device, such as a portable
audio player.
MIDI [IN]/[OUT] terminals ..............................Page 98
For connecting external MIDI devices.
[USB TO HOST] terminal ............................... Page 97
For connecting to a computer.
[USB TO DEVICE] terminal............................ Page 95
For connecting a USB device such as a USB flash drive.
Air Vents
NOTICE
This instrument has special air vents in the top panel and rear panel.
Do not place objects where they might block the air vent, since this
may prevent adequate ventilation of the internal components, and
possibly result in the instrument overheating.
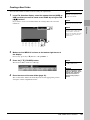
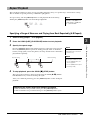
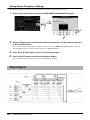
Attaching the Music Rest
Insert the music rest into the slots as shown.
Air Vents

PSR-A3000 Owner’s Manual 15
Panel Controls and Terminals
Using the Headphones
Connect a pair of headphones to the [PHONES] jack.
CAUTION
Do not listen with the headphones at high volume for long periods of time. Doing so may cause hearing loss.
Standard stereo phone plug

16 PSR-A3000 Owner’s Manual
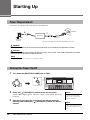
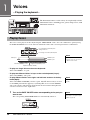
Starting Up
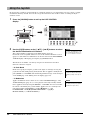
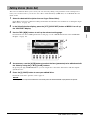
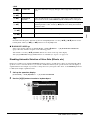
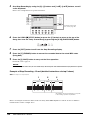
Connect the AC adaptor in the order shown in the illustration.
1 Turn down the [MASTER VOLUME] dial to “MIN”.
2 Press the [ ] (Standby/On) switch to turn on the power.
After the Main display appears, adjust the volume as desired while playing the
keyboard.
3 After you finish using the instrument, turn off the power by
pressing and holding the [ ] (Standby/On) switch for about a
second.
Power Requirements
WARNING
Use the specified AC adaptor (page 215) only. Using the wrong AC adaptor can result in damage to the instrument or overheating.
CAUTION
When setting up the product, make sure that the AC outlet you are using is easily accessible. If some trouble or malfunction occurs, immedi-
ately turn the power off and disconnect the plug from the outlet.
NOTE
Follow the order shown above in reverse when disconnecting the AC adaptor.
3
1
2
AC adaptor
DC IN jack
(page 14)
AC Outlet
The shape of the plug and outlet differs depending on your area.
Power cord
Turning the Power On/Off
2
NOTE
Do not press the foot pedal or move
the joystick, etc. when turning the
power on. Doing so may cause the
instrument to malfunction.
NOTE
Until the Main display appears, no
operations can be carried out, includ-
ing power-off and keyboard perfor-
mance.

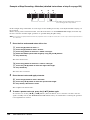
PSR-A3000 Owner’s Manual 17
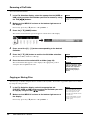
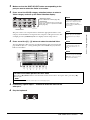
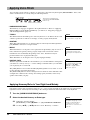
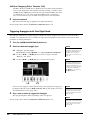
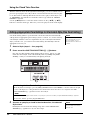
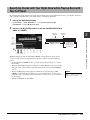
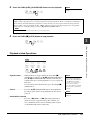
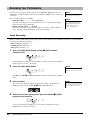
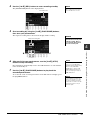
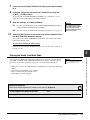
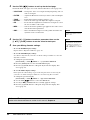
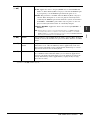
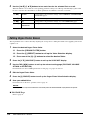
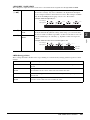
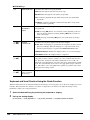
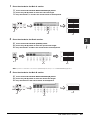
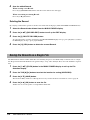
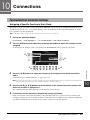
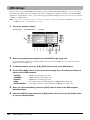
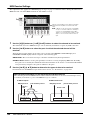
To prevent unnecessary power consumption, this instrument features an Auto Power
Off function that automatically turns the power off if the instrument is not operated
for a specified period of time. The amount of time that elapses before the power is
automatically turned off is approximately 30 minutes by default; however, you can
change the setting.
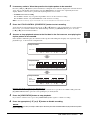
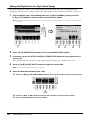
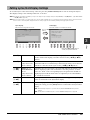
1 Call up the operation display.
[FUNCTION] TAB [E] MENU 1 [J] UTILITY TAB [E] CONFIG 1
2 Press the [B] button several times to select “4 AUTO POWER
OFF.”
3 Use the [4 ]/[5 ] buttons to set the value.
If you do not want to turn the power off automatically (disable the Auto Power
Off), select DISABLED.
Press the [EXIT] button several times to exit from the display.
CAUTION
Even when the power switch is turned off, electricity is still flowing to the product at the minimum level. When you are not using the prod-
uct for a long time, make sure to unplug the power cord from the wall AC outlet.
NOTICE
While recording or editing, or while a message is displayed, the power cannot be turned off even if you press the [ ] (Standby/On)
switch. If you want to turn off the power, press the [ ] (Standby/On) switch after recording, editing, or after the message has disap-
peared. If you need to force-quit the instrument, hold down the [ ] (Standby/On) switch for longer than three seconds. Note that the
force-quit operation might cause data loss and damage to the instrument.
Setting the Auto Power Off function
NOTICE
Any data which has not been
saved to the USER or USB drive
will be lost if the power automat-
ically turns off. Make sure to
save your data before the power
turns off (page 28).
3
2
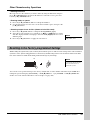
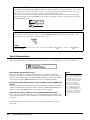
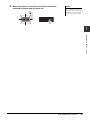
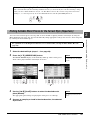
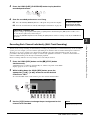
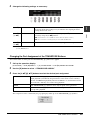
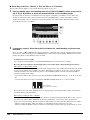
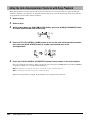
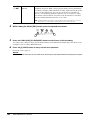
Disabling Auto Power Off (simple method)
Turn the power on while holding down the lowest key on the keyboard. A message appears briefly, then the
instrument starts up with the Auto Power Off function disabled.
C1

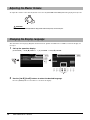
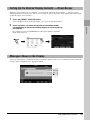
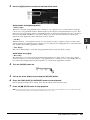
18 PSR-A3000 Owner’s Manual
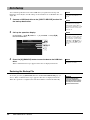
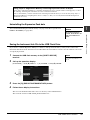
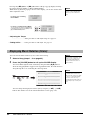
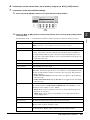
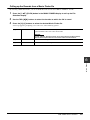
To adjust the volume of the entire keyboard sound, use the [MASTER VOLUME] dial while playing the keyboard.
This determines the language (English, German, French, Spanish and Italian are available) used in the display for
messages.
1 Call up the operation display.
[FUNCTION] TAB [F] MENU 2 [G] SYSTEM TAB [E] OWNER
2 Use the [4 ]/[5 ] buttons to select the desired language.
Press the [EXIT] button several times to exit from the display.
Adjusting the Master Volume
CAUTION
Do not use the instrument at high volume for long periods of time. Doing so may cause hearing loss.
Changing the Display Language
2

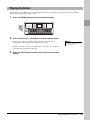
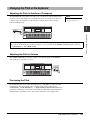
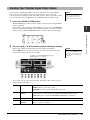
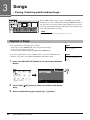
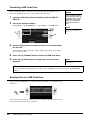
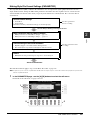
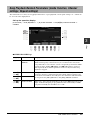
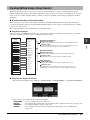
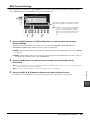
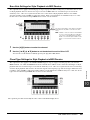
PSR-A3000 Owner’s Manual 19
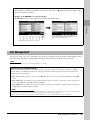
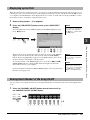
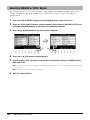
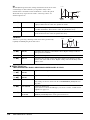
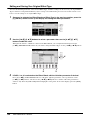
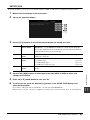
The Demos provide helpful, easy-to-understand introductions to the features and functions as well as dynamic
demonstrations of the high-quality sounds.
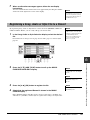
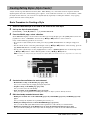
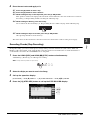
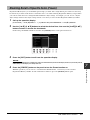
1 Press the [DEMO] button to call up the Demo display.
2 Press one of the [A] – [H] buttons to show a specific Demo.
Pressing one of the [I] – [J] buttons plays back the overview Demo
continuously, calling up the various displays in sequence.
Sub menus may be shown on the display. Press one of the [A] – [J] buttons
corresponding to the desired sub menu.
3 Press the [EXIT] button several times to exit from the Demo
display.
Playing the Demos
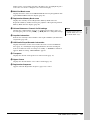
NOTE
To return to the higher level menu,
press the [EXIT] button.

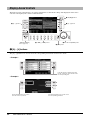
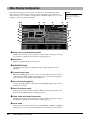
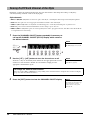
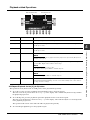
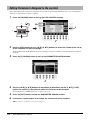
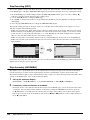
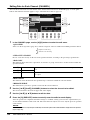
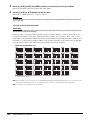
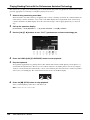
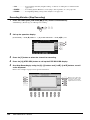
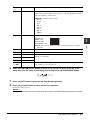
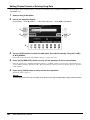
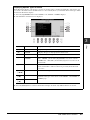
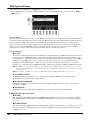
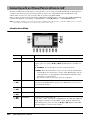
20 PSR-A3000 Owner’s Manual
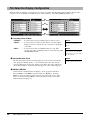
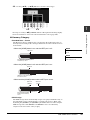
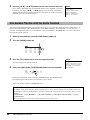
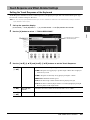
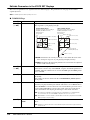
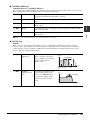
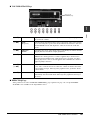
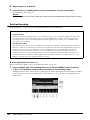
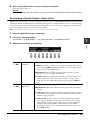
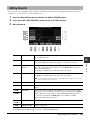
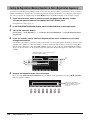
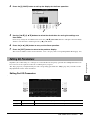
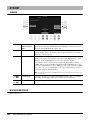
The LCD provides comprehensive at-a-glance information on all current settings. The displayed menu can be
selected or changed by the controls around the LCD.
The [A] – [J] buttons are used to select the corresponding menu items shown next to them.
• Example 1
• Example 2
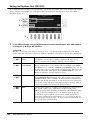
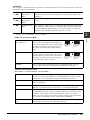
Display-based Controls
[A] – [J] buttons
[A] – [J] buttons
TAB [ E][F] buttons
[DIRECT ACCESS]
button (page 23)
Data dial and [ENTER] button [1 ] – [8 ] buttons
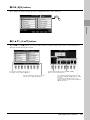
[EXIT] button
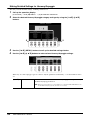
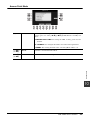
[A] – [J] buttons
In the File Selection display (page 26),
the [A] – [J] buttons can be used to select
the corresponding files.
The [A] and [B] buttons are used to
move the cursor up or down.
The [F] and [H] buttons are used to select
the corresponding parameter.
Starting Up
La page charge ...
La page charge ...
La page charge ...
La page charge ...
La page charge ...
La page charge ...
La page charge ...
La page charge ...
La page charge ...
La page charge ...
La page charge ...
La page charge ...
La page charge ...
La page charge ...
La page charge ...
La page charge ...
La page charge ...
La page charge ...
La page charge ...
La page charge ...
La page charge ...
La page charge ...
La page charge ...
La page charge ...
La page charge ...
La page charge ...
La page charge ...
La page charge ...
La page charge ...
La page charge ...
La page charge ...
La page charge ...
La page charge ...
La page charge ...
La page charge ...
La page charge ...
La page charge ...
La page charge ...
La page charge ...
La page charge ...
La page charge ...
La page charge ...
La page charge ...
La page charge ...
La page charge ...
La page charge ...
La page charge ...
La page charge ...
La page charge ...
La page charge ...
La page charge ...
La page charge ...
La page charge ...
La page charge ...
La page charge ...
La page charge ...
La page charge ...
La page charge ...
La page charge ...
La page charge ...
La page charge ...
La page charge ...
La page charge ...
La page charge ...
La page charge ...
La page charge ...
La page charge ...
La page charge ...
La page charge ...
La page charge ...
La page charge ...
La page charge ...
La page charge ...
La page charge ...
La page charge ...
La page charge ...
La page charge ...
La page charge ...
La page charge ...
La page charge ...
La page charge ...
La page charge ...
La page charge ...
La page charge ...
La page charge ...
La page charge ...
La page charge ...
La page charge ...
La page charge ...
La page charge ...
La page charge ...
La page charge ...
La page charge ...
La page charge ...
La page charge ...
La page charge ...
La page charge ...
La page charge ...
La page charge ...
La page charge ...
La page charge ...
La page charge ...
La page charge ...
La page charge ...
La page charge ...
La page charge ...
La page charge ...
La page charge ...
La page charge ...
La page charge ...
La page charge ...
La page charge ...
La page charge ...
La page charge ...
La page charge ...
La page charge ...
La page charge ...
La page charge ...
La page charge ...
La page charge ...
La page charge ...
La page charge ...
La page charge ...
La page charge ...
La page charge ...
La page charge ...
La page charge ...
La page charge ...
La page charge ...
La page charge ...
La page charge ...
La page charge ...
La page charge ...
La page charge ...
La page charge ...
La page charge ...
La page charge ...
La page charge ...
La page charge ...
La page charge ...
La page charge ...
La page charge ...
La page charge ...
La page charge ...
La page charge ...
La page charge ...
La page charge ...
La page charge ...
La page charge ...
La page charge ...
La page charge ...
La page charge ...
La page charge ...
La page charge ...
La page charge ...
La page charge ...
La page charge ...
La page charge ...
La page charge ...
La page charge ...
La page charge ...
La page charge ...
La page charge ...
La page charge ...
La page charge ...
La page charge ...
La page charge ...
La page charge ...
La page charge ...
La page charge ...
La page charge ...
La page charge ...
La page charge ...
La page charge ...
La page charge ...
La page charge ...
La page charge ...
La page charge ...
La page charge ...
La page charge ...
La page charge ...
La page charge ...
La page charge ...
La page charge ...
La page charge ...
La page charge ...
La page charge ...
La page charge ...
La page charge ...
La page charge ...
La page charge ...
La page charge ...
La page charge ...
La page charge ...
La page charge ...
La page charge ...
La page charge ...
La page charge ...
La page charge ...
La page charge ...
La page charge ...
La page charge ...
La page charge ...
La page charge ...
-
 1
1
-
 2
2
-
 3
3
-
 4
4
-
 5
5
-
 6
6
-
 7
7
-
 8
8
-
 9
9
-
 10
10
-
 11
11
-
 12
12
-
 13
13
-
 14
14
-
 15
15
-
 16
16
-
 17
17
-
 18
18
-
 19
19
-
 20
20
-
 21
21
-
 22
22
-
 23
23
-
 24
24
-
 25
25
-
 26
26
-
 27
27
-
 28
28
-
 29
29
-
 30
30
-
 31
31
-
 32
32
-
 33
33
-
 34
34
-
 35
35
-
 36
36
-
 37
37
-
 38
38
-
 39
39
-
 40
40
-
 41
41
-
 42
42
-
 43
43
-
 44
44
-
 45
45
-
 46
46
-
 47
47
-
 48
48
-
 49
49
-
 50
50
-
 51
51
-
 52
52
-
 53
53
-
 54
54
-
 55
55
-
 56
56
-
 57
57
-
 58
58
-
 59
59
-
 60
60
-
 61
61
-
 62
62
-
 63
63
-
 64
64
-
 65
65
-
 66
66
-
 67
67
-
 68
68
-
 69
69
-
 70
70
-
 71
71
-
 72
72
-
 73
73
-
 74
74
-
 75
75
-
 76
76
-
 77
77
-
 78
78
-
 79
79
-
 80
80
-
 81
81
-
 82
82
-
 83
83
-
 84
84
-
 85
85
-
 86
86
-
 87
87
-
 88
88
-
 89
89
-
 90
90
-
 91
91
-
 92
92
-
 93
93
-
 94
94
-
 95
95
-
 96
96
-
 97
97
-
 98
98
-
 99
99
-
 100
100
-
 101
101
-
 102
102
-
 103
103
-
 104
104
-
 105
105
-
 106
106
-
 107
107
-
 108
108
-
 109
109
-
 110
110
-
 111
111
-
 112
112
-
 113
113
-
 114
114
-
 115
115
-
 116
116
-
 117
117
-
 118
118
-
 119
119
-
 120
120
-
 121
121
-
 122
122
-
 123
123
-
 124
124
-
 125
125
-
 126
126
-
 127
127
-
 128
128
-
 129
129
-
 130
130
-
 131
131
-
 132
132
-
 133
133
-
 134
134
-
 135
135
-
 136
136
-
 137
137
-
 138
138
-
 139
139
-
 140
140
-
 141
141
-
 142
142
-
 143
143
-
 144
144
-
 145
145
-
 146
146
-
 147
147
-
 148
148
-
 149
149
-
 150
150
-
 151
151
-
 152
152
-
 153
153
-
 154
154
-
 155
155
-
 156
156
-
 157
157
-
 158
158
-
 159
159
-
 160
160
-
 161
161
-
 162
162
-
 163
163
-
 164
164
-
 165
165
-
 166
166
-
 167
167
-
 168
168
-
 169
169
-
 170
170
-
 171
171
-
 172
172
-
 173
173
-
 174
174
-
 175
175
-
 176
176
-
 177
177
-
 178
178
-
 179
179
-
 180
180
-
 181
181
-
 182
182
-
 183
183
-
 184
184
-
 185
185
-
 186
186
-
 187
187
-
 188
188
-
 189
189
-
 190
190
-
 191
191
-
 192
192
-
 193
193
-
 194
194
-
 195
195
-
 196
196
-
 197
197
-
 198
198
-
 199
199
-
 200
200
-
 201
201
-
 202
202
-
 203
203
-
 204
204
-
 205
205
-
 206
206
-
 207
207
-
 208
208
-
 209
209
-
 210
210
-
 211
211
-
 212
212
-
 213
213
-
 214
214
-
 215
215
-
 216
216
-
 217
217
-
 218
218
-
 219
219
-
 220
220
-
 221
221
-
 222
222
-
 223
223
-
 224
224


Yamaha PSR-A3000 Le manuel du propriétaire
- Catégorie
- Synthétiseur
- Taper
- Le manuel du propriétaire
dans d''autres langues
- italiano: Yamaha PSR-A3000 Manuale del proprietario
- English: Yamaha PSR-A3000 Owner's manual
- español: Yamaha PSR-A3000 El manual del propietario
- Deutsch: Yamaha PSR-A3000 Bedienungsanleitung
- русский: Yamaha PSR-A3000 Инструкция по применению
- Nederlands: Yamaha PSR-A3000 de handleiding
- português: Yamaha PSR-A3000 Manual do proprietário
- dansk: Yamaha PSR-A3000 Brugervejledning
- polski: Yamaha PSR-A3000 Instrukcja obsługi
- čeština: Yamaha PSR-A3000 Návod k obsluze
- svenska: Yamaha PSR-A3000 Bruksanvisning
- Türkçe: Yamaha PSR-A3000 El kitabı
- suomi: Yamaha PSR-A3000 Omistajan opas
- română: Yamaha PSR-A3000 Manualul proprietarului
Documents connexes
-
Yamaha PSR-OR700 Le manuel du propriétaire
-
Yamaha PSR-SX600 Manuel utilisateur
-
-
-
-
Yamaha PSR-S650 Le manuel du propriétaire
-
Yamaha PSR-A5000 Manuel utilisateur
-
-
-
Yamaha PSR-S670 Manuel utilisateur