Riccar R60 Broom Vacuum Manuel utilisateur
- Catégorie
- Aspirateurs
- Taper
- Manuel utilisateur

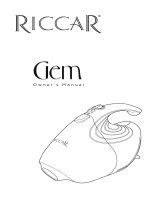
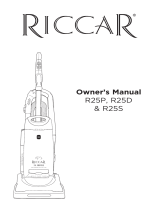
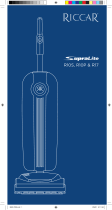
Owner’s Manual
R60


1
Polarization Instructions ......................................................3
Parts Identification ...........................................................4
Vacuum Description ........................................................5-6
Assembling the Vacuum ......................................................7
Operating the Vacuum ........................................................8
Emptying the Dust Cup .......................................................9
Cleaning the Dust Cup .......................................................10
Replacing the HEPA Media Filter ..............................................10
Cleaning the Foam Filters .....................................................11
Troubleshooting. . . . . . . . . . . . . . . . . . . . . . . . . . . . . . . . . . . . . . . . . . . . . . . . . . . . . . . . . . . . . 12
Warranty ...................................................................13
INDEX
The model and serial numbers of this product may be found on the back of the unit.
You should register your vacuum online at www.Riccar.com as soon as possible for
your protection. Also note the model and serial numbers of your unit in the spaces
provided below, and retain this book as a permanent record of yourpurchase.
Model Number _________________________________________________________
Serial Number _________________________________________________________
Date Purchased ________________________________________________________
This vacuum cleaner is a product of high-quality materials and superior workmanship.
We urge you to read these operating instructions carefully before you use this
vacuum cleaner in order to obtain the full performance and satisfaction it can
offeryou.
Before you plug in this vacuum cleaner charger, make sure the voltage indicated on
the rating plate located on the back of the charger is the same as your local supply.
Customer’s Record
Save These Instructions

2
IMPORTANT SAFETY INSTRUCTIONS
When using an electrical appliance, basic precautions should always be
followed, including the following:
READ ALL INSTRUCTIONS BEFORE USING THIS
APPLIANCE. FOR HOUSEHOLD USE ONLY.
IMPORTANT:
The manufacturer cannot accept responsibility for damage
caused when the appliance is not used according to the instructions, or for uses other
than those for which it was intended.
WARNING:
To reduce the risk of fire, electric shock, damage or injury:
• Empty the dust cup before the
contents reach the “fill line” on the
dust cup. Over-filling the dust cup may
cause dirt and debris to clog the filter
and cause loss of suction.
• Always unplug the vacuum from the
electrical outlet before removing the
dust cup.
• Do not leave appliance when plugged
in. Unplug from outlet when not in use
and before servicing.
• WARNING: ELECTRIC SHOCK COULD
OCCUR IF USED OUTDOORS OR ON
WET SURFACES.
• Do not allow to be used as a toy. Close
attention is necessary when used by or
near children.
• Use only as described in this manual.
Use only manufacturer’s recommended
attachments.
• Do not use with damaged cord or plug.
Or if appliance is not working as it
should, has been dropped, damaged,
left outdoors, or dropped into water,
return it to your Authorized Riccar
Retailer for service.
• Do not unplug by pulling on cord. To
unplug, grasp the plug, not the cord.
• Do not pull or carry by cord, use
cord as a handle, close a door on the
cord, or pull cord around sharp edges
or corners. Do not run appliance
over cord. Keep cord away from
heatedsurfaces.
• Do not handle plug or appliance with
wet hands.
• Do not put any object into openings.
Do not use with any opening blocked;
keep free of dust, lint, hair and anything
that may reduce air flow.
• Keep hair, loose clothing, fingers and all
parts of body away from openings and
moving parts.
• Do not pick up anything that is burning
or smoking, such as cigarettes, matches
or hot ashes.
• Do not use without filters in place.
• Turn off all controls before unplugging.
• Do not use to pick up flammable or
combustible liquids such as gasoline
or use in areas where they may
bepresent.
• Do not attempt to service the unit while
appliance is plugged in.
• Do not use vacuum to pick up water or
any wet materials.
• Use extra care when cleaning on stairs.
SAVE THESE INSTRUCTIONS

3
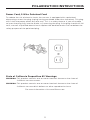
POLARIZATION INSTRUCTIONS
Power Cord, 2-Wire Polarized Cord
To reduce the risk of electric shock, the vacuum is equipped with a polarized
alternating current line plug (a plug having one blade wider than the other). This plug
will fit into the power outlet only one way. This is a safety feature. If you are unable
to insert the plug fully into the outlet, try reversing the plug. If the plug should still fail
to fit, contact a qualified electrician to replace the obsolete outlet. Do not defeat the
safety purpose of the polarized plug.
State of California Proposition 65 Warnings:
WARNING: This product contains one or more chemicals known to the State of
California to cause cancer.
WARNING: This product contains one or more chemicals known to the State of
California to cause birth defects or other reproductive harm.
For more information visit www.Riccar.com

4
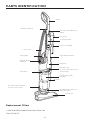
• Genuine HEPA Media and Foam Filter Set
Part # RS60F
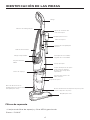
PARTS IDENTIFICATION
Replacement Filters
Handle
Telescopic Wand Extension
Button
Telescopic Wand
Crevice Tool Caddy
2-Speed On/Off Switch
Carry Handle
Dust Cup Latch
(to remove dust cup from the
vacuum body)
Dust Cup Release Button (to
empty dust cup)
Floor Nozzle
Floor Nozzle Release Button
(to remove floor nozzle)
Main Body
Cyclonic Filter Holder
Assembly
Dust Cup
HEPA Media Filter
Assembly
Power Cord
Foam Filters
Crevice Tool
Rotating Cord Hook

5
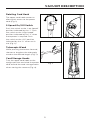
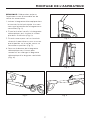
VACUUM DESCRIPTION
Fig. 1
Fig. 2
Fig. 3
Fig. 4
Rotating Cord Hook
The upper cord hook rotates to
allow quick access to the power
cord (Fig. 1).
2-Speed On/Off Switch
Push the switch to the “Low Speed”
position indicated by the “I”. Push
the switch to the “High Speed”
position indicated by the “II” when
more power is required. Push
the switch to the “Off” position
indicated by the “O” when not in
use (Fig. 2).
Telescopic Wand
While pressing the button forward,
shorten or lengthen the telescopic
wand to the desired length (Fig. 3).
Cord Storage Hooks
Turn the upper cord hook to the
upright position and wind the power
cord around the cord storage hooks
when storing the vacuum (Fig. 4).

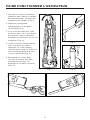
6
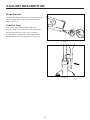
Floor Nozzle
Attach the floor nozzle to the end of the
neck of the dust cup for cleaning bare
floors (Fig. 1).
Crevice Tool
The cleaning tool caddy holds the
crevice tool. This tool can be attached
to the end of the main unit in place
of the floor nozzle for cleaning along
baseboards and small spaces (Fig. 2).
Fig. 1
Fig. 2
VACUUM DESCRIPTION

7
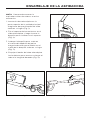
Fig. 1
Fig. 2
Fig. 3 Fig. 4
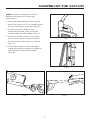
ASSEMBLING THE VACUUM
NOTE: Always unplug the vacuum
before assembling or removing
accessories.
1. Insert the telescoping wand into the
top of the main unit. Ensure the button
on the wand locks into place (Fig. 1).
2. Attach the tool caddy to the
telescoping wand, then insert the
crevice tool into the caddy (Fig. 2).
3. Attach the floor nozzle to the neck
of the dust cup ensuring the button
on the nozzle neck locks into place
(Fig. 3).
4. Push the button on the telescopic
wand forward to shorten or lengthen
the wand to the desired length
(Fig. 4).

8
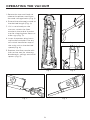
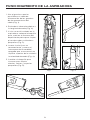
OPERATING THE VACUUM
Fig. 1
Fig. 2
Fig. 4
Fig. 3 Fig. 5
1. Rotate the top cord hook to
release the power cord from
the cord storage hooks (Fig. 1).
2. Extend the telescopic wand to
the desired length (Fig. 2).
3. If it is not already on the
vacuum, attach the floor
nozzle to the end of the dust
cup for cleaning bare floors or
area rugs (Fig. 3).
4. Insert the power plug into a
wall outlet and press the on/
off switch located on top of
the main unit to the desired
speed (Fig. 4).
5. Replace the floor nozzle with
the crevice tool for cleaning
baseboards, ceilings and small
spaces (Fig. 5).

9
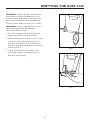
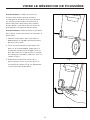
EMPTYING THE DUST CUP
Fig. 1
Fig. 2
WARNING: Empty the dust cup before
the contents reach the bottom of the
cyclonic filter assembly. Overfilling the
dust cup may cause dirt and debris to
clog the filter and cause loss of suction.
WARNING: Always unplug the vacuum
from the electrical outlet before
removing the dust cup.
1. Turn the vacuum off and unplug the
power cord from the wall outlet.
2. While holding the vacuum over a trash
can, push the release button at the
bottom of the dust cup. The base of
the dust cup will drop down, releasing
the dirt (Fig. 1).
3. Close the bottom of the dust cup,
ensuring it locks into place (Fig. 2).
Resume vacuuming.

10
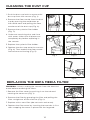
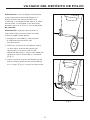
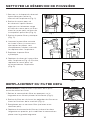
CLEANING THE DUST CUP
1. Push the dust cup latch to remove the
dust cup from the vacuum (Fig. 1).
2. Remove the floor nozzle from the dust
cup by pressing the red button on
the nozzle neck and pulling the floor
nozzle out of the dust cup (Fig. 2).
3. Remove the cyclonic filter holder
(Fig. 3).
4. Shake out remaining dust and rinse
with water. Make sure all pieces are
completely dry before replacing in
thevacuum.
5. Replace the cyclonic filter holder.
6. Replace the dust cup onto the vacuum
(Fig. 4). Then replace the floor nozzle
and resume vacuuming (Fig. 5).
Fig. 1
Fig. 3
Fig. 2
Fig. 4
Fig. 5
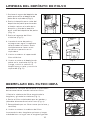
REPLACING THE HEPA MEDIA FILTER
Fig. 1
Fig. 2
WARNING: Always unplug the vacuum from the electrical
outlet before removing the filters.
1. Remove the filter cover by pushing in on the tab and
rotating the cover out (Fig. 1).
2. Remove the filter by grasping the filter and pulling the
filter straight out of the machine (Fig. 2).
3. Replace with a new filter (do not wash and reuse).
4. Replace the filter cover by inserting the two tabs in first
then snapping the cover in place with the large tab.

11
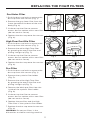
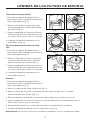
REPLACING THE FOAM FILTERS
Fig. 2
Fig. 3 Fig. 4
Fig. 1
Fig. 5 Fig. 6
Pre-Motor Filter
1. Push the dust cup latch to remove the
dust cup from the vacuum (Fig. 1).
2. Remove the gray foam filter from the
frame located at the base of the main
body (Fig. 2).
3. Shake or tap the filter to remove
excess dust or replace with a new filter
(do not wash or reuse).
4. Replace the dust cup onto the vacuum
(Fig. 4).
High Flow Dust Bin Filter
1. Push the dust cup latch to remove the
dust cup from the vacuum (Fig. 1).
2. Remove the white High Flow filter
by grasping the top of the filter and
pulling straight up (Fig. 3).
3. Shake or tap the filter to remove
excess dust or replace with a new filter
(do not wash or reuse).
4. Replace the dust cup onto the vacuum
(Fig. 4).
Pre-Filter
1. Push the dust cup latch to remove the
dust cup from the vacuum (Fig. 1).
2. Remove the cyclonic filter holder
(Fig. 5).
3. Remove the white High Flow filter
by grasping the top of the filter and
pulling straight up (Fig. 3).
4. Remove the black pre-filter from the
inside of the cyclonic filter holder
(Fig. 6).
5. Shake or tap the filter to remove
excess dust or replace with a new filter
(do not wash or reuse).
6. Replace the pre-filter and the High
Flow filter in the cyclonic filter holder.
7. Replace the dust cup onto the vacuum
(Fig. 4).
WARNING: Do not put filters in the
dishwasher or clothes washing machine.

12
Problem Check Point Possible Solution
Suction power is weak. • Dust cup
• Floor nozzle/
Crevice tool
• Filters
• If the dust cup is full, empty it.
• If clogged, remove the object.
• Replace filters.
The vacuum does not
work.
• Power cord Insert the power plug firmly into an
electrical outlet.
Sudden loss of power. • Thermal reset Turn off vacuum and unplug from
electrical outlet. Let vacuum cool down
for 60 minutes before turning back on.
Check for clogs. Empty dust container.
Dirt and debris are
blowing through
exhaust vent.
• Filters Make sure all filters are clean, dry and
installed correctly.
Any other service should be performed by an AuthorizedRiccar Vacuum Retailer.
To locate your nearest Authorized Retailer, visit our website at www.Riccar.com or
call 888-6-RICCAR.
• Keep machine and all accessories clean and in good operating condition.
• Replace HEPA media filter and clean foam filters frequently if vacuuming fine
powders such as flour or drywall dust.
• Always use genuine filters and parts, as use of other products may result in poor
cleaning or filtration performance. Riccar Vacuums filtration products are
designed for maximum performance.
• Store machine carefully in a dry area.
• For optimum cleaning performance and safety, follow your owner’s manual.
TROUBLESHOOTING
FOR BEST PERFORMANCE

13
Problem Check Point Possible Solution
Suction power is weak. • Dust cup
• Floor nozzle/
Crevice tool
• Filters
• If the dust cup is full, empty it.
• If clogged, remove the object.
• Replace filters.
The vacuum does not
work.
• Power cord Insert the power plug firmly into an
electrical outlet.
Sudden loss of power. • Thermal reset Turn off vacuum and unplug from
electrical outlet. Let vacuum cool down
for 60 minutes before turning back on.
Check for clogs. Empty dust container.
Dirt and debris are
blowing through
exhaust vent.
• Filters Make sure all filters are clean, dry and
installed correctly.
Any other service should be performed by an AuthorizedRiccar Vacuum Retailer.
To locate your nearest Authorized Retailer, visit our website at www.Riccar.com or
call 888-6-RICCAR.
WARRANTY
What is Covered:
This warranty covers any defects in material and workmanship in your new vacuum
and applies exclusively to the original purchaser.
How Long Coverage Lasts:
Warranty coverage for this vacuum lasts two years. Household models used
commercially are only warranted for 90 days.
What is Not Covered:
• Damage to the vacuum which occurs from neglect, abuse, alterations, accident,
misuse or improper maintenance.
• Normal replacement items: disposable filters.
• Damage associated with or resulting from the use of non-genuine parts including
normal replacement items.
What We Will Do:
This warranty provides, at no cost to you, all labor and parts to keep this vacuum in
correct operating condition during the warranted period.
How to Get Service:
Warranty service can only be obtained by presenting the vacuum to an Authorized
Riccar Retailer. A proof-of-purchase and product serial number will be required
before service is rendered. To locate your nearest service center, please call
888-6-RICCAR or visit www.Riccar.com.
THIS WARRANTY IS EXCLUSIVE AND IN LIEU OF ANY AND ALL OTHER
WARRANTIES WHETHER WRITTEN, ORAL, EXPRESSED OR IMPLIED, (INCLUDING
ANY WARRANTY OF MERCHANTABILITY OR FITNESS FOR A PARTICULAR
PURPOSE). THIS WARRANTY DISCLAIMS LIABILITY FOR INCIDENTAL OR
CONSEQUENTIAL DAMAGES.
How State Law Applies:
This warranty gives you specific legal rights, and you may also have other rights
which vary from state to state.
Register your warranty online at www.Riccar.com

14
Owner's Warranty Information
Purchased from:
Store name
Address
City, State, Zip
Telephone
The model and serial number of this product may be found on the back of the unit. Register
your vacuum online at www.Riccar.com as soon as possible for your protection. Also, note the
model and serial numbers of your unit in the spaces provided below, and retain this book as a
permanent record of your purchase.
Model Number __________________________________________________________________
Serial Number ___________________________________________________________________
Date Purchased __________________________________________________________________
keep this for your records…

Owner’s Manual
R60


1
Instrucciones de polarización ...................................................... 3
Identificación de las piezas.........................................................4
Descripción de la aspiradora ..................................................... 5-6
Ensamblaje de la aspiradora ....................................................... 7
Funcionamiento de la aspiradora ...................................................8
Vaciado del depósito de polvo .....................................................9
Limpieza del depósito de polvo ................................................... 10
Reemplazo del filtro HEPA ........................................................ 10
Limpieza de los filtros de esponja...................................................11
Resolución de problemas ..........................................................12
Garantía .........................................................................13
ÍNDICE
El modelo y los números de serie de este producto se encuentran en la parte posterior de
la unidad. Debe registrar su aspiradora en línea en www.Riccar.com tan pronto como sea
posible para su protección. Escriba también el modelo y los números de serie de su unidad
en los espacios que se proporcionan a continuación y guarde este folleto como un registro
permanente de su compra.
Número de modelo __________________________________________________________
Número de serie ____________________________________________________________
Fecha de compra ____________________________________________________________
Su aspiradora de es un producto con materiales de alta calidad y manufactura superior. Le
recomendamos que lea estas instrucciones de funcionamiento con atención antes de usar
esta aspiradora para así obtener el mejor rendimiento y satisfacción que puede ofrecerle.
Antes de conectar el cargador de su aspiradora de, asegúrese de que el voltaje indicado
en la placa de características ubicada en la parte posterior del cargador sea igual al de su
suministro local.
REGISTRO DEL CLIENTE
CONSERVE ESTAS INSTRUCCIONES

2
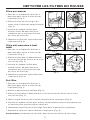
INSTRUCCIONES DE SEGURIDAD IMPORTANTES
Al utilizar un electrodoméstico siempre se deben seguir las precauciones básicas,
incluidas las siguientes:
LEA TODAS LAS INSTRUCCIONES ANTES
DE USARESTE APARATO
El fabricante no acepta la responsabilidad
por los daños causados cuando el
electrodoméstico no se utiliza de acuerdo
con las instrucciones o para otros usos que
no sean aquellos para los que fue fabricado.
Esta aspiradora está diseñada solo para uso
doméstico.
Para reducir el riesgo de incendio, descarga eléctrica o lesión:
• No se aleje del aparato mientras
esté conectado. Desenchúfelo del
tomacorriente cuando no esté en
uso y antes de realizar tareas de
mantenimiento.
• ADVERTENCIA: PODRÍA PRODUCIRSE
UNA DESCARGA ELÉCTRICA SI
SE UTILIZA AL AIRE LIBRE O EN
SUPERFICIES MOJADAS.
• No permita que se utilice como un
juguete. Preste especial atención
cuando es utilizado por niños o cerca
de ellos.
• Utilícelo solamente de acuerdo
con lo descrito en este manual.
Utilice solamente los accesorios
recomendados por el fabricante.
• No lo utilice si el cable o la clavija
tienen daños o si el aparato no funciona
como debería, se cayó, está dañado, lo
dejaron a la intemperie ocayó al agua.
• No lo jale ni lo desplace tirando
del cable, no utilice el cable como
manija, no permita que se cierre
ninguna puerta sobre el cable, ni
jale el cable alrededor de bordes o
esquinas pronunciadas. No pase
el electrodoméstico encima del
cable. Mantenga el cable alejado de
superficies calientes.
• No jale del cable para desenchufar el
aparato. Para desconectarlo, tome la
clavija, no el cable.
• No manipule el enchufe ni el aparato
con las manos mojadas.
• No coloque ningún objeto en las
aberturas. No lo utilice si alguna
abertura está obstruida; manténgalo sin
polvo, pelusa, cabello y cualquier otra
cosa que pueda reducir el flujo de aire.
• Mantenga el cabello, la ropa suelta,
los dedos y todas las partes del
cuerpo alejados de las aberturas y
componentes móviles.
• No aspire nada que esté encendido o
emita humo, como cigarrillos, fósforos
o cenizas calientes.
• No lo utilice sin haber colocado antes el
depósito de polvo y los filtros.
• Apague todos los controles antes de
desenchufarlo.
• No lo utilice para recoger líquidos
combustibles o inflamables como
gasolina, ni lo utilice en áreas donde
estos líquidos puedan estar presentes.
• No intente realizar el mantenimiento
o la limpieza de la unidad cuando el
aparato esté enchufado.
• No use la aspiradora para aspirar agua
o materiales mojados o húmedos.
• Tenga especial cuidado al limpiar
escaleras.
CONSERVE ESTAS INSTRUCCIONES.
ADVERTENCIA:
La page est en cours de chargement...
La page est en cours de chargement...
La page est en cours de chargement...
La page est en cours de chargement...
La page est en cours de chargement...
La page est en cours de chargement...
La page est en cours de chargement...
La page est en cours de chargement...
La page est en cours de chargement...
La page est en cours de chargement...
La page est en cours de chargement...
La page est en cours de chargement...
La page est en cours de chargement...
La page est en cours de chargement...
La page est en cours de chargement...
La page est en cours de chargement...
La page est en cours de chargement...
La page est en cours de chargement...
La page est en cours de chargement...
La page est en cours de chargement...
La page est en cours de chargement...
La page est en cours de chargement...
La page est en cours de chargement...
La page est en cours de chargement...
La page est en cours de chargement...
La page est en cours de chargement...
La page est en cours de chargement...
La page est en cours de chargement...
La page est en cours de chargement...
La page est en cours de chargement...
La page est en cours de chargement...
La page est en cours de chargement...
-
 1
1
-
 2
2
-
 3
3
-
 4
4
-
 5
5
-
 6
6
-
 7
7
-
 8
8
-
 9
9
-
 10
10
-
 11
11
-
 12
12
-
 13
13
-
 14
14
-
 15
15
-
 16
16
-
 17
17
-
 18
18
-
 19
19
-
 20
20
-
 21
21
-
 22
22
-
 23
23
-
 24
24
-
 25
25
-
 26
26
-
 27
27
-
 28
28
-
 29
29
-
 30
30
-
 31
31
-
 32
32
-
 33
33
-
 34
34
-
 35
35
-
 36
36
-
 37
37
-
 38
38
-
 39
39
-
 40
40
-
 41
41
-
 42
42
-
 43
43
-
 44
44
-
 45
45
-
 46
46
-
 47
47
-
 48
48
-
 49
49
-
 50
50
-
 51
51
-
 52
52


Riccar R60 Broom Vacuum Manuel utilisateur
- Catégorie
- Aspirateurs
- Taper
- Manuel utilisateur
dans d''autres langues
- English: Riccar R60 Broom Vacuum User manual
- español: Riccar R60 Broom Vacuum Manual de usuario
- português: Riccar R60 Broom Vacuum Manual do usuário
Documents connexes


Autres documents
-
Simplicity S60 Manuel utilisateur
-
Hoover SH40080 Manuel utilisateur
-
-
Hoover UH70400 Le manuel du propriétaire
-
Electrolux EL4060A Manuel utilisateur
-
-
-
Maytag M600 Le manuel du propriétaire