Jenn-Air JGCP430WP Manuel utilisateur
- Catégorie
- Cuisinières
- Taper
- Manuel utilisateur

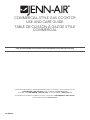
COMMERCIAL-STYLE GAS COOKTOP
USE AND CARE GUIDE
TABLE DE CUISSON À GAZ DE STYLE
COMMERCIAL
W11090432A
For questions about features, operation/performance, parts, accessories, or service in the U.S.A., call:
1-800-JENNAIR (1-800-536-6247) or visit our website at www.jennair.com.
In Canada, call: 1-800-JENNAIR (1-800-536-6247), or visit our website at www.jennair.ca.
Au Canada, pour assistance, installation ou service, composez le 1-800-JENNAIR (1-800-536-6247)
ou visitez notre site web à www.jennair.ca.
Para una versión de estas instrucciones en español, visite www.jennair.com

2
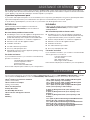
SAFETY INFORMATION ................................................................3
PARTS AND FEATURES ................................................................5
COOKTOP FEATURES ................................................................... 6
Burners .............................................................................. 6
Chrome Electric Griddle ....................................................7
Cookware ..........................................................................8
Home Canning ..................................................................8
CARE AND CLEANING ..................................................................9
Cooktop Surface ...............................................................9
Sealed Surface Burners ....................................................9
Porcelain-Coated Grates and Caps ................................10
Griddle .............................................................................10
Cooktop Controls ............................................................11
Stainless Steel .................................................................11
TROUBLESHOOTING ..................................................................12
ASSISTANCE OR SERVICE .........................................................13
ACCESSORIES .............................................................................13
WARRANTY ..................................................................................14
Table of Contents
INFORMATIONS DE SÉCURITÉ..................................................15
PIÈCES ET CARACTÉRISTIQUES ..............................................17
CARACTÉRISTIQUES DE LA TABLE DE CUISSON ..................18
Brûleurs ...........................................................................18
Plaque à frire électrique chromée ...................................19
Ustensiles de cuisson .....................................................21
Préparation de conserves à la maison ...........................21
ENTRETIEN ET NETTOYAGE ...................................................... 22
Surface de la table de cuisson ........................................22
Brûleurs de surface scelles .............................................22
Grilles et chapeaux emailles ...........................................23
Plaque à frire ...................................................................23
Commandes de la table de cuisson ...............................24
Acier inoxydable ..............................................................24
DÉPANNAGE .................................................................................25
ASSISTANCE OU SERVICE .........................................................26
ACCESSOIRES .............................................................................27
GARANTIE .....................................................................................28
Table des matières

3
SAFETY INFORMATION
WARNING: If the information in these instructions is not followed exactly, a fire or
explosion may result causing property damage, personal injury or death.
– Do not store or use gasoline or other flammable vapors and liquids in the vicinity of this
or any other appliance.
– WHAT TO DO IF YOU SMELL GAS:
•
Do not try to light any appliance.
•
Do not touch any electrical switch.
•
Do not use any phone in your building.
•
Immediately call your gas supplier from a neighbor's phone. Follow the gas supplier's
instructions.
•
If you cannot reach your gas supplier, call the fire department.
– Installation and service must be performed by a qualified installer, service agency or
the gas supplier.

4
SAFETY INFORMATION
SAVE THESE INSTRUCTIONS
IMPORTANT SAFETY INSTRUCTIONS
WARNING: To reduce the risk of fire, electrical shock,
injury to persons, or damage when using the cooktop, follow
basic precautions, including the following:
■ WARNING:
NEVER use this appliance as a space
heater to heat or warm the room. Doing so may result in
carbon monoxide poisoning and overheating of the cooktop.
■ CAUTION: Do not store items of interest to children in
cabinets above the cooktop – children climbing on the
cooktop to reach items could be seriously injured.
■ Proper Installation – The cooktop, when installed, must be
electrically grounded in accordance with local codes or, in
the absence of local codes, with the
National Electrical
Code, ANSI/NFPA70 or the Canadian Electrical Code,
Part 1
. Be sure the cooktop is properly installed and
grounded by a qualified technician.
■
This cooktop is equipped with a three-prong grounding
plug for your protection against shock hazard and should
be plugged directly into a properly grounded receptacle. Do
not cut or remove the grounding prong from this plug.
■
Disconnect the electrical supply before servicing the
cooktop.
■ Injuries may result from the misuse of the cooktop such as
stepping, leaning, or sitting on the top surface.
■
Maintenance – Keep cooktop area clear and free from
combustible materials, gasoline, and other flammable
vapors and liquids.
■
Storage on the cooktop – Flammable materials should not
be stored on or near surface units.
■ Top burner flame size should be adjusted so it does not
extend beyond the edge of the cooking utensil.

5
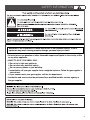
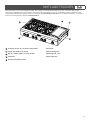
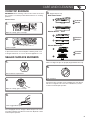
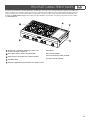
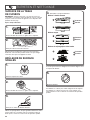
These instructions cover several different models. The cooktop you have purchased may have some or all of the items listed.
The locations and appearances of the features shown here may not match those of your model. Refer to these instructions or the
“Frequently Asked Questions (FAQs)” section of our website at producthelp.jennair.com for more detailed instructions. In Canada,
refer to the Customer Service Section at www.jennair.ca.
A
B
C
D
E
Commercial-style die cast metal control knobs
Heavy duty double grate design
Electric chrome griddle (on some models)
Island trim
Drip tray (on griddle models)
1
2
3
4
5
1
2
3
4
5
Not shown:
Optional backguards
Optional griddle cover
Optional wok ring
PARTS AND FEATURES

6
COOKTOP FEATURES
BURNERS
WARNING
Fire Hazard
Do not let the burner flame extend beyond the edge of
the pan.
Turn off all controls when not cooking.
Failure to follow these instructions can result in death
or fire.
BTU/Hr
BURNER
APPEARANCE FEATURES
Ultra-
Power™
dual-flame
burner
This burner has an upper
and lower level of flame.
The Power Hi setting
uses both flame levels at
full power to provide the
highest heat. It is ideal for
cooking large quantities
of food or liquid and using
large pots and pans. The
Simmer Hi and Lo settings
use the upper flame only.
Medium
burner
This burner is ideal for
cooking smaller quantities
of food and melting
chocolate or butter.
Simmer
burner
This burner reaches a
low of 500 BTU/Hr. It
provides the gentle, low
temperatures required
for simmering soups,
stewing, and melting
delicate ingredients
like butter, cheese,
and chocolate.
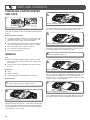
Igniting Burners:
■ Electric igniters automatically light the surface burners
when control knobs are turned to Lite.
■ Before setting a control knob, place filled cookware on
the grate. Do not operate a burner using empty cookware
or without any cookware on the grate.
■ Visually check that the burner has lit. If the burner does not
ignite, listen for the clicking sound. If you do not hear the
igniter click, turn off the burner. Check for a tripped circuit
breaker or blown fuse.
■ Check that the control knob is pressed completely down on
the valve shaft. If the spark igniter still does not operate, call
a trained repair specialist.
■ When the control knobs for any small or medium burner are
turned to Lite, all small and medium burners will click. When
the control knob for the large burner is turned to Lite, these
burners will click independently of the other burners. In both
cases, only the burner with the control knob turned to Lite
will produce a flame.
Reignition Feature
During cooktop use, if one or more burners are extinguished
due to external causes (such as a water spill, wind, or ventilation
draft), the ignition system will turn on to reignite the flame.
When the flame comes back on, the system will stop sparking.
If the draft in the room is not removed, occasional sparking may
continue. Sparking may also occasionally occur when using the
low setting on a burner.
To Set a Burner:
Push in one more time to get from Lo to Hi.
In Case of Power Failure
Hold a lit match near a
burner and turn knob
counterclockwise to
HI. After burner lights,
turn knob to the desired
setting.
1.
Push in and turn
counterclockwise to LITE.
2.
Turn knob counterclockwise
between HI and LO.
REMEMBER: When cooktop is in use or during the
Self-Cleaning cycle, the entire cooktop area may
become hot.

7
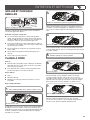
COOKTOP FEATURES
A
B
C
Sealed Surface Burners
Sealed surface burners are designed to minimize gaps and
seams that can allow liquids and spills to get under the cooktop.
This design makes cleanup quick and easy.
Stacked Power Burner
Medium Burner
Simmer/Melt Burner
IMPORTANT: Do not obstruct the flow of combustion and
ventilation air around the burner grate edges.
Burner cap: Always keep the burner cap in place when using a
surface burner. A clean burner cap will help avoid poor ignition
and uneven flames. Always clean the burner cap after a spillover
and routinely remove and clean the caps according to the “Care
and Cleaning” section.
Gas opening: Gas must flow freely throughout the gas opening
for the burner to light properly. Keep this area free of soil and do
not allow spills, food, cleaning agents, or any other material to
enter the gas opening. Keep spillovers out of the gas opening
by always using a burner cap.
Burner ports: Check burner flames occasionally for proper size
and shape as shown above. A good flame is blue in color, not
yellow. Keep this area free of soil and do not allow spills, food,
cleaning agents, or any other material to enter the burner ports.
1
Burner cap
2
Burner base
3
Choke (for use with
medium burner,
Propane gas only)
1
2
1
2
1
2
3
1
1-1
1
/
2
"
(2.5-3.8 cm)
2
Burner ports
1
2
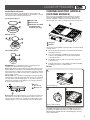
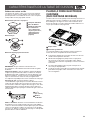
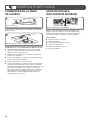
CHROME ELECTRIC GRIDDLE
(ON SOME MODELS)
The chrome electric griddle provides the perfect cooking
surface for grilled sandwiches, pancakes, eggs, burgers,
sautéed vegetables, and many more family favorites. The
attractive low-stick surface is designed to make cleanup easy.
The chrome electric griddle system provides an evenly heated
cooking surface.
■ Be sure plastic film has been removed and wash with hot
water before first use.
■ To avoid scratching the griddle, do not place any pots
or pans on the griddle. Use only heat-resistant plastic
or wooden utensils.
■ The griddle surface is ready to use and does not need
to be seasoned.
■ Pouring cold water on a hot griddle may warp the griddle,
resulting in an uneven cooking surface.
A
B
1
Drip tray
2
Griddle
2
1
To Use:
The griddle light will turn off when the griddle has finished
preheating. The griddle light will turn on and off during use to
indicate that the griddle element is maintaining the selected
surface temperature.
1.
Position drip tray.
2.
Push in and turn knob.
3.
Place food on griddle and
cook to desired doneness.

8
Cooking Chart
FOOD SETTING
COOK TIME
TOTAL MINUTES
Sausage patties
and links
325°F (163°C) 12-18
Bacon slices
350°F (177°C) 7-11
Ham steak
(fully cooked)
325°F (163°C) 5-7
Frankfurters and
precooked sausages
325°F (163°C) 8-15
Ground meat patties
350°F (177°C) 10-15
Grilled sandwiches
325°F (163°C) 3-5
Fish steaks, fillets
325°F (163°C) 8-15
Eggs
300°F (149°C) 3-5
Hash brown potatoes
400°F to 425°F
(204°C to 218°C)
8-12
French toast
350°F (177°C) 5-7
Pancakes
350°F (177°C) 2-4
COOKWARE
IMPORTANT: Do not leave empty cookware on a hot surface
cooking area, element, or surface burner.
Ideal cookware should have a flat bottom, straight sides, and a
well-fitting lid and the material should be of medium-to-heavy
thickness.
Rough finishes may scratch the cooktop or grates. Aluminum
and copper may be used as a core or base in cookware.
However, when used as a base, they can leave permanent
marks on the cooktop or grates.
Cookware material is a factor in how quickly and evenly heat
is transferred which affects cooking results. A nonstick finish
has the same characteristics as its base material. For example,
aluminum cookware with a nonstick finish will take on the
properties of aluminum.
Cookware with nonstick surfaces should not be used under
the broiler.
Use the following chart as a guide for cookware material
characteristics.
COOKWARE CHARACTERISTICS
Aluminum
■ Heats quickly and evenly.
■ Suitable for all types of cooking
■ Medium or heavy thickness is best
for most cooking tasks.
Cast iron
■ Heats slowly and evenly.
■ Good for browning and frying
■ Maintains heat for slow cooking.
Ceramic or
ceramic glass
■ Follow manufacturer’s instructions.
■ Heats slowly, but unevenly.
■ Ideal results on low-to-medium heat
settings
Copper
■ Heats very quickly and evenly.
Earthenware
■ Follow manufacturer’s instructions.
■ Use on low heat settings.
Porcelain enamel
on steel or cast
iron
■ See stainless steel or cast iron.
Stainless steel
■ Heats quickly, but unevenly.
■ A core or base of aluminum or
copper on stainless steel provides
even heating.
HOME CANNING
When canning for long periods, alternate the use of surface
burners between batches. This allows time for the most recently
used areas to cool.
■ Center the canner on the grate.
■ Do not place canner on two surface burners at the same
time.
■ For more information, contact your local agricultural
department. Companies that manufacture home canning
products can also offer assistance.
Griddle Charts
The settings and times are guidelines only and may need to be
adjusted for individual tastes.
Preheat Chart
TEMPERATURE TIME TO PREHEAT (in minutes)
250°F (121°C) 10
300°F (149°C) 14
350°F (177°C) 15
400°F (204°C) 20
450°F (232°C) 25
500°F (260°C) 27
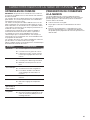
COOKTOP FEATURES

9
COOKTOP SURFACE
IMPORTANT: Before cleaning, make sure all controls are off and
the cooktop is cool. Always follow label instructions on cleaning
products.
After Each Use:
To preserve the finish, clean food spills containing acids, such
as vinegar and tomato, as soon as the entire appliance is cool.
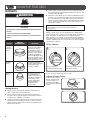
SEALED SURFACE BURNERS
Use a straight pin. Do not enlarge or distort the port. Do not use
a wooden toothpick. If the burner needs to be adjusted, contact
a trained repair specialist.
1.
Wipe off cooktop, grates, and caps.
2.
Clean food spills.
1.
Remove burner cap and base.
2.
Wipe off cooktop, grates, and caps.
3.
Clean clogged burner ports.
Make sure alignment pins are properly aligned with burner cap.
If the burner does not light, check cap alignment. If the burner
still does not light, do not service the sealed burner yourself.
Contact a trained repair specialist.
4. Replace burner cap.
5.
Turn on burner.
Dual-Flame Burner
Medium Burner
Simmer/Melt Burner
1
Incorrect
2
Correct
1
Incorrect
2
Correct
1
Incorrect
2
Correct
1
1
1
2
2
2
CARE AND CLEANING

10
PORCELAIN-COATED GRATES
AND CAPS
Clean with a nonabrasive nylon scrub pad and mildly abrasive
cleanser.
Know Your Grates and Caps
■ Food spills containing acids, such as vinegar and tomato,
should be cleaned as soon as the cooktop, grates, and
caps are cool. These spills may affect the finish.
■ To avoid chipping, do not bang grates and caps against
each other or hard surfaces such as cast iron cookware.
■ Do not reassemble caps on burners while wet.
■ Do not clean in the Self-Cleaning cycle.
■ Do not clean in dishwasher.
Use scrub pad and cleanser.
`
Use a pad holder or wooden spoon with non-scratch pad. Use
pressure on soiled areas. Repeat if needed for heavy soils. `
Fold a damp towel and, with the pad holder or wooden spoon,
go over the griddle to remove remaining residue.
`
`
Once cool, wipe the griddle with a clean, damp terry cloth towel.
Then buff with a microfiber cloth. If streaking, rainbowing, or
ghosting occurs, use a mixture of 1 part white vinegar to 2 parts
water on a towel to wipe the griddle.
`
Clean the drip tray with warm soapy water. Wipe the area under
the drip tray clean. Once dry, put the drip tray back in position.
3.
Scrape residue into drip tray.
4.
Remove remaining residue.
5. Turn off griddle and let cool.
6.
Wipe off griddle.
7.
Remove, empty, and clean drip tray.
GRIDDLE
Tips:
■ Prior to cleaning the griddle, make sure that all cooktop
burners have been turned off and the oven controls have
been locked.
■ For best results, clean the griddle shortly after removing
the food.
Do Not Use:
■ Soap
■ Abrasive materials
■ Cleaning materials, including stainless steel cleaner
After Each Use:
Using a measuring cup, pour up to 1 cup (236.6 mL) tap water
over the soiled area, starting at the back, allowing the water to
run toward the drip tray in the front. Allow the water to bubble
on the griddle for 3 to 4 seconds.
1. Heat for 10 to 15 minutes at 300°F (149°C).
2.
Pour water on soiled area.
CARE AND CLEANING

11
COOKTOP CONTROLS
Pull the knobs straight away from the control panel to remove.
Know Your Cooktop Controls
■ To avoid damage to the cooktop controls, do not use steel
wool, abrasive cleansers, or oven cleaner.
■ To avoid damage, do not soak knobs.
■ When replacing knobs, make sure knobs are in the Off
position.
■ Do not remove seals under knobs.
■ When replacing knobs after cleaning either the surface
burner controls or the griddle module control, make sure
the knobs are replaced to the correct location. The power
burner knobs have power settings and the griddle knob
has temperature settings. All other knobs have Hi, Med,
Lo settings only.
1.
Remove knobs.
2.
Clean with warm, soapy water.
STAINLESS STEEL
(ON SOME MODELS)
Use affresh
®
Stainless Steel Cleaner or affresh
®
Stainless Steel
Cleaning Wipes (not included). Rub in direction of grain to avoid
possible damage to the steel surface.
Do Not Use:
■ Soap-filled scouring pads
■ Abrasive cleaners
■ Cooktop polishing creme
■ Steel-wool pads
■ Gritty washcloths
■ Abrasive paper towels
Use cleaner or wipes.
CARE AND CLEANING

12
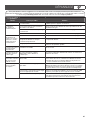
If you experience Possible causes Solution
Nothing will operate A household fuse has blown or a circuit
breaker has tripped.
Replace the fuse or reset the circuit breaker. If the problem
continues, call an electrician.
Surface burners will
not operate
This is the first time the surface burners
have been used.
Turn on any one of the surface burner knobs to release air from
the gas lines.
The control knob is not set correctly. Push in knob before turning to a setting.
The burner ports are clogged. Clean clogged burner ports with a straight pin.
Surface burner
flames are uneven,
yellow, and/or noisy
The burner ports are clogged. Clean clogged burner ports with a straight pin.
On models with caps, the burner caps
are not positioned properly.
Make sure alignment pins are properly aligned with the
burner cap.
Propane gas is being used. The cooktop may have been converted improperly. Contact
a trained repair specialist.
Surface burner makes
popping noises
The burner is wet. Let it dry.
Burner sparks but
does not light
There is continuous sparking, but the
burner does not light.
Discontinue use of the surface burner and contact a service
technician.
Excessive heat
around cookware
on cooktop
The cookware is not the proper size. Use cookware about the same size as the surface cooking area,
element, or surface burner. Cookware should not extend more
than 1/2" (1.3 cm) outside the cooking area.
Cooktop cooking
results not what
expected
The proper cookware is not being used. Use medium-to-heavy cookware made of the material that cooks
food the way you want. The best cookware should have a flat
bottom, straight sides, and a well-fitting lid.
The control knob is not set to the proper
heat level.
Set the Cooktop Control to HI, MED, or LO, depending upon
the type of cooking you want to do.
The cooktop is not level. The cooktop must be level for the griddle to operate properly.
See the Installation Instructions for leveling instructions.
First try the solutions suggested here. If you need further assistance or more recommendations that may help you avoid
a service call, refer to the warranty page in these instructions and scan the code there with your mobile device, or visit
producthelp.jennair.com. In Canada, visit www.jennair.ca.
TROUBLESHOOTING

13
For accessories in the U.S.A., you can visit our website at www.jennair.com or call us at 1-800-JENNAIR (1-800-536-6247). In Canada,
visit our website at www.jennair.ca or call us at 1-800-JENNAIR (1-800-536-6247). Or see the “Accessories” brochure to order.
affresh
®
Stainless Steel Cleaner and Polish
(stainless steel models)
affresh
®
Stainless Steel Wipes
(stainless steel models)
affresh
®
Cooktop Cleaner
Cooktop Protectant
Gas Grate/Drip Pan Cleaner
affresh
®
Kitchen and Appliance Cleaner
Griddle
Wok Ring
19¹¹/₁₆" (50.0 cm) to 39" (99.0 cm) Adjustable Backguard
for 30" (76.2 cm) Ranges and Cooktops
19¹¹/₁₆" (50.0 cm) to 39" (99.0 cm) Adjustable Backguard
for 36" (91.4 cm) Ranges and Cooktops
19¹¹/₁₆" (50.0 cm) to 39" (99.0 cm) Adjustable Backguard
for 48" (121.9 cm) Ranges and Cooktops
9" (22.9 cm) Backguard for 30" (76.2 cm) Ranges and
Cooktops
9" (22.9 cm) Backguard for 36" (91.4 cm) Ranges and
Cooktops
9" (22.9 cm) Backguard for 48" (121.9 cm) Ranges and
Cooktops
33
1
/
2
" (85.0 cm) Retractable Backguard with Dual-Position
Shelf for 30" (76.2 cm) Ranges and Cooktops
33
1
/
2
" (85.0 cm) Retractable Backguard with Dual-Position
Shelf for 36" (91.4 cm) Ranges and Cooktops
33
1
/
2
" (85.0 cm) Retractable Backguard with Dual-Position
Shelf for 48" (121.9 cm) Ranges and Cooktops
Before calling for assistance or service, please check the “Troubleshooting” section. It may save you the cost of a service call. If you
still need help, follow the instructions below. When calling, please know the purchase date and the complete model and serial number
of your appliance. This information will help us to better respond to your request.
If you need replacement parts
If you need to order replacement parts, we recommend that you use only factory specified parts. These factory specified parts will fit
right and work right because they are made with the same precision used to build every new Jenn-Air
®
appliance.
To locate factory specified parts in your area, call us or your nearest Jenn-Air designated service center.
IN THE U.S.A.
Call the Jenn-Air Customer eXperience Center toll free:
1-800-JENNAIR (1-800-536-6247) or visit our website at
www.jennair.com.
Our consultants provide assistance with:
■ Scheduling of service. Jenn-Air
®
appliances designated service
technicians are trained to fulfill the product warranty and
provide after-warranty service anywhere in the United States.
■ Features and specifications on our full line of appliances.
■ Referrals to local Jenn-Air
®
appliance dealers.
■ Installation information.
■ Use and maintenance procedures.
■ Accessory and repair parts sales.
■ Specialized customer assistance (Spanish speaking, hearing
impaired, limited vision, etc.).
For further assistance
If you need further assistance, you can write to Jenn-Air with any
questions or concerns at:
Jenn-Air Brand Home Appliances
Customer eXperience Center
553 Benson Road
Benton Harbor, MI 49022-2692
Please include a daytime phone number in your correspondence.
IN CANADA
Call the Jenn-Air Canada Customer eXperience Centre toll free:
1-800-JENNAIR (1-800-536-6247) or visit our website
at www.jennair.ca.
Our consultants provide assistance with:
■ Scheduling of service. Jenn-Air
®
appliances designated
service technicians are trained to fulfill the product warranty
and provide after-warranty service anywhere in Canada.
■ Features and specifications on our full line of appliances.
■ Referrals to local Jenn-Air
®
appliance dealers.
■ Installation information.
■ Use and maintenance procedures.
■ Accessory and repair parts sales.
For further assistance
If you need further assistance, you can write to Jenn-Air Canada
with any questions or concerns at:
Customer eXperience Centre
Jenn-Air Canada
200 - 6750 Century Ave.
Mississauga, Ontario L5N 0B7
Please include a daytime phone number in your correspondence.
ASSISTANCE OR SERVICE
ACCESSORIES

14
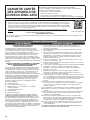
IF YOU NEED SERVICE:
1. Before contacting us to arrange service, please determine whether your product requires repair. Some
questions can be addressed without service. Please take a few minutes to review the Troubleshooting or
Problem Solver section of the Use and Care Guide, scan the QR code on the right to access additional
resources, or visit
https://jennair.custhelp.com.
2. All warranty service is provided exclusively by our authorized Jenn-Air Service Providers. In the U.S. and
Canada, direct all requests for warranty service to:
Jenn-Air Customer eXperience Center
1-800-JENNAIR (1-800-536-6247).
If outside the 50 United States or Canada, contact your authorized Jenn-Air dealer to determine whether another warranty applies.
JENN-AIR® COOKING
LIMITED WARRANTY
ATTACH YOUR RECEIPT HERE. PROOF OF PURCHASE IS REQUIRED
TO OBTAIN WARRANTY SERVICE.
Please have the following information available when you call the
Customer eXperience Center:
■ Name, address and telephone number
■ Model number and serial number
■ A clear, detailed description of the problem
■ Proof of purchase including dealer or retailer name and address
FIVE YEAR LIMITED WARRANTY
WHAT IS COVERED WHAT IS NOT COVERED
TWO YEAR LIMITED WARRANTY (PARTS & LABOR)
For two years from the date of purchase, when this major
appliance is installed, operated and maintained according to
instructions attached to or furnished with the product, Jenn-Air
brand of Whirlpool Corporation or Whirlpool Canada, LP (hereafter
“Jenn-Air”) will pay for factory specified replacement parts and
repair labor to correct defects in materials or workmanship
that existed when this major appliance was purchased or, at
its sole discretion replace the product. In the event of product
replacement, your appliance will be warranted for the remaining
term of the original unit’s warranty period.
THIRD THROUGH FIFTH YEAR LIMITED WARRANTY
(CERTAIN COMPONENT PARTS ONLY -
LABOR NOT INCLUDED)
In the third through fifth years from the date of original purchase,
when this major appliance is installed, operated and maintained
according to instructions attached to or furnished with the product,
Jenn-Air will pay for factory specified parts for the following
components to correct non-cosmetic defects in materials or
workmanship in these parts that prevent function of this major
appliance and that existed when this major appliance was
purchased. This is a limited 5-year warranty on the below named
parts only and does not include repair labor.
■ Electric element
■ Touch Pad and microprocessor
■ Glass ceramic cooktop: if due to thermal breakage
■ Electronic controls
■ Magnetron tube
■ Sealed gas burners
YOUR SOLE AND EXCLUSIVE REMEDY UNDER THIS LIMITED
WARRANTY SHALL BE PRODUCT REPAIR AS PROVIDED
HEREIN. Service must be provided by a Jenn-Air designated
service company. This limited warranty is valid only in the United
States or Canada and applies only when the major appliance
is used in the country in which it was purchased. This limited
warranty is effective from the date of original consumer purchase.
Proof of original purchase date is required to obtain service under
this limited warranty.
1. Commercial, non-residential, multiple-family use, or use
inconsistent with published user, operator or installation
instructions.
2. In-home instruction on how to use your product.
3. Service to correct improper product maintenance or installation,
installation not in accordance with electrical or plumbing codes or
correction of household electrical or plumbing (i.e. house wiring,
fuses or water inlet hoses).
4. Consumable parts (i.e. light bulbs, batteries, air or water filters,
preservation solutions, etc.).
5. Defects or damage caused by the use of non-genuine Jenn-Air
parts or accessories.
6. Conversion of products from natural gas or L.P. gas.
7. Damage from accident, misuse, abuse, fire, floods, acts of God or
use with products not approved by Jenn-Air.
8. Repairs to parts or systems to correct product damage or defects
caused by unauthorized service, alteration or modification of
the appliance.
9. Cosmetic damage including scratches, dents, chips, and other
damage to the appliance finishes unless such damage results from
defects in materials and workmanship and is reported to Jenn-Air
within 30 days.
10. Discoloration, rust or oxidation of surfaces resulting from caustic
or corrosive environments including but not limited to high
salt concentrations, high moisture or humidity or exposure to
chemicals.
11. Food or medicine loss due to product failure.
12. Pick-up or delivery. This product is intended for in-home repair.
13. Travel or transportation expenses for service in remote locations
where an authorized Jenn-Air servicer is not available.
14. Removal or reinstallation of inaccessible appliances or built-in
fixtures (i.e. trim, decorative panels, flooring, cabinetry, islands,
countertops, drywall, etc.) that interfere with servicing, removal or
replacement of the product.
15. Service or parts for appliances with original model/serial numbers
removed, altered or not easily determined.
The cost of repair or replacement under these excluded
circumstances shall be borne by the customer.
https://jennair.custhelp.com
12/14
DISCLAIMER OF IMPLIED WARRANTIES
IMPLIED WARRANTIES, INCLUDING ANY IMPLIED WARRANTY OF MERCHANTABILITY OR IMPLIED WARRANTY OF FITNESS FOR A
PARTICULAR PURPOSE, ARE LIMITED TO ONE YEAR OR THE SHORTEST PERIOD ALLOWED BY LAW. Some states and provinces do not
allow limitations on the duration of implied warranties of merchantability or fitness, so this limitation may not apply to you. This warranty gives
you specific legal rights, and you also may have other rights that vary from state to state or province to province.
DISCLAIMER OF REPRESENTATIONS OUTSIDE OF WARRANTY
Jenn-Air makes no representations about the quality, durability, or need for service or repair of this major appliance other than the
representations contained in this warranty. If you want a longer or more comprehensive warranty than the limited warranty that comes with this
major appliance, you should ask Jenn-Air or your retailer about buying an extended warranty.
LIMITATION OF REMEDIES; EXCLUSION OF INCIDENTAL AND CONSEQUENTIAL DAMAGES
YOUR SOLE AND EXCLUSIVE REMEDY UNDER THIS LIMITED WARRANTY SHALL BE PRODUCT REPAIR AS PROVIDED HEREIN. JENN-
AIR SHALL NOT BE LIABLE FOR INCIDENTAL OR CONSEQUENTIAL DAMAGES. Some states and provinces do not allow the exclusion or
limitation of incidental or consequential damages, so these limitations and exclusions may not apply to you. This warranty gives you specific
legal rights, and you also may have other rights that vary from state to state or province to province.

15
AVERTISSEMENT : Si les renseignements dans ces instructions ne sont pas
exactement observés, un incendie ou une explosion peut survenir, causant des
dommages au produit, des blessures ou un décès.
– Ne pas entreposer ni utiliser de l’essence ou d’autres vapeurs ou liquides inflammables
à proximité de cet appareil ou de tout autre appareil électroménager.
– QUE FAIRE DANS LE CAS D’UNE ODEUR DE GAZ :
•
Ne pas tenter d’allumer un appareil.
•
Ne pas toucher à un commutateur électrique.
•
Ne pas utiliser le téléphone se trouvant sur les lieux.
•
Appeler immédiatement le fournisseur de gaz à partir du téléphone d'un voisin. Suivre
ses instructions.
•
À défaut de joindre votre fournisseur de gaz, appeler les pompiers.
– L’installation et l’entretien doivent être effectués par un installateur qualifié, une agence
de service ou le fournisseur de gaz.
Avertissements de la proposition 65 de l'État de Californie :
AVERTISSEMENT : Ce produit contient au moins un produit chimique connu par l’État de Californie pour être à l’origine de
cancers.
AVERTISSEMENT : Ce produit contient au moins un produit chimique connu par l’État de Californie pour être à l’origine de
malformations et autres déficiences de naissance.
INFORMATIONS DE SÉCURITÉ

16
IMPORTANTES INSTRUCTIONS DE SÉCURITÉ
CONSERVEZ CES INSTRUCTIONS
AVERTISSEMENT : Pour réduire le risque d’incendie, de
choc électrique, de blessures ou de dommages lors de
l’utilisation de la table de cuisson, il convient d’observer
certaines précautions élémentaires dont les suivantes :
■
AVERTISSEMENT : NE JAMAIS utiliser cet appareil
comme dispositif de chauffage de la pièce. Le non-respect
de cette instruction peut entraîner une intoxication au
monoxyde de carbone et une surchauffe de la table de
cuisson.
■
MISE EN GARDE –
Ne pas remiser dans des
armoires au-dessus de la table de cuisson, des objets que
des enfants pourraient vouloir atteindre. Les enfants
pourraient se blesser gravement en grimpant sur la table
de cuisson.
■
Installation appropriée – La table de cuisson lorsqu’elle est
correctement installée doit être reliée à la terre
conformément aux codes locaux ou, en l’absence de codes
locaux, selon le
Code national électrique, ANSI/NFPA70 ou
le Code canadien des installations électriques, Partie 1
.
S’assurer que la table de cuisson est correctement
installée et reliée à la terre par un technicien qualifié.
■ La table de cuisson est munie d’une fiche de liaison à la
terre à trois broches pour votre protection contre les
risques de choc électrique et doit être branchée
directement dans une prise de courant bien reliée à la
terre. Ne pas couper ni enlever la broche de liaison à la
terre de cette fiche.
■ Débrancher l’alimentation électrique avant d’exécuter des
réparations à la table de cuisson.
■ Des blessures peuvent survenir du mauvais usage de la
table de cuisson tel que se tenir debout sur la surface, se
pencher ou s’asseoir sur le dessus de la surface.
■ Entretien – Garder l’espace autour de la table de cuisson
dégagé et exempt de matériaux combustibles, d’essence
et d’autres vapeurs et liquides inflammables.
■ Remisage sur la table de cuisson – Des produits
inflammables ne doivent pas être remisés sur ou près des
éléments de surface.
■ La taille de la flamme des brûleurs de surface devrait être
ajustée de sorte qu’elle ne dépasse pas le bord d’un
ustensile de cuisson.
INFORMATIONS DE SÉCURITÉ

17
Ce manuel couvre plusieurs modèles différents. La table de cuisson que vous avez achetée peut comporter l'ensemble des
articles énumérés ou seulement certains d'entre eux. L’emplacement et l’apparence des caractéristiques illustrées peuvent
ne pas correspondre à ceux de votre modèle. Se reporter à ce manuel ou à la section Foire Aux Questions (FAQ) de notre
site Web sur www.jennair.com pour des instructions plus détaillées. Au Canada, consulter la section Service à la clientèle
sur www.jennair.ca.
A
B
C
D
E
Boutons de commande métalliques coulés sous
pression de style commercial
Conception service intense de grille double
Grille chromée électrique (sur certains modèles)
Garniture d’îlot
Plateau d’égouttement (sur modèles avec plaque à frire)
1
2
3
4
5
1
2
3
4
5
Non illustré :
Dosserets facultatifs
Couvercle de plaque à frire facultatif
Cerclage de wok facultatif
PIÈCES ET CARACTÉRISTIQUES

18
BRÛLEURS
Risque d’incendie
La flamme d'un brûleur ne devrait pas dépasser le bord
du récipient de cuisson.
Fermer tous les réglages lorsque la cuisson est
terminée.
Le non-respect de ces instructions peut causer un
décès ou un incendie.
AVERTISSEMENT
BTU/H
ILLUSTRATION DU
BRÛLEUR CARACTÉRISTIQUES
Brûleur
à double
flamme
Ultra-
Power™
Ce brûleur comporte un
débit thermique minimal
et un débit thermique
maximal. Le réglage Power
Hi (puissance élevée) utilise
les deux niveaux de flamme
à pleine puissance pour
fournir le niveau thermique
maximal. Il est idéal pour
la cuisson de grandes
quantités d'aliments
liquides ou solides à l'aide
de grandes casseroles
et poêles. Les réglages
Simmer Hi et Lo (mijotage à
grand et petit feu) utilisent
uniquement la petite
flamme.
Brûleur
moyen
Ce brûleur est idéal pour
cuire de petites quantités
d'aliments et fondre du
chocolat ou du beurre.
Brûleur de
mijotage
Ce brûleur atteint 500
BTU/h au réglage minimum.
Il fournit des températures
basses nécessaires pour
faire mijoter des soupes,
des ragoûts et pour faire
fondre des ingrédients
délicats comme le beurre,
le fromage et le chocolat.
Allumage des brûleurs :
■ Des allumeurs électriques allument automatiquement les
brûleurs de surface lorsque les boutons de commande sont
tournés à Lite (allumage).
■ Avant de régler un bouton de commande, placer l’ustensile
de cuisson rempli sur la grille. Ne pas faire fonctionner un
brûleur avec un ustensile de cuisson vide ou sans ustensile
de cuisson sur la grille.
■ Vérifier visuellement que le brûleur est allumé. Si le brûleur
ne s’allume pas, guetter un déclic. Si l'allumeur n'émet
aucun déclic, éteindre le brûleur. Vérifier si le disjoncteur
ne s’est pas déclenché ou si un fusible n’est pas grillé.
■ Vérifier que le bouton de commande est complètement
enfoncé sur la tige de la soupape. Si l’allumeur ne fonctionne
toujours pas, appeler un technicien de réparation qualifié.
■ Lorsque les boutons de commande d’un brûleur de
petite ou moyenne puissance sont tournés à la position
Lite (allumage), tous les brûleurs de petite ou moyenne
puissance émettent un déclic. Lorsque le bouton de
commande commandant le gros brûleur est tourné à la
position Lite (allumage), ces brûleurs émettent des déclics
indépendamment des autres brûleurs. Dans les deux cas,
seul le brûleur dont le bouton de commande est placé sur
Lite (allumage) produira une flamme.
Caractéristique de rallumage
Durant l’utilisation de la table de cuisson, si un ou plusieurs
brûleurs s’éteint/s’éteignent en raison de causes extérieures
(tel qu'un renversement de liquide, un courant d'air ou un
mouvement d’air lié à l’aspiration), le système d'allumage
s'active pour rallumer la flamme. Lorsque la flamme réapparaît,
la production d'étincelles cesse. Si l’on n’élimine pas le courant
d'air dans la pièce, la production épisodique d’étincelles peut se
poursuivre. Une production d’étincelles peut aussi se produire
occasionnellement lorsqu’on utilise le débit thermique minimal
sur l’un des brûleurs.
Pour régler un brûleur :
Enfoncer une fois de plus pour passer de Lo (bas) à Hi (élevé).
En cas de panne
de courant
Tenir une allumette
allumée près d’un
brûleur et tourner le
bouton dans le sens
antihoraire à HI (élevé).
Une fois le brûleur
allumé, tourner le bouton
au réglage souhaité.
1.
Enfoncer et tourner le
bouton dans le sens
antihoraire à LITE
(allumage)
.
2.
Tourner le bouton dans le
sens antihoraire entre HI
(élevé) et LO (bas).
NE PAS OUBLIER : Lors de l’utilisation de la cuisson ou
durant le programme d’autonettoyage, toute la surface de
cuisson peut devenir chaude.
CARACTÉRISTIQUES DE LA TABLE DE CUISSON

19
CARACTÉRISTIQUES DE LA TABLE DE CUISSON
A
B
C
Brûleurs de surface scellés
Les brûleurs de surface scellés sont conçus pour minimiser
les espaces et joints d'où les liquides et les renversements
peuvent pénétrer sous la table de cuisson. Cette conception
rend possible un nettoyage rapide et facile.
Brûleur haute puissance superposé
Brûleur moyen
Brûleur de mijotage/pour faire fondre
IMPORTANT : Ne pas entraver l’évacuation de l’air
de combustion et de ventilation autour des bords des grilles
de brûleur.
Chapeau de brûleur : Toujours garder le chapeau de brûleur
en place lorsqu’un brûleur de surface est utilisé. Un chapeau
de brûleur propre aide à empêcher le mauvais allumage et les
flammes irrégulières. Toujours nettoyer le chapeau du brûleur
après un renversement; enlever et nettoyer régulièrement
les chapeaux tel qu’indiqué à la section “Entretien et nettoyage”.
1
2
1
2
1
2
3
1
2
Ouverture de gaz : Pour que le brûleur s’allume
convenablement, le gaz doit pouvoir circuler librement à travers
l’orifice de gaz. Garder cette zone propre et ne pas laisser de
renversements, d'aliments, d'agents de nettoyage ou tout autre
produit pénétrer dans l’ouverture de gaz. Toujours utiliser un
chapeau de brûleur pour protéger l'ouverture de gaz contre tout
renversement.
Orifices de brûleur : Examiner occasionnellement les flammes
des brûleurs pour en vérifier la taille et la forme tel qu’indiqué
ci-dessus. Une bonne flamme est bleue plutôt que jaune. Garder
cette zone exempte de souillures et ne pas laisser les produits
renversés, les aliments, les agents de nettoyage ou autre produit
pénétrer dans les orifices de brûleur.
1
Chapeau de brûleur
2
Base du brûleur
3
Douille de réduction
(pour utilisation
avec le brûleur de
moyenne puissance,
uniquement pour
l’alimentation au
propane)
1
1-1
1
/
2
"
(2,5-3,8 cm)
2
Orifices
de brûleur
PLAQUE À FRIRE ÉLECTRIQUE
CHROMÉE
(SUR CERTAINS MODÈLES)
La surface de cuisson de la plaque à frire électrique chromée est
idéale pour faire cuire des sandwiches, des crêpes, des œufs,
des hamburgers, des légumes sautés et de nombreux autres
favoris de la famille. La surface attrayante à faible adhésion est
conçue pour rendre le nettoyage facile.
Le système de plaque à frire électrique chromée fournit une
surface de cuisson à répartition de chaleur uniforme.
■ S'assurer que la pellicule a été retirée et laver avec de l'eau
chaude avant la première utilisation.
■ Afin d'éviter d'égratigner la plaque à frire, ne pas placer
de casseroles ou de poêles sur la plaque à frire. Utiliser
uniquement des ustensiles en plastique ou en bois résistants
à la chaleur.
■ La surface de la plaque à frire est prête à l'emploi et ne
nécessite pas de préparation.
■ Le fait de verser de l'eau froide sur une plaque à frire chaude
peut déformer la plaque à frire et entraîner une surface de
cuisson irrégulière.
A
B
1
2
1
Plaque à frire
2
Plateau d'égouttement

20
CARACTÉRISTIQUES DE LA TABLE DE CUISSON
Le témoin lumineux de la plaque à frire s’éteint lorsque le
préchauffage de la plaque à frire est terminé. Le témoin
lumineux de la plaque à frire s'allume et s'éteint durant
l'utilisation pour indiquer que l'élément de la plaque à frire
maintient la température de surface sélectionnée.
Tableau de cuisson
Les réglages et durées de cuisson sont cités à titre indicatif
seulement et peuvent être modifiés en fonction des goûts
personnels.
ALIMENT RÉGLAGE
DURÉE DE
CUISSON TOTAL
MINUTES
Galettes et chapelets
de saucisses
325°F (163°C) 12-18
Tranches de bacon
350°F (177°C) 7-11
Tranches de jambon
(entièrement cuit)
325°F (163°C) 5-7
Saucisses de
francfort et saucisses
précuites
325°F (163°C) 8-15
Galettes de viande
hachée
350°F (177°C) 10-15
Sandwiches grillés
325°F (163°C) 3-5
Darnes et filets
de poisson
325°F (163°C) 8-15
Œufs
300°F (149°C) 3-5
Pommes de terre
rissolées
400°F à 425°F
(204°C à 218°C)
8-12
Pain doré
350°F (177°C) 5-7
Crêpes
350°F (177°C) 2-4
Utilisation :
1.
2.
Pousser et tourner le bouton.
3.
Placer l’aliment sur la plaque
et cuire au degré de cuisson
désiré.
Positionner le plateau d'égouttement.
Tableaux de cuisson avec plaque à frire
Les réglages et durées de cuisson sont cités à titre indicatif
seulement et peuvent être modifiés en fonction des goûts
personnels.
Tableau de préchauffage
TEMPÉRATURE
DURÉE DE PRÉCHAUFFAGE
(en minutes)
250°F (121°C) 10
300°F (149°C) 14
350°F (177°C) 15
400°F (204°C) 20
450°F (232°C) 25
500°F (260°C) 27
La page est en cours de chargement...
La page est en cours de chargement...
La page est en cours de chargement...
La page est en cours de chargement...
La page est en cours de chargement...
La page est en cours de chargement...
La page est en cours de chargement...
La page est en cours de chargement...
La page est en cours de chargement...
La page est en cours de chargement...
La page est en cours de chargement...
La page est en cours de chargement...
-
 1
1
-
 2
2
-
 3
3
-
 4
4
-
 5
5
-
 6
6
-
 7
7
-
 8
8
-
 9
9
-
 10
10
-
 11
11
-
 12
12
-
 13
13
-
 14
14
-
 15
15
-
 16
16
-
 17
17
-
 18
18
-
 19
19
-
 20
20
-
 21
21
-
 22
22
-
 23
23
-
 24
24
-
 25
25
-
 26
26
-
 27
27
-
 28
28
-
 29
29
-
 30
30
-
 31
31
-
 32
32


Jenn-Air JGCP430WP Manuel utilisateur
- Catégorie
- Cuisinières
- Taper
- Manuel utilisateur
dans d''autres langues
- English: Jenn-Air JGCP430WP User manual
Documents connexes
-
Jenn-Air W10204447A Manuel utilisateur
-
-
-
Jenn-Air JGCP536HM Le manuel du propriétaire
-
Jenn-Air PRO-STYLE JGCP430ADP Le manuel du propriétaire
-
-
-
-
Jenn-Air JDS1750FS Le manuel du propriétaire
-