


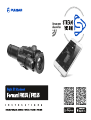
Digital night vision Forward FN
1-26
27-52
53-80
81-106
107-132
Vision nocturne digitale Forward FN
Digitales Nachtsichtgerät Forward FN
Visor nocturno digital Forward FN
Dispositivo notturno digitale Forward FN
Цифровой ПНВ Forward FN
133-158
РУССКИЙ

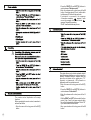
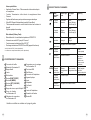
MicroUSB cable
Lens/eyepiece protective covers
User manual
Lens cloth
Warranty card
Digital module
Cosmetic cover
Monocular Pulsar 5x30
Carrying case
Wireless remote control
IPS5 Battery Pack
Battery charger with
mains charger
Quick-release IR Illuminator
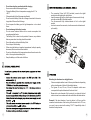
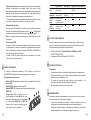
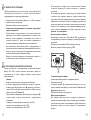
Digital Night Vision Forward FN is a combination of a digital module and
5-power monocular for observation both in the twilight and daytime. To operate
in total darkness the unit can be employed with an invisible IR Illuminator.
The Forward FN can also be mounted on the majority of day binoculars or
monoculars by detaching the monocular Pulsar 5x30 and using adapter rings
which enable its positioning on objective lenses with various diameters.
In this manner you are able to convert your day optical device into a night
vision device.
The Forward FN is designed for professional and amateur use, such as
observation, security, night and day video recording.
FN135
78138
FN155
78108
Enhanced nighttime sensitivity
Easy to install and operate
5x monocular included
Compact and lightweight
Invisible 940 nm IR Illuminator
Wi-Fi. Integration with iOS and Android devices
Integrated video and sound recorder
Fully waterproof (IPX7)
Wide range of operating temperature (-25…+50°C)
Updatable features
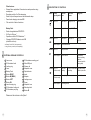
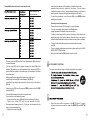
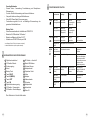
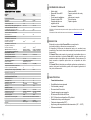
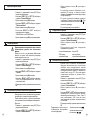
Characteristics of the monocular
Optical magnification, x
Eye relief, mm
Field of view, degree / m at 1000m
Dimensions (LxWxH), mm/inch
Weight, kg/oz
5
18
7 / 122
147x68x68 / 5.8x2.7x2.7
0.2 / 7
5
18
7 / 122
0.2 / 7
272x92x77/10.7x3.6x3
0.41 / 14.5
0.48 / 16.9

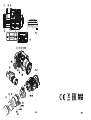
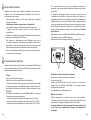
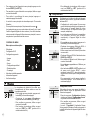
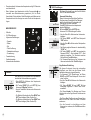
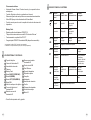
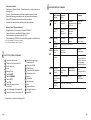
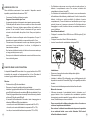
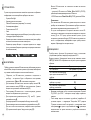
EXTERNAL VIEW AND CONTROLS
5
6
7
8
9
10
11
1
2
3
4
Lens cover
IR Illuminator hood
Locking ring
Lever
Battery Pack
Button RIGHT
Button M (MENU)
Button LEFT
Button ON
Lens focusing ring
IR Illuminator locking nut
IR Illuminator port plug
IR Illuminator mounting port
MicroUSB port
Weaver rail
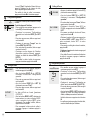
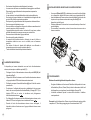
Adapter's cover
Optical device
Insert
Adapter
Locking screw
12
13
14
4
4
3
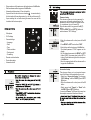
Other features:
Stream Vision application. Remote review and operation using
smartphone
Recording and live YouTube streaming
Quick four-point bayonet mount with automatic clamp
Power bank charging via microUSB
Full control of all device functions
Battery Pack
Quick-change batteries IPS5/IPS10
Wi-Fi up to 16 hours*
Operation on AA or CR123 batteries **
Charging IPS5/IPS10 batteries via USB
(when the unit is on)
* on Battery Pack IPS10 (sold separately).
** using a battery container (sold separately).
15
16
17
18
19
Screw
Adapter's lever
Mounting block
Button IR
21
22
23
24
20
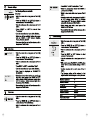
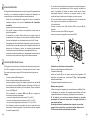
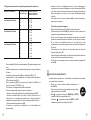
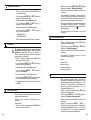
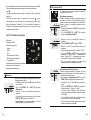
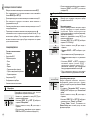
ON (9)
Unit is off
Other short
presses
Long press
Power unit off
DESCRIPTION OF CONTROLS
Current
operating mode
5
First short
press
Power unit on Display ON / OFF
Unit is on Display off Display ON / OFF
LEFT(8)
Unit is on
Wi-Fi ON
Wi-Fi OFF
Menu navigation
Downwards/Leftwards
SumLight ON
MENU(7)
Unit is on
Menu navigation
Enter quick menu
Enter main menu
Confirm selection Exit submenu
without confirming
selection /
Exit menu (switch to
viewing mode)
RIGHT(6)
Unit is on
(«Video» mode)
Unit is on
(«Photo» mode)
Menu navigation
Start video
recording
Stop video recording/
Switch to photo mode
Take a photograph
Upwards/rightwards
Button
M
SumLight OFF
Pause / resume video
recording
Switch to video mode
Please see the scheme on the flyleaf.

6
5
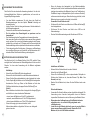
Remove the decorative cover from the digital module.
Lift the lever (4).
Install the battery (5) into the dedicated slot on the device housing so
that element F (see Pic.1 on the flyleaf) appears from below.
Fix the battery by clicking the lever.
Installing the battery pack into device:
Only use the charger supplied with the Battery Pack. The use of any
other charger may irreparably damage the Battery Pack or the
charger and may cause fire.
When keeping the battery for a long period, it should not be fully
charged or fully discharged.
Do not charge the battery immediately after bringing the battery
from cold environment to a warm one. Wait for 30-40 minutes for
the battery to get warm.
Safety measures:

Do not leave a battery unattended while charging.
Never use a modified or damaged charger.
Charge the Battery Pack at a temperature ranging from 0 °C to
+45 °C.
Otherwise batter's life will decrease significantly.
Do not leave the Battery Pack with a charger connected to the mains
longer than 24 hours after full charge.
Do not expose the battery pack to high temperature or to a naked
flame.
Do not submerge the battery in water.
Do not connect external device with a current consumption that
exceeds permitted levels.
The Battery Pack is short circuit protected. However, any situation
that may cause short-circuiting should be avoided.
Do not dismantle or deform the Battery Pack.
Do not drop or hit the battery.
When using the battery at negative temperatures, battery's capacity
decreases, this is normal and is not a defect.
Do not use the battery at the temperatures above those shown in the
table – this may decrease battery's life.
Keep the battery out of the reach of children.
8
7
10
Choose an adapter with an insert of the required diameter depending
on the outer diameter of the bell of the daylight device.
The figures 42 mm, 50 mm, 56 mm in adapter's model name
correspond to the optical diameter of the device's bell.
Measure the outer diameter of the housing of your device's bell and
select an insert in accordance with reference data in the tables below.
Mounting the attachment on daylight device
Example. If the lens diameter of your day device is 42 mm, and the
measured outer diameter of the housing of the device’s bell is 47.2 mm,
you need to use an insert with marking "Ø 47". Compatibility chart of
inserts for the day devices.
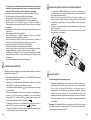
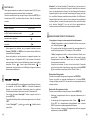
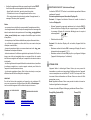
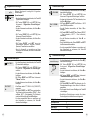
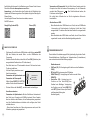
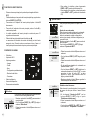
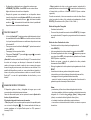
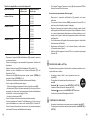
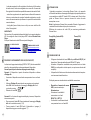
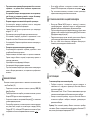
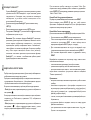
The monocular Pulsar 5x30 (C) (included) converts the digital
module into a 5x digital night vision device.
Insert the monocular firmly so that the pins in the monocular’s body
enter the notches (D) of the digital module.
Turn the monocular fully counterclockwise to fix it on the digital
module.
In order to remove the monocular, turn the monocular clockwise and
pull carefully.
mount
detach
D
D
C

Compatibility chart of inserts for the day devices
Outer diameter of day
device's lens, mm
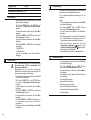
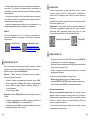
Remove the cover (16) from the Cover Ring Adapter (19) by turning it
counterclockwise.
Put the insert (18) into the adapter, unsnap the clamp (22) of the
adapter (19) and firmly mount the adapter on the device's bell (17) to
ensure that the surface in the bottom part of the adapter is located
above the barrel.
Before installing it is advised to degrease the device's bell.
Install firmly the insert (18) into the adapter (19) (Pic.3).
Install firmly the adapter with insert onto the lens of your day device
(Pic.3).
Snap the lever (22) from the original OPEN position to the CLOSE
position (Pic.3).
10
9
Check that the adapter firmly fits the objective lens.
If you see there is a clearance, please:
- Loosen the locking screw (20) with the hex-nut wrench (S=2mm).
- Tighten the screw (21) with hex-nut wrench (S=4mm).
Recommended clamping force is 1 N·m (can be checked with the
help of a torque screwdriver).
- Tighten the locking screw (20).
Insert firmly the device into the adapter so that the teeth in the
adapter's body enter the notches of the device. Turn the device
clockwise against the stop. Triangle-shaped marking on the device
and the square-shaped marking on the adapter should match.
To align the attachment, move the lever (22) to the OPEN position
and align horizontally.
Powering on and image setup
Remove the lens cover (1) by turning it counterclockwise.
Turn the unit on with a short press of the ON (9) button.
Image appears on the display in several seconds.
To obtain a crisp image of the icons on the display, rotate the dioptre
adjustment ring of your optical device. After this there is no need to
rotate the dioptre adjustment ring for distance or any other conditions.
To focus on the object being observed rotate the lens focusing
ring (10).
To set up display brightness and contrast, please refer to the QUICK
MENU FUNCTIONS section.
After use, hold down the ON button to turn the unit off.
11
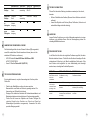
Enter the menu with a long press of the М (7) button. To toggle
between the main menu options, press the RIGHT (6) and LEFT (8)
buttons.
12
QUICK MENU FUNCTIONS
The quick menu allows setup of display brightness and contrast.

12
11
Enter a submenu of the main menu with a short press of the М button.
Exit the submenu with a long press of the М button.
Automatic exit takes place in 10 sec of inactivity.
Upon exit from the menu the cursor location is memorized only
for the duration of the working session (i.e. until the unit is turned off).
Upon restarting the unit and entering the menu the cursor will be
located on the first menu option.
Microphone
Wi-Fi settings
General settings
– Language
– Date
– Time
– Photo resolution
– Factory reset
– Formatting
Remote control activation
Device information
Automatic shutoff
Wi-Fi Settings
Password setup
This submenu allows you to set a password to
access your unit from an external device. The
password is used to connect an external device
(i.e. smartphone) to your Forward FN.
Enter the menu with a long press of the М (7)
button.
Press the RIGHT (6) and LEFT (8) buttons to
select submenu “Wi-Fi Settings”.
– Enter the submenu with a short press of the М
button.
– Press RIGHT or LEFT to select item “PAS”.
– Enter the item with a short press of the М button.
– The default password “12345” appears on the
display.
– Set the desired password with RIGHT or LEFT
(button RIGHT to increase value; button LEFT to
reduce). Switch between digits with a short press
of the M button.
– Save the password and exit the submenu with a
long press of the M button.
Access level setup
This submenu allows you to set required access
level of the Stream Vision application to your unit.
– Select item “Access level setup” in submenu
“Wi-Fi Settings” with the RIGHT (6) and LEFT
(8) buttons.
– Enter the submenu with a short press of the М
button.
– Select access level “Owner” or “Guest” with
the RIGHT (6) and LEFT (8) buttons.
- Access level Owner. The Stream Vision user has
the complete access to all functions of the unit.

14
13
21.07.2017
21.07.2017

16
15
The remote control duplicates unit’s major
functions.
Before operating the remote control, remember to
activate it as follows:
– Enter the menu with a long press of the М (7)
button.
– Press the RIGHT (6) and LEFT (8) buttons to
select submenu “Remote control”.
– Enter the submenu with a short press of the М
button. Countdown starts (30 sec), within which
hold down any RC button for two seconds.
– If activation is successful, the message
«Connection complete» appears. If error
occurs the message «Connection failed» ·
appears. Repeat the procedure.
– The RC is activated and ready for use.
This option allows you to activate automatic shutoff
which determines whether your unit is in a working
position. Automatic shutoff is actuated after you
move the unit relative to the optical axis: > 70°
Upwards or downwards; >30°Leftwards or
rightwards; and if no controls are used.
– Enter the menu with a long press of the М (7)
button.
– Press the RIGHT (6) and LEFT (8) buttons to
select submenu “Auto shutoff”.
– Enter the submenu with a short press of the М
button.
– With the RIGHT and LEFT buttons select the time
period (1 min, 3 min, 5 min) upon expiry of which
the unit will automatically shut down. Select “Off”
if you wish to deactive Auto shutoff.
– Save your selection with a long press of the M
button.

Note: respective icons on the status bar show
the status of the function:
- off:
- auto shutoff time (i.e. 1 min):
1 min
18
17
The status bar is located in the lower part of the display and shows
information on the actual operating status of the unit, including:
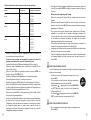
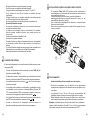
IR
The unit is equipped with a detachable IR Illuminator with a wavelength
of 940 nm which allows the user to increase observation range in lowlight
or in complete darkness.
Make sure that the IR Illuminator is mounted and connected to the
attachment – the display will show icon of the connected or
disconnected IR Illuminator.
To activate the IR Illuminator: turn the unit with the ON button, press
briefly the IR button (24) on the edge of the IR Illuminator. Default IR
power level is minimal (IR1). IR Illuminator icon with respective
power level is shown in the bar status.
To switch between power levels ( or ) press briefly the IR
button.
To focus the IR spot, rotate the IR Illuminator hood (2).
To deactivate the IR Illuminator, hold down the IR button.
To remove the IR Illuminator, rotate the IR locking nut (11)
counterclockwise. Screw the port plug (12).
IR
IRIR
Instead of the supplied IR Illuminator you can mount:
- laser IR Illuminator Pulsar Ultra AL-915 (#79138) operating at
915nm
- LED IR Illuminator Pulsar Ultra-940 (#79139) operating at 940nm
Notes:
Upon turning the IR off, power level is not saved in the unit's memory.
Upon turning on, the IR Illuminator switches to the minimum power
level - IR1.
In order to align the IR spot vertically or horizontally, turn the locking
ring (3) 5-10 degrees counterclockwise. Move the IR Illuminator hood
(2) to match the spot with the image seen through the unit. Tighten the
locking ring.
Your unit features wireless connection option (Wi-Fi) which links it with
external appliances (tablet, smartphone).
Turn on the wireless module the with a long press of the LEFT (8) button.
Wi-Fi operation is shown in the status bar as follows:
15
Connection status
Status bar indication
Wi-Fi off
Wi-Fi activated by the user,
Wi-Fi is being activated
Wi-Fi is on, no connection with
attachment
Wi-Fi is on, Wi-Fi is on, attachment
connected
No icon
Your unit is detected by an external device as «Forward FN_XXXX»,
where XXXX – is the last four digits of attachment's serial number».

20
19
After a password is generated on an external appliance (please refer
to the menu option “Wi-Fi setup” of the section “Main menu functions”
of this user manual) and connection is established, the icon in the
status bar changes to ; transmission of the video signal to the
display of external device starts automatically.
16
The unit features video recording and photography of the image being
saved to the internal memory card.
Before using this feature, please read the menu options “Date setup”,
“Time setup” of the section “Main menu functions”.
17
The built-in recorder operates in two modes:
- Photo (photography; in the top right corner of the display you can
see a photography icon),
If estimated number of photos that can be saved to the Flash card is more
than 100, message «>100» is shown.
- Video (video recording; in the top right corner of the display you can
see a video icon, current video resolution, total video time left in the
format HH:MM:SS (hours : minutes : seconds)
When switched on, the unit is in the Video mode. Toggle between Video
and Photo modes with a long press of the RIGHT (6). Switching is
cyclical (Video-> Photo-> Video…).

22
21
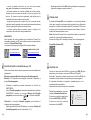
To playback video files recorded by the unit on iOS-based computers, we
recommend that you use VLC video player or Elmedia player.
Download links and QR codes are shown below:
VLC VIDEO PLAYER
ELMEDIA VIDEO PLAYER
http://www.videolan.org/
vlc/download-macosx.html
https://itunes.apple.com/us/
app/elmedia-multiformat-video/
id937759555?mt=12
The DISPLAY OFF function activates stand-by mode which allows the
unit to be quickly powered on.
Operating scenarios for the «Display off» function:
Scenario 1. The unit is turned off. Turn the unit on and activate
«Display off».
Turn on the unit on with a short press of the ON (9) button.
Activate «Display off» with a long press of the ON button.
Message “Display off” with countdown appears.
Release the ON button.
Scenario 2. «Display off» is on, the unit needs to be turned off.
Hold down the ON button. Message “Display off” with countdown
appears (1,2,3)
Hold down the ON button until the unit turns off (the unit turns off after
1 is reached).
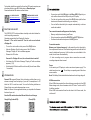
STREAM VISION
19
Forward FN supports Stream Vision technology which allows you to
stream an image from the display of your unit to a smartphone or PC
tablet via Wi-Fi in real time mode. You can find further guidelines on
Stream Vision on our web site www.pulsar-nv.com
Note: the Stream Vision application allows you to update the firmware
features of your unit.
Scan the QR codes to download Stream Vision free of charge:
Google Play (Android OS): iTunes (iOS):
FUNCTION DISPLAY OFF
18
Power
In this mode your PC/laptop is used as an external power supply. The
status bar shows icon . The unit keep on operating and all functions
are accessible.
Note: The Battery Pack installed in the attachment is not being charged!
USB disconnection.
When USB is disconnected from the unit where connection is in the USB
Mass storage mode, the unit remains on the OFF state. Turn the unit ON
for further operation.
When USB is disconnected from the unit when in the Power mode, the
unit turns off.
Connect one end of the USB cable to the Micro-USB (14) port of your
unit, and the other end to the USB port of your PC/laptop.
Turn the unit on with a short press of the ON (9) button (unit that has
been turned off cannot be detected by your computer).
Your unit will be detected by the computer automatically; no drivers
need to be installed.
Two connection modes will appear on the display:
Memory card (external memory) and Power.
Select connection mode with the RIGHT (6) and LEFT (8) buttons.
Confirm selection with a short press of the M (7) button.
Connection modes:
Memory card (external memory). In this mode the unit is detected by
the computer as a flash card. This mode is designed for work with the files
saved in attachment's memory. Unit's functions are not available in this
mode; the unit turns off automatically.
- If video recording was in progress when connection was made,
recording stops and video is saved.
20
21

24
23
The unit is equipped with a Weaver rail (15) which allows the user to
mount extra accessories (please remove the IR Illuminator before using
the rail), such as:
22
Wipe external plastic and metal surfaces clean of dust and dirt with a
soft cloth moistened with a synthetic cleaning agent.
Clean the electric terminals of the Battery Pack and unit's battery slot
using a grease-free organic solvent.
Check the objective and eyepiece lenses. If required, remove dust
and sand (preferably by a noncontact method). Clean the external
surfaces of the lenses with products expressly designed for this
purpose.
Maintenance should be carried out at least twice a year, and should
consist of the following measures:
Always store the unit in its carrying case in a dry, well-ventilated
space. For prolonged storage, remove the battery.
The table presented below lists some potential problems that may occur
when using the unit. If a problem encountered is not listed, or if the
recommended action does not resolve the problem, the unit should be
returned for repair.
24
25
26
23
The unit will not turn
on.
The unit does not
operate on external
power supply.
Battery Pack is discharged.
USB cable is damaged.
Brightness or contrast level
is too low.
Charge the battery.
Replace USB cable.
Adjust brightness/contrast level.
Check
Corrective action
Problem
External power supply is
discharged.
Charge the external power
supply (if necessary).
Image is too dark.

Check
Corrective action
Problem
The unit will not
focus.
The unit is wrongly adjusted. Adjust the unit according to the
instructions given in the
Section “OPERATION” and
check the surfaces of the
eyepiece and objective lenses
and clean them if necessary
from dust, condensation, frost,
etc; to prevent fogging in cold
weather, apply a special anti-
fog solution.
Wireless remote
control will not
operate.
Remote control is not
activated.
Low battery.
Activate the remote control
according to instructions.
Install a new CR2032 battery.
Smartphone or tablet
PC cannot be
connected to the
unit.
Password in the unit was
changed.
Delete network and connect
again inserting the password
saved in the unit.
Poor image quality /
Detection range
reduced.
Problems described may arise in adverse weather conditions
(snow, rain, fog etc.).
Barely visible texture
which does not
hinder detection
range or efficiency of
observation can be
noticed on the
display after the
extra laser IR
Illuminator (AL915)
is activated.
This is normal for eye safe
laser IR illuminators.
This is not a defect.
The clamp of the
adapter cannot be
opened.
Wrong insert is chosen. Choose the appropriate insert.
Check the gap between the lips
of the adapters.
To ensure stable Wi-Fi
performance, move the unit to
an area with few or no Wi-Fi
networks.
There are too many Wi-Fi
networks in the area where
the unit is located which may
cause signal interference.
26
25

Câble microUSB
Couvercles de protection
de l’objectif et oculaire
Manuel d'utilisation
Chiffon pour objectif
Carte de garantie
Module numérique
Monoculaire Pulsar 5x30
Étui
Télécommande sans fil
Bloc batterie IPS5
Chargeur de batterie avec
chargeur alimentation secteur
Illuminateur IR amovible
Haute sensibilité nocturne
Mise en place et commande faciles
Monoculaire 5x inclus
Compact et léger
Illuminateur IR invisible de 940 nm
Wi-Fi. Possibilité d'intégration avec les dispositifs IOS et Android
Appareil d'enregistrement vidéo –audio incorporé
Etanchéité absolue (IPX7)
Large gamme de températures d'utilisation (-25…+50°C)
Logiciel renouvelable
MODÈLE
FN135
78138
SKU#
FN155
78108
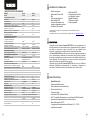
Caractéristiques optiques:
Génération
Grossissement, x
Lentille d'objectif
Champ de vision (à 100m), degrés / m
Distance maximum d'observation d'un animal,
comme un cerf (1,7m), m
Distance de prise de vue rapprochée, m
recommandé Max. grossissement
optiquede l’appareil , x
Caractéristiques électroniques
Sensibilité du dispositif, mW
- longueur d'onde 780 nm,
résolution 25 lignes/mm
- longueur d'onde 915 nm,
résolution 25 lignes/mm
Résolution, pix / Format de capteur, pouce
Type / Résolution de l'écran, pixels
Illuminateur IR amovible
Type / Longueur d'onde, nm
Caractéristiques opérationnelles:
Alimentation, V
Type batterie / capacité /
tension sortie
Alimentation extérieure
Temps de fonctionnement sur bloc
batterie (à t=22 °C), h (Wi-Fi ON, IR OFF)
Degré de protection, code IP (CEI60529)
Plage de températures opératoires
Dimensions (LxLxH), mm
Poids (sans bloc batterie et IR), kg
Enregistreur vidéo
Résolution vidéo, pixel
Résolution photo, pixel
Format vidéo/photo
Mémoire incorporée
Capacité de mémoire incorporée
Voie Wi-Fi
Fréquence
Standard
Distance de réception en ligne
de visée directe, m
Digital
1
1:1.2
6,8 / 11,4
370
5
2-6
3x10
-5
1
,
5x10
-4
CMOS / 702х526
AMOLED / 640x480
LED / 940
3,1- 4,2
Li-Ion Battery Pack IPS5 /
5000 mAh / DC 3.7V
5V (USB)
9
IPX7
-25 °C... +50 °C
135x92x77 272x92x77
0,41
640х480
640х480 / 1280x960
.avi / .jpg
16Go
300 min video ou plus de 20 000 photo
2,4GHz
802.11 b/g/n
15
Digital
1
1:1
5 / 8,7
450
5
4-8
CMOS / 702х526
AMOLED / 640x480
LED / 940
3,1- 4,2
5V (USB)
9
IPX7
-25 °C... +50 °C
0,48
640х480
640х480 / 1280x960
.avi / .jpg
16Go
2,4GHz
802.11 b/g/n
15
CARACTERISTIQUES TECHNIQUES
3x10
-5
1,5x10
-4
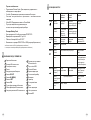
Caractéristiques du monoculaire
Grossissment optique, fois
Dégagement oculaire, mm
Champ de vision, degrés / m à 100m
Dimensions, mm
Poids, kg
5
18
7 / 122
147x68x68
0,2
5
14
7 / 122
147x68x68
0,2
CONTENUS DE L'EMBALLAGE
La conception et le logiciel de ce produit peuvent être modifiés en vue du
développement.
La dernière édition de ce manuel d'utilisation est disponible sur www.pulsar-nv.com.
L’appareil nocturne digitale Forward FN135/155 est une combinaison d'un
module numérique et un monoculaire avec un grossissement de 5x, l'appareil
est utilisé au crépuscule et dans la journée. Pour une utilisation dans
l'obscurité, le contenu de l’emballage offre un illuminateur IR invisible.
Le Forward FN135/155 peut être aussi monté sur la plupart des jumelles de
jour ou monoculaires en détachant le monoculaire Pulsar 5x30 et en utilisant
les inserts qui permettent son positionnement sur des lentilles d'objectif avec
divers diamètres. De cette manière, vous pouvez convertir votre dispositif
optique de jour dans un dispositif de vision de nuit.
L’appareil nocturne digitale Forward FN135/155 est conçu pour différents
domaines d'utilisations professionnelles et récréatives, notamment la
surveillance, l'activité de sécurité, la photographie de nuit et de la vidéo.
CARACTÉRISTIQUES
Spécificités-clés:
28
27

VUE EXTÉRIEURE ET COMMANDES
5
6
7
8
9
10
11
1
2
3
4
Couvercle de lentille
Blende de l'illuminateur IR
Bague d'arrêt
Levier
Bloc batterie
Bouton RIGHT (DROIT)
Bouton M (MENU)
Bouton LEFT (GAUCHE)
Bouton ON
Bague de mise au point d'objectif
Ecrou de fixation
de l'illuminateur IR
Obturateur du connecteur
de l'illuminateur IR
Connecteur pour le montage
de l'illuminateur IR
Port microUSB
Rail Weaver
Couvercle de l'adaptateur
Appareil optique
Insert
Adaptateur
Vis d'arrêt
12
13
14
4
30
29
Autres spécificités:
Application Stream Vision. Télécommande et observation depuis
un smartphone.
Youtube. Transmission- vidéo directe et enregistrement dans
l'Internet
Système de fixation aux quatre points au serrage automatique
MicroUSB. Support d'alimentation à partir du Power Bank
Télécommande assurant le contrôle total de toutes les fonctions du
dipositif
Système pratique de montage
15
16
17
18
19
Vis
Levier de l'adaptateur
Ensemble de fixation
Bouton IR
21
22
23
24
20
Bloc batterie (Battery Pack):
Blocs batteries Li-Ion se détachant rapidement IPS5/IPS10
Autonomie en mode Wi-Fi jusqu'à 16 heures*
Fonctionnement sur batteries АА ou CR123**
Recharge des batteries IPS5/IPS10 via USB (appareil fonctionne)
* sur bloc batterie IPS10 (vendu séparément).
** en utilisant un compartiment batterie (vendu séparément).
5
DESCRIPTION DES COMMANDES
ON (9)
Autres appuis
courts
Arrêter l'appareil
Mode
opératoire
actuel
Premier appui
court
Allumer/
Éteigner l'affichage
(fonction Display off)
Éteigner
l'affichage
Allumer/
Éteigner l'affichage
(fonction Display off)
LEFT(8)
Allumer
SumLight
MENU(7)
RIGHT(6)
Navigation
dans le menu
Navigation
dans le menu
Navigation
dans le menu
Bouton
M
Éteigner
SumLight
L'appareil
est éteint
Appui long
Alimentation
branchée
L'appareil
est allumé
L'appareil
est allumé
(mode video)
L'appareil
est allumé
(mode photo)
L'appareil
est allumé
L'appareil
est allumé
Wi-Fi marche/arrêt
Navigation vers le haut/vers la droite
Lancer le menu rapide
Accéder
au menu principal
Confirmer la sélection
Quittez le sous-menu
sans confirmer
la sélection /
Quittez le menu
(passez en mode
visualisation)
Navigation vers le bas/vers la gauche
Démarrer
l'enregistrement
vidéo
Pause / reprendre
l'enregistrement vidéo
Arrêter l'enregistre-
ment vidéo /
Passer en mode photo
Prendre une photo
Passer en mode vidéo
Veuillez vous référer au schéma sur la page de garde.

32
31
L’appareil est destinée pour l'utilisation prolongée. Pour assurer la
longevité et un bon fonctionnement de l'appareil il faut suivre les
recommandations suivantes:
Avant utilisation, vérifiez que vous avez installé et fixé l’appareil
selon les instructions.
N'oubliez pas d'arreter l’appareil après l'exploitation!
Il est défendu de réparer et démonter l’appareil sous garantie.
L’appareil peut être exploité dans une large étendue de
températures.
Néanmois si l'appareil est apporté du froid dans un local chaud ne le
mettez pas en marche depuis 2-3 heures.
Afin d'assurer le fonctionnement sans défaillance ainsi que la
constatation opportune et la réparation des défauts causant l'usure
prématurée et mise hors marche des unités et des pièces il faut
effectuer à temps la visite et l'entretien techniques de l’appareil.
Eviter la surchauffe des batteries par les rayons de soleil, flamme ou
sources de chaleur de ce type.
PARTICULARITES D'EMPLOI
Soulevez le levier (C) du chargeur.
Enlevez le couvercle de protection sur le bloc batterie.
Installez le bloc batterie dans le chargeur en insérant les broches (A)
de la batterie dans les rainures (B) du chargeur. Le logo Pulsar sur le
bloc batterie doit être placé plus près du levier; encliquetez le levier
(C)(Fig.4).
Au moment de l'installation, un voyant LED vert (D) sur le chargeur
s'allumera et commencera à clignoter:
- une fois si la charge de la batterie est comprise entre 0% et 50%.
- deux fois si la charge de la batterie est comprise entre 51% et 75%.
- trois fois si la charge de la batterie est comprise entre 75% et 100%.
UTILISATION DU BLOC BATTERIE
L’appareil est livré avec un bloc batterie Li-Ion rechargeable IPS5 ayant
une autonomie maximum de 9 heures. N'oubliez pas de charger le bloc
batterie avant la première utilisation.
Charge:
Enlevez le couvercle décorative du bloc batterie.
Soulevez le levier (4).
Installez la batterie (5) dans la fente spéciale sur le boîtier de
l'appareil afin que l'élément F (voir Fig. 1 sur la page de garde)
apparaisse par en dessous.
Fixez la batterie en encliquetant le levier.
Installation du bloc batterie dans l'appareil:
Utilisez uniquement le chargeur fourni avec le bloc batterie.
L'utilisation d'un autre chargeur peut endommager définitivement le
bloc batterie ou le chargeur et peut provoquer un incendie.
Lorsque la batterie est stockée pendant une longue période, elle
ne doit pas être complètement chargée ou complètement
déchargée.
Mesures de sécurité:
Si le voyant s'allume en vert en fixe, la batterie est chargée au
maximum. Vous pouvez séparer la batterie du chargeur en soulevant
le levier (C).
Si l'indicateur du chargeur s'allume en rouge en continu lors de
l'installation de la batterie, le niveau de charge de la batterie est
probablement inférieur à l'acceptable (la batterie a été longtemps en
décharge profonde). Conservez la batterie dans le chargeur pendant
une longue période (jusqu'à plusieurs heures), enlevez et réinsérez-
la. Si l'indicateur commence à clignoter en vert, la batterie est bonne;
si elle continue à s'allumer en rouge, elle est défectueuse. N'utilisez
pas la batterie!
Raccordez la prise micro-USB du câble USB au port (E) du chargeur.
Raccordez la prise micro-USB au chargeur.
Insérez la fiche mâle du chargeur dans la prise femelle 220 V.

Ne chargez pas immédiatement la batterie après l'avoir amenée
depuis un environnement froid vers un environnement chaud.
Attendez 30-40 minutes pour que la batterie se réchauffe.
34
33
Ne laissez pas une batterie sans surveillance pendant sa charge.
N'utilisez jamais un chargeur modifié ou endommagé.
Chargez le bloc batterie à une température entre 0 °C et +45 °C.
Sinon la durée de vie de la batterie diminuera considérablement.
Ne laissez pas le bloc batterie avec un chargeur connecté à
l'alimentation secteur pendant plus de 24 heures après une recharge
complète.
N'exposez pas le bloc batterie à des températures élevées ou à une
flamme nue.
N'immergez pas dans l'eau la batterie.
Ne connectez pas un appareil extérieur soutirant une intensité
supérieure à l'intensité maximum autorisée.
Le bloc batterie est protégé contre les court-circuits. Cependant, il
faut éviter les situations pouvant provoquer un court-circuit.
Ne démontez pas et ne déformez pas le bloc batterie.
Ne laissez pas tomber ou ne heurtez pas la batterie.
Lorsque vous utilisez la batterie avec des températures négatives,
sa capacité diminue, ceci est normal et n'est pas un défaut.
N'utilisez pas la batterie à des températures supérieures à celles
indiquées dans le tableau – ceci pourrait diminuer la durée de vie de
la batterie.
Conservez la batterie hors de portée des enfants.
Raccordez l'alimentation extérieure au port de l'appareil USB (14)
( ). Fig.1 sur la page de garde
L'appareil se commute alors sur l'alimentation extérieure, et le bloc
batterie IPS5 commencera à se charger lentement.
L'écran affichera l'icône batterie indiquant le niveau de charge
en pourcentage.
Au cas où le dispositif est connecté à un ordinateur, un adaptateur de
secteur ou un power bank non-conformes à la norme Battery
Charger (ВC 1.0), la batterie IPS5 ne pourra pas se charger, seule
l'icône de l'alimentation externe sera affichée .
Si l'appareil fonctionne sur une alimentation extérieure, mais si la
batterie IPS5 n'est pas connectée, l'icône est affichée.
Lorsque l'alimentation extérieure est déconnectée, l'appareil passe
sur le bloc batterie interne sans s'éteindre.
ALIMENTATION EXTÉRIEURE
L'appareil peut être alimenté par une alimentation extérieure comme un
chargeur Power Bank (5 V).
Sélectionner I'adaptateur avec I'insert d'un diamètre approprié en
fonction du diametre extérieur de I'objectif de votre viseur optique.
Les chiffres de 42mm/50mm/56mm, qui figurent dans la
dénomination de I'adaptateur, représentent le diamètre utile de
I'objectif du viseur optique. Afin de sélectionner I'insert, il est
nécessaire de mesurer le diametre extérieur du corps de I'objectif de
votre viseur optique de jour, en se référant aux données présentées
aux tableaux.
Installer l’appareil sur appareil optique
Example. Si le diamétre utile de votre viseur est égal à 42 mm et le diam
tre extérieur mesuré de I'objectif est de 47,2 mm, il convient d'utiliser un
insert portant le marquage de “Ø47".
10
Le monoculaire Pulsar 5x30 (fourni) permet de transformer le
module numérique en dispositif d'observation numérique nocturne
avec un grossissement de 5x.
Placez à fond le monoculaire (C) dans le module numérique, en
assurant un bon contact, de façon que les goupilles dans le corps de
monoculaire, rentrent dans les rainures (B) du module numérique
(voir la fig.).
Tournez le monoculaire dans le sens antihoraire pour le fixer sur le
module numérique.
Pour enlever le monoculaire, tournez le monoculaire dans le sens
horaire et tirer-le doucement.
monter
enlever
D
D
C
MISE EN SERVICE
MONTAGE DU MONOCULAIRE SUR LE MODULE NUMÉRIQUE
La page est en cours de chargement...
La page est en cours de chargement...
La page est en cours de chargement...
La page est en cours de chargement...
La page est en cours de chargement...
La page est en cours de chargement...
La page est en cours de chargement...
La page est en cours de chargement...
La page est en cours de chargement...
La page est en cours de chargement...
La page est en cours de chargement...
La page est en cours de chargement...
La page est en cours de chargement...
La page est en cours de chargement...
La page est en cours de chargement...
La page est en cours de chargement...
La page est en cours de chargement...
La page est en cours de chargement...
La page est en cours de chargement...
La page est en cours de chargement...
La page est en cours de chargement...
La page est en cours de chargement...
La page est en cours de chargement...
La page est en cours de chargement...
La page est en cours de chargement...
La page est en cours de chargement...
La page est en cours de chargement...
La page est en cours de chargement...
La page est en cours de chargement...
La page est en cours de chargement...
La page est en cours de chargement...
La page est en cours de chargement...
La page est en cours de chargement...
La page est en cours de chargement...
La page est en cours de chargement...
La page est en cours de chargement...
La page est en cours de chargement...
La page est en cours de chargement...
La page est en cours de chargement...
La page est en cours de chargement...
La page est en cours de chargement...
La page est en cours de chargement...
La page est en cours de chargement...
La page est en cours de chargement...
La page est en cours de chargement...
La page est en cours de chargement...
La page est en cours de chargement...
La page est en cours de chargement...
La page est en cours de chargement...
La page est en cours de chargement...
La page est en cours de chargement...
La page est en cours de chargement...
La page est en cours de chargement...
La page est en cours de chargement...
La page est en cours de chargement...
La page est en cours de chargement...
La page est en cours de chargement...
La page est en cours de chargement...
La page est en cours de chargement...
La page est en cours de chargement...
La page est en cours de chargement...
La page est en cours de chargement...
La page est en cours de chargement...
La page est en cours de chargement...
-
 1
1
-
 2
2
-
 3
3
-
 4
4
-
 5
5
-
 6
6
-
 7
7
-
 8
8
-
 9
9
-
 10
10
-
 11
11
-
 12
12
-
 13
13
-
 14
14
-
 15
15
-
 16
16
-
 17
17
-
 18
18
-
 19
19
-
 20
20
-
 21
21
-
 22
22
-
 23
23
-
 24
24
-
 25
25
-
 26
26
-
 27
27
-
 28
28
-
 29
29
-
 30
30
-
 31
31
-
 32
32
-
 33
33
-
 34
34
-
 35
35
-
 36
36
-
 37
37
-
 38
38
-
 39
39
-
 40
40
-
 41
41
-
 42
42
-
 43
43
-
 44
44
-
 45
45
-
 46
46
-
 47
47
-
 48
48
-
 49
49
-
 50
50
-
 51
51
-
 52
52
-
 53
53
-
 54
54
-
 55
55
-
 56
56
-
 57
57
-
 58
58
-
 59
59
-
 60
60
-
 61
61
-
 62
62
-
 63
63
-
 64
64
-
 65
65
-
 66
66
-
 67
67
-
 68
68
-
 69
69
-
 70
70
-
 71
71
-
 72
72
-
 73
73
-
 74
74
-
 75
75
-
 76
76
-
 77
77
-
 78
78
-
 79
79
-
 80
80
-
 81
81
-
 82
82
-
 83
83
-
 84
84


Pulsar Forward FN135 Manuel utilisateur
- Taper
- Manuel utilisateur
- Ce manuel convient également à
dans d''autres langues
- italiano: Pulsar Forward FN135 Manuale utente
- English: Pulsar Forward FN135 User manual
- español: Pulsar Forward FN135 Manual de usuario
- Deutsch: Pulsar Forward FN135 Benutzerhandbuch
- русский: Pulsar Forward FN135 Руководство пользователя
Documents connexes
-
Pulsar IPS Battery Charger Le manuel du propriétaire
-
-
-
-
-
-
-
-
Pulsar 79142 Manuel utilisateur
-
Autres documents
-
Carson NV-200 Mode d'emploi
-
Bresser 18-77400 Le manuel du propriétaire
-
Yukon Advanced Optics Ranger RT 6.5x42S Le manuel du propriétaire
-
Yukon Photon RT Manuel utilisateur
-
-
-
-