1
Have Questions? Need Assistance?
Call us at 1-866-671-7988
An instructional video demonstrating this procedure is available at www.saberGrills.com/Support/Article.aspx?articleid=348
Des questions? Avez-vous besoin d'aide?
Appelez-nous au 1-866-671-7988
Une vidéo expliquant cette marche à suivre est mise à votre disposition au www.saberGrills.com/Support/Article.aspx?articleid=348
¿Tiene preguntas? ¿Necesita asistencia?
Llámenos al 1-866-671-7988
Puede ver el video instructivo que describe este procedimiento en: www.saberGrills.com/Support/Article.aspx?articleid=348
For Model Numbers: / Pour les numéros de modèle : / Para los números de modelo:
R33CC0312, R33SC0012,
R50CC0312, R50CC0612, R50SC0012, R50C1715
R67SC0012
English: Pages 2-12
Français: Pages 13-24
Español: Páginas 25 36
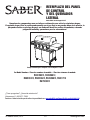
CONTROL PANEL & SIDE
BURNER REPLACEMENT
Estimated time to complete this replacement: 1 hour.
Saber Grills Recall September 2017
Replace the components as instructed below to prevent the following hazard:
The grills’ LP regulator can allow gas to flow at a higher pressure than intended, which can result in a
gas leak and flame burst from the burner knobs, posing fire and burn hazards to consumers.
© Saber Grills, LLC
Printed in U.S.A.
80028080 ● 09/13/17 ● Revision 03
sabergrills.com

2
Replacement Procedure - Before you Begin
IMPORTANT! Before beginning the replacement procedure:
• Read through this entire procedure to familiarize yourself with the steps.
• Ensure that your Grill is cool and all Control Knobs are in the OFF ( ) position.
• Disconnect and remove the LP Cylinder.
• Retain your hardware for use in reassembling your Grill, unless instructed to do otherwise.
• Keep the shipping carton and supplied shipping label for use in returning your old parts to Saber Grills.
• Some steps will require bending and extended reaching. Please review this guide before attempting to
replace these parts. If you determine that you are unable to complete these steps, please contact Saber
Grills for assistance.
Please note that extra Wires, Wire Ties, and Screws are included should you need them.
After completion of this procedure, you will have installed a completely new Control Panel and Hose/Regulator assembly into
your Saber Grill. If your Grill has a Side Burner - you will also replace it as well.
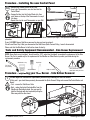
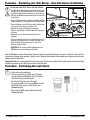
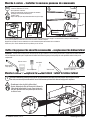
Tools and Safety Equipment Recommended - Control Panel Replacement
NOTE: Some Tools are not included. We recommend the use of the tools listed below to complete the replacement of the
Control Panel.
Wear gloves to protect your hands during the replacement procedure.
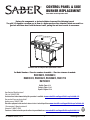
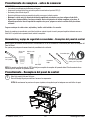
Procedure - Replacing your Control Panel
Open the Cart Panel Door(s)
Remove the Grease Tray for easy access to components.
NOTE: We will not show the Doors in the steps after this step - this will help make the images easier to follow. Please
DO NOT remove your Doors.
1
These symbols mean to use
caution and to wear your Gloves.
Phillips Screwdriver
7/16” Socket
Tool (Included)
Small bucket or cup
Soft Bristle Brush
Liquid Soap
Flat Blade
Screwdriver
NOTE: You will need the 7/16” socket tool (included) to complete the replacement of the Side Burner. This Tool is needed only
for the replacement of the Side Burner.
© Saber Grills, LLC
Printed in U.S.A.
sabergrills.com
80028080 ● 09/13/17 ● Revision 03

3
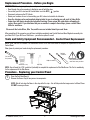
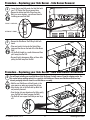
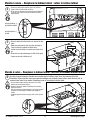
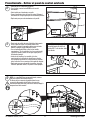
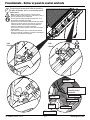
Procedure - Removing the Existing Control Panel
• Remember, the Doors are not shown.
• Using your thumb, press UP on the face of the
Thermometer.
• You will feel the Thermometer snap loose.
• Pull the Thermometer away from the Control Panel.
• Place the Thermometer in a secure place for
reinstallation later.
• Repeat this step for each Thermometer on your Grill.
2
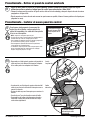
• Remove all Control Knobs by pulling them straight
away from the Control Panel. The Knobs may be
tight and require increased effort to remove them.
• Perform the following ONE Knob at a time.
• Using a Phillips Screwdriver, remove the two #8
Machine Screws and Washers (if provided) and
keep the Control Knobs and Bezels in a secure
place for reinstallation later.
• Reinstall the two Screws and Washers (if provided)
back in the location from where they were removed.
This will hold the Manifold in place until all Bezels
are removed. This is shown in the inset image.
• Repeat this step for each Control Knob on your Grill
including your Side Burner, if your Grill is so
equipped.
3
Control Panel
P
ress UP
4
NOTE - if your Grill DOES NOT have a Side Burner -
then this step will not apply. You may skip this step.
The Gas Manifold is connected to the Side Burner
with a Quick-Disconnect type fitting. Slide the Quick-
Disconnect back and while holding it back, pull the
Hose away from the Fitting.
1
1
2
CAUTION: Do not rotate the Knobs
clockwise past the OFF position
to avoid damage to the Valves.
© Saber Grills, LLC
Printed in U.S.A.
sabergrills.com
80028080 ● 09/13/17 ● Revision 03

4
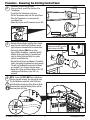
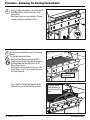
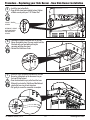
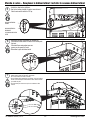
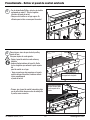
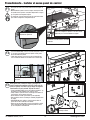
For this step, close the Doors on your Grill and raise
the Lid.
This step will require your Gloves.
• Grasp the Control Panel at each end and lift it
straight up from the Grill. You will be disengaging
the three locking tabs that hold the top of the
Control Panel in place.
• Note that there are connections on the rear of the
Control Panel - so do not try to completely remove
the Control Panel yet.
6
Procedure - Removing the Existing Control Panel
Lift only enough to
disengage tabs
Rotate the Control
Panel and allow it to
rest on the top of the
Doors.
Tabs
5
• Using your Phillips Screwdriver, remove the two #8
Sheet Metal Screws from the lower tabs of the
Control Panel.
• Place these Screws in a secure location . They will
be used to install your new Control Panel.
• First - rotate the Control Panel down and let the
bottom of it rest on the Door Handles, as shown.
© Saber Grills, LLC
Printed in U.S.A.
sabergrills.com
80028080 ● 09/13/17 ● Revision 03

5
Procedure - Removing the Existing Control Panel
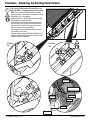
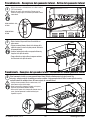
7
In this step you will disconnect the Ignitor Wires and
Light Switch Wires (if equipped) from the Control Panel.
• NOTE - Be sure to hold the Control Panel in place while
removing the Wires. Once all Wires are removed, the Control
Panel could fall if it is not supported.
• On the left hand side - Hold the Switch to prevent damage.
Pull both Wires loose from the Switch.
• On the right hand side, first bend up the flap on the Heat
Shield as shown. Then pull the red and black Wires loose
from the Switch. Take note of the proper location for the
Wires for reassembly. This is shown below.
• Once you have the Control Panel disconnected, remove it
from the Grill and set it aside.
• Take care while removing the Side Burner Quick-Connect (if
equipped) and Hose and Regulator from the Grill to prevent
damage to other Grill Components.
Left Hand
Side
Right Hand
Side
Red Wire
Black Wire
Black Wire
Red Wire
Not Used
Heat Shield is
shown transparent
Black Wire
Rear
of
Switch
© Saber Grills, LLC
Printed in U.S.A.
sabergrills.com
80028080 ● 09/13/17 ● Revision 03

6
Procedure - Removing the Existing Control Panel
8
• Remove your new Control Panel from the shipping carton, being careful not to damage the carton. This
carton will be used to re-pack the old Control Panel for shipment back to Saber Grills.
• Place your old Control Panel into the carton, seal it up with packing tape and place the prepaid, return shipping label
on it in a conspicuous location.
• Please drop the package off at the nearest shipping facility as soon as possible; or call the toll free number on the
label to schedule a pick-up.
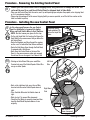
Procedure - Installing the new Control Panel
9
In this step you will prepare the new Control
Panel for installation, re-connect the Ignitor
Wires and Light Switch Wires to their Switches.
• NOTE - Be sure to wear your gloves for this step.
• On the right hand Side, first bend up the flap on the
Heat Shield in the same manner that you did on the
old Control Panel.
• Route the Regulator and Hose through the opening
and be sure it is behind the Door Braces and Doors.
• Route the Side Burner Hose through the Side Panel,
if equipped with a Side Burner.
• Next, place the Control Panel on the top of the
Doors in the same manner as when you removed
the old one. Be sure to support it so it doesn’t fall.
Rotate the Control
Panel and allow it to
rest on the top of the
Doors.
Tabs
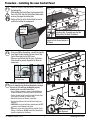
10
• Next, on the right hand side, press the red Wire
terminal onto the center Switch Spade shown at
right.
• Press the black Wire onto the Switch shown at
right.
• Refer to step 7 for proper Wire placement.
• Check that the Wires are securely placed and then
bend the Heat Shield flap back down as it was
originally.
• Starting on the left hand Side, press each Wire
Terminal onto one of the Switch Spades. Either Wire
can go on either Spade.
Left Hand
Side
Right Hand
Side
Black Wire
Red Wire
Not Used
Heat Shield is
shown transparent
© Saber Grills, LLC
Printed in U.S.A.
sabergrills.com
80028080 ● 09/13/17 ● Revision 03

7
11
Procedure - Installing the new Control Panel
• Rotate the Control Panel into position, raised above
the locking tabs.
• While holding the Control Panel in place against the
front of the Grill, slide the Control Panel down while
ensuring it engages the locking tabs.
• Gently pull the top of the Control Panel forward to
confirm the locking tab engagement.
Be sure the top of the Control Panel engages
the locking tabs. If needed, open the tabs
slightly with a flat blade Screwdriver.
1
2
2
Locking tab
Shown fully
Engaged
• Using your Phillips Screwdriver, reinstall the two #8
sheet metal Screws through the lower tabs of the
Control Panel and into the Grill Frame.
• When you are finished with this step - the Burner
Tubes should be properly aligned to the Valves as
shown here:
12
You will now reinstall the Bezels and Control Knobs. Be
sure to complete each Bezel and Knob before moving to
the next one. This will keep the Manifold properly
attached to the rear of the Control Panel.
• Using a Phillips Screwdriver, remove the two #8 Machine
Screws and Washers (if provided) from the Control Panel.
• Position the Bezel on the Control Panel with the Valve Stem
in the center of the Bezel, as shown at right.
• Reinstall the Screws and Washers (if provided).
• Align the Control Knob to the Valve Shaft and firmly press
into place.
• CAUTION: Do not rotate the Knobs clockwise past the OFF
position to avoid damage to the Valves.
• Repeat this step for each Control Knob on your Grill. If your
Grill has a Side Burner, DO NOT reinstall the Control Knobs,
you will be replacing the Side Burner.
13
Proper Bezel-to-Valve
Stem Alignment
Shown rotated to allow
for a larger image.
The lower tab holes should now be
aligned with the Screw locations in
the frame.
© Saber Grills, LLC
Printed in U.S.A.
sabergrills.com
80028080 ● 09/13/17 ● Revision 03

8
Tools and Safety Equipment Recommended - Side Burner Replacement
NOTE: Some Tools are not included. You will need the 7/16” socket tool (included) to complete the replacement of the Side
Burner. This Tool is needed only for the replacement of the Side Burner. Wear Gloves to protect your Hands during the
replacement procedure.
These symbols mean to use
caution and to wear your Goves.
• Remove your Cooking Grates for this step.
• Insert your Thermometers, one at a time into the
Control Panel.
• Engage the tabs into the Control Panel slots, then
press down on the top of the Thermometer to snap it
into place.
• Repeat this step for each Thermometer on your Grill.
1
!!
2
Control Panel
Press D
OWN
3
14
Procedure - Installing the new Control Panel
Procedure - Replacing your Side Burner - Side Burner Removal
If your Grill DOES NOT have a Side Burner - you are almost done. Please skip to Page 11 and perform the leak check
procedure.
If your Grill DOES have a Side Burner we need to show you how to replace it.
You will recall from Step 5 that you disconnected the Side Burner Quick-Connect fitting - leave it disconnected.
Please note that the Side Burner lid will not be shown for clarity.
• First - remove the Side Burner Grate.
• Next - unplug the Ignitor Electrode Wire from the
Side Burner Electrode by hand. You may need to
hold the Electrode with one hand while pulling the
Wire away with the other hand.
1
The tip must be visible!
You will begin the Side Burner replacement procedure by removing the old Side Burner.
At this point - you should have previously disconnected the Quick-Connect fitting and removed the Control Knobs and
Bezels.
Phillips Screwdriver
7/16” Socket
Tool (Included)
Small bucket or cup
Soft Bristle Brush
Liquid Soap
© Saber Grills, LLC
Printed in U.S.A.
sabergrills.com
80028080 ● 09/13/17 ● Revision 03

9
Procedure - Replacing your Side Burner - Side Burner Removal
• Loosen the top two Bolts under the Side Shelf with
your 7/16” Socket Tool. Do not remove them.
• Remove the bottom two Bolts. Place these two
Bolts in a secure location - you will need them for
installing your new Side Shelf.
2
TOP BOLT - LOOSEN ONLY
BOTTOM BOLT - REMOVE
• Remove the Side Burner Shelf lifting it with both
hands
• Place one hand in front under the Control Valve
stems and the other on the back of the Side Burner
Shelf.
• Lift the Shelf straight up a small distance and then
pull it away from the Grill.
• Be careful not to damage any Wires or Hoses while
pulling the Shelf away from the Grill.
3
LIFT HERE
LIFT HERE
• Hold the new Side Burner with both hands, in the
same manner as when you removed the old one.
• Align the key slots in the Shelf with top Bolts that
we previously loosened.
• Once the key slots are aligned over the Bolts, gently
press the Shelf unit down to engage the Bolts.
• The Shelf will now support itself and you can let go
of it.
4
You will begin installing your new Side Burner Side Shelf now. Carefully remove it from the shipping carton. Use
this carton and any packing material to re-pack the old Side Burner. Remove new Side Burner Grate and any
internal packaging materials from the new Side Burner assembly.
Procedure - Replacing your Side Burner - New Side Burner Installation
© Saber Grills, LLC
Printed in U.S.A.
sabergrills.com
80028080 ● 09/13/17 ● Revision 03

10
Procedure - Replacing your Side Burner - New Side Burner Installation
• Install the two bottom Bolts.
• Once all Bolts have been installed by hand, tighten
all Bolts securely with your 7/16” Socket Tool.
5
TOP BOLT - TIGHTEN
SECURELY
BOTTOM BOLT - REPLACE
BOLTS ON BOTH SIDES
AND THEN TIGHTEN
SECURELY.
• Reconnect the Ignitor Electrode Wire to the Side
Burner Electrode by hand. You may need to hold the
Electrode with one hand while pushing the
connector with the other hand.
• Reinstall the Side Burner Grate.
6
7
• Install the Quick Disconnect connection to the Side
Burner by pulling back on the disconnect ring on
the brass fitting by hand.
• Once the disconnect ring is pulled back the brass
fitting will push onto the Side Burner Manifold and
release the brass ring to lock into place.
• Pull gently to ensure the connection is complete
1
1
2
© Saber Grills, LLC
Printed in U.S.A.
sabergrills.com
80028080 ● 09/13/17 ● Revision 03

11
Procedure - Replacing your Side Burner - New Side Burner Installation
8
You will now reinstall the Bezels and Control Knobs.
• Your Side Burner may have only one Control Knob. If your
Side Burner has TWO Control Knobs, be sure to complete
each Bezel and Knob before moving to the next one. This
will keep the Manifold properly attached to the rear of the
Control Panel.
• Using a Phillips Screwdriver, remove the two #8 machine
Screws and Washers (if provided) from the Control Panel.
• Position the Bezel on the Side Burner with the Valve stem
in the center of the Bezel, as shown at right.
• Reinstall the Screws and Washers (if provided).
• Align the Control Knob to the Valve Shaft and firmly press
into place.
• Repeat this step for the remaining Control Knob, if
equipped.
• Orient the Control Knob to align the D-shaped stem to the
opening in the Knob and press it on until the Knob is just
inside the Bezel. Repeat these steps for each of the
Valves to install the Knobs.
• CAUTION: Do not rotate the Knobs clockwise past the
OFF position to avoid damage to the Valves.
Proper Bezel-to-Valve
Stem Alignment
Congratulations! You are now finished with the replacement of parts on your Saber Grill. You will need to perform a thorough
leak check procedure on your Grill to ensure there are no gas leaks.
1
Ÿ Gloves will not be needed now.
Ÿ The next step will be to reinstall your LP Cylinder,
connect the Hose and Regulator to the LP Cylinder,
and leak check your new connection.
Ÿ Do not install the grease tray at this point.
Ÿ First, you will need a Cup or a small Bucket, a small
soft Bristle Brush (such as a Paint Brush), and
dishwashing liquid.
Ÿ Next, create a 50/50 soapy solution of water and
dishwashing liquid.
Procedure - Performing the Leak Check
Pack the Side Burner and the Control Panel into each original carton provided with your new parts. Pack both cartons into the
original outer shipping carton provided. Apply the return shipping label provided to the orignial outer shipping carton for return
shipment back to Saber Grills.
© Saber Grills, LLC
Printed in U.S.A.
sabergrills.com
80028080 ● 09/13/17 ● Revision 03

12
2
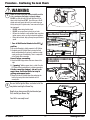
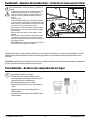
Procedure - Continuing the Leak Check
WARNING
3
Be sure that the Ignition Wires are tucked out of the
way before inserting the Grease Tray.
Now that you have successfully leak checked your
Grill, reinstall your Grease Tray.
Your Grill is now ready to use!
SIDE BURNER CONNECTION,
IF EQUIPPED
Hose Manifold Connection
© Saber Grills, LLC
Printed in U.S.A.
sabergrills.com
Failure to correct a gas leak could potentially result in
a fire, causing personal injury or property damage.
DO NOT use your grill until it has been leak-tested. If you
detect a leak at any time, Turn off the gas at the LP STOP!
cylinder valve and correct the leak. If you cannot stop a gas
leak by closing the LP cylinder valve, leave area and call your
fire department!
Ÿ DO NOT smoke during the leak check
Ÿ DO NOT use an open flame to check for gas leaks
Ÿ Grill must be checked in a well ventilated area, away from
ignition sources such as gas fired or electrical appliances.
Ÿ During the leak check, keep grill away from open flame or
sparks.
1. Turn all Grill Control Knobs to the OFF ( )
position.
2. Be sure the Regulator is tightly connected to LP Cylinder.
3. Completely open LP Cylinder Valve by turning the hand
wheel counterclockwise. If you hear a continuous rushing
sound, turn the gas off immediately. There is a major leak
at the Cylinder Valve connection.
Correct before proceeding.
4. Brush the 50/50 soapy solution onto areas shown at the
right.
5. If “growing” bubbles appear, there is a leak. Close the
LP Cylinder Valve immediately and re-tighten connections.
If leaks cannot be stopped - do not try to
repair them. Call Saber Grills for help in
getting replacement parts.
6. Always close the LP Cylinder Valve after performing the
leak test by turning hand wheel clockwise until it is
securely shut.
© Saber Grills, LLC
Printed in U.S.A.
sabergrills.com
80028080 ● 09/13/17 ● Revision 03

13
Des questions? Avez-vous besoin d'aide?
Appelez-nous au 1-866-671-7988
Une vidéo expliquant cette marche à suivre est mise à votre disposition au www.saberGrills.com/Support/Article.aspx?articleid=348
For Model Numbers: / Pour les numéros de modèle : / Para los números de modelo:
R33CC0312, R33SC0012,
R50CC0312, R50CC0612, R50SC0012, R50C1715
R67SC0012
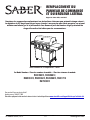
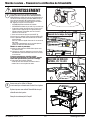
REMPLACEMENT DU
PANNEAU DE COMMANDE
ET DU BRÛLEUR LATÉRAL
Durée estimative de ce remplacement : 1 heure.
Rappel de Saber Grills, août 2017
Remplacez les composantes conformément aux instructions ci-dessous pour prévenir le danger suivant :
Le régulateur de GPL du gril peut laisser le gaz s'écouler à une pression plus élevée que prévu, ce qui peut
entraîner une fuite de gaz et le jaillissement d'une flamme à partir des boutons du gril, présentant un
danger d'incendie et de brûlure pour les consommateurs.
© Saber Grills, LLC
Printed in U.S.A.
sabergrills.com
80028080 ● 09/13/17 ● Revision 03

14
Marche à suivre pour le remplacement – Avant de commencer
IMPORTANT! Avant d'amorcer la marche à suivre pour le remplacement :
• Lisez cette marche à suivre dans son intégralité pour vous familiariser avec les étapes.
• Assurez-vous que le gril est froid et que tous les boutons de réglage sont sur la position OFF ( O ).
• Débranchez et retirez la bouteille de GPL.
• Conservez la quincaillerie; vous l'utiliserez plus tard pour réassembler votre gril, à moins d'une indication contraire.
• Conservez la boîte d'expédition et l'étiquette d'expédition fournie pour retourner vos anciennes pièces à Saber Grills.
• Vous devrez vous pencher et tendre les bras pour exécuter quelques-unes des étapes. Veuillez passer ce guide en revue avant
de tenter de remplacer ces pièces. Si vous déterminez que vous ne pouvez pas exécuter ces étapes, veuillez prendre contact
avec Saber Grills pour obtenir de l'aide.
Veuillez noter que des câbles, des attaches pour câbles et des vis en surplus sont inclus, en cas de besoin.
Au terme de cette marche à suivre, vous aurez installé un panneau de commande et un assemblage de tuyau et de régulateur tout neuf dans votre gril Saber. Si votre gril est
équipé d'un brûleur latéral, vous le remplacerez également.
Outils et équipement de sécurité recommandés – remplacement du panneau de commande
REMARQUE : Certains outils ne sont pas inclus. Nous vous recommandons d'utiliser les outils énumérés ci-dessous pour remplacer le panneau de
commande.
Portez des gants pour vous protéger les mains pendant la marche à suivre pour le remplacement.
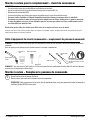
Marche à suivre – Remplacer le panneau de commande
Ouvrez la ou les portes du panneau du chariot.
Retirez le bac à graisse pour avoir facilement accès aux composantes.
REMARQUE : Nous ne montrerons pas les portes dans les prochaines étapes, ce qui vous permettra de suivre les images plus
facilement. Veuillez NE PAS ôter vos portes.
1
Ces symboles signifient qu'il faut
faire preuve de prudence et porter
des gants.
Tournevis à croix
Outil à douille de
7/16 po
Petit seau ou
tasse
Pinceau à poils doux
Savon liquide
Tournevis à tête
plate
REMARQUE : Vous aurez besoin de l'outil à douille de 7/16 po (inclus) pour effectuer le remplacement du brûleur latéral. Cet outil est uniquement
nécessaire pour le remplacement du brûleur latéral.
© Saber Grills, LLC
Printed in U.S.A.
sabergrills.com
80028080 ● 09/13/17 ● Revision 03

15
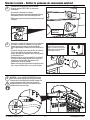
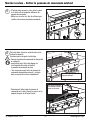
Marche à suivre – Retirer le panneau de commande existant
• Souvenez-vous que les portes ne sont pas illustrées.
• Du pouce, appuyez VERS LE HAUT sur le devant du
thermomètre.
• Vous sentirez le thermomètre se dégager.
• Retirez le thermomètre du panneau de commande. Placez le
thermomètre en lieu sûr; vous le réinstallerez plus tard.
• Répétez cette étape pour chaque thermomètre dont votre gril
est équipé.
2
• Retirez tous les boutons de réglage en les tirant à angle droit
par rapport au panneau de commande. Il se peut que les
boutons soient serrés et que leur retrait nécessite des
efforts supplémentaires. Effectuez ce qui suit UN bouton à la
fois.
• À l'aide d'un tournevis à croix, retirez les deux vis à métal no
8 et les deux rondelles (le cas échéant) et mettez les
boutons de réglage et les enjoliveurs en lieu sûr pour pouvoir
les réinstaller plus tard.
• Remettez les deux vis et les deux rondelles (le cas échéant)
en place. Cela tient la rampe en place jusqu'à ce que tous
les enjoliveurs aient été retirés. Vous pouvez en voir
l'illustration sur l'image en médaillon.
• Répétez cette étape pour chaque bouton de réglage de votre
gril, y compris le brûleur latéral, si votre gril en est équipé.
3
Panneau de
commande
Appuyez
VE
R
S
L
E H
AUT
4
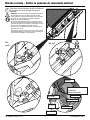
REMARQUE – Si votre gril N'EST PAS ÉQUIPPÉ d'un brûleur
latéral, cette étape ne s'applique pas. Vous pouvez la sauter.
La rampe à gaz est branchée au brûleur latéral au moyen d'un
raccord à déconnexion rapide. Faites glisser le raccord à
déconnexion rapide vers l'arrière et, en le tenant dans cette
nouvelle position, retirez-en le tuyau.
1
1
2
AVERTISSEMENT : Ne passez pas la
position OFF O lorsque vous faites
tourner les boutons dans le sens des
aiguilles d'une montre, afin d'éviter
d'endommager les valves.
© Saber Grills, LLC
Printed in U.S.A.
sabergrills.com
80028080 ● 09/13/17 ● Revision 03

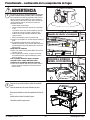
16
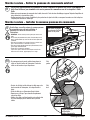
Pour cette étape, fermez les portes de votre gril et
soulevez le couvercle.
Vous devez porter des gants à cette étape.
• Saisissez le panneau de commande de chaque côté
et soulevez-le
• à angle droit du gril. Vous allez dégager les
trois languettes de sûreté qui tiennent
le panneau de commande en place.
• Vous remarquerez que l'arrière du panneau de
commande comprend des raccords – ne tentez
donc pas encore de le retirer complètement.
6
Marche à suivre – Retirer le panneau de commande existant
Soulevez assez pour dégager les
languettes seulement.
Faites pivoter le panneau
de commande et laissez-le
reposer sur les portes.
Languettes
5
• À l'aide de votre tournevis à croix, retirez les deux
vis à métal no 8 des languettes inférieures du
panneau de commande.
• Mettez ces vis en lieu sûr. Vous les utiliserez pour
installer votre nouveau panneau de commande.
• Premièrement, faites pivoter le panneau de
commande vers le bas et laissez-le reposer sur les
poignées de porte, de la façon illustrée.
© Saber Grills, LLC
Printed in U.S.A.
sabergrills.com
80028080 ● 09/13/17 ● Revision 03

17
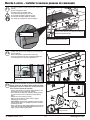
Marche à suivre – Retirer le panneau de commande existant
7
À cette étape, vous allez débrancher les câbles de l'allumeur et
de l'interrupteur (si le gril en est équipé) du panneau de
commande.
• REMARQUE - Assurez-vous de bien tenir le panneau de commande en
place pendant que vous retirez les câbles. Une fois tous les câbles
retirés, le panneau de commande pourrait tomber s'il n'est pas soutenu.
• Du côté gauche – tenez l'interrupteur pour éviter tout dommage.
Dégagez les deux câbles de l'interrupteur.
• Du côté droit, pliez premièrement le volet de l'écran thermique vers le
haut de la façon illustrée. Ensuite, dégagez les câbles rouge et noir de
l'interrupteur en tirant dessus. Prenez note de l'emplacement correct des
câbles en vue de leur réinstallation. Il est indiqué ci-dessous.
• Une fois que vous avez débranché le panneau de commande, retirez-le
du gril et mettez-le de côté.
• Faites preuve de prudence lorsque vous retirez le raccord à déconnexion
rapide du brûleur latéral (le cas échéant) et le tuyau et le régulateur du
gril, afin d'éviter d'endommager les autres composant
Côté
gauche
Côté droit
Câble rouge
Câble noir
Câble noir
Câble rouge
Pas utilisé
L'écran thermique
est illustré de
manière transparente
Câble noir
Arrière de
l'interrupteur
© Saber Grills, LLC
Printed in U.S.A.
sabergrills.com
80028080 ● 09/13/17 ● Revision 03

18
Marche à suivre – Retirer le panneau de commande existant
8
• Sortez votre nouveau panneau de commande de la boîte d'expédition en prenant soin d'éviter d'endommager la
boîte. Vous l'utiliserez pour réemballer votre ancien panneau de commande en vue de le réexpédier à Saber
Grills.
• Mettez votre ancien panneau de commande dans la boîte, fermez-la à l'aide de ruban d'emballage et apposez l'étiquette d'expédition de
retour affranchie à un endroit bien visible.
• Veuillez apporter le colis au centre d'expédition le plus proche dans les plus brefs délais, ou composez le numéro sans frais indiqué sur
l'étiquette pour demander un ramassage.
Marche à suivre – Installer le nouveau panneau de commande
9
À cette étape, vous allez préparer le nouveau panneau
de commande en vue de son installation et
rebrancher les câbles de l'allumeur et de
l'interrupteur.
• REMARQUE - Assurez-vous de porter des gants pour exécuter cette
étape.
• Du côté droit, pliez premièrement le volet de l'écran thermique vers le
haut, de la même manière que vous l'avez fait sur l'ancien panneau de
commande.
• Faites passer le régulateur et le tuyau par l'ouverture et assurez-vous
qu'ils se trouvent derrière les contrevents et les portes.
• Faites passer le tuyau du brûleur latéral par le panneau latéral, si votre
gril est équipé d'un brûleur latéral.
• Ensuite, laissez le panneau de commande
reposer sur les portes, comme vous l'avez fait pour retirer l'ancien.
Assurez-vous de le soutenir, apoyarlo para que no se caiga.
Faites pivoter le panneau
de commande et laissez-le
reposer sur les portes.
Languettes
10
• Ensuite, du côté droit, enfilez la borne du câble rouge sur la
broche centrale de l'interrupteur, de la façon illustrée à
droite.
• Enfilez le câble noir sur l'interrupteur illustré à droite.
• Reportez-vous à l'étape 7 pour connaître l'emplacement
correct des câbles.
• Vérifiez si les câbles sont bien branchés, puis repliez le volet
de l'écran thermique pour le remettre dans sa position
initiale.
• En commençant par la gauche, enfilez chaque borne de
câble sur l'une des broches de l'interrupteur. L'ordre des
câbles sur les broches n'a pas d'importance.
Côté
gauche
Côté
droit
Câble noir
Pas utilisé
L'écran thermique
est illustré de
manière transparente
Câble rouge
© Saber Grills, LLC
Printed in U.S.A.
sabergrills.com
80028080 ● 09/13/17 ● Revision 03

19
11
Marche à suivre – Installer le nouveau panneau de commande
• Faites pivoter le panneau de commande pour le mettre en position, en le
soulevant
au-dessus des languettes de sûreté.
• En tenant le panneau de commande en place
contre l'avant du gril, faites-le glisser vers le bas
en vous assurant qu'il engage les languettes de sûreté.
• Tirez doucement sur l'avant du panneau de commande
pour confirmer que les languettes de sûreté sont engagées.
Assurez-vous que le haut du panneau de commande engage les
languettes de sûreté. Au besoin, ouvrez légèrement les languettes
au moyen d'un tournevis à tête plate.
1
2
2
Languette de sûreté engagée
à fond
• À l'aide de votre tournevis à croix, réinstallez les deux vis à métal no 8 à
travers les languettes
inférieures du panneau de commande, dans le cadre du gril.
• Lorsque vous avez terminé cette étape, les mélangeurs devraient être
correctement alignés sur les valves, de la façon illustrée ici :
12
Vous allez à présent réinstaller les enjoliveurs et les boutons de
réglage. Assurez-vous de terminer chaque enjoliveur et chaque
bouton avant de passer au suivant. Ainsi, la rampe restera bien
fixée à l'arrière du panneau de commande.
• À l'aide de votre tournevis à croix, retirez les deux vis à métal no 8 et les
deux rondelles (s'il y a lieu) du panneau de commande.
• Placez l'enjoliveur sur le panneau de commande de manière que la tige
de la valve se trouve au centre de l'enjoliveur, de la façon illustrée à
droite.
• Réinstallez les vis et les rondelles (s'il y a lieu).
• Alignez le bouton de réglage sur l'arbre de la valve, et appuyez
fermement pour le mettre en place.
• AVERTISSEMENT : Ne passez pas la position OFF O lorsque vous faites
tourner les boutons dans le sens des aiguilles d'une montre, afin d'éviter
d'endommager les valves.
• Répétez cette étape pour chaque bouton de réglage de votre gril. Si votre
gril est équipé d'un brûleur latéral, NE RÉINSTALLEZ PAS les boutons de
réglage; vous allez remplacer le brûleur latéral.
13
Alignement correct de l'enjoliveur
sur la tige de la valve
Illustration en position tournée pour pouvoir
agrandir l'image.
Les trous des languettes inférieures devraient être
alignés sur l'emplacement des vis sur le cadre.
© Saber Grills, LLC
Printed in U.S.A.
sabergrills.com
80028080 ● 09/13/17 ● Revision 03

20
Outils et équipement de sécurité recommandés – remplacement du brûleur latéral
REMARQUE : Certains outils ne sont pas inclus. Vous aurez besoin de l'outil à douille de 7/16 po (inclus) pour effectuer le remplacement du brûleur latéral. Cet
outil est uniquement nécessaire pour le remplacement du brûleur latéral. Portez des gants pour vous protéger les mains pendant la marche à suivre pour le
remplacement.
Ces symboles signifient qu'il faut faire preuve
de prudence et porter des
• Pour cette étape, retirez vos grilles de cuisson.
• Insérez vos thermomètres, un à la fois,
• dans le panneau de commande.
• Engagez les languettes dans les fentes du panneau de commande,
puis appuyez sur le haut du thermomètre pour
le mettre en place.
• Répétez cette étape pour chaque thermomètre dont votre gril est équipé.
1
!!
2
Panneau de
commande
Appuyez
V
ERS
LE BA
S
3
14
Marche à suivre – Installer le nouveau panneau de commande
Marche à suivre – Remplacer le brûleur latéral : retirer le brûleur latéral
Si votre gril N'EST PAS ÉQUIPPÉ d'un brûleur latéral, vous avez presque terminé. Allez directement à la page 11 et suivez la marche à suivre pour vérifier l'étanchéité.
Si votre gril EST ÉQUIPPÉ d'un brûleur latéral, nous devons vous montrer comment le remplacer.
Rappelez-vous qu'à l'étape 5, vous avez débranché le raccord à déconnexion rapide du brûleur latéral. Laissez-le débranché.
Veuillez noter que le couvercle du brûleur latéral n'est pas illustré, par souci de clarté.
• Premièrement, retirez la grille du brûleur latéral.
• Ensuite, débranchez le câble de l'électrode de l'allumeur de
l'électrode du brûleur latéral à la main. Il vous faudra peut-
être tenir l'électrode d'une main pendant que vous tirez sur
le câble de l'autre.
1
La pointe doit
être visible!
Vous allez commencer la marche à suivre pour le remplacement du brûleur latéral en retirant l'ancien brûleur latéral.
À ce stade, vous devriez déjà avoir débranché le raccord à déconnexion rapide et retiré les boutons de réglage et les enjoliveurs.
Tournevis à croix
Outil à douille de
7/16 po (inclus)
Petit seau ou tasse
Pinceau à poils doux
savon liquide
© Saber Grills, LLC
Printed in U.S.A.
sabergrills.com
80028080 ● 09/13/17 ● Revision 03
La page est en cours de chargement...
La page est en cours de chargement...
La page est en cours de chargement...
La page est en cours de chargement...
La page est en cours de chargement...
La page est en cours de chargement...
La page est en cours de chargement...
La page est en cours de chargement...
La page est en cours de chargement...
La page est en cours de chargement...
La page est en cours de chargement...
La page est en cours de chargement...
La page est en cours de chargement...
La page est en cours de chargement...
La page est en cours de chargement...
La page est en cours de chargement...
-
 1
1
-
 2
2
-
 3
3
-
 4
4
-
 5
5
-
 6
6
-
 7
7
-
 8
8
-
 9
9
-
 10
10
-
 11
11
-
 12
12
-
 13
13
-
 14
14
-
 15
15
-
 16
16
-
 17
17
-
 18
18
-
 19
19
-
 20
20
-
 21
21
-
 22
22
-
 23
23
-
 24
24
-
 25
25
-
 26
26
-
 27
27
-
 28
28
-
 29
29
-
 30
30
-
 31
31
-
 32
32
-
 33
33
-
 34
34
-
 35
35
-
 36
36


Saber Compact R33CC0312 Manuel utilisateur
- Catégorie
- Barbecues
- Taper
- Manuel utilisateur
dans d''autres langues
- English: Saber Compact R33CC0312 User manual
- español: Saber Compact R33CC0312 Manual de usuario
Documents connexes
-
Saber Compact R50CC0612 Manuel utilisateur
-
Saber Compact R67SC0917 Manuel utilisateur
-
-
-
Saber Compact R50SB0412 Assembly & Product Manual
-
-