KitchenAid KUDE40CVBL3 User Instructions
- Catégorie
- Lave-vaisselle
- Taper
- User Instructions

Thank you for Choosing KitchenAid ®Appliances.
We hold our company to the highest quality standards and it is important to usthat you have a positive experience owning a
KitchenAid®product.
Foryour convenience, we have provided an easy to follow User Instruction Book. These instructions include a "Troubleshooting"
section to help you through any problems you may encounter.
Foradditional information, you can visit the Frequently Asked Questions (FAQs)section of our website at www.kitchenaid.com. If
you need further assistance using your KitchenAid dishwasher, please contact us at 1-800-422-1230. InCanada: visit
www.kitchenaid.ca or call 1-800-807-6777.
Have your complete model and serial number ready. You can find your model and serial number on the label located near the door
on the right-hand or left-hand side of the dishwasher interior.
Para obtener acceso a "lnstrucciones para el usuario de la lavavajillas" en espa_ol, o paraobtener informaci6n adicional acerca de
su producto, visite: www.kitchenaid.com
Tenga listo su nOmerocompleto de modelo y de serie. Puede encontrar su nOmero de modelo y de serie en la etiqueta ubicada
cerca de la puerta, al lado derecho o izquierdo del interior de la lavavajillas.
Table of Contents
DISHWASHERSAFETY.............................................................1
QUICK STEPS............................................................................3
DISHWASHERUSE....................................................................3
CYCLE ANDOPTION DESCRIPTIONS....................................4
DISHWASHERFEATURES........................................................6
FILTRATIONSYSTEM ...............................................................7
DISHWASHERCARE.................................................................8
TROUBLESHOOTING................................................................9
WARRANTY..............................................................................11
Your safety and the safety of others are very important.
We haveprovided many important safety messages in this manual and on your appliance. Always read and obey all safety
messages.
This is the safety alert symbol.
This symbol alerts you to potential hazards that can kill or hurt you and others.
All safety messages will follow the safety alert symbol and either the word "DANGER" or "WARNING."
These words mean:
You can be killed or seriously injured if you don't immediately
follow instructions.
You can be killed or seriously injured if you don't follow
instructions.
All safety messages will tell you what the potential hazard is, tell you how to reduce the chance of injury, and tell you what can
happen if the instructions are not followed.
W10300235A

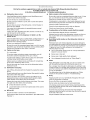
iMPORTANT SAFETY iNSTRUCTiONS
WARNING: When using the dishwasher, follow basic precautions, including the following:
[] Read all instructions before using the dishwasher. [] Do not tamper with controls.
[] Use the dishwasher only for its intended function.
[] Use only detergents or rinse agents recommended for use in
a dishwasher, and keep them out of the reach of children.
[] When loading items to be washed:
1) Locate sharp items so that they are not likely to damage
the door seal; and
2) Load sharp knives with the handles up to reduce the risk
of cut-type injuries.
[] Do not wash plastic items unless they are marked
"dishwasher safe" or the equivalent. For plastic items not so
marked, check the manufacturer's recommendations.
[] Do not touch the heating element during or immediately after
use.
[] Do not operate the dishwasher unless all enclosure panels
are properly in place.
[] Do not abuse, sit on, or stand on the door, lid, or dish racks
of the dishwasher.
[] To reduce the risk of injury, do not allow children to play in
or on the dishwasher.
[] Under certain conditions, hydrogen gas may be produced in
a hot water system that has not been used for two weeks or
more. HYDROGEN GAS IS EXPLOSIVE. If the hot water
system has not been used for such a period, before using
the dishwasher turn on all hot water faucets and let the
water flow from each for several minutes. This will release
any accumulated hydrogen gas. As the gas is flammable,
do not smoke or use an open flame during this time.
[] Remove the door or lid to the washing compartment
when removing an old dishwasher from service or
discarding it.
SAVE THESE iNSTRUCTiONS
GROUNDING iNSTRUCTiONS
For a grounded, cord-connected dishwasher:
The dishwasher must be grounded. In the event of a
malfunction or breakdown, grounding will reduce the risk of
electric shock by providing a path of least resistance for
electric current. The dishwasher is equipped with a cord
having an equipment-grounding conductor and a grounding
plug. The plug must be plugged into an appropriate outlet
that is installed and grounded in accordance with all local
codes and ordinances.
WARNING: Improper connection of the equipment-
grounding conductor can result in a risk of electric shock.
[]
Check with a qualified electrician or service representative
if you are in doubt whether the dishwasher is properly
grounded. Do not modify the plug provided with the
dishwasher; if it will not fit the outlet, have a proper outlet
installed by a qualified electrician.
For a permanently connected dishwasher:
The dishwasher must be connected to a grounded metal,
permanent wiring system, or an equipment-grounding
conductor must be run with the circuit conductors and
connected to the equipment-grounding terminal or lead on
the dishwasher.
SAVE THESE iNSTRUCTiONS
Tip Over Hazard
Do not use dishwasher until completely installed.
Do not push down on open door.
Doing so can result in serious injury or cuts.

Prepare and load
dishwasher.
<) ick ¸
Select
a cycle and option.
2 Add detergent _,_/.'
forcleaningand ,_....,
rinse aid for
drying.
_ Start dishwasher.
NOTE: Ifthe Start/Resume
button is located on the top of
door, push door firmly closed
within 3 seconds of pressing
Start/Resume.
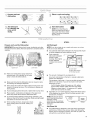
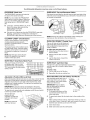
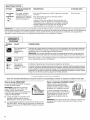
Prepare and Load the Dishwasher
IMPORTANT: Remove leftover food, bones, toothpicks and other
hard items from the dishes. Remove labels from containers before
washing.
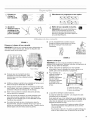
Upper rack Lower rack
Make sure nothing keeps spray arm(s) from
spinning freely. It is important for the water
spray to reach all soiled surfaces.
)
• Make sure that when the dishwasher door is closed no items
are blocking the detergent dispenser.
• Items should be loaded with soiled surfaces facing down and
inward to the spray as shown. This will improve cleaning and
drying results.
• Avoid overlapping items like bowls or plates that may trap food.
• Place plastics, small plates and glasses in the upper rack.
Wash only plastic items marked "dishwasher safe."
• To avoid thumping/clattering noises during operation: Load
dishes so they do not touch one another. Make sure lightweight
load items are secured in the racks.
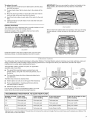
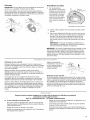
When loading silverware, always place sharp
items pointing down and avoid "nesting" as
shown.
Add Detergent
NOTE: If you do not plan to run a wash cycle soon, run a rinse
cycle. Do not use detergent.
• Use automatic dishwasher detergent only. Add powder, liquid
or tablet detergent just before starting a cycle.
• Fresh automatic A
dishwasher detergent
results in better
cleaning. Store tightly
closed detergent B
container in acool, dry
place.
A. Cover latch
B. Main Wash section
C. Pre-Wash section
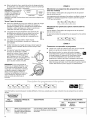
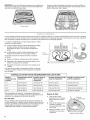
• The amount of detergent to use depends on:
How much soil remains on the items - Heavily soiled loads
require more detergent.
The hardness of the water - If you use too little in hard water,
dishes won't be clean. If you use too much in soft water,
glassware will etch.
Soft to Medium Water (0-6 grains per U.S. gallon)
[typical water softener water and some city water]
Medium to Hard Water (7-12 grains per U.S. gallon)
[well water and some city water]
• Depending on your water hardness, fill the Main Wash section
of the dispenser as shown. Fill the Pre-Wash section to the
level shown, if needed.
NOTE: Fill amounts shown
are for standard powdered
detergent. Follow
instructions on the package
when using other dishwasher
detergent.
Hard Water
Soft Water
Main Wash
i HardWaterSoftWater
Pre-Wash
Add Rinse Aid
Your dishwasher is designed to use rinse aid for good drying
performance. Without rinse aid your dishes and dishwasher
interior will have excessive moisture. The heat dry option will
not perform as well without rinse aid.

Rinseaidkeepswaterfromformingdropletsthatcan
dryasspotsorstreaks.Theyalsoimprovedryingby
allowingwatertodrainoffofthedishesafterthefinal
rinse.
Rinseaidhelpstoreduceexcessmoistureonthedish
racksandinteriorofyourdishwasher.
Full
Add
• Check the rinse aid indicator. Add rinse aid when indicator
drops to "Add" level.
To add rinse aid, turn the dispenser cap
to "Refill" and lift off. Pour rinse aid into
the opening until the indicator level is at
"Full." Replace the dispenser cap and
turn to "Lock." Make sure cap is fully
locked.
NOTE: For most water conditions, the
factory setting of 2 will give good
results. Ifyou have hard water or notice
rings or spots, try a higher setting. Turn
the arrow adjuster inside the dispenser
by either using your fingers or inserting
a flat-blade screwdriver into the center
of the arrow and turning.
Lock
Refill
turn to lock
STEP3
Select a Cycle (cycles vary by model)
See "Cycle and Option Descriptions" charts in the following
section.
Heavier cycles and options affect cycle length. Some cycles and
options will take up to 31/2hours to complete.
Select Options (options vary by model)
See "Cycle and Option Descriptions" charts in the following
section.
You can customize your cycles by pressing the options desired.
STEP4
Start or Resume a Cycle
Run hot water at the sink nearest your dishwasher until the
water is hot. Turn off water.
Push door firmly closed. The door latches
automatically. Select the wash cycle and options
desired OR press Start/Resume to repeat the same
cycle and options as in the previous wash cycle.
You can add an item anytime before the main wash starts.
Open the door slowly and add the item. Close the door firmly.
Press Start/Resume.
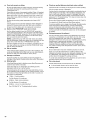
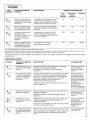
This information covers several different models. Your dishwasher may not have all of the cycles and options described.
_Washlng
_Drylng
_Clean
_Sanltlzed
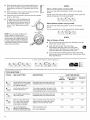
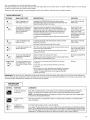
CYCLES DISH LOAD TYPES DESCRIPTIONS
WASH TIME (HH:MM)
Cycle Cycle + Options *Maximum
Minimum Minimum
_'_ ................./ Use for hard't°-clean; heavily During the Wash; the Wash action Will li55 2i25 3i23
Heavy sol ed pots, pans, casseroles, repeatedly pause for several seconds.
L D_t_...._i and regu!ai tablewarel
Use for loads with normal
amounts of food soil.
The energy-usage label is based on this
cycle. During the wash, the wash action
will repeatedly pause for several seconds.
1:25 1:50 3:13
_""i Use for iightly soiled items or During the Wash; the Wash action will 1:20 li50 3i14
Dght! china and crystal, repeatedly pause for several seconds.
China
When you need fast results,
the 1 Hour Wash will clean
your dishes using slightly
more water and energy.
This cycle does not dry. For improved
drying, select the Heated Dry option,
adding 1/2hour to the wash cycle.
0:58 0:88 0:58
Use for rinsing dishes This cycle does not dry. 0:15 none none
Rinse glasses, and silverware that DO not use deter,_ent
Only
....................................._ wi!! not be Washed right away. ..... !

Youcancustomizeyourcyclebyselectinganoption•
Seeoptionselections•Ifyouchangeyourmind,presstheoptionagaintoturnofftheoption,orselectadifferentoption•Youcanchange
anoptionanytimebeforetheselectedoptionbegins•
*Maximumwashtimesdependonwatertemperature,heavysoilcondition,dishloadsizeandoptionsselected•
OPTIONS DISH LOAD TYPES DESCRIPTIONS USE WITH:
...................._'_ Pans casseroles etcl Activates the PROSCRUB® spray jets and PrOVides Heaw Duty or Normal
ProScrub With tough food soil. intensified water spray to the back of the lower level rack. .....Wash Cycle ................
L,..,,_,,,,,,,,,,,,,,,,,,,,/ May add heat and time to the cycle.
Tosanitize your dishes and
glassware in accordance
with NSF/ANSI Standard
184 for Residential
Dishwashers•
Raises the water temperature in the final rinse to
approximately 155°F (68°C). This high temperature rinse
sanitizes your dishes and glassware in accordance with
NSF/ANSI Standard 184 for Residential Dishwashers•
Certified residential dishwashers are not intended for
licensed food establishments•
The Sanitize or Sani Rinse option adds heat and time to the
cycle•
Normal Wash cycle•
Heavy Duty cycle
automatically uses Sani
Rinse• Only these
sanitization cycles have
been designed to meet
the NSF/ANSI
requirements•
...................."/ Loads containing tough, increases the target water temperature during the wash Heaw Duty or Normal
Hi-Temp baked-on food. portions of the cycle, Wash CYC!es
_,,,_,_,_,_,_,_,_,_,_,_,_' dds heat, wash time and water to the CYC!el
For best drying results, dry
dishes with heat.
Turn OFF when loads contain plastic dinnerware that may be
sensitive to high temperatures•
This option with the use of rinse aid will provide the best
drying performance•
All cycles, except Rinse
Only. Automatic with all
wash cycles unless you
turn it off.
................... To rUnY0UidishWasher at Delays the start of a CYo!e up to 4 hour& All Cyclesl except Rinse
4H_'ayr a !ate[ t!me 9r dunng select a Washcycle and Options: Press 4 Hour De!ay. Press 0n!Y
...._, peaK nours
............... ! Start/Resume. C!ose the door firmly,
Control Lock Toavoid unintended use of To turn on Lock, press and hold Heat Dry for at least Anytime
your dishwasher, or cycle 4 seconds•
and option changes during
a cycle•
To turn off Lock, press and hold Heat Dry for at least
4 seconds•
When Control Lock is lit, all buttons are disabled• Ifyou press
any pad while your dishwasher is locked, the light flashes
3 times• The dishwasher door can be opened while the
controls are locked•
IMPORTANT: The sensor in your dishwasher monitors the soil level• Cycle time and/or water usage can vary as the sensor adjusts the
cycle for the best wash performance• If the incoming water is less than the recommended temperature or food soils are heavy, the cycle
will automatically compensate by adding time, heat and water as needed•
CONTROL PURPOSE COMMENTS
To start or resume a If the door is opened during a cYcle or the power is interrupted theStartiResume indicator
II wash cyc! e flashesi The cYC!e wi!l not resume unti! the door is closed and Sta_Resume is p!essed:
NOTE: If the Start/Resume button is located onthe top of door push door f rmly closed w thin
3 seconds of pressing Start/Resume.
To cancel wash
cycle
Close the door firmly• The dishwasher starts a 2-minute drain (if needed)• Let the dishwasher
drain completely•
e Washing TOfollow the The Clean indicator glows Whena cYcle is finished.
Drying
progress of your
.. ; . . If you select the Sani Rinse option when the Sani Rinse cycle is finished the Sanitized indicator
_ Clean a snwasner cyc e glows_ If your dishwasher did not properly sanitize your dishes the light flashes at the end of the
Sanitized
cycle, This can happen if the cycle is interrupted, or the water could not be heated to the required

Dishw2s e : ea:h: :res
Your KitchenAid dishwasher may have some or all of these features.
PROSCRUB ®Wash Area
The PROSCRUB ®wash area is located at
the back of the lower level rack.
NOTE: You must select the PROSCRUB ®
wash option to use this feature. Make sure
items do not interfere with the water feed
tube, spray arms, or PROSCRUB ®spray
jets.
• Load pans, casserole dishes, etc. in the
back of the lower dish rack with the
soiled surfaces facing the
PROSCRUB ®spray jets.
• Only one row of items may face the PROSCRUB ®spray jets.
Stacking, overlapping or nesting items will keep the
PROSCRUB ®spray jets from contacting all of the surfaces.
CULINARY CADDY ®Utensil Basket
Use the utensil basket to hold specialty
cooking utensils (serving spoons,
spatulas, and similar items), or overflow
silverware items.
The basket hangs on the bottom rack in
the right-hand corner. Load the basket
while it is on the bottom rack or remove
the basket for loading on a counter or
table.
NOTE: Spin the spray arms. Be sure
items in the basket do not stop the
rotation of the spray arms.
SURE-HOLD ®Small Items Mesh Pouch
This pouch hangs on the front of
the bottom rack. Use it to hold
small items that could otherwise
"fly" around inside the dishwasher
during a cycle.
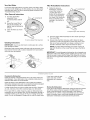
Adjustable 2-Position Mid Level Rack
After removing the culinary tool rack, you can raise or lower the mid
level rack to fit tall items in either the mid level or bottom rack.
Adjusters are located on each side of the mid level rack. Each
adjuster has 2 preset positions. The high and low positions are
marked on the adjuster.
IMPORTANT: If using the culinary tool baskets in the Down
position, the mid level rack must also be in the lowest position.
To raise the rack, press both rack adjusters and lift the rack until it
is in the Up position and level.
To lower the rack,
press both rack
adjusters and slide the
rack back to its lower
position.
NOTE: The mid level
rack must be level.
SURE-HOLD ®Cup and Stemware Holder
Fold down the extra shelf on the left-hand or right-hand side of the
mid level rack to hold additional cups, stemware or long items such
as utensils and spatulas.
NOTE: Remove the culinary tool basket(s) when washing tall
stemware or other tall items in the mid level rack.
FLEXI-FOLD DOWN TM Flexible Tines
The row of tines on the left-hand and
right-hand sides of the mid-level rack \
can be adjusted to make room for a
variety of dishes.
To adjust the fold-down tines:
1. Grasp the tip of the tine that is in
the tine holder.
2. Gently push the tine out of the
holder.
3. Lay the tines down, toward the
center of the rack.
SURE-HOLD ®Light Item Clips
The light item clips hold lightweight plastic items
such as cups, lids, or bowls in place during --._ _-_'_//
washing.
To move a clip:
1. Pull the clip up and off the tine.
2. Reposition the clip on another tine.
Removable Mid Level and Culinary Tool Racks
The removable racks allow you to
wash larger items such as stock
pots, roasters, and cookie sheets
in the lower level rack.
IMPORTANT: Remove dishes
prior to removing the mid level
rack from dishwasher.
To remove the rack:
1. To access track stops, pull the
rack forward until it stops and
clicks into place.
2.
A.Trackstop
B.Track
To open track stops, flip the track stop to the outside of the
track.
3. After opening both track stops, slide front wheels up and out
of the slot in track. Continue to pull rack forward in track and
slide the back wheels up and out of the track.
4. Close track stops.
5. Slide rack tracks back into dishwasher.
B

To replace the rack:
1. Gently pull rack tracks forward in dishwasher until they stop
and click into place.
2. To open track stops, flip the track stop to the outside of the
track.
3. Place the back rack rollers on each side of the rack into the
track slot and roll the rack back into the tracks.
4. Insert front rack rollers on each side of the rack into the rack
slots.
5. Close track stops on both sides of rack and slide rack back
into dishwasher.
Culinary Tool Rack
The culinary tool rack is designed with 2 movable baskets to hold
extra silverware, knives and cooking utensils.
Install the baskets in this up position when you have extra
silverware and flatware to wash.
IMPORTANT: When you are using the culinary tool baskets in the
down position, the mid level rack must also be in the lowest
position.
Downposition
Remove the front basket in the down position, when you are using
the cup shelves or other tall items in the mid level rack for more
room.
Up position
Install the baskets in this down position when you have extra
silverware, knives, or utensils requiring more room to wash.
Your dishwasher has the latest technology in dishwasher filtration. This triple filtration system minimizes sound and optimizes water and
energy conservation while providing superior cleaning performance. Throughout the life of your dishwasher, the filter will require
maintenance to sustain peak cleaning performance.
The triple filter system consists of 2 parts, an upper filter
assembly and a lower filter.
• The upper filter assembly keeps oversized items and
foreign objects, along with very fine food particles, out of
the pump.
• The lower filter keeps food from being recirculated onto
your dishware.
The filters may need to be cleaned when:
• Visible objects or soils are on the Upper Filter Assembly.
• There is degradation in cleaning performance (that is,
soils still present on dishes).
• Dishes feel gritty to the touch.
It is very easy to remove and maintain the filters. The chart
below shows the recommended cleaning frequency.
Locating
Upper Filter
Assembly ..................
Lower Filter
RECOMMENDED TIME INTERVAL TO CLEAN YOUR FILTER
Number of Loads If you wash
Per Week before loading
1-3 Once per year
4-7 Once per year
i
8,12 Once per year Twice per year
13-14 Once per year Twice per year
If you scrape and rinse If you only scrape
before loading before loading*
Once per year Twice per year
Once per year Twice per year
Eve_ three months
Every three months
If you do not scrape or rinse
before loading
Eve_ two months
once per month
Eve_ two Weeks
Once per week
*Manufacturer's recommendation: This practice will conserve the water and energy that you would have used to prepare your dishes. This
will also save you time and effort.

Very Hard Water
Ifyou have hard water (above 15 grains), clean your filter at least
once per month. Building up of white residue on your dishwasher
indicates hard water. For tips on removing spots and stains, see
"Troubleshooting" section.
Filter Removal Instructions
1. Turn the Upper Filter
Assembly 1¼turn
counterclockwise and lift
out.
2. Grasp the Lower Filter in
the circular opening, lift
slightly, and pull forward to
remove.
3. Clean the filters as shown
below.
tab
To remove Upper Filter Assembly
Cleaning Instructions
IMPORTANT: Do not use wire brush, scouring pad, etc. as they
may damage the filters.
Rinse filter under running water until most soils are removed. If you
have hard-to-remove soils or calcium deposits from hard water, a
soft brush may be required.
J
Filter Reinstallation Instructions
1.
Noting the previous
illustrations, place the
Lower Filter under the
Locating Tabs in the
bottom of the dishwasher
so the round opening for
the Upper Filter Assembly
lines up with the round
opening in the bottom of
the tub.
rtab
To replace Upper Filter Assembly
2.
3.
Insert the Upper Filter Assembly into the circular opening in
the Lower Filter.
Slowly rotate the filter clockwise until it drops into place.
Continue to rotate until the filter is locked into place. If the
filter is not fully seated (still turns freely), continue to turn
the filter clockwise until it drops and locks into place.
NOTE: The Upper Filter Assembly arrow does not have to
align with the arrow in the Lower Filter as long as the filter is
locked.
IMPORTANT: To avoid damage to dishwasher, do not operate your
dishwasher without the filters properly installed. Be sure the Lower
Filter is securely in place and the Upper Filter Assembly is locked
into place. If the Upper Filter Assembly turns freely, it is not locked
into place.
Cleaning the Dishwasher
Clean the exterior of the dishwasher with a soft, damp cloth and
mild detergent. Ifyour dishwasher has a stainless steel exterior, a
stainless steel cleaner is recommended.
Clean the interior of the dishwasher, with a paste of powdered
dishwasher detergent and water or use liquid dishwasher detergent
on a damp sponge to clean the cooled-down interior.
A white vinegar rinse may remove white spots and film. Vinegar is
an acid, and using it too often could damage your dishwasher.
Put 2 cups (500 mL) white vinegar in a glass or dishwasher-safe
measuring cup on the bottom rack. Run the dishwasher through a
complete washing cycle using an air-dry or an energy-saving dry
option. Do not use detergent. Vinegar will mix with the wash water.
If you have a drain air gap,
check and clean it if the
dishwasher isn't draining
well.
Storing the Dishwasher
If you will not be using the dishwasher during the summer months,
turn off the water and power supply to the dishwasher. In the
winter, if the dishwasher could be exposed to near freezing
temperatures or is left in aseasonal dwelling such as a second
home or vacation home, avoid water damage by having your
dishwasher winterized by authorized service personnel.

First try the solutions suggested here or visit our website and reference FAQs (Frequently Asked Questions)
to possibly avoid the cost of a service call.
In the U.S.A., www.kitchenaid.com In Canada, www.kitchenaid.ca
Dishwasher does not run • Water remains in the tub/will not drain
If the Start/Resume light is blinking, push Start/Resume and
close the door within 3 seconds.
Be sure the door is closed and latched.
Be sure you have selected a cycle. (See "Cycles and Options
Descriptions.")
Be sure there is power to the dishwasher. A circuit breaker or
fuse may have tripped.
It is normal for the dishwasher to repeatedly pause several
times during a cycle.
If lights other than Start/Resume blink and the unit will not run,
you will need to call for service.
Detergent remains in the dispenser or tablet is on the
bottom of tub
Check for dishwater such as cookie sheets, cutting boards, or
large containers, etc., that may be blocking the detergent
dispenser from opening properly.
Be sure your detergent is fresh and lump free.
Be sure the cycle has completed (green light is on). If it has not
completed, you will need to resume the cycle by pressing Start/
Resume and closing the door within 3 seconds.
Cycles run too long
Try 1 hour wash.
To use less water and reduce energy consumption you will
encounter cycles that typically run for up to 3 hours.
A water heater setting of 120°F (49°C) is best, the dishwasher
will delay longer while heating cooler water.
Options such as; Hi-Temp Scrub and ProScrub _ will add time
to the cycle. Heated Dry adds 1/2hour.
Run the hot water at a faucet close to the dishwasher before
starting the cycle.
Dishwasher not drying
Use of Rinse Aid along with the Heated Dry needed for proper
drying.
Proper loading of items can affect drying. (See specific loading
instructions within this guide.)
Plastic and items with nonstick surfaces are difficult to dry
because they have a porous surface which tends to collect
water droplets. Towel drying may be necessary.
Glasses and cups with concave bottoms hold water. This water
may spill onto other items when unloading.
• Unload the bottom rack first.
• Locate these items on the more slanted side of the rack for
improved results.
Will not fill
Be sure the water is turned on to the dishwasher.
Check that the float is free from obstructions. (See Dishwasher
Features.")
Be sure the cycle has completed (the green light is on). If it has
not, you will need to resume the cycle by pressing Start/
Resume and closing the door within 3 seconds.
If dishwasher is connected to a food waste disposer, be sure
the knockout plug has been removed from the disposer inlet.
Check for kinks inthe drain hose.
Check for food obstructions in the drain or disposer.
Check your house fuse or circuit breaker.
Condensation on the kitchen counter (built-in models)
Is the dishwasher aligned with the countertop?
Moisture from the vent in the dishwasher console can form on
the counter. Refer to the Installation Instructions for more
information.
Hard Water (white residue on the dishwasher interior or
glassware)
Extremely hard water mineral deposits can cause damage to
your dishwasher and make it difficult to achieve good cleaning.
A water softener is strongly recommended if your hardness is
15 grains or more. If a water softener is not installed, the
following steps may help.
• Use a commercial cleaner (such as "Jet Dry Dishwasher
Cleaner") once per month.
Always use a rinse aid.
Always use a high-quality, fresh detergent.
Use a detergent booster (such as "Glass Magic").
Odors
If the dishwasher is not used daily, you can run a rinse cycle
with the partial load daily until a full load is ready to run.
Run a vinegar rinse through the dishwasher by putting 2 cups
of white vinegar in an upright glass measuring cup in the lower
rack. Run a normal cycle with the Heated Dry option turned off.
Do not use detergent.
The dishwasher may not be draining properly, see "Water
remains in the tub/will not drain" in "Troubleshooting."
Noisy
Surging sounds can occur periodically throughout the cycle
while the dishwasher is draining.
Be sure the filters are properly installed.
Normal water vale hissing may be heard periodically.
A thumping sound may be heard if items extend beyond the
racks and interfere with the wash arms. Readjust the dishware
and resume the cycle.
A normal snap sound may be heard when the detergent
dispenser opens during the cycle and when the door is opened
at the end of the cycle.
Proper installation will affect noise levels.

• Food soils remain on dishes
Be sure the dishwasher is loaded correctly. Improper loading
can greatly decrease the washing performance (see
"Dishwasher Use.")
Check filter to ensure it is properly installed. Clean it if needed.
(See "Cleaning Instructions" in "Filtration System" for details.)
Select the proper cycle and options for the type of soils. The
Heavy Duty cycle with the ProScrub ®option can be used for
tougher loads.
Be sure the incoming water temperature is at least 120°F
(49°C).
Use the proper amount of fresh detergent. More detergent is
needed for heavier-soiled loads and hard water conditions.
Scrape food from dishes prior to loading (do not prerinse).
Dishes in the PROSCRUB ®wash are not clean
Are the dishes loaded to face the PROSCRUB ®spray jets?
Load soiled dish surfaces to face the back of the dishwasher
toward the PROSCRUB ®spray jets. Tilt the dishes toward the
back so water can drain from surfaces, and the lower spray
arm can wash the item from below.
NOTE: Loaded items may shift when dish racks are pushed
into the dishwasher. Make sure dishes do not interfere with the
spray arms, water feed true or PROSCRUB ®spray jets.
Are items loaded sos they do not overlap? Load items only on
row deep without any overlap so that the PROSCRUB ®spray
jets can reach all surfaces.
• Did not sanitize
If the sanitized light is blinking, the load is NOT sanitized. The
cycle was interrupted in the final rinse, or your water heater is
set too low. Set your water heater to 120°F (49°C).
Damage to dishware
Improper loading can cause dishes to become chipped or
damaged. (See specific loading instructions within this guide.)
Blinking lights
If the Start/Resume light is blinking, press Start/Resume and
close the door within 3 seconds.
If the Clean light or any other lights are blinking and the
dishwasher will not run, call for service.
If the dishwasher still works and the Clean light blinks, it may
be an indication that something is not working properly. Count
the number of times the light blinks at the end of a cycle and
see below for explanation.
• 1 Blink- Control problem
Call for Service if it continues
• 6 Blinks - Wash motor problems
Call for Service if it continues
• 8 Blinks - Low or no water detected
See "Will Not Fill" in "Troubleshooting" section.
• Cloudy or spotted dishware (and hard water solution)
Liquid rinse aid is necessary for drying and to reduce spotting.
Use the correct amount of detergent.
Confirm that the cloudiness is removable by soaking the item in
white vinegar for 5 minutes. Ifthe cloudiness disappears, it is
due to hard water. Adjust the amount of detergent and rinse
aid. See "Hard Water (white residue on dishwasher interior or
glassware)" in "Troubleshooting." If it does not come clear, it is
due to etching (see below).
Be sure the incoming water temperature is set at 120°F (49°C).
Try using the Hi-Temp Scrub and Sani Rinse options.
To remove spotting, run a vinegar rinse through the dishwasher,
wash and rinse the affected items, load into dishwasher,
remove all silverware and metal items, put 2 cups of white
vinegar in a glass measuring cup in the lower rack. Run a
normal cycle with the Heated Dry option turn off. No detergent
is needed.
• Etching (permanent cloudiness)
This is an erosion of the surface of the glassware and can be
caused by a combination of: water that is too hot, from using
too much detergent with soft water for by prewashing.
Detergent needs food soil to act upon. If etching has occurred,
the glassware is permanently damaged. To avoid further
etching, adjust the detergent amount to match the water
hardness, stop pre-washing, and use water heating options
only when incoming water temperature is below 120°F (49°C).
Leaking water
Be sure dishwasher has been installed properly and is level.
Suds can cause the dishwasher to overflow. Measure the
detergent accurately and use only detergents designed for use
in a dishwasher. Less detergent is needed in soft water. Try
another brand of detergent if sudsing continues.
To avoid rinse aid leaking from the dispenser, be sure the lid is
securely attached and avoid overfilling.
• Tub is discolored
Tomato-based foods can discolor the tub or dishware.
• A citrus-based cleaner can be used to clean.
High iron content in the water can discolor the tub.
10

KITCHENAID ®DISHWASHER WARRANTY
LIMITED WARRANTY
For one year from the date of purchase, when this major appliance is operated and maintained according to instructions attached to or
furnished with the product, KitchenAid brand of Whirlpool Corporation or Whirlpool Canada LP (hereafter "KitchenAid") will pay for factory
specified parts and repair labor to correct defects in materials or workmanship that existed when this major appliance was purchased.
Service must be provided by a KitchenAid designated service company. YOUR SOLE AND EXCLUSIVE REMEDY UNDER THIS LIMITED
WARRANTY SHALL BE PRODUCT REPAIR AS PROVIDED HEREIN. This limited warranty is valid only in the United States or Canada and
applies only when the major appliance is used in the country in which it was purchased. Proof of original purchase date is required to
obtain service under this limited warranty.
SECOND THROUGH FIFTH YEAR LIMITED WARRANTY ON CERTAIN COMPONENT PARTS
In the second through the fifth year from the date of purchase, when this major appliance is operated and maintained according to
instructions attached to or furnished with the product, KitchenAid will pay for factory specified parts for the following components to
correct defects in materials or workmanship that existed when this major appliance was purchased: nylon dish racks and electronic
controls.
LIFETIME LIMITED WARRANTY ON STAINLESS STEEL TUB AND INNER DOOR LINER
For the lifetime of the product from the date of purchase, when this major appliance is installed, operated and maintained according to
instructions attached to or furnished with the product, KitchenAid will pay for factory specified parts and repair labor for the following
components to correct defects in materials or workmanship that existed when this major appliance was purchased: stainless steel tub
and inner door liner.
ITEMS EXCLUDED FROM WARRANTY
This limited warranty does not cover:
1. Replacement parts or repair labor if this major appliance is used for other than normal, single-family household use or when it is used
in a manner that is inconsistent to published user or operator instructions and/or installation instructions.
2. Service calls to correct the installation of your major appliance, to instruct you on how to use your major appliance, to replace or repair
house fuses, or to correct house wiring or plumbing.
3. Service calls to repair or replace appliance light bulbs, air filters or water filters. Consumable parts are excluded from warranty
coverage.
4. Damage resulting from accident, alteration, misuse, abuse, fire, flood, acts of God, improper installation, installation not in accordance
with electrical or plumbing codes, or use of products not approved by KitchenAid.
5. Cosmetic damage, including scratches, dents, chips or other damage to the finish of your major appliance, unless such damage
results from defects in materials or workmanship and is reported to KitchenAid within 30 days from the date of purchase.
6. Any food or medicine loss due to refrigerator or freezer product failures.
7. Pickup and delivery. This major appliance is intended to be repaired in your home.
8. Repairs to parts or systems resulting from unauthorized modifications made to the appliance.
9. Expenses for travel and transportation for product service if your major appliance is located in a remote area where service by an
authorized KitchenAid servicer is not available.
10. The removal and reinstallation of your major appliance if it is installed in an inaccessible location or is not installed in accordance with
KitchenAid's published installation instructions.
11. Replacement parts or repair labor on major appliances with original model/serial numbers that have been removed, altered or cannot
be easily determined.
DISCLAIMER OF IMPLIED WARRANTIES
IMPLIED WARRANTIES, INCLUDING ANY IMPLIED WARRANTY OF MERCHANTABILITY OR IMPLIED WARRANTY OF FITNESS FOR A
PARTICULAR PURPOSE, ARE LIMITED TO ONE YEAR OR THE SHORTEST PERIOD ALLOWED BY LAW. Some states and provinces do
not allow limitations on the duration of implied warranties of merchantability or fitness, so this limitation may not apply to you. This
warranty gives you specific legal rights, and you also may have other rights that vary from state to state or province to province.
LIMITATION OF REMEDIES; EXCLUSION OF INCIDENTAL AND CONSEQUENTIAL DAMAGES
YOUR SOLE AND EXCLUSIVE REMEDY UNDER THIS LIMITED WARRANTY SHALL BE PRODUCT REPAIR AS PROVIDED HEREIN.
KITCHENAID SHALL NOT BE LIABLE FOR INCIDENTAL OR CONSEQUENTIAL DAMAGES. Some states and provinces do not allow the
exclusion or limitation of incidental or consequential damages, so these limitations and exclusion may not apply to you. This warranty
gives you specific legal rights, and you also may have other rights that vary from state to state or province to province.
If outside the 50 United States and Canada, contact your authorized KitchenAid dealer to determine if another warranty applies. 2/10
11

For additional product information or to view FAQs (Frequently Asked Questions), in U.S.A. visit: www.kitchenaid.com
In Canada visit: www.kitchenaid.ca
Ifyou do not have access to the Internet and you need assistance using your product or you would like to schedule service, you may
contact KitchenAid at the number below.
Have your complete model number ready. You can find your model and serial number on the label located near the door on the right-hand
or left-hand side of the dishwasher interior.
For assistance or service in the U.S.A., call 1-800-422-1230. In Canada, call 1-800-807-6777.
Ifyou need further assistance, you can write to KitchenAid with any questions or concerns at the address below:
In the U.S.A.: In Canada:
KitchenAid Brand Home Appliances
Customer eXperience Center
553 Benson Road
Benton Harbor, MI 49022-2692
KitchenAid Brand Home Appliances
Customer eXperience Centre
200--6750 Century Avenue
Mississauga, Ontario L5N 0B7
Please include a daytime phone number in your correspondence.
Please keep this User Instructions and model number information for future reference.
W10300235A
SP PN W10300236A
© 2010. All rights reserved. ® Registered TrademarkFrM Trademark of KitchenAid, U.S.A., KitchenAid Canada licensee in Canada
3/10
Printed in U.S.A.

Nous vous remercions d'avoir choisi les appareils KitchenAid ®.
Notre compagnie entretient les normes de qualite les plus elev6es et il est important que vous soyez satisfait de posseder un produit
KitchenAid®.
Pour votre commodite, vous trouverez un Manuel d'instructions d'utilisation facile a suivre. Ces instructions incluent une section
"Depannage" pour vous aider a resoudre les problemes que vous pouvez rencontrer.
Pour des informations supplementaires, visitez la section Foire aux questions (FAQ)de notre site Web www.kitchenaid.com. Si
vous avez besoin de plus d'assistance au sujet de I'utilisation de votre lave-vaisselle KitchenAid, veuillez nous tel6phoner au
1-800-422-1230. Au Canada, visitez notre site Web www.kitchenaid.ca ou tel6phonez au 1-800-807-6777.
Preparez vos numeros de modele et de s@ieau complet. Vous trouverez vos num@os de modele et de s@iesur I'etiquette situee
pres de la porte sur le c6te droit ou gauche, a I'int@ieur du lave-vaisselle.
Table des mati res
SleCURITle DU LAVE-VAISSELLE ............................................. 1
EFAPES RAPIDES ...................................................................... 3
UTILISATION DU LAVE-VAISSELLE ........................................ 3
DESCRIPTION DES PROGRAMMES ET DES OPTIONS ....... 4
CARACTleRISTIQUES DU LAVE-VAISSELLE .......................... 6
SYSTi=ME DE FILTRATION ....................................................... 8
ENTRETIEN DU LAVE-VAISSELLE .......................................... 9
DlePANNAGE .............................................................................. 9
GARANTIE ................................................................................ 11
Votre securite et celle des autres est tres importante.
Nous donnons de nombreux messages de s_curit_ importants dans ce manuel et sur votre appareil m_nager. Assurez-vous de
toujours lire tousles messages de s_curit_ et de vous y conformer.
Voici le symbole d'alerte de s_curit_.
Ce symbole d'alerte de s_curit_ vous signale les dangers potentiels de d_c_s et de blessures graves a vous
eta d'autres.
Tousles messages de s_curit_ suivront le symbole d'alerte de s_curit_ et le mot "DANGER" ou
"AVERTISSEMENT". Ces mots signifient •
Risque possible de d_ces ou de blessure grave si vous ne
suivez pas imm_diatement les instructions.
Risque possible de d_ces ou de blessure grave si vous
ne suivez pas les instructions.
Tousles messages de s_curit_ vous diront quel est le danger potentiel et vous disent comment r_duire le risque de blessure et
ce qui peut se produire en cas de non-respect des instructions.
W10300235A

IMPORTANTES INSTRUCTIONS DE SI_CURITI_
AVERTISSEMENT : Lors de I'utilisation du lave-vaisselle, suivre les precautions el6mentaires dont les suivantes :
[] Lire la totalite des instructions avant d'utiliser le
lave-vaisselle.
[] N'utiliser le lave-vaisselle que pour laver la vaisselle.
[] Utiliser uniquement les detersifs ou agents de rin(;age
recommandes pour lave-vaisselle et les garder hors de la
portee des enfants.
[] Lorsque vous chargez le lave-vaisselle :
1) Placer les objets coupants de fa(;on qu'ils ne puissent
endommager le joint de la porte; et
2) Placer les couteaux le manche vers le haut de fa(;on &ne
pas vous couper.
[] Ne pas laver d'articles en plastique & moins qu'ils ne soient
marques "Peut aller au lave-vaisselle" ou I'equivalent. Si
I'article ne porte aucune indication, verifier aupres du
fabricant.
[] Ne pas toucher I'el6ment chauffant pendant le
fonctionnement ou immediatement apr_s.
[] Ne pas faire fonctionner le lave-vaisselle si tous les
panneaux de I'enceinte ne sont pas en place.
[] Ne pas jouer avec les commandes.
[] Ne pas abuser, vous asseoir ni monter sur la porte,
le couvercle ou les paniers du lave-vaisselle.
[] Pour eviter tout risque d'accident, ne pas laisser les
enfants jouer dans ou sur le lave-vaisselle.
[] Sous certaines conditions, de I'hydrogene peut se former
dans un reseau d'eau chaude inutilise depuis deux
semaines ou plus. L'HYDROG#NE EST UN GAZ
EXPLOSIBLE. Si le systeme d'eau chaude n'a pas et6
utilise depuis un certain temps, laisser couler I'eau chaude
des robinets pendant quelques minutes avant de faire
fonctionner le lave-vaisselle. Cette mesure permettra &
I'hydrogene de s'evaporer. Ce gaz etant inflammable, ne
pas fumer ni utiliser de flamme nue pendant cette periode.
[] Enlever la porte ou le couvercle du compartiment de lavage
Iorsque vous remplacez ou mettez au rebut un vieux
lave-vaisselle.
CONSERVEZ CES INSTRUCTIONS
INSTRUCTIONS DE MISE A LA TERRE
Pour un lave-vaisselle reli6 & la terre, branch6 avec un
cordon :
Le lave-vaisselle doit etre relie& la terre. En cas d'un
mauvais fonctionnement ou d'une panne, la raise & terre
reduira le risque d'un choc electrique en fournissant le moins
de resistance pour le courant electrique. Le lave-vaisselle est
equipe d'un cordon avec un conducteur pour relier les
appareils &la terre et d'une fiche de raise &la terre. La fiche
doit etre branchee sur une prise appropriee, installee et reliee
& la terre conformement aux codes et reglements Iocaux.
AVERTiSSEMENT : La connexion incorrecte du
conducteur pour relier les appareils & la terre peut causer le
risque de choc electrique. Verifier avec un electricien
competent ou un representant de service si vous avez
des doutes si le lave-vaisselle est correctement relie& la
terre. Ne pas modifier la fiche fournie avec le lave-
vaisselle; si elle n'entre pas dans la prise, faire installer
une prise appropriee par un electricien competent.
Pour un lave=vaisselle branch_ en permanence :
Le lave-vaisselle doit etre branche & un systeme
d'installation electrique permanent en metal relie & la
terre, ou un conducteur pour relier les appareils & la terre
doit etre relie avec les conducteurs du circuit et branche
&une borne pour relier les appareils & la terre ou au
cordon d'alimentation electrique avec le lave-vaisselle.
CONSERVEZ CES INSTRUCTIONS
Risque de basculement
Ne pas utiliser le lave=vaisselle jusqu'a ce qu'il soit compl_tement installS.
Ne pas appuyer sur la porte ouverte.
Le non=respect de ces instructions peut causer des blessures graves ou des coupures.

Preparer et
charger le
lave-vaisselle.
S_ ° /
[_120_S ¸"2_"__'__
3 S_lectionner un
programme et une option.
Ajouter le
d_tergent pour le
nettoyage et de
I'agent de rin(;age
pour le s_chage.
ff
Mettre le lave-vaisselle en marche.
REMARQUE : Si le bouton Start/Resume
(mise en marche/reprise) se trouve au
sommet de la porte, bien fermer la porte
dans les 3 secondes qui suivent I'appui sur
la touche Start/Resume.
_I IAIiV!°_'kl I! @II@
Preparer et charger le lave-vaisselle
IMPORTANT : Enlever de la vaisselle les restes alimentaires, os,
cure-dents et autres articles durs. Enlever les etiquettes des
recipients avant de les mettre a laver.
Panier sup_rieur
l',_tt._'.i;_l_'_..........
'iii'II,II'f ;,'I'Ii
Panier inf_rieur
S'assurer que rien n'emp_che les bras
d'aspersion de tourner librement. II est
important que le jet d'eau atteigne toutes les
surfaces sales.
Verifier que Iorsque la porte du lave-vaisselle est fermee, aucun
article ne bloque le distributeur de detergent.
Charger dans le panier les articles en orientant la surface sale
vers I'interieur, vers le bras d'aspersion - voir I'illustration. Ceci
optimisera I'efficacite de nettoyage et de sechage.
€:viter le chevauchement d'articles retenant les aliments,
comme des bols ou assiettes.
Placer les articles de plastique, les petites assiettes et les
verres dans le panier superieur. Ne laver des articles de
plastique au lave-vaisselle que s'ils sont identifies comme
"lavable au lave-vaisselle".
Pour eviter les bruits de choc et d'entrechoc durant le
fonctionnement, charger la vaisselle de fagon & ce que les
articles ne se touchent pas les uns les autres. S'assurer que les
articles legers sont bien retenus dans les paniers.
Lors du chargement des couverts, toujours
charger les articles aceres pointes vers le bas
et eviter d'"imbriquer" les articles (voir
I'illustration).
ETAPE 2
Ajouter le d_tergent
REMARQUE : Si vous n'avez pas I'intention d'effectuer un
programme de lavage dans I'immediat, executer un programme de
rin£;age. Ne pas utiliser de detergent.
• Utiliser uniquement du detergent pour lave-vaisselle
automatique. Verser le detergent en poudre, liquide ou en
pastille, juste avant de demarrer un programme.
• Pour I'obtention de A
meilleurs resultats, un
detergent & lave-
vaisselle automatique B
frais est meilleur. C
Conserver le recipient
du detergent bien
ferme dans un lieu sec
et frais.
A. Loquet du couvercle
B. Section de lavage pricipal
C. Section de pr_lavage
La quantite de detergent &utiliser depend :
Du degre de salete de la vaisselle - Les charges tr_s sales
necessitent plus de detergent.
De la durete de I'eau - Si on utilise trop peu de detergent dans
une eau dure, la vaisselle ne sera pas parfaitement lavee. Si on
utilise trop de detergent dans une eau douce, la solution
attaquera les articles en verre.
Eau douce & moyenne (0 &6 grains par gallon US) [eau
venant d'adoucisseur d'eau general et eau du service
d'eau de la ville]
Eau moyenne & dure (7 & 12 grains par gallon US) [eau de
puits et, dans certains cas, du service d'eau de la ville]

• SelonladuretedeI'eau,remplirlasectiondelavageprincipal
dudistributeur,voirillustration.Remplirlasectiondeprelavage
jusqu'auniveauindiqu6,sinecessaire.
REMARQUE : Les quantit6s _ HardWater J )
indiqu6es correspondent & S0ttWater HardWater
I'emploi d'un detergent en
poudre standard. Lors de
I'utilisation d'un autre Lavageprincipa( Pr_lavage
detergent, proceder conformement aux instructions indiqu6es sur
I'emballage.
Verser I'agent de rin(_age
Votre lave-vaisselle est congu pour utiliser un agent de rincage
pour un sechage satisfaisant. Sans agent de rincage, la
vaisselle et I'interieur du lave-vaisselle seront extr_mement
humides. L'option sechage avec chaleur ne pourra pas
s'effectuer aussi bien sans agent de rin(_age.
• Les agents de ringage emp_chent I'eau de former des _ Full
gouttelettes qui peuvent secher en laissant des taches
g
ou coulees. IIs ameliorent egalement le sechage en
permettant & I'eau de s'ecouler de la vaisselle Iors du
sechage final.
• Les agents de rin(_age aident & reduire I'exces Add
d'humidite sur les paniers a vaisselle et & I'interieur du
lave-vaisselle.
Verifier I'indicateur de I'agent de rincage. Verser I'agent de
rincage quand I'indicateur atteint le niveau marque "Add"
(ajouter).
Pour ajouter I'agent de ringage, tourner
le bouton du distributeur & "Refill"
(remplir) et soulever. Verser I'agent de
rin(_agedans I'ouverture jusqu'& ce
que I'indicateur soit sur "Full" (plein).
Remettre le bouton du distributeur et le
tourner a "Lock" (verrouille). S'assurer
que le bouton est bien verrouill&
REMARQUE : Pour une majorite de
types d'eau, le reglage effectue &I'usine
& 2 donnera de bons resultats. En cas
d'eau dure ou d'observation d'anneaux
ou dep6ts, essayer un reglage plus
eleve. Tourner I'ajusteur &fleche &
I'interieur du distributeur soit & la main,
soit en inserant un tournevis a lame
plate au centre de la fleche et en
tournant.
Lock
Refill__
_ tourpour verrouiller
ETAPE 3
S_lectionner un programme (les programmes varient
selon les modules)
Voir les tableaux "Description des programmes et des options"
dans la section qui suit.
Les programmes plus intenses et les options modifient la duree du
programme. Certains programmes et options prendront jusqu'&
3 h 30 pour se terminer.
S_lectionner les options (les options varient selon les
modules)
Voir les tableaux "Description des programmes et des options"
dans la section qui suit.
On peut personnaliser les programmes en appuyant sur les options
desirees.
ETAPE 4
Commencer ou reprendre un programme
• Laisser I'eau couler du robinet le plus pres du lave-vaisselle
jusqu'& ce qu'elle soit chaude. Fermer le robinet.
• Bien fermer la porte. Le verrou de la porte s'engage
automatiquement. Choisir le programme et les options
de lavage desires OU appuyer sur Start/Resume (mise
en marche/reinitialisation) pour reprendre les m_mes
programme et options que dans le programme precedent.
• On peut ajouter un article & n'importe quel moment avant le
debut du lavage principal. Ouvrir doucement la porte et ajouter
I'article. Bien fermer la porte. Appuyer sur Start/Resume.
.... R ...... _ 0 " : ........
• Washing
• Drying
• Clean
• Sanitized
Ces informations couvrent plusieurs modeles differents. Votre lave-vaisselle peut ne pas comporter tous les programmes et options
decrits.
PRO- TYPES DE CHARGE DE DESCRIPTIONS
GRAMMES VAISSELLE
DURI_E DE LAVAGE (HH:MM)
Pro- Programme + *Maximum
gramme options
minimum minimum
Utiliser ce programme pour Lors du lavage, I'action de lavage fera 1:55 2:25 3:23
les cassero!es, p0_les et !a des pauses r6p6t6es pendant que!ques
vaisselle ordinaire difficiles & secondes.
nettoyer et tres sales,

PRO-
GRAMMES
TYPES DE CHARGE DE
VAISSELLE
DESCRIPTIONS DURI_E DE LAVAGE (HH:MM)
Pro- Programme + *Maximum
gramme options
minimum minimum
Utiliser ce programme pour
des charges comportant des
quantites normales de debris
alimentaires.
L'etiquette de consommation d'energie
est basee sur ce programme• Lors du
lavage, I'action de lavage fera des pauses
rep6t6es pendant quelques secondes.
1:25 1:50 3:13
• Ut hserce programme pour Lors du lavage I action de lavage fera 1 20 1:50 3:18
Light/ les articles 16gerement sales des pauses r6pet6es pendant quelques
..chj_%.._ en porce!aine et en cristal, secondes,
Lorsqu'on souhaite obtenir
des resultats plus
rapidement, I'option Lavage
en 1 heure consomme
legerement plus d'eau et
d'energie.
Ce programme ne seche pas. Pour le
sechage ameliore, choisissez I'option
seche de chauffage, ajoutant I'heure de
1/2 au cycle de lavage.
0:58 0:88 0:58
....................,_ Utiliser ce piogramme pour Ce programme ne seche pasl 0:!5 aucUne aucune
--Rinse rincer la vaisse!le, les verres Ne pas ut ser de detergent
[ on!yw..j et I argenterie qui ne seront
pas lav6s imm6diatement.
On peut personnaliser le programme en selectionnant une option•
Voir la selection d'options. Si vous changez d'avis, appuyez sur cette option &nouveau pour la desactiver, ou selectionnez une option
differente. Vous pouvez changer une option & tout moment avant que I'option choisie ne commence•
*Les durees minimales de lavage dependent de la temperature de I'eau, de la salete, de la taille de la charge de vaisselle et des options
selectionnees.
OPTIONS TYPES DE CHARGE DE DESCRIPTIONS
VAISSELLE
A UTILISER AVEC :
_Q......................"'/ Casseroles marmites etc, Active les jets PROSCRUB® et declenche une aspersion Programme Heavy Duty
ProScrub comportant des SOU!lures intensifi6e & 'a[ri_re du panier inf6rieur. (se_ice intense) ou
J tenaces. Peut ajouter de achaeuret accroitre adur6edu Norma Wash (avage
programme, norma!),
Pour assainir la vaisselle et
la verrerie conformement &
la norme 184 NSF/ANSI
pour les lave-vaisselle
residentiels.
Augmente la temperature de I'eau du rin(;age final & environ
155°F (68°C). Ce rin£;age & haute temperature assainit la
vaisselle et la verrerie conformement & la norme 184 NSF
pour les lave-vaisselle residentiels. Les lave-vaisselle
residentiels certifies ne sont pas destines aux
etablissements alimentaires autorises.
L'option Sanitize ou Sani Rinse augmente la chaleur et la
duree du programme•
Programme Normal
Wash (lavage normal)•
Le programme Heavy
Duty (service intense)
utilise automatiquement
Sani Rinse• Seuls ces
programmes
d'assainissement ont
ete con£:us pour
repondre aux exigences
de la norme NSF/ANSI.
................. charge avec a! ments cu ts Augmente a temp6ratuie c b ede ,eau !ors des phases de Programme HeaVYDuty
Hi-Temp adherant & la vaisse!lel lavage du programmel (sewice intense) ou
Scrub ,s , Normal Wash (lavage
k......_............ AjoUte de a chaleur, du temps de lavage et de I eau au L
programmel _o[ma!!!
Sechage avec chaleur
pourles meilleursresultats
de sechage.
ARRE_TERle lave-vaisselle quand la charge contient de la
vaisselle en plastique qui peut _tre sensible a des
temperatures elevees.
Cette option avec I'utilisation d'un agent de rin£;age fournira
le meilleur rendement de sechage.
Tousles programmes,
sauf Rinse Only.
Automatique avec tous
les programmes de
lavage & moins de
I'eteindre.
_v'...................."_ Pour mettre en marche le Differe la mise en marche d'un programme jusqu'& 4 heures. Tousles programmes
4 Hour /i - "
lave valsselle plus tard ou sauf Rinse Only
Delay en dehors des heures de Choisir un programme de lavage et !es optionsl AppUyer sur .......................... ..............
_,...................... : 4 Hour Delay. Appuyer sur Start/Resume. Bien fermer la
porte:

OPTIONS TYPES DE CHARGE DE DESCRIPTIONS A UTILISER AVEC :
VAISSELLE
Verrouillage
des
commandes
Pour eviter I'utilisation
involontaire du lave-
vaisselle ou le changement
de programme ou d'option
durant un programme•
Pour verrouiller, appuyer sur Heat Dry pendant 4 secondes
au moins.
A tout moment•
Pour deverrouiller, appuyer sur Heat Dry pendant
4 secondes au moins.
Lorsque Control Lock est allume, tousles boutons sont
desactives. Lorsqu'on appuie sur une touche alors que les
commandes du lave-vaisselle sont verrouillees, I'indicateur
lumineux clignote 3 fois. On peut ouvrir la porte du lave-
vaisselle Iorsque les commandes sont verrouillees.
IMPORTANT : Le capteur incorpore au lave-vaisselle contrele le degre de salet& La duree du programme et/ou la consommation d'eau
peuvent verier etant donne que le capteur rajuste le programme pour assurer des performances de lavage optimales. Si la temperature de
I'eau d'arrivee est inferieure & celle recommandee ou que lavaisselle est tr_s sale, le programme compensera automatiquement en
allongeant la duree du programme et en augmentant la quantite d'eau et le chauffage, au besoin.
COMMAN USAGE COMMENTAIRES
DE
Pour commencer ou Si la porte est ouverte durant un programme ou en cas d'interruption de I'alimentation 61ectriquel
reprendre un I'indicateur Start/Resume clignote. Le programme ne reprendera pas tent que la porte ne sere
programme de pas fermee et qu,on n'aura pas appuy6 sur Start/Resume.
!avage REMARQUE : Si ieboUtonStart/Resume (mise en marche/reprise)se troupe au sommet dela
porte, bien fermer la porte dens !es 3 secondes qui suivent !'appui sur !a touche Start/Resume,
Pour annuler un
programme de
lavage
Bien fermer la porte• Le lave-vaisselle commence une vidange de 2 minutes (au besoin). Laisser
le lave-vaisselle evacuer I'eau completement.
• • i i • • i • . i i ii ii
O Washng Pour sulwe la L indJcateur Clean (propre) s allume Iorsqu un programme est termJne.
Drying progression du; Si 'option Sani RinSe (rin£:age sanitaire) est selectionnee i'indicateur sanitized (assain) s'allume
sC_e_t_zedPar°gral_eme au !ave- iorsque !e programme Sani Rinse est termin& Uindicateur c!ignote &la findu programme Iorsque
le !ave-vaisse!!e n apas bien assaini la vaisse!le,comme par exemp!e Iorsqu on a interrompu le
programme ou clue I'eau n,a pas pu 6tre chauffee & la temperature necessaire. Le temoin s'eteint
Iorsqu'on ouvre et ferme la porte ou appuie sur CANCEL (annuler).
Votre lave-vaisselle KitchenAid peut comporter toutes les caract_ristiques suivantes ou seulement certaines d'entre elles.
Zone de lavage PROSCRUB ®
La zone de lavage PROSCRUB ®est situee
I'arriere du panier inferieur.
REMARQUE : Selectionner I'option de
lavage PROSCRUB ®pour utiliser cette
fonction. Verifier que les articles
n'interferent pas avec le tube d'alimentation
d'eau, les bras d'aspersion ou les jets
d'aspersion PROSCRUB ®.
• Charger les po_les et casseroles en les
orientant la surface sale vers les jets
PROSCRUB ®a I'arriere du panier inferieur.
Une seule rangee d'articles & la fois peut _tre orientee vers les
jets PROSCRUB ®.Empiler, faire se chevaucher ou imbriquer les
articles emp_chera les jets PROSCRUB ®d'atteindre toutes les
surfaces•
Panier & ustensiles CULINARY CADDY ®
Utiliser le panier & ustensiles pour
maintenir les ustensiles de cuisines
(grandes cuilleres, spatules et articles
similaires), ou y charger les couverts.
Le panier &ustensiles est suspendu
dens le panier inferieur sur le cete droit.
Charger le panier alors qu'il est sur le
panier inferieur ou le retirer pour le
charger sur un comptoir ou sur une
table•
REMARQUE : Faire tournoyer le bras d'aspersion. S'assurer que
les articles dens le panier n'entravent pas la rotation du bras
d'aspersion.

Filet SURE-HOLD ®pour petits articles
Ce filet est place & I'avant du _i_==l_=_=i_i
panier inferieur.Utiliser lefilet pour i
les petits articles qui, autrement, I
risqueraient de "voler" a I'interieur
du lave-vaisselle durant un
programme.
Panier interm_diaire r_glable & 2 positions
Retirer le panier pour ustensiles de cuisson, vous pouvez alors
lever ou baisser le panier intermediaire pour mettre de grands
articles dans le panier intermediaire ou inferieur. Les regleurs sont
situes de chaque c6te du panier intermediaire. Chaque reglage
comporte 2 positions prer6gl6es. Les positions hautes et basses
sont indiqu6es sur le reglage.
r
i
IMPORTANT : Lors de I'utilisation des paniers pour ustensiles de
cuisson en position basse, le panier de niveau intermediaire doit lui
aussi etre place dans la position la plus basse.
Pour soulever le panier, appuyer sur les deux regleurs du panier et
soulever le panier jusqu'& ce qu'il soit en position haute et
d'aplomb.
Pour abaisser le
panier, appuyer sur les
deux regleurs du
panier et glisser le
panier &sa position la
plus basse.
L i 'i _j[i_i_Aiii
i . ;8
l
REMARQUE • Le
panier intermediaire
doit etre d'aplomb.
Support de tasses et de verres & pied SURE-HOLD ®
Rabattre la tablette d'appoint du c6te gauche ou droit du panier
intermediaire pour y placer des tasses, verres a pied ou articles
longs tels que les ustensiles et spatules.
REMARQUE • Retirer le(s) panier(s) pour ustensiles de cuisson Iors
du lavage de grands verres &pied ou d'autres grands articles dans
le panier intermediaire.
Tiges flexibles FLEXI-FOLD DOWN TM
La rangee de tiges sur les c6tes
gauche et & droite du panier
intermediaire peut etre reglee pour
faire de la place pour divers articles
de vaisselle.
Pour ajuster les tiges rabattables :
1. Saisir la pointe de la tige qui se
trouve dans le support de la tige.
2. Pousser doucement la tige
I'exterieur du support de la tige.
3. Rabattre les tiges vers le centre
du panier.
Attaches pour articles I_gers SURE-HOLD ®
Les attaches maintiennent les articles legers en
plastique tels que les tasses, couvercles ou bols en
place pendant le lavage.
Pour d_placer une attache :
1. Tirer I'attache vers le haut pour la separer de la
tige.
2. Reinstaller I'attache sur une autre tige.
Panier amovible interm_diaire et panier amovible pour
ustensiles de cuisson
Les paniers amovibles permettent A
de laver des articles de plus
grande taille tels que marmites,
r6tissoires et t61es& biscuits dans
le panier de niveau inferieur.
IMPORTANT : Oter la vaisselle B
avant de retirer le panier de niveau
intermediaire du lave-vaisselle.
A.Butte d'arr#t
Pour enlever le panier: B.Glissiere
1. Pour acceder aux butees
d'arret, tirer le panier vers
I'avant jusqu'& I'arret et jusqu'& ce qu'il s'enclenche en place.
2. Pour ouvrir les butees d'arret, relever la butee d'arret vers
I'exterieur de la glissiere.
3. Apr_s ouverture des deux butees d'arret, faire glisser les roues
avant vers le haut pour les sortir de la fente dans la glissiere.
Continuer & tirer le panier vers I'avant et faire glisser les roues
arriere vers le haut pour les sortir de la glissiere.
4. Fermer les butees d'arret.
5. Faire glisser les butees de panier pour les reinstaller dans le
lave-vaisselle.
Pour r_installer le panier
1. Tirer doucement les butees du panier vers I'avant dans le lave-
vaisselle jusqu'& I'arret et jusqu'& ce qu'elles s'enclenchent en
place.
2. Pour ouvrir les butees d'arret, relever la butee d'arret vers
I'exterieur de la glissiere.
3. Placer les roulettes arriere du panier de chaque c6te du panier
dans la fente de la glissiere et faire rouler le panier pour le
reinstaller dans les glissieres.
4. Inserer les roulettes avant du panier de chaque c6te du panier
dans les fentes du panier.
5. Fermer les butees d'arret des deux c6tes du panier et faire
glisser le panier pour le reinstaller dans le lave-vaisselle.
Panier pour ustensiles de cuisson
Le panier pour ustensiles de cuisson est con(_u avec 2 paniers
amovibles pour contenir les couverts, couteaux et ustensiles de
cuisson supplementaires.
Installer les paniers en position elevee en cas de couverts ou de
vaisselle plate supplementaires & laver.
Position _lev_e
Installer les paniers en position basse en cas de couverts,
couteaux ou ustensiles supplementaires necessitant plus d'espace
pour le lavage.

IMPORTANT:LorsdeI'utilisationdespanierspourustensilesde
cuissonenpositionbasse,lepanierdeniveauintermediairedoit
aussietre&lapositionlaplusbasse.
Lorsqu'onutiliselestablettespourtassesoud'autresarticlesde
grandetailledanslepanierintermediaire,retirerlepanieravanten
positionbassepourplusd'espace.
Position basse
Ce lave-vaisselle comporte la technologie la plus recente en matiere de filtration. Le systeme &triple filtration minlmise le bruit et optimise
la consommation d'eau et d'energie, tout en fournissant une performance de nettoyage superieure. Durant toute la vie du lave-vaisselle le
filtre necessitera I'entretien approprie pour le maintien de la performance de nettoyage optimale.
Le systeme & triple filtration comprend deux parties : le filtre
superieur et le filtre inferieur.
• Le filtre superieur retient les debris alimentaires et objets
etrangers de grande taille ainsi que les particules
alimentaires tr_s fines, et les empeche d'atteindre la
pompe.
• Le filtre inferieur retient les debris alimentaires et les
empeche de circuler avec I'eau du lave-vaisselle.
II peut etre necessaire de nettoyer les filtres a certaines
occasions :
• Presence d'objets et souillures dans le filtre superieur.
• Degradation de la performance de lavage (presence de
residus et souillures sur la vaisselle).
• Perception de rugosite au toucher sur les surfaces de la
vaisselle.
II est tres facile de retirer et d'entretenir les filtres. Le tableau
ci-dessous indique la frequence de nettoyage recommandee
pour les filtres.
Fittre
sup6rieur .........
Pattes de
positionnement
....
;i
Fittre inf6rieur
INTERVALLES DE NETTOYAGE
Nombre
d'utilisations par
semaine
1-3
4-7
I
8-12 Une fois paran
13-14 Une fois par an
Vaisselle lav_e avant le Vaisselle racine et Vaisselle seulement racl6e Vaisselle ni racl6e ni rinc_e
chargement rinc_e avant le avant le chargement* avant le chargement
chargement
I
Une fois par an Une fois par an Deux fois par an Tousles deUx mois
Une fois par an Une fois par an Deux fois par an Une fois par mois
Deux fois paran Tousies trois mois
ToUtes les deux semaines
Deux fois par an Tousles trois mois Une fois par semaine
*Recommandation du fabricant •Cette pratique eliminera la
consommation d'eau et d'energie associee &la preparation de la
vaisselle et vous epargnera du temps et des efforts.
Eau tr_s dure
Si I'eau distribuee dans la region est tr_s dure (concentration de
calcaire superieure & 15 grains), nettoyer le filtre au moins une fois
par mois. La formation d'un residu blanc sur les surfaces du lave-
vaisselle indique la durete de I'eau. On trouve & la section
"Depannage" des conseils sur I'elimination des taches.
D_pose du filtre
1. Faire tourner le filtre
superieur de _¼tour dans le
sens antihoraire; soulever
le filtre.
2. Saisir le filtre inferieur dans -
I'ouverture circulaire,
soulever legerement et tirer
vers I'avant.
3. Nettoyer les filtres - voir la
description du processus
ci-dessous.
Patte de
D_pose du filtre sup_rieur
La page est en cours de chargement...
La page est en cours de chargement...
La page est en cours de chargement...
La page est en cours de chargement...
-
 1
1
-
 2
2
-
 3
3
-
 4
4
-
 5
5
-
 6
6
-
 7
7
-
 8
8
-
 9
9
-
 10
10
-
 11
11
-
 12
12
-
 13
13
-
 14
14
-
 15
15
-
 16
16
-
 17
17
-
 18
18
-
 19
19
-
 20
20
-
 21
21
-
 22
22
-
 23
23
-
 24
24


KitchenAid KUDE40CVBL3 User Instructions
- Catégorie
- Lave-vaisselle
- Taper
- User Instructions
dans d''autres langues
- English: KitchenAid KUDE40CVBL3
Documents connexes
-
KitchenAid W10205938 Manuel utilisateur
-
KitchenAid KUDE40CVBL1 Le manuel du propriétaire
-
KitchenAid KUDE40FXPA0 User Instructions
-
KitchenAid KUDK03FTSS1 Manuel utilisateur
-
Amana KUDT03FTSS2 Manuel utilisateur
-
-
-
-
-
Autres documents
-
Whirlpool WDF560SAFM Le manuel du propriétaire
-
-
Jenn-Air W10300216A Manuel utilisateur
-
-
Jenn-Air JDB3650AWR5 Le manuel du propriétaire
-
Maytag W10199658A Le manuel du propriétaire
-
Maytag MDB7709AWQ2 Le manuel du propriétaire
-
IKEA IUD7070DS2 Le manuel du propriétaire
-
Maytag MDBTT53AWB2 Le manuel du propriétaire
-
Maytag MDB8989SHK User Instructions