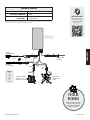
Pit Boss 11019 Le manuel du propriétaire
- Catégorie
- Outils de jardin
- Taper
- Le manuel du propriétaire

11019
..
300522
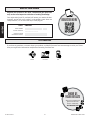
READ ALL INSTRUCTIONS
BEFORE INSTALLING AND
USING THE APPLIANCE,
SAVE THESE INSTRUCTIONS.
LISEZ TOUTES LES INSTRUCTIONS
AVANT D'INSTALLER ET
D'UTILISER L'APPAREIL,
CONSERVEZ CES INSTRUCTIONS.
LEA TODAS LAS INSTRUCCIONES
ANTES DE INSTALAR Y
UTILIZAR EL APARATO, GUARDE
ESTAS INSTRUCCIONES.

® 2 ..
ENGLISH
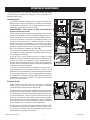
IMPORTANT SAFEGUARDS
IMPORTANT, READ CAREFULLY, RETAIN FOR FUTURE REFERENCE.
MANUAL MUST BE READ BEFORE OPERATING!
.
.
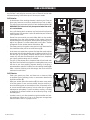
WARNING: Please read the entire manual before installation and use of this electric, pellet fuel burning appliance.
Failure to follow these instructions could result in property damage, bodily injury, or even death. Contact local building or fire
officials about restrictions and installation inspection requirements in your area. Save these instructions.
SAFETY LISTING
In accordance with the procedures and specifications listed in the UL 2728A-2019 "pellet fuel burning cooking appliances"
and ULC/ORD C2728-19 "pellet fuel burning equipment." Pit Boss® Grills pellet cooking appliances have been inde-
pendently tested and listed by CSA (an accredited testing laboratory) to UL and ULC standards.
PROPOSITION 65 - CALIFORNIA
WARNING: This product can expose you to chemicals including wood dust, which is known to the State of
California to cause cancer, and carbon monoxide, which is known to the State of California to cause birth
defects or other reproductive harm. For more information go to .65..
DANGERS AND WARNINGS
You must contact your local home association, building or fire officials, or authority having jurisdiction, to obtain the
necessary permits, permissions, or information on any installation restrictions, such as any smoker being installed on a
combustible surface, inspection requirements, or even ability to use, in your area.
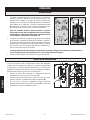
1. A minimum clearance of 305mm (12 inches) from combustible constructions to the sides of the smoker, and 305mm (12 inches) from
the back of the smoker to combustible constructions must be maintained. Do not install appliance on combustible floors, or
floors protected with combustible surfaces unless proper permits and permissions are obtained by authorities having
jurisdiction. Do not use this appliance indoors, in an enclosed or unventilated area, inside homes, vehicles, tents, garages. This
hardwood pellet appliance must not be placed under overhead combustible ceiling or overhang. Keep your smoker in an area clear
and free from combustible materials, gasoline, and other flammable vapors and liquids.
WARNING: Be aware of building combustible material, maintain the fire to avoid over-firing. Should a grease fire occur,
turn the smoker OFF and leave the cabinet door closed until the fire is out. Unplug the power cord. Do not throw water
on the unit. Do not try to smother the fire. Use of an all-class (class ABC) approved fire extinguisher is valuable to keep on
site. If an uncontrolled fire does occur, call the Fire Department.
2. Keep electrical supply cords and the fuel away from heated surfaces. Do not use your smoker in the rain or around any water source.
If the supply cord is damaged, it must be replaced by the manufacturer, its service agent, or similar qualified persons in order to
avoid a hazard.

.. 3 ®
ENGLISH
3. After a period of storage, or non-use, check the burn pot for obstructions, the hopper for foreign objects, and any air blockage
around the fan intake or chimney. Clean before use. Regular care and maintenance is required to prolong the lifespan of your unit.
If the smoker is stored outside during the rainy season or seasons of high humidity, care should be taken to insure that
water does not get into the hopper. When wet or exposed to high humidity, hardwood pellets will expand greatly, decompose,
and may jam the feed system. Always disconnect the power, before performing any service or maintenance.
IMPORTANT! Always power off the appliance and allow the shut-down cycle to run. Unplug the appliance only once the
shut-down cycle is complete, and/or before cleaning. Failure to follow this warning can cause damage, serious injury, fire,
electric shock, or death.
WARNING: Do not transport your smoker while in use or while the smoker is hot. Ensure the fire is completely out and that
the smoker is completely cool to the touch before moving.
4. It is recommended to use heat-resistant barbecue mitts or gloves when operating the smoker. Do not use accessories not specified
for use with this appliance. Do not put a barbecue cover or anything flammable in the storage space area under the barbecue.
Remove pots and pans while the operating appliance is unattended, to reduce the risk of fire.
WARNING: This appliance is not recommended for children, persons with reduced physical, sensory or mental capabilities,
or lack of experience and knowledge, unless they are under direct supervision or instruction by a person responsible for
their safety.
5. Parts of the barbecue may be very hot, and serious injury may occur. Keep young children and pets away while in use.
6. Do not enlarge igniter holes or burn pot. Failure to follow this warning could lead to a fire hazard and bodily harm and will void your
warranty.
7. Product may have sharp edges or points. Contact may result in injury. Handle with care.
DISPOSAL OF ASHES
Ashes should be placed in a metal container with a tight-fitting lid. The closed container of ashes should be placed on a non-combustible
floor or on the ground, well away from all combustible materials, pending final disposal. When ashes are disposed by burial in soil, or
otherwise locally dispersed, they should be retained in a closed container until all cinders have thoroughly cooled.
HARDWOOD PELLET FUEL
This pellet cooking appliance is designed and approved for pelletized, all natural hardwood fuel only. Any other type of fuel burned in
this appliance will void the warranty and safety listing. Use only wood pellet fuel specified by the manufacturer. Do not use pellet fuel
labeled as having additives. Hardwood pellets are highly susceptible to moisture and should always be stored in an airtight container. If
you are storing your grill, without use, for an extended period, we recommend clearing all pellets from your grill's hopper and auger, to
prevent jams. The pellet fuel mean heating value in 18,569-20,362 KJ/KG (8,000-8,770 BTU/LB), ash content < 1%.
WARNING: Never use gasoline, gasoline-type lantern fuel, kerosene, charcoal lighter fluid, or similar liquids to start or ‘freshen
up’ a fire in this appliance. Keep all such liquids well away from the appliance when in use.
At the time of printing, there is no industry standard for barbecue hardwood pellets, although most pellet mills use the same standards
to make hardwood pellets for domestic use. Further information, can be found at www.pelletheat.org or the Pellet Fuel Institute.
Contact your local dealer on the quality of pellets in your area, and for information on brand quality. As there is no control over the quality
of pellets used, moisture affected pellets, we assume no responsibility to damage caused by poor quality of fuel.
CREOSOTE
Creosote - formation, and need for removal. When burning, it produces black smoke with a residue that is also black in color. When wood
pellets are burned slowly, they produce tar and other organic vapors that combine with expelled moisture to form creosote. The creosote
vapors condense in a relatively cool oven flue and exhaust hood of a slow-burning fire. As a result, creosote residue accumulates on the
flue lining and exhaust hood. When ignited, this creosote makes an extremely hot fire.
The grease duct should be inspected at least twice a year to determine when the grease and/or creosote buildup has occurred. When
grease or creosote has accumulated, it should be removed to reduce the risk of fire.

® 4 ..
ENGLISH
CARBON MONOXIDE
Follow these guidelines to prevent this colorless, odorless gas from poisoning you, your family or others:
• Know the symptoms of carton monoxide poisoning: headache, dizziness, weakness, nausea, vomiting, sleepiness, and confusion.
Carbon monoxide reduces the blood’s ability to carry oxygen. Low blood oxygen levels can result in loss of consciousness and death.
• See a doctor if you or others develop cold or flu-like symptoms while cooking or in the vicinity of the appliance. Carbon monoxide
poisoning, which can easily be mistaken for a cold or flu, is often detected too late.
• Alcohol consumption and drug use increase the effects of carbon monoxide poisoning.
Carbon monoxide is especially toxic to mother and child during pregnancy, infants, the elderly, smokers, and people with blood or circu-
latory system problems, such as anemia, or heart disease.

.. 5 ®
ENGLISH
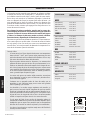
SPECIFICATIONS
4
110120, 60z
250
29.4 / 65
54215° / 130420°
701 675 1,351 /
27.6 26.5 53.2
55.5 / 122.3
PACKAGE CONTENTS
1 x
1 x
1 x
1 x
1 x
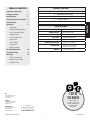
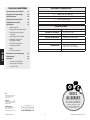
TABLE OF CONTENTS
Important Safeguards 2
Package Contents 5
Specifications 5
Getting To Know Your Smoker
6
Control Board 7
Operation
• Setting Up
• Setting The Temperature
• Using The Meat Probes
• Auger Priming
• First Use (Burn Off)
• Regular Use
• Hot Smoking
• Shut-down
• More Functions
8
Care & Maintenance 14
Troubleshooting 16
Warranty
• Terms & Conditions
• Register Your Smoker
• Customer Care
19
Visit us online for
assembly videos, free
recipes, smoking tips,
manual updates
and more.
8877 N Gainey Center Dr,
Scottsdale, AZ 85258
480-923-9630
15110 Yellowhead Trail NW,
Edmonton, AB T5V 1A1
877-942-2246
Unit 8, De Hootkamp 8,
Hedel, NL 5321
service-eu@dansons.com ©2023 , .

® 6 ..
ENGLISH
1,677.4 /
260.0
8,387 /
1,300
A
B
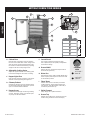
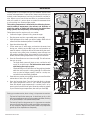
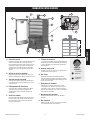
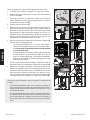
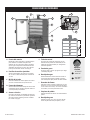
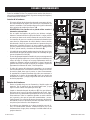
GETTING TO KNOW YOUR SMOKER
Cabinet Door
Keep the door seal and glass clean to maintain
the care of the cabinet door. A firm closing of the
door will ensure the desired temperature inside
the smoker is achieved. Avoid leaning or putting
weight on the door to keep hinges intact.
Adjustable Cooking Grates
Adjust the supports brackets and cooking grates
to the desired height for each level of cooking.
Hopper Sight Glass
Easily observe the level of pellets in your hopper
without constantly opening the hopper lid.
Chimney Exhaust
Opening the chimney increases airflow through-
out the smoker. Adjust by twisting the cap more
open or closed for added ventilation.
Hopper Access
A substantial sized hopper to last long smoking
sessions. The hopper safety screen breaks apart
any clumps of fuel when added.
Control Board
The control system that manages the feed
rate of pellet fuel, the fan speed, and adjustable
environment settings.
Grease Shield
Collects the juices and fats that drip and directs
them into the grease tray.
Water Pan
Adds moisture to the smoke chamber. While using
water is implied, other liquids can be used as well
for varied flavor profiles.
Flame Tamer
A barrier over the fire in the burn pot and the
cooking elements. Proper positioning into the
inset grooves, with slotted holes on the sides, is
essential to prevent flare ups.
Pellet Cleanout
Easily change out of pellet fuel flavors.
Grease Tray
Captures the cooking juices and grease from the
smoker. Easily pull out to remove and empty.
K
J
D
E
F
G
H
B
A
B
C
A
A
A
A
A
I

.. 7 ®
ENGLISH
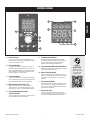
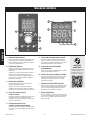
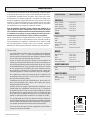
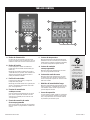
CONTROL BOARD
F/C
P3 P2P1C
P3 P2P1C
F/C
P3 P2P1C
P3 P2P1C
D
G H
J
Check out some
common FAQs online
or Live Chat with
Customer Care.
#12001
Power Button
Press once to turn on. Press and hold for three
seconds to turn off. Button will glow blue if unit is
connected to a power source.
Function Button
Quick press to change the temperature units of
the Controller from Fahrenheit (ºF) to Celsius (ºC).
Press and hold this button to initiate priming the
auger, resulting in an extra feed of pellets to the
burn pot. Release to stop priming.
Controller Knob
Push once to adjust and set the grill temperature.
Press and hold for three seconds to adjust and set
the programmable meat probe temperature.
Meat Probe Connection Ports
Plug-in the adapter end of a meat probe to a
connection port. The readout will appear on the
display screen for the corresponding meat probe.
Programmable Meat Probe
Connection Port
Same as regular meat probe ports, but this port is
programmable on the Control Board.
Temperature Readout
Displays the Actual temperature from inside
the smoker. Readout is taken by the grill probe
(sensor). Adjusting the Controller Knob will
display the desired target temperature.
Programmable Meat Probe Readout
Displays the temperature reading of the program-
mable meat probe connected.
Meat Probe Readouts
Displays the temperature reading of the meat
probe (or probes) that are connected. The readout
corresponds with the plug-in connection port
selected.
Fire Intensity Meter
Displays the Actual temperature intensity of the
fire in the burn pot, changing from blue to red.
The color also changes when the desired target
temperature is adjusted.
Operation Icons
A solid icon is visible when a component is in
operation. When an icon is flashing, an error has
occurred. See Troubleshooting for assistance.
A
F
E
B
C
I

® 8 ..
ENGLISH
OPERATION
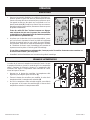
SETTING UP
1. With all outdoor appliances, outside weather conditions play
a big part in the performance of your smoker and the cooking
time needed to perfect your meals. This appliance must not be
placed under an overhead combustible ceiling or overhang (A).
Keep your smoker in an area clear from combustible materials,
gasoline, and other flammable vapors and liquids.
All Pit Boss® units should keep a minimum clearance of
305mm (12 inches) from combustible constructions and this
clearance must be maintained while the smoker is opera-
tional. (B)
2. Parts are located throughout the shipping carton, including un-
derneath the smoker. Inspect the smoker, parts, and hardware
blister pack after removing from the protective shipping carton.
Discard all packaging materials from inside and outside of the
smoker before assembly, then review and inspect all parts by as-
sembly guide.
If any part is missing or damaged, do not attempt to as-
semble. Contact your dealer or Pit Boss® Customer Care for
parts.
3. Assemble the unit according to assembly guide instructions.
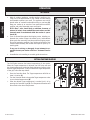
SETTING THE TEMPERATURE
The Grill Probe measures the internal temperature of the smoker.
When the Target temperature is adjusted, the Grill Probe will read
the Actual temperature inside the smoke cabinet and adjust to the
desired Target temperature. To adjust the desired Target temperature
of the grill, follow the steps below:
1. Press the Controller Knob. The Target temperature will blink to
show it is active. (A)
2. Turn the Controller Knob to change the Target temperature value
to your desired temperature. (B)
3. Once the desired Target temperature is reached, lock it in by
pressing the Controller Knob (C). The Temperature Readout will
return back to the Actual Temperature.
A B
A B
C

.. 9 ®
ENGLISH
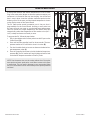
USING THE MEAT PROBES
A meat probe measures the internal temperature of a cut of meat.
Plug-in the meat probe adapter to the meat probe connection port
and ensure it is inserted all the way into the plug. You will feel and
hear it snap in place. Insert the stainless-steel meat probe into the
thickest portion of the meat, and the internal temperature is shown
on the display screen of the Control Board.
The P1C (meat probe control) connection port is the port that is
programmable on the Control Board. Inserting a meat probe into
this port will cook your meat to your desired target temperature.
Once P1C reaches the target temperature, the Control Board will
automatically reduce the temperature of the smoker to low (54°C /
130°F) to keep food warm until ready to serve.
To program the P1C, follow the steps below:
1. Plug-in the adapter end of a meat probe into the P1C port on the
Control Board. (A)
2. Press and hold the controller knob for three seconds. The tem-
perature readout of P1C will blink to show it is active. (B)
3. Turn the Controller Knob to increase or decrease the desired tar-
get temperature value. (C)
4. Press the Controller Knob once to lock in the desired target tem-
perature (D). The P1C readout will stop blinking and return back
to the Actual Temperature readout of the P1C probe.
NOTE: Run the excess wire out the smoke cabinet door. Ensure the
meat probe and meat probe wires avoid direct contact with flame
or excess heat. This can result in damage to your meat probe. When
not in use, disconnect and set aside to keep a meat probe protected
and clean.
D
C
B
A

® 10 ..
ENGLISH
AUGER PRIMING
First time using your smoker or whenever your smoker runs out of pellets in the hopper, you will need to prime the auger.
If not primed, the smoker will timeout before the pellets are ignited, and no fire will start. Follow these steps to prime
the auger:
1. Open the hopper lid. Make sure there are no foreign objects in the hopper or blocking the auger feed system.
2. Remove all cooking components (grill grates, grease shield, flame tamer) from the interior of the smoker. Locate the
burn pot in the bottom of the pellet smoker.
3. Plug the power cord into a power source.
4. Press the Power Button to turn the unit on. This will initiate the start-up cycle.
• Check to make sure you hear the auger turning. Place your hand above the burn pot and feel for air movement.
DO NOT place your hands or fingers inside the burn pot, as this can cause injury.
• After approximately a minute, you should begin to feel the air getting warmer above the burn pot. The igniter
tip does not glow red but will get extremely hot and will burn. Do not touch the igniter.
5. Once verified that all electric components are working correctly, press and hold the Power Button for three seconds
to turn your smoker off.
6. Fill the hopper with all natural hardwood barbecue pellets.
7. Press the Power Button to turn the unit on. This will initiate the start-up cycle.
8. Press and hold the Function Button (F/C) to prime the auger. Once you hear pellets drop from the auger into the burn
pot, release the Function Button.
9. Press and hold the Power Button for three seconds to turn your smoker off. Please make sure you allow your smoker
to stay plugged in until it finishes the cool down cycle. Once the fan turns off, the smoker has completed the
shutdown cycle and it is safe to unplug your smoker.
10. Re-install the cooking components into the smoking chamber. Ensure the FRONT labelled side of the grease shield
and flame tamer are facing the cabinet door once installed.
11. Your smoker is now primed and ready to use! If this is the first use of the smoker, proceed with a burn-off.
FIRST USE (BURN OFF)
Once your auger has been primed and before cooking in your smoker for the first time, it is important to complete a
smoker burn off to burn off the smoker and rid it of any foreign matter.
1. Follow Regular Use instructions to turn the unit on.
• Fill the water pan ¾ with water, and monitor the water level during the burn off. Ensure the water pan contains
water for the entirety of the burn off.
2. Turn the Controller Knob to 176°C / 350°F. Keep the cabinet door open until smoke starts to fill the interior of the
smoking chamber. Then, latch the cabinet door closed and let the unit burn off for 30-40 minutes. This will burn off
the interior of the unit and rid it of any foreign matter.
3. Follow Shut-down instructions to turn the unit off, or proceed with smoking at your desired temperature.

.. 11 ®
ENGLISH
REGULAR USE
Smoking foods in your smoker can give you different results based
on time and temperature. For best results, keep a record of what you
cooked, at what temperature, how long you cooked for, and the re-
sults. Adjust to your taste for the next time. As you become familiar
with your smoker, it is wise to place an outdoor thermometer close
to your cooking area. Practice makes perfect.
The cooking temperature is affected by the following factors:
outside ambient temperature, the amount and direction of
wind, the quality of pellet fuel being used, the cabinet door
being opened, and the quantity of food being cooked.
Follow these steps for regular use of your smoker:
1. Confirm the auger is primed. If not, prime the auger.
2. Plug the power cord into a grounded power source. (A)
3. Open the hopper lid to check your level of pellets. Refill with all
natural barbecue hardwood pellets if needed. (B)
4. Open the cabinet door. (C)
5. Fill the water pan ¾ with water, and monitor the water level
during your smoking session (D). Larger cuts and quantities of
meat can release a significant amount of water during the smok-
ing session, losing some juices. Introducing more moisture into
the smoking chamber allows the connective tissues and fats to
render, and the cooking temperature to stay more consistent.
6. Press the Power Button to turn the unit on (E). This will activate
the start-up cycle:
• The auger feed system will begin to turn, and the fan will
supply air to the burn pot. The cabinet door must remain
open during the start-up cycle.
• Smoke will begin to fill the interior of the smoking chamber
while the start-up cycle is taking place (F). To confirm the
start-up cycle has begun properly, listen for a torchy roar,
and notice some heat being produced.
7. Once the heavy smoke starts getting thinner, close and latch the
cabinet door to lock a firm seal. (G)
8. Press the Controller Knob. Turn the Controller Knob to change
the target temperature value to your desired temperature.
Once the desired target temperature is reached, lock it in by
pressing the Controller Knob again. Allow the smoker to preheat
to your desired target temperature, then add your food! (H)
During your smoke session, short or long, it is important to monitor:
• The level of liquid in the water pan. It should not go dry, as this
will cause temperature swings in the smoking chamber, resulting
in dry (overcooked) or raw (undercooked) foods.
• The level of liquid in the grease cup. It is important to note the
amount of juices that drip from the meat. While some meat juic-
es may evaporate, higher water-content meats may require the
grease cup to be emptied more frequently.
A
B
E
F
G
C
D
H

® 12 ..
ENGLISH
HOT SMOKING
The form of cooking known as hot smoking refers to longer cooking
times and at lower temperatures (also known as low and slow), but
results in more natural flavor on your prepared foods. The band of
pink (after smoking) is referred to as a smoke ring and is highly prized
by outdoor chefs. Smoking foods with hardwood pellets will turn
light-colored meats and poultry pink, whereas it will add a band of
pink to darker cuts of meat.
For best results, allow time for meats to rest after cooking. This
allows the natural juices to migrate back into the meat fiber,
giving a much juicer, flavorful cut. Resting times can be as little
as 3 minutes and up to 60 minutes, depending on the size of
the protein.
Follow our guide of smoking different proteins. It is important to
note that it is not possible to tell if a meat cut is done by simply
looking at it. Using a meat probe or a Pit Boss® Meat Thermometer
is the best way to determine the internal temperature of the foods
you are cooking.
Helpful tips:
• Meat will close its fibers after it reaches an internal temperature
of 49ºC / 120ºF, so best to prepare for a smoking session with a
cold, or very cold, selection of foods before placing them inside
the smoker.
• Leave open space between the foods and the extremities of the
smoke cabinet for proper heat flow. Food on a crowded smoker
will require more cooking time. Use a set of long-handled tongs
for turning meats, and a spatula for softer items like fish and
cheese. Using a piercing utensil, such as a fork, will prick the
meat and allow the juices to escape.
• Fattier meats with lots of connective tissue are best in a smoker,
as the fats renders, delivering juicy smoked sensations.
• Start with a small pork shoulder roast, which is inexpensive and
more forgiving, then move on to larger cuts like brisket and ribs.
• Tenderloins and lean roasts require more attention, as the meat
dries out faster. Ensure that there is lots of fluid in the water pan
at all times during smoke sessions with less fatty meats. Liquids
such as fruit juice, cider vinegar, wine, or beer can offer a subtle
but flavorful impact to your meat cuts.
• If you are near the end of a smoking session, reduce the amount
of moisture in the smoking chamber by letting the water pan run
dry. This will allow the flavor components of your food to crisp
up and/or caramelize.
• Sugar-based sauces are best applied near the end of cooking to
prevent flare-ups.
MEAT TYPE FINISHED
INTERNAL TEMP
POULTRY
Turkey (whole) 74°C / 165°F
Chicken (whole) 74°C / 165°F
Drumsticks, Breasts 74°C / 165°F
Small Game Birds 74°C / 165°F
Duck 74°C / 165°F
PORK
Ham (whole) 71°C / 160°F
Roast 74°C / 165°F
Tenderloin 82°C / 180°F
Spare Ribs 88°C / 190°F
Baby Back Ribs 88°C / 190°F
Butt (Shoulder) 90-98°C / 195-210°F
BEEF
Prime Rib 57°C / 135°F
Tenderloin 60°C / 140°F
Roast 63°C / 145°F
Spare Ribs 79°C / 175°F
Brisket 90-98°C / 195-210°F
WILD GAME
Tenderloin 74°C / 165°F
Roast 74°C / 165°F
SEAFOOD
Fillets 63°C / 145°F
Salmon (whole) 63°C / 145°F
Lobster 63°C / 145°F
Snapshot this page
for reference. You
can thank us later!

.. 13 ®
ENGLISH
SHUT-DOWN
Follow these steps to safely turn off your smoker:
1. Press and hold the Power Button for three seconds to turn the unit
off. (A)
• The smoker will begin its automatic cool-down cycle and the
display reads "OFF". The auger system will stop feeding fuel,
the flame will burn out, and the fan will continue to run until
the cool-down cycle is complete.
2. Once the shut-down cycle is complete and the fan turns off,
unplug the power cord. (B)
IMPORTANT! Always power off the appliance and allow the
shut-down cycle to run. Unplug the appliance only once the
shut-down cycle is complete, and/or before cleaning. Failure
to follow this warning can cause damage, serious injury, fire,
electric shock, or death.
MORE FUNCTIONS
Overheat Protection
• If the smoker overheats, it will automatically
produce an error code and shut-down as a
safety feature. This is often due to a grease
fire or an overfeed of fuel.
• See troubleshooting for more details.
Prime for Quick Recovery
Use the Function Button (F/C) to activate an extra
feed of pellets to the burn pot.
• This can be used to add more fuel to the fire
before opening the smoker cabinet door,
resulting in a quick heat recovery time.
• Use when low smoking, to increase the in-
tensity of clean smoke flavor. A extra feed of
pellets will add a burst of smoky goodness!
B
Explore a variety of
grilling accessories available
from our online store for
all cooking levels.
Check out some
common FAQs online
or Live Chat with
Customer Care.
#12001
A

® 14 ..
ENGLISH
CARE & MAINTENANCE
Any Pit Boss® unit will give you many years of flavorful service with
minimum cleaning. Follow these tips to service your smoker:
Grill Interior
• At the bottom of the smoking chamber is the burn pot. Clean out
after every few uses to avoid any hard build-up of ash or debris.
This will also ensure proper ignition of fresh hardwood pellets. (A)
WARNING: This feature can only be operated when the smok-
er is cooled down.
• Use a grill cleaning brush to remove any food or build-up from the
cooking grates. Best practice is to do this while they are still warm
from a previous cook.
• Grease fires are caused by too much fallen debris on the cooking
components from the inside chamber of the smoker. Clean any
accumulated grease on the grease shield (above the water pan), as
well as any splatter. For an extra deep clean, use Pit Boss® Cleaner
& Degreaser for the smoker interior and exterior. (B)
• The water pan may also gather some grease. Use an aluminum foil
liner inside the water pan for an easier clean up. (C)
• In the event you experience a grease fire, keep the smoke cabinet
door closed and close the chimney cap to choke out the fire. If the
fire does not go out quickly, carefully remove the food, turn the
smoker off, and shut the cabinet door until the fire is completely
out. Lightly sprinkle baking soda, if available.
• The glass of the cabinet door is tempered and will not break with
high heat. Excessive build-up of grease or cooking debris may cause
the door to not close properly. Frequent cleaning of the glass is
recommended to maintain visibility into the smoking chamber (D).
Make a solution of baking soda and vinegar, then scrub with fine
steel wool in small circles.
Grill Exterior
• Check your grease tray often, and clean out as necessary. Keep
in mind the type of cooking you do, as some meats release more
liquid than others. (E)
• Wipe your smoker down after each use (F). Use warm soapy water
to cut the grease. Do not use oven cleaner, abrasive cleansers, or
abrasive cleaning pads on the outside surfaces. All painted surfac-
es are not covered under warranty, but are rather part of general
maintenance and upkeep. For paint scratches, wearing, or flaking
of the finish, all painted surfaces can be touched up using a high
heat BBQ paint.
• A smoker cover is your best protection against weather and out-
side pollutants. When not in use, or for long-term storage, keep
the unit under a cover in a garage or shed.
E
A C
F
B
D

.. 15 ®
ENGLISH
Probes
• Wipe your meat probe after each use. A meat probe not in use
should be rolled up in a large, loose coil. Kinks or folds in the probe
wires may cause damage. Do not place in the dishwasher or sub-
merge in water. Water damage to the internal wires will cause a
meat probe to short-out, causing false readings. (G)
• Check and clean off any grease or debris from the grill probe
(sensor), found inside the smoking chamber, on the right-side wall.
The grill probe must remain clean to give accurate temperature
readings to the Control Board. (H)
• If a probe is damaged, it should be replaced.
Hopper
• The hopper includes a clean-out feature to allow for ease of clean-
ing and change out of pellet fuel flavors. Locate the clean-out door
on the back side of the hopper. Place a clean, empty pail under the
clean-out door. Loosen the door knob slightly to release the door
latch. Rotate the door latch upwards to open the door, allowing
the pellets from the hopper to empty. Once empty, rotate the door
latch back onto the Door Knob. Tighten the door knob to secure. (I)
NOTE: Use a long handled brush or wet/dry vacuum to remove
excess pellets, sawdust, and debris for a complete clean-out.
• Running all pellets out of your auger system is recommended if
your smoker will be unused for an extended period of time. This
can be done by simply running your smoker, on an empty hopper,
until all pellets have emptied from the auger tube.
• Check and clean off any debris from the fan air intake vent, found
on the underside of the unit. For an extensive cleaning, remove
the screws from the fan housing and carefully wipe off any grease
build-up directly on the fan blades. Use warm soapy water to cut
the soot and grease. This ensures airflow is clean and sufficient to
the feed system. (J)
SMOKER CARE CHEAT SHEET
ITEM CLEANING FREQUENCY CLEANING METHOD
Main Cabinet Glass Door Every 2-3 Smoke Sessions Mix Baking Soda & Vinegar, Scrub with Steel Wool
(Fine)
Bottom of Main Cabinet Every 5-6 Smoke Sessions Scoop Out, Wet/Dry Vacuum Excess Debris
Burn Pot After Each Smoke Session Scoop Out, Wet/Dry Vacuum Excess Debris
Cooking Grates After Each Smoke Session Burn Off Excess, Brass Wire Brush
Water Pan After Each Smoke Session Scrub Pad & Soapy Water
Grease Tray After Each Smoke Session Scrub Pad & Soapy Water
Auger Feed System When Pellet Bag is Empty Allow Auger to Push Out Sawdust, Leaving Hopper
Empty
Electric Components Once A Year Dust Out Interior, Wipe Fan Blades with Soapy Water
Air Intake Vent Every 5-6 Smoke Sessions Dust, Scrub Pad & Soapy Water
Grill Probe (Sensor) Every 2-3 Grill Sessions Cloth & Soapy Water Snapshot this chart
for reference.
JI
G H

® 16 ..
ENGLISH
TROUBLESHOOTING
Proper cleaning, maintenance, and the use of clean, dry, quality fuel will prevent common operational problems. When
your Pit Boss® smoker is operating poorly, or on a less frequent basis, the following troubleshooting tips may be helpful.
WARNING: Always disconnect the electrical cord prior to opening the smoker for any inspection, maintenance,
cleaning, or service work. Ensure the smoker is completely cooled to avoid injury.
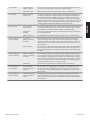
PROBLEM CAUSE SOLUTION
No Power Lights On The
Control Board
Not connected to
power source
Ensure unit is plugged into a working power source. Ensure a minimum 10 amp service.
Ensure all wire connections are firmly connected and dry.
Fuse blown on the
control board
Remove the two screws in the front of the control board, and this will release it from
its positioning. Carefully pull the control board forward. Check the fuse for a broken
wire or if the wire has turned black. If yes, fuse needs to be manually replaced.
Faulty control board Control Board needs to be replaced. Contact Customer Care for a replacement part.
Smoker will not achieve
or maintain stable
temperature
Water pan is low/
empty
Check status of Water Pan. Refill with liquid. Follow Care and Maintenance instruc-
tions if dirty.
Grill probe (sensor) Check status of Grill Probe (Sensor). Follow Care and Maintenance instructions if dirty.
Contact Customer Care for a replacement part if damaged.
Insufficient air flow
through burn pot
Remove cooking components from the interior of the smoker. Check burn pot for ash
build-up or obstructions. Follow Care and Maintenance instructions for ash build-up.
Check fan. Ensure it is working properly and air intake from underneath the unit is
not blocked. Follow Care and Maintenance instructions if dirty. Check auger motor
to confirm operation, and ensure there is no blockage in the auger tube. Once all the
above steps have been done, start the smoker and wait for 10 minutes. Check that the
flame produced is bright and vibrant.
Lack of fuel, poor fuel
quality, obstruction in
feed system
Check hopper to check that fuel level is sufficient, and replenish if low. Should the
quality of hardwood pellets be poor, or the length of the pellets too long, this may
cause an obstruction in the feed system. Remove pellets and follow Care and Mainte-
nance instructions.
Smoker produces excess
or discolored smoke,
food is discolored from
smoke
Grease build-up Follow Care and Maintenance instructions.
Hardwood pellet
quality
Remove moist hardwood pellets from hopper. Follow Care and Maintenance instruc-
tions to clean out. Replace with dry hardwood pellets.
Burn pot is blocked Clear burn pot for moist hardwood pellets. Follow Auger Priming Procedure.
Insufficient air intake
for fan
Check fan. Ensure it is clean, working properly, and air intake is not blocked. Follow
Care and Maintenance instructions if dirty.
Frequent flare-ups Cooking temperature Attempt cooking at a lower temperature. Grease does have a flash point. Keep the
temperature under 176°C / 350°F when cooking highly greasy food.
Grease build-up on
cooking components
Follow Care and Maintenance instructions.
"ErH" Error Code The unit has overheat-
ed, possibly due to
grease fire or excess
fuel.
Press and hold the Power Button for three seconds to turn the unit off, and allow
smoker to cool. Follow Care and Maintenance instructions. After maintenance, remove
pellets, and confirm positioning of all component parts. Once cooled, turn the unit on,
then select desired temperature. If error code still displayed, contact Customer Care.

.. 17 ®
ENGLISH
"ErP" Error Code Grill probe wire not
making connection.
Remove the access panel and check for any damage to the Grill Probe wires. Discon-
nect and reconnect the Grill Probe connectors to the Control Board.
Grill Probe is broken Grill Probe need to be replaced. Contact Customer Care for a replacement.
"ErL" Error Code Grill fails to perform
start-up cycle.
Check proper positioning of cooking components. Check hopper for sufficient fuel
or if there is an obstruction in the feed system. Remove pellets and follow Care and
Maintenance instructions. Check Grill Probe (Sensor) to confirm if actual tempera-
ture is correct and accurate. Follow Care and Maintenance instructions if dirty. Check
igniter positioning and that it is heating up properly. In extreme cold, the smoker may
require a second start. Turn smoker off, wait, then turn on again. Check fan. Ensure it
is working properly. Follow Care and Maintenance instructions if dirty.
"NoP" Error Code Bad connection at
connection port
Disconnect the meat probe from the connection port on the Control Board, and recon-
nect. Ensure the meat probe adapter is firmly connected. Check for signs of damage
to the adapter end. If still failed, call Customer Care for replacement part.
Meat probe is
damaged
Check for signs of damage to the wires of the meat probe. If damaged, call Customer
Care for replacement part.
Faulty control board Control Board needs to be replaced. Contact Customer Care for a replacement part.
"Err" Error Code and
Auger icon blinking
Auger motor is
jammed, not making
connection
Remove cooking components from the interior of the smoker. Turn the unit on
and inspect the auger feed system. Visually confirm that the auger is dropping
pellets into the burn pot. Disconnect and reconnect the Auger Motor connector to
the Control Board. If not operating properly, call Customer Care for assistance or a
replacement part.
Auger not primed Before the unit is used for the first time or anytime the hopper is completely emptied
out, the auger must be primed to allow pellets to fill the auger tube. If not primed,
the igniter will timeout before the pellets reach the burn pot. Follow Auger Priming
Procedure.
"Err" Error Code and
Igniter icon blinking
Igniter is not working
properly, not making a
connection
Remove cooking components from the interior of the smoker. Turn the unit on and
inspect the igniter. Visually confirm that the igniter is working by placing your hand
above the burn pot and feeling for heat. Visually confirm that the igniter is sticking
3mm/0.1 inches into the hole in the burn pot, and open to light the pellets. Disconnect
and reconnect the Igniter connector to the Control Board. If not operating properly,
call Customer Care for assistance or a replacement part.
Igniter failure Igniter needs to be replaced. Contact Customer Care for replacement part.
"Err" Error Code and
Fan icon blinking
Fan is not working
properly, not making a
connection
Check fan. Ensure it is working properly and air intake is not blocked. Remove fan
housing and check for any damage to the fan wires. Disconnect and reconnect the
fan connector to the Control Board. Follow Care and Maintenance instructions if fan
blades are dirty.
"Err" Error Code and
Pellet icon blinking
Lack Of Fuel, Poor Fuel
Quality, Grill will not
stay lit.
Check hopper to check that fuel level is sufficient and replenish if low. Should the
quality of hardwood pellets be poor, or the length of the pellets too long, this may
cause an obstruction in the feed system. Remove pellets and follow Care and Mainte-
nance instructions.

® 18 ..
ENGLISH
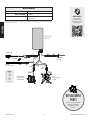
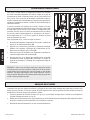
WIRE DIAGRAM
110120, 60z
250
1.12 / /
2.48 /
: Electrical components, passed by product safety testing and certification services, comply with a testing
tolerance of ± 5-10 percent.
Live chat with
Customer Care for
technical and service
related queries.
Contact your local retailer
or visit us online for
a complete catalog
of parts.
110120 , 200
110120 , 60z,
1
110120 , 60z,
2
CONTROL
BOARD
white
yellow
purple
red
black
green
silver
#12001

.. 19 ®
ENGLISH
WARRANTY
TERMS & CONDITIONS
Pit Boss® Grills ("Pit Boss®"), manufactured by Dansons, carries a 5 year warranty against defects and workmanship on
all parts and a 5 year warranty on electrical components of this product. Dansons warrants that all parts to be free of
defects in material and workmanship, under normal use and conditions, for the length of use and ownership by the
original purchaser.
There is no other or additional warranty applicable to this product.
This warranty does not apply:
• if unable to provide proof of the purchase or after the warranty has expired.
• to damages or defects from wear and tear, such as scratches, dents, dings, chips, or minor cosmetic cracks. These
aesthetic changes of the product do not affect its performance.
• if your product has not been installed, operated, cleaned, and maintained in strict accordance with the accompanied
product manual. The warranty does not cover damage or breakage due to misuse, improper handling, or custom
modifications.
• to rust or oxidization, unless there is loss of structural integrity on the smoker component. Even by utilizing materi-
als that resist rust, the protective coatings can be compromised by various substances and conditions beyond control
of the manufacturer. High temperatures, excessive humidity, chlorine, industrial fumes, fertilizers, lawn pesticides,
and salt are some of the substances that can affect metal coatings.
• to damages or defects occurring during commercial use, rental use, or any use for which the product is not intended.
• to damages or defects exceeding the cost of the product.
• to damages or defects caused by service or repair of the product by an unauthorized dealer of Pit Boss®.
During the term of the warranty, Dansons obliges to furnishing a replacement for defective and/or failed components
and will not charge for repair or replacement for parts returned, freight prepaid, should the part(s) are found to be de-
fective upon examination.
Dansons does not accept responsibility, legal or otherwise, for the incidental or consequential damage to the property
or persons resulting from the use of this product, during or after the warranty period. All warranties by manufacturer
are set forth herein and no claim shall be made against manufacturer on any warranty or representation. Some states do
not allow the exclusion or limitation of incidental or consequential damages, or limitations of implied warranties, so the
limitations or exclusions set forth in this limited warranty may not apply to you. This limited warranty gives you specific
legal rights and you may have other rights, which vary from state to state.

® 20 ..
ENGLISH
#12002
CUSTOMER CARE
If you have any questions or concerns about your product, our helpful Customer Care team are eager to assist you. Please
have your registration information ready before contacting Customer Care.
Share your creations and
glam shots with the
Pit Boss community.
#
REGISTER YOUR SMOKER
Register your product in less than a minute and gain quick and
easy access to an impressive collection of cooking knowledge.
Your registration (proof of purchase) will ensure you receive the best
warranty service with your product. In the unlikely event there are
safety concerns, it is our fast-track way of notifying you.
4
La page est en cours de chargement...
La page est en cours de chargement...
La page est en cours de chargement...
La page est en cours de chargement...
La page est en cours de chargement...
La page est en cours de chargement...
La page est en cours de chargement...
La page est en cours de chargement...
La page est en cours de chargement...
La page est en cours de chargement...
La page est en cours de chargement...
La page est en cours de chargement...
La page est en cours de chargement...
La page est en cours de chargement...
La page est en cours de chargement...
La page est en cours de chargement...
La page est en cours de chargement...
La page est en cours de chargement...
La page est en cours de chargement...
La page est en cours de chargement...
La page est en cours de chargement...
La page est en cours de chargement...
La page est en cours de chargement...
La page est en cours de chargement...
La page est en cours de chargement...
La page est en cours de chargement...
La page est en cours de chargement...
La page est en cours de chargement...
La page est en cours de chargement...
La page est en cours de chargement...
La page est en cours de chargement...
La page est en cours de chargement...
La page est en cours de chargement...
La page est en cours de chargement...
La page est en cours de chargement...
La page est en cours de chargement...
La page est en cours de chargement...
La page est en cours de chargement...
La page est en cours de chargement...
-
 1
1
-
 2
2
-
 3
3
-
 4
4
-
 5
5
-
 6
6
-
 7
7
-
 8
8
-
 9
9
-
 10
10
-
 11
11
-
 12
12
-
 13
13
-
 14
14
-
 15
15
-
 16
16
-
 17
17
-
 18
18
-
 19
19
-
 20
20
-
 21
21
-
 22
22
-
 23
23
-
 24
24
-
 25
25
-
 26
26
-
 27
27
-
 28
28
-
 29
29
-
 30
30
-
 31
31
-
 32
32
-
 33
33
-
 34
34
-
 35
35
-
 36
36
-
 37
37
-
 38
38
-
 39
39
-
 40
40
-
 41
41
-
 42
42
-
 43
43
-
 44
44
-
 45
45
-
 46
46
-
 47
47
-
 48
48
-
 49
49
-
 50
50
-
 51
51
-
 52
52
-
 53
53
-
 54
54
-
 55
55
-
 56
56
-
 57
57
-
 58
58
-
 59
59


Pit Boss 11019 Le manuel du propriétaire
- Catégorie
- Outils de jardin
- Taper
- Le manuel du propriétaire
dans d''autres langues
- English: Pit Boss 11019 Owner's manual
- español: Pit Boss 11019 El manual del propietario
Documents connexes
-
 Pit Boss 11014 Manuel utilisateur
-
 Pit Boss PBV7PW1 Manuel utilisateur
-
Pit Boss PBV5P1 Manuel utilisateur
-
 Pit Boss PB0820D3 Manuel utilisateur
-
 Pit Boss 10989 Savannah Wood Pellet Grill Le manuel du propriétaire
-
Pit Boss PB500LXW1 Le manuel du propriétaire
-
 Pit Boss PBV3A1 Analog Electric Smoker (3-Series) Manuel utilisateur
-
 Pit Boss PB820SC Le manuel du propriétaire