ROOMS TO GO 24866723 Assembly Instructions
- Taper
- Assembly Instructions

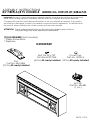
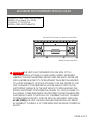
83" FIREPLACE TV CONSOLE
ASSEMBLY INSTRUCTIONS
MODEL No. CRE149-87/24866723
Important:
Be sure to check all packing material carefully for small parts which may come loose
inside carton during shipment. Separate, identify and count all parts and metal hardware.
Compare with parts list and hardware illustrations to be sure all parts are present. If any part(s)
are missing or damaged, contact your dealer's customer services deparment. For efficient and
fast service, please indicate the model number and the parts needed.
ATTENTION:
Some lettered parts listed on the instruction sheets may not be in
the parts bag, they may already be assembled.
TOOLS REQUIRED (Not included)
* Phillips Screwdriver
* Fireplace
HARDWARE:
Pull
Part No. HBJ-3365
(2 Pcs)
All ready Installed
Bolt 8 x 32 x 7/8"
Part No.HCPP-05A
(4 Pcs)
All ready Installed
Cover Cap
Part No. HCPH-H
(2Pcs)
All ready Installed
PAGE 1 OF 9
Anti-tip
Part No. HB-488
(1 pc.)

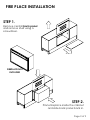
FIRE PLACE INSTALLATION
STEP 1.
Remove central
back panel
and remove shelf using a
screwdriver.
STEP 2.
Place fireplace inside the cabinet
and slide back panel back in.
Page 2 of 9
FIREPLACE NOT
INCLUDED

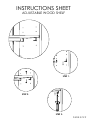
G
H
J
K
STEP 1.
STEP 2.
STEP 3.
PAGE 3 OF 9
INSTRUCTIONS SHEET
ADJUSTABLE WOOD SHELF

WARNING INSTALL FURNITURE TIPPING RESTRAINT KIT
Warning Advertencia Avertissement
ANTI-TIP
Installation instructions:
This tip restraint must be attached to wall stub using 2” screw enclosed
1.Attach a bracket securely to the back top rail of the furniture using the 5/8” screw provided through the smaller hole.
2. Locate the other bracket on the wall over the wall stud and 2 inches below the mounting bracket secure to the back of
your unit. Attach to the wall stud using the 2’’ screw provided, through the smaller hole.
3. Place the furniture into position so both mounting brackets are vertically in line
4. Laces the end of the restraint strap though the larger hole in each mounting bracket. Bring both ends together and
slide the flat end through the looking end and flat draw it through until all slack is removed.
5. Confirm that the strap in securely laced and lacked.
Instrucciones de instalacion:
Este seguro contra volcado debe fijarse a un taco de pared con el tornillo de 2” que se incluye.
1. Coloque un soporte firmemente en la parte superior trasera del mueble ,usando el tornillo 5/8” que se proporciona y el
agujero mas pequeño
2. Ubique el otro soporte en la pared sobre un taco y 5cm (2pulg.) por debajo del soporte de montaje asegurado en la
parte bracera de la unidad .Fije al taco de pared usando el taco de 2’’ que incluye y el agujero mas pequeño .
3. Coloque el mueble en el sitio, de modo de modo que los dos soportes estén en una línea vertical.
4. Pase el extremo de una cinta de sujeción por el agujero más grande en cada soporte de montaje, una los dos
extremos y deslice el extremo plano por el lado del cierre, hasta que quede tenso.
5. Confirme que la cinta este bien asegurada.
Instructions d` installation:
Ce dispositif de sécurité doit être fixé au montai d` un mur a` l` aide de la vis de 5cm (2 po) fournie
1. fixer solidement un support a`la traversé supérieure du meuble, en passant la vis de 1,6cm (5/8 po) dans le plus petit
trou.
2. placer I` autre support sur un montant du mur, a` environ 5cm (po) plus bas, par rapport au premier support de fixation,
fixer ce support en passant la vis de 5cm (2 po) fournie dans le plus petit trou.
3. positionner le meuble afin d`aligner verticalement les deux supports de fixation
4. passer l`extrémité de i`attache dans les plus grands trous des deux supports. Joindre les extrémités insérer l`extrémité
plate dans le dispositif de blocage puis tirer au maximum pour desserrer.
5. vérifier que l`attache est solidement fixée et bloquée.
ANTI-TIP PART No HB-488
Back View
PAGE 4 OF 9

2
14
33
Directions of Adjusting
Euro Style Hinges
1.- PLEASE REMOVE SHIPPING
SCREW. #1
2.- LATERAL ADJUSTMENT
a)Loosen screw #4 slightly.
b)Turn screw #2 to move door
leftor right.
c)Re-tighten screw #4.
d)Adjust all hinges accordingly.
3.- VERTICAL ADJUSTMENT
Loosen screws #3 to move door
upor down, then tighten securely
.
PAGE 5 OF 9

WARNING
THIS UNIT IS NOT INTENDED FOR USE WITH CRT TVs.
USE ONLY WITH FLAT PANEL TVs AND AUDIO/VIDEO EQUIPMENT
MEETING THE RECOMMENDED WEIGHT AND SIZE LIMITS. NEVER USE
WITH LARGER/HEAVIER TV'S OR EQUIPMENT THAN RECOMMENDED.
TO AVOID INSTABILITY, PLACE FLAT PANEL TV IN THE CENTER OF THE
UNIT. THE BASE OF THE TELEVISION MUST BE ABLE TO REST ON THE
SUPPORTING SURFACE OF THE UNIT WITHOUT OVER-HANGING THE
EDGES. IMPROPERY POSITIONED FLAT PANEL TVs OR FLAT PANEL TVs
INCLUDING OTHER EQUIPMENT THAT EXCEED THE RECOMMEND SIZE
AND WEIGHT LIMITS COULD FALL OFF OR BREAK THE UNIT, CAUSING
POSSIBLE SERIOUS INJURY. FOR USE WITH TVs WEIGHING LESS THAN
65 LBS (29KG)
OR LESS. USE WITH HEAVIER TELEVISIONS MAY RESULT
IN INSTABILITY CAUSING A TIP OVER RESULTING IN DEATH OR SERIOUS
INJURY.
MAXIMUM RECOMMENDED WEIGHT LOADS
Fits most 50" flat panel tvs. Maximum load 55 lbs.
Maximum shelf load 25 lbs.
PAGE 6 OF 9
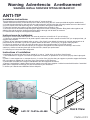
MANUFACTURER: Oak Furniture West
ADRESS: Otay Mesa Ca. 92154
CATALOG: TV CONSOLE
MODEL:
CRE149-87/
24866723

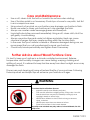
Care and Maintenance
Use a soft, clean cloth that will not scratch the surface when dusting.
•
Use of furniture polish is not necessary. Should you choose to use polish, test first
•
in an inconspicuous area.
Using solvents of any kind on your furniture may damage your furniture's finish.
•
Never use water to clean your furniture as it may damage the finish.
•
Always use coasters under beverage glasses and flowerpots.
•
Liquid spills should be removed immediately. Using a soft, clean cloth, blot the
•
spill gently. Avoid rubbing.
Always use protective pads under hot dishes and plates. Heat can cause
•
chemical changes that may create spotting within the furniture finish.
In the even that your furniture is stained or otherwise damaged during use, we
•
recommend that you call a professional to repair your furniture.
Check bolts/screws periodically and tighten them if necessary.
•
Further Advice about Wood Furniture Care
It is best to keep your furniture in a climate-controlled environment. Extreme
temperature and humidity changes can cause fading, warping, shrinking and
splitting of wood. It is advised to keep furniture away from direct sunlight as sun may
damage the finish.
Proper care and cleaning at home will extend the life of your purchase. Following
these important and helpful tips will enhance your furniture as it ages.
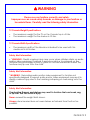
WARNING
Children have died from furniture tip-over.
To reduce the risk of furniture tip-over:
ALWAYS install tip-over restraint provided.
•
FOR use with televisions weighing 65 lbs /29 kg or less. Use with
•
heavier televisions may result in instability causing tip-over
resulting in death or serious injury
NEVER allow children to stand, climb or hang on drawers,
•
doors, or shelves.
NEVER open more than one drawer at a time.
•
Place heaviest items in the lowest drawers.
•
Use of tip-over restraints may only reduce, but not eliminate, the risk
of tip-over.
PAGE 7 OF 9

Please use your furniture correctly and safely.
Improper use can cause safety hazards, or damage to your furniture or
household items. Carefully read the following safety information.
WARNING
TV Console Weight Specifications:
The maximum weight for the TV on the Console top is: 65 Lbs.
•
The maximum weight for the shelves is: 25 Lbs.
•
TV Console Width Specifications:
The maximum width of the television intended to be used with this
•
media unit is: 60 Inches.
Safety Alert Information:
• "
WARNING
- Death or serious injury may occur when children climb on audio
and/or video equipment furniture. A remote control or toys placed on the
furniture may encourage a child to climb on the fumiture and as a result the
furniture may tip over onto the child."
Safety Alert Information:
"
WARNING
- Relocating audio and/or video equipment to furniture not
specitically designed to support audio and/or video equipment may result in
death or serious injury due to the furnishing collapsing or overturning onto the
child."
Safety Alert Information:
Overloading Drawers and shelves may result in furniture that can break, sag,
or tip over. This can result in injury.
Never
exceed the weight limits shown.
Always
place heavier items on lower shelves as far back from the front as
possible.
PAGE 8 OF 9

TV Placement on the console:
"Always place TV no more than two inches from the back edge of the console.
Placing TV more than two inches from the back edge may increase the risk
that the console will tip over'
Safety Alert Information:
Moving furniture that is not designed to be moved or equipped with casters may
result in injury or damage to furnishings and/or personal property.
Always
unload shelves and drawers, starting with top surfaces, before moving.
Never
push or pull furniture on carpet. Have a second person help lift properly to
move and/or reposition furniture.
PAGE 9 OF 9
MANUFACTURER: Oak Furniture West
ADRESS: Otay Mesa Ca. 92154
CATALOG: TV CONSOLE
MODEL:
CRE149-87/
24866723
-
 1
1
-
 2
2
-
 3
3
-
 4
4
-
 5
5
-
 6
6
-
 7
7
-
 8
8
-
 9
9


ROOMS TO GO 24866723 Assembly Instructions
- Taper
- Assembly Instructions
dans d''autres langues
- English: ROOMS TO GO 24866723
Documents connexes
-
ROOMS TO GO 25124900 Assembly Instructions
-
-
-
-
-
-
Autres documents
-
Costway KC53797NA Manuel utilisateur
-
Sauder 419119 Mode d'emploi
-
-
 Whalen MAR3N1C Manuel utilisateur
-
-
-
-
