Rowenta MASTER VALET Le manuel du propriétaire
- Taper
- Le manuel du propriétaire

1800140122-02 - 36/16
1800140122-02 IS6300 US.qxp_110X154 12/09/2016 10:06 Page1

INSTRUCTIVO DE OPERACION
Le invitamos a leer cuidadosamente este
instructivo antes de usar su aparato, en el
encontrarà sus caracteristicas e instrucciones
para el mejor aprovechamiento del mismo.
Verifique que el voltaje de su instalacion sea
igual al de su aparato el cual se indica en este
instructivo
Central de vapor
Modelo. IS63xx
Caracteristicas eléctricas:
120 V ~ 60 Hz 1550 W
Importado por:
Groupe SEB MEXICO, S.A. DE C.V
Calle Goldsmith 38-401 Piso 4 Polanco
Distrito Federal C.P. 11560 México, D.F.
Servicio al Consumidor :
01 (800) 112.83.25
01 (800) 505.45.00
www.rowenta.com
www.rowenta.ca
EN
ES
FR
MASTER VALET
IS63XX
1800140122-02 IS6300 US.qxp_110X154 12/09/2016 10:06 Page2

1
7
8
4
21
20
2
3
6
10
11
13
12
14
5
15
16
17
18
19
9
e
el
s
a
e
N
S
R
1800140122-02 IS6300 US.qxp_110X154 12/09/2016 10:06 Page3

6
22b
22a
22c
1800140122-02 IS6300 US.qxp_110X154 12/09/2016 10:06 Page4

fig. 1 fig. 2 fig. 3
fig. 4
fig. 7 fig. 8 fig. 9
fig. 6fig. 5
1
2
3
1800140122-02 IS6300 US.qxp_110X154 12/09/2016 10:06 Page5

fig. 16
fig. 13
fig. 14
fig. 17 fig. 18
fig. 15
fig. 10 fig. 11 fig. 12
1
1800140122-02 IS6300 US.qxp_110X154 12/09/2016 10:06 Page1

•
•
•
•
•
•
•
•
•
•
•
•
•
•
•
fig. 22
fig. 23 fig. 24
fig. 21
fig. 19 fig. 20
fig. 15
2
1800140122-02 IS6300 US.qxp_110X154 12/09/2016 10:06 Page2

3
IMPORTANT SAFETY
INSTRUCTIONS
• When using your appliance, basic precautions should always be followed,
including the following:
• Read all instructions before using this product.
• This product has been designed for domestic and indoor use only. Any
commercial use, inappropriate use or failure to comply with the instructions,
the manufacturer accepts no responsibility and the guarantee will not apply.
• WARNING ! The voltage of your electrical installation must correspond to
that of the appliance (120V). Connecting to the wrong voltage may cause
irreversible damage to the steamer and will void the guarantee.
• Use appliance for its intended use only.
• To reduce the risk of contact with hot water emitting from steam vents, check
appliance before each use by holding it away from body and operating
steam button.
• Never pull on the cord to disconnect the appliance from electrical outlet;
instead, grasp plug and pull to disconnect the appliance.
• Do not allow cord to touch hot surfaces. Let appliance cool completely down
before putting away. Loop cord loosely around appliance when storing.
• Always disconnect appliance from electrical outlet when filling with water or
emptying, and when not in use.
• Do not operate appliance with a damaged cord or if appliance has been
dropped or damaged. To avoid the risk of electric shock, do not disassemble
or attempt to repair the appliance. Take it to the nearest authorized approved
service center for examination and repair. Incorrect reassembly or repair
could cause a risk of fire, electrical shock or injury to persons when the
appliance is used.
• Close supervision is necessary for any appliance being used by or near
children.
• Do not leave appliance un-attended while plugged in or while it is still hot.
• Burns could occur from touching hot metal or plastic parts, hot water or
steam.
• Use care when you empty a steam appliance. There may be hot water in the
reservoir.
• If an extension cord is absolutely necessary, a cord with a 15A ampere rated
shall be used. A cord rated for less amperage can result in a risk of fire or
electric shock due to overheating. Care shall be taken to arrange the cord so
1800140122-02 IS6300 US.qxp_110X154 12/09/2016 10:06 Page3

B
1
P
1
2
3
4
5
H
1
2
3
4
5
2
•
•
1
2
3
4
5
6
7
8
9
1
1
1
D
4
that it cannot be pulled or be tripped over.
• To protect against a risk of electric shock, do not immerse the appliance in
water or other liquids.
• Do not direct steam at people, animals or clothes while they are being worn.
• This appliance is not intended for use by persons (including children) with
reduced physical, sensory or mental capabilities, or lack of experience and
knowledge, unless they have been given supervision or instruction
concerning use of the appliance by a person responsible for their safety.
Children should be supervised to ensure that they do not play with the
appliance.
• The use of other accessory attachments than those provided by is not
recommended and may result in fire, electric shock or personal injury.
• The appliance must be rested on a stable surface. When placing the
appliance on its base, ensure that the surface on which the base is placed is
stable.
• The appliance must not be used if it has been dropped, if there are visible
signs of damage or if it is leaking.
• Check the electrical power for sign and ware or damage prior to use. If the
electrical power is damaged, it must be replaced at an approved service
center to avoid any danger.
• To reduce the risk of electric shock, this appliance has a polarized plug (one
blade is wider than the other). This plug will fit in a polarized outlet only one
way. If the plug does not fit fully in the outlet, reverse the plug. If it still does
not fit, contact a qualified electrician to install the proper outlet. Do not
change the plug in any way.
• The surfaces which are marked or close to with this sign are very hot during
the use of the appliance. Do not touch these surfaces before the appliance
has cooled down.
The surfaces which are marked or close to with this sign are very hot
during the use of the appliance. Do not touch these surfaces before the
appliance has cooled down.
SAVE THESE INSTRUCTIONS
ENVIRONMENTAL PROTECTION FIRST !
i Your appliance contains valuable materials which can be recovered or re-
cycled.
‹ When disposing of it, take it to a collection point or an approved service
center.
1800140122-02 IS6300 US.qxp_110X154 12/09/2016 10:06 Page4

5
BEFORE USE
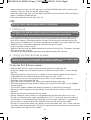
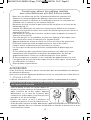
1 • Garment steamer assembly
Pole assembly
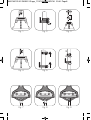
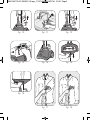
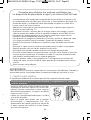
1. Unscrew the pole’s fastening screw on the base of the pole. (fig. 1)
2. Hold the pole such that the cord holder is on the left. Check that the 2 pole clips are
unlocked. (fig. 2)
3. Insert the pole into the base by pressing downwards until the holes of the pole and
base are at the same level, so that you can put the screw back. If the holes are not
aligned, check that the clips of the pole are well and truly unlocked. (fig. 3)
4. Screw the pole fastening screw back in as far as it will go so that the pole is firmly
fixed to the base. (fig. 4).
5. Adjust the pole to its maximum height by sliding it upwards (fig. 5) then locking the
2 clips. (fig. 6). Make sure the 3 segments of the pole are fully extended.
Hanger with Roll & Press system assembly
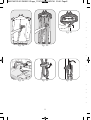
1. Unscrew the hanger fastening screw at the bottom of the hanger. (fig. 7)
2. Hold the hanger such that the Roll & Press system handle is on the same side as the
locking hook.
3. Insert vertically the hanger on the top of the pole. The holes at the bottom of the
hanger and in the pole should be at the same level. (fig. 8)
4. Put the screw back and screw in as far as it will go so that the hanger is firmly fixed
to the pole. (fig. 9)
5. Install the steam head between the hanger hooks.
2 • Filling the water tank
• Ensure that the steamer is unplugged. Remove the water tank from the base of the
appliance by pulling the handle upwards (fig. 10). Unscrew the tank cap and fill the
tank. (fig. 11). Maximum capacity is indicated by the “max” mark.
• The steamer must be used with TAP WATER. If the water in your area is hard, Rowenta
IMPORTANT: Never use water that contains additives (starch, perfume, aromatic subs-
tances, softener, etc) in the steamer. Additives such as these can affect the properties
of the steam and lead to the formation of deposits.
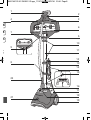
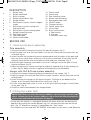
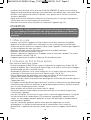
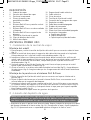
1. Steam head
2. Steam head hook
3. Built in hanger
4. Rotary trouser/dress clips
5. Hanger holder
6. Roll & press system: vertical support
shade
7. Roll & press system: rolling and
locking handle
8. Roll & press system: locking hook
9. Hanger fastening screw
10. Pole locking clips
11. Telescopic pole
12. Electric cord holder
13. Electric cord
14. Velcro strip
15. Pole fastening screw
16. Steam hose connector
17. Removable water tank
18. ON/OFF pedal
19. Transport wheels
20. Textile steam hose
21. On/ off light
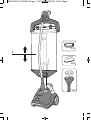
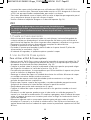
22. Built in accessories
a. Fabric brush
b. Lint pad
c. Delicates steam cap
DESCRIPTION
n
n.
h
d
n
y.
e
t
e
s
e
e
e
e
e
s
t
g
e
t
e
-
1800140122-02 IS6300 US.qxp_110X154 12/09/2016 10:06 Page5

A
1
•
•
•
6
recommends that you mix half tap water and half distilled water, which reduces the
hardness. You can also use bottled spring water.
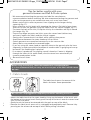
• After closing the cap, turn the tank down and hold it by the handle. Check out that no
water is leaking through the cap.
• Place the water tank on the base (fig. 12).
USE
1 • Setting up
• Only operate the steamer on the floor clear of any materials which may obstruct the
base of the steamer (flat and horizontal surface). Do not obstruct the openings on the
lower part of the appliance. This device should not be used on very thick carpets or rugs.
• Undo the Velcro strip and completely unwind the electrical cord.
• Plug in to power socket. (fig.13)
• Switch on by pressing the pedal located at the front of the device. The power indicator
light will come on. (fig.14)
• The device will begin producing steam after approximately 60 seconds.
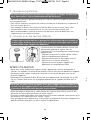
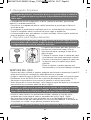
2 • Using the Roll & Press system
To use the Roll & Press system:
• Hold the Roll & Press system handle and roll down the shade (fig. 15).
• Insert the handle into the locking hook on the pole and check that it is firmly locked.
(fig. 16)
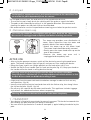
• Hang the garments from the built-in hanger or from another hanger which may be
suspended from the hook located on the hanger rod. (fig. 18-19)
• To steam trousers, we recommend that you also use the support with clips as
indicated in the illustration.(fig. 20)
• Grasp the steam head with the steam vents pointing away from you.
• Start steaming by brushing material lightly with the grain of the fabric in an up/down
vertical motion.
• The vertical support shade helps keep the garment in place while steaming.
• Start at the top the garment and gradually move downward. Always steam in a vertical
position.
• Always be careful not to touch the hot steam.
• Always hang the steam head in an upright position on the hook when not in use.-
• During use, the hose may make a gurgling noise. This is a normal occurrence due to
condensation. If the device begins to gurgle, rest the steam head on its support for a
few moments in order to direct the condensation into the device once again.
• During use, some water drips may appear on the telescopic pole. This is also a normal
occurrence due to condensation. To limit this phenomena, do not press too heavily the
steam head on the Roll & Press shade.
Warning: Never steam a garment while it is being worn.
The flexible hose and the end of the steam head can become extremely hot during
use. This is perfectly normal. Be careful and avoid any prolonged contact.
The Roll & Press system integrated in the hanger provides a vertical support while
steaming, to help remove wrinkles more easily and efficiently.
1800140122-02 IS6300 US.qxp_110X154 12/09/2016 10:06 Page6

7
Tips for better results with your
garment steamer and Roll & Press system
• We recommend checking the garment care label for manufacturer
recommendations before steaming. We also recommend testing the garment and
effect on the garment on an unobtrusive area such as an inner seam.
• Button up the shirt’s collar to prevent from slipping on the hanger during
steaming (fig. 17).
• When steaming a shirt, begin with steaming the sleeves. Get hold of one sleeve
and cross it over the garment using the Roll & Press for vertical support (fig. 17).
• To steam the back of the shirt, lift up the shirt by the shoulders and flip it around
the hanger (fig. 19).
• To put crisp edges on pants and shirts, press the steam head (without any
accessory) against the fabric and the vertical support.
• Gently press steamer brush into fabric while making slow passes.
• Avoid contact between the steam head and silk or velvet.
• Certain garments are smoothed more easily on the reverse side.
• Heavy fabrics may need to be steamed longer.
• If you are using the steam head at a position close to the ground, raise the hose
frequently in order to avoid the formation of condensation. A gurgling noise may
be heard if the flexible pipe is pinched.
• If no steam is produced, if a gurgling sound is heard or if water is dripping
through the holes of the steam head, raise the steam hose occasionally to
remove condensation inside.
• Be careful at all times.
ACCESSORIES
1 • Fabric brush
The fabric brush opens the weave of the
fabrics for better steam penetration.
• Attach the fabric brush to the steam head by lining up the bottom of the brush with
the bottom of the steam head. Gently push the top of the brush onto the steam head
until it clicks into place.
• Gently brush the area to be steamed with the grain or nap of the fabric.
• Remove the fabric brush once unit is unplugged and completely cool. Remove it by
pressing on the release tab on top of brush while pulling it forward.
Before using an accessory, check the manufacturer recommendations.
It is also recommend that you carry out a test on part of the fabric which cannot
be seen.
Be sure unit is unplugged and completely cool before attaching accesories.
s.
r
al
l
e
1800140122-02 IS6300 US.qxp_110X154 12/09/2016 10:06 Page7

2
•
•
•
•
•
8
2 • Lint pad
The lint pad removes hair, lint and animal fur for a professional finish.
• To use the lint pad, slowly brush the clothing with the grain or nap of the fabric.
• The pad can be cleaned by brushing it in the opposite direction. We recommend
cleaning the pad on an old cloth that can be discarded.
• We recommend to use the lint pad before steaming your clothes for perfect results.
3 • Delicates steam cap
The steam cap provides even distribution of
steam, filters impurities from the water and
protects fabrics from water dripping.
• Attach the steam cap to the steam head.
The steam head should be totally covered.
• Gently press the steam head with cap on the
area to be steamed.
• Remove the steam cap once unit is
unplugged and completely cool.
AFTER USE
• After using the garment steamer, switch off the device by pressing the pedal once
again. The power indicator light will go off, and you can then unplug the device.
• Hang the steam head in an upright position on the hook when not in use.
• Unlock the Roll & Press handle from its hook on the pole (fig. 21). Keep your hand on
the handle while the shade is rolling back to the top.
• Empty and rinse the water tank each time before storage in order to flush out any
scale particles. (fig. 22)
• Loosely wind up the electrical cord and close with the Velcro strip, then hang it from
the clip on the pole. (fig.23 - fig. 24)
• Do not carry the steamer by the water tank handle. This appliance includes luggage
style wheels for added convenience when transporting.
1 • TRANSPORT
• Your device is fitted with two wheels for ease of transport. Tilt the device towards the
rear holding the pole and then pull along to transport.
• You can also lift up the device in order to transport it, again holding the device by the
pole.
The lint pad is a separate accessory and cannot be attached to the steam head.You
can use the lint pad independently from the steamer.
The steam cap cannot be used together with the fabric brush on the steam head.
Be sure unit is unplugged and completely cool before attaching accesories.
Warning: never let go of the handle until the shade has totally rolled back.
Once the device is switched off, it is recommended to wait several minutes so that
the Roll & Press shade has dried before rolling it back.
Warning: Never touch the head until it has cooled down completely.
1800140122-02 IS6300 US.qxp_110X154 12/09/2016 10:06 Page8

9
2 • Cleaning
• Clean the main unit with a damp cloth.
• Clean the Roll & Press system shade with a damp cloth or non abrasive sponge.
Do not use any cleaning products such as soap or detergents.
• Always handwash the delicates steam cap and wait until it is totally dry before using
again.
• To maintain maximum performance, your steamer must be descaled occasionally.
The time between descaling operations depends on the quality of the water and the
frequency with which you use the appliance. The appliance must be descaled at least
once a year or after 50 hours of use.
• To carry out a descaling operation, follow the following steps:
1. Ensure that the appliance has cooled down completely (2 hours minimum).
2. Fill the water tank with fresh water and place it on the main unit
allowing water to fill the boiler.
3. Remove the water tank from the base and empty out the water via the water tank
filling hole by tipping the device over a sink. Limescale and other residues are
thus removed.
4. Repeat step 2 and 3 several times until the scale has been removed.
CAUTION: Don’t fill the boiler by the steam head holes !
Never immerse the steam head in water !
Do not attempt to lift up or transport the device holding the Roll & Press shade, the
pedal, the water tank handle or the built-in hanger.
Always roll back the Roll & Press shade before transporting the device.
Always make sure the pole is firmly attached to the base unit before lifting up the
device (see assembly instructions).
f
d
d.
e
s
1800140122-02 IS6300 US.qxp_110X154 12/09/2016 10:06 Page9

•
•
•
•
•
•
•
•
•
•
•
•
•
•
10
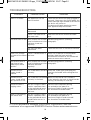
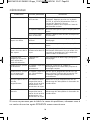
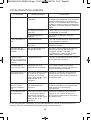
TROUBLESHOOTING
Problems Possible causes Solutions
There is no steam. The appliance has not
been turned on.
Check that the device has been plugged in
correctly. Next press the On/Off pedal, the
power indicator light located at the front of
the device will come on.
The device will begin producing steam
after approximately 60 seconds.
The hose has been
obstructed.
Check that the hose is not bent or twisted.
There is no water left in
the water tank.
Switch off the device and fill the water
tank.
The steam flow is low. Your steamer has a build-
up of scale because it has
not been rinsed out
regularly.
See descaling process (Cleaning
paragraph).
The hose has been
obstructed.
Check that the hose is not bent or twisted.
Water runs through
the holes of the steam
head.
There is condensation in
the hose.
Never use a steamer in the horizontal
position. Hold the hose vertically
outstretched and wait for the condensed
water to return to the steamer.
The steamer takes a
long time to heat
and/or ejects white
particles.
Your steamer has a build-
up of scale because it has
not been descaled
regularly.
See descaling process (Cleaning
paragraph).
The Roll & Press
system shade is
crooked.
The shade didn’t roll back
correctly.
Unroll the shade again and keep your
hand on the handle while rolling back to
the top.
The Roll & Press
system shade rolled
back up while in use.
The shade was not locked
correctly in the hook.
Make sure the Roll & Press handle is
firmly locked in the hook. It should not be
moving horizontally or vertically.
The hose makes a
gurgling noise.
You are using the steam
head in a position close
to the ground and some
condensation occurs in
the hose.
Raise the hose frequently during
use and adjust the pole to its
maximum height in order to avoid
the formation of condensation.
Water is overflowing
from water tank.
You are using the steam
head in a position close
to the ground and some
condensation occurs in
the hose.
Raise the hose frequently during
use and adjust the pole to its
maximum height in order to avoid
the formation of condensation.
If it is not possible to establish the cause of the problem, seek the
assistance of an approved ROWENTA Service Center www.rowenta.com
1800140122-02 IS6300 US.qxp_110X154 12/09/2016 10:07 Page10

11
CONSIGNES DE SÉCURITÉ
IMPORTANTES
• Lorsque vous utilisez votre appareil, les précautions de base devraient
toujours être respectées, notamment les suivantes :
• Lisez toutes les instructions avant d'utiliser cet appareil.
• Cet appareil a été conçu pour un usage domestique et pour l'intérieur
seulement. En cas d’utilisation commerciale, inappropriée ou non conforme
au mode d’emploi, le fabricant décline toute responsabilité et la garantie ne
s’applique pas.
• ATTENTION ! La tension de votre installation électrique doit correspondre à
celle du fer (120 V). Une connexion à la mauvaise tension peut causer des
dommages irréversibles au fer et rend la garantie invalide.
• N'utilisez cet appareil que pour l'utilisation pour laquelle il est prévu.
• Pour réduire le risque de contact avec l'eau chaude sortant des valves
d’émission de la vapeur, faites fonctionner l'appareil avant chaque utilisation
en le tenant éloigné de vous et en utilisant le bouton vapeur.
• Ne tirez jamais sur le cordon pour débrancher l’appareil de la prise
électrique; saisissez plutôt la fiche et tirez dessus pour débrancher l'appareil.
• Évitez que le cordon ne touche des surfaces chaudes. Laissez l'appareil
refroidir complètement avant de le ranger. Enroulez simplement le cordon
autour de l'appareil pour le ranger
• Assurez-vous que l'appareil est débranché lors du remplissage, de la
vidange ou lorsque vous ne l’utilisez pas.
• Évitez de faire fonctionner l'appareil si son cordon est endommagé ou si
l'appareil est tombé ou qu’il est endommagé. Pour éviter tout risque de choc
électrique, ne démontez pas et ne tentez pas de réparer l'appareil. Apportez-
le plutôt au centre de services agréé le plus proche pour inspection et
réparation. Un réassemblage ou une réparation incorrects peuvent entraîner
un incendie, des chocs électriques ou des blessures chez les utilisateurs de
l’appareil.
• Une surveillance accrue est nécessaire lorsque l’appareil est utilisé par des
enfants ou en leur présence.
• Ne laissez pas l'appareil branché sans surveillance, ou pendant qu'il est
encore chaud.
• Soyez prudent lorsque vous videz un appareil à vapeur. Vous vous exposez
au risque de brûlures au contact des pièces métalliques chaudes, de l'eau
chaude ou de la vapeur. Il pourrait y avoir de l'eau chaude dans le réservoir.
• Si une rallonge est absolument nécessaire, veillez à utiliser un cordon avec
un ampérage égal à 15 ampères. Un cordon électrique d'un ampérage
inférieur entraîne un risque d'incendie ou de choc électrique dû à une
surchauffe. Lorsque vous utilisez une rallonge, des précautions
f
1800140122-02 IS6300 US.qxp_110X154 12/09/2016 10:07 Page11

A
1
A
1
2
3
4
5
A
1
2
3
4
5
2
•
1
2
3
4
5
6
7
8
9
1
1
D
12
supplémentaires doivent être prises pour s'assurer que personne ne
trébuche sur le cordon.
• Pour réduire le risque de choc électrique, n’immergez pas l'appareil dans
l'eau ou dans d'autres liquides.
• Ne dirigez pas la vapeur vers des personnes et des animaux et ne repassez
pas de vêtements lorsqu'ils sont portés.
• Cet appareil n’est pas prévu pour être utilisé par des personnes (y compris
des enfants) dont les capacités physiques, sensorielles ou mentales sont
réduites, ou des personnes manquant d’expérience ou de connaissances,
sauf si elles ont pu bénéficier, par l’intermédiaire d’une personne
responsable de leur sécurité, de supervision ou d’instructions préalables
concernant l’utilisation de l’appareil.
• L'utilisation d'accessoires étrangers qui ne sont pas fournis avec l'appareil
n'est pas recommandée et peut entraîner un incendie, un choc électrique ou
des blessures.
• L’appareil doit être utilisé et rangé sur une surface plane. Lorsque vous
placez l’appareil sur son support, veillez à ce que la surface sur laquelle est
placée le support soit stable.
• L’appareil ne doit pas être utilisé s'il est tombé par terre, s’il porte des signes
visibles d’endommagement ou s’il fuit.
• Vérifiez le cordon électrique à la recherche de signes d'usure ou
d’endommagement avant toute utilisation. Si le cordon électrique est
endommagé, il doit être remplacé dans un centre de services agréé pour
éviter tout danger.
• La température des surfaces portant ce signe ou des surfaces autour de ce
signe est très élevée pendant l'utilisation de l'appareil. N'y touchez pas avant
que l'appareil ne soit refroidi.
La température des surfaces portant ce signe ou des surfaces autour de
ce signe est très élevée pendant l'utilisation de l'appareil. N’y touchez
pas avant que l'appareil ne soit refroidi.
CONSERVEZ CES
INSTRUCTIONS
PARTICIPONS À LA PROTECTION DE L’ENVIRONNEMENT !
i Votre appareil contient des matériaux récupérables ou recy-
clables.
‹ Lorsque vous souhaitez vous en débarrasser, déposez-le
dans un point de collecte ou un centre de service agréé.
1800140122-02 IS6300 US.qxp_110X154 12/09/2016 10:07 Page12

13
AVANT UTILISATION
1 • Installation du défroisseur
Assemblage du mât télescopique
1. Dévissez et retirez la vis de fixation du mât qui se trouve sur la base. (fig. 1)
2. Tenez le mât de façon à ce que l’accroche cordon électrique soit à gauche. Vérifiez
que les 2 clips du mât soient déverrouillés. (fig. 2)
3. Insérez le pôle dans la base en appuyant vers le bas, jusqu’à ce que les trous du mât
et de la base soient au même niveau, de manière à remettre la vis. Si les trous ne
correspondent pas, vérifiez que les clips du mât soient bien déverrouillés. (fig. 3)
4. Revissez la vis de fixation du mât jusqu’au bout afin que le mât soit solidement fixé à
la base. (fig. 4)
5. Déployez le mât jusqu'à sa hauteur maximale en le glissant vers le haut (fig 5) puis
verrouillez les 2 clips (fig 6) Assurez vous que les 3 segments du mât soient
totalement déployés.
Assemblage du cintre avec Roll & Press sytem
1. Dévissez la vis de fixation du mât qui se situe en bas du cintre (fig.7).
2. Tenez le cintre de telle sorte que la poignée du Roll & Press system se trouve du
même côté que l'accroche de verrouillage.
3. Insérez le cintre sur le haut du mât. Les trous en bas du cintre et dans le mât doivent
arriver au même niveau (fig 8)
.
4. Remettez la vis et revissez jusqu'au bout afin que le cintre soit solidement fixé au mât
(fig 9)
.
5. Installez la tête vapeur entre les crochets du cintre.
2 • Remplissage du réservoir d’eau
• Veillez à ce que l’appareil soit débranché. Retirez le réservoir d’eau de la base de
l'appareil en tirant la poignée vers le haut (fig. 10). Dévissez le bouchon du réservoir et
remplissez le réservoir (fig. 11). Sa capacité maximale est atteinte au repère « max ».
IMPORTANT : N’utilisez pas d’eau contenant des additifs (tels que l'amidon, des par-
fums, des substances aromatiques, des adoucissants, etc.) dans votre défroisseur. De
tels additifs peuvent altérer les propriétés de la vapeur et peuvent former des dépôts.
1. Tête vapeur
2. Crochet tête vapeur
3. Cintre intégré
4. Pinces rotatives pantalon/robe
5. Accroche cintre
6. Roll & press system: support vertical
de défroissage
7. Roll & press system: poignée
d'enroulement et de verrouillage
8. Roll & press system: accroche de
verrouillage
9. Vis de fixation du cintre
10. Clips de verrouillage du mât
11. Mât téléscopique
12. Accroche cordon électrique
13. Cordon électrique
14. Bande velcro
15. Vis de fixation du mât
16. Raccord de tuyau vapeur
17. Réservoir amovible
18. Pédale marche/arrêt
19. Roues de transport
20. Cordon vapeur en textile
21. Voyant lumineux marche/arrêt
22. Accessoires intégrés
a. Brosse à étoffe
b. Brosse anti-peluches
c. Housse pour textiles délicats
DESCRIPTION
e
s
z
s
t
,
e
s
l
u
s
t
s
u
t
r
e
t
e
z
1800140122-02 IS6300 US.qxp_110X154 12/09/2016 10:07 Page13

A
A
d
N
1
L
•
•
•
14
• Le défroisseur doit être utilisé avec de l’EAU DU ROBINET. Si votre eau est calcaire,
Rowenta recommande de mélanger une moitié d’eau du robinet avec une moitié d’eau
distillée, ce qui permet de réduire la dureté ; vous pouvez aussi utiliser une eau de
source en bouteille.
• Après avoir revissé le bouchon,retournez le réservoir pour le saisir par la poignée et
vérifiez que l’eau ne s’écoule pas par le bouchon.
• Remettez le réservoir d’eau en place sur la base de l’appareil (fig. 12).
UTILISATION
1 • Mise en route
• Lorsque vous utilisez l’appareil, veillez à retirer du sol tout matériau susceptible
d’obstruer la base du défroisseur (utilisation sur une surface plane et horizontale).
N’obstruez pas les orifices sur la partie inférieure de l’appareil. N'utilisez pas l'appareil
sur des moquettes ou tapis très épais.
• Détachez la bande velcro et déroulez entièrement le cordon électrique.
• Branchez la fiche d’alimentation. (fig.13)
• Allumez l’appareil en appuyant sur la pédale située à l’avant de l’appareil. Le voyant
d’alimentation s’allume. (fig.14)
• L’appareil produit de la vapeur au bout de 60 secondes environ.
2. Utilisation du Roll & Press system
Pour utiliser le Roll & Press system:
• Prenez la poignée du Roll & Press system et deroulez le support vers le bas (fig 15)
• Insérez la poignée dans l'accroche de verrouillage sur le mât et vérifiez que le support
de défroissage est bien verrouillé (fig 16)
• Suspendez le vêtement sur le cintre intégré ou sur un autre cintre que vous pouvez
suspendre à l’accroche cintre situé sur la tige du cintre. (fig 18-19)
• Pour le défroissage des pantalons, nous vous conseillons d’utiliser également le
support avec pinces comme indiqué sur le dessin (fig 20).
• Saisissez la tête vapeur en prenant soin de diriger les orifices de diffusion de vapeur à
l’opposé de vous.
• Le support vertical de défroissage aide à tenir en place le vêtement lors du défroissage
• Commencez par le haut du vêtement et descendez progressivement. Veillez à toujours
tenir le tuyau flexible en position verticale.
• Soyez prudent afin d’éviter tout contact avec la vapeur.
• Accrochez toujours la tête vapeur en position verticale sur le crochet lorsque vous
n'utilisez pas l’appareil.
• Lors de l’utilisation, il arrive que le tuyau fasse un bruit de gargouillement. Il s’agit du
résultat normal de la condensation. S’il commence à gargouiller, reposez la tête
vapeur sur son support pendant quelques instants afin de diriger la condensation à
nouveau dans l’appareil.
• Lors de l'utilisation, quelques gouttes d'eau peuvent apparaitre sur le mât
téléscopique. Il s’agit du résultat normal de la condensation. Pour limiter ce
phénomène, n'appuyez pas trop fort la tête vapeur contre le support vertical Roll &
Press.
Avertissement : Ne défroissez jamais un vêtement directement sur une personne.
Le tuyau flexible et l'extrêmité de la tête vapeur peuvent devenir très chauds lors
de l’utilisation. Ceci est parfaitement normal. Soyez prudent et évitez tout contact
prolongé.
1800140122-02 IS6300 US.qxp_110X154 12/09/2016 10:07 Page14

15
Conseils pour obtenir les meilleurs résultats
avec votre défroisseur et le Roll & Press system
• Nous vous conseillons de vérifier l’étiquette d’entretien du vêtement afin
d’obtenir les recommandations du fabricant. Nous vous recommandons
également de tester le vêtement et la solidité de la couleur sur une partie non
visible de celui-ci comme sur une couture intérieure.
• Boutonnez le col de la chemise pour éviter qu'elle ne glisse sur le cintre lors du
défroissage (fig 17).
• Lorsque vous défroissez une chemise, commencez par défroisser les manches:
saisissez une manche et croisez la en travers du vêtement pour pouvoir utiliser le
support Roll & Press.
• Pour défroisser l'arrière de la chemise, soulevez la par les épaules et tournez la
autour du cintre (fig 19).
• Pour faire des plis sur les pantalons ou chemises, appuyez la tête vapeur (sans
aucun accessoire) contre le vêtement et le support vertical.
• Appuyez légèrement la brosse à étoffe sur le tissu en faisant des gestes lents.
• Évitez tout contact de la tête de vapeur avec de la soie ou du velours.
• Certains articles se défroissent plus facilement sur l’envers.
• Les tissus plus lourds peuvent nécessiter une opération de défroissage plus
longue.
• Si vous défroissez dans une position basse proche du sol, redressez le tuyau
fréquemment afin d'empêcher la formation de condensation. Un bruit de
gargouillement peut survenir en cas de pincement du tuyau flexible.
• Si aucune vapeur ne se produit, si vous entendez des gargouillements ou si de
l’eau goutte par les trous de la tête vapeur, élevez le tuyau vapeur afin d’enlever
la condensation à l’intérieur.
• Soyez prudent en permanence.
ACCESSOIRES
Avant d’utiliser un accessoire, prenez connaissance des recommandations du fabricant
du vêtement à défroisser.
Nous vous conseillons également d'effectuer un test sur une partie non visible du tissu.
1 • Brosse à étoffe
La brosse à étoffe ouvre la trame du tissu pour favoriser la pénétration de la vapeur.
• Fixez la brosse à tissus sur la tête vapeur en
orientant la partie inférieure de la brosse sur la
partie inférieure de la tête vapeur. Appuyez
délicatement sur le haut de la brosse pour
l’enfoncer sur la tête vapeur jusqu’à ce que vous
entendiez le clic de verrouillage.
• Brossez sans forcer la zone à défroisser en
respectant le grain ou le sens des fibres du tissu.
• Avant de retirer la brosse à étoffe, débranchez l’appareil et attendez son refroidissement
complet. Appuyez alors sur le bouton de libération en haut de la brosse tout en tirant
l’accessoire vers l’avant.
Avant de fixer un accessoire sur la tête, vérifiez que celle-ci parfaitement froide et
que l'appareil est débranché.
u
e
1800140122-02 IS6300 US.qxp_110X154 12/09/2016 10:07 Page15
La page est en cours de chargement...
La page est en cours de chargement...
La page est en cours de chargement...
La page est en cours de chargement...
La page est en cours de chargement...
La page est en cours de chargement...
La page est en cours de chargement...
La page est en cours de chargement...
La page est en cours de chargement...
La page est en cours de chargement...
La page est en cours de chargement...
-
 1
1
-
 2
2
-
 3
3
-
 4
4
-
 5
5
-
 6
6
-
 7
7
-
 8
8
-
 9
9
-
 10
10
-
 11
11
-
 12
12
-
 13
13
-
 14
14
-
 15
15
-
 16
16
-
 17
17
-
 18
18
-
 19
19
-
 20
20
-
 21
21
-
 22
22
-
 23
23
-
 24
24
-
 25
25
-
 26
26
-
 27
27
-
 28
28
-
 29
29
-
 30
30
-
 31
31


Rowenta MASTER VALET Le manuel du propriétaire
- Taper
- Le manuel du propriétaire
dans d''autres langues
Documents connexes
-
Rowenta 1110030737 Mode d'emploi
-
-
-
-
-
-
-
-
-
Autres documents
-
Tefal IS3340T1 Manuel utilisateur
-
-
-
-
-
-
CHI 11572 Manuel utilisateur
-
-
T-Fal DT6130Q1 Manuel utilisateur
-