
Characteristic Value
Voltage
+24V DC ± 5%
Current Power 5A
Current S-Power Asycube 50&80 1A
Asycube 240 3A
Characteristic Value
Default IP address 192.168.127.254
Default subnet mask 255.255.255.0
Port 4001
Caractéristique Valeur
Tension
+24V CC ± 5%
Consommation 5A
Consommation
alimentation S
Asycube 50&80 1A
Asycube 240 3A
Caractéristique Valeur
Adresse IP par défaut 192.168.127.254
Masque de sous-
réseau par défaut
255.255.255.0
Port 4001
Asycube 80
Asycube 50
Asyril_ASYCUBE_Quickstart_EN-FR-DE-revB 000.100.525 15.11.2016
Asycube 240
Asycube
QUICKSTART
Troubleshooting
• HMI crashes on starting
Start HMI with administrator access (right-
click on HMI shortcut, Properties-
Compatibility, select “Run as administrator”)
• HMI starts but no buttons are displayed
The “SurfaceToolKit” is missing or improperly
installed
Documentation
• Operating Manual
Mechanical and electrical interfaces, optional
equipment, maintenance procedure etc.
• Programming Guide
Communication with the Asycube and related
commands
• User Guide
How to tune vibrations and sequences
Additional information
Have a look at
your
USB
key
!
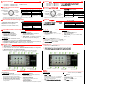
NOTE: The non-modifiable Vibration Set 26 contains default parameters for a standard part.
Start using your Asycube
1. Put parts on the Asycube platform
2. Select the Vibration Set 1 in the “platform” tab
3. In “home” tab test the different Standard Vibrations (shown below)
4. Adjust vibration parameters and Sequences depending on your scenarios
Requirements
Computer with Windows 7 (or above)
.Net 4.0 minimum installed
User rights access allowing to install
and execute software
Configuration
1. Select the “configuration” button on the right
2. Select “asycube” in the list for adding a new product
3. Fill in the details on your Asycube (name given, Ethernet communication information)
4. Save and restart HMI to apply modifications
Installation
1. Insert the USB key
2. Install the “SurfaceToolkitRuntime”
(dependencies folder)
3. Install “HMI_installer_“ (version x64 or x86
depending your computer)
Install and configure Asyril HMI
Ethernet communication (RJ45)
Configure Ethernet communication
Change the IP address of your Computer
to be on the same network as the Asycube
(see table on the right)
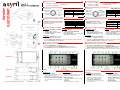
A tight fastening of the Asycube to a solid
base is necessary.
• Asycube 240 4 x M6 screws
• Asycube 80 4 x M5 screws
• Asycube 50 2 x M5 screws
Mo
unt
your Asycube
EN
*S
afety
-
Power has
to be supplied to use backlight or outputs (Asycube 240)
Connect your Asycube electrically
(1) 24VDC PELV
S-Power*
(2) 0V GND
S
-
Power
*
(3) 24VDC PELV
Power
(4) 0V GND
Power
(5) EARTH
On Asycube side:
Power supply (M16, 5 poles)
Alimentations (M16, 5 broches)
*A
limentation de sécurité
doit être alimentée afin d
’utilis
er le
rétroéclairage
ou les sorties
(Asycube 240)
Ra
ccordez électriquement votre Asycube
(1) PELV 24V CC
alimentation S*
(2) 0V TERRE
alimentation S*
(3) Alimentation
PELV 24V CC
(4) 0V TERRE
alimentation
(5) TERRE
Côté Asycube :
Installez votre Asycube
FR
L'Asycube doit être installé sur
une surface solide.
• Asycube 240 4 x M6 vis
• Asycube 80 4 x M5 vis
• Asycube 50 2 x M5 vis
Communication
Ethernet (RJ45)
Configure
z
la communication Ethernet
Changez l’adresse IP de votre
Ordinateur afin d’être sur le même réseau
que l’Asycube (voir tableau à droite)
Condition préalable
Windows 7 (ou plus)
Minimum .Net 4.0 installé
Droits d’accès utilisateur permettant
l’installation & exécution du software
Configuration
1. Sélectionnez le bouton “Configuration” sur la droite
2. Sélectionnez “Asycube” dans la liste pour ajouter un nouveau produit
3. Remplissez les détails de votre Asycube (nom donné, informations de communication)
4. Sauvez et redémarrez l’IHM pour appliquer les modifications
Installation
1. Insérez la clé USB
2. Installez le “SurfaceToolkitRuntime”
(répertoire “dependencies”)
3. Installez “HMI_installer_“ (version x64 ou
x86 dépendant votre ordinateur)
Installez et configurez l’
HM
I
Asyril
Commencez à utiliser votre Asycube
1. Mettez vos pièces sur la plateforme de l’Asycube
2. Sélectionnez le set de vibration 1 dans l’onglet “plate-forme”
3. Dans l’onglet “accueil” testez les différentes vibrations standard (image ci-dessous)
4. Ajustez les paramètres de vibrations et les séquences selon les scenarios
REMARQUE : Le set de vibration 26 (non-modifiable) contient les paramètres par défaut
Dépannage
• HMI plante lors du démarrage
Démarrez l’HMI avec droits d’accès
d’administrateur (click droit raccourci HMI,
Propriétés-Compatibilité, sélectionnez
“exécuter en tant qu’administrateur”)
• Les boutons ne s’affichent pas
Le “SurfaceToolKit” manque ou n’a pas été
installé correctement
Documentation
• Manuel d’instructions
Interfaces mécaniques et électriques,
accessoires, procédure manutention etc.
• Manuel de programmation
Communication avec l’Asycube et
commandes liées
• Guide d’utilisation
Comment régler les vibrations et séquences
Information supplémentaire
Regardez sur votre clé USB !

Eigenschaft Wert
Spannung
+24V CC ± 5%
Stromaufnahme 5A
Abgesicherte
S- Strohmaufnahme
Asycube 50&80 1A
Asycube 240 3A
Eigenschaft Wert
Standard IP-Adresse 192.168.127.254
Standard
Subnetzmaske
255.255.255.0
Port 4001
+24V DC ± 5%
Power
5A
S-Power
Asycube 50&80 1A
Asycube 240 3A
Default IP
192.168.127.254
Default subnet mask 255.255.255.0
4001
Der Asycube muss auf einer soliden Fläche
montiert werden.
• Asycube 240 4 x M6 Schrauben
• Asycube 80 4 x M5 Schrauben
• Asycube 50 2 x M5 Schrauben
Asycube befestigen
DE
Spannungsversorgung (M16, 5
-
polig)
*Um die Hintergrundbeleuchtung oder Ausgänge (Asycube 240) zu benutzen,
muss die Sicherheits-Spannung versorgt werden.
Asycube elektrisch verschalten
(1) 24VDC PELV
S-Power*
(2) 0V GND
S-Power*
(3) 24VDC PELV
Power
(4) 0V GND
Power
(5) MASSE
Auf Asycube-Seite:
Ethernet
Kommunikation
(RJ45)
Ethernet Kommunikation konfigurieren
Verändern Sie die IP Adresse ihres
Computers um auf dem gleichen
Netzwerk zu sein (siehe Tabelle rechts)
Voraussetzungen
Windows 7 (oder mehr)
Minimum .Net 4.0 installiert
Zugriffsrechte um Software zu
installieren und auszuführen
Konfiguration
1. “Konfiguration” Schaltfläche rechts klicken
2. “asycube” in der Liste wählen um neues Produkt hinzuzufügen
3. Details über ihr Asycube angeben (gegebener Name, Kommunikations-Informationen)
4. Speichern und HMI neustarten um die Änderungen zu übernehmen
Installation
1. USB-Stick einführen
2. “SurfaceToolkitRuntime” installieren
(“dependencies” Ordner)
3. “HMI_installer_“ installieren (Version x64
oder x86 vom Computer abhängend)
Asyril HMI installieren und konfigurieren
Asycube nutzen
1. Teile auf Asycube Plattform legen
2. Vibrations-Set 1 im “Plattform” Tab selektieren
3. In der “Startseite“ die verschiedenen Standard-Vibrationen testen (unten abgebildet)
4. Vibrations-Parameter und Sequenzen anpassen
HINWEIS: Der Vibrations-Set 26 enthält die nicht abdingbaren voreingestellte Parameter
Fehlerbehebung
• HMI stürzt beim Start ab
HMI mit Administratorzugriff starten (rechts-
Klick auf HMI Verknüpfung, Eigenschaften-
Kompatibilität, “Als Administrator ausführen”)
• Schaltflächen werden nicht angezeigt
Der “SurfaceToolKit” fehlt oder wurde nicht
richtig installiert
Dokumentation
• Bedienungsanleitung
Mechanische und elektrische Schnittstellen,
Zubehör, Wartung etc.
• Programmieranleitung
Kommunikation mit dem Asycube und
zugehörige Befehle
• Benutzerhandbuch
Vibrationsparameter und Sequenzen anpassen
Zusätzliche Informationen
Sehen Sie im USB-Stick nach!
Troubleshooting
•
HMI
Start HMI
(right-click
on HMI shortcut, Properties/ Compatibility,
select “Run as administrator”)
• HMI
“SurfaceToolKit”
.
•
Manual
/
,
,
.
• Programming
Asycube
• User
Have a look at your USB key!
NOTE:
Set 26
default parameter
.
Asycube
1. (parts) Asycube .
2. Platform탭에서 Vibration Set 1 선택
3. “home” 탭에서 여러 가지의 스탠다드 진동을 테스트 한다. (하기 참조)
4.
.
Windows 7
.Net 4.0 minimum installed
User rights access
.
1. 오른쪽 하단 “configuration”버튼 선택
2. New product 추가를 위해 리스트 내 “asycube” 선택
3. Asycube의 상세정보 입력 (명칭, 이더넷 통신 정보)
4.
변경사항
적용
위해
Save 및 restart
Installation
1. USB key 삽입
2. “SurfaceToolkitRuntime” 설치
(dependencies folder)
3. “HMI_installer_“ ( version x64/
x86 )
&
Asyril HMI
Ethernet
(RJ45)
Ethernet
IP
Asycube IP
( )
Asycube
.
• Asycube 240 4 x M6 screws
• Asycube 80 4 x M5 screws
• Asycube 50 2 x M5 screws
Asycube
KO
*Safety-Power has to be supplied to use backlight or outputs (Asycube 240)
Asycube
(1) 24VDC PELV
S-Power*
(2) 0V GND
S
-
Power
*
(3) 24VDC PELV
Power
(4) 0V GND
Power
(5) EARTH
On Asycube side:
(M16, 5 poles)
-
 1
1
-
 2
2


dans d''autres langues
- English: Asyril Asycube Series
- Deutsch: Asyril Asycube Series
Autres documents
-
BAZZ PR4001CH Guide d'installation
-
OJ Electronics AHC-3000 Mode d'emploi
-
 Winmate W15FA3S-EHA2 Guide de démarrage rapide
-
 Winmate W15FA3S-EHA2 Manuel utilisateur
-
 Winmate W15FA3S-EHA2 Guide de démarrage rapide
-
 Winmate EL Series Quick Start Manuals
-
 Winmate W15FA3S-EHA2 Manuel utilisateur
-
 Winmate W07FA3S-PCM1-PoE Manuel utilisateur
-
Winmate W10FA3S-IPH1HM Manuel utilisateur
-
 Winmate W15FA3S-EHA2 Guide de démarrage rapide


