
Please read these instructions carefully before using this product, and save this manual for future use.
E-Series HMI
W07FA3S-EHT1
W10FA3S-EHH2
W15FA3S-EHA2
Quick Start Guide
V1.1
For more information on this and other Winmate
products, please visit our website at:
www.winmate.com
Document Part Number: 9152111I101C

ii
FCC Statement
This device complies with part 15 FCC rules.
Operation is subject to the following two conditions:
This device may not cause harmful interference.
This device must accept any interference received
including interference that may cause undesired operation.
This equipment has been tested and found to comply with the limits for a class
"B" digital device, pursuant to part 15 of the FCC rules. These limits are
designed to provide reasonable protection against harmful interference when
the equipment is operated in a commercial environment. This equipment
generates, uses, and can radiate radio frequency energy and, if not installed
and used in accordance with the instruction manual, may cause harmful
interference to radio communications. Operation of this equipment in a
residential area is likely to cause harmful interference in which case the user
will be required to correct the interference at him own expense.
European Union
Electromagnetic Compatibility Directive (2014/30/EU)
EN55024: 2010/ A1: 2015
o IEC61000-4-2: 2009
o IEC61000-4-3: 2006+A1: 2007+A2: 2010
o IEC61000-4-4: 2012
o IEC61000-4-5: 2014
o IEC61000-4-6: 2014
o IEC61000-4-8: 2010
o IEC61000-4-11: 2004
EN55032: 2012/AC:2013
EN61000-3-2:2014
EN61000-3-3:2013
Low Voltage Directive (2014/35/EU)
EN 60950-1:2006/A11:2009/A1:2010/A12:2011/ A2:2013
This equipment is in conformity with the requirement of the following EU
legislations and harmonized standards. Product also complies with the
Council directions.

iii
Copyright Notice
No part of this document may be reproduced, copied, translated, or transmitted in
any form or by any means, electronic or mechanical, for any purpose, without the
prior written permission of the original manufacturer.
Trademark Acknowledgement
Brand and product names are trademarks or registered trademarks of their
respective owners.
Disclaimer
Winmate Inc. reserve the right to make changes, without notice, to any product,
including circuits and/or software described or contained in this manual in order
to improve design and/or performance. We assume no responsibility or liability
for the use of the described product(s) conveys no license or title under any
patent, copyright, or masks work rights to these products, and make no
representations or warranties that these products are free from patent, copyright,
or mask work right infringement, unless otherwise specified. Applications that are
described in this manual are for illustration purposes only. We make no
representation or guarantee that such application will be suitable for the specified
use without further testing or modification.
Warranty
Winmate Inc. warranty guarantees that each of its products will be free from
material and workmanship defects for a period of one year from the invoice date.
If the customer discovers a defect, we will, at his/her option, repair or replace the
defective product at no charge to the customer, provide it is returned during the
warranty period of one year, with transportation charges prepaid. The returned
product must be properly packaged in its original packaging to obtain warranty
service. If the serial number and the product shipping data differ by over 30 days,
the in-warranty service will be made according to the shipping date. In the serial
numbers the third and fourth two digits give the year of manufacture, and the fifth
digit means the month (e. g., with A for October, B for November and C for
December).
For example, the serial number 1W14Axxxxxxxx means October of year 2014.

iv
Customer Service
We provide a service guide for any problem by the following steps: First, visit the
website of our distributor to find the update information about the product.
Second, contact with your distributor, sales representative, or our customer
service center for technical support if you need additional assistance.
You may need the following information ready before you call:
Product serial number
Software (OS, version, application software, etc.)
Description of complete problem
The exact wording of any error messages
In addition, free technical support is available from our engineers every business
day. We are always ready to give advice on application requirements or specific
information on the installation and operation of any of our products.
Safety Information
WARNING! / AVERTISSEMENT!
Always completely disconnect the power cord from your chassis
whenever you work with the hardware. Do not make connections
while the power is on. Sensitive electronic components can be
damaged by sudden power surges. Only experienced electronics
personnel should open the PC chassis.
Toujours débrancher le cordon d’alimentation du chassis lorsque
vous travaillez sur celui-ci. Ne pas brancher de connections
lorsque l’alimentation est présente. Des composantes
électroniques sensibles peuvent être endommagées par des sauts
d’alimentation. Seulement du personnel expérimenté devrait ouvrir
ces chassis.
CAUTION/ATTENTION
Always ground yourself to remove any static charge before
touching the CPU card. Modern electronic devices are very
sensitive to static electric charges. As a safety precaution, use a
grounding wrist strap at all times. Place all electronic components
in a static-dissipative surface or static-shielded bag when they are
not in the chassis.
Toujours verifier votre mise à la terre afin d’éliminer toute charge
statique avant de toucher la carte CPU. Les équipements
électroniques moderns sont très sensibles aux décharges
d’électricité statique. Toujours utiliser un bracelet de mise à la
terre comme précaution. Placer toutes les composantes
électroniques sur une surface conçue pour dissiper les charge, ou
dans un sac anti-statique lorsqu’elles ne sont pas dans le chassis.

v
Contents
INTRODUCTION 1
Features 1
Package Contents 2
Product Overview 3
E-Series HMI 7” 3
E-Series HMI 10.1” 4
E-Series HMI 15.6” 5
GETTING STARTED 6
Turning On Your Device 6
Connecting to Other Devices 7
DC Input Connector 7
Serial Port Connector 7
LAN (RJ45) Connector 8
USB A Type Connector 8
USB OTG Connector 8
CAN Bus Connector 9
Changing Serial Port Settings 10
Ethernet 12
Main Menu 12
Configuring Ethernet 13
Checking Ethernet Settings 14
Winmate® Home Manager 15
How to Lock Applications 15
How to Reset WHM 17
Turning Off Your Device 18
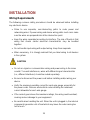
INSTALLATION 19
Wiring Requirements 19
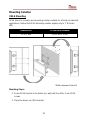
Mounting Solution 20
VESA Mounting 20
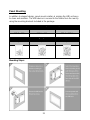
Panel Mounting 21
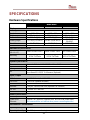
SPECIFICATIONS 22
Hardware Specifications 22
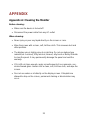
APPENDIX 23
Appendix A: Cleaning the Monitor 23
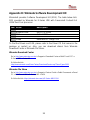
Appendix B: Winmate Software Development Kit 24


1
INTRODUCTION
Congratulations on purchasing Winmate® E-Series HMI. Winmate® continues
developing new generation of Human Machine Interfaces for Industry 4.0 and
Internet of Things (IoT). Our E-Series HMI runs on Android 4.4 / Linux operating
system that allows installing the latest applications (APPs). Thereby wide
customization possibilities are available to satisfy the needs of industrial
automation.
There is one USB 2.0 onboard to connect mouse or keyboard, USB OTG for
system updates and micro SD card for data logging, backup or data storage.
1 GB system memory ensures stable operation of applications.
With mounting clips for panel mounting there is no need to drill holes in a fixture.
This saves you the time for mounting and guarantee aesthetic look of the wall
after the unit gets removed.
Features
Winmate® E-Series HMI features:
Freescale® Cortex® A9 i.MX6 Dual Core 1 GHz
Android/Linux Operating System (Customizable and easy to use)
Resistant to scratches Projected Capacitive Multi-Touch (P-CAP)
Fanless cooling system and Ultra-low power consumption
Front IP65 water and dust proof, rear IP22
Power over Ethernet (Data and Power connections in a single cable)
Mounting clips for Quick Installation
Elegant design for room booking, access control and room information
applications

2
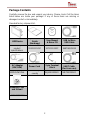
Package Contents
Carefully remove the box and unpack your device. Please check if all the items
listed below are inside your package. If any of these items are missing or
damaged contact us immediately.
Standard factory shipment list:
HMI Device
Quick Start
Guide
(Hardcopy)
User Manual
& Driver CD
USB to Micro
USB Cable
Varies by
product
specifications
9152111I101C
9171111I102P
9487049050K0
AC Adapter
(12V/ 50W)
Power Cord
2 pin Terminal
Block
Mini USB to
UART Cable
(For Linux use)
922D050W12VA
Varies by
country
94J602G020K0
94E7053090K0
Mounting Clips
and Screws
82111E240400

3
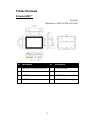
Product Overview
E-Series HMI 7”
Unit: mm
Dimensions: 184.8 x 128.6 x 50.2 mm
№
Description
№
Description
①
Mini USB Console (Linux use)
⑤
RS232/422/485
②
Micro SD
⑥
CAN BUS
③
LAN/ PoE
⑦
1 x USB 2.0
④
USB OTG
⑧
12V DC in (Phoenix type)

4
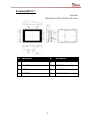
E-Series HMI 10.1”
Unit: mm
Dimensions: 293.6 x 199.2 x 62.3 mm
№
Description
№
Description
①
Mini USB Console (Linux use)
⑤
RS232/422/485
②
Micro SD
⑥
CAN BUS
③
LAN/ PoE
⑦
1 x USB 2.0
④
USB OTG
⑧
12V DC in (Phoenix type)

5
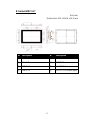
E-Series HMI 15.6”
Unit: mm
Dimensions: 421 x 260.6 x 65.5 mm
№
Description
№
Description
①
Mini USB Console (Linux use)
⑤
RS232/422/485
②
Micro SD
⑥
CAN BUS
③
LAN/ PoE
⑦
1 x USB 2.0
④
USB OTG
⑧
12V DC in (Phoenix type)
.

6
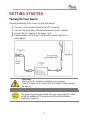
GETTING STARTED
Turning On Your Device
Follow the following steps to turn on your HMI device:
1. Connect a 3-pin terminal block to the HMI connector.
2. Connect the other side of the terminal block to the AC adapter.
3. Connect the AC adapter to the power cord.
4. Plug the power cord to the AC outlet and the device will turn on
automatically.
CAUTION
Use only the AC adapter included in your package
(Rating: Output 4.2 A). Using other AC adapters may damage
the device.
ALTERNATING CURRENT
This product must be grounded. Use only a grounded AC outlet.
Install the additional PE ground wire if the local installation
regulations require it.

7
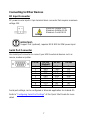
Connecting to Other Devices
DC Input Connector
DC power source input is 2-pin terminal block connector that requires maximum
voltage 12V.
IMPORTANT:
Support PoE (optional), requires IEEE 802.3at 25W power input.
Serial Port Connector
Use serial port connector to connect your HMI to external devices such as
mouse, modem or printer.
Serial port settings can be configured in Winmate application for Android OS.
Refer to “Configuring Serial Port Settings” of this Quick Start Guide for more
detail.
Voltage
Minimum Voltage 11.4V
Maximum Voltage 12.6V
Maximum Current 4.2A
Pin №
RS-232
(Default)
RS-422
RS-485
1
DCD
TxD-
D-
2
RXD
TxD+
D+
3
TXD
RxD+
NC
4
DTR
RxD-
NC
5
GND
GND
GND
6
DSR
NC
NC
7
RTS
NC
NC
8
CTS
NC
NC
9
RI
NC
NC

8
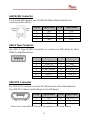
LAN (RJ45) Connector
The E-Series HMI supports one 10/100/1000 Mbps Ethernet interface for
connecting to the internet.
USB A Type Connector
Use USB A Type (USB2.0) connector to connect your HMI device to other
USB2.0 compatible devices.
USB OTG Connector
Use USB OTG connector to connect the HMI device to other external devices.
Use USB OTG cable to install software on the HMI device.
Refer to the E-Series HMI User Manual for more details on how to install software.
Pin №
Signal Name
Pin №
Signal Name
1
TX1+
2
TX1-
3
TX2+
4
TX2-
5
TX3+
6
TX3-
7
TX4+
8
TX4-
Pin №
Signal Name
Pin №
Signal Name
1
+5V
2
USB_D-
3
USB_D+
4
GND
5
STDA_SSRX-
6
STDA_SSRX+
7
GND_DRAIN
8
STDA_SSTX-
9
STDA_SSTX+
10
+5V
11
USB_D-
12
USB_D+
13
GND
Pin №
Signal Name
Pin №
Signal Name
1
+5V
2
USB_OTG_D-
3
USB_OTG_D+
4
USB_OTG_ID
5
GND

9
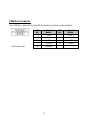
CAN Bus Connector
Use CAN Bus connector for the HMI machine-to-machine communication.
*PIN9 default is NC
Pin
№
Signal
Name
Pin
№
Signal
Name
1
GND
2
CAN_L
3
GND
4
NC
5
NC
6
NC
7
CAN_H
8
GND
9*
+5V/NC

10
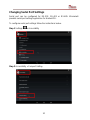
Changing Serial Port Settings
Serial port can be configured for RS-232, RS-422 or RS-485. Winmate®
provides serial port settings application for Android OS.
To configure serial port settings follow the instructions below:
Step 1 Settings > Accessibility
Step 2 Accessibility > Comport-Setting

11
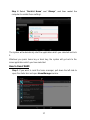
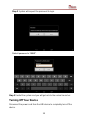
Step 3 Comport-Setting > Comport 1/ Comport 2/ Comport 3
* Select Comport 1/ Comport 2/ Comport 3 that you want to configure.
Step 4 Comport 1 > RS232/RS422/RS485
* Configure Comport 1 settings

12
Ethernet
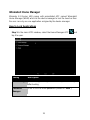
Main Menu
Use Android application to connect Ethernet.
Step 1 Connect Ethernet Cable to the HMI device.
Step 2 Go to APPS. Open Ethernet application.
Step 3 Ethernet APP main menu appears
Setting
Description
Check Ethernet
Check Ethernet connection parameters: IP mode, IP
address, DNS address and others
Configure Ethernet
Enable Ethernet connection and configure its such as
connection type
Advanced Settings
Configure advanced parameters of the Ethernet

13
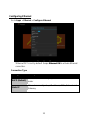
Configuring Ethernet
Go to Apps > Ethernet > Configure Ethernet
*Ethernet OFF is set by default. Swipe Ethernet ON to activate Ethernet
connection.
Connection Type
Setting
Description
DHCP (Default)
The device automatically capture IP-address from the
router
Static IP
Allows to manually set up IP-address, DNS, Network and
Gateway

14
Checking Ethernet Settings
Go to APPS > Ethernet > Check Ethernet
Ethernet settings menu appears on the top right side of the desktop.
For a more detailed Android 4.4 user guide, follow the download path below:
http://static.googleusercontent.com/media/www.google.com/en/us/help/hc/images/android/a
ndroid_ug_42/Android-Quick-Start-Guide.pdf
La page est en cours de chargement...
La page est en cours de chargement...
La page est en cours de chargement...
La page est en cours de chargement...
La page est en cours de chargement...
La page est en cours de chargement...
La page est en cours de chargement...
La page est en cours de chargement...
La page est en cours de chargement...
La page est en cours de chargement...
La page est en cours de chargement...
-
 1
1
-
 2
2
-
 3
3
-
 4
4
-
 5
5
-
 6
6
-
 7
7
-
 8
8
-
 9
9
-
 10
10
-
 11
11
-
 12
12
-
 13
13
-
 14
14
-
 15
15
-
 16
16
-
 17
17
-
 18
18
-
 19
19
-
 20
20
-
 21
21
-
 22
22
-
 23
23
-
 24
24
-
 25
25
-
 26
26
-
 27
27
-
 28
28
-
 29
29
-
 30
30
-
 31
31


Winmate W15FA3S-EHA2 Guide de démarrage rapide
- Taper
- Guide de démarrage rapide
- Ce manuel convient également à
dans d''autres langues
Documents connexes
-
 Winmate W15FA3S-EHA2 Guide de démarrage rapide
-
 Winmate EL Series Quick Start Manuals
-
 Winmate W15FA3S-EHA2 Manuel utilisateur
-
 Winmate R15FA3S-PCC3-PoE Manuel utilisateur
-
 Winmate W07FA3S-PCM1-PoE Manuel utilisateur
-
 Winmate W15FA3S-EHA2 Manuel utilisateur
-
 Winmate W15FA3S-EHA2 Guide de démarrage rapide
-
 Winmate R15FA3S-PCC3-PoE Guide de démarrage rapide
-
 Winmate W15FA3S-EHA2 Manuel utilisateur
-
 Winmate R15FA3S-PTC3 Guide de démarrage rapide


