
A 1035 22nd Avenue, Unit 1
n
Oakland, CA 94606 P 510.489.2530 E TalkToUs@alwusa.com W alwusa.com
INSTALLATION INSTRUCTIONS
LIGHTPLANE 3.5 – LP3.5SDWL
SUSPENDED MOUNT - WET LOCATION
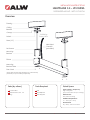
Overview
Framing
Ceiling
Bracket
Canopy
Swivel
Stem (12”)
Set Screws
Mounting
Bracket
Fixture
Mounting
Bracket Plate
Pem Studs
Wet Listed
Conduit*
(provided)
To Building
Power J-Box
*Power feed location may either be out of the endcap
(standard) or top mounted (as depicted).
Drill
#2 phillips bit
Tools Required
Wire strippers
Input Voltage / Frequency:
High Voltage AC
(See product label for input voltage)
Rated Power:
See product drawing
Ambient Temperature:
-
4° – 120°F (
-
20° – 50°C)
Environment:
Dry, damp, and wet locations
Quick Specs
Junction Box
Parts (by others)
Wood Screws, #10, 1.5”
long

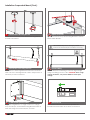
LP3.5SDWL Installation Guide 2 of 3 IG072518-A.0
Install Canopy Bracket directly into framing using
appropriate hardware at each stem mounting location.
Install Swivel over Canopy Cover.
2
Install J-Box, Canopy Bracket & Swivel
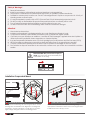
Installation: Suspended Mount
A
T
MUST
"
SEE MOUNTING
FOR HEIGHT
THREADED NPS
WET LISTED
CONDUIT BY ALW
POWERFEED
TOP
SIDE
BOTTOM
See nal/record drawings for mounting locations. Install
framing with consideration for alignment of wiring and
suspension mounting locations. Install J-Box to connect
high voltage wiring from xture to building power.
1
See Final/Record Drawings for Mounting Locations
SAMPLE DRAWING
Safety & Warnings!
1. Read all instructions.
2. Install in accordance with national and local electrical code regulations.
3. This product is intended to be installed and serviced by a qualied, licensed electrician.
4. Suitable for outdoor/wet location use. Do NOT submerge xture in liquids or use product in vicinity of
standing water or other liquids.
5. It is recommended to power with a GFCI (Ground Fault Circuit Interrupter) protected circuit.
6. Do NOT modify or disassemble this product beyond instructions or warranty will be void.
7. Turn off electrical power before installing or servicing xture in any way.
8. To reduce the risk of re and overheating, make sure all connections are tight.
1. Lisez toutes les instructions.
2. Installez conformément à la réglementation du code électrique national et local.
3. Ce produit est destiné à être installé et entretenu par un électricien agréé qualié.
4. Convient pour une utilisation en extérieur / humide. NE PAS immerger l’appareil dans des liquides ou
utiliser le produit à proximité d’eau stagnante ou d’autres liquides.
5. Il est recommandé d’alimenter avec un circuit protégé par un disjoncteur de fuite à la terre (GFCI).
6. NE PAS modier ou démonter ce produit au-delà des instructions ou la garantie sera annulée.
7. Coupez l’alimentation électrique avant de évoluer le système d’éclairage en aucune façon.
8. Pour réduire le risque d’incendie et de surchauffe, assurez-vous que toutes les connexions sont bien
serrées.
Attention!
SHOCK HAZARD! May result in serious injury or
death. Turn power OFF at circuit breaker prior
to installation or servicing.

LP3.5SDWL Installation Guide 3 of 3 IG072518-A.0LP3.5SDWL Installation Guide
Mount Stem onto Swivel, then attach Mounting Bracket
to other end of Stem.
3
Mount Stem & Mounting Bracket
Raise Fixture to Mounting Brackets and mount as shown.
Take care not to damage Fixture surface. Adjust Stems as
necessary to mount and level.
4
Raise Fixture to Mounting Brackets
Align Mounting Brackets to edges of Fixture so it aligns
to lip of endcaps, and install Mounting Bracket Plates on
each side using two Pem Studs/nuts, as shown.
5
Install Mounting Bracket Plates
Tighten Set Screws at top of Mounting Bracket to secure
Fixture within Bracket.
6
Tighten Set Screws
Turn breaker ON and check if xture operates as
intended and that there are no loose connections.
8
Turn Power On
Installation: Suspended Mount (Cont.)
To Building Power
Caution High Voltage
Refer to nal/record drawing to connect high voltage
wiring to building power at J-Box. CAUTION: This is a high
voltage AC xture, see product label for exact input
voltage.
7
Connect Wiring
SHOCK HAZARD! May result in serious injury or death. Turn
power OFF at circuit breaker prior to installation or servicing.
-
 1
1
-
 2
2
-
 3
3


dans d''autres langues
- English: ALW LP3.5SDWL Installation guide
Autres documents
-
Hinkley Lighting 3122KZ Guide d'installation
-
Cooper Lighting TopTier LED Guide d'installation
-
Lithonia Lighting LTIKSQLED27K90CRIMW Mode d'emploi
-
 Kichler Lighting 339501AP Manuel utilisateur
-
Hatco DL Series Le manuel du propriétaire
-
 Kichler Lighting 35166 Manuel utilisateur
-
 Hinkley Lighting 4811KZ Guide d'installation
-
 Kichler Lighting 35163 Manuel utilisateur
-
Modern Forms FR-W2006-62L-MW Guide d'installation
-
Lithonia Lighting GRWL 24IN 40K 80CRI SLV M4 Guide d'installation


