Jenn-Air JDB3650AWR3 Le manuel du propriétaire
- Catégorie
- Lave-vaisselle
- Taper
- Le manuel du propriétaire

THANK YOU for purchasing this high-quality product. If you should experience a problem not covered in TROUBLESHOOTING,
please visit our website at www.jennair.com for additional information. If you still need assistance, call us at 1-800-688-1100. In
Canada, visit our website at www.jennair.ca or call us at 1-800-807-6777.
You will need your model and serial number located near the door on the right-hand or left-hand side of the dishwasher interior.
Para obtener acceso a "lnstrucciones para elusuario de lalavavajillas" en espa_ol, o para obtener informaci6n adicional de su
producto, visite: www.jennair.com
Tenga listo su nQmerode modelo completo. Puede encontrar su nQmerode modelo y de serie en la etiqueta ubicada cerca de la
puerta al lado derecho o izquierdo del interior de la lavavajillas.
TableofContents
DISHWASHER SAFETY ............................................................. 1
QUICK STEPS ............................................................................ 2
DISHWASHER USE .................................................................... 3
CYCLE AND OPTION DESCRIPTIONS .................................... 5
DISHWASHER FEATURES ........................................................ 7
FILTRATION SYSTEM ............................................................... 8
DISHWASHER CARE ................................................................. 9
TROUBLESHOOTING ................................................................ 9
WARRANTY .............................................................................. 11
,
Your safety and the safety of others are very important.
We have provided many important safety messages in this manual and on your appliance. Always read and obey all safety
messages.
This is the safety alert symbol.
This symbol alerts you to potential hazards that can kill or hurt you and others.
All safety messages will follow the safety alert symbol and either the word "DANGER" or "WARNING."
These words mean:
You can be killed or seriously injured if you don't immediately
follow instructions.
You can be killed or seriously injured if you don't follow
instructions.
All safety messages will tell you what the potential hazard is, tell you how to reduce the chance of injury, and tell you what can
happen if the instructions are not followed.
W10300216A

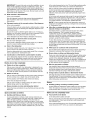
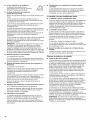
iMPORTANT SAFETY iNSTRUCTiONS
WARNING: When using the dishwasher, follow basic precautions, including the following:
[] Read all instructions before using the dishwasher. [] Do not tamper with controls.
[] Use the dishwasher only for its intended function.
[] Use only detergents or rinse agents recommended for use in
a dishwasher, and keep them out of the reach of children.
[] When loading items to be washed:
1) Locate sharp items so that they are not likely to damage
the door seal; and
2) Load sharp knives with the handles up to reduce the risk
of cut-type injuries.
[] Do not wash plastic items unless they are marked
"dishwasher safe" or the equivalent. For plastic items not so
marked, check the manufacturer's recommendations.
[] Do not touch the heating element during or immediately after
use.
[] Do not operate the dishwasher unless all enclosure panels
are properly in place.
[] Do not abuse, sit on, or stand on the door, lid, or dish racks
of the dishwasher.
[] To reduce the risk of injury, do not allow children to play in
or on the dishwasher.
[] Under certain conditions, hydrogen gas may be produced in
a hot water system that has not been used for two weeks or
more. HYDROGEN GAS IS EXPLOSIVE. If the hot water
system has not been used for such a period, before using
the dishwasher turn on all hot water faucets and let the
water flow from each for several minutes. This will release
any accumulated hydrogen gas. As the gas is flammable,
do not smoke or use an open flame during this time.
[] Remove the door or lid to the washing compartment
when removing an old dishwasher from service or
discarding it.
SAVE THESE iNSTRUCTiONS
GROUNDING iNSTRUCTiONS
For a grounded, cord-connected dishwasher:
The dishwasher must be grounded. In the event of a
malfunction or breakdown, grounding will reduce the risk of
electric shock by providing a path of least resistance for
electric current. The dishwasher is equipped with a cord
having an equipment-grounding conductor and a grounding
plug. The plug must be plugged into an appropriate outlet
that is installed and grounded in accordance with all local
codes and ordinances.
WARNING: Improper connection of the equipment-
grounding conductor can result in a risk of electric shock.
[]
Check with a qualified electrician or service representative
if you are in doubt whether the dishwasher is properly
grounded. Do not modify the plug provided with the
dishwasher; if it will not fit the outlet, have a proper outlet
installed by a qualified electrician.
For a permanently connected dishwasher:
The dishwasher must be connected to a grounded metal,
permanent wiring system, or an equipment-grounding
conductor must be run with the circuit conductors and
connected to the equipment-grounding terminal or lead on
the dishwasher.
SAVE THESE iNSTRUCTiONS
Tip Over Hazard
Do not use dishwasher until completely installed.
Do not push down on open door.
Doing so can result in serious injury or cuts.

Prepare and load _
dishwasher. %Y
Select a cycle and option.
(Cycles and options vary by model.)
EVERYDAY CYCLES
ENTERTAINMENT CYCLES --
OPTIONS
Add detergent ,' _ _
for cleaning and
rinse aid for
drying.
....:i:%
Start dishwasher.
NOTE: If the Start/Resume button is
located on the top of the door, push
the door firmly closed within
3 seconds of pressing START/
RESUME.
Start /
Resume
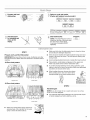
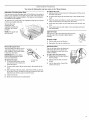
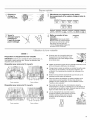
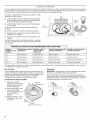
Prepare and Load the Dishwasher
IMPORTANT: Remove leftover food, bones, toothpicks and other
hard items from the dishes. Remove labels from containers before
washing.
10 Place load pattern
Upper rack Lower rack
12 Place load pattern
• Make sure that when the dishwasher door is closed no items
are blocking the detergent dispenser.
• Items should be loaded with soiled surfaces facing down and
inward to the spray as shown. This will improve cleaning and
drying results.
• Avoid overlapping items like bowls or plates that may trap food.
• Place plastics, small plates and glasses in the upper rack.
Wash only plastic items marked "dishwasher safe."
• To avoid thumping/clattering noises during operation: Load
dishes so they do not touch one another. Make sure lightweight
load items are secured in the racks.
When loading silverware, always place sharp
items pointing down. Mix some of the items
having pointing up and some pointing down.
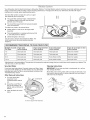
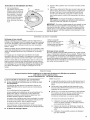
Add Detergent
NOTE: If you do not plan to run a wash cycle soon, run a rinse
cycle. Do not use detergent.
• Use automatic dishwasher detergent only. Add powder, liquid
or tablet detergent just before starting a cycle.
Upper rack Lower rack
Make sure nothing keeps spray arm(s) from
spinning freely. It is important for the water
spray to reach all soiled surfaces.

Freshautomatic
dishwasherdetergent
resultsinbetter
cleaning.Storetightly
closeddetergent
containerinacool,dry
place.
C
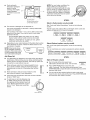
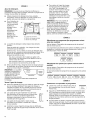
NOTE: For most water conditions, the
factory setting of 2 will give good
results. If you have hard water or notice
rings or spots, try a higher setting. Turn
the arrow adjuster inside the dispenser
by either using your fingers or inserting
a flat-blade screwdriver into the center
of the arrow and turning.
A. Cover latch
B. Main Wash section
C. Pre-Wash section
• The amount of detergent to use depends on:
How much soil remains on the items - Heavily soiled loads
require more detergent.
The hardness of the water - Ifyou use too little in hard water,
dishes won't be clean. If you use too much in soft water,
glassware will etch.
Soft to Medium Water (0-6 grains per U.S. gallon)
[typical water softener water and some city water]
Medium to Hard Water (7-12 grains per U.S. gallon)
[well water and some city water]
• Depending on your water hardness, fill the Main Wash section
of the dispenser as shown. Fill the Pre-Wash section to the
level shown, if needed.
NOTE: Fill amounts shown
are for standard powdered
detergent. Follow instructions
on the package when using
other dishwasher detergent.
HardWater
Soft Water
HardWater
SoftWater
MainWash Pre-Wash
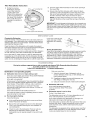
Add Rinse Aid
Your dishwasher is designed to use rinse aid for good drying
performance. Without rinse aid your dishes and dishwasher
interior will have excessive moisture. The heat dry option will
not perform as well without rinse aid.
Rinse aid keeps water from forming droplets that can
dry as spots or streaks. They also improve drying by
allowing water to drain off of the dishes after the final
rinse.
• Rinse aid helps to reduce excess moisture on the
dish racks and interior of your dishwasher.
• Check the rinse aid indicator. Add rinse aid when indicator
drops to "Refill" level.
• To add rinse aid, turn the dispenser cap Lock
to "Refill" and lift off. Pour rinse aid into
the opening until the indicator level is at
"Full." Replace the dispenser cap and
turn to "Lock." Make sure cap is fully
locked.
Full
Add
Refill
turn to lock
Select a Cycle (cycles vary by model)
See "Cycle and Option Descriptions" charts inthe following
section.
Heavier cycles and options affect cycle length. Some cycles and
options will take up to 31/2hours to complete.
EVERYDAY CYCLES
ENTERTAINMENT CYCLES __
Select Options (options vary by model)
See "Cycle and Option Descriptions" charts in the following
section.
You can customize your cycles by pressing the options desired.
OPTIONS
STEP 4
Start or Resume a Cycle
• Run hot water at the sink nearest your
dishwasher until the water is hot. Turn off water. Start/
Resume
• Press START/RESUME and close the door
within 3 seconds. The door latches automatically. Press
START/RESUME to repeat the same cycle and options as in the
previous wash cycle.
• You can add an item anytime before the main wash starts.
Open the door slowly and add the item. Press START/RESUME
and close the door within 3 seconds.

]VERYDAYCYCLES ENTERTAINMENTCYCLES -- OPTIONS
Control Lock
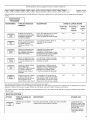
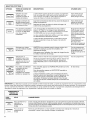
This information covers several different models. Your dishwasher may not have all of the cycles and options described.
FSZq
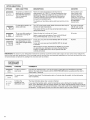
CYCLES DISH LOAD TYPES DESCRIPTIONS
WASH TIME (HH:MM)
Cycle Cycle +
Minimum Options
Minimum
*Maximum
, , use for any loads With heavY, Designed to seleCt the number of water 2:1i 2:35 3:07
Sensor norma or ight amounts of fills best suited for the soil level of each
Wash foodsoil, load.
Use for hard-to-clean, heavily This cycle forces maximum time, water
Heavy ] soiled pots, pans, casseroles, and heat.
Wash J and regular tableware.
1:39 2:09 3:30
use for loads With normal The energy_usage label isbased Onthis ! :! i ! :4i 3:30
Normal I amounts of food soil. cycle. During the wash the wash action
Wash repeate(_!y pause for severa! secondsl
Use for lightly soiled items or
China! I china and crystal.
Crystal
I
During the wash, the wash action will
repeatedly pause for several seconds.
1:17 1:47 2:51
, When YoUneed fast results, This CYc!edoes not dry: For improved 0:58 0:880:88
1Hour I the 1Hour Wash will clean drying, select the Heated Dry oPtion,
Wash J yourdishes using slightly adding _/2hour to the wash cyc!el
more water and energy.
I PlateWarmer I
Use for loads of clean plates
and keep food warm longer
by serving it on a heated
plate.
The Plate Warmer cycle will heat 12 clean
dinner plates to a warm temperature.
Remember when removing the items
from the dishwasher they will still be
warm.
0:37 0:37 0:37
You can customize your cycle by selecting an option.
See option selections. If you change your mind, press the option again to turn off the option, or select a different option. You can change
an option anytime before the selected option begins.
*Maximum wash times depend on water temperature, heavy soil condition, dish load size and options selected.
OPTIONS DISH LOAD TYPES DESCRIPTIONS USE WITH:
use for small Ioadsl For added convenience: use for washing a small load sensor Wash, HeavY
Top I dishes in the t0p rack, wash; N°rmal Wash;
P
/ Rack I China/Crystal or 1-Hour
L J
Wash
SteamClean ]
Use for loads with normal
amounts of soil.
The Steam option adds steam to the cycle. This option
raises the water temperature in the final rinse to
approximately 155°F (68°C). The option adds heat and time
to the cycle.
Heavy Wash or Normal
Wash cycle.
Loads containing toUgh, increases the target watei temperature during the Wash HeaW Wash oi Noima i
baked-° n f°°d! P°Ai°ns 0f the cyc!e. Wash cYCle
Adds heat, wash time and water to the cycle.

OPTIONS DISH LOAD TYPES DESCRIPTIONS USE WITH:
Sanitize l
Tosanitize your dishes and
glassware in accordance
with NSF/ANSI Standard
184 for Residential
Dishwashers.
Raises the water temperature in the final rinse to
approximately 155°F (68°C). This high temperature rinse
sanitizes your dishes and glassware in accordance with
NSF/ANSI Standard 184 for Residential Dishwashers.
Certified residential dishwashers are not intended for
licensed food establishments.
The Sanitize or Sani Rinse option adds heat and time to the
cycle.
Normal Wash cycle.
Heavy Wash cycle
automatically uses
Sanitize. Only these
sanitization cycles have
been designed to meet
the NSF/ANSI
requirements.
For best drying results, drY Turn OFF When loads contain plastic dinnerware that may be All cYClesl Automatic
I Heated I dishes with heat: sensitivet° high temPe!atu!es! with al! wash cycles
Dry _ unless you turn It off
I I This option with the use of rinse aid will provide the best"
drying performance.
I 4 HourDelay I
To run your dish washer at Delays the start of a cycle up to 4 hours.
a later time or during off- Select a wash cycle and options. Press 4 HOUR DELAY.
peak hours. Press START/RESUME. Close the door firmly.
All cycles.
c0ntrol Lock To avoid Unintended use of To turn on Lock:, press and hold HEATED DRY forat least Anytime
your dishwasher, or cycle 4 seconds.
and opt on changes dur ng
Heated,-, I , ! " To turn off Locki press and hold HEATED DRY for at least
Dry _ a cyc e
I I ' 4 seconds,
when Control Lock is lit ai! buttons are disabled, if you press
any pad whi!e your dishwasher is locked, the light f ashes
3 timesl The dishwasher do0r can be 0pened wh le the
controls are locked.
IMPORTANT: The sensor in your dishwasher monitors the soil level. Cycle time and/or water usage can vary as the sensor adjusts the
cycle for the best wash performance. If the incoming water is less than the recommended temperature or food soils are heavy, the cycle
will automatically compensate by adding time, heat and water as needed.
CYCLE STATUS
CONTROL PURPOSE COMMENTS
I To start or resume a if the dOor is opened during a cYcle or the power is interrUpted, the StartJResUme indicatoi
Start/ / wash cycle flashes. The cycle will not resume until the START/RESUME button is pushed and the door is
Resume J cloSed Within 3 seconds.
To cancel wash Close the door firmly. The dishwasher starts a 2-minute drain (if needed). Let the dishwasher
Cancel cycle drain completely.
=. To follow the The Clean indicator glows When a CYcle is finished.
m C°_i[°i_°ck progress 0f your If You select the Sanitize option; when the Sani Rinse Cycle is finished, the Sanitize indicator
alsnwasner CyCle
Clean glows. Ifyour dishwasher did not properly sanitize your dishes, the light flashes at the end of the
cyc!e, This can happen if the cycle is interruPted, or the water could not be heated to the required
temperature i The light goes off when you open and c!ose the door or press CANCEL

Your Jenn-Air dishwasher may have some or all of these features.
Adjustable 2-Position Upper Rack
You can raise or lower the upper rack to fit tall items inthe upper or
bottom rack. Adjusters are located on each side of the upper rack.
Each adjuster has 2 preset positions. The high and low positions
are marked on the adjuster.
To raise the rack, press both rack adjusters and lift the rack until it
is in the Up position and level.
To lower the rack,
press both rack
adjusters and slide the
rack back to its lower
position.
NOTE: The upper rack
must be level.
To replace the rack:
1. Gently pull rack tracks forward in dishwasher until they stop
and click into place.
2. To open track stops, flip the track stop to the outside of the
track.
3. Place the back rack rollers on each side of the rack into the
track slot and roll the rack back into the tracks.
4. Insert front rack rollers on each side of the rack into the rack
slots.
5. Close track stops on both sides of rack and slide rack back
into dishwasher.
Light Item Clips
The light item clips hold lightweight plastic items
such as cups, lids, or bowls in place during
washing.
To move a clip:
1. Pull the clip up and off the tine.
2. Reposition the clip on another tine.
Removable Upper Rack
The removable rack allows you to A
wash larger items such as stock
pots, roasters, and cookie sheets
in the lower level rack.
IMPORTANT: Remove dishes
prior to removing the mid level
rack from dishwasher.
B
To remove the rack: A. Trackstop
1. To access track stops, pull the B.Track
rack forward until it stops and
clicks into place.
2. To open track stops, flip the track stop to the outside of the
track.
3. After opening both track stops, slide front wheels up and out
of the slot in track. Continue to pull rack forward in track and
slide the back wheels up and out of the track.
4. Close track stops.
5. Slide rack tracks back into dishwasher.
Fold-down Tines
The row of tines on the left-hand and
right-hand sides of the upper rack
can be adjusted to make room for a
variety of dishes.
To adjust the fold-down tines:
1. Grasp the tip of the tine that is in
the tine holder.
2. Gently push the tine out of the
holder.
3. Lay the tines down, toward the
center of the rack.

Yourdishwasherhasthelatesttechnologyindishwasherfiltration.Thistriplefiltrationsystemminimizessoundandoptimizeswaterand
energyconservationwhileprovidingsuperiorcleaningperformance.Throughoutthelifeofyourdishwasher,thefilterwillrequire
maintenancetosustainpeakcleaningperformance.
Thetriplefiltersystemconsistsof2parts,anupper
filterassemblyandalowerfilter.
• Theupperfilterassemblykeepsoversizeditems
andforeignobjects,alongwithveryfinefood
particles,outofthepump.
• Thelowerfilterkeepsfoodfrombeingrecirculated
ontoyourdishware.
Thefiltersmayneedtobecleanedwhen:
• VisibleobjectsorsoilsareontheUpperFilter
Assembly.
• Thereisdegradationincleaningperformance(that
is,soilsstillpresentondishes).
• Dishesfeelgrittytothetouch.
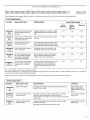
Itisveryeasytoremoveandmaintainthefilters.The
chartbelowshowstherecommendedcleaning
frequency.
Locating
Tabs
pill
Lower Filter
Number of Loads If you wash If you scrape and rinse If you only scrape
Per Week before loading before loading before loading*
1 '3 ' Once per year Once per year Twice per year ........................................
4-7 once per year Once per year Twice per year
i i
8-12 Once per year Twice per year Every three months
13-14 Once per year Twice per year Every three months
If you do not scrape or rinse
before loading
EverY two months
Once per month
Every two weeks
Once per week
*Manufacturer's recommendation: This practice will conserve the water and energy that you would have used to prepare your dishes. This
will also save you time and effort.
Very Hard Water
Ifyou have hard water (above 15 grains), clean your filter at least
once per month. Building up of white residue on your dishwasher
indicates hard water. For tips on removing spots and stains, see
"Troubleshooting" section.
Filter Removal Instructions
1. Turn the Upper Filter
Assembly 1¼turn
counterclockwise and lift
out.
2. Grasp the Lower Filter in
the circular opening, lift
slightly, and pull forward to
remove.
3. Clean the filters as shown
below.
tab
Cleaning Instructions
IMPORTANT: Do not use wire brush, scouring pad, etc., as they
may damage the filters.
Rinse filter under running water until most soils are removed. Ifyou
have hard-to-remove soils or calcium deposits from hard water, a
soft brush may be required.
To remove Upper Filter Assembly

Filter Reinstallation Instructions
1=
Noting the previous
illustrations, place the
Lower Filter under the
Locating Tabs in the
bottom of the dishwasher
so the round opening for
the Upper Filter Assembly
lines up with the round
opening in the bottom of
the tub.
tab
To replace Upper Filter Assembly
2.
3.
Insert the Upper Filter Assembly into the circular opening in
the Lower Filter.
Slowly rotate the filter clockwise until it drops into place.
Continue to rotate until the filter is locked into place. If the
filter is not fully seated (still turns freely), continue to turn
the filter clockwise until it drops and locks into place.
NOTE: The Upper Filter Assembly arrow does not have to
align with the arrow in the Lower Filter as long as the filter is
locked.
IMPORTANT: To avoid damage to dishwasher, do not operate your
dishwasher without the filters properly installed. Be sure the Lower
Filter is securely in place and the Upper Filter Assembly is locked
into place. If the Upper Filter Assembly turns freely, it is not locked
into place.
Cleaning the Dishwasher
Clean the exterior of the dishwasher with a soft, damp cloth and
mild detergent. If your dishwasher has a stainless steel exterior, a
stainless steel cleaner is recommended - Stainless Steel Cleaner
and Polish Part Number 31462.
Clean the interior of the dishwasher, with a paste of powdered
dishwasher detergent and water or use liquid dishwasher detergent
on a damp sponge to clean the cooled-down interior.
A white vinegar rinse may remove white spots and film. Vinegar is
an acid, and using it too often could damage your dishwasher.
Put 2 cups (500 mL) white vinegar in a glass or dishwasher-safe
measuring cup on the bottom rack. Run the dishwasher through a
complete washing cycle using an air-dry or an energy-saving dry
option. Do not use detergent. Vinegar will mix with the wash water.
If you have a drain air gap,
check and clean it if the
m
dishwasher isn't draining _,-
well.
Storing the Dishwasher
If you will not be using the dishwasher during the summer months,
turn off the water and power supply to the dishwasher. In the
winter, if the dishwasher could be exposed to near freezing
temperatures or is left in aseasonal dwelling such as a second
home or vacation home, avoid water damage by having your
dishwasher winterized by authorized service personnel.
First try the solutions suggested here or visit our website and reference FAQs (Frequently Asked Questions)
to possibly avoid the cost of a service call.
Inthe U.S.A., www.jennair.com In Canada, www.jennair.ca
Dishwasher is not operating properly
• Dishwasher does not run or stops during a cycle
Is the door closed tightly and latched? Press START/RESUME
and close the door within 3 seconds.
Is the right cycle selected?
Is there power to the dishwasher? Has a household fuse blown,
or has a circuit breaker tripped? Replace the fuse or reset the
circuit breaker. If the problem continues, call an electrician.
Has the motor stopped due to an overload? The motor
automatically resets itself within a few minutes. If it does not
restart, call for service.
Is the water shutoff valve (if installed) turned on?
It is normal for certain cycles to repeatedly pause for several
seconds during the main wash.
• The Clean light isflashing
Check the following:
• Is the overfill protection float able to move up and down
freely? Press down to release.
• Be sure the water supply is turned on to the dishwasher.
(This is very important following the new installation of
your dishwasher.)
• Check for suds in the dishwasher. If foam or suds are
detected by the dishwasher sensing system, the
dishwasher may not operate properly or may not fill with
water.
Suds can come from:
1. Using the incorrect type of detergent, such as
laundry detergent, hand soap, or dish detergent for
hand washing dishes.
2. Forgetting to replace the rinse aid dispenser cap
after filling (or refilling) the rinse aid.
3. Using an excessive amount of dishwasher detergent.
• Dishwasher will not fill
Is the overfill protection float able to
move up and down freely? Press down
to release.
Dishwasher seems to run too long
Try the 1 Hour Wash cycle.
The dishwasher can run up to 31/2hours depending on soil
level, water temperature, cycles and options.
Is the water supplied to the dishwasher hot enough? The
dishwasher runs longer while heating water.
Is the dishwasher cycle time within the cycle times? See cycle
sections wash times. A delay automatically occurs in some
wash and rinse cycles until the water reaches the proper
temperature.
This dishwasher is equipped with an optical sensor wash that
detects water temperature, soil and detergent amount. Wash
cycles are adjusted based on what is sensed.

IMPORTANT:Theveryfirstwashcycleafterinstallationinyour
homewillbeadjustedtoincludeanadditional2rinses.This
cyclemustnotbeinterruptedforpropersensoradjustment.If
thisadjustmentcycleiscanceledorstoppedbeforetheClean
lightcomesonattheendofthecycle,thenextwashcyclewill
repeatthissensoradjustment.
Waterremainsinthedishwasher
Isthecyclecomplete?
Wasthedisposerknockoutplugremovedduringinstallation?
(See"Installthedrainhose"sectionintheInstallation
Instructions.)
• Detergent remains in the covered section of the dispenser
Is the cycle complete?
Check for items such as cookie sheets, cutting boards, or large
containers that may be blocking the detergent dispenser from
opening properly.
Be sure the cycle has finished (green light is on). If it has not
finished, you will need to resume the cycle by pressing START/
RESUME and closing the door within 3 seconds.
Is the detergent lump-free? Replace detergent if necessary.
• White residue on the front of the access panel
Was too much detergent used?
Is the brand of detergent making excess foam? Try a different
brand to reduce foaming and eliminate buildup.
• Odor in the dishwasher
Are dishes washed only every 2 or 3 days? Run a rinse cycle
once or twice a day until you have a full load.
Does the dishwasher have a new plastic smell? Run a vinegar
rinse as described in "Dishwasher Care."
Condensation on the kitchen counter (built-in models)
Is the dishwasher aligned with the countertop? Moisture from
the vent in the dishwasher console can form on the counter.
Refer to the Installation Instructions for more information.
Dishes do not dry completely
• Dishes do not dry completely
Did you use a rinse aid? Your dishwasher is designed to use
rinse aid for good drying performance. Without rinse aid your
dishes and dishwasher interior will have excessive moisture.
The heat dry option will not perform as well without rinse aid.
• Dishes are not dry
Did you load your dishwasher to allow proper water drainage?
Do not overload. Use a liquid rinse aid to speed drying.
Are the plastics wet? Plastics often need towel drying.
Is the rinse aid dispenser empty?
Did you use an air-dry or energy-saving dry option? Use a
heated drying option for dryer dishes.
• Excess moisture on racks and dishwasher interior
Check the rinse aid indicator to see that there is rinse aid in the
dispenser.
Spots and stains on dishes
Spotting and filming on dishes
Is your water hard, or is there a high mineral content in your
water? Conditioning the final rinse water with a liquid rinse aid
helps eliminate spotting and filming. Keep the rinse aid
dispenser filled. Always use a high-temp option. Ifyour water
hardness is 13 grains or above, it is strongly recommended that
you install a home water softener. If you do not wish to drink
softened water, have the softener installed onto your hot water
supply.
Is the water temperature too low? For best dishwashing results,
water should be 120°F (49°C) as it enters the dishwasher.
Did you use the correct amount of effective detergent? Use
recommended dishwasher detergents only. Do not use less
than 1 tbs (15 g) per load. Detergent must be fresh to be
effective. Heavy soil and/or hard water generally require extra
detergent.
Is the home water pressure high enough for proper dishwasher
filling? Home water pressure should be 20 to 120 psi (138 to
828 kPa) for proper dishwasher fill. If you have questions about
your water pressure, call a licensed, qualified plumber.
NOTE: To remove spots and film from glassware, remove all
silverware and metal items and run avinegar rinse as described
in "Dishwasher Care."
Silica film or etching (silica film is a milky, rainbow-colored
deposit; etching is a cloudy film)
Sometimes there is a water/chemical reaction with certain
types of glassware. This is usually caused by some
combination of soft or softened water, alkaline washing
solutions, insufficient rinsing, overloading the dishwasher, and
the heat of drying. It might not be possible to avoid the
problem, except by hand washing.
To slow this process use a minimum amount of detergent but
not less than 1 tbs (15 g) per load. Use a liquid rinse aid and
underload the dishwasher to allow thorough rinsing. Silica film
and etching are permanent and cannot be removed. Do not use
heated drying.
White spots on cookware with nonstick finish
Has the dishwasher detergent removed cookware seasoning?
Reseason cookware after washing it in the dishwasher.
• Brown stains on dishes and dishwasher interior
Does your water have high iron content? Rewash dishes using
1-3 tsp (5-15 mL) of citric acid crystals added to the covered
section of the detergent dispenser. Do not use detergent.
Follow with a Normal wash cycle with detergent. If treatment is
needed more often than every other month, the installation of
an iron removal unit is suggested.
• Black or gray marks on dishes
Are aluminum items rubbing dishes during washing?
Disposable aluminum items can break down in the dishwasher
and cause marking. Hand wash these items. Remove
aluminum markings by using a mild abrasive cleaner.
• Orange stains on plastic dishes or dishwasher interior
Are large amounts of tomato-based foods on dishes placed in
the dishwasher? It may be necessary to use a stain removal
product to remove stains from your dishwasher. Stains will not
affect dishwasher performance.
Noises
Grinding, grating, crunching or buzzing sounds
A hard object has entered the wash module (on some models).
When the object is ground up, the sound should stop. If the
noise persists after a complete cycle, call for service.
Dishes are not completely clean
• Food soil left on the dishes
Is the dishwasher loaded correctly?
Did you choose the cycle that describes the most difficult soil in
your dishwasher? If you have some items with heavier soils,
use a heavier cycle.
Is the water temperature too low? For best dishwashing results,
water should be 120°F (49°C) as it enters the dishwasher.
10

Did you use the correct amount of fresh detergent? Use
recommended dishwasher detergents only. Do not use less
than 1 tbs (15 g) per load. Detergent must be fresh to be
effective. Heavy soil and/or hard water generally require extra
detergent.
Is detergent caked in dispenser? Use fresh detergent only. Do
not allow detergent to sit for several hours in a wet dispenser.
Clean dispenser when caked detergent is present.
Is the pump or spray arm clogged by labels from bottles and
cans?
Is the home water pressure high enough for proper dishwasher
filling? Home water pressure should be 20 to 120 psi (138 to
828 kPa) for proper dishwasher fill. Ifyou have questions about
your water pressure, call a licensed, qualified plumber.
Are high suds slowing the wash arm? Do not use soap or
laundry detergents. Use recommended dishwasher detergents
only.
• Dishes in the PROSCRUB _wash area are not clean
Are the dishes loaded to face the PROSCRUB _spray jets?
Load soiled dish surfaces to face the back of the dishwasher
toward the PROSCRUB _ spray jets. Tilt the dishes toward the
back so water can drain from surfaces, and the lower spray
arm can wash the item from below.
NOTE: Loaded items may shift when dish racks are pushed
into the dishwasher. Make sure dishes do not interfere with the
spray arms, water feed tube, or PROSCRUB _spray jets.
Are items loaded so they do not overlap? Load items only one
row deep without any overlap so that the PROSCRUB _spray
jets can reach all surfaces.
Dishes are damaged during a cycle
Chipping of dishes
Did you load the dishwasher properly? Load the dishes and
glasses so they are stable and do not strike together from
washing action. Minimize chipping by moving the rack in and
out slowly.
NOTE: Antiques, feather-edged crystal, and similar types of
china and glassware might be too delicate for automatic
dishwashing. Wash by hand.
JENN-AIR DISHWASHERWARRANTY
ONE YEAR LIMITED WARRANTY
For one year from the date of purchase, when this major appliance is operated and maintained according to instructions attached to or
furnished with the product, Jenn-Air brand of Maytag Corporation or Maytag Limited (hereafter "Jenn-Air") will pay for factory specified
replacement parts and repair labor to correct defects in materials or workmanship. Service must be provided by a Jenn-Air designated
service company. This limited warranty applies only when the major appliance is used in the country in which it is purchased.
SECOND THROUGH FIFTH YEAR LIMITED WARRANTY ON CERTAIN COMPONENT PARTS
In the second through the fifth year from the date of purchase, when your major appliance is installed, operated and maintained according
to instructions attached to or furnished with the product, Jenn-Air will pay for factory specified parts for the following components if
defective in materials or workmanship: dish racks, all parts of the wash system, drain motor, electronic controls and heating element.
Replacements parts will also be provided if there is rust including the exterior cabinet and front panels.
LIFETIME LIMITED WARRANTY ON STAINLESS STEEL TUB AND INNER DOOR LINER
For the lifetime of the product from the date of purchase, when this major appliance is installed, operated and maintained according to
instructions attached to or furnished with the product, Jenn-Air will pay for factory specified parts and repair labor for the following
components to correct defects in materials or workmanship that existed when this major appliance was purchased: stainless steel tub
and inner door liner.
ITEMS JENN-AIR WILL NOT PAY FOR
1. Service calls to correct the installation of your major appliance, to instruct you how to use your major appliance, to replace or repair
house fuses or to correct house wiring or plumbing.
2. Service calls to repair or replace appliance light bulbs, air filters or water filters. Those consumable parts are excluded from warranty
coverage.
3. Repairs when your major appliance is used for other than normal, single-family household use.
4. Damage resulting from accident, alteration, misuse, abuse, fire, flood, acts of God, improper installation, installation not in accordance
with electrical or plumbing codes, or use of products not approved by Jenn-Air.
5. Replacement parts or repair labor costs for units operated outside the United States or Canada.
6. Pickup and delivery. This major appliance is designed to be repaired in the home.
7. Repairs to parts or systems resulting from unauthorized modifications made to the appliance.
8. Expenses for travel and transportation for product service in remote locations.
9. The removal and reinstallation of your appliance if it is installed in an inaccessible location or is not installed in accordance with
published installation instructions.
10. Replacement parts or repair labor costs when the major appliance is used in a country other than the country in which it was
purchased.
11

DISCLAIMER OF IMPLIED WARRANTIES
IMPLIED WARRANTIES, INCLUDING ANY IMPLIED WARRANTY OF MERCHANTABILITY OR IMPLIED WARRANTY OF FITNESS FOR A
PARTICULAR PURPOSE, ARE LIMITED TO ONE YEAR OR THE SHORTEST PERIOD ALLOWED BY LAW. Some states and provinces do
not allow limitations on the duration of implied warranties of merchantability or fitness, so this limitation may not apply to you. This
warranty gives you specific legal rights, and you also may have other rights that vary from state to state or province to province.
LIMITATION OF REMEDIES; EXCLUSION OF INCIDENTAL AND CONSEQUENTIAL DAMAGES
YOUR SOLE AND EXCLUSIVE REMEDY UNDER THIS LIMITED WARRANTY SHALL BE PRODUCT REPAIR AS PROVIDED HEREIN.
JENN-AIR SHALL NOT BE LIABLE FOR INCIDENTAL OR CONSEQUENTIAL DAMAGES. Some states and provinces do not allow the
exclusion or limitation of incidental or consequential damages, so these limitations and exclusion may not apply to you. This warranty
gives you specific legal rights, and you also may have other rights that vary from state to state or province to province.
Outside the 50 United States and Canada, this warranty does not apply. Contact your authorized Jenn-Air dealer to determine if another
warranty applies. 2/1o
For additional product information, in the U.S.A., visit www.jennair.com. In Canada, visit www.jennair.ca.
Ifyou do not have access to the Internet and you need assistance using your product or you would like to schedule service, you may
contact Jenn-Air at the number below.
Have your complete model number ready. You can find your model number and serial number on the label located near the door on the
right-hand or left-hand side of the dishwasher interior.
For assistance or service in the U.S.A., call 1-800-688-1100. In Canada, call 1-800-807-6777.
Ifyou need further assistance, you can write to Jenn-Air with any questions or concerns at the address below:
In the U.S.A.: In Canada:
Jenn-Air Brand Home Appliances
Customer eXperience Center
553 Benson Road
Benton Harbor, MI 49022-2692
Please include a daytime phone number in your correspondence.
Jenn-Air Brand Home Appliances
Customer eXperience Center
200--6750 Century Avenue
Mississauga, Ontario L5N 0B7
Please keep these User Instructions and model number information for future reference.
W10300216A
SP PN W10300217A
©2010.
All rights reserved. ® Registered Trademark/TM Trademark of Jenn-Air, U.S.A. Used under license in Canada.
4/10
Printed in U.S.A.

Nous vous REMERCIONS d'avoir achete ce produit de haute qualite. Si vous rencontrez un probleme non mentionne dans la
section DI_PANNAGE,veuillez visiter notre site www.jennair.com pour des informations supplementaires. Si vous avez toujours
besoin d'assistance, veuillez nous tel6phoner au 1-800-688-1100. Au Canada, visitez notre site www.jennair.ca ou tel6phonez-
nous au 1-800-807-6777.
Vous aurez besoin de vos num@os de modele et de s@ie situes pres de la porte sur le c6te droit ou gauche, A I'int@ieurdu
lave-vaisselle.
Tabledes mali res
SECURITE DU LAVE-VAISSELLE ............................................. 1
E'TAPES RAPIDES ...................................................................... 3
UTILISATION DU LAVE-VAISSELLE ........................................ 3
DESCRIPTION DES PROGRAMMES ET DES OPTIONS ....... 5
CARACTERISTIQUES DU LAVE-VAISSELLE .......................... 7
SYSTEME DE FILTRATION ....................................................... 8
ENTRETIEN DU LAVE-VAISSELLE .......................................... 9
DEPANNAGE .............................................................................. 9
GARANTIE ................................................................................ 12
_ ,_ _ 4
Votre securite et celle des autres est tres importante.
Nous donnons de nombreux messages de s_curit_ importants dans ce manuel et sur votre appareil m_nager. Assurez-vous de
toujours lire tousles messages de s_curit_ et de vous y conformer.
Voici le symbole d'alerte de s_curit_.
Ce symbole d'alerte de s_curit_ vous signale les dangers potentiels de d_c_s et de blessures graves a vous
eta d'autres.
Tous les messages de s_curit_ suivront le symbole d'alerte de s_curit_ et le mot "DANGER" ou
"AVERTISSEMENT". Ces mots signifient •
Risque possible de d_cbs ou de blessure grave si vous ne
suivez pas imm_diatement les instructions.
Risque possible de d_cbs ou de blessure grave si vous
ne suivez pas les instructions.
Tous les messages de s_curit_ vous diront quel est le danger potentiel et vous disent comment r_duire le risque de blessure et
ce qui peut se produire en cas de non-respect des instructions.
W10300216A

IMPORTANTES INSTRUCTIONS DE SI_CURITI_
AVERTISSEMENT : Lors de I'utilisation du lave-vaisselle, suivre les precautions el6mentaires dont les suivantes :
[] Lire la totalite des instructions avant d'utiliser le
lave-vaisselle.
[] N'utiliser le lave-vaisselle que pour laver la vaisselle.
[] Utiliser uniquement les detersifs ou agents de rin(;age
recommandes pour lave-vaisselle et les garder hors de la
portee des enfants.
[] Lorsque vous chargez le lave-vaisselle :
1) Placer les objets coupants de fa(;on qu'ils ne puissent
endommager le joint de la porte; et
2) Placer les couteaux le manche vers le haut de fa(;on & ne
pas vous couper.
[] Ne pas laver d'articles en plastique & moins qu'ils nesoient
marques "Peut aller au lave-vaisselle" ou I'equivalent. Si
I'article ne porte aucune indication, verifier aupres du
fabricant.
[] Ne pas toucher I'el6ment chauffant pendant le
fonctionnement ou immediatement apr_s.
[] Ne pas faire fonctionner le lave-vaisselle si tous les
panneaux de I'enceinte ne sont pas en place.
[] Ne pas jouer avec les commandes.
[] Ne pas abuser, vous asseoir ni monter sur la porte,
le couvercle ou les paniers du lave-vaisselle.
[] Pour eviter tout risque d'accident, ne pas laisser les
enfants jouer dans ou sur le lave-vaisselle.
[] Sous certaines conditions, de I'hydrogene peut se former
dans un reseau d'eau chaude inutilise depuis deux
semaines ou plus. L'HYDROG#NE EST UN GAZ
EXPLOSIBLE. Si le systeme d'eau chaude n'a pas et6
utilise depuis un certain temps, laisser couler I'eau chaude
des robinets pendant quelques minutes avant de faire
fonctionner le lave-vaisselle. Cette mesure permettra &
I'hydrogene de s'evaporer. Ce gaz etant inflammable, ne
pas fumer ni utiliser de flamme nue pendant cette periode.
[] Enlever la porte ou le couvercle du compartiment de lavage
Iorsque vous remplacez ou mettez au rebut un vieux
lave-vaisselle.
CONSERVEZ CES INSTRUCTIONS
iNSTRUCTiONS DE MISE A LA TERRE
Pour un lave-vaisselle reli6 & la terre, branch6 avec un
cordon :
Le lave-vaisselle dolt etre relie& la terre. En cas d'un
mauvais fonctionnement ou d'une panne, la raise & terre
reduira le risque d'un choc electrique en fournissant le moins
de resistance pour le courant electrique. Le lave-vaisselle est
equipe d'un cordon avec un conducteur pour relier les
appareils & la terre et d'une fiche de raise & la terre. La fiche
doit etre branchee sur une prise appropriee, installee et reliee
& la terre conformement aux codes et reglements Iocaux.
AVERTiSSEMENT : La connexion incorrecte du
conducteur pour relier les appareils & la terre peut causer le
risque de choc electrique. Verifier avec un electricien
competent ou un representant de service si vous avez
des doutes si le lave-vaisselle est correctement relie &la
terre. Ne pas modifier la fiche fournie avec le lave-
vaisselle; si elle n'entre pas dans la prise, faire installer
une prise appropriee par un electricien competent.
Pour un lave-vaisselle branch_ en permanence :
Le lave-vaisselle doit etre branche & un systeme
d'installation electrique permanent en metal relie& la
terre, ou un conducteur pour relier les appareils & la terre
doit etre relie avec les conducteurs du circuit et branche
&une borne pour relier les appareils & la terre ou au
cordon d'alimentation electrique avec le lave-vaisselle.
CONSERVEZ CES INSTRUCTIONS
Risque de basculement
Ne pas utiliser le lave=vaisselle jusqu'a ce qu'il soit compl_tement installS.
Ne pas appuyer sur la porte ouverte.
Le non=respect de ces instructions peut causer des blessures graves ou des coupures.

Preparer et
charger le
lave-vaisselle.
Verser le
d_tergent pour le
nettoyage et
I'agent de ringage
pour le s_chage.
3 _lectionner un programme et une option.
(Les programmes et les options changent selon le
module.)
EVERYDAY CYCLES
ENTERTAINMENT CYCLES __
OPTIONS
_ Mettre en marche le lave-
_ vaisselle, start/
Resume
REMARQUE : Si le bouton Start/
Resume (mise en marche/reprise)
se trouve au sommet de la porte,
bien fermer la porte dans les
3 secondes qui suivent I'appui sur
la touche START/RESUME.
t sc£ o du s e
Preparation et chargement du lave-vaisselle
IMPORTANT : Enlever de la vaisselle les restes alimentaires, os,
cure-dents et autres articles durs. Enlever les etiquettes des
recipients avant de les laver.
Disposition pour service de 10 couverts
Panier sup_rieur Panierinf_rieur
Disposition pour service de 12 couverts
Panier sup_rieur
Panier inf_rieur
S'assurer que rien n'emp_che le(s) bras
d'aspersion de tourner librement. II est
important que lejet d'eau atteigne toutes
les surfaces sales.
• Verifier que Iorsque la porte du lave-vaisselle est fermee, aucun
article ne bloque le distributeur de detergent.
• Charger dans le panier les articles en orientant la surface sale
vers le bas et vers I'interieur, vers le bras d'aspersion, tel
qu'illustr& Ceci ameliorera les resultats de nettoyage et de
sechage.
• leviter le chevauchement d'articles tels que les bols ou les
assiettes pouvant retenir les aliments.
• Placer les articles de plastique, les petites assiettes et les
verres dans le panier superieur. Ne laver des articles de
plastique au lave-vaisselle que s'ils sont identifies comme
"lavable au lave-vaisselle".
Pour eviter les bruits de choc et d'entrechoc durant le
fonctionnement : Charger la vaisselle pour que les articles ne
se touchent pas les uns les autres. S'assurer que les articles
legers sont bien retenus dans les paniers.
Lors du chargement des couverts, toujours
charger les articles acer6s pointes vers le bas.
Orienter certains articles vers le haut et
d'autres vers le bas Iorsqu'on les place
ensemble.

I_TAPE 2
Ajout de d_tergent.
REMARQUE : Si vous n'avez pas I'intention d'effectuer un
programme de lavage dans I'immediat, executer un programme de
rin£_age.Ne pas utiliser de detergent.
• Utiliser uniquement du detergent pour lave-vaisselle
automatique. Verser le detergent en poudre, liquide ou en
pastille, juste avant de demarrer un programme.
• Pour I'obtention de
meilleurs resultats,
il est recommande
d'utiliser un
detergent & lave-
vaisselle
automatique frais.
Conserver le
recipient du
detergent bien
ferme dans un lieu
sec et frais.
A
B
A. Loquet du couvercle
B. Section de lavage principal
C. Section du pr_lavage
La quantite de detergent & utiliser depend des el6ments
suivants •
Degre de salete de la vaisselle - Les charges tr_s sales
necessitent plus de detergent.
Durete de I'eau - Si on n'utilise pas assez de detergent dans
une eau dure, la vaisselle ne sera pas parfaitement lavee. Si on
utilise trop de detergent dans une eau douce, la solution
attaquera les articles en verre.
Eau douce &moyenne (0 a 6 grains par gallon U.S.)
[eau venant d'un adoucisseur d'eau gen6ral et eau du
service d'eau de la ville]
Eau moyenne & dure (7 a 12 grains par gallon U.S.)
[eau de puits et du service d'eau de la ville]
• Selon la durete de I'eau, remplir la section de lavage principal
du distributeur tel qu'illustr& Remplir la section de prelavage
jusqu'au niveau indiqu6, si necessaire.
REMARQUE • Les quantites HardWater
indiqu6es correspondent a HardWater
I'emploi d'un detergent en s0ftwater softwater
poudre standard. Lors de
I'utilisation d'un autre Lavageprincipal Pr_lavage
detergent pour lave-vaisselle,
proceder conformement aux instructions indiqu6es sur
I'emballage.
Verser I'agent de ringage
Votre lave-vaisselle est con£_u pour utiliser un agent de rin£_age
pour un sechage satisfaisant. Sans agent de rin£_age,la
vaisselle et I'interieur du lave-vaisselle seront trop humides.
L'option de sechage avec chaleur ne fonctionnera pas de
maniere optimale sans agent de rin£_age.
• Les agents de rin£_ageempechent I'eau de former
des gouttelettes qui peuvent secher en laissant des _ Full
taches ou coulees. IIs ameliorent egalement le
H
sechage en permettant & I'eau de s'ecouler de la
vaisselle apr_s le rin£_agefinal.
• Les agents de rin(_age aident &reduire I'exces kW=JAdd
d'humidite sur les paniers & vaisselle et & I'interieur
du lave-vaisselle.
• Contr61er le niveau d'agent de rin£_agedans le distributeur.
Ajouter de I'agent de rin£_ageIorsque I'indicateur est au niveau
"Refill" (remplir).
Pour ajouter de I'agent de rin£:age,
tourner le bouchon du distributeur
vers "Refill" (remplissage) et le
soulever. Verser I'agent de rin(_age
dans I'ouverture jusqu'& ce que
I'indicateur soit sur "Full" (plein).
Remettre en place le bouchon du
distributeur et le tourner Vers "Lock"
(verrouillage). Verifier qu'il est bien
verrouill&
Lock
Refill__
tourpour verrouiller
REMARQUE : Pour une majorite de
types d'eau, le reglage effectue &
I'usine & 2 donnera de bons resultats.
Si I'eau du domicile est dure ou si on
remarque la presence d'anneaux ou
de taches, essayer un reglage plus
eleve. Tourner I'ajusteur & fleche &
I'interieur du distributeur soit a la main,
soit en inserant un tournevis & lame
plate au centre de la fleche et en tournant.
S_lectionner un programme (les programmes varient
selon les modules)
Voir les tableaux "Description des programmes et des options"
dans la section qui suit.
Les programmes plus intenses et les options modifient la duree du
programme. L'execution de certains programmes et options
prendra jusqu'& 3 heures et demie.
EVERYDAY CYCLES
ENTERTAINMENT CYCLES __
S_lectionner les options (les options varient selon le
module).
Voir les tableaux "Description des programmes et des options"
dans la section qui suit.
On peut personnaliser les programmes en appuyant sur les options
desirees.
OPTIONS
ETAPE 4
Commencer ou reprendre un programme
• Laisser I'eau couler du robinet le plus pres du
lave-vaisselle jusqu'& ce qu'elle soit chaude.
Fermer I'eau.
Start /
Resume
• Appuyer sur START/RESUME (mise en marche/reprise) dans
les 3 secondes qui suivent et fermer la porte. Le verrou de la
porte s'engage automatiquement. Appuyer sur START/
RESUME (mise en marche/reprise) pour reprendre le meme
programme et les memes options que Iors du programme de
lavage precedent.
• On peut ajouter un article a n'importe quel moment avant le
debut du lavage principal. Ouvrir la porte lentement et ajouter
I'article. Appuyer sur START/RESUME et fermer la porte dans
les 3 secondes qui suivent.

EVERYDAY CYCLES ENTERTAINMENT CYCLES -- OPTIONS _ Control Lock
Ces informations couvrent plusieurs modeles differents. Votre lave-vaisselle peut ne pas comporter tous les programmes et options
decrits.
PROGRAMMES TYPES DE CHARGE DE
VAISSELLE
DESCRIPTIONS
DURI_E DE LAVAGE (HH:MM)
Programme Programme + *Dur6e
minimum options maximu
minimum m
A uti!isei pour toUtes les congu pour s61ectionner !e nombre 2ill 2i35 3:07
Sensor charges ayant des quantit6s id6al de remplissages pour !e
Wash de salet6s importantes, niveau de salet6 de chaque charge.
norma!es ou !6g_res,
Heavy
Wash
Utiliser ce programme pour
les casseroles, les poeles et
la vaisselle ordinaire
difficiles a nettoyer et tr_s
sales.
Ce programme utilise la duree, le
volume d'eau et la chaleur
maximum.
1:39 2:09 3:30
Ut !iser ce pr0gramme pour L'6tiquette de consommation lill 1:41 3:30
des charges comportant d,6nergie est basee sur Ce
Wash des quantit6s normales de programme. Lors du lavage, Faction
debris alimentaires, de lavage fera des pauses r6p6t6es ..........................................................................
pendant que!ques secondes.
China/.
Crystal
Utiliser ce programme pour
les articles legerement sales
ou pour la porcelaine ou le
cristal.
Lors du lavage, I'action de lavage
fera des pauses repetees pendant
quelques secondes.
1:17 1:47 2:51
Lorsqu'on s0uhaite obtenir Ce programme n'effectue pas de 0:59 0:88 0:88
1Hour des r6sultats plus sechage. Pour un meilleur sechage
Wash rapidement, !'option Lavage s61ectionner !'option Heated Dry
en 1 heure consomme (s6chage avec cha eur)ajouter
1
leg_rement plus d eau et V2heure au programme de !avage.
d,6nergie.
Utilisation pour des charges Le programme de rechauffeur de 0:37 0:37 0:37
I Plate I de plats propres et pour plat chauffera 12 grandes assiettes
Warmer I garder les aliments chauds & temperature tiede. Ne pas oublier
plus Iongtemps en les que les articles sent encore chauds
servant dans un plat chaud. Iorsqu'on les retire du lave-vaisselle.
Vous pouvez personnaliser votre programme en selectionnant une option.
Voir les selections d'options. Si vous changez d'avis, appuyez sur cette option &nouveau pour la desactiver, ou selectionnez une option
differente si desire. Vous pouvez changer d'option en tout temps avant que I'option choisie ne commence.
*Les durees maximum de lavage dependent de la temperature de I'eau, de la salete, de la taille de la charge de vaisselle et des options
selectionnees.
OPTIONS TYPES DE CHARGE DE DESCRIPTIONS UTILISER AVEC :
VAISSELLE
..... uti!isation pour de petites Pour plus de commodit6, & utiliser p0ur laver une petite LaVage sensor (par
T, 1 charges, charge de plats dans le panier superieur, detection), Heaw Wash
oR
Rack J (lavage intense), _lorma!
--- Wash (avage norma),

OPTIONS TYPES DE CHARGE DE DESCRIPTIONS UTILISER AVEC :
VAISSELLE
SteamClean
Utilisation pour des
charges avec des
quantites normales de
residus alimentaires.
L'option Steam (vapeur) ajoute de la vapeur au programme.
Lors du rin£;age final, cette option porte la temperature de
I'eau &environ 155°F (68°C). Cette option augmente le
niveau de chaleur et la duree du programme.
Heavy Wash (lavage
intense) ou Normal
Wash (lavage normal)
charges C0ntenant des Augmente la temp6rature cible de I'eau durant les 6tapes de Heavy Wash (lavage
Super [ aliments tenaces ayant lavage du programmel intense) ou Norma!
Sc;ubI adh6r6.& !a vaisse!leapr_s Augmente !e niveaU de chaleur, ia dur6e de !avage et !e wash (lavage no[ma!)
une CU!SS°nau T0UB volume d,eau du programmel
Sanitize ]
Pour assainir la vaisselle et
la verrerie conformement &
la norme 184 NSF/ANSI
pour lave-vaisselle
residentiels.
Lors du rin£;age final, la temperature de I'eau s'eleve &
environ 155°F (68°C). Ce rin£:age & haute temperature
assainit la vaisselle et la verrerie conformement & la norme
184 NSF/ANSI pour les lave-vaisselle residentiels.
Les lave-vaisselle residentiels certifies ne sont pas destines
aux etablissements alimentaires autorises.
L'option Sanitize (assainissement) ou Sani Rinse (rin£:age
sanitaire) augmente le niveau de chaleur et la duree du
programme.
Programme de Normal
Wash (llavage normal).
Le programme Heavy
Wash (lavage intense)
utilise automatiquement
Sanitize
(assainissement). Seuls
ces programmes
d'assainissement ont
ete con£:us pour
repondre aux exigences
de la norme NSF/ANSI.
S6chage aVec Chaleui ARRC:TER le laVe*VaisSelle qUand ia charge c0ntient dela Tousles programmesl
Heated,, pour les me Ileurs r6su!tats vaisselle en plastique qui peut 6tre sensible & des Automatique avec tous
Dry _ de s6chagel temp6ratures 61ev6es. les programmes de
avage & mo'ns qu'on ne
............................................................... Cetteoptionavec utilisationdunagentderingagefournira, ^. ..........
arre[e
!e meil!eur rendement de sechage,
4 Hour
Delay
Selectionner ce
programme pour faire
fonctionner votre lave-
vaisselle plus tard ou en
dehors des heures de
pointe.
Differe la mise en marche d'un programme jusqu'& 4 heures.
Choisir un programme de lavage et les options. Appuyer sur
4 HOUR DELAY (mise en marche differ6e). Appuyer sur
START/RESUME (mise en marche/reprise). Bien fermer la
porte.
Tousles programmes.
Verrouillage Pour 6viter une uti!isation Pour veir0uil er, appuyer sur HEATED DRY pendant au moinS En tout temps
des involontaire du lave. 4 secondes.
commandes va sse e, ou un
i _ P0ur deVerrouiller, appuyer sur HEATED DRY pendant au
cnangement de.roclramr OLd tion mo ns 4 secondes
Heated_[ pr ga me u op
Dry t_ pendant un programme Lorsque I indicateur Control Lock (verrouillage)est allum6
tous les boutons sont d6sactiv6s, Lorsqu,on appuie sur une
touche alors que les commandes du lave-vaissel e sont
verrouill6es, Iindicateur lumineux c!ignote 3 lois. On peut
0uwir la porte du !avewa sselle 10rsque !es commandes sont
verrouill6es
IMPORTANT : Le detecteur incorpore au lave-vaisselle contr61e le degre de salet& La duree du programme et/ou la consommation d'eau
peuvent varier etant donne que le detecteur rajuste le programme pour assurer des performances de lavage optimales. Si la temperature
de I'eau d'arrivee est inferieure & celle recommandee ou que la vaisselle est tres sale, le programme compensera automatiquement en
allongeant la duree du programme et en augmentant la quantite d'eau et de chaleur, au besoin.
COMMANDES ET
TI_MOINS DE
PROGRAMME
COM- ROLE COMMENTAIRES
MANDE
Pour commencer ou Si I'on ouvre la porte durant un programme ou si si une panne de courant se produit, le temoin
Start/ reprendre un lumineux Start/Resume (mise en marche/reprise) clign0te. Le programme ne reprend pas avant
Resume programme de que on a t appuy6 sure bouton START/RESUME (mse en marche!repr se) et que a porte at 6t6
!avage ferm6e dans !es 3 secondes qui suivent.
Cancel
Pour annuler un
programme de
lavage
Fermez la porte fermement. Le lave-vaisselle commence une vidange de 2 minutes (si
necessaire). Laissez le lave-vaisselle vidanger completement.

COM- ROLE COMMENTAIRES
MANDE
Pour suivre la L'indicateur Clean (propre) s'allume Iorsqu'un programme est terrain&
m Contro ock • --
m SontzeJ p_og_e_n au i _i;_ Si vous s6 ectionnez !.option Sanitize (assainissement) Io_sque !e programme Sanitize est
"u cooo ,_.u._._,,,._ u_ Z.-_._ terrain6 le t6moin Sanitized s'allumel Si le lave:vaisselle n'a pas assaini a vaisselle comme il
!ave-va!sse!! e convient, le t6moin clignote & latin du Programmel ceci peut se produire Iorsque le programme
est interrompu, ou si Ieau n a pas pu 6tre chauff6e & !atemp6rature s0uhait6e. Le t6moin s 6teint
?otre lave-vaisselle Jenn-Air peut comporter toutes ces caract_ristiques ou seulement certaines d'entre elles.
Panier sup_rieur r_glable a 2 positions
On peut lever ou baisser le panier JntermedJaire pour mettre de
grands articles dans le panier superieur ou inferieur. Les regleurs
sent situ6s de chaque c6te du panier superieur. Chaque regleur
comporte 2 positions prer6gl6es. Les positions hautes et basses
sent indiqu6es sur le regleur.
Pour soulever le panier, appuyer sur les deux regleurs du panier et
soulever le panier jusqu'& ce qu'il soit en position haute et
d'aplomb.
Pour abaisser le
panier, appuyer sur les
deux regleurs du
panier et glisser &
nouveau le panier &sa
position la plus basse.
REMARQUE : Le
panier superieur doit
_tre d'aplomb.
t¸ _
d
Panier amovible sup_rieur
Les paniers amovibles permettent
de laver des articles de plus
grande taille tels que marmites,
r6tissoires et t61es & biscuits dans
le panier de niveau inferieur.
IMPORTANT : 0ter la vaisselle B
avant de retirer le panier de niveau
intermediaire du lave-vaisselle.
A.Butte d'arr#t
Pour enlever le panier: B.Glissiere
1. Pour acceder aux butees
d'arr_t, tirer le panier vers
I'avant jusqu'& I'arr_t et jusqu'& ce qu'il s'enclenche en place.
2. Pour ouvrir les butees d'arr_t, relever la butee d'arr_t vers
I'exterieur de la glissiere.
3. Apr_s ouverture des deux butees d'arr_t, faire glisser les roues
avant vers le haut pour les sortir de la fente dans la glissiere.
Continuer &tirer le panier vers I'avant et faire glisser les roues
arriere vers le haut pour les sortir de la glissiere.
4. Fermer les butees d'arr_t.
5. Faire glisser les butees de panier pour les reinstaller dans le
lave-vaisselle.
Pour r_installer le panier
1. Tirer doucement les butees du panier vers I'avant dans le lave-
vaisselle jusqu'& I'arr_t et jusqu'& ce qu'elles s'enclenchent en
place.
2. Pour ouvrir les butees d'arr_t, relever la butee d'arr_t vers
I'exterieur de la glissiere.
3. Placer les roulettes arriere du panier de chaque c6te du panier
dans la fente de la glissiere et faire rouler le panier pour le
reinstaller dans les glissieres.
4. Inserer les roulettes avant du panier de chaque c6te du panier
dans les fentes du panier.
5. Fermer les butees d'arr_t des deux c6tes du panier et faire
glisser le panier pour le reinstaller dans le lave-vaisselle.
Attaches pour articles I_gers
Les attaches maintiennent les articles legers en
plastique tels que les tasses, couvercles ou bols en
place pendant le lavage.
Pour d_placer une attache :
1. Tirer I'attache vers le haut pour la separer de la
tige.
2. Reinstaller I'attache sur une autre tige.
Tiges flexibles
La rangee de tiges sur les c6tes &
gauche et &droite du panier \
superieur peut _tre reglee pour faire
de la place pour divers articles de
vaisselle.
Pour ajuster les tiges rabattables :
1. Saisir la pointe de la tige qui se trouve dans le support de la
tige.
2. Pousser doucement la tige &I'exterieur du support de la tige.
3. Rabattre les tiges vers le bas et vers le centre du panier.

Celave-vaissellecomportelatechnologielaplusrecenteenmatieredefiltration.Lesysteme&triplefiltrationminimiselebruitetoptimise
laconservationd'eauetd'energie,toutenfournissantuneperformancedenettoyagesuperieure.Duranttoutelaviedulave-vaissellele
filtrenecessiteraI'entretienappropriepourlemaintiendelaperformancedenettoyageoptimale.
Lesysteme&triplefiltrationcomprenddeuxparties•lefiltre
superieuretlefiltreinferieur.
• Lefiltresuperieurretientlesel6mentsetobjetsetrangers
degrandetailleainsiquelesparticulesalimentairestr_s
fines,etlesempeched'atteindrelapompe.
• Lefiltreinferieurempechelesalimentsd'etreredeposes
surlavaisselle.
IIpeutetrenecessairedenettoyerlesfiltresacertaines
occasions:
• Presenced'objetsousouilluresdanslefiltresuperieur.
• Degradationdelaperformancedelavage(presencede
souilluressurlavaisselle).
• Perceptionderugositeautouchersurlessurfacesdela
vaisselle.
IIesttresfacilederetireretd'entretenirlesfiltres.Letableau
ci-dessousindiquelafrequencedenettoyagerecommandee
pourlesfiltres.
Pattes de
positionnement
Ensen,b e
de filtre ...........
superieur
Fittre inf6rieur
INTERVALLES DE NETTOYA(_ E RECOMMANDES POUR LES FILTRES
Nombre Vaisselle lav_e avant le
d'utilisations par chargement
semaine
I
1,3 Une fois par an
4-7 Une fois par an
8,12 Une fois par an
13-14 Une fois par an
Vaisselle racine et Vaisselle seulement racl6e Vaisselle ni racl6e ni rinc_e
rinc_e avant le avant le chargement* avant le chargement
chargement
Une fois par an Deux fois par an Tousles deux mois
Une fois par an Deux fois par an Une fois par mois
Ueux fois par an Tous les trois mois Toutes les deux semaines
Deux fois par an Tousles trois mois Une fois par semaine
*Recommandation du fabricant • Cette pratique eliminera la consommation d'eau et d'energie associee a la preparation de la vaisselle et
vous epargnera du temps et des efforts.
Eau tr_s dure Nettoyage
Si I'eau distribuee dans la region est tr_s dure (concentration de
calcaire superieure & 15 grains), nettoyer le filtre au moins une fois
par mois. La formation d'un residu blanc sur les surfaces du lave-
vaisselle indique la durete de I'eau. On trouve a lasection
"Depannage" des conseils sur I'elimination des taches.
Instructions de d_pose du filtre
1. Faire tourner le filtre
superieur de 1¼tour dans le
sens antihoraire; soulever
le filtre et le degager.
2. Saisir le filtre inferieur dans
I'ouverture circulaire,
soulever legerement et tirer
vers I'avant pour le
degager.
3. Nettoyer les filtres - voir la
description du processus
ci-dessous.
Patte de
IMPORTANT : Ne pas utiliser de brosse metallique ni de tampon &
recurer, etc., susceptible d'endommager les filtres.
Rincer chaque filtre sous le jet d'eau du robinet, pour eliminer la
plupart des souillures. S'il reste des souillures difficiles &enlever ou
des dep6ts de calcium imputables & la durete de I'eau, il peut etre
necessaire d'employer un pinceau souple.
D_pose du filtre sup_rieur
La page est en cours de chargement...
La page est en cours de chargement...
La page est en cours de chargement...
La page est en cours de chargement...
-
 1
1
-
 2
2
-
 3
3
-
 4
4
-
 5
5
-
 6
6
-
 7
7
-
 8
8
-
 9
9
-
 10
10
-
 11
11
-
 12
12
-
 13
13
-
 14
14
-
 15
15
-
 16
16
-
 17
17
-
 18
18
-
 19
19
-
 20
20
-
 21
21
-
 22
22
-
 23
23
-
 24
24


Jenn-Air JDB3650AWR3 Le manuel du propriétaire
- Catégorie
- Lave-vaisselle
- Taper
- Le manuel du propriétaire
dans d''autres langues
- English: Jenn-Air JDB3650AWR3 Owner's manual
Documents connexes
Autres documents
-
KitchenAid KUDE40CVWH3 User Instructions
-
KitchenAid KUDE40CVBL1 Le manuel du propriétaire
-
Maytag MDB7709AWQ2 Le manuel du propriétaire
-
KitchenAid KUDE40FXPA0 User Instructions
-
Maytag W10199658A Le manuel du propriétaire
-
Maytag MDB7760SAS0 User Instructions
-
KitchenAid KUDK03FTSS1 Manuel utilisateur
-
IKEA IUD9750WS4 Le manuel du propriétaire
-
-
Fulgor DW524L1AWH0 Le manuel du propriétaire