
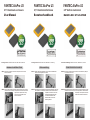
2.5” Aluminum enclosure
User Manual
FANTEC AluPro U3 FANTEC AluPro U3 FANTEC AluPro U3
2,5” Aluminium Gehäuse
Benutzerhandbuch
Packungsinhalt: FANTEC AluPro U3, USB Kabel 3.0, Anleitung
Einbauanleitung
R
2.5” boîtier aluminium
MANUEL DE L'UTILISATEU
Contenu de l'emballage: FANTEC , câble USB 3.0, manuel
Guide d'installation du matériel
Package contents: FANTEC AluPro U3 , USB Cable 3.0, Manual
Hardware Installation Guide
AluPro U3
STEP1: Push at the rear side to remove the inner plastic frame out of the
aluminum enclosure.
STEP2: Push the HDD towards the electronic board and make sure the SATA
connector is well connected. Then please fix the screws at the left and
right side of the plastic frame. Finally
push the inner frame back into the
aluminum enclosure.
Schritt 1: Drücken Sie auf die Rückseite, um den inneren Kunstsoffrahmen
aus dem Aluminiumgehäuse zu ziehen.
Schritt 2: Verbinden Sie die Festplatte mit der Platine des Gehäuses, indem Sie
die Festplatte in das Gehäuse schieben. Danach schrauben Sie die
Festplatte an der linken und rechten
Seite des Kunststoffrahmens fest.
Zum Schluß schieben Sie den
Rahmen wieder zurück in das
Aluminiumgehäuse.
ETAPE 1: Pousser sur le côté arrière pour retirer le cadre intérieur en plastique
sur l' boîtier en aluminium.
ETAPE 2: Faites glisser le disque dans le boîtier et connectez le disque à la carte
du boîtier. Ensuite, fixer les vis sur le côté gauche et à droite du cadre
en plastique. Enfin repousser les cadre
intérieur dans le boîtier en aluminium.

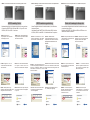
HDD Formatting Guide
- New hard disks have to be formatted, before you can use them.
- Connect the FANTEC ALU-25U3 via USB 3.0 to your PC's with
USB 3.0, USB 2.0 or USB 1.1 interface.
STEP1: Right-click on
“My Computer” icon and select
the ”Manage” column.
STEP2: Select “Disk Management”
and you will see your External HDD
showed “Unallocated”.
E
l
Guide de formatage du disque dur
- Les nouveaux disques durs doivent être formatés avant qu'ils
ne puissent être utilisés.
- Branchez le FANTEC ALU-25U3 p ar USB ou eSATA sur votre
ordinateur. Mettez en marche.
TAPE 1 : Cliquez à droite sur l'icône
« Mon ordinateur » et sélectionnez
a colonne « Gestion ».
ETAPE 2 : Sélectionnez « Gestion
de disque » et vous verrez que votre
disque dur externe est indiqué
comme « Non affecté ».
HDD Formatierungsanleitung
- Neue Festplatten müssen formatiert werden, bevor Sie diese
benutzen können.
- Verbinden Sie das FANTEC ALU-25U3 mittels USB3.0 mit der
USB 3.0, USB 2.0 oder USB 1.1 Schnittstelle ihres Computers
Schritt 1: Rechtsklick auf das
Symbol “Arbeitsplatz”; und wählen
Sie “Verwalten” in dem Menü aus.
Schritt 2: Wählen Sie die
“Datenträgerverwaltung” aus. Ihre
Festplatte wird als “Nicht initialisiert”
angezeigt. Bitte initialisieren Sie die
Festplatte.
ETAPE 3 : Cliquez à droite sur le
bloc « Non affecté » et s
é
lectionnez
« Nouvelle partition ».
ETAPE 4 : L'« assistant nouvelle
partition » apparaît. Veuillez suivre
les consignes de l'assistant pour
effectuer la partition.
ETAPE 5 : Une fois la partition
terminée, le disque dur externe
sera alors reconnu comme
« Nouveau volume ».
ETAPE 6 : Double-cliquez
Mon ordinateur ». Vous pourrez
voir le nouveau volume sur votre
ordinateur.
STEP3: Right-Click on the
“Unallocated” bock and select
“New Partition”.
STEP5: When partitioning is
completed, the external HDD will be
recognized as a “New Volume”.
STEP4: The “New Partition Wizard”
wi l l appea r. Please follow th e
instruction of the wizard to complete.
STEP6: Double-click “My Computer”
You will see the new volume appears
on your PC.
Schritt 3: Die externe HDD wird nun
als “Online” angezeigt. Rechtsklick auf
den “Nicht zugeordnet” Balken und
anschließend Linksklick auf “Neue
Partition erstellen”.
Schritt 4: Der Assistent zum erstellen
einer neuen Partition erscheint. Bitte
folgen Sie den Anweisungen bis zum
Ende.
Schritt 5: Wenn Ihre neue Partition
erstellt wurde, wird Ihre HDD als
“Volume“ dargestellt.
Schritt 6: Die Festplatte wird nun
im „ Arbeitsplatz“ angezeigt.
«
STEP3: Fix the screws at the bottom side. The asembling process is done. Schritt 3: Befestigen Sie die Schrauben ann derUnterseite. Der Festplatteneinbau
ist nun abgeschlossen.
ETAPE 3: Fixez les vis sur la partie inférieure. L'installation du disque dur
est terminée.
-
 1
1
-
 2
2


dans d''autres langues
- English: Fantec AluPro U3 User manual
- Deutsch: Fantec AluPro U3 Benutzerhandbuch
Documents connexes
-
Fantec DB-AluSky U3 Manuel utilisateur
-
-
-
-
-
-
-
Fantec MM-FHDL Manuel utilisateur
-
-