GE ZIF36NMFRH Le manuel du propriétaire
- Catégorie
- Cave à vin
- Taper
- Le manuel du propriétaire
Ce manuel convient également à

OwneF_s
Manual
Built-In
36" Single Door
Refrigerators
and
36" Single Door
Freezers
www.monogram.com
Monogram._

Consumer Infbrnlafion
R@'igerator/Freezer
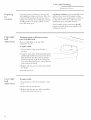
lntrvduction Your new Monogram refl'igerator/fl'eezer makes an eloquent statement of style, convenience
and kitchen planning flexibility: Whether you chose it tor its pm'ity of design, practical storage
arrangements or assiduous attention to detail--or tkw all of these reasons--you'll find that wmr
Monogram reti'igerator/fl'eezer's superior blend of torm and flmction will delight you fin" years
to COlile.
The Monogram refl'igerator/fl'eezer was designed to provide the flexibility to blend in with
vom" kitchen cabinetry. Decorative door insert panels allow it to match wmr kitchen cabinets
or blend with vom" kitchen decor. Custom handles are also available to flu'ther personalize
yore" refl'igerator/fl'eezer. Through a series of product and trim kit choices, the Monogram
refl'igerator/fl'eezer can be beautiflflly integrated into the kitchen.
Since this is designed to be a built-in product, custom panels are required on the fl'ont of
the Monogram refl_igerator/fl'eeze_: Consult yore" kitchen designer or cabinetmaker t0r vour
customized look.
The information on the fi)llowing pages will hel I) you operate and maintain vom"
refl'igera tor/fl'eezer properly.
If you have any other questions, visit ore" Website at: www.monogram.com.
Contents Consumer Services
hnportant Phone Nmnbe_ ................ 19
Model and Serial Numbers ................. 3
Problem Solver . ...................... 16, 17
Product Registration ...................... 3
SafeD' Instructions ...................... 4-7
Wm'anlv ........................ Back Cover
Care m_d Clemlhag
Cleaning--Outside and Inside ............. 13
Condenser . ............................. 13
I,ight Bulb Replacement .................. 14
Vacation ................................ 14
Operating Instructions
Automatic Icemaker . ...................... 9
Shelves .............................. 11, 12
Storage Drawe_ ......................... 10
Temperature Controls ..................... 8
_,V_ter Filter Accessory ..................... 9
Wine Rack .............................. 11
Preparation
Clea ra n ces .............................. 15
i,eveling ................................ 15
I,ocation ................................ 15
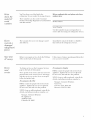
Be/ore
using
your
refrigerator/
.f}_eezer
Read this manual careflflly. It is intended to
hel I) you operate and maintain your new
refl'igera tor/fl'eezer i)roperly.
Kee I) it handy fin" answers to your questions.
If you don't trade,stand something or
need more hell), there is a list ol toll-fl'ee
consumer service nmnbe_ included in
the back section of this manual.
OR
Visit our _,Vebsite at: www.monogrmn.com

Write
down the
model &
serial
n _!lfl_l b eys
You'll see them on a label inside the
refl'igerator/fl'eezer under the storage drawers.
These nmnbers are also on the Consumer
Product Owne_Mfip Registration Card included
with this manual.
Before sending in this card, please write these
numbers here:
Model Number
Serial Number
Use these numbe_5 in an) correspondence or
serxice calls concerning }our refl]gerator/ffeezer.
l.f you
received a
damaged
fi4gerato i
.fF(?ezer
The warrant} does not coxer damage caused
after delix err.
hnmediatelv contact the dealer (or builder)
that sold xou the refrigerator/fl'eezer,
Save time
& money
Before )ou request service, check the Problem It lists causes of minor operating problems that
Solxer in the back of this manual, you can correct yourself.
If you
need
service
To obtain se_wice, see the Consumer Services
page in the back of this manual.
X_'e're proud of ore" service and want vou to be
pleased. Iffi)r some reason you are not hai)py
with the service you receive, here are steps to
fl)llow fl)r flu'ther hell).
For customers in the USA:
FIRST, contact the people who se_wiced vom"
appliance. Explain why you are not pleased.
In most cases, this will solve the problem.
NEXT, if you are still not pleased, write all the
details--including your phone nmnbe_--to:
Manager, ()lstomer Relations
GE Appliances
Appliance Park
I,ouisville, KY 40295
For customers in Canada:
FIRST, contact the people who serviced vom"
appliance. Explain why you are not pleased.
In most cases, this will solve the problem.
NEXT, if wm are still not pleased, write all the
details--including your phone nmnber to:
Manager, (_onsumer Relations
Camco Inc.
1 Factory I,ane, Suite 310
Moncton, N.B. El(; 9M3

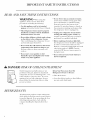
IMPORTANT SAFETY INSTRUCTIONS
READ AND SAVE 7"HESE INS TR UCTIONS
WARNING-x, hen.singthis
appliance always exercise basic satiety
precautions, including tile fi_llowing:
• Use this appliance only for its intended
purpose as described in this Owner's Manual.
• This refrigerator/freezer must be properly
installed in accordance with the Installation
Instructions before it is used.
• Do not allow children to climb, stand or hang
on the shelves in the refrigerator/freezer.
Thev could dalnage tile refrigerator/fl'eezer
and seriously iqjure thelnselves.
• Do not touch the cold surfaces in the freezer
compartment when hands are damp or wet,
Skin may adhere to these extrelnelv cold
S/lI'J[_l ces,
• Do not store or use gasoline or other
flammable vapors and liquids in the vicinity
of this or any other appliance.
• If your freezer has an automatic icemaker,
awfid contact with tile inoving parts of tile
ejector n/echanisln, or with tile heating
elelnent located on tile bottom of tile
icelnaker. Do not place fingers or hands on
the autolnatic icelnaking inechanisn/while
tile reti'igerator/freezer is i)lugged ill.
• Unplug your refrigerator/freezer before
clemfing and making repairs. NOTE: X_'e
strongly recolnlnend that any servicing be
i)erfl)rlned by a qualified individual.
• Before replacing a burned-out light bulb,
tile refl'igerator/fl'eezer should be tmi)lugged
in order to awfid contact with a live wire
filament. (A burned-out light bulb may break
when being replaced.) NOTE: Turning
control to (-)FF does not YeIllOVe l)oweI" to
tile light circuit.
• Do not refreeze frozen foods which have
thawed completely.
ii DANGER." RISK OF CHIIJ) ENTRAPMENT
Child entral)inent and stdtocation are not
i)roblelns of tile past..]unked or abandoned
refl'igerator/freezers are still dangerous...even
if they will sit fi_i" "just a few days." If you are
getting rid of your old refl'igerator/fl'eezer,
please fi_llow the insti uctions below to hel I)
i)revent accidents.
Before You Throw Away Your Old
Refrigerator/Freezer or Freezer:
• Take off tile doors.
• i,eave tile shelves in place so that children
max not easilx clilnb inside.
t ?,Ft Gt?,t NTS
All refl'igeration products contain refl_igerants,
which under federal law inust be relnoved prior
to product disposal. If you are getting rid of an
old refrigeration product, check with tile
company handling tile disposal about what
to do.

LIRE ET CONSERVER CES INSTRUCTIONS
AVERTISSEMENT :
I,oI_que vous utilisez le r_liJg_rateur/coi_g-_lateui;
observez toujours certaines prg_cautions de
base, notaululent :
• N'utilisez l'appaxeil que pour son usage
prOvu, coullne d_crit dans le i)r_sent malmel
de 1'utilisa teur.
• Installez le r6frig6rateur/cong61ateur
conform6ment aux directives d'installation
avant de l'utiliser.
• Ne laissez pas les enfants grimper, s'asseoir,
se tenir debout ni se pendre aux clayettes du
r6frig6rateur/cong61ateur. Ils i_ourraient
endoummger le r_fl'ig_rateur et se blesser
gravem ent.
• Une lois le cong61ateur en marche,
ne touchez pas les surfaces froides du
cong61ateur, surtout si vous avez les mains
humides ou mouill6es : la peau risque
d'adh_rer fi ces surthces tr_s ti'oides.
• N'entreposez et n'utilisez pas d'essence ou
autres vapeurs et liquides inflmumables _t
proximit6 de cet appareil ou de tout autre
appaJeeil 61ectrom6nager.
Pour les r6frig6rateurs dot6 d'tme machine h
glagons automatique, 6vitez le contact avec les
pi_ces inobiles du nlg_canislne _jecteur
ou avec l'(dg_u_ent clmutthnt situ(_ _'lla partie
infiXrieure de la umchine fi gla(:ons. Ne posez
pas les doigts ou les umins sur le u_calfiSlne
de la machine fi gla(:ons pendant que le
r_flJg_rateur/cong_lateur est branch,.
• D6branchez votre r_frig6rateur/cong61ateur
avant de le nettoyer et de le r6parer.
REMARQUE : Nous wins recolnlnandons
viveu_ent de courier toute r_i)aratioi_ _'lun
techlficien qualifi_.
• Avmlt de remplacer tree ampoule gfill6e, le
r_liJg&'ateur/cong_lateur doit &tre d_branch_
afin d'_viter tout contact avec un fil sous
tension. (Une ami)oule grill_e peut se briser
i)endant l'op_ration). REMARQUE : Ix)rsque
vous placez la commande sur <,0,, (_teint),
l'alimelm_tioi_ _lectrique de l'ami)oule n'est
pas couple.
• Ne fares PAS recongeler des aliments
surgel6s qui ont compl&tement d6gel&
ii DANGER : RISQUES POUR LES ENFANTS
I,es elffants pris au pi&ge ou inorts d'asphyxie
sont toujours d'actualit_. I,es appareils de
rg_fl'ig_ratioi_ abandong_s sont toqjours aussi
dangereux, n_&ine si on n'attend que "quelque
jours" pour s'en d_barasser. Si vous ne gardez
pas votre ancien appareil, veuillez suivre les
directives ci-dessous afin de i)r_venir les
accidents.
Avmit de vous d6barasser de votre vieux
appaJceil de r6frig6ration :
• Dg_montez les portes.
• I,aissez les clavettes en place afin d'emp_cher
les enlhnts de griml)er _'_l'ii_t_rieur.
REFRIGERANT S
Tous les appareils de r_fl'ig_ration contiennent
des r_fl'ig_rants qui, confiwm&nent aux lois
fiXd_rales, doivent _tre enlev_s avant toute
_limilmtion de l'appareil. Si vous vous
d_barrassez de vieux appareils de r_frig&'ation,
v&'ifiez, aupr&s de la soci_t_ qui s'occupe de
leur _limilmtion, ce que vous devez taire.

IMPORTANT SAFETY INSTRUCTIONS
HOW TO CONNECT EIJ ?,CTRICITY
Do uot, under ally circmnstauces, cut or
remove the third (gromld) prong from the
power cord. For personal safety, this appliance
must be properly gromlded.
The power cord of this appliance is equipped
with a 3-prong (grounding) plug which mates
with a standard 3-prong (grounding) wall
outlet to minimize the possibility of electric
shock hazard from this appliance.
Have the wall outlet and circuit checked by
a qualified electrician to make sure the outlet
is properly grotmded.
Where a standard E-prong wall outlet is
encountered, it is your personal responsibility
and obligation to have it replaced with a
properly grounded 3-prong wall outlet.
The reti'igerator/freezer should always be
plugged into its own individual electrical outlet
which has a voltage rating that matches the
rating plate.
DO NOT USE AN ADAPTER PLUG TO
CONNECT THE REFRIGERATOR/FRI_:ZER
TO A 2-PRONG OUTLET.
DO NOT USE AN EXTENSION CORD
WITH THIS APPLIANCE.
This provides the best pertimnance and also
prevents overloading house wiring circuits
which could cause a fire hazard from
overheated wires.
Never tmphlg your refl'igerator/fl'eezer bv
pulling on the power cord, Always grip plug
fi_mlv and pull straight out fi'om the outlet,
Repair or replace immediately all power
cords that have become fl'ayed or otherwise
damaged. Do not use a cord that shows cracks
or abrasion damage along its length or at
either end.
X_hen moxing the refrigerator/freezer away
fl'om the wall, be careflfl not to roll oxer or
damaoe_ the power cord.
SAVE THESE
INSTRUCTIONS

RA CC0 RDEMEN T EIJ ?,C7"RIQUE
Ne coupez _firetirez en auctm cas la troisibme
broche (raise a la terre) de la fiche du cordon
d'alimentation. Pour votre s6curit6, cet appaJceil
doit 6tre correctement mis ii la terre.
I,e cordon d'alimentation de cet appareil est
muni d'une fiche 5 3 broches (raise 5 la terre)
qui se branche darts une prise mural ordinaire
5 3 alvg_oles (raise 5 la terre) pour rg_duire au
minimum les risques du chocs (_lectriques.
Faites examiner la prise de courant et le circuit
par un (_lectricien qualifi(_ pour wins assurer
que la prise est correctement raise 5 la terre.
Si la prise murale est du type standard 5
2 alv&_les, il vous incombe de la thire
remplacer par une prise 5 3 alvgu)les
correctem ent raise 5 la terre.
I,e r(_fl'ig(_rateur/cong_lateur doit toujours _tre
branch(_ darts sa propre prise de courant, dont la
tension nominale est identique 5 celle indiqug_e
sur la plaque signal_tique.
N'UTILISEZ PAS UNE FICHE
D'ADAPTATION POUR RACCORDER
EE R_:FRI G]_:RATEUR/C O N G_:LATEUR
DANS UNE PRISE MURALE A 2 ALVEOLES.
N'UTIL1SEZ PAS DE CORDONS
PROLONGATEURS AVEC CET APPAREIL.
Cette precaution est recommandg_e pour
garantir un rendement optimum et _viter
une surcharge des circuits (_lectriques de la
r4sidence, ce qui pourrait crg_er un risque
d'incendie par su_chauflb des ills.
Ne d_branchezjamais l'appareil en tirant le
cordon d'alimentation. Saisissez refinement
la fiche du cordon et tirez droit pour la retirer
de la prise.
R_parez ou remplacez immg_diatement tout
cordon efliloch_ ou endommag_. N'utilisez pas
un cordon fendill(_ ou pr(_sentant des signes
d' tlS/lI'e.
i,orsque xous dg_placez l'appareil du tour, faites
attention de ne pas la taire fouler sur le cordon
d'alimentation afin de ne pas l'endommager.
CONSERVEZ CES
DIRECTIVES

Operating Instructions
I¢_/rit_'erator/Freezer
Set the
temp_ ature
control
WHEN YOU FIRST TURN THE
REFRIGERATOR/FREEZER ON,
SET THE CONTROL AT 5.
9 is tile coldest setting, 1 is tile wannest.
For colder or waYiner teillperattlres, a(!itlst
tile control one nt/Illbev }It }1 tiIlle.
IMPORTANT: When first setting the control,
or adjusting it, allow 24 hours for the
refrigerator/freezer to get cold.
NOTE: Turning the control to the OFF
position stops cooling in the refrigerator/
freezer, but does not shut off power to
the refrigerator/freezer.
(_5 IS NORMAL
9 ISCOLDEST
How to test
temp_atures
Use the milk test for the refrigerator. Place a
container of milk on tile top shelf. Check it a
day later. If tile milk is too warm or too cold,
a@_st tile temperature control.
Use the ice cream test for the freezer. Place
a container of ice cream in tile center of the
fl'eezer. Check it after a day. If it's too hard
or too soft, a@_st tile temperature control.
Always allow 24 hours for the refrigerator/
freezer to reach the temperature you set.

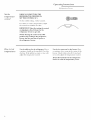
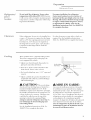
Automatic Icenlaker (fleezer models)
R(/)'ig'eralor/Freezer
Automatic
icemako
qreezer modds )
A newly-installed freezer may take 12-24 hours
to begin making ice.
The icemaker will produce seven cubes per
cycle--ai)i)roximately 100-130 cubes in a
24-hour period, dei_ei_ding on the fl'eezer
telllpei'attu'e, i'ooi11 tell/i)ei'attwe , ntli]lbei" of
door ol)enings and other rise conditions.
If your fl'eezer is operated before the water
COlmection is inade to the icelnaker, set the
power switch to O (off).
When the fl'eezer has been connected to the
water supply; set the power switch to I (on).
The green light will come on.
The icelnaker will fill with water when it cools
to 15°F. A newly-installed fl'eezer inav take
12-24 hours to begin nmking ice cubes.
Throw awav the first few batches of ice to allow
the water line to clear.
Be sure i_othing interteres with the sweep of
the teeler am_.
When the bin fills to the level of the teeler
arln, the icelnaker will stop producing ice.
PowerSwitch
Gr__ r
PowerLight FeelerAne
It is nornml fl_r several cubes to b%joined
togeth er.
If ice is not used fl'equently, old ice cubes will
become chmdy, taste stale and shrink.
If ice cubes get stuck in the icelnaker, the green
power light will blink. To correct this,
set the power switch to O (off) and relnove the
cubes. Set the power switch to I (on) to restart
the icelnaker.
After the icelnaker has been turned on again,
there will be a delay of about 45 ininutes before
the icelnaker resulnes oi)erations.
NOTE: In holnes with lowei=than-average water
l)ressure, you inay hear the icelnaker cycle
InultiI)le tilnes when nmking one batch of ice.
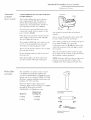
Wato filter
(I€€gssor_
The water filter is an option at extra cost and
is available fl'Oln your dealei; GE Parts and
Accessories, 800.626.2002 or GEAl)pliances.coln.
Specit)' your choice of either GXRI,Q or GXITQ.
Both have COlnplete installation instructions and
install on 1/4" O.D. water line.
Both water filters require rel)lacen_elK
cartridges, Rei)lacen/ent cartridges are available
through (;E Parts and Accessories,
800,626,2002, or GEAi)pliances,com,
Replacement
Model No. Cartridge No.
(;XRLQ GXRTQR
GXITQ GXITQR
In-LineRefrigerator/IcemakerFilter
Model#GXRLQ
RefrigeratorWaterFilterKit
Model#GXITQ

r
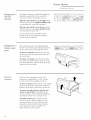
St() age Drawers
R@'i g'era 1or/Fre ezer
R rigerator
Storage
drawers
The upper drawers have individual, a(!iustable
hmniditv controls that let wm control the
amount of cold air entering the drawers.
Slide the control all the way to the High setting
and the drawer provides higher hmnidity levels
recommended fl)r most leat}' vegetables.
Slide the control all the way to the Low setting
and the drawer provides lower humidity levels
recommended ti)r most ti nits.
Excess water that ma) accumulate in the
bottom of the drawers should be emptied
and the drawers wiped dry.
Refrigerator--
Seah?d snack
paTgs
The sealed snack pans retain high hmnidiw
tot the convenient storage ofhmch meats and
cheese, hors d'oeuw'es, spreads and snacks.
To remove a snack pm_, pull the pan out and
lift the front of the pan up tmtil it snaps out of
the wire holder.
To replace a snack pm_, place the back of the
pan in the wire holder, i,ower the fl'ont of the
pan, then push down until the fl'ont of the pan
snaps into the wire holder:
Drawer
removal
Drawers in the refl'igerator/freezer will
stop befin'e coming all the way out, to hel I)
prevent contents fl'om spilling onto floor.
To remove a drawer, pull the drawer out and lilt
the fl'ont of the drawer up and out of the wire
holder. I,ilt the back of the drawer up and out.
To remove the upper drawers when the door
cmmot be opened fully, the shelf above the
drawers must be removed. Push the shelf back,
then lilt up. Tilt the cover and take it out.
To replace a drawer, place the back of the
drawer in the wire holder, making sure the
extensions of the side of the drawer fit into
the back of the wire holder. I,ower the fl'ont
of the drawer into the wire holder. Press
firmly on the top of the drawer.
II
10

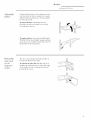
Shelves
I?_J}'igerator/Freezer
Adjustable
shelves
Tempered glass shelves in the refl'igerator and
wire shelves in the fl'eezer enable wm to make
efficient shelf arrangements to fit wmr tamilv's
tood storage needs.
To remove shelves: Tilt shelf up at fl'ont,
then lift it up and out of tracks on rear wall
of refl'ige rato r/fl'ee ze _;
To replace shelves: Select desired shelf height.
With shelf fl'ont raised slightly, engage top lugs
in tracks at rear of cabinet. Then lower front of
shelf tmtil it locks into position.
Removable
wine rack
(on all
r fdg'erator
models)
The wine rack is designed to hold a bottle on
its side and will fit on any shelf.
To relocate the wine rack: Pull the wine rack
straight out, position its lip over the right edge
of the shelf wm want to suspend it fl'om and
push it all the wav in.
11

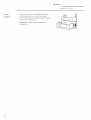
Shelves
I?@'ig'erator/Freezer
Solne door shelves are a(!justable and can be
i/loved (i I) }lIl(1 dowll to Illeet y()III" storage
needs. The deeper door shelves nlust be placed
at tile botton/ of tile door.
To remove: I,ift tile shelf ii I) and slide it
towards vi)/i,
12

re and (;leaning
R@'igerator/Freezer
Cleaning
outside
Door hmadles and trim--Clean with a cloth
dampened with soapy water. D_v with a sott
cloth.
Keep the outside clean. Wipe with a clean
cloth lightly dmni)ened with mild liquid dish
detergent. Dry with a clean, sott cloth.
Do not wipe tile refl'igerator with a soiled dish
cloth or wet towel. These may leave a residue
that can damage the finish. Do not use
scouring pads, powdered cleaners, bleach or
cleaners containing bleach because these
products can scratch and damage tile finish.
Stainless steel Regularly clean and polish the
Stainless Steel Door Panels and Handles (on
some models) with a commercially available
stainless steel cleaner such as Stairdess Sled
Mag'ic _'_to preserve and protect tile fine finish.
Stai_de, ss Sled ,\lag'i_ is available thr(>ugh GE
Parts and Accessories, 800.626.2002, or
GEAl)pliances.com. Order part number
X45X10X 15.
Do not use appliance wax or polish on tile
stainless steel.
Cleaning
inside
To help prevent odors,
leave _lil open box
of baking soda in the
refrigera tor/ti'eezer.
Turn off power at the circuit
breaker or fuse box before
clemfing. If this is not practical,
wring excess nloisture out of sponge or cloth
when cleaning around switches, lights or
controls.
Use warm water and baking soda soh|tion--
about a tablespoon (15 ml) of baking soda to
a quart (1 liter) of water. This both cleans and
neutralizes odors. Thoroughly rinse and wipe dry.
Other parts of the refrigerator/freezer--
including door gaskets, meat and vegetable
drawers, ice storage bin and all plastic
parts--can be cleaned tile same way. Atter
cleaning the door gaskets, apply a thin laver of
petroleum jelly to tile door gaskets at tile hinge
side. This helps kee I) the gaskets from sticking
and bending ()tit of shape.
Avoid clemfing cold glass shelves with hot water
because the extreme temperature difference
may cause them to break. Handle glass shelves
carefully, Rough handling of tempered glass
cml cause it to shatter.
Do not wash any plastic refrigerator/freezer
parts in the dishwasher.
Conde72ser
To clean the condenser fins:
First turn off tile power at tile circuit breaker
or fllse box. _,\'ait about 30 minutes fi)r tile
condenser area to cool. Then reli/ove tile
decorative panel by litiing up and toward you.
Use a sott bristle b_ush to loosen dust and lint
OIS tile condenser tins. [.[se _1 WlC/iUiil hose to
YeIllove soil.
After clemfing: Reconnect power at tile fllse
box or circuit breaker.
Replace the decorative panel.
DecorativePanel
Y >
13

re and Cleaning
R_/rigerator/t_reezer
Preparing
./br
vacation
For long wlcations or absences, FeI/love tk)o(1
and unplug the refl'igerator/fl'eezer. Move the
control to OFF, and clean the interior with a
baking soda solution of one tablespoon (l 5 ml)
of baking soda to one quart (l liter) of water.
i,eave the doors open.
For shorter vacations, relnove perishable foods
and leave the control at the regular setting.
However, if the room temperature is expected
to drop below 60°F (l 6°C), fl_llow the same
instructions as for extended wacations.
Move icemaker power switch to the 0 (off)
position and shut off the water sui)pl ) to the
refrigera tor/freezer.
Upperlight
bulb
replacement
Turning the control to OFF does not remove
power to the light circuit.
There are light bulbs at the top of the
refl'igera tor/fl'eezer.
To replace a bulb:
1 Turn off power at the circuit breaker or
fl/se box.
Grasp the back of the shield with both hands,
pull the light shield tin'ward and rotate down.
This will release the tabs at the back of the
shield fl'om the back wall of the refl'igerator.
Next, move the shield back to release the tabs
at the fl'ont of the shield.
3 Replace with the same size bulb and reinstall
the shield,
4 Tm'n the power on.
J
i .........
Lower light
bulb
r ,placement
To replace a bulb:
1 Turn offpower at the circuit breaker or fllse
box.
2 Remove the top two drawers.
3 P,eplace with the same size bulb, reinstall the
drawers and tm'n the power on.
14

Preparation
R@'ig'erator/Freezer
Rd ige ator/
._ezer
location
Do not install the refrigerator/freezer where
temperatures will be below 60°F (16°C) because
it will not run otten enough to maintain proper
temperatures, and tile refrigerator will develop
high internal humidity.
For proper installation, the refrigerator/
freezer must be placed on a level surface of
hard material the stone height as the rest of the
flooring. This surface should be strong enough
to support a fully loaded refrigerator/freezer,
or approximately 1,200 lbs. each. See the
Installation Instructions (Pub. No. 49-60073-3)
for complete directions.
Clearances
If the refl'igerator/fl'eezer is to be installed in a
corne_, a 4" clearance is required on tile hinge
side fi)r a 90 ° door oi)ening and access to fl'esh
fi)od (h'awe_. A 15" clearance is required on
tile hinge side to remove pans. A 25" clearance
is required on the hinge side for a fifll 130 °
door swing.
No other clearances at top, sides or back are
required. See tile Installation Instructions
(Pub. No. 49-60073-3) tier complete directions.
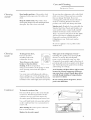
Leveling These products have a 4-point leveling system.
The front is supported by leveling legs, the
rear is sui)ported bx wheels.
• A@lst rear wheels beneath tile product to
just barely touch tile 2x4 block.
• Turn the 7/16" hex ntlt located above the
fl'ont wheels. Turn to raise or lower.
• For fl'ont leveling legs, rise a 1-1/4" open-end
wI'ench.
• At!just careflflly; tile product should be level
and I)lumb with cabinetry; and should align
with toekick height.
CAUTION-The rear leveling
wheels and front leveling legs are limited to a
u_axiumm height a(!iustment of ] ". If the
installation requires more than 84-1/2" height,
tile installer should elew_te tile retrigerator on
a sheet of plywood or runners. Cabinetry trim
could also be added across tile top of tile
opening to shorten the opening. If you
attempt to raise the refrigerator more thm_ 1",
you will damage the front leveling legs m_d
ream leveling wheels.
See tile Installation Instructions (Pub. No.
49-60073-3) ti_r complete directions.
Hex NutAdjusts
RearWheels
LevelingLeg
MISE EN GARDE-
I,es roues de nivellement arri&re et les pattes
de nivellement avant permettent tm r_glage
maximal de 25 mm (l po). Si l'ouverture pore"
le r_frig_ratetu" a tree hautetu" sup_rietu'e 5
2,15 m (84-1/9 po), l'installatem" dolt _lever le
r_fl'ig_ratem" sin" line ti_uille de contre-plaqu_
ou des glissi&res. I1 est 6galement possible
d'ajouter des baguettes de finition des placards
sin" le haut de l'ouverture afin de la r6duire.
Lever le r6frig6rateur de plus de 25 mm (1 po)
endommage les pattes de _fivellement avm_t et
les roues de _tivellement arri&re.
15

The Problenl Solver
I?_J)'ig'e ra lo r/Fre ez e r
Questions ?
Use this
problem
solven t
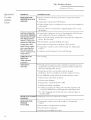
PROBLEM POSSIBLE CAUSE
REFRIGERATOR/
FREEZER DOES NOT
OPERATE
MOTOR OPERATES
FOR LONG PERIODS
OR CYCLES ON AND
OFF FREQUENTLY
(Modern refrigerators
mad freezers with more
storage space and a
larger freezer require
more operating time.
They start mid stop
often to maintain even
temperatures.)
VIBRATION OR
RATTLING
(Slight vibration
is normal.)
OPERATING
SOUNDS
• May be in defrost cycle when motor does not operate for about
30 minutes.
• Temperature control in the OFF position.
• If interior light is not on, refrigerator/freezer ma) not be I)lugged,, in
at wall outlet.
• Tile fllse is blown/circuit breaker is tripped. Replace fllse or reset
the breaker.
• Normal when refl'igerator/fl'eezer is first phlgged in. _ait 24 hours
or tile refl'igerator/fl'eezer to completely cool down.
•Otten occurs when large aillo/ints of fl)od are placed in refrigerator/
freezer. This is normal.
• Door lett open or package holding door open.
• Hot weather or ti'equent door openings. This is normal.
• Temperature control set at tile coldest setting. See Temperature
Control.
• Condenser needs cleanin , See Care and Cleanin ,
• See i e;elin ,
• Tile high speed compressor motor required to maintain near zero
temperatures in the large fl'eezer may produce higher sound levels
than vour old reti'igerator/freezer.
• Normal tan air flow--one tan blows cold air through
refrigerator/ti'eezei--another t_lIl cools tile COllll)I'essoI" inotoi'.
• These NORMAl, sounds will also be heard fl'om time to time:
• Defl'ost timer switch clicks at defl'ost.
• Defl'ost water dripping.
• Temperature control clicks ON or OFK
• Refrigerant boiling or gurgling.
• Cracking or i)opping of cooling coils caused by expansion and
contraction during defl'ost and refl'igeration fi)llowing defl'ost.
• Ice cubes dropping into tile bin and water running in pipes as
icemaker refills.
DOOR NOT CLOSING • Refrigerator/freezer not level. See i evelin *
PROPERLY
REFRIGERATOR/
FREEZER
TOO WARM
eno/i rh
• Temperature control not set cold _ See Temperature
Control,
• X4arm weather or frequent door openings.
• Door lett open for hmg tim e.
• Package may be holding door open.
16

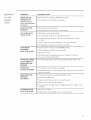
Questions ?
Use this
problem
solver/
PROBLEM POSSIBLE CAUSE
FROST OR ICE
CRYSTALS ON
FROZEN FOOD
(Frost within package
is normal.)
SLOW ICE CUBE
FREEZING
ICE CUBES HAVE
ODOR/TASTE
AUTOMATIC
ICEMAKER
DOES NOT WORK
MOISTURE FORMS
ON OUTSIDE OF
REFRIGERATOR/
FREEZER
MOISTURE
COLLECTS INSIDE
REFRIGERATOR/
FREEZER
HAS ODOR
INTERIOR LIGHT
DOES NOT WORK
• Door left open or I)ackage, holding door open.
• Too freqtlent or too long, door ol)enings, .
• Door may have been lett open.
• Turn temperatm'e control to a colder setting,
• Old cubes need to be discarded,
• Ice storage bin needs to be emptied and washed,
• Unsealed packages in freezer may be transmitting odor/taste to
ice cubes,
• Interior offl'eezer needs cleaning, See Care and Cleaning,
• Pom_tasting incoming water, Install a water filter,
• Icemaker power switch is in the 0 (off) position,
• _'ater supply tin'ned off or not connected.
• Freezer too W_II'I/I,
• Piled up cubes in storage bin may ca ilse icemaker to sh lit off
too soon. I,evel c/ibes bv hand.
• Not mmsual dm'ing periods of high hmnidity. _4]i)e sm'iace dry.
• Too fl'equent or too long door openings.
• In hmnid weather, air carries moistm'e into refl'igerator/fl'eezer when
doors aye opened.
• Foods with strong odors should be tightly covered.
• Check tot spoiled tood.
• Interior needs cleaning. See Care and Cleaning.
• Defl'ost water s_stem needs cleaning.
• Keep open box of baking soda in reti'igerator/freezer; replace every
3 months.
• No power at outlet.
• I,ight bulb needs replacing. See Care and Cleaning.
17

Notes
R_frig'_rator/Fr_ez_,r
18

Consumer Services
R_/*'ig'erator/Freezer
GE Answer
Center _
In the USA:
800.626.2000
With the purchase of your new Monogram appliance, receive the
assurance that if you ever need information or assistance from GE,
we'll be there. All you have to do is call--toll-free, t
Whatever your question about any Monogran/major appliance, GE Answer Cente_ _'_
information service is available to hell). Your call--and yotu" question--will be answered
promptly and courteously. And wm can call any time. GE Answer Centei _': selMce is open
24 hotu's a day, 7 days a week.
In Canada, call 888.880.3030.
OR
Visit otu" X_'ebsite at: www.monogram.com
In-Home Repair
Service
In the USA:
800.444.1845
In Canada:
888.880.3030
A GE consmner service protessional will provide expert repair service, scheduled at a time
that's convenient for vou. Manv GE Consmner Service company-operated locations offer
VO/I seiwice todav or touloITO_'_ oI" at VO/lI" convenience (7:00 a.u/. to 7:00 l).Ul, weekda}:s,
9:00 a.m. to 2:00 p.m. Saturdays). Our tactory-trained technicians know yotu" appliance
inside and out--so most repairs can be handled in just one visit.
For Customers
With Special
Needs...
In the USA:
800. 626. 2000
GE offers Braille controls for a xarietx of GE appliances, and a
broch m'e to assist in I)lannim"_ a barrie_free kitchen fi)r persons
with limited mobility.
Const/uleI's with impaired hearing or speech xsho have access to a
TDD or a conventional telet)pewriter ma_ call 800.TDD.(;EAC
(800.833.4322) to request infiwmation or set\ice.
Service Contracts
In the USA:
800. 626. 2224
In Canada:
888.880.3030
You can have the secure teeling that GE Consmner Service will still be there after wmr
warranty expires. Pro'chase a GE contract while vom" warranty is still in efli_ct and vou'll
receive a substantial (liscotmt. With a multiple-year contract, you're assured of fllture
service at todav's prices.
Parts and
Accessories
In the USA:
800.626.2002
In Canada:
888.880.3030
Individuals qualified to service their own appfiances can have parts or accessories sent directly
to their home. The GE parts system provides access to over 47,000 parts...and all GE Genuine
Renewal Parts are flfllv warranted. VISA, MasterCard and Discover cards are accepted.
User maintenance instructions contained in this manual cover procedures intended to be
performed by may user. Other servicing generally should be referred to qualified service
persomml. Caution must be exercised, since improper servicing may cause unsafe operation.
19

Warranty
Re]rigeralor/Freezer
WHATIS
COVERED
P)om the Date
of the Or_qinal
Purchase
YOUR MONOGRAM WARRANTY
Staple sales slip or cancelled check here. Proof of original purchase
date is needed to obtain service under warranty.
FULL TWO-YFAR WARRANTY
For two ,/ears Ii'om (late of original purchase, we will provide, Dee of charge, parts and set\ice labor in
xour home to repair or replace any part q/'lhe rtJi'_wralor//i'ePzerthat Iitils because of a manulitcmring defect.
FULL FIVE-YFAR WARRANTY
For five years Ii'om (late of original purchase, we will provide, Ii'ee of charge, parts and service labor
in your ilome to repair or replace w O,part r?/'the sealt'd r@'ig'emti_g',_ystt,m (the compressol; condense1;
e_aporator and all connecting robing) that iifils because of a naanufitcmring deibct.
LIMITED ADDITIONAL SEVEN-YEAR WARRANTY ON THE SEALED SYSTEM
For the sixth through twelfth year fl'om the (late of the original purchase, we will provide, Dee of
charge, replacement parts ff)r w O,part q/the st:alt:d r(./rig'emti_g'._ystt.m (the compressol; condenseg
exaporator and all connecting robing) that iifils because of a naanufitcmring deibct. You pa_ for
the service trip m your home and ff)r service labor charges.
LIMITED LIFETIME WARRANTY ON FULL EXTENSION SLIDES
From the (late of the original purchase we will provide, li'ee of charge, l'eplacement parts li)r
a_O,part r!fthe/ull t,xtemio_ slidt,_ that dills because of a man ulilcturing delect. You pay fl)r the service
trip to your home and fl)r service labor charges.
This warrant\ is extended to the original purchaser and any succeeding owner li)r prod ucts
purchased fl)r ordinary honae use in the 48 mainland states, Hawaii and \4_shington, D.C.
In Alaska the warranty is the same except that it is I,[MITED because you must pay to ship
the prod uct to the service shop or li)r the service technician's tra\ el costs to your bonae.
All warralm serxice will be proxided b) om _ Factorx• Serxice Centers or bx our authorized
Custon_er Care _ serxicers d rating normal working hours.
Should _our appliance need service, during warranty period or beyond, in the U.S.A. call
800.44411845. In Canada: 888.444.1845.
WHAT IS NOT
COVERED
• Service trips to your home to teach you how
to use the product.
• Replacement of house fuses or resetting of
circtfit breakers.
• Incidental or consequential damage caused
by possible defects with this appliance.
• Damage to the product caused by accident,
fire, floods or acts of God.
• Damage caused after delivery.
• Failure of the product if it is used for other
than its intended purpose or used commercially.
• Improper installation, delivery or maintenance.
If you have an installation problem, contact
your dealer or installer. You are responsible for
providing adequate electrical, plumbing and
other connecting facilities.
• Loss of food due to spoilage.
• Replacement of the light bulbs other than as
noted above.
Seine states/provinces do not allow the exclusion or limitation of incidental or consequential
damages, so the above limitation or exclusion ma} not apply to votL This warranty gives you specific
legal rights, and you lna_ also have other rights which vary l_'Oln state to state/province to province.
To know what your legal rights are in }_mr state/province, consuh \_mr local or state/provincial
consumer allifirs ollice or your state's/province's Attorney C,eneral.
Warrantor in USA: General Electric Company.
Louisville, KY 40225
Warrantor in Canada: Camco Inc.
Monogram:
162D9646PO03
49-60317-1
60182-01 12-o3JR
Printed in the United States
GEConsumer Products
General Electric Company
Louisville, KY40225
@2003GeneralElectdcCompany
-
 1
1
-
 2
2
-
 3
3
-
 4
4
-
 5
5
-
 6
6
-
 7
7
-
 8
8
-
 9
9
-
 10
10
-
 11
11
-
 12
12
-
 13
13
-
 14
14
-
 15
15
-
 16
16
-
 17
17
-
 18
18
-
 19
19
-
 20
20


GE ZIF36NMFRH Le manuel du propriétaire
- Catégorie
- Cave à vin
- Taper
- Le manuel du propriétaire
- Ce manuel convient également à
dans d''autres langues
- English: GE ZIF36NMFRH Owner's manual
Documents connexes
-
 GE Monogram Built In 36 Single Door Refrigerators and 36 Single Door Freezers Manuel utilisateur
-
GE FUF14DUARWW Le manuel du propriétaire
-
GE ZDI15CHBB Le manuel du propriétaire
-
GE ZV950 Le manuel du propriétaire
-
GE ZDI15CWWC Le manuel du propriétaire
-
GE ZDBC240NABS Le manuel du propriétaire
-
-
-
-

Autres documents
-
Hotpoint HSS22GFTFWW Le manuel du propriétaire
-
-
-
Monogram ZDP36N4D Le manuel du propriétaire
-
Jenn Air JSM900TAAU Le manuel du propriétaire
-
WilTec 60317 Manuel utilisateur
-
-
CDVI DGLIWLC Guide d'installation