
IMPORTANT: IMPORTANT : IMPORTANTE:
Read Before Using Lire avant usage Leer antes de usar
For English Version Version française Versión en español
See page 2 Voir page 19 Ver la página 36
Operating/Safety Instructions
Consignes de fonctionnement/sécurité
Instrucciones de funcionamiento y seguridad
1-800-4-DREMEL (1-800-437-3635) http://www.dremel.com
Call Toll Free for
Consumer Information
& Service Locations
Pour obtenir des informations
et les adresses de nos centres
de service après-vente,
appelez ce numéro gratuit
Llame gratis para
obtener información
para el consumidor y
ubicaciones de servicio
MM40
DM 2610016364 09-11:DM 2610016364 09-11.qxp 9/7/11 9:27 AM Page 1

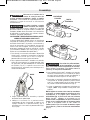
Work area safety
Keep work area clean and well lit. Cluttered
or dark areas invite accidents.
Do not operate power tools in explosive
atmospheres, such as in the presence of
flammable liquids, gases or dust. Power
tools create sparks which may ignite the dust
or fumes.
Keep children and bystanders away while
operating a power tool. Distractions can
cause you to lose control.
Electrical safety
Power tool plugs must match the outlet.
Never modify the plug in any way. Do not
use any adapter plugs with earthed
(grounded) power tools. Unmodified plugs
and matching outlets will reduce risk of electric
shock.
Avoid body contact with earthed or grounded
surfaces such as pipes, radiators, ranges
and refrigerators. There is an increased risk
of electric shock if your body is earthed or
grounded.
Do not expose power tools to rain or wet
conditions. Water entering a power tool will
increase the risk of electric shock.
Do not abuse the cord. Never use the cord
for carrying, pulling or unplugging the power
tool. Keep cord away from heat, oil, sharp
edges or moving parts. Damaged or entangled
cords increase the risk of electric shock.
When operating a power tool outdoors,
use an extension cord suitable for outdoor
use. Use of a cord suitable for outdoor use
reduces the risk of electric shock.
If operating a power tool in a damp location
is unavoidable, use a Ground Fault Circuit
Interrupter (GFCI) protected supply. Use of
an GFCI reduces the risk of electric shock.
Personal safety
Stay alert, watch what you are doing and
use common sense when operating a
power tool. Do not use a power tool while
you are tired or under the influence of drugs,
alcohol or medication. A moment of inattention
while operating power tools may result in
serious personal injury.
Use personal protective equipment. Always
wear eye protection. Protective equipment
such as dust mask, non-skid safety shoes, hard
hat, or hearing protection used for appropriate
conditions will reduce personal injuries.
Prevent unintentional starting. Ensure the
switch is in the off-position before
connecting to power source and / or battery
pack, picking up or carrying the tool.
Carrying power tools with your finger on the
switch or energizing power tools that have the
switch on invites accidents.
Remove any adjusting key or wrench before
turning the power tool on. A wrench or a
key left attached to a rotating part of the
power tool may result in personal injury.
Do not overreach. Keep proper footing and
balance at all times. This enables better
control of the power tool in unexpected
situations.
Dress properly. Do not wear loose clothing
or jewelry. Keep your hair, clothing and
gloves away from moving parts. Loose
clothes, jewelry or long hair can be caught in
moving parts.
If devices are provided for the connection
of dust extraction and collection facilities,
ensure these are connected and properly
used. Use of dust collection can reduce dust-
related hazards.
Power tool use and care
Do not force the power tool. Use the
correct power tool for your application. The
correct power tool will do the job better and
safer at the rate for which it was designed.
Do not use the power tool if the switch does
not turn it on and off. Any power tool that
cannot be controlled with the switch is
dangerous and must be repaired.
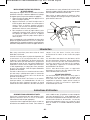
Read all safety warnings and all instructions. Failure to follow the warnings
and instructions may result in electric shock, fire and/or serious injury.
SAVE ALL WARNINGS AND INSTRUCTIONS FOR FUTURE REFERENCE
The term “power tool” in the warnings refers to your mains-operated (corded) power tool or
battery-operated (cordless) power tool.
!
WARNING
General Power Tool Safety Warnings
-2-
DM 2610016364 09-11:DM 2610016364 09-11.qxp 9/7/11 9:27 AM Page 2

Disconnect the plug from the power source
and/or the battery pack from the power tool
before making any adjustments, changing
accessories, or storing power tools. Such
preventive safety measures reduce the risk of
starting the power tool accidentally.
Store idle power tools out of the reach of
children and do not allow persons unfamiliar
with the power tool or these instructions to
operate the power tool. Power tools are
dangerous in the hands of untrained users.
Maintain power tools. Check for misalignment
or binding of moving parts, breakage of
parts and any other condition that may
affect the power tool’s operation. If damaged,
have the power tool repaired before use.
Many accidents are caused by poorly
maintained power tools.
Keep cutting tools sharp and clean. Properly
maintained cutting tools with sharp cutting
edges are less likely to bind and are easier to
control.
Use the power tool, accessories and tool
bits etc. in accordance with these instructions,
taking into account the working conditions
and the work to be performed. Use of the
power tool for operations different from those
intended could result in a hazardous situation.
Service
Have your power tool serviced by a qualified
repair person using only identical
replacement parts. This will ensure that the
safety of the power tool is maintained.
Hold power tool by insulated gripping
surfaces, when performing an operation
where the cutting tool may contact hidden
wiring or its own cord. Cutting tool
contacting a "live" wire may make exposed
metal parts of the power tool "live" and could
give the operator an electric shock.
Use clamps or another practical way to
secure and support the workpiece to a
stable platform. Holding the work by hand or
against your body leaves it unstable and may
lead to loss of control.
Do not drill, fasten or break into existing
walls or other blind areas where electrical
wiring may exist. If this situation is
unavoidable, disconnect all fuses or circuit
breakers feeding this worksite.
Use a metal detector to determine if there
are gas or water pipes hidden in the work
area or call the local utility company for
assistance before beginning the operation.
Striking or cutting into a gas line will result in
explosion. Water entering an electrical device
may cause electrocution.
Always hold the tool firmly with both hands
for maximum control. Keep proper footing
and balance at all times. This enables better
control of the power tool in unexpected
situations.
Keep hands away from cutting area. Do
not reach under the material being cut. The
proximity of the blade to your hand is hidden
from your sight.
Do not use dull or damaged blades. Bent
blade can break easily or cause kickback.
Exercise extreme caution when handling
the accessories. The accessories are very
sharp.
Wear protective gloves when changing
cutting accessories. Accessories become
hot after prolonged usage.
Use thick cushioned gloves and limit the
exposure time by taking frequent rest
periods. Vibration caused by the tool may be
harmful to the hands and arms.
Before scraping, check workpiece for nails.
If there are nails, either remove them or set
them well below intended finished surface.
Striking a nail with accessory edge could
cause the tool to jump.
Do not wet sand with this tool. Liquids
entering the motor housing is an electrical
shock hazard.
Never work in area which is soaked with a
liquid, such as a solvent or water, or
dampened such as newly applied
wallpaper. There is an electrical shock
Safety Rules for Oscillating Tools
-3-
DM 2610016364 09-11:DM 2610016364 09-11.qxp 9/7/11 9:27 AM Page 3

hazard when working in such conditions with a
power tool and heating of the liquid caused by
scraping action may cause harmful vapors to
be emitted from workpiece.
Always wear eye protection and a dust
mask for dusty applications and when
sanding overhead. Sanding particles can be
absorbed by your eyes and inhaled easily
and may cause health complications.
Use special precautions when sanding
chemically pressure treated lumber, paint
that may be lead based, or any other
materials that may contain carcinogens. A
suitable breathing respirator and protective
clothing must be worn by all persons entering
the work area. Work area should be sealed by
plastic sheeting and persons not protected
should be kept out until work area is thoroughly
cleaned.
Do not use sandpaper intended for larger
sanding pads. Larger sandpaper will extend
beyond the sanding pad causing snagging,
tearing of the paper or kick-back. Extra paper
extending beyond the sanding pad can also
cause serious lacerations.
Additional Safety Warnings
GFCI and personal protection devices like
electrician’s rubber gloves and footwear will
further enhance your personal safety.
Do not use AC only rated tools with a DC
power supply. While the tool may appear to
work, the electrical components of the AC
rated tool are likely to fail and create a hazard
to the operator.
Keep handles dry, clean and free from oil
and grease. Slippery hands cannot safely
control the power tool.
Develop a periodic maintenance schedule
for your tool. When cleaning a tool be
careful not to disassemble any portion of
the tool since internal wires may be
misplaced or pinched or safety guard return
springs may be improperly mounted.
Certain cleaning agents such as gasoline,
carbon tetrachloride, ammonia, etc. may
damage plastic parts.
Risk of injury to user. The power cord must only
be serviced by a Dremel Service Facility.
Some dust created by power
sanding, sawing, grinding,
drilling, and other construction activities
contains chemicals known to cause cancer,
birth defects or other reproductive harm.
Some examples of these chemicals are:
• Lead from lead-based paints,
• Crystalline silica from bricks and cement and
other masonry products, and
• Arsenic and chromium from chemically-
treated lumber.
Your risk from these exposures varies,
depending on how often you do this type of
work. To reduce your exposure to these
chemicals: work in a well ventilated area, and
work with approved safety equipment, such as
those dust masks that are specially designed
to filter out microscopic particles.
!
WARNING
-4-
DM 2610016364 09-11:DM 2610016364 09-11.qxp 9/7/11 9:27 AM Page 4

IMPORTANT: Some of the following symbols may be used on your tool. Please study them
and learn their meaning. Proper interpretation of these symbols will allow you to operate the
tool better and safer.
Symbol Name Designation/Explanation
V Volts Voltage (potential)
A Amperes Current
Hz Hertz Frequency (cycles per second)
W Watt Power
kg Kilograms Weight
min Minutes Time
s Seconds Time
Diameter Size of drill bits, grinding wheels, etc.
n
0
No load speed Rotational speed, at no load
n Rated speed Maximum attainable speed
.../min Revolutions or reciprocation Revolutions, strokes, surface speed,
per minute orbits etc. per minute
0 Off position Zero speed, zero torque...
1, 2, 3, ... Selector settings Speed, torque or position settings.
I, II, III, Higher number means greater speed
Infinitely variable selector with off Speed is increasing from 0 setting
Arrow Action in the direction of arrow
Alternating current Type or a characteristic of current
Direct current Type or a characteristic of current
Alternating or direct current Type or a characteristic of current
Class II construction Designates Double Insulated
Construction tools.
Earthing terminal Grounding terminal
Warning symbol Alerts user to warning messages
Li-ion RBRC seal Designates Li-ion battery recycling
program
Ni-Cad RBRC seal Designates Ni-Cad battery recycling
program
Read manual symbol Alerts user to read manual
Wear eye protection symbol Alerts user to wear eye protection
Symbols
0
-5-
DM 2610016364 09-11:DM 2610016364 09-11.qxp 9/7/11 9:27 AM Page 5

-6-
This symbol designates that this tool is listed by Underwriters Laboratories.
This symbol designates that this tool is listed by the Canadian Standards
Association.
This symbol designates that this tool is listed by the Canadian Standards
Association, to United States and Canadian Standards.
This symbol designates that this tool complies to NOM Mexican Standards.
This symbol designates that this tool is listed by the Intertek Testing
Services, to United States and Canadian Standards.
Symbols (continued)
IMPORTANT: Some of the following symbols may be used on your tool. Please study them
and learn their meaning. Proper interpretation of these symbols will allow you to operate the
tool better and safer.
This symbol designates that this tool is recognized by Underwriters Laboratories.
This symbol designates that this tool is listed by Underwriters Laboratories,
to United States and Canadian Standards.
DM 2610016364 09-11:DM 2610016364 09-11.qxp 9/7/11 9:27 AM Page 6

-7-
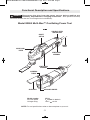
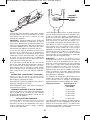
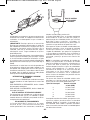
Functional Description and Specifications
Disconnect the plug from the power source before making any
assembly, adjustments or changing accessories. Such preventive safety
measures reduce the risk of starting the tool accidentally.
!
WARNING
NOTE: For tool specifications refer to the nameplate on your tool.
FIG. 1
Model MM40 Multi-Max™ Oscillating Power Tool
VARIABLE SPEED
CONTROL DIAL
ON/OFF
SWITCH
POWER
CORD
VENTILATION
OPENINGS
ACCESSORY
CLAMPING
FLANGE
ACCESSORY HOLDER
Model number MM40
No load speed n
0
10,000-21,000/min
Voltage rating 120 V 60 Hz
VENTILATION
OPENINGS
QUICK LOCK
™
LEVER
DM 2610016364 09-11:DM 2610016364 09-11.qxp 9/7/11 9:28 AM Page 7

Disconnect the plug from
the power source before
making any assembly, adjustments or
changing accessories. Such preventive
safety measures reduce the risk of starting the
tool accidentally.
For all work or when
changing accessories
always wear protective gloves. Such
preventive safety measures reduce the risk of
injury from sharp edges of the accessories.
Application tools can become very hot while
working. Danger of burns!
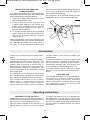
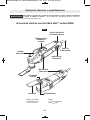
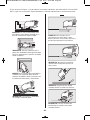
INSTALLING AND REMOVING
ACCESSORIES WITH QUICK LOCK™
ACCESSORY CHANGE
The Dremel Multi-Max™ MM40 includes an
integrated accessory change mechanism. The
Quick Lock™ accessory interface allows you to
install and remove accessories without the need
of a wrench or hex key. You will also no longer
need to worry about losing a clamping screw &
washer as these parts are no longer used in the
MM40 version of the Multi-Max™.
1. To install an accessory using the Quick
Lock™ feature, hold tool upside down to
prevent the blade from falling off the
accessory holder when installing and
removing accessories.
2. Turn the Quick Lock™ lever on the top on the
tool counter-clockwise to unlock the clamping
mechanism (Fig. 2). The lever needs to be
fully engaged to unlock the clamping
mechanism.
3. Clean accessory holder, accessory and the
clamping flange with a clean cloth.
4. Place the accessory onto the accessory
holder making sure the accessory engages
all pins in the holder and the accessory is
flush against the accessory holder (Fig. 3a &
Fig 3b).
To avoid pinching, firmly
hold Quick Lock lever when
fastening accessory. Avoid placing hands
or fingers between lever and tool body.
5. Turn the Quick Lock™ lever on the top of the
tool in a clockwise motion, to the closed
position, to securely lock the accessory in
place (Fig. 2).
6. To remove an accessory, simply unlock the
clamping mechanism by turning the Quick
Lock™ lever counter-clockwise as described
above (Fig. 2).
7. Lift up on the accessory bracket to take it off
the pins. (Note: be careful, blade may be
hot.)
NOTE: Some accessories, such as scrapers
or blades, may be mounted either straight
on the tool, or at an angle to increase
usability (Fig. 4). In order to do this with the
Quick Lock™ interface, place the accessory
onto the accessory holder making sure the
accessory engages all pins in the holder and
the accessory is flush against the accessory
holder. Securely lock the accessory in place
as described previously (Fig. 2).
Assembly
-8-
!
WARNING
!
WARNING
FIG. 3a
CLAMPING
FLANGE
ACCESSORY
HOLDER
FIG. 3b
!
WARNING
FIG. 2
OPEN
CLOSE
DM 2610016364 09-11:DM 2610016364 09-11.qxp 9/7/11 9:28 AM Page 8

-9-
INSTALLING AND REMOVING
SANDING SHEETS
Your backing pad uses hook-and-loop backed
sandpaper, which firmly grips the backing pad
when applied with moderate pressure.
1. Align the sanding sheet and press it onto
the sanding plate by hand.
2. Firmly press the power tool with the
sanding sheet against a flat surface and
briefly switch the power tool on. This will
promote good adhesion and helps to
prevent premature wear.
3. To change, merely peel off the old sanding
sheet, remove dust from the backing pad if
necessary, and press the new sanding
sheet in place.
After considerable service the backing pad
surface will become worn, and the backing pad
must be replaced when it no longer offers a
firm grip. If you are experiencing premature
wear out of the backing pad facing, decrease
the amount of pressure you are applying
during operation of the tool.
For maximum use of abrasive, rotate pad 120
degrees when tip of abrasive becomes worn.
FIG. 4
Thank you for purchasing the Dremel Multi-
Max™.
This tool was designed to tackle home repair,
remodeling and restoration projects. The
Dremel Multi-Max™ tackles tasks that are
tedious, time consuming or simply next to
impossible to achieve with any other tool.
The ergonomic housing is designed for you
to hold and control in a comfortable manner
during operation.
It comes with an assortment of accessories
that are specifically designed for remodeling
work where you need precision and control.
Your Dremel Multi-Max™ has a robust
electric motor, is comfortable in the hand,
and is made to accept a large variety of
accessories including flush cut blades,
scraper blades, grout removal wheels and
sanding pads.
Accessories come in a variety of shapes and
permit you to do a number of different jobs.
As you become familiar with the range of
accessories and their uses, you will learn just
how versatile your Dremel Multi-Max™ is.
Visit www.dremel.com to learn more about
what you can do with your Dremel Multi-
Max™.
INTENDED USE
This Dremel Multi-Max™ Tool is intended for
dry sanding of surfaces, corners, edges,
scraping, sawing soft metals, wood and
plastic components, and grout removal using
the applicable tools and accessories
recommended by Dremel.
Introduction
Operating Instructions
LEARNING TO USE THE TOOL
Getting the most out of your oscillating tool is a
matter of learning how to let the speed and the
feel of the tool in your hands work for you.
The first step in learning to use the tool is to
get the “feel” of it. Hold it in your hand and feel
its weight and balance (Fig. 5). Depending on
the application, you will need to adjust your
hand position to achieve optimum comfort and
control. The unique comfort grip on the body of
the tool allows for added comfort and control
during use.
DM 2610016364 09-11:DM 2610016364 09-11.qxp 9/7/11 9:28 AM Page 9

-10-
When holding tool, do not cover the air vents
with your hand. Blocking the air vents could
cause the motor to overheat.
IMPORTANT! Practice on scrap material first
to see how the tool’s high-speed action
performs. Keep in mind that your tool will
perform best by allowing the speed, along with
the correct accessory, do the work for you. Be
careful not to apply too much pressure.
Instead, lower the oscillating accessory lightly
to the work surface and allow it to touch the
point at which you want to begin. Concentrate
on guiding the tool over the work using very
little pressure from your hand. Allow the
accessory to do the work.
Usually it is better to make a series of passes
with the tool rather than to do the entire job
with one pass. To make a cut, for example,
pass the tool back and forth over the work. Cut
a little material on each pass until you reach
the desired depth.
SLIDE "ON/OFF" SWITCH
The tool is switched "ON" by the slide switch
located on the topside of the motor housing.
TO TURN THE TOOL "ON", slide the switch
button forward.
TO TURN THE TOOL "OFF", slide the switch
button backward.
VARIABLE SPEED CONTROL DIAL
This tool is equipped with a variable speed
control dial (Fig. 6). The speed may be
controlled during operation by presetting the
dial in any one of ten positions.
OPERATING SPEEDS
The Dremel Multi-Max™ consists of an AC
universal motor and oscillating mechanism to
perform applications such as cutting, grout
removal, scraping, sanding and more.
The Dremel Multi-Max™ has a high
oscillating motion of 10,000 - 21,000 /min
(OPM). The high speed motion allows the
Dremel Multi-Max™ to achieve with excellent
results. The oscillating motion allows the dust
to fall to the surface rather than slinging
particles into the air.
To achieve the best results when working
with different materials, set the variable
speed control to suit the job (See Speed
Chart on Page 12 & 13 for guidance) . To
select the right speed for the accessory in
use, practice with scrap material first.
NOTE: Speed is affected by voltages
changes. A reduced incoming voltage will
slow the OPM of the tool, especially at the
lowest setting. If your tool appears to be
running slowly, increase the speed setting
accordingly. The tool may not start at the
lowest switch setting in areas where outlet
voltage is less than 120 volts. Simply move
the speed setting to a higher position to
begin operation.
The variable speed control settings are
marked on the speed control dial. The
settings for approximate /min (OPM) are:
Switch Setting Speed Range
/min (OPM)
2 10,000-11,000
4 11,000-13,000
6 13,000-16,000
8 16,000-19,000
10 19,000-21,000
You can refer to the charts on the following
pages to determine the proper speed, based
on the material and accessory being used.
These charts enable you to select both the
correct accessory and the optimum speed at a
glance.
FIG. 5
FIG. 6
VARIABLE SPEED
CONTROL DIAL
DM 2610016364 09-11:DM 2610016364 09-11.qxp 9/7/11 9:28 AM Page 10

-11-
FIG. 8FIG. 7
CORRECT: Sand with a smooth
back and forth motion, allowing the
weight of the tool to do the work.
INCORRECT: Avoid sanding with
only the tip of the pad. Keep as
much sand paper in touch with the
work surface as possible.
CORRECT: Always sand with the
pad and sandpaper flat against the
work surface. Work smoothly in a
back and forth motion.
INCORRECT: Avoid tipping the
pad. Always sand flat.
CORRECT: Always cut with a
smooth back and forth motion.
Never force the blade. Apply light
pressure to guide the tool.
INCORRECT: Do not twist the tool
while cutting.This can cause the
blade to bind.
CORRECT: Make sure flexible
scraper blade flexes enough
INCORRECT: Avoid screw head
touching surface with flexible
scraper blade.
Please refer to figures 7 and 8 for further instruction on how to use your Dremel Multi-Max™.
Following these instructions will allow you to get the highest performance out of your oscilating tool.
DM 2610016364 09-11:DM 2610016364 09-11.qxp 9/7/11 9:28 AM Page 11

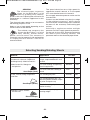
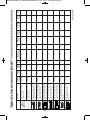
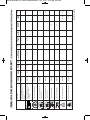
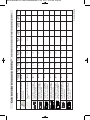
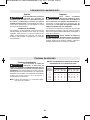
Multi-Max™ Accessory Speed Settings
Use only Dremel, high-performance accessories.
60, 120 and 240 Grit
Paper - Bare Wood
60, 120 and 240 Grit
Paper - Paint
HCS Wood Flush
Cut Blade
1-1/4" x 3/8"
HCS Wood Flush
Cut Blade
1-1/4" x 3/4"
HCS Wood Flush
Cut Blade
1-1/4" x 1-1/8"
HCS Wood Flush
Cut Blade
1-5/8" x 3/4"
HCS Wood Flush
Cut Blade
1-1/4" x 1-11/16"
BiM Wood/Metal
Flush Cut Blade
1" x 3/4"
BiM Wood/Metal
Blade
1-1/4" x 1-1/8"
2 - 10
2 - 10
8 - 10
8 - 10
8 - 10
8 - 10
8 - 10
8 - 10
8 - 10
2 - 10
2 - 10
6 - 10
6 - 10
6 - 10
6 - 10
6 - 10
6 - 10
6 - 10
-
2 - 10
-
-
-
-
-
-
-
2 - 6
2 - 6
2 - 6
2 - 6
2 - 6
2 - 6
2 - 6
2 - 6
2 - 6
8 - 10
8 - 10
-
-
-
-
-
8 - 10*
8 - 10*
8 - 10
8 - 10
-
-
-
-
-
8 - 10
8 - 10
"
-
-
-
-
-
-
-
-
-
!
-
-
-
-
-
-
-
-
-
-
-
-
-
-
-
-
-
-
-
-
-
-
-
-
-
-
-
MM70W
MM70P
MM411
MM440
MM460
MM470
MM480
MM422
MM462
WOOD
1/4
IN
3/4
1
1/2
"
-12-
DM 2610016364 09-11:DM 2610016364 09-11.qxp 9/7/11 9:28 AM Page 12

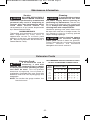
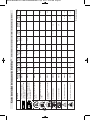
Multi-Max™ Accessory Speed Settings
Use only Dremel, high-performance accessories.
BiM Wood/Metal
Blade
1-5/8" x 3/4"
BiM Wood/Metal
Blade
1-1/4" x 1-11/16"
3" Flat
Saw Blade
1/8" Grout Removal
Blade
1/16" Grout Removal
Blade
Rigid Scraper Blade
Flexible Scraper
Blade
60 Grit Diamond
Paper
24 Grit Carbide
Rasp
8 - 10
8 - 10
8 - 10
-
-
-
-
6 - 10
6 - 10
6 - 10
6 - 10
-
-
-
-
-
6 - 10
-
-
-
-
-
2 - 4
2 - 4
-
6 - 10
2 - 6
2 - 6
2 - 6
-
-
-
-
-
-
8 - 10*
8 - 10*
-
-
-
-
-
-
-
8 - 10
8 - 10
-
-
-
-
-
-
-
"
-
-
-
-
-
2 - 8
-
-
-
!
-
-
-
-
-
2 - 6
2 - 6
-
-
-
-
-
-
-
-
-
6 - 10
6 - 10
-
-
-
6 - 10
6 - 10
-
-
6 - 10
6 - 10
MM472
MM482
MM450
MM500
MM501
MM600
MM610
MM900
MM920
WOOD
MM920
"
-13-
DM 2610016364 09-11:DM 2610016364 09-11.qxp 9/7/11 9:28 AM Page 13

APPLICATION
Your Dremel Multi-Max™ Tool is intended for
sanding and cutting wooden materials, plastic,
plaster and non-ferrous metals. It is especially
suitable for working close to edges, in tight
spaces, and for flush cutting. This tool must be
used only with Dremel accessories .
Below are some typical uses for your Dremel
Multi-Max™ Tool.
For all accessories, work
with the accessory away
from the body. Never position hand near or
directly in front of working area. Always hold
the tool with both hands and wear protective
gloves.
Flush Cutting
Remove excess wood from door jamb, window
sill and/or toekick. Removing excess copper or
PVC pipe.
Removal work
e.g. carpets & backing, old tile adhesives,
caulking on masonry, wood and other
surfaces.
Removal of excess materials
e.g. plaster, mortar splatters, concrete on tiles,
sills.
Preparation of surfaces
e.g. for new floors and tiles.
Detail sanding
e.g. for sanding in extremely tight areas
otherwise difficult to reach and require hand
sanding
CUTTING
Saw blades are ideal for making precise cuts
in tight areas, close to edges or flush to a
surface.
Select a medium to high speed for making
initial plunge, start off at medium speed for
increased control. After making your initial cut,
you can increase speed for faster cutting
ability.
Flush cutting blades are
intended to make precise cuts to
allow for installation of flooring or
wall material. When flush cutting
it is important not to force the tool during the
plunge cut. If you experience a strong vibration
in your hand during the plunge cut, this
indicates that you are applying too much
pressure. Back the tool out and let the speed
of the tool do the work. While keeping the teeth
of the blade in the work surface, move the
back of the tool in a slow sideways motion.
This motion will help expedite the cut.
When making a flush cut it is always a good
idea to have a piece of scrap material (tile or
wood) supporting the blade. If you need to rest
the flush cutting blade on a delicate surface,
you should protect the surface with cardboard
or masking tape.
The flat saw blade is ideal for
making precise cuts in wood,
plaster, drywall material.
Applications include cutting openings in flooring
for venting, repairing damaged flooring, cutting
openings for electrical boxes. The blade works
best on softer woods such as pine. For harder
woods, the blade life will be limited.
Select a medium to high speed.
The flat saw blade can also be used for
window restoration making glazing easy to
remove. The saw blade can be placed directly
against the edge of the window frame, guiding
the blade through the glazing.
GROUT REMOVAL
Grout removal blades are ideal
for removing damaged or
cracked grout. Grout blades
come in different widths (1/16" and 1/8") to
tackle different grout line widths. Before
selecting a grout blade measure the grout line
width to pick the appropriate blade.
Select a medium to high speed.
To remove the grout, use a back and forth
motion, making several passes along the grout
line. The hardness of the grout will dictate how
many passes are needed. Try and keep the
grout blade aligned with the grout line and be
careful not to apply too much side pressure on
the grout blade during the process. To control
plunge depth use the carbide grit line on the
blade as an indicator. Be careful not to plunge
beyond the carbide grit line to avoid damage to
the backer board material.
The grout blades can handle both sanded and
unsanded grout. If you notice the blade
clogging during the grout removal process, you
can use a brass brush to clean the grit, thus
exposing the grit again.
The grout blade geometry is designed so that
the blade can remove all grout up to the
surface of a wall or corner. This can be
Operating Applications
!
WARNING
-14-
DM 2610016364 09-11:DM 2610016364 09-11.qxp 9/7/11 9:28 AM Page 14

accomplished by ensuring that the segmented
portion of the blade is facing the wall or corner.
SCRAPING
Scrapers are suitable for removing old coats of
varnish or adhesives, removing bonded
carpeting, e.g. on stairs/steps and other
small/medium size surfaces.
Select low to medium speed.
Rigid scrapers are for large area
removal, and harder materials
such as vinyl flooring, carpeting
and tile adhesives. When
removing strong, tacky adhesives, grease the
scraper blade surface with (petroleum jelly
or silicone grease) to reduce gumming up.
The carpet/vinyl flooring removes easier if
it is scored prior to removal so the scraper
blade can move underneath the flooring
material.
Flexible scrapers are used for
hard to reach areas and softer
material such as caulk.
Mount the scraper blade with the logo side
facing up. With the flexible scraper, make sure
that the screw head does not make contact
with surface during the scraping process (a 30
- 45 degree pitch is recommend). This can be
accomplished by making sure that the tool is at
an angle to the blade. You should be able to
see the blade flex during the scraping process.
If you are removing caulk from a delicate
surface such as a bath tub or tile back splash,
we recommend taping or protecting the
surface that the blade will rest on. Use rubbing
alcohol to clean the surface after the caulk
and/or adhesive is removed.
Turn the tool on and place desired accessory
on the area where material is to be removed.
Begin with light pressure. The oscillating
motion of accessory only occurs when
pressure is applied to the material to be
removed.
Excessive pressure can gouge or damage the
background surfaces (e.g,. wood, plaster).
SANDING
Sanding accessories are suitable
for dry sanding of wood, metal,
surfaces, corners and edges and
hard to reach areas.
Work with the complete surface of the sanding
pad, not only with the tip.
Corners may be finished using the tip or edge
of the selected accessory, which should
occasionally be rotated during use to distribute
the wear on the accessory and backing pad
surface.
Sand with a continuous motion and light
pressure. DO NOT apply excessive pressure -
let the tool do the work. Excessive pressure
will result in poor handling, vibration, and
unwanted sanding marks and premature wear
on the sanding sheet.
Always be certain that smaller workpieces are
securely fastened to a bench or other support.
Larger panels may be held in place by hand on
a bench or sawhorses.
Open-coat aluminum oxide sanding sheets are
recommended for most wood or metal sanding
applications, as this synthetic material cuts
quickly and wears well. Some applications,
such as metal finishing or cleaning, require
special abrasive pads which are available from
your dealer. For best results, use Dremel
sanding accessories which are of superior
quality and are carefully selected to produce
professional quality results with your oscillating
tool.
The following suggestions may be used as a
general guide for abrasive selection, but the
best results will be obtained by sanding a test
sample of the workpiece first.
Grit Application
Coarse For rough wood or metal
sanding, and rust or old
finish removal.
Medium For general wood or metal
sanding
Fine For final finishing of wood,
metal, plaster and other
surfaces.
With the workpiece firmly secured, turn tool on
as described above. Contact the work with the
tool after the tool has reached its full speed,
and remove it from the work before switching
the tool off. Operating your oscillating tool in
this manner will prolong switch and motor life,
and greatly increase the quality of your work.
Move the oscillating tool in long steady strokes
parallel to the grain using some lateral motion
to overlap the strokes by as much as 75%.
DO NOT apply excessive pressure - let the
tool do the work. Excessive pressure will result
in poor handling, vibration, and unwanted
sanding marks.
-15-
DM 2610016364 09-11:DM 2610016364 09-11.qxp 9/7/11 9:28 AM Page 15

Material Application Grit Size
All wooden materials (e.g.,
hardwood, softwood, chipboard,
building board) Metal materials–
Metal materials, fiberglass
and plastics
Paint, varnish, filling compound
and filler
Masonry, stone, cement
and thin set
Selecting Sanding/Grinding Sheets
GRINDING
The diamond paper accessory
allows for the Multi-Max™ to be
used for grinding away cement,
plaster or thin set. Preparing the surface for tile
replacement is a common application for this
accessory.
The diamond paper needs to be mounted to
the backing pad prior to use.
Select a low to high speed depending on the
material removal rate desired.
The carbide rasp accessory also
allows the Multi-Max™ to grind
away cement, thinset mortar,
plaster, and also wood. This accessory is
commonly used to prepare for tile replacement
or rasping wood to smooth a surface or
remove material.
The speed should be set at high speed for
aggressive material removal or at low speed
for a more detailed removal of material.
Do not apply excessive pressure on the tool-let
it do the work.
Corners may be finished using the tip or edge
of the selected accessory, which should
occasionally be rotated during use to distribute
the wear on the accessory and backing pad
surface.
Grind with a continuous motion and light
pressure. DO NOT apply excessive pressure -
let the tool do the work. Excessive pressure
will result in poor handling, vibration, and
premature wear on the diamond paper sheet.
For coarse-sanding, e.g. of
rough, unplanned beams and
boards
For face sanding and planing
small irregularities
For finish and fine sanding of
wood
For sanding off paint
For sanding primer (e.g., for
removing brush dashes, drops
of paint and paint run)
For final sanding of primers
before coating
For smoothing, shaping and
braking edges
Coarse
Medium
Fine
Coarse
Medium
Fine
Coarse
60
120
240
80
120
240
60
Sand Paper (Dark)
Sand Paper (White)
Diamond Paper
-16-
DM 2610016364 09-11:DM 2610016364 09-11.qxp 9/7/11 9:28 AM Page 16

Maintenance Information
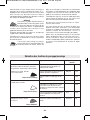
Extension Cords
If an extension cord is
necessary, a cord with
adequate size conductors that is capable
of carrying the current necessary for your
tool must be used. This will prevent
excessive voltage drop, loss of power or
overheating. Grounded tools must use 3-wire
extension cords that have 3-prong plugs and
receptacles.
NOTE: The smaller the gauge number, the
heav i er the cord.
RECOMMENDED SIZES OF EXTENSION CORDS
120 VOLT ALTERNATING CURRENT TOOLS
Service
NO USER SERVICEABLE
PARTS INSIDE. Preventive
maintenance performed by un au thorized
personnel may result in misplacing of
internal wires and components which
could cause serious hazard. We
recommend that all tool service be performed
by a Dremel Service Facility.
CARBON BRUSHES
The brushes and commutator in your tool have
been engineered for many hours of
dependable service.To maintain peak
efficiency of the motor, we recommend every
50 - 60 hours the brush es be serviced by a
Dremel Service Facility.
Cleaning
To avoid accidents always
dis connect the tool from
the power supply before cleaning or
performing any main tenance. The tool may
be cleaned most effectively with compressed
dry air. Always wear safety gog gles when
cleaning tools with compressed air.
Ventilation openings and switch levers must
be kept clean and free of foreign matter. Do
not at tempt to clean by inserting pointed
objects through openings.
Certain cleaning agents
and sol vents damage
plastic parts. Some of these are: gasoline,
carbon tetrachlo ride, chlo rinated cleaning
solvents, ammonia and house hold
detergents that contain ammonia.
!
WARNING
CAUTION
!
Tool’s
Ampere
Rating
Cord Size in A.W.G.
Wire Sizes in mm
2
3-6
6-8
8-10
10-12
12-16
18 16 16 14 0.75 0.75 1.5 2.5
18 16 14 12 0.75 1.0 2.5 4.0
18 16 14 12 0.75 1.0 2.5 4.0
16 16 14 12 1.0 2.5 4.0 —
14 12 —— ————
25 50 100 150 15 30 60 120
Cord Length in Feet Cord Length in Meters
!
WARNING
!
WARNING
Extension Cords
-17-
DM 2610016364 09-11:DM 2610016364 09-11.qxp 9/7/11 9:28 AM Page 17

Your Dremel product is warranted against defective material or workmanship for a period of two years from
date of purchase. In the event of a failure of a product to conform to this written warranty, please take the
following action:
1. DO NOT return your product to the place of purchase.
2. Carefully package the product by itself, with no other items, and return it, freight prepaid, along with:
A. A copy of your dated proof of purchase (please keep a copy for yourself).
B. A written statement about the nature of the problem.
C. Your name, address and phone number to:
UNITED STATES
Dremel Service Center Dremel Service Center
4915 21st Street OR 4631 E. Sunny Dunes Road
Racine, WI 53406 Palm Springs, CA 92264
1-800-4-Dremel
CANADA OUTSIDE
Giles Tool Agency CONTINENTAL UNITED STATES
47 Granger Av. See your local distributor or write to
Scarborough, Ont Dremel, 4915 21st Street
Canada M1K 3K9 Racine, WI 53406
1-416-287-3000
We recommend that the package be insured against loss or in transit damage for which we cannot be
responsible.
This warranty applies only to the original registered purchaser. DAMAGE TO THE PRODUCT RESULTING
FROM TAMPERING, ACCIDENT, ABUSE, NEGLIGENCE, UNAUTHORIZED REPAIRS OR ALTERATIONS,
UNAPPROVED ATTACHMENTS OR OTHER CAUSES UNRELATED TO PROBLEMS WITH MATERIAL OR
WORKMANSHIP ARE NOT COVERED BY THIS WARRANTY.
No employee, agent, dealer or other person is authorized to give any warranties on behalf of Dremel. If
Dremel inspection shows that the problem was caused by problems with material or workman ship within the
limitations of the warranty, Dremel will repair or replace the product free of charge and return product
prepaid. Repairs made necessary by normal wear or abuse, or repair for product outside the warranty period,
if they can be made, will be charged at regular factory prices.
DREMEL MAKES NO OTHER WARRANTY OF ANY KIND WHATEVER, EXPRESSED OR IMPLIED, AND ALL
IMPLIED WARRANTIES OF MERCHANTABILITY AND FITNESS FOR A PARTICULAR PURPOSE WHICH
EXCEED THE ABOVE MENTIONED OBLIGATION ARE HEREBY DISCLAIMED BY DREMEL AND EXCLUDED
FROM THIS LIMITED WARRANTY.
This warranty gives you specific legal rights and you may also have other rights which vary from state to
state. The obligation of the warrantor is solely to repair or replace the product. The warrantor is not liable for
any incidental or consequential damages due to any such alleged defect. Some states do not allow the
exclusion or limitation of incidental or consequential damages, so the above limitations or exclusion may not
apply to you.
For prices and warranty fulfillment in the continental United States, contact your local Dremel distributor.
© Robert Bosch Tool Corporation 1800 W. Central Road Mt. Prospect, IL 60056-2230
Exportado por: Robert Bosch Tool Corporation Mt. Prospect, IL 60056 -2230, E.U.A.
Importado a México por: Robert Bosch, S. de R.L. de C.V.
Calle Robert Bosch No. 405 - 50071 Toluca, Edo. de Méx. - México
Tel. 052 (722) 279 2300 ext 1160 / Fax. 052 (722) 216-6656
Dremel
®
Limited Warranty
-18-
DM 2610016364 09-11:DM 2610016364 09-11.qxp 9/7/11 9:28 AM Page 18

Veuillez lire tous les avertissements et toutes les consignes de sécurité. Si l'on
n'observe pas ces avertissements et ces consignes de sécurité, il existe un risque de
choc électrique, d'incendie et/ou de blessures corporelles graves.
CONSERVEZ TOUS LES AVERTISSEMENTS ET TOUTES LES CONSIGNES
DE SÉCURITÉ POUR RÉFÉRENCE FUTURE.
Dans les avertissements, le terme « outil électroportatif » se rapporte à votre outil branché sur le secteur (avec fil) ou
à votre outil alimenté par piles (sans fil).
Avertissements généraux concernant la sécurité des outils électroportatifs
AVERTISSEMENT
!
Sécurité du lieu de travail
Maintenez le lieu de travail propre et bien éclairé.
Les risques d’accident sont plus élevés quand on
travaille dans un endroit encombré ou sombre.
N’utilisez pas d’outils électroportatifs dans des
atmosphères explosives, comme par exemple en
présence de gaz, de poussières ou de liquides
inflammables. Les outils électroportatifs produisent
des étincelles qui risquent d’enflammer les poussières
ou les vapeurs.
Éloignez les enfants et les visiteurs quand vous vous
servez d’un outil électroportatif. Vous risquez une
perte de contrôle si on vous distrait.
Sécurité électrique
Les fiches des outils électroportatifs doivent
correspondre à la prise. Il ne faut absolument jamais
modifier la fiche. N’utilisez pas d’adaptateur de prise
avec des outils électroportatifs munis d’une fiche de
terre. Le risque de choc électrique est moindre si on
utilise une fiche non modifiée sur une prise qui lui
correspond.
Évitez tout contact du corps avec des surfaces reliées
à la terre tels que tuyaux, radiateurs, gazinières ou
réfrigérateurs. Le risque de choc électrique augmente
si votre corps est relié à la terre.
N’exposez pas les outils électroportatifs à la pluie ou
à l’humidité. Si de l’eau pénètre dans un outil
électroportatif, le risque de choc électrique augmente.
Ne maltraitez pas le cordon. Ne vous en servez
jamais pour transporter l’outil électroportatif, pour le
tirer ou pour le débrancher. Éloignez le cordon de la
chaleur, des huiles, des arêtes coupantes ou des
pièces mobiles. Les cordons abîmés ou emmêlés
augmentent les risques de choc électrique.
Si vous utilisez un outil électroportatif à l’extérieur,
employez une rallonge conçue pour l’extérieur. Ces
rallonges sont faites pour l’extérieur et réduisent le
risque de choc électrique.
S'il est absolument nécessaire d'utiliser l'outil
électroportatif dans un endroit humide, utilisez une
alimentation protégée par un disjoncteur de fuite de
terre (GFCI). L'utilisation d'un disjoncteur GFCI réduit
les risques de choc électrique.
Sécurité personnelle
Restez concentré, faites attention à ce que vous
faites, et servez-vous de votre bon sens lorsque vous
utilisez un outil électroportatif. N'employez pas
d’outils électroportatifs quand vous êtes fatigué ou
sous l’emprise de drogues, d’alcool ou de
médicaments. Quand on utilise des outils
électroportatifs, il suffit d’un moment d’inattention pour
causer des blessures corporelles graves.
Utilisez des équipements de sécurité personnelle.
Portez toujours une protection oculaire. Le port
d'équipements de sécurité tels que des masques
antipoussières, des chaussures de sécurité
antidérapantes, des casques de chantier et des
protecteurs d'oreilles dans des conditions appropriées
réduira le risque de blessure corporelle.
Évitez les démarrages intempestifs. Assurez-vous que
l'interrupteur est dans la position arrêt (Off) avant de
brancher l'outil dans une prise de courant et/ou un
bloc-piles, de le ramasser ou de le transporter. Le
transport d'un outil électroportatif avec le doigt sur la
gâchette ou le branchement de cet outil quand
l'interrupteur est en position de marche (ON) est une
invite aux accidents.
Enlevez toutes les clés de réglage avant de mettre
l’outil électroportatif en marche. Si on laisse une clé
sur une pièce tournante de l’outil électroportatif, il y a
risque de blessure corporelle.
Ne vous penchez pas. Conservez toujours une bonne
assise et un bon équilibre. Ceci vous permettra de
mieux maîtriser l’outil électroportatif dans des situations
inattendues.
Habillez-vous de manière appropriée. Ne portez pas
de vêtements amples ou de bijoux. Attachez les
cheveux longs. N’approchez pas les cheveux, les
vêtements ou les gants des pièces en mouvement.
Les vêtements amples, les bijoux ou les cheveux longs
risquent d’être happés par les pièces en mouvement.
Si l’outil est muni de dispositifs permettant le
raccordement d’un système d’aspiration et de
collecte des poussières, assurez-vous que ces
dispositifs sont raccordés et utilisés correctement.
L'utilisation d'un dépoussiéreur peut réduire les
dangers associés à l'accumulation de poussière.
-19-
DM 2610016364 09-11:DM 2610016364 09-11.qxp 9/7/11 9:28 AM Page 19

Utilisation et entretien des outils
électroportatifs
Ne forcez pas sur l’outil électroportatif. Utilisez l’outil
électroportatif qui convient à la tâche à effectuer.
L’outil qui convient à la tâche fait un meilleur travail et
est plus sûr à la vitesse pour lequel il a été conçu.
Ne vous servez pas de l’outil électroportatif si son
interrupteur ne parvient pas à le mettre en marche ou
à l’arrêter. Tout outil électroportatif qui ne peut pas
être commandé par son interrupteur est dangereux et
doit être réparé.
Débranchez la fiche de la prise ou enlevez le bloc-pile
de l’outil électroportatif avant tout réglage,
changement d’accessoires ou avant de ranger l’outil
électroportatif. De telles mesures de sécurité
préventive réduisent le risque de démarrage intempestif
de l’outil électroportatif.
Rangez les outils électroportatifs dont vous ne vous
servez pas hors de portée des enfants et ne permettez
pas à des personnes qui ne connaissent pas l’outil
électroportatif ou qui ignorent ces consignes de s’en
servir. Les outils électroportatifs sont dangereux dans
les mains d’utilisateurs inexpérimentés.
Entretenez les outils électroportatifs. Vérifiez que les
pièces mobiles sont alignées correctement et ne
coincent pas. Vérifiez qu’il n’y a pas de pièces
cassées ou d’autre circonstance qui risquent
d’affecter le fonctionnement de l’outil électroportatif.
Si l’outil est abîmé, faites-le réparer avant de
l’utiliser. De nombreux accidents sont causés par des
outils électroportatifs mal entretenus.
Maintenez les outils coupants affûtés et propres. Les
outils coupants entretenus correctement et dotés de
bords tranchants affûtés sont moins susceptibles de
coincer et sont plus faciles à maîtriser.
Utilisez l'outil électroportatif, les accessoires et les
embouts d'outil, etc. conformément à ces
instructions, en tenant compte des conditions de
travail et des travaux à réaliser. L'emploi d’outils
électroportatifs pour des tâches différentes de celles
pour lesquelles ils ont été prévus peut résulter en une
situation dangereuse.
Entretien
Faites réparer votre outil électroportatif par un agent
de service qualifié n’utilisant que des pièces de
rechange identiques. Ceci assure que la sécurité de
Consignes de sécurité pour les outils oscillants
Tenez l’outil électroportatif par ses surfaces de
préhension isolées lorsque vous effectuez une
opération à l’occasion de laquelle l'outil de coupe
risque d’entrer en contact avec un fil caché ou avec
son propre cordon d’alimentation. Tout contact de
l'outil de coupe avec un fil sous tension risque de
mettre aussi sous tension les parties métalliques
exposées de l’outil électroportatif, ce qui pourrait
causer un choc électrique pour l’opérateur.
Utilisez des brides ou d’autres moyens pratiques de
brider ou de supporter la pièce sur une plate-forme
stable. Tenir la pièce à la main ou contre le corps est
instable et risque de résulter en une perte de contrôle.
Ne percez, fixez et ne rentrez pas dans des murs
existants ou autres endroits aveugles pouvant abriter
des fils électriques. Si cette situation est inévitable,
débranchez tous les fusibles ou les disjoncteurs
alimentant ce site.
Utilisez un détecteur de métaux afin d’établir s’il y a
des tuyaux d’eau ou à gaz dissimulés dans l’aire de
travail ou appelez la compagnie de service public
locale pour assistance avant de commencer
l’opération. Le fait de frapper une conduite de gaz ou
de couper dans celle-ci provoquera une explosion.
L’eau pénétrant dans un appareil électrique peut
entraîner une électrocution.
Tenez toujours l’outil fermement à deux mains pour
mieux le maîtriser. Conservez toujours une bonne
assise et un bon équilibre. Ceci vous permettra de
mieux maîtriser l’outil électroportatif dans des situations
inattendues.
Tenez les mains à l'écart de l'aire de coupe. Ne
tendez pas la main sous la lame de scie ou à
proximité de celle-ci. La proximité de la lame par
rapport à votre main peut vous être dissimulée.
N'utilisez pas de lames émoussées ou
endommagées. Les lames pliées peuvent aisément
se fracturer ou causer un rebond.
Faites extrêmement attention lorsque vous
manipulez des accessoires. Les accessoires sont
très tranchants.
Portez des gants de protection lorsque vous
changez des accessoires de coupe. Les accessoires
deviennent très chauds après une utilisation
prolongée.
-20-
DM 2610016364 09-11:DM 2610016364 09-11.qxp 9/7/11 9:28 AM Page 20
La page est en cours de chargement...
La page est en cours de chargement...
La page est en cours de chargement...
La page est en cours de chargement...
La page est en cours de chargement...
La page est en cours de chargement...
La page est en cours de chargement...
La page est en cours de chargement...
La page est en cours de chargement...
La page est en cours de chargement...
La page est en cours de chargement...
La page est en cours de chargement...
La page est en cours de chargement...
La page est en cours de chargement...
La page est en cours de chargement...
La page est en cours de chargement...
La page est en cours de chargement...
La page est en cours de chargement...
La page est en cours de chargement...
La page est en cours de chargement...
La page est en cours de chargement...
La page est en cours de chargement...
La page est en cours de chargement...
La page est en cours de chargement...
La page est en cours de chargement...
La page est en cours de chargement...
La page est en cours de chargement...
La page est en cours de chargement...
La page est en cours de chargement...
La page est en cours de chargement...
La page est en cours de chargement...
La page est en cours de chargement...
-
 1
1
-
 2
2
-
 3
3
-
 4
4
-
 5
5
-
 6
6
-
 7
7
-
 8
8
-
 9
9
-
 10
10
-
 11
11
-
 12
12
-
 13
13
-
 14
14
-
 15
15
-
 16
16
-
 17
17
-
 18
18
-
 19
19
-
 20
20
-
 21
21
-
 22
22
-
 23
23
-
 24
24
-
 25
25
-
 26
26
-
 27
27
-
 28
28
-
 29
29
-
 30
30
-
 31
31
-
 32
32
-
 33
33
-
 34
34
-
 35
35
-
 36
36
-
 37
37
-
 38
38
-
 39
39
-
 40
40
-
 41
41
-
 42
42
-
 43
43
-
 44
44
-
 45
45
-
 46
46
-
 47
47
-
 48
48
-
 49
49
-
 50
50
-
 51
51
-
 52
52


Dremel MM40-DR-RT Manuel utilisateur
- Catégorie
- Outils électroportatifs
- Taper
- Manuel utilisateur
dans d''autres langues
- English: Dremel MM40-DR-RT User manual
- español: Dremel MM40-DR-RT Manual de usuario
Documents connexes
-
Dremel CKDR-01 Mode d'emploi
-
-
-
-
-
-
-
Dremel Multi-max MM40 Original Instructions Manual
-
-