Philips HR1946/70 AVANCE COLLECTION Le manuel du propriétaire
- Catégorie
- Fabricants de jus
- Taper
- Le manuel du propriétaire

17
A
C
16
17
1
3
4 6
7
8
5
2
B
12
13
14
9
15
10 11
1
HR1942, HR1943
HR1944, HR1945
HR1946, HR1947
HR1949
3000 001 44061 A
EN User manual
DE Benutzerhandbuch
ES Manual del usuario
FR Mode d’emploi
IT Manuale utente
NL Gebruiksaanwijzing
PT Manual do utilizador

1
2
2 3 4 5
1
2
6 7 8 9
10 11 12 13
14
15 16 18
1
2
19
20
21 22
1
2
23 24
1
2
25 26
27 28

ENGLISH 6
DEUTSCH 13
ESPAÑOL 20
FRANÇAIS 27
ITALIANO 34
NEDERLANDS 40
PORTUGUÊS 46
HR1942, HR1943, HR1944, HR1945, HR1946, HR1947, HR1949

6
ENGLISH
Introduction
Congratulations on your purchase and welcome to Philips! To fully benet from the
support that Philips oers, register your product at www.philips.com/welcome. This
Philips Avance slow juicer helps you to get all the goodness of fruits and vegetables
into your glass, so that you can enjoy tasty and healthy juices every day. Its
innovative technology allows you to extract up to the maximum of fruits and
vegetables and to quickly clean the appliance in less than 1 minute. The fully
integrated design was developed to take up little space and to give you great
results.
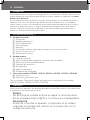
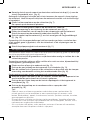
General description (Fig. 1)
A Juicing unit
a Pusher
b Berry tray
c Feeding tube
d Drip stop
e Spout
f Black two-part lter for clear juice*
g Juicing screw
h Pulp outlet
B Motor unit
i Locking clamp
j On/o button with power-on light
k Reverse/Pre-clean button
l Mains cord
m Cord storage facility
n Pulp container
o Safety pins
C Jug (HR1942, HR1943, HR1944, HR1945, HR1947, HR1949 only)
p Juice jug
q Lid of juice jug
*Not shown: grey two-part lter for bre juice (HR1942, HR1944, HR1946, HR1947,
HR1949 only)
Important
Read this user manual carefully before you use the appliance and save it for future
reference.
Danger
- Do not immerse the motor unit in water or any other
liquid. Do not rinse it under the tap and do not clean it in
the dishwasher.

7
ENGLISH
Warning
- Check if the voltage indicated on the base of the
appliance corresponds to the local mains voltage before
you connect the appliance.
- Do not use the appliance if the plug, the mains cord or
other parts are damaged. If the mains cord is damaged,
you must have it replaced by Philips, a service centre
authorised by Philips or similarly qualied persons in
order to avoid a hazard.
- This appliance is intended for household use only. If the
appliance is used improperly or for professional or semi-
professional purposes or if it is not used according to the
instructions in the user manual, the guarantee becomes
invalid and Philips refuses any liability for damage
caused.
- This appliance can be used by persons with reduced
physical, sensory or mental capabilities or lack of
experience and knowledge if they have been given
supervision or instruction concerning use of the appliance
in a safe way and if they understand the hazards involved.
- This appliance shall not be used by children. Keep the
appliance and its cord out of the reach of children.
- Children shall not play with the appliance.
- Never reach into the feeding tube with your ngers or an
object while the appliance is operating. Only use the
pusher for this purpose.
- Always disconnect the appliance from the mains if you
leave it unattended or before you assemble, disassemble
or clean it.
- Always unwind the mains cord completely before you
switch on the appliance.
- Never let the appliance operate unattended.

8
ENGLISH
Caution
- Never use any accessories or parts from other
manufacturers or that Philips does not specically
recommend. If you use such accessories or parts, your
guarantee becomes invalid.
- Always place the appliance on a stable, level and
horizontal surface.
- Do not use the appliance outdoors.
- Avoid contact with moving parts.
- Make sure all parts are assembled properly before you
switch on the appliance.
- Only use the appliance when the locking clamp is in
locked position.
- Only unlock the locking clamp after you have switched
o the appliance and the juicing screw has stopped
rotating.
- Do not remove the pulp container when the appliance
is operating.
- Cut large ingredients into pieces that t into the feeding
tube. Remove stones, cores, seeds and thick peels from
fruits or vegetables before juicing.
- Do not exert too much pressure on the pusher to avoid
damage.
- Food colouring can discolour parts. This is normal and
has no impact on the performance of the appliance.
- To optimise the lifetime of the appliance, do not use it
continuously for more than 30 minutes.
Built-in safety lock
The appliance is equipped with a built-in safety lock. The safety pins on the motor
unit ensure that you can only switch on the appliance if you have placed the juicing
unit and the pulp container on the motor unit correctly.
Electromagnetic elds (EMF)
This Philips appliance complies with all applicable standards and regulations
regarding exposure to electromagnetic elds.

9
ENGLISH
Before rst use
Thoroughly clean all parts before you use the appliance for the rst time (see
chapter ‘Cleaning’).
Note: Make sure all parts are completely dry before you start using the appliance.
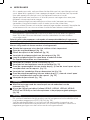
Preparing for use
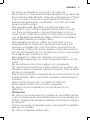
Assembling the juicing unit
1 Attach the pulp outlet to the juicing unit and turn it clockwise until the arrow
(
) points to the ‘locked’ indication. (Fig. 2)
2 Insert the juicing screw into the juicing unit (Fig. 3).
3 Assemble the two parts of the lter (Fig. 4).
4 Place the two-part lter over the juicing screw (Fig. 5).
Tip: Use the black two-part filter for clear juice. If you prefer cloudy juice with
more fibres in it, use the grey two-part filter.
5 Attach the spout to the juicing unit and turn it clockwise until the arrow (
)
points to the ‘locked’ indication. (Fig. 6)
Important: Do not attach or detach the spout when the juicing unit is mounted on
the motor unit. Always take o the juicing unit from the motor unit before
assembling or disassembling.
6 Place the berry tray on the feeding tube (Fig. 7).
Placing the juicing unit onto the motor unit
1 Place the assembled juicing unit onto the motor unit, with the pulp outlet
tting into the opening on the motor unit (Fig. 8).
2 Align the projections on the juicing unit with the recesses in the motor unit.
Slide the juicing unit onto the motor unit until it locks into place. (Fig. 9)
3 Press the juicing unit onto the motor unit (1) and then close the locking clamp
(2). (Fig. 10)
Note: If the locking clamp cannot be closed, check if the juicing unit is positioned
properly with the projections on the juicing unit into the recesses of the motor
unit.
4 Slide the pulp container into the motor unit (Fig. 11).
Using the appliance
The appliance only functions if the juicing unit and the pulp outlet are
assembled correctly and the locking clamp is locked properly.
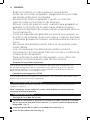
1 Wash the fruit and/or vegetables. If necessary, cut them into pieces that t into
the feeding tube.
Note: Remove stones and thick peels of the fruits you would not eat, for example
from oranges, pomegranates etc.
2 Place a jug or a glass under the spout (Fig. 12).
3 Press the on/o button to switch on the appliance (Fig. 13).

10
ENGLISH
4 Put the pieces of fruit or vegetables in the feeding tube and gently press them
down towards the juicing screw with the pusher (Fig. 14).
Never insert your ngers or an object into the feeding tube or juicing unit.
5 When the juice ow has stopped, switch o the appliance and wait until the
juicing screw has stopped rotating.
6 Press the pre-clean button to remove the last drops of juice from the juicing
unit (Fig. 15).
7 To prevent juice from dripping onto the table, press the drip stop (Fig. 16).
Tips
- Use fresh fruit and vegetables, as they contain more juice. Pineapples, beetroots,
celery stalks, apples, cucumbers, carrots, spinach, melons, tomatoes,
pomegranates and grapes are particularly suitable for processing in the juicer.
- You do not have to remove thin peels or skins. Only remove peels which you
would not eat, e.g. those of oranges, pineapples, kiwis, melons and uncooked
beetroots.
- If you want to juice fruits with stones, such as peaches, plums or cherries,
remove the stones before juicing.
- When you prepare apple juice, remember that the thickness of the apple juice
depends on the kind of apple you use. The juicier the apple, the thinner the
juice. Choose a kind of apple that produces the type of juice you prefer.
- Apple juice turns brown very quickly. To slow down this process, add a few drops
of lemon juice.
- This juicer can handle starchy fruits such as bananas and mangoes. You can add
milk or water directly through the feeding tube.
- Citrus fruits can also be processed with the juicer, remove the white pith of citrus
fruits because it has a bitter taste.
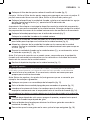
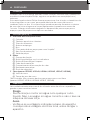
Cleaning (Fig. 17)
- The appliance is easier to clean if you do so immediately after use. Look at the
cleaning table to see how all parts can be cleaned.
Never use scouring pads, abrasive cleaning agents or aggressive liquids such as
alcohol, petrol or acetone to clean the appliance.
Note: All detachable parts are dishwasher-safe and can be safely cleaned under
the tap.
1 Switch o the appliance and remove the plug from the wall socket.
2 Open the locking clamp (Fig. 18).
3 Slide the juicing unit o the motor unit (Fig. 19).
4 Remove the pulp container from the motor unit (Fig. 20).
5 Empty the pulp container and rinse it under the tap.
Disassembling and cleaning the juicing unit
1 Remove the pusher from the feeding tube (Fig. 21).
2 Remove the berry tray from the feeding tube (Fig. 22).
3 Turn the juice collector anticlockwise until the arrow (
) points to the ‘open’
indication and remove it from the juicing unit. (Fig. 23)

11
ENGLISH
4 Remove the two-part lter and disassemble it (Fig. 24).
5 Turn the pulp outlet anticlockwise until the arrow (
) points to the ‘open’
indication and remove it from the juicing unit. (Fig. 25)
6 Remove the juicing screw (Fig. 26).
Storage
1 Wind the mains cord around the cord storage facility in the base of the motor
unit (Fig. 27).
2 You can store the juice jug and lid (HR1942, HR1943, HR1944, HR1945, HR1947,
HR1949 only), and the berry tray in the pulp container (Fig. 28).
Recycling
- This symbol means that this product shall not be disposed of with normal
household waste (2012/19/EU) (Fig. 29).
- Follow your country’s rules for the separate collection of electrical and electronic
products. Correct disposal helps prevent negative consequences for the
environment and human health.
Ordering accessories
To buy accessories or spare parts, visit www.shop.philips.com/service or go to your
Philips dealer. You can also contact the Philips Consumer Care Centre in your
country.
Guarantee and support
If you need information or support, please visit www.philips.com/support or read
the separate worldwide guarantee leaet.
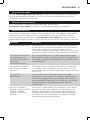
Troubleshooting
This chapter summarises the most common problems you could encounter with the
appliance. If you are unable to solve the problem with the information below, visit
www.philips.com/support for a list of frequently asked questions or contact the
Consumer Care Centre in your country.
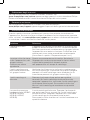
Problem Solution
The appliance does not
work.
The appliance is equipped with two safety pins. If either
the juicing unit or the pulp container has not been
placed on the motor unit properly, the appliance does
not work. Check whether these parts have been
assembled in the right way (see chapter ‘Preparing for
use’).
The motor unit gives o
an unpleasant smell
the rst few times the
appliance is used.
This is not unusual. If the appliance continues to give o
this smell after a few times, check the quantities you are
processing and the processing time.

12
ENGLISH
Problem Solution
The juicing unit cannot
be placed onto the
motor unit.
Check if the spout is properly attached to the juicing
unit. Make sure that the projections on the juicing unit
are aligned with the recesses in the motor unit (see
g. 9).
The juicing unit is
blocked.
Press the pre-clean button for a few seconds. If the
juicing unit is still blocked, then switch o the appliance,
remove the juicing unit and disassemble all parts.
Remove the fruit that is blocking the juicing unit. Then
process a smaller quantity.
The power-on light
ashes. (HR1942,
HR1943, HR1944,
HR1946, HR1947,
HR1949 only)
The juicing unit is blocked. Press the pre-clean button
for a few seconds. If the juicing unit is still blocked, then
switch o the appliance, remove the juicing unit and
disassemble all parts. Remove the fruit that is blocking
the juicing unit. Then process a smaller quantity.

13
DEUTSCH
Einführung
Herzlichen Glückwunsch zu Ihrem Kauf und willkommen bei Philips! Um die
Unterstützung von Philips optimal nutzen zu können, registrieren Sie Ihr Produkt
bitte unter www.philips.com/welcome.
Mit dem Philips Avance Entsafter für sanftes Entsaften landet all das Gute aus
Obst und Gemüse in Ihrem Glas, sodass Sie jeden Tag leckere und gesunde Säfte
genießen können. Dank der innovativen Technologie holen Sie das Maximum an
Saft aus Obst und Gemüse heraus und können das Gerät schnell in weniger als
1 Minute reinigen. Das vollständig integrierte Design nimmt nur wenig Platz ein und
liefert brillante Ergebnisse.
Allgemeine Beschreibung (Abb. 1)
A Entsaftereinheit
a Stopfer
b Beerentablett
c Einfüllönung
d Tropf-Stopp
e Auslauf
f Schwarzer zweiteiliger Filter für klaren Saft*
g Entsafterschraube
h Fruchteischauslass
B Motoreinheit
i Verriegelungsklemme
j Ein-/Ausschalter mit Betriebsanzeige
k Rücklauf-/Vorreinigungstaste
l Netzkabel
m Kabelaufwicklung
n Fruchteischbehälter
o Sicherheitsstifte
C Behälter (nur HR1942, HR1943, HR1944, HR1945, HR1947, HR1949)
p Saftbehälter
q Deckel des Saftbehälters
*Nicht abgebildet: grauer zweiteiliger Filter für faserhaltigen Saft (nur HR1942,
HR1944, HR1946, HR1947, HR1949)
Wichtig
Lesen Sie diese Bedienungsanleitung vor dem Gebrauch des Geräts aufmerksam
durch, und bewahren Sie sie für eine spätere Verwendung auf.
Gefahr
- Tauchen Sie die Motoreinheit keinesfalls in Wasser oder
andere Flüssigkeiten. Spülen Sie sie auch nicht unter
ießendem Wasser ab, und reinigen Sie sie nicht in der
Spülmaschine.

14
DEUTSCH
Warnung
- Prüfen Sie vor Inbetriebnahme, ob die Spannungsangabe
an der Unterseite des Geräts mit der örtlichen
Netzspannung übereinstimmt.
- Verwenden Sie das Gerät nicht, wenn der Stecker, das
Netzkabel oder andere Teile des Geräts beschädigt sind.
Wenn das Netzkabel beschädigt ist, darf es nur von einem
Philips Service-Center, einer von Philips autorisierten
Werkstatt oder einer ähnlich qualizierten Person
ausgetauscht werden, um Gefährdungen zu vermeiden.
- Dieses Gerät ist nur für den Gebrauch im Haushalt
bestimmt.
Bei unsachgemäßem Gebrauch oder Verwendung
für halbprofessionelle oder professionelle Zwecke
oder bei Nichtbeachtung der Anweisungen in der
Bedienungsanleitung erlischt die Garantie. In diesem Fall
lehnt Philips jegliche Haftung für entstandene Schäden
ab.
- Dieses Gerät kann von Personen mit verringerten
physischen, sensorischen oder psychischen Fähigkeiten
oder Mangel an Erfahrung und Kenntnis verwendet
werden, wenn sie bei der Verwendung beaufsichtigt
wurden oder Anweisung zum sicheren Gebrauch des
Geräts erhalten und die Gefahren verstanden haben.
- Das Gerät darf nicht von Kindern verwendet werden.
Halten Sie das Gerät und das Netzkabel außerhalb der
Reichweite von Kindern.
- Kinder dürfen nicht mit dem Gerät spielen.
- Greifen Sie niemals bei laufendem Motor mit den Fingern
oder einem Gegenstand in die Einfüllönung. Verwenden
Sie hierzu nur den Stopfer.
- Trennen Sie das Gerät immer von der Stromversorgung,
wenn Sie es unbeaufsichtigt lassen und bevor Sie es
zusammensetzen, auseinandernehmen oder reinigen.
- Wickeln Sie das Netzkabel immer vollständig ab, bevor
Sie das Gerät einschalten.
- Lassen Sie das eingeschaltete Gerät niemals
unbeaufsichtigt.

15
DEUTSCH
Achtung
- Verwenden Sie keine Zubehörteile anderer Hersteller
oder solche, die von Philips nicht ausdrücklich empfohlen
werden.
Falls Sie derartiges Zubehör benutzen, erlischt die
Garantie.
- Stellen Sie das Gerät stets auf eine stabile, ebene und
waagerechte Unterlage.
- Verwenden Sie das Gerät nicht im Freien.
- Vermeiden Sie den Kontakt mit beweglichen Teilen.
- Prüfen Sie, bevor Sie das Gerät einschalten, ob alle Teile
ordnungsgemäß zusammengesetzt sind.
- Verwenden Sie das Gerät erst dann, wenn sich die
Verriegelungsklemme in gesperrter Position bendet.
- Entsperren Sie die Verriegelungsklemme erst,
nachdem Sie das Gerät ausgeschaltet haben und die
Entsafterschnecke zum Stillstand gekommen ist.
- Nehmen Sie den Fruchteischbehälter nicht ab, solange
das Gerät in Betrieb ist.
- Schneiden Sie große Zutaten in kleinere Stücke, die in die
Einfüllönung passen. Entfernen Sie vor dem Entsaften
Steine, Kerne, Samen sowie dickere Schalen aus dem
Obst oder Gemüse.
- Vermeiden Sie übermäßigen Druck auf den Stopfer, damit
dieser nicht beschädigt wird.
- Lebensmittelfarben können Teile verfärben. Dies ist
normal und beeinträchtigt die Leistung des Geräts nicht.
- Verwenden Sie das Gerät nicht durchgehend länger
als 30 Minuten, um die optimale Lebensdauer zu
gewährleisten.
Integrierte Sicherheitssperre
Das Gerät ist mit einem integrierten Sicherheitssystem ausgestattet. Die
Sicherheitsnadeln an der Motoreinheit stellen sicher, dass Sie das Gerät nur
einschalten können, wenn die Entsaftereinheit und der Fruchteischbehälter korrekt
in die Motoreinheit eingesetzt wurden.
Elektromagnetische Felder
Dieses Philips Gerät erfüllt sämtliche Normen und Regelungen bezüglich der
Exposition in elektromagnetischen Feldern.

16
DEUTSCH
Vor dem ersten Gebrauch
Reinigen Sie alle Teile gründlich, bevor Sie das Gerät zum ersten Mal verwenden
(siehe Kapitel “Reinigung”).
Hinweis: Vergewissern Sie sich, dass alle Teile vollständig trocken sind, bevor Sie
das Gerät verwenden.
Für den Gebrauch vorbereiten
Die Entsaftereinheit zusammensetzen
1 Befestigen Sie den Fruchteischauslass an der Entsaftereinheit, und
drehen Sie ihn im Uhrzeigersinn, bis der Pfeil (Á) auf die Position “locked”
(geschlossen) zeigt. (Abb. 2)
2 Setzen Sie die Entsafterschnecke in die Entsaftereinheit ein (Abb. 3) ein.
3 Setzen Sie die beiden Teile des Filters zusammen (Abb. 4).
4 Bringen Sie den zweiteiligen Filter über der Entsafterschnecke an (Abb. 5).
Tipp: Verwenden Sie den schwarzen zweiteiligen Filter für klaren Saft. Wenn Sie
trüben Saft mit mehr Fasern bevorzugen, verwenden Sie den grauen zweiteiligen
Filter.
5 Befestigen Sie den Auslauf an der Entsaftereinheit, und drehen Sie ihn
im Uhrzeigersinn, bis der Pfeil (Á) auf die Position “locked” (geschlossen)
zeigt. (Abb. 6)
Wichtig: Ausgießer nicht anbringen oder abnehmen, während die Entsaftereinheit
auf der Motoreinheit montiert ist. Nehmen Sie die Entsaftereinheit vor dem
Zusammensetzen und Auseinandernehmen immer von der Motoreinheit.
6 Setzen Sie das Beerentablett auf die Einfüllönung (Abb. 7).
Die Entsaftereinheit auf die Motoreinheit setzen
1 Setzen Sie die zusammengesetzte Entsaftereinheit so auf die Motoreinheit,
dass der Fruchteischauslass in die Önung an der Motoreinheit
passt (Abb. 8).
2 Richten Sie die Vorsprünge an der Entsaftereinheit an den Vertiefungen der
Motoreinheit aus. Schieben Sie die Entsaftereinheit auf die Motoreinheit, bis
sie einrastet. (Abb. 9)
3 Drücken Sie die Entsaftereinheit auf die Motoreinheit (1), und schließen Sie
dann die Verriegelungsklemme (2). (Abb. 10)
Hinweis: Wenn die Verriegelungsklemme nicht geschlossen werden kann, überprüfen
Sie, ob die Entsaftereinheit ordnungsgemäß mit den Vorsprüngen an den
Vertiefungen der Motoreinheit ausgerichtet ist.
4 Schieben Sie den Fruchteischbehälter in die Motoreinheit (Abb. 11).
Das Gerät benutzen
Das Gerät funktioniert nur, wenn die Entsaftereinheit und der Fruchteischauslass
korrekt zusammengesetzt wurden und die Verriegelungsklemme ordnungsgemäß
geschlossen ist.
1 Waschen Sie das Obst und/oder Gemüse, und schneiden Sie es bei Bedarf in
Stücke, die in die Einfüllönung passen.
Hinweis: Entfernen Sie Kerne und dicke Haut, die Sie nicht essen möchten, wie bei
Orangen oder Granatäpfeln usw.
2 Stellen Sie einen Behälter oder ein Glas unter den Auslauf (Abb. 12).
3 Drücken Sie den Ein-/Ausschalter, um das Gerät einzuschalten (Abb. 13).

17
DEUTSCH
4 Geben Sie die Obst- oder Gemüsestücke in die Einfüllönung, und drücken Sie
sie behutsam mit dem Stopfer in Richtung der Entsafterschnecke (Abb. 14).
Stecken Sie keinesfalls Ihre Finger oder Gegenstände in die Einfüllönung oder
Entsaftereinheit.
5 Wenn kein Saft mehr ausießt, schalten Sie das Gerät aus, und warten Sie,
bis die Entsafterschnecke zum Stillstand gekommen ist.
6 Drücken Sie die Vorreinigungstaste zum Entfernen der letzten Tropfen Saft aus
der Entsaftereinheit (Abb. 15).
7 Drücken Sie auf den Tropf-Stopp, um zu vermeiden, dass Saft auf den Tisch
tropft (Abb. 16).
Tipps
- Verarbeiten Sie nur frisches Obst und Gemüse, weil es saftiger ist. Ananas,
rote Bete, Stangensellerie, Äpfel, Gurken, Möhren, Spinat, Melonen, Tomaten,
Granatäpfel und Weintrauben eignen sich hervorragend zum Entsaften.
- Sie müssen die Schalen nicht unbedingt entfernen. Entfernen Sie nur die
Schalen, die Sie nicht essen, z.B. Schalen von Orangen, Ananas, Kiwis, Melonen
und roher roter Bete.
- Wenn Sie Steinobst, wie z. B. Prsiche, Paumen oder Kirschen, entsaften
möchten, entfernen Sie vor dem Entsaften die Steine.
- Berücksichtigen Sie bei der Zubereitung von Apfelsaft, dass die Konsistenz des
Saftes von der verwendeten Apfelsorte abhängt. Je saftiger der Apfel, desto
dünnüssiger der Saft. Wählen Sie eine Apfelsorte, deren Saft Ihrem Geschmack
entspricht.
- Apfelsaft wird schnell braun. Sie können diesen Vorgang verzögern, indem Sie
dem Apfelsaft einige Tropfen Zitronensaft beifügen.
- Dieser Entsafter kann stärkehaltiges Obst wie Bananen oder Mangos
verarbeiten. Sie können Milch oder Wasser direkt über die Einfüllönung
hinzugeben.
- Sie können mit dem Entsafter auch Zitrusfrüchte verarbeiten. Entfernen Sie
hierbei die weiße Haut der Zitrusfrüchte, da sie einen bitteren Beigeschmack hat.
Pege (Abb. 17)
- Am einfachsten lässt sich das Gerät unmittelbar nach dem Gebrauch reinigen.
Sehen Sie sich die Reinigungstabelle an, um zu sehen, wie alle Teile gereinigt
werden können.
Benutzen Sie zum Reinigen des Geräts keine Scheuerschwämme und -mittel oder
aggressive Flüssigkeiten wie Alkohol, Benzin oder Azeton.
Hinweis: Alle abnehmbaren Teile sind spülmaschinenfest und können ohne
Bedenken unter fließendem Wasser gereinigt werden.
1 Schalten Sie das Gerät aus, und ziehen Sie den Stecker aus der Steckdose.
2 Önen Sie die Verriegelungsklemme (Abb. 18).
3 Schieben Sie die Entsaftereinheit aus der Motoreinheit (Abb. 19).
4 Entnehmen Sie den Fruchteischbehälter aus der Motoreinheit (Abb. 20).
5 Entleeren Sie den Fruchteischbehälter, und spülen Sie ihn unter ießendem
Wasser ab.
Die Entsaftereinheit auseinandernehmen und reinigen
1 Nehmen Sie den Stopfer aus der Einfüllönung (Abb. 21).
2 Nehmen Sie das Beerentablett von der Einfüllönung (Abb. 22).

18
DEUTSCH
3 Drehen Sie den Auslauf gegen den Uhrzeigersinn, bis der Pfeil (Á)
auf die Position “open” (oen) zeigt, und entnehmen Sie ihn aus der
Entsaftereinheit. (Abb. 23)
4 Entnehmen Sie den zweiteiligen Filter, und nehmen Sie ihn
auseinander (Abb. 24).
5 Drehen Sie den Fruchteischauslass gegen den Uhrzeigersinn, bis der Pfeil
(Á) auf die Position “open” (oen) zeigt, und entnehmen Sie ihn aus der
Entsaftereinheit. (Abb. 25)
6 Entfernen Sie die Entsafterschraube (Abb. 26).
Aufbewahrung
1 Wickeln Sie das Netzkabel um die Kabelaufwicklung an der Gerätebasis der
Motoreinheit (Abb. 27).
2 Sie können die Saftkanne, den Deckel (nur HR1942, HR1943, HR1944, HR1945,
HR1947, HR1949) und das Beerenfach im Fruchteischbehälter verstauen
(Abb. 28).
Recycling
- Dieses Symbol bedeutet, dass das Produkt nicht mit dem normalen Hausmüll
entsorgt werden kann (2012/19/EU) (Abb. 29).
- Befolgen Sie die örtlichen Bestimmungen zur getrennten Entsorgung von
elektrischen und elektronischen Produkten. Eine ordnungsgemäße Entsorgung
hilft, negative Auswirkungen auf Umwelt und Gesundheit zu vermeiden.
Zubehör bestellen
Um Zubehör oder Ersatzteile zu kaufen, gehen Sie auf
www.shop.philips.com/service oder zu Ihrem Philips Händler. Sie können auch ein
Philips Service-Center in Ihrem Land kontaktieren.
Garantie und Support
Für Unterstützung und weitere Informationen besuchen Sie die Philips Website
unter www.philips.com/support, oder lesen Sie die internationale Garantieschrift.
Fehlerbehebung
In diesem Abschnitt sind die häugsten Probleme zusammengestellt, die mit
Ihrem Gerät auftreten können. Sollten Sie ein Problem mithilfe der nachstehenden
Informationen nicht beheben können, besuchen Sie unsere Website unter
www.philips.com/support für eine Liste mit häug gestellten Fragen, oder wenden
Sie sich an das Service-Center in Ihrem Land.

19
DEUTSCH
Problem Lösung
Das Gerät funktioniert
nicht.
Das Gerät verfügt über zwei Sicherheitsnadeln. Wenn die
Entsaftereinheit oder der Fruchteischbehälter nicht
ordnungsgemäß in die Motoreinheit eingesetzt wurde,
funktioniert das Gerät nicht. Prüfen Sie, ob diese Teile
korrekt eingesetzt wurden (siehe Kapitel “Für den
Gebrauch vorbereiten”).
Bei den ersten
Benutzungen gibt das
Gerät einen
unangenehmen
Geruch von sich.
Das ist am Anfang nichts Ungewöhnliches. Sollte das
Gerät nach einigen Anwendungen immer noch diesen
Geruch abgeben, überprüfen Sie,
ob Sie zuviel Obst/Gemüse auf einmal verarbeiten oder
das Gerät zu lange laufen lassen.
Die Entsaftereinheit
kann nicht auf die
Motoreinheit gesetzt
werden.
Überprüfen Sie, ob der Auslauf ordnungsgemäß an der
Entsaftereinheit befestigt wurde. Vergewissern Sie sich,
dass die Vorsprünge an der Entsaftereinheit an den
Vertiefungen der Motoreinheit ausgerichtet sind (siehe
Abb. 9).
Die Entsaftereinheit ist
blockiert.
Halten Sie die Vorreinigungstaste einige Sekunden lang
gedrückt. Wenn die Entsaftereinheit immer noch
blockiert ist, schalten Sie das Gerät aus, entfernen Sie
die Entsaftereinheit, und nehmen Sie alle Teile
auseinander. Entfernen Sie das Obst, das die
Entsaftereinheit blockiert. Verarbeiten Sie dann eine
kleinere Menge.
Die Betriebsanzeige
blinkt (nur HR1942,
HR1943, HR1944,
HR1946, HR1947,
HR1949).
Die Entsaftereinheit ist blockiert. Halten Sie die
Vorreinigungstaste für einige Sekunden lang gedrückt.
Wenn die Entsaftereinheit immer noch blockiert ist,
schalten Sie das Gerät aus, entfernen Sie die
Entsaftereinheit, und nehmen Sie alle Teile auseinander.
Entfernen Sie das Obst, das die Entsaftereinheit
blockiert. Verarbeiten Sie dann eine kleinere Menge.

20 ESPAÑOL
Introducción
Enhorabuena por la compra de este producto y bienvenido a Philips. Para sacar el
mayor partido de la asistencia que Philips le ofrece, registre su producto en www.
philips.com/welcome.
Esta licuadora Avance de Philips le ayuda a llevar todos los nutrientes de frutas y
verduras a su vaso, de manera que pueda disfrutar de deliciosos y saludables
zumos todos los días. Su innovadora tecnología le permite aprovechar al máximo
las frutas y verduras frescas, y limpiar rápidamente el aparato en menos de un
minuto. El diseño totalmente integrado se ha desarrollado para ocupar poco
espacio y ofrecerle excelentes resultados.
Descripción general (g. 1)
A Unidad de licuado
a Empujador
b Bandeja para bayas
c Oricio de entrada
d Tapa antigoteo
e Boquilla
f Filtro de dos partes negro para conseguir un zumo sin pulpa*
g Accesorio para zumos
h Salida para la pulpa
B Unidad motora
i Cierre de sujeción
j
Botón de encendido/apagado con piloto de encendido
k Botón hacia atrás/de prelimpieza
l Cable de alimentación
m Recogecable
n Depósito de pulpa
o Pasadores de seguridad
C Jarra (solo modelos HR1942, HR1943, HR1944, HR1945, HR1947 y HR1949)
p Jarra para zumo
q Tapa de la jarra para zumo
*No se muestra: Filtro de dos parte gris para zumo con pulpa (solo modelos
HR1942, HR1944, HR1946, HR1947 y HR1949)
Importante
Antes de usar el aparato, lea atentamente este manual de usuario y consérvelo por
si necesitara consultarlo en el futuro.
Peligro
- No sumerja la unidad motora en agua ni otros líquidos.
No la enjuague bajo el grifo y no la lave en el lavavajillas.
Advertencia
- Antes de conectar el aparato, compruebe si el voltaje
indicado en la base del mismo se corresponde con el
voltaje de red local.

21ESPAÑOL
- No utilice el aparato si el enchufe, el cable de
alimentación u otras partes están dañados. Si el cable de
alimentación está dañado, debe ser sustituido por Philips
o por un centro de servicio autorizado por Philips o un
profesional igualmente cualicado, con el n de evitar
situaciones de peligro.
- Este aparato está diseñado únicamente para uso
doméstico. Si se utiliza el aparato de forma incorrecta,
con nes profesionales o semiprofesionales, o de un
modo que no esté de acuerdo con las instrucciones de
uso, la garantía quedará anulada y Philips no aceptará
responsabilidades por ningún daño.
- Este aparato puede ser usado por personas con su
capacidad física, psíquica o sensorial reducida y por
quienes no tengan los conocimientos y la experiencia
necesarios, si han sido supervisados o instruidos acerca
del uso del aparato de forma segura y siempre que sepan
los riesgos que conlleva su uso.
- Este aparato no debe ser utilizado por los niños.
Mantenga el aparato y su cable fuera del alcance de los
niños.
- No permita que los niños jueguen con el aparato.
- No introduzca los dedos ni ningún objeto por el oricio de
entrada cuando el aparato esté funcionando. Sólo se debe
utilizar el empujador.
- Desconecte siempre el aparato de la red eléctrica si lo va
a dejar desatendido o antes de montarlo, desmontarlo o
limpiarlo.
- Desenrrolle siempre por completo el cable de
alimentación antes de encender el aparato.
- No deje nunca el aparato en funcionamiento sin
vigilancia.
Precaución
- No utilice nunca accesorios o piezas de otros fabricantes
o que no hayan sido especícamente recomendados por
Philips. La garantía queda anulada si utiliza tales piezas o
accesorios.
- Coloque siempre el aparato sobre una supercie estable,
plana y horizontal.
- No utilice el aparato al aire libre.

22 ESPAÑOL
- Evite el contacto con las piezas en movimiento.
- Antes de encender el aparato, asegúrese de que todas
las piezas estén bien montadas.
- Únicamente utilice el aparato cuando el cierre de
sujeción esté en la posición de bloqueo.
- Abra el cierre de sujeción solo cuando haya apagado el
aparato y el tornillo de licuado haya dejado de girar.
- No quite el depósito de pulpa cuando el aparato esté en
funcionamiento.
- Corte los ingredientes grandes en trozos que quepan en
el oricio de entrada. Quite los huesos, corazón, semillas
y cáscaras gruesas de frutas o verduras antes de hacer el
zumo.
- No ejerza demasiada presión sobre el empujador para
evitar daños.
- Los colorantes de los alimentos pueden producir
decoloración en las piezas. Esto es normal y no afecta al
rendimiento del aparato.
- Para optimizar la vida útil del aparato, no lo utilice de
manera continua durante más de 30 minutos.
Bloqueo de seguridad incorporado
Este aparato está equipado con un bloqueo de seguridad incorporado. Los
pasadores de seguridad de la unidad del motor garantizan que solo pueda
encender el aparato si ha colocado correctamente la unidad de licuado y el
depósito de pulpa en la unidad del motor.
Campos electromagnéticos (CEM)
Este aparato de Philips cumple los estándares y las normativas aplicables sobre
exposición a campos electromagnéticos.
Antes de utilizarlo por primera vez
Limpie bien todas las piezas antes de usar el aparato por primera vez (consulte el
capítulo “Limpieza”).
Nota: Asegúrese de que todas las piezas están totalmente secas antes de
comenzar a utilizar el aparato.
Preparación para su uso
Montaje de la unidad de licuado
1 Coloque la salida para la pulpa en la unidad de licuado y gírela en el sentido
de las agujas del reloj hasta que la echa ( Á ) apunte hacia la indicación de
bloqueado. (g. 2)
2 Inserte el tornillo de licuado en la unidad de licuado (Fig. 3).
3 Arme las dos piezas del ltro (g. 4).
La page charge ...
La page charge ...
La page charge ...
La page charge ...
La page charge ...
La page charge ...
La page charge ...
La page charge ...
La page charge ...
La page charge ...
La page charge ...
La page charge ...
La page charge ...
La page charge ...
La page charge ...
La page charge ...
La page charge ...
La page charge ...
La page charge ...
La page charge ...
La page charge ...
La page charge ...
La page charge ...
La page charge ...
La page charge ...
La page charge ...
La page charge ...
La page charge ...
La page charge ...
La page charge ...
-
 1
1
-
 2
2
-
 3
3
-
 4
4
-
 5
5
-
 6
6
-
 7
7
-
 8
8
-
 9
9
-
 10
10
-
 11
11
-
 12
12
-
 13
13
-
 14
14
-
 15
15
-
 16
16
-
 17
17
-
 18
18
-
 19
19
-
 20
20
-
 21
21
-
 22
22
-
 23
23
-
 24
24
-
 25
25
-
 26
26
-
 27
27
-
 28
28
-
 29
29
-
 30
30
-
 31
31
-
 32
32
-
 33
33
-
 34
34
-
 35
35
-
 36
36
-
 37
37
-
 38
38
-
 39
39
-
 40
40
-
 41
41
-
 42
42
-
 43
43
-
 44
44
-
 45
45
-
 46
46
-
 47
47
-
 48
48
-
 49
49
-
 50
50


Philips HR1946/70 AVANCE COLLECTION Le manuel du propriétaire
- Catégorie
- Fabricants de jus
- Taper
- Le manuel du propriétaire
dans d''autres langues
- italiano: Philips HR1946/70 AVANCE COLLECTION Manuale del proprietario
- español: Philips HR1946/70 AVANCE COLLECTION El manual del propietario
- Deutsch: Philips HR1946/70 AVANCE COLLECTION Bedienungsanleitung
- Nederlands: Philips HR1946/70 AVANCE COLLECTION de handleiding
- português: Philips HR1946/70 AVANCE COLLECTION Manual do proprietário
Documents connexes
-
Philips HR1892 Manuel utilisateur
-
Philips HR1888/80 Manuel utilisateur
-
Philips HR1895/74 Manuel utilisateur
-
-
-
-
-
-
Philips HR1858/50 Manuel utilisateur
-
Philips HR1945/80R1 Product Datasheet