Yamaha 5UME Le manuel du propriétaire
- Catégorie
- Motocyclettes
- Taper
- Le manuel du propriétaire
Ce manuel convient également à
La page est en cours de chargement...

EC010010
WR250F(W)
OWNER’S SERVICE MANUAL
©2006 by Yamaha Motor Co., Ltd.
1st Edition, August 2006
All rights reserved.
Any reprinting or unauthorized
use without the written
permission of
Yamaha Motor Co., Ltd.
is expressly prohibited.
Printed in Japan
WR250F(W)
MANUEL D’ATELIER
DU PROPRIETAIRE
©2006 Yamaha Motor Co., Ltd.
1ère édition, août 2006
Tous droits réservés
Toute reimpression
ou utillisation sans la
permission écrite de
la Yamaha Motor Co., Ltd.
est formellement interdite.
Imprimé au Japon
La page est en cours de chargement...

EC020000
INTRODUCTION
Congratulations on your purchase of
a Yamaha WR series. This model is
the culmination of Yamaha’s vast
experience in the production of pace-
setting racing machines. It repre-
sents the highest grade of
craftsmanship and reliability that
have made Yamaha a leader.
This manual explains operation,
inspection, basic maintenance and
tuning of your machine. If you have
any questions about this manual or
your machine, please contact your
Yamaha dealer.
NOTE:
Yamaha continually seeks advance-
ments in product design and quality.
Therefore, while this manual con-
tains the most current product infor-
mation available at the time of
printing, there may be minor discrep-
ancies between your machine and
this manual. If you have any ques-
tions concerning this manual, please
consult your Yamaha dealer.
WARNING
PLEASE READ THIS MANUAL
CAREFULLY AND COMPLETELY
BEFORE OPERATING THIS
MACHINE. DO NOT ATTEMPT TO
OPERATE THIS MACHINE UNTIL
YOU HAVE ATTAINED A SATIS-
FACTORY KNOWLEDGE OF ITS
CONTROLS AND OPERATING
FEATURES AND UNTIL YOU
HAVE BEEN TRAINED IN SAFE
AND PROPER RIDING TECH-
NIQUES. REGULAR INSPECTIONS
AND CAREFUL MAINTENANCE,
ALONG WITH GOOD RIDING
SKILLS, WILL ENSURE THAT YOU
SAFETY ENJOY THE CAPABILI-
TIES AND THE RELIABILITY OF
THIS MACHINE.
INTRODUCTION
Félicitations pour votre achat d’une
Yamaha séries WR. Ce modèle est
l’aboutissement de la vaste expérience
de Yamaha dans la production de machi-
nes de course. Il représente l’échelon le
plus élevé de la dextérité manuelle et de
la fiabilité qui ont fait de Yamaha un lea-
der.
Ce manuel explique le fonctionnement,
l’inspection, l’entretien de base et la
mise au point de votre machine. Si vous
avez des questions à poser à propos de ce
manuel ou de votre machine, prière de
prendre contact avec votre concession-
naire Yamaha.
N.B.:
Yamaha s’efforce en permanence d’amé-
liorer la conception ainsi que la qualité
de ses produits. Par conséquent, même si
ce manuel contient les toutes dernières
informations sur les produits disponi-
bles lors de l’impression, de légères dif-
férences sont possibles entre votre
machine et ce manuel. Pour toute ques-
tion relative au présent manuel, consulter
un concessionnaire Yamaha.
AVERTISSEMENT
PRIERE DE LIRE ATTENTIVE-
MENT ET COMPLETEMENT CE
MANUEL AVANT D’UTILISER
CETTE MACHINE. NE PAS
ESSAYER D’UTILISER CETTE
MACHINE AVANT DE POSSEDER
DES CONNAISSANCES SATISFAI-
SANTES SUR SES COMMANDES
ET FONCTIONS ET D’AVOIR ETE
FORME POUR DES TECHNIQUES
DE CONDUITE CORRECTES ET
SURES. DES INSPECTION REGU-
LIERES ET UN ENTRETIEN SOI-
GNEUX, AVEC UNE BONNE
APTITUDE DE CONDUITE, VOUS
ASSURERONT LA POSSIBILITE
D’APPRECIER LES POSSIBILITES
ET LA FIABILITE DE CETTE
MACHINE.
La page est en cours de chargement...

IMPORTANT NOTICE
THIS MACHINE IS DESIGNED
STRICTLY FOR COMPETITION
USE, ONLY ON A CLOSED
COURSE. It is illegal for this machine
to be operated on any public street,
road, or highway. Off-road use on
public lands may also be illegal.
Please check local regulations
before riding.
1. THIS MACHINE IS TO BE
OPERATED BY AN EXPERI-
ENCED RIDER ONLY.
Do not attempt to operate
this machine at maximum
power until you are totally
familiar with its characteris-
tics.
2. THIS MACHINE IS
DESIGNED TO BE RIDDEN
BY THE OPERATOR ONLY.
Do not carry passengers on
this machine.
3. ALWAYS WEAR PROTEC-
TIVE APPAREL.
When operating this
machine, always wear an
approved helmet with gog-
gles or a face shield. Also
wear heavy boots, gloves,
and protective clothing.
Always wear proper fitting
clothing that will not be
caught in any of the moving
parts or controls of the
machine.
4. ALWAYS MAINTAIN YOUR
MACHINE IN PROPER
WORKING ORDER.
For safety and reliability,
the machine must be prop-
erly maintained. Always
perform the pre-operation
checks indicated in this
manual. Correcting a
mechanical problem before
you ride may prevent an
accident.
5. GASOLINE IS HIGHLY
FLAMMABLE.
Always turn off the engine
while refueling. Take care
to not spill any gasoline on
the engine or exhaust sys-
tem. Never refuel in the
vicinity of an open flame, or
while smoking.
SAFETY INFORMATION
NOTICE
IMPORTANTE
CETTE MACHINE EST STRICTE-
MENT DESTINEE A LA COMPETI-
TION, UNIQUEMENT SUR CIRCUIT
FERME. Il est illégal d’utiliser cette
machine sur une rue, route ou artère
publique. L’utilisation de tous-terrains
sur les domaines publics peut également
être illégale. Prière de vérifier les lois
locales avant de conduire.
1. CETTE MACHINE NE DOIT
ETRE UTILISEE QUE PAR
UN CONDUCTEUR EXPERI-
MENTE.
Ne pas essayer d’utiliser cette
machine à sa puissance maxi-
mum tant que vous n’êtes pas
familier avec ses caractéristi-
ques.
2. CETTE MACHINE N’EST
CONCUE POUR ETRE UTI-
LISEE QUE PAR LE CON-
DUCTEUR.
Ne pas prendre de passagers
sur cette machine.
3. TOUJOURS PORTER UN
EQUIPEMENT DE PROTEC-
TION.
Lors de l’utilisation de cette
machine, toujours porter un
casque homologué avec des
lunettes ou un protège-visage.
Porter également de grosses
bottes, des gants et des vête-
ments de protection. Toujours
porter des vêtements de taille
correcte qui ne seront pas pris
dans une des pièces ou com-
mandes mobiles de la machine.
4. TOUJOURS GARDER
VOTRE MACHINE EN BON
ETAT DE MARCHE.
La machine doit être correcte-
ment entretenue pour des
questions de sécurité et de fia-
bilité. Toujours effectuer les
opérations précédant l’utilisa-
tion indiquées dans ce manuel.
La correction d’un problème
mécanique avant la conduite
peut empêcher un éventuel
accident.
5. L’ESSENCE EST HAUTE-
MENT INFLAMMABLE.
Toujours arrêter le moteur en
faisant le plein. Faire attention
à ne pas verser d’essence sur le
moteur ou le pot d’échappe-
ment. Ne jamais faire le plein
au voisinage d’une flamme une
ou en fumant.
INFORMATION DE SECURITE
La page est en cours de chargement...

6. GASOLINE CAN CAUSE
INJURY.
If you should swallow some
gasoline, inhale excess
gasoline vapors, or allow
any gasoline to get into
your eyes, contact a doctor
immediately. If any gaso-
line spills onto your skin or
clothing, immediately wash
skin areas with soap and
water, and change your
clothes.
7. ONLY OPERATE THE
MACHINE IN AN AREA
WITH ADEQUATE VENTI-
LATION.
Never start the engine or let
it run for any length of time
in an enclosed area.
Exhaust fumes are poison-
ous. These fumes contain
carbon monoxide, which by
itself is odorless and color-
less. Carbon monoxide is a
dangerous gas which can
cause unconsciousness or
can be lethal.
8. PARK THE MACHINE
CAREFULLY; TURN OFF
THE ENGINE.
Always turn off the engine
if you are going to leave the
machine. Do not park the
machine on a slope or soft
ground as it may fall over.
9. THE ENGINE, EXHAUST
PIPE, MUFFLER, AND OIL
TANK WILL BE VERY HOT
AFTER THE ENGINE HAS
BEEN RUN.
Be careful not to touch
them or to allow any cloth-
ing item to contact them
during inspection or repair.
10. PROPERLY SECURE THE
MACHINE BEFORE TRANS-
PORTING IT.
When transporting the
machine in another vehicle,
always be sure it is prop-
erly secured and in an
upright position and that
the fuel cock is in the
“OFF” position. Otherwise,
fuel may leak out of the car-
buretor or fuel tank.
6. L’ESSENCE PEUT CAUSER
DES BLESSURES.
Si vous avalez de l’essence, res-
pirez des vapeurs d’essence en
excès ou laissez de l’essence
pénétrer dans vos yeux, pren-
dre immédiatement contact
avec un médecin. Si de
l’essence est renversée sur
votre peau ou vos vêtements,
laver immédiatement la peau
avec du savon et de l’eau et
changer de vêtements.
7. N’UTILISER LA MACHINE
QUE DANS UN ENDROIT
AVEC AERATION ADE-
QUATE.
Ne jamais mettre le moteur en
marche ni le laisser tourner
pendant un quelconque laps de
temps dans un endroit clos.
Les fumées d’échappement
sont toxiques. Ces fumées con-
tiennent du monoxyde de car-
bone incolore et inodore. Le
monoxyde de carbone est un
gaz toxique dangereux qui
peut entraîner la perte de con-
naissance ou être mortel.
8. STATIONNER AVEC SOIN
LA MACHINE ET ARRE-
TER LE MOTEUR.
Toujours arrêter le moteur si
vous devez abandonner la
machine. Ne pas stationner en
pente ou sur un sol mou ou elle
pourrait se renverser.
9. LE MOTEUR, LE SYSTÈME
D’ÉCHAPPEMENT ET LE
RÉSERVOIR D’HUILE
SONT TRÈS CHAUDS
LORSQUE LE MOTEUR A
TOURNÉ.
Bien veiller à ne pas toucher
ces organes et éviter tout con-
tact avec les vêtements pen-
dant l’inspection ou la
réparation du véhicule.
10. FIXER SOLIDEMENT LA
MACHINE AVANT DE LA
TRANSPORTER.
En cas de transport de la
machine sur un autre véhicule,
toujours s’assurer qu’elle est
correctement fixée et posée sur
ses roues et que le robinet de
carburant est dans la position
OFF (fermé). Sans quoi il peut
y avoir des fuites du carbura-
teur et du réservoir.
La page est en cours de chargement...

EC050000
TO THE NEW OWNER
This manual will provide you with a
good basic understanding of fea-
tures, operation, and basic mainte-
nance and inspection items of this
machine. Please read this manual
carefully and completely before oper-
ating your new machine. If you have
any questions regarding the opera-
tion or maintenance of your machine,
please consult your Yamaha dealer.
NOTE:
This manual should be considered a
permanent part of this machine and
should remain with it even if the
machine is subsequently sold.
EC060000
NOTICE
Some data in this manual may
become outdated due to improve-
ments made to this model in the
future. If there is any question you
have regarding this manual or
your machine, please consult your
Yamaha dealer.
EC070001
F.I.M. MACHINE WEIGHTS:
Weights of machines without
fuel
The minimum weights for
motocross machines are:
for the class 125 cc ..... minimum
88 kg (194 lb)
for the class 250 cc ..... minimum
98 kg (216 lb)
for the class 500 cc ..... minimum
102 kg (225 lb)
In modifying your machine (e.g.,
for weight reduction), take note of
the above limits of weight.
AU NOUVEAU
PROPRIETAIRE
Ce manuel vous apportera une connais-
sance de base des caractéristiques, du
fonctionnement, et des entretiens de base
et des délais d’inspection de cette
machine.
Veuillez lire soigneusement et entière-
ment ce manuel avant d’utiliser votre
nouvelle machine. Si vous avez des
questions concernant le fonctionnement
ou l’entretien de votre machine, veuillez
consulter votre concessionnaire Yamaha.
N.B.:
Ce manuel doit être considéré comme
partie permanente de la machine et doit
rester avec celle-ci si elle est revendue à
une tierce personne.
AVERTISSEMENT
Certaines données contenues dans ce
manuel risquent de devenir périmées
du fait d’améliorations apportées à ce
modèle dans le futur. Pour toute ques-
tion concernant ce manuel ou la
machine, consulter un concessionnaire
Yamaha.
POIDS DES MACHINES,
SPECIFICATION F.I.M.:
Poids des machines sans carburant
Poids minimum admis pour les moto-
cross:
pour la catégorie 125 cc ...minimum
88 kg (194 lb)
pour la catégorie 250 cc ...minimum
98 kg (216 lb)
pour la catégorie 500 cc ...minimum
102 kg (225 lb)
En cas de modification de la machine
(par exemple pour réduction de
poids), tenir compte des limites de
poids spécifiées ci-dessus.
La page est en cours de chargement...

EC080000
HOW TO USE THIS
MANUAL
EC081000
PARTICULARLY
IMPORTANT
INFORMATION
The Safety Alert Symbol means
ATTENTION! BECOME ALERT!
YOUR SAFETY IS INVOLVED!
Failure to follow WARNING instruc-
tions could result in severe injury or
death to the machine operator, a
bystander, or a person inspecting or
repairing the machine.
A CAUTION indicates special pre-
cautions that must be taken to avoid
damage to the machine.
NOTE:
A NOTE provides key information to
make procedures easier or clearer.
WARNING
CAUTION:
EC082000
FINDING THE REQUIRED
PAGE
1. This manual consists of seven
chapters; “General information”,
“Specifications”, “Regular
inspection and adjustments”,
“Tuning”, “Engine”, “Chassis”
and “Electrical”.
2. The table of contents is at the
beginning of the manual. Look
over the general layout of the
book before finding then
required chapter and item.
Bend the book at its edge, as
shown, to find the required fore
edge symbol mark and go to a
page for required item and
description.
COMMENT UTILISER
CE MANUEL
INFORMATIONS
PARTICULIEREMENT
IMPORTANTES
Le symbole d’alerte de sécurité signifie
ATTENTION! SOYEZ VIGILANT!
VOTRE SECURITE EST EN JEU!
Le non-respect des instructions AVER-
TISSEMENT peut entraîner de sérieuses
blessures ou la mort au pilote de la
machine, à un passant ou à une personne
inspectant ou réparant la machine.
Un ATTENTION indique les procédures
spéciales qui doivent être suivies pour
éviter d’endommager la machine.
N.B.:
Un N.B. fournit les renseignements
nécessaires pour rendre les procédures
plus faciles ou plus claires.
AVERTISSEMENT
ATTENTION:
TROUVER LA PAGE
RECHERCHEE
1. Ce manuel comprend 7 chapitres;
“Renseignements généraux”,
“Caractéristiques”, “Controles et
réglages periodiques”, “Mise au
point”, “Moteur”, “Châssis” et “Par-
tie électrique”.
2. La table des matières se trouve au
début du manuel.
Regarder la disposition générale du
manuel avant de recherche le chapi-
tre et l’article désirés.
Arquer le manuel à son bord, de la
manière indiquée, pour trouver le
symbole de devant désiré et passer à
une page de la description et l’arti-
cle désirés.
La page est en cours de chargement...

EC083000
MANUAL FORMAT
All of the procedures in this manual are organized in a
sequential, step-by-step format. The information has
been complied to provide the mechanic with an easy to
read, handy reference that contains comprehensive
explanations of all disassembly, repair, assembly, and
inspection operations.
In this revised format, the condition of a faulty component
will precede an arrow symbol and the course of action
required will follow the symbol, e.g.,
• Bearings
Pitting/damage
→
Replace.
EC084002
HOW TO READ DESCRIPTIONS
To help identify parts and clarify procedure steps, there
are exploded diagrams at the start of each removal and
disassembly section.
1. An easy-to-see exploded diagram
1
is provided for
removal and disassembly jobs.
2. Numbers
2
are given in the order of the jobs in the
exploded diagram. A number that is enclosed by a
circle indicates a disassembly step.
3. An explanation of jobs and notes is presented in an
easy-to-read way by the use of symbol marks
3
.
The meanings of the symbol marks are given on the
next page.
4. A job instruction chart
4
accompanies the exploded
diagram, providing the order of jobs, names of parts,
notes in jobs, etc.
5. Extent of removal
5
is provided in the job instruction
chart to save the trouble of an unnecessary removal
job.
6. For jobs requiring more information, the step-by-step
format supplements
6
are given in addition to the
exploded diagram and job instruction chart.
FORMAT DU MANUEL
Dans ce manuel, toutes les procédures sont décrites pas à pas.
Les informations ont été condensées pour fournir au mécani-
cien un guide pratique et facile à lire, contenant des explica-
tions claires pour toutes les procédures de démontage,
réparation, remontage et vérification.
Dans ce nouveau format, l’état d’un composant défectueux est
suivi d’une flèche qui indique les mesures à prendre. Exemple:
• Roulements
Piqûres/endommagement → Remplacer.
COMMENT LIRE LES DESCRIPTIONS
Chaque section détaillant des étapes de démontage ou de
remontage est précédée de vues en éclaté qui permettent de cla-
rifier ces opérations.
1. Exemple de vue en éclaté 1 clarifiant les opérations de
démontage et de remontage.
2. Sur les vues en éclaté, les pièces sont numérotées 2 dans
l’ordre des opérations à effectuer. Un chiffre entouré d’un
cercle correspond à une étape de démontage.
3. Les vues en éclaté portent également des symboles 3 qui
rappellent des points importants à ne pas oublier. La signi-
fication de ces symboles est expliquée à la page suivante.
4. Les vues en éclaté sont suivies d’un tableau 4 fournissant
l’ordre des opérations, le nom des pièces, des remarques,
etc.
5. Pour éviter la dépose superflue de pièces, l’étendue de la
dépose 5 est indiquée dans le tableau de description du
travail.
6. Pour les travaux qui demandent des explications supplé-
mentaires, la vue en éclaté et le tableau sont suivis d’une
description détaillée 6 des opérations.
La page est en cours de chargement...

ILLUSTRATED SYMBOLS
(Refer to the illustration)
Illustrated symbols 1 to 7 are
designed as thumb tabs to indicate
the chapter’s number and content.
1
General information
2
Specifications
3
Regular inspection and adjustments
4
Tuning
5
Engine
6
Chassis
7
Electrical
Illustrated symbols 8 to D are used
to identify the specifications appear-
ing in the text.
8
With engine mounted
9
Special tool
0
Filling fluid
A
Lubricant
B
Tightening
C
Specified value, Service limit
D
Resistance (
Ω
), Voltage (V), Electric
current (A)
Illustrated symbols E to H in the
exploded diagrams indicate grade of
lubricant and location of lubrication
point.
E
Apply engine oil
F
Apply molybdenum disulfide oil
G
Apply lightweight lithium-soap base
grease
H
Apply molybdenum disulfide grease
Illustrated symbols I to J in the
exploded diagrams indicate where to
apply a locking agent and where to
install new parts.
I
Apply locking agent (LOCTITE
®
)
J
Use new one
SYMBOLES
GRAPHIQUES
(Voir l’illustration)
Les symboles graphiques 1 à 7 servent
à repérer les différents chapitres et à
indiquer leur contenu.
1
Renseignements généraux
2
Caractéristiques
3
Controles et réglages periodiques
4
Mise au point
5
Moteur
6
Châssis
7
Partie électrique
Les symboles graphiques 8 à D per-
mettent d’identifier les spécifications
encadrées dans le texte.
8
Avec de montage du moteur
9
Outil spécial
0
Liquide de remplissage
A
Lubrifiant
B
Serrage
C
Valeur spécifiée, limite de service
D
Résistance (
Ω
), tension (V), intensité (A)
Les symboles graphiques E à H utilisés
dans les vues en éclaté indiquent les
endroit à lubrifier et le type de lubrifiant.
E
Appliquer de l’huile moteur
F
Appliquer de l’huile au bisulfure de
molybdène
G
Appliquer de la graisse fluide à base de
savon au lithium
H
Appliquer de la graisse au bisulfure de
molybdène
Les symboles graphiques I à J dans
les vues en éclaté indiquent le produit de
blocage à appliquer et les pièces qui
nécessitent un remplacement.
I
Appliquer un agent de blocage
(LOCTITE
®
)
J
Utiliser une pièce neuve.
12
34
56
78
90
AB
CD
EF
GH
IJ
GEN
INFO
SPEC
INSP
ADJ
TUN
ENG
CHAS
–+
ELEC
T
R
.
.
E
M
B
M
New

ABGEBILDETEN SYMBOL
(Siehe Abbildung)
Die unter 1 bis 7 abgebildeten
Symbole weisen auf die Themen der
einzelnen Kapitel hin.
1
Allgemeine Angaben
2
Technische Daten
3
Regelmässige Wartungs- und
Einstellarbeiten
4
Abstimmung
5
Motor
6
Fahrwerk
7
Elektrische Anlage
Die Symbole 8 bis D weisen auf
wichtige Angaben im Text hin.
8
Wartung mit montiertem Motor
möglich
9
Spezialwerkzeug
0
Art und Menge einzufüllender
Flüssigkeiten
A
Schmiermittel
B
Anzugsmoment
C
Verschleißgrenzen, Toleranzen
D
Elektrische Sollwerte
Die Symbole E bis H werden in den
Explosionszeichnungen verwendet
und weisen auf Schmier- und Klebe-
mittel sowie die entsprechenden
Stellen hin.
E
Motoröl
F
Molybdändisulfidöl
G
Leichtes Lithiumfett
H
Molybdändisulfidfett
Die Symbole I und J werden eben-
falls in den Explosionszeichnungen
verwendet.
I
Klebemittel (LOCTITE
®
)
J
Neues Bauteil verwenden
SIMBOLI ILLUSTRATI
(Fare riferimento
all’illustrazione)
I simboli illustrati da 1 a 7 vengono
realizzati come linguette per indicare il
numero del capitolo ed il suo contenuto.
1
Informazioni generali
2
Dati tecnici
3
Controllie regolazioni periodiche
4
Messa a punto
5
Motore
6
Parte ciclistica
7
Impianto elettrico
I simboli illustrati da 8 a D vengono
impiegati per identificare le specifiche
che compaiono nel testo.
8
A motore montato
9
Utensile speciale
0
Fluido
A
Lubrificante
B
Serraggio
C
Valore specificato, limite
D
Resistenza (
Ω
), Tensione (V), Corrente
elettrica (A)
I simboli illustrati da E a H nella rap-
presentazione esplosa indicano il tipo di
lubrificante e l’ubicazione dei punti di
lubrificazione.
E
Impiegare olio motore
F
Impiegare olio di bisolfuro molibdeno
G
Impiegare grasso a base di sapone di litio
leggero
H
Impiegare grasso di bisolfuro di
molibdeno
I simboli illustrati da I a J nella rap-
presentazione esplosa indicano dove
applicare un agente bloccante e dove
installare i nuovi pezzi.
I
Applicare un agente bloccante
(LOCTITE
®
)
J
Usare un pezzo nuovo
SÍMBOLOS ILUSTRADOS
(Consulte la ilustración)
Los símbolos ilustrados 1 a 7 están
diseñados como lengüetas a seguir
con el dedo para indicar el número
del capítulo y el contenido.
1
Información general
2
Especificaciones
3
Revisiones y ajustes periódicos
4
Reglaje
5
Motor
6
Chasis
7
Sistema eléctrico
Los símbolos ilustrados 8 a D se
utilizan para identificar las especifi-
caciones que aparezcan en el texto.
8
Con el motor montado
9
Herramienta especial
0
Líquido a añadir
A
Lubricante
B
Apriete
C
Valor especificado, límite de servicio
D
Resistencia (
Ω
), Voltaje (V), Sistema
eléctrico actual (A)
Los símbolos ilustrados E a H del
diagrama de despiece indican el
grado del lubricante y la ubicación
del punto a lubricar.
E
Aplicar aceite de motor
F
Aplicar aceite de disulfuro de
molibdeno
G
Aplicar grasa ligera de litio
H
Aplicar grasa de disulfuro de
molibdeno
Los símbolos ilustrados I a J del
diagrama de despiece indican dónde
aplicar un producto de bloqueo y
dónde instalar las nuevas piezas.
I
Aplicar un producto de bloqueo
(LOCTITE
®
)
J
Utilizar una pieza nueva

EC090010
INDEX
GENERAL
INFORMATION
SPECIFICATIONS
REGULAR
INSPECTION AND
ADJUSTMENTS
TUNING
ENGINE
CHASSIS
ELECTRICAL
INDEX
RENSEIGNEMENTS
GENERAUX
CARACTERISTI-
QUES
CONTROLES ET
REGLAGES
PERIODIQUES
MISE AU POINT
MOTEUR
CHÂSSIS
PARTIE
ELECTRIQUE

INDEX
ALLGEMEINE
ANGABEN
TECHNISCHE
DATEN
REGELMÄSSIGE
WARTUNGS- UND
EINSTELLARBEITEN
ABSTIMMUNG
MOTOR
FAHRWERK
ELEKTRISCHE
ANLAGE
INDICE
INFORMAZIONI
GENERALI
DATI TECNICI
CONTROLLI E
REGOLAZIONI
PERIODICHE
MESSA A PUNTO
MOTORE
PARTE CICLISTICA
IMPIANTO
ELETTRICO
INDEX
INFORMACIÓN
GENERAL
GEN
INFO
1
ESPECIFICACIONES
SPEC
2
REVISIONES Y
AJUSTES
PERIÓDICOS
INSP
ADJ
3
REGLAJE
TUN
4
MOTOR
ENG
5
CHASIS
CHAS
6
SISTEMA
ELÉCTRICO
ELEC
7
– +
La page est en cours de chargement...

INHALT
KAPITEL 1
ALLGEMEINE
ANGABEN
FAHRZEUGBESCHREIBUNG
....1-2
FAHRZEUG-
IDENTIFIZIERUNG
......................1-4
WICHTIGE INFORMATIONEN
...1-6
KABELANSCHLÜSSE
KONTROLLIEREN
....................1-10
SPEZIALWERKZEUGE
............1-17
BEDIENUNGSELEMENTE
UND DEREN FUNKTION
..........1-28
MULTIFUNKTIONSANZEIGE
...1-36
KRAFTSTOFF
...........................1-50
STARTEN UND EINFAHREN
...1-52
ANZUGSDREHMOMENTE
KONTROLLIEREN
....................1-61
PFLEGE UND LAGERUNG
......1-66
KAPITEL 2
TECHNISCHE DATEN
ALLGEMEINE TECHNISCHE
DATEN
...................................... 2-39
WARTUNGSDATEN
................. 2-42
ALLGEMEINE
ANZUGSMOMENTE
................. 2-57
MASSEINHEITEN
.....................2-57
SCHMIERSYSTEM-
SCHAUBILDER
.........................2-98
KABELFÜHRUNGS-
SCHAUBILD
............................2-102
KAPITEL 3
REGELMÄSSIGE
WARTUNGS- UND
EINSTELLARBEITEN
WARTUNGSINTERVALLE
.........3-7
ROUTINEKONTROLLE VOR
FAHRTBEGINN
.........................3-18
MOTOR
..................................... 3-22
FAHRWERK
..............................3-78
ELEKTRISCHE ANLAGE
.......3-122
INDICE
CAPITOLO 1
INFORMAZIONI
GENERALI
DESCRIZIONE
............................... 1-2
NUMERO DI SERIE DEL
MEZZO
............................................ 1-4
INFORMAZIONI
IMPORTANTI
................................ 1-6
CONTROLLO DEL
COLLEGAMENTO
...................... 1-10
ATTREZZI SPECIALI
................ 1-20
FUNZIONI DI CONTROLLO
.... 1-28
DISPLAY MULTIFUNZIONE
.... 1-36
CARBURANTE
............................. 1-50
AVVIAMENTO E
-RODAGGIO
................................. 1-52
PUNTI DI CONTROLLO
SERRAGGIO
................................ 1-62
PULIZIA E CUSTODIA
.............. 1-66
CAPITOLO 2
DATI TECNICI
DATI TECNICI GENERALI
...... 2-58
SPECIFICHE DI
MANUTENZIONE
....................... 2-61
SPECIFICHE GENERALI
.......... 2-76
DEFINIZIONE UNITÀ DI
MISURA
......................................... 2-76
SCHEMI DI
LUBRIFICAZIONE
..................... 2-98
SCHEMA PERCORSO
DEI CAVI
..................................... 2-102
CAPITOLO 3
CONTROLLI E
REGOLAZIONI
PERIODICHE
INTERVALLI DI
MANUTENZIONE
....................... 3-10
CONTROLLI E
MANUTENZIONE DA
COMPIERE PRIMA DELLA
MESSA IN FUNZIONE
............... 3-19
MOTORE
....................................... 3-23
PARTE CICLISTICA
.................. 3-78
IMPIANTO ELETTRICO
......... 3-122
ÍNDICE
CAPÍTULO 1
INFORMACIÓN
GENERAL
DESCRIPCIÓN
............................1-2
IDENTIFICACIÓN DE LA
MÁQUINA
....................................1-4
INFORMACIÓN
IMPORTANTE
.............................1-6
COMPROBACIÓN DE
LAS CONEXIONES
...................1-10
HERRAMIENTAS
ESPECIALES
............................1-23
FUNCIONES DE
LOS MANDOS
...........................1-28
VISOR MULTIFUNCIÓN
...........1-36
COMBUSTIBLE
.........................1-50
PUESTA EN MARCHA Y
RODAJE
....................................1-52
PUNTOS DE
COMPROBACIÓN DE
APRIETE
...................................1-63
LIMPIEZA Y
ALMACENAMIENTO
................1-66
CAPÍTULO 2
ESPECIFICACIONES
ESPECIFICACIONES
GENERALES
.............................2-77
ESPECIFICACIONES DE
MANTENIMIENTO
.....................2-80
ESPECIFICACIONES
GENERALES DE APRIETE
......2-95
DEFINICIÓN DE UNIDADES
....2-95
DIAGRAMAS DE ENGRASE
....2-98
DIAGRAMA DE
CABLEADO
.............................2-102
CAPÍTULO 3
REVISIONES Y
AJUSTES
PERIÓDICOS
INTERVALOS DE
MANTENIMIENTO
.....................3-13
REVISIÓN PREVIA Y
MANTENIMIENTO
.....................3-20
MOTOR
......................................3-24
CHASIS
.....................................3-78
SISTEMA ELÉCTRICO
...........3-122
La page est en cours de chargement...

KAPITEL 4
ABSTIMMUNG
MOTOR
....................................... 4-2
FAHRWERK
..............................4-22
KAPITEL 5
MOTOR
KÜHLER
...................................... 5-2
VERGASER
...............................5-10
SEKUNDÄRLUFTSYSTEM
......5-40
NOCKENWELLEN
....................5-46
ZYLINDERKOPF
.......................5-68
VENTILE UND
VENTILFEDERN
.......................5-76
ZYLINDER UND KOLBEN
........5-96
KUPPLUNG
.............................5-112
ÖLFILTER, WASSERPUMPE UND
KURBELGEHÄUSEDECKEL
RECHTS
..................................5-130
AUSGLEICHSWELLE
............. 5-146
ÖLPUMPE
...............................5-154
ÖLTANK
..................................5-158
KICKHEBELWELLE UND
SCHALTWELLE
......................5-168
LICHTMASCHINE UND
STARTERKUPPLUNG
............5-186
MOTOR DEMONTIEREN
........5-208
KURBELGEHÄUSE UND
KURBELWELLE
..................... 5-222
GETRIEBE, SCHALTWALZE
UND SCHALTGABELN
..........5-246
KAPITEL 6
FAHRWERK
VORDER- UND
HINTERRAD
................................6-2
VORDER- UND
HINTERRADBREMSEN
............6-24
TELESKOPGABEL
...................6-62
LENKER
....................................6-92
LENKUNG
...............................6-106
SCHWINGE
.............................6-122
FEDERBEIN
............................6-142
CAPITOLO 4
MESSA A PUNTO
MOTORE
......................................... 4-2
PARTE CICLISTICA
.................. 4-22
CAPITOLO 5
MOTORE
RADIATORE
.................................. 5-3
CARBURATORE
.......................... 5-11
SISTEMA DI INIEZIONE
ARIA
............................................... 5-41
ALBERI A CAMME
..................... 5-47
TESTATA
...................................... 5-69
VALVOLE E MOLLE
VALVOLE
..................................... 5-77
CILINDRO E PISTONE
.............. 5-97
FRIZIONE
................................... 5-113
ELEMENTO FILTRO OLIO,
POMPA DELL’ACQUA
E COPERCHIO CARTER
DESTRO
...................................... 5-131
EQUILIBRATORE
..................... 5-147
POMPA DELL’OLIO
................ 5-155
SERBATOIO DELL’OLIO
....... 5-159
ALBERO PEDALE E
ALBERO DEL CAMBIO
........... 5-169
MAGNETE AC E GIUNTO
STARTER
.................................... 5-187
RIMOZIONE DEL
MOTORE
..................................... 5-209
CARTER E ALBERO
MOTORE
..................................... 5-223
TRASMISSIONE, CAMMA
DEL CAMBIO E FORCELLA
DEL CAMBIO
............................. 5-247
CAPITOLO 6
PARTE CICLISTICA
RUOTA ANTERIORE
E POSTERIORE
............................. 6-3
FRENO ANTERIORE E
POSTERIORE
............................... 6-25
FORCELLA ANTERIORE
......... 6-63
MANUBRIO
.................................. 6-93
STERZO
....................................... 6-107
FORCELLONE
OSCILLANTE
............................. 6-123
AMMORTIZZATORE
POSTERIORE
............................. 6-143
CAPÍTULO 4
REGLAJE
MOTOR
........................................4-2
CHASIS
.....................................4-22
CAPÍTULO 5
MOTOR
RADIADOR
..................................5-4
CARBURADOR
.........................5-12
SISTEMA DE INDUCCIÓN
DE AIRE
....................................5-42
EJES DE LEVAS
.......................5-48
CULATA
....................................5-70
VÁLVULAS Y MUELLES
DE VÁLVULAS
..........................5-78
CILINDRO Y PISTÓN
................5-98
EMBRAGUE
............................5-114
ELEMENTO DEL FILTRO
DE ACEITE, BOMBA DE
AGUA Y TAPA DEL
CÁRTER DERECHA
...............5-132
COMPENSADOR
....................5-148
BOMBA DE ACEITE
...............5-156
DEPÓSITO DE ACEITE
..........5-160
EJE DEL PEDAL DE
ARRANQUE Y EJE DEL
CAMBIO
..................................5-170
MAGNETO CA Y
EMBRAGUE DE
ARRANQUE
............................5-188
DESMONTAJE DEL
MOTOR
....................................5-210
CÁRTER Y CIGÜEÑAL
...........5-224
CAJA DE CAMBIOS,
LEVA DE CAMBIO Y
HORQUILLA DE CAMBIO
......5-248
CAPÍTULO 6
CHASIS
RUEDA DELANTERA Y
RUEDA TRASERA
......................6-4
FRENO DELANTERO Y
FRENO TRASERO
....................6-26
HORQUILLA DELANTERA
......6-64
MANILLAR
................................6-94
DIRECCIÓN
.............................6-108
BASCULANTE
........................6-124
AMORTIGUADOR
TRASERO
...............................6-144
La page est en cours de chargement...

KAPITEL 7
ELEKTRISCHE
ANLAGE
ELEKTRISCHE BAUTEILE
UND SCHALTPLAN
....................7-2
ZÜNDSYSTEM
............................7-7
E-STARTER
..............................7-20
LADESYSTEM
..........................7-45
DROSSELKLAPPEN-
SENSOR
....................................7-53
BELEUCHTUNGSANLAGE
......7-69
SIGNALANLAGE
......................7-79
CAPITOLO 7
IMPIANTO
ELETTRICO
COMPONENTI ELETTRICI E
SCHEMA ELETTRICO
................ 7-2
IMPIANTO DI ACCENSIONE
..... 7-8
IMPIANTO DI AVVIAMENTO
ELETTRICO
................................. 7-20
IMPIANTO DI CARICA
.............. 7-46
SISTEMA SENSORE
POSIZIONE FARFALLA
............ 7-54
IMPIANTO DI
ILLUMINAZIONE
....................... 7-70
SISTEMA DI
SEGNALAZIONE
......................... 7-80
CAPÍTULO 7
SISTEMA ELÉCTRICO
COMPONENTES Y ESQUEMA
ELÉCTRICO
................................7-2
SISTEMA DE ENCENDIDO
........7-9
SISTEMA DE ARRANQUE
ELÉCTRICO
..............................7-20
SISTEMA DE CARGA
...............7-47
SISTEMA SENSOR DE
POSICIÓN DEL
ACELERADOR
..........................7-55
SISTEMA DE ILUMINACIÓN
....7-71
SISTEMA DE
SEÑALIZACIÓN
........................7-81

1 - 1
GEN
INFO
DESCRIPTION
EC100000
GENERAL INFORMATION
EC110000
DESCRIPTION
1
Clutch lever
2
Hot starter lever
3
Engine stop switch
4
Multi-function display
5
Main switch
6
Start switch
7
Front brake lever
8
Throttle grip
9
Radiator cap
0
Fuel tank cap
A
Taillight
B
Kickstarter crank
C
Fuel tank
D
Headlight
E
Radiator
F
Coolant drain bolt
G
Rear brake pedal
H
Valve joint
I
Fuel cock
J
Cold starter knob
K
Air cleaner
L
Catch tank
M
Drive chain
N
Oil level check window
O
Shift pedal
P
Front fork
NOTE:
• The machine you have purchased may differ slightly
from those shown in the following.
• Designs and specifications are subject to change with-
out notice.
RENSEIGNEMENTS GENERAUX
DESCRIPTION
1 Levier d’embrayage
2 Levier de démarrage à chaud
3 Coupe-circuit du moteur
4 Ecran multifonction
5 Contacteur à clé
6 Contacteur du démarreur
7 Levier de frein avant
8 Poignée des gaz
9 Bouchon du radiateur
0 Bouchon de réservoir de carburant
A Feu arrière
B Pédale de kick
C Réservoir de carburant
D Phare
E Radiateur
F Boulon de vidange du liquide de refroidissement
G Pédale de frein arrière
H Clapet de reniflard
I Robinet de carburant
J Commande de départ à froid
K Filtre à air
L Réservoir de récupération
M Chaîne de transmission
N Hublot de contrôle du niveau d’huile
O Sélecteur
P Fourche
N.B.:
• Votre moto diffère peut-être partiellement de celle montrée
sur ces photos.
• La conception et les caractéristiques peuvent être modifiées
sans préavis.
DESCRIPTION
La page est en cours de chargement...

1 - 3
GEN
INFO
MACHINE IDENTIFICATION
EC120001
MACHINE
IDENTIFICATION
There are two significant reasons for
knowing the serial number of your
machine:
1. When ordering parts, you can
give the number to your Yamaha
dealer for positive identification
of the model you own.
2. If your machine is stolen, the
authorities will need the number
to search for and identify your
machine.
EC121001
VEHICLE IDENTIFICATION
NUMBER
The vehicle identification number
1
is stamped on the right of the steer-
ing head pipe.
EC123001
ENGINE SERIAL NUMBER
The engine serial number
1
is
stamped into the elevated part of the
right-side of the engine.
1
EC124000
MODEL LABEL
The model label
1
is affixed to the
frame under the rider’s seat. This
information will be needed to order
spare parts.
IDENTIFICATION DE LA
MOTO
Il y a deux bonnes raisons de connaître le
numéro de série de sa moto:
1. A la commande de pièces de
rechange, ces numéros permettent
au concessionnaire Yamaha d’iden-
tifier clairement la moto.
2. En cas de vol de la moto, la police
réclamera ce numéro afin de facili-
ter son identification.
NUMERO D’IDENTIFICATION DE
LA MOTO
Le numéro d’identification de la moto 1
est estampé sur le côté droit du tube de
direction.
NUMERO DE SERIE DU MOTEUR
Le numéro de série du moteur 1 est
estampé sur un bossage situé sur le côté
droit du moteur.
ETIQUETTE DE MODELE
L’étiquette de modèle 1 est apposée sur
le cadre, sous la selle du pilote. Les
informations reprises sur cette étiquette
sont requises lors de la commande de
pièces de rechange.
IDENTIFICATION DE LA MOTO
La page est en cours de chargement...

1 - 5
GEN
INFO
IMPORTANT INFORMATION
EC130000
IMPORTANT
INFORMATION
EC131010
PREPARATION FOR REMOVAL
AND DISASSEMBLY
1. Remove all dirt, mud, dust, and
foreign material before removal
and disassembly.
When washing the machine with
high pressured water, cover the
parts follows.
• Silencer exhaust port
• Side cover air intake port
• Water pump housing hole at
the bottom
• Drain hole on the cylinder
head
(right side)
• All electrical components
2. Use proper tools and cleaning
equipment. Refer to “SPECIAL
TOOLS” section.
3. When disassembling the
machine, keep mated parts
together. They include gears,
cylinders, pistons, and other
mated parts that have been
“mated” through normal wear.
Mated parts must be reused as
an assembly or replaced.
4. During the machine disassem-
bly, clean all parts and place
them in trays in the order of dis-
assembly. This will speed up
assembly time and help assure
that all parts are correctly rein-
stalled.
5. Keep away from fire.
EC132000
ALL REPLACEMENT PARTS
1. We recommend to use Yamaha
genuine parts for all replace-
ments. Use oil and/or grease
recommended by Yamaha for
assembly and adjustment.
INFORMATIONS
IMPORTANTES
PREPARATION A LA DEPOSE ET
AU DEMONTAGE
1. Eliminer soigneusement saletés,
boue, poussière et corps étrangers
avant la dépose et le démontage.
Avant de laver la moto à l’eau sous
pression, recouvrir les parties sui-
vantes.
• Orifice d’échappement du silen-
cieux
• Prise d’admission d’air du cache
latéral
• Orifice situé dans le fond du car-
ter de la pompe à eau
• Orifice de vidange de la culasse
(côté droit)
• Tous les composants électriques
2. Utiliser les outils et le matériel de
nettoyage appropriés. Se reporter à
la section “OUTILS SPECIAUX”.
3. Lors du démontage de la moto, gar-
der ensemble les pièces appariées. Il
s’agit des engrenages, des cylindres,
pistons et autres pièces qui ont été
“façonnées l’une à l’autre” par
l’usure normale. Ces pièces doivent
être réutilisées ensemble ou rempla-
cées.
4. Lors du démontage de la moto, net-
toyer toutes les pièces et les dispo-
ser dans des plateaux dans l’ordre
du démontage. Ceci diminuera le
temps de remontage et permettra de
s’assurer que toutes les pièces ont
été correctement remontées.
5. Travailler à l’écart de toute flamme.
PIECES DE RECHANGE
1. Nous recommandons d’utiliser des
pièces Yamaha d’origine pour tous
les remplacements. Utiliser les
graisses et/ou huiles recommandées
par Yamaha lors des remontages et
réglages.
INFORMATIONS IMPORTANTES
La page est en cours de chargement...

1 - 7
GEN
INFO
IMPORTANT INFORMATION
EC133000
GASKETS, OIL SEALS AND O-
RINGS
1. All gaskets, oil seals, and O-
rings should be replaced when
an engine is overhauled. All gas-
ket surfaces, oil seal lips, and O-
rings must be cleaned.
2. Properly oil all mating parts and
bearings during reassembly.
Apply grease to the oil seal lips.
EC134000
LOCK WASHERS/PLATES AND
COTTER PINS
1. All lock washers/plates
1
and
cotter pins must be replaced
when they are removed. Lock
tab(s) should be bent along the
bolt or nut flat(s) after the bolt or
nut has been properly tightened.
EC135001
BEARINGS AND OIL SEALS
1. Install the bearing(s)
1
and oil
seal(s)
2
with their manufac-
turer’s marks or numbers facing
outward. (In other words, the
stamped letters must be on the
side exposed to view.) When
installing oil seal(s), apply a light
coating of lightweight lithium
base grease to the seal lip(s). Oil
the bearings liberally when
installing.
CAUTION:
Do not use compressed air to spin
the bearings dry. This causes
damage to the bearing surfaces.
EC136000
CIRCLIPS
1. All circlips should be inspected
carefully before reassembly.
Always replace piston pin clips
after one use. Replace distorted
circlips. When installing a circlip
1
, make sure that the sharp-
edged corner
2
is positioned
opposite to the thrust
3
it
receives. See the sectional view.
4
Shaft
JOINTS, BAGUES D’ETANCHEITE
ET JOINTS TORIQUES
1. Lors de la révision du moteur, tous
les joints, bagues d’étanchéité et
joints toriques doivent être rempla-
cés. Toutes les surfaces des joints,
toutes les lèvres de bagues d’étan-
chéité et tous les joints toriques doi-
vent être nettoyés.
2. Lors du remontage, huiler correcte-
ment toutes les pièces en contact et
tous les roulements. Graisser les
lèvres des bagues d’étanchéité.
RONDELLES-FREINS, FREINS
D’ECROU ET GOUPILLES
FENDUES
1. Les rondelles-freins, freins d’écrou
1 et goupilles fendues ne peuvent
jamais être réutilisés. Replier les
onglets de blocage contre la ou les
faces du boulon ou de l’écrou après
avoir correctement serré ces der-
niers.
ROULEMENTS ET BAGUES
D’ETANCHEITE
1. Monter les roulements 1 et les
bagues d’étanchéité 2 en orientant
vers l’extérieur leurs marques ou
numéros de fabricant. (En d’autres
mots, les lettres poinçonnées doi-
vent se trouver sur la face visible.)
Lors de la mise en place des bagues
d’étanchéité, appliquer une légère
couche de graisse fluide à base de
lithium sur leurs lèvres. Huiler
généreusement les roulements avant
de les mettre en place.
ATTENTION:
Ne pas sécher les roulements à l’air
comprimé. Cela endommagerait les
surfaces de roulement.
CIRCLIPS
1. Vérifier soigneusement tous les cir-
clips avant le remontage. Toujours
remplacer les circlips d’axe de pis-
ton après chaque utilisation. Rem-
placer tout circlip déformé. Lors du
montage d’un circlip 1, veiller à ce
que le côté non chanfreiné 2 soit
positionné du côté opposé à la pous-
sée 3 qu’il reçoit. Voir la vue en
coupe.
4
Arbre
INFORMATIONS IMPORTANTES
La page est en cours de chargement...

1 - 9
GEN
INFO
CHECKING OF CONNECTION
EC1C0001
CHECKING OF
CONNECTION
Dealing with stains, rust, moisture,
etc. on the connector.
1. Disconnect:
• Connector
2. Dry each terminal with an air
blower.
3. Connect and disconnect the con-
nector two or three times.
4. Pull the lead to check that it will
not come off.
5. If the terminal comes off, bend
up the pin
1
and reinsert the ter-
minal into the connector.
6. Connect:
• Connector
NOTE:
The two connectors “click” together.
7. Check for continuity with a
tester.
NOTE:
• If there in no continuity, clean the
terminals.
• Be sure to perform the steps 1 to 7
listed above when checking the
wire harness.
• For a field remedy, use a contact
revitalizer available on the market.
• Use the tester on the connector as
shown.
VERIFICATION DES
CONNEXIONS
Traitement des taches, de la rouille, de
l’humidité, etc., sur le connecteur.
1. Déconnecter:
• Connecteur
2. Sécher chaque borne à l’air com-
primé.
3. Connecter et déconnecter le connec-
teur deux ou trois fois.
4. Tirer sur le fil pour vérifier s’il ne se
détache pas.
5. Si la borne se détache, redresser la
lame 1 de la broche et insérer à
nouveau la borne dans le connec-
teur.
6. Connecter:
• Connecteur
N.B.:
Les deux connecteurs s’encliquètent.
7. Vérifier la continuité à l’aide d’un
multimètre.
N.B.:
• S’il n’y a pas de continuité, nettoyer
les bornes.
• Ne pas oublier d’effectuer les étapes 1
à 7 ci-dessus lors du contrôle du fais-
ceau de fils.
• En cas de dépannage sur place, utiliser
un produit de contact disponible dans
le commerce.
• Tester le connecteur comme illustré.
VERIFICATION DES CONNEXIONS
La page est en cours de chargement...

1 - 11
GEN
INFO
SPECIAL TOOLS
SPECIAL TOOLS
The proper special tools are necessary for complete and accurate tune-up and assembly. Using the correct special tool
will help prevent damage caused by the use of improper tools or improvised techniques. The shape and part number used
for the special tool differ by country, so two types are provided. Refer to the list provided to avoid errors when placing an
order.
NOTE:
• For U.S.A. and Canada, use part number starting with “YM-”, “YU-” or “ACC-”.
• For others, use part number starting with “90890-”.
Part number Tool name/How to use Illustration
YU-1135-A, 90890-01135 Crankcase separating tool
These tool is used to remove the crankshaft from
either case.
YU-3097, 90890-01252
YU-1256
Dial gauge and stand
Stand
These tools are used to check each part for runout or
bent.
YU-90050, 90890-01274
YU-90050, 90890-01275
YM-91044, 90890-04081
YU-90063, 90890-01278
Crankshaft installing tool
Crankshaft installing pot
Crankshaft installing bolt
Spacer (crankshaft installer)
Adapter (M12)
These tools are used to install the crankshaft.
YU-1304, 90890-01304 Piston pin puller set
This tool is used to remove the piston pin.
YU-24460-01, 90890-01325
YU-33984, 90890-01352
Radiator cap tester
Radiator cap tester adapter
These tools are used for checking the cooling
system.
YU-33975, 90890-01403 Steering nut wrench
This tool is used when tighten the steering ring nut to
specification.
YM-01494, 90890-01494 Damper rod holder
Use this tool to remove and install the damper rod.
YM-A0948, 90890-01502 Fork seal driver
This tool is used when install the fork oil seal.
90890-01135
90890-01304
90890-01325
90890-01352
YM-01494
90890-01494
YM-A0948
90890-01502
La page est en cours de chargement...
La page est en cours de chargement...
La page est en cours de chargement...
La page est en cours de chargement...
La page est en cours de chargement...
La page est en cours de chargement...
La page est en cours de chargement...
La page est en cours de chargement...
La page est en cours de chargement...
La page est en cours de chargement...
La page est en cours de chargement...
La page est en cours de chargement...
La page est en cours de chargement...
La page est en cours de chargement...
La page est en cours de chargement...
La page est en cours de chargement...
La page est en cours de chargement...
La page est en cours de chargement...
La page est en cours de chargement...
La page est en cours de chargement...
La page est en cours de chargement...
La page est en cours de chargement...
La page est en cours de chargement...
La page est en cours de chargement...
La page est en cours de chargement...
La page est en cours de chargement...
La page est en cours de chargement...
La page est en cours de chargement...
La page est en cours de chargement...
La page est en cours de chargement...
La page est en cours de chargement...
La page est en cours de chargement...
La page est en cours de chargement...
La page est en cours de chargement...
La page est en cours de chargement...
La page est en cours de chargement...
La page est en cours de chargement...
La page est en cours de chargement...
La page est en cours de chargement...
La page est en cours de chargement...
La page est en cours de chargement...
La page est en cours de chargement...
La page est en cours de chargement...
La page est en cours de chargement...
La page est en cours de chargement...
La page est en cours de chargement...
La page est en cours de chargement...
La page est en cours de chargement...
La page est en cours de chargement...
La page est en cours de chargement...
La page est en cours de chargement...
La page est en cours de chargement...
La page est en cours de chargement...
La page est en cours de chargement...
La page est en cours de chargement...
La page est en cours de chargement...
La page est en cours de chargement...
La page est en cours de chargement...
La page est en cours de chargement...
La page est en cours de chargement...
La page est en cours de chargement...
La page est en cours de chargement...
La page est en cours de chargement...
La page est en cours de chargement...
La page est en cours de chargement...
La page est en cours de chargement...
La page est en cours de chargement...
La page est en cours de chargement...
La page est en cours de chargement...
La page est en cours de chargement...
La page est en cours de chargement...
La page est en cours de chargement...
La page est en cours de chargement...
La page est en cours de chargement...
La page est en cours de chargement...
La page est en cours de chargement...
La page est en cours de chargement...
La page est en cours de chargement...
La page est en cours de chargement...
La page est en cours de chargement...
La page est en cours de chargement...
La page est en cours de chargement...
La page est en cours de chargement...
La page est en cours de chargement...
La page est en cours de chargement...
La page est en cours de chargement...
La page est en cours de chargement...
La page est en cours de chargement...
La page est en cours de chargement...
La page est en cours de chargement...
La page est en cours de chargement...
La page est en cours de chargement...
La page est en cours de chargement...
La page est en cours de chargement...
La page est en cours de chargement...
La page est en cours de chargement...
La page est en cours de chargement...
La page est en cours de chargement...
La page est en cours de chargement...
La page est en cours de chargement...
La page est en cours de chargement...
La page est en cours de chargement...
La page est en cours de chargement...
La page est en cours de chargement...
La page est en cours de chargement...
La page est en cours de chargement...
La page est en cours de chargement...
La page est en cours de chargement...
La page est en cours de chargement...
La page est en cours de chargement...
La page est en cours de chargement...
La page est en cours de chargement...
La page est en cours de chargement...
La page est en cours de chargement...
La page est en cours de chargement...
La page est en cours de chargement...
La page est en cours de chargement...
La page est en cours de chargement...
La page est en cours de chargement...
La page est en cours de chargement...
La page est en cours de chargement...
La page est en cours de chargement...
La page est en cours de chargement...
La page est en cours de chargement...
La page est en cours de chargement...
La page est en cours de chargement...
La page est en cours de chargement...
La page est en cours de chargement...
La page est en cours de chargement...
La page est en cours de chargement...
La page est en cours de chargement...
La page est en cours de chargement...
La page est en cours de chargement...
La page est en cours de chargement...
La page est en cours de chargement...
La page est en cours de chargement...
La page est en cours de chargement...
La page est en cours de chargement...
La page est en cours de chargement...
La page est en cours de chargement...
La page est en cours de chargement...
La page est en cours de chargement...
La page est en cours de chargement...
La page est en cours de chargement...
La page est en cours de chargement...
La page est en cours de chargement...
La page est en cours de chargement...
La page est en cours de chargement...
La page est en cours de chargement...
La page est en cours de chargement...
La page est en cours de chargement...
La page est en cours de chargement...
La page est en cours de chargement...
La page est en cours de chargement...
La page est en cours de chargement...
La page est en cours de chargement...
La page est en cours de chargement...
La page est en cours de chargement...
La page est en cours de chargement...
La page est en cours de chargement...
La page est en cours de chargement...
La page est en cours de chargement...
La page est en cours de chargement...
La page est en cours de chargement...
La page est en cours de chargement...
La page est en cours de chargement...
La page est en cours de chargement...
La page est en cours de chargement...
La page est en cours de chargement...
La page est en cours de chargement...
La page est en cours de chargement...
La page est en cours de chargement...
La page est en cours de chargement...
La page est en cours de chargement...
La page est en cours de chargement...
La page est en cours de chargement...
La page est en cours de chargement...
La page est en cours de chargement...
La page est en cours de chargement...
La page est en cours de chargement...
La page est en cours de chargement...
La page est en cours de chargement...
La page est en cours de chargement...
La page est en cours de chargement...
La page est en cours de chargement...
La page est en cours de chargement...
La page est en cours de chargement...
La page est en cours de chargement...
La page est en cours de chargement...
La page est en cours de chargement...
La page est en cours de chargement...
La page est en cours de chargement...
La page est en cours de chargement...
La page est en cours de chargement...
La page est en cours de chargement...
La page est en cours de chargement...
La page est en cours de chargement...
La page est en cours de chargement...
La page est en cours de chargement...
La page est en cours de chargement...
La page est en cours de chargement...
La page est en cours de chargement...
La page est en cours de chargement...
La page est en cours de chargement...
La page est en cours de chargement...
La page est en cours de chargement...
La page est en cours de chargement...
La page est en cours de chargement...
La page est en cours de chargement...
La page est en cours de chargement...
La page est en cours de chargement...
La page est en cours de chargement...
La page est en cours de chargement...
La page est en cours de chargement...
La page est en cours de chargement...
La page est en cours de chargement...
La page est en cours de chargement...
La page est en cours de chargement...
La page est en cours de chargement...
La page est en cours de chargement...
La page est en cours de chargement...
La page est en cours de chargement...
La page est en cours de chargement...
La page est en cours de chargement...
La page est en cours de chargement...
La page est en cours de chargement...
La page est en cours de chargement...
La page est en cours de chargement...
La page est en cours de chargement...
La page est en cours de chargement...
La page est en cours de chargement...
La page est en cours de chargement...
La page est en cours de chargement...
La page est en cours de chargement...
La page est en cours de chargement...
La page est en cours de chargement...
La page est en cours de chargement...
La page est en cours de chargement...
La page est en cours de chargement...
La page est en cours de chargement...
La page est en cours de chargement...
La page est en cours de chargement...
La page est en cours de chargement...
La page est en cours de chargement...
La page est en cours de chargement...
La page est en cours de chargement...
La page est en cours de chargement...
La page est en cours de chargement...
La page est en cours de chargement...
La page est en cours de chargement...
La page est en cours de chargement...
La page est en cours de chargement...
La page est en cours de chargement...
La page est en cours de chargement...
La page est en cours de chargement...
La page est en cours de chargement...
La page est en cours de chargement...
La page est en cours de chargement...
La page est en cours de chargement...
La page est en cours de chargement...
La page est en cours de chargement...
La page est en cours de chargement...
La page est en cours de chargement...
La page est en cours de chargement...
La page est en cours de chargement...
La page est en cours de chargement...
La page est en cours de chargement...
La page est en cours de chargement...
La page est en cours de chargement...
La page est en cours de chargement...
La page est en cours de chargement...
La page est en cours de chargement...
La page est en cours de chargement...
La page est en cours de chargement...
La page est en cours de chargement...
La page est en cours de chargement...
La page est en cours de chargement...
La page est en cours de chargement...
La page est en cours de chargement...
La page est en cours de chargement...
La page est en cours de chargement...
La page est en cours de chargement...
La page est en cours de chargement...
La page est en cours de chargement...
La page est en cours de chargement...
La page est en cours de chargement...
La page est en cours de chargement...
La page est en cours de chargement...
La page est en cours de chargement...
La page est en cours de chargement...
La page est en cours de chargement...
La page est en cours de chargement...
La page est en cours de chargement...
La page est en cours de chargement...
La page est en cours de chargement...
La page est en cours de chargement...
La page est en cours de chargement...
La page est en cours de chargement...
La page est en cours de chargement...
La page est en cours de chargement...
La page est en cours de chargement...
La page est en cours de chargement...
La page est en cours de chargement...
La page est en cours de chargement...
La page est en cours de chargement...
La page est en cours de chargement...
La page est en cours de chargement...
La page est en cours de chargement...
La page est en cours de chargement...
La page est en cours de chargement...
La page est en cours de chargement...
La page est en cours de chargement...
La page est en cours de chargement...
La page est en cours de chargement...
La page est en cours de chargement...
La page est en cours de chargement...
La page est en cours de chargement...
La page est en cours de chargement...
La page est en cours de chargement...
La page est en cours de chargement...
La page est en cours de chargement...
La page est en cours de chargement...
La page est en cours de chargement...
La page est en cours de chargement...
La page est en cours de chargement...
La page est en cours de chargement...
La page est en cours de chargement...
La page est en cours de chargement...
La page est en cours de chargement...
La page est en cours de chargement...
La page est en cours de chargement...
La page est en cours de chargement...
La page est en cours de chargement...
La page est en cours de chargement...
La page est en cours de chargement...
La page est en cours de chargement...
La page est en cours de chargement...
La page est en cours de chargement...
La page est en cours de chargement...
La page est en cours de chargement...
La page est en cours de chargement...
La page est en cours de chargement...
La page est en cours de chargement...
La page est en cours de chargement...
La page est en cours de chargement...
La page est en cours de chargement...
La page est en cours de chargement...
La page est en cours de chargement...
La page est en cours de chargement...
La page est en cours de chargement...
La page est en cours de chargement...
La page est en cours de chargement...
La page est en cours de chargement...
La page est en cours de chargement...
La page est en cours de chargement...
La page est en cours de chargement...
La page est en cours de chargement...
La page est en cours de chargement...
La page est en cours de chargement...
La page est en cours de chargement...
La page est en cours de chargement...
La page est en cours de chargement...
La page est en cours de chargement...
La page est en cours de chargement...
La page est en cours de chargement...
La page est en cours de chargement...
La page est en cours de chargement...
La page est en cours de chargement...
La page est en cours de chargement...
La page est en cours de chargement...
La page est en cours de chargement...
La page est en cours de chargement...
La page est en cours de chargement...
La page est en cours de chargement...
La page est en cours de chargement...
La page est en cours de chargement...
La page est en cours de chargement...
La page est en cours de chargement...
La page est en cours de chargement...
La page est en cours de chargement...
La page est en cours de chargement...
La page est en cours de chargement...
La page est en cours de chargement...
La page est en cours de chargement...
La page est en cours de chargement...
La page est en cours de chargement...
La page est en cours de chargement...
La page est en cours de chargement...
La page est en cours de chargement...
La page est en cours de chargement...
La page est en cours de chargement...
La page est en cours de chargement...
La page est en cours de chargement...
La page est en cours de chargement...
La page est en cours de chargement...
La page est en cours de chargement...
La page est en cours de chargement...
La page est en cours de chargement...
La page est en cours de chargement...
La page est en cours de chargement...
La page est en cours de chargement...
La page est en cours de chargement...
La page est en cours de chargement...
La page est en cours de chargement...
La page est en cours de chargement...
La page est en cours de chargement...
La page est en cours de chargement...
La page est en cours de chargement...
La page est en cours de chargement...
La page est en cours de chargement...
La page est en cours de chargement...
La page est en cours de chargement...
La page est en cours de chargement...
La page est en cours de chargement...
La page est en cours de chargement...
La page est en cours de chargement...
La page est en cours de chargement...
La page est en cours de chargement...
La page est en cours de chargement...
La page est en cours de chargement...
La page est en cours de chargement...
La page est en cours de chargement...
La page est en cours de chargement...
La page est en cours de chargement...
La page est en cours de chargement...
La page est en cours de chargement...
La page est en cours de chargement...
La page est en cours de chargement...
La page est en cours de chargement...
La page est en cours de chargement...
La page est en cours de chargement...
La page est en cours de chargement...
La page est en cours de chargement...
La page est en cours de chargement...
La page est en cours de chargement...
La page est en cours de chargement...
La page est en cours de chargement...
La page est en cours de chargement...
La page est en cours de chargement...
La page est en cours de chargement...
La page est en cours de chargement...
La page est en cours de chargement...
La page est en cours de chargement...
La page est en cours de chargement...
La page est en cours de chargement...
La page est en cours de chargement...
La page est en cours de chargement...
La page est en cours de chargement...
La page est en cours de chargement...
La page est en cours de chargement...
La page est en cours de chargement...
La page est en cours de chargement...
La page est en cours de chargement...
La page est en cours de chargement...
La page est en cours de chargement...
La page est en cours de chargement...
La page est en cours de chargement...
La page est en cours de chargement...
La page est en cours de chargement...
La page est en cours de chargement...
La page est en cours de chargement...
La page est en cours de chargement...
La page est en cours de chargement...
La page est en cours de chargement...
La page est en cours de chargement...
La page est en cours de chargement...
La page est en cours de chargement...
La page est en cours de chargement...
La page est en cours de chargement...
La page est en cours de chargement...
La page est en cours de chargement...
La page est en cours de chargement...
La page est en cours de chargement...
La page est en cours de chargement...
La page est en cours de chargement...
La page est en cours de chargement...
La page est en cours de chargement...
La page est en cours de chargement...
La page est en cours de chargement...
La page est en cours de chargement...
La page est en cours de chargement...
La page est en cours de chargement...
La page est en cours de chargement...
La page est en cours de chargement...
La page est en cours de chargement...
La page est en cours de chargement...
La page est en cours de chargement...
La page est en cours de chargement...
La page est en cours de chargement...
La page est en cours de chargement...
La page est en cours de chargement...
La page est en cours de chargement...
La page est en cours de chargement...
La page est en cours de chargement...
La page est en cours de chargement...
La page est en cours de chargement...
La page est en cours de chargement...
La page est en cours de chargement...
La page est en cours de chargement...
La page est en cours de chargement...
La page est en cours de chargement...
La page est en cours de chargement...
La page est en cours de chargement...
La page est en cours de chargement...
La page est en cours de chargement...
La page est en cours de chargement...
La page est en cours de chargement...
La page est en cours de chargement...
La page est en cours de chargement...
La page est en cours de chargement...
La page est en cours de chargement...
La page est en cours de chargement...
La page est en cours de chargement...
La page est en cours de chargement...
La page est en cours de chargement...
La page est en cours de chargement...
La page est en cours de chargement...
La page est en cours de chargement...
La page est en cours de chargement...
La page est en cours de chargement...
La page est en cours de chargement...
La page est en cours de chargement...
La page est en cours de chargement...
La page est en cours de chargement...
La page est en cours de chargement...
La page est en cours de chargement...
La page est en cours de chargement...
La page est en cours de chargement...
La page est en cours de chargement...
La page est en cours de chargement...
La page est en cours de chargement...
La page est en cours de chargement...
La page est en cours de chargement...
La page est en cours de chargement...
La page est en cours de chargement...
La page est en cours de chargement...
La page est en cours de chargement...
La page est en cours de chargement...
La page est en cours de chargement...
La page est en cours de chargement...
La page est en cours de chargement...
La page est en cours de chargement...
La page est en cours de chargement...
La page est en cours de chargement...
La page est en cours de chargement...
La page est en cours de chargement...
La page est en cours de chargement...
La page est en cours de chargement...
La page est en cours de chargement...
La page est en cours de chargement...
La page est en cours de chargement...
La page est en cours de chargement...
La page est en cours de chargement...
La page est en cours de chargement...
La page est en cours de chargement...
La page est en cours de chargement...
La page est en cours de chargement...
La page est en cours de chargement...
La page est en cours de chargement...
La page est en cours de chargement...
La page est en cours de chargement...
La page est en cours de chargement...
La page est en cours de chargement...
La page est en cours de chargement...
La page est en cours de chargement...
La page est en cours de chargement...
La page est en cours de chargement...
La page est en cours de chargement...
La page est en cours de chargement...
La page est en cours de chargement...
La page est en cours de chargement...
La page est en cours de chargement...
La page est en cours de chargement...
La page est en cours de chargement...
La page est en cours de chargement...
La page est en cours de chargement...
La page est en cours de chargement...
La page est en cours de chargement...
La page est en cours de chargement...
La page est en cours de chargement...
La page est en cours de chargement...
La page est en cours de chargement...
La page est en cours de chargement...
La page est en cours de chargement...
La page est en cours de chargement...
La page est en cours de chargement...
La page est en cours de chargement...
La page est en cours de chargement...
La page est en cours de chargement...
La page est en cours de chargement...
La page est en cours de chargement...
La page est en cours de chargement...
La page est en cours de chargement...
La page est en cours de chargement...
La page est en cours de chargement...
La page est en cours de chargement...
La page est en cours de chargement...
La page est en cours de chargement...
La page est en cours de chargement...
La page est en cours de chargement...
La page est en cours de chargement...
La page est en cours de chargement...
La page est en cours de chargement...
La page est en cours de chargement...
La page est en cours de chargement...
La page est en cours de chargement...
La page est en cours de chargement...
La page est en cours de chargement...
La page est en cours de chargement...
La page est en cours de chargement...
La page est en cours de chargement...
La page est en cours de chargement...
La page est en cours de chargement...
La page est en cours de chargement...
La page est en cours de chargement...
La page est en cours de chargement...
La page est en cours de chargement...
La page est en cours de chargement...
La page est en cours de chargement...
La page est en cours de chargement...
La page est en cours de chargement...
La page est en cours de chargement...
La page est en cours de chargement...
La page est en cours de chargement...
La page est en cours de chargement...
La page est en cours de chargement...
La page est en cours de chargement...
La page est en cours de chargement...
La page est en cours de chargement...
La page est en cours de chargement...
La page est en cours de chargement...
La page est en cours de chargement...
La page est en cours de chargement...
La page est en cours de chargement...
La page est en cours de chargement...
La page est en cours de chargement...
La page est en cours de chargement...
La page est en cours de chargement...
La page est en cours de chargement...
La page est en cours de chargement...
La page est en cours de chargement...
La page est en cours de chargement...
La page est en cours de chargement...
La page est en cours de chargement...
La page est en cours de chargement...
La page est en cours de chargement...
La page est en cours de chargement...
La page est en cours de chargement...
La page est en cours de chargement...
La page est en cours de chargement...
La page est en cours de chargement...
La page est en cours de chargement...
La page est en cours de chargement...
La page est en cours de chargement...
La page est en cours de chargement...
La page est en cours de chargement...
La page est en cours de chargement...
La page est en cours de chargement...
La page est en cours de chargement...
La page est en cours de chargement...
La page est en cours de chargement...
La page est en cours de chargement...
La page est en cours de chargement...
La page est en cours de chargement...
La page est en cours de chargement...
La page est en cours de chargement...
La page est en cours de chargement...
La page est en cours de chargement...
La page est en cours de chargement...
La page est en cours de chargement...
La page est en cours de chargement...
La page est en cours de chargement...
La page est en cours de chargement...
La page est en cours de chargement...
La page est en cours de chargement...
La page est en cours de chargement...
La page est en cours de chargement...
La page est en cours de chargement...
La page est en cours de chargement...
La page est en cours de chargement...
La page est en cours de chargement...
La page est en cours de chargement...
La page est en cours de chargement...
La page est en cours de chargement...
La page est en cours de chargement...
La page est en cours de chargement...
La page est en cours de chargement...
La page est en cours de chargement...
La page est en cours de chargement...
La page est en cours de chargement...
La page est en cours de chargement...
La page est en cours de chargement...
La page est en cours de chargement...
La page est en cours de chargement...
La page est en cours de chargement...
La page est en cours de chargement...
La page est en cours de chargement...
La page est en cours de chargement...
La page est en cours de chargement...
La page est en cours de chargement...
La page est en cours de chargement...
La page est en cours de chargement...
La page est en cours de chargement...
La page est en cours de chargement...
La page est en cours de chargement...
La page est en cours de chargement...
La page est en cours de chargement...
La page est en cours de chargement...
La page est en cours de chargement...
La page est en cours de chargement...
La page est en cours de chargement...
La page est en cours de chargement...
La page est en cours de chargement...
La page est en cours de chargement...
La page est en cours de chargement...
La page est en cours de chargement...
La page est en cours de chargement...
La page est en cours de chargement...
La page est en cours de chargement...
La page est en cours de chargement...
La page est en cours de chargement...
La page est en cours de chargement...
La page est en cours de chargement...
La page est en cours de chargement...
La page est en cours de chargement...
La page est en cours de chargement...
La page est en cours de chargement...
La page est en cours de chargement...
La page est en cours de chargement...
La page est en cours de chargement...
La page est en cours de chargement...
La page est en cours de chargement...
La page est en cours de chargement...
La page est en cours de chargement...
La page est en cours de chargement...
La page est en cours de chargement...
La page est en cours de chargement...
La page est en cours de chargement...
La page est en cours de chargement...
La page est en cours de chargement...
La page est en cours de chargement...
La page est en cours de chargement...
La page est en cours de chargement...
La page est en cours de chargement...
La page est en cours de chargement...
La page est en cours de chargement...
La page est en cours de chargement...
La page est en cours de chargement...
La page est en cours de chargement...
La page est en cours de chargement...
La page est en cours de chargement...
La page est en cours de chargement...
La page est en cours de chargement...
La page est en cours de chargement...
La page est en cours de chargement...
La page est en cours de chargement...
La page est en cours de chargement...
La page est en cours de chargement...
La page est en cours de chargement...
La page est en cours de chargement...
La page est en cours de chargement...
La page est en cours de chargement...
La page est en cours de chargement...
La page est en cours de chargement...
La page est en cours de chargement...
La page est en cours de chargement...
La page est en cours de chargement...
La page est en cours de chargement...
La page est en cours de chargement...
La page est en cours de chargement...
La page est en cours de chargement...
La page est en cours de chargement...
La page est en cours de chargement...
La page est en cours de chargement...
La page est en cours de chargement...
La page est en cours de chargement...
La page est en cours de chargement...
La page est en cours de chargement...
La page est en cours de chargement...
La page est en cours de chargement...
La page est en cours de chargement...
La page est en cours de chargement...
La page est en cours de chargement...
La page est en cours de chargement...
La page est en cours de chargement...
La page est en cours de chargement...
La page est en cours de chargement...
La page est en cours de chargement...
La page est en cours de chargement...
La page est en cours de chargement...
La page est en cours de chargement...
La page est en cours de chargement...
La page est en cours de chargement...
La page est en cours de chargement...
La page est en cours de chargement...
La page est en cours de chargement...
La page est en cours de chargement...
La page est en cours de chargement...
La page est en cours de chargement...
La page est en cours de chargement...
La page est en cours de chargement...
La page est en cours de chargement...
La page est en cours de chargement...
La page est en cours de chargement...
La page est en cours de chargement...
La page est en cours de chargement...
La page est en cours de chargement...
La page est en cours de chargement...
La page est en cours de chargement...
La page est en cours de chargement...
La page est en cours de chargement...
La page est en cours de chargement...
La page est en cours de chargement...
La page est en cours de chargement...
La page est en cours de chargement...
La page est en cours de chargement...
La page est en cours de chargement...
La page est en cours de chargement...
La page est en cours de chargement...
La page est en cours de chargement...
La page est en cours de chargement...
La page est en cours de chargement...
La page est en cours de chargement...
La page est en cours de chargement...
La page est en cours de chargement...
La page est en cours de chargement...
La page est en cours de chargement...
La page est en cours de chargement...
La page est en cours de chargement...
La page est en cours de chargement...
La page est en cours de chargement...
La page est en cours de chargement...
La page est en cours de chargement...
La page est en cours de chargement...
La page est en cours de chargement...
La page est en cours de chargement...
La page est en cours de chargement...
La page est en cours de chargement...
La page est en cours de chargement...
La page est en cours de chargement...
La page est en cours de chargement...
La page est en cours de chargement...
La page est en cours de chargement...
La page est en cours de chargement...
La page est en cours de chargement...
La page est en cours de chargement...
La page est en cours de chargement...
La page est en cours de chargement...
La page est en cours de chargement...
La page est en cours de chargement...
La page est en cours de chargement...
La page est en cours de chargement...
La page est en cours de chargement...
La page est en cours de chargement...
La page est en cours de chargement...
La page est en cours de chargement...
La page est en cours de chargement...
La page est en cours de chargement...
La page est en cours de chargement...
La page est en cours de chargement...
La page est en cours de chargement...
La page est en cours de chargement...
La page est en cours de chargement...
La page est en cours de chargement...
La page est en cours de chargement...
La page est en cours de chargement...
La page est en cours de chargement...
La page est en cours de chargement...
La page est en cours de chargement...
La page est en cours de chargement...
La page est en cours de chargement...
La page est en cours de chargement...
La page est en cours de chargement...
La page est en cours de chargement...
La page est en cours de chargement...
La page est en cours de chargement...
-
 1
1
-
 2
2
-
 3
3
-
 4
4
-
 5
5
-
 6
6
-
 7
7
-
 8
8
-
 9
9
-
 10
10
-
 11
11
-
 12
12
-
 13
13
-
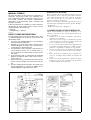 14
14
-
 15
15
-
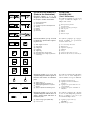 16
16
-
 17
17
-
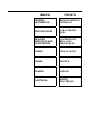 18
18
-
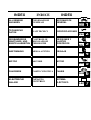 19
19
-
 20
20
-
 21
21
-
 22
22
-
 23
23
-
 24
24
-
 25
25
-
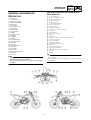 26
26
-
 27
27
-
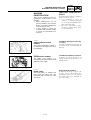 28
28
-
 29
29
-
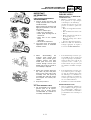 30
30
-
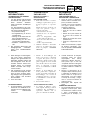 31
31
-
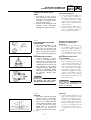 32
32
-
 33
33
-
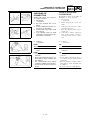 34
34
-
 35
35
-
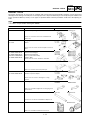 36
36
-
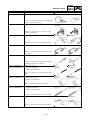 37
37
-
 38
38
-
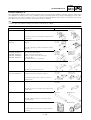 39
39
-
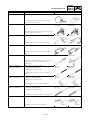 40
40
-
 41
41
-
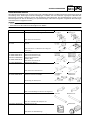 42
42
-
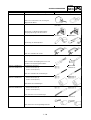 43
43
-
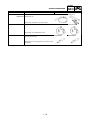 44
44
-
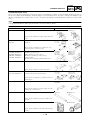 45
45
-
 46
46
-
 47
47
-
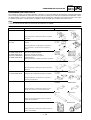 48
48
-
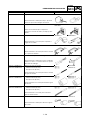 49
49
-
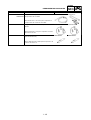 50
50
-
 51
51
-
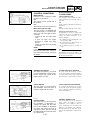 52
52
-
 53
53
-
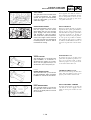 54
54
-
 55
55
-
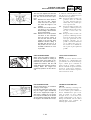 56
56
-
 57
57
-
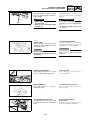 58
58
-
 59
59
-
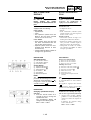 60
60
-
 61
61
-
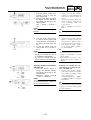 62
62
-
 63
63
-
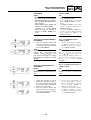 64
64
-
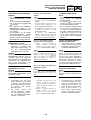 65
65
-
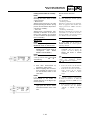 66
66
-
 67
67
-
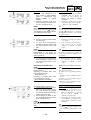 68
68
-
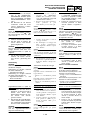 69
69
-
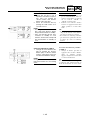 70
70
-
 71
71
-
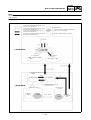 72
72
-
 73
73
-
 74
74
-
 75
75
-
 76
76
-
 77
77
-
 78
78
-
 79
79
-
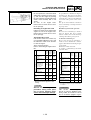 80
80
-
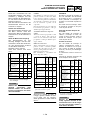 81
81
-
 82
82
-
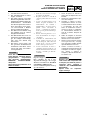 83
83
-
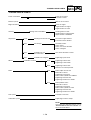 84
84
-
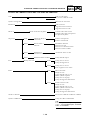 85
85
-
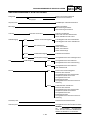 86
86
-
 87
87
-
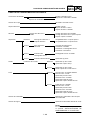 88
88
-
 89
89
-
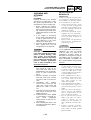 90
90
-
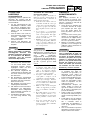 91
91
-
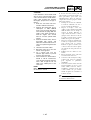 92
92
-
 93
93
-
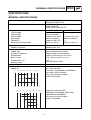 94
94
-
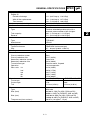 95
95
-
 96
96
-
 97
97
-
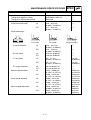 98
98
-
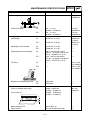 99
99
-
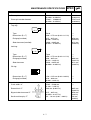 100
100
-
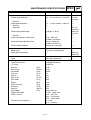 101
101
-
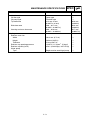 102
102
-
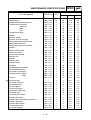 103
103
-
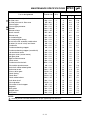 104
104
-
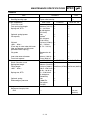 105
105
-
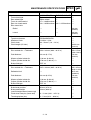 106
106
-
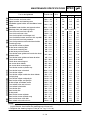 107
107
-
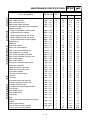 108
108
-
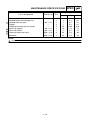 109
109
-
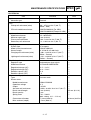 110
110
-
 111
111
-
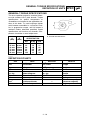 112
112
-
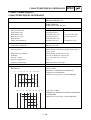 113
113
-
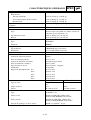 114
114
-
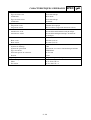 115
115
-
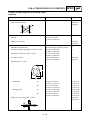 116
116
-
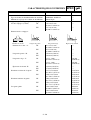 117
117
-
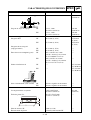 118
118
-
 119
119
-
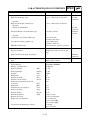 120
120
-
 121
121
-
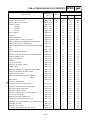 122
122
-
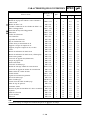 123
123
-
 124
124
-
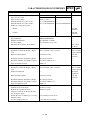 125
125
-
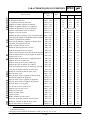 126
126
-
 127
127
-
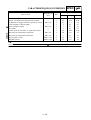 128
128
-
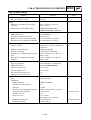 129
129
-
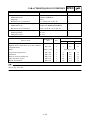 130
130
-
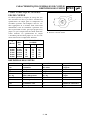 131
131
-
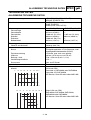 132
132
-
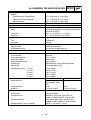 133
133
-
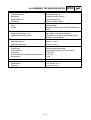 134
134
-
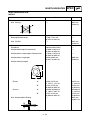 135
135
-
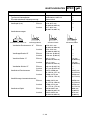 136
136
-
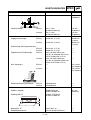 137
137
-
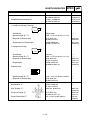 138
138
-
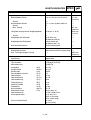 139
139
-
 140
140
-
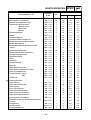 141
141
-
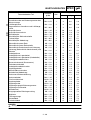 142
142
-
 143
143
-
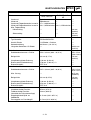 144
144
-
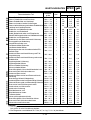 145
145
-
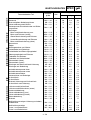 146
146
-
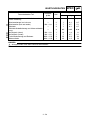 147
147
-
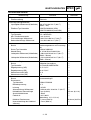 148
148
-
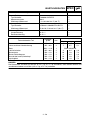 149
149
-
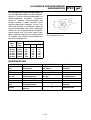 150
150
-
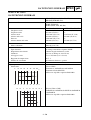 151
151
-
 152
152
-
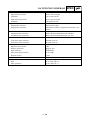 153
153
-
 154
154
-
 155
155
-
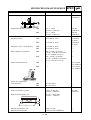 156
156
-
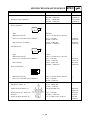 157
157
-
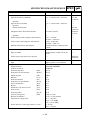 158
158
-
 159
159
-
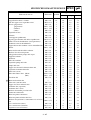 160
160
-
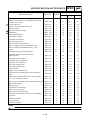 161
161
-
 162
162
-
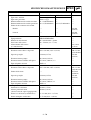 163
163
-
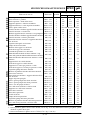 164
164
-
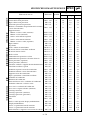 165
165
-
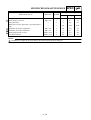 166
166
-
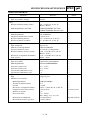 167
167
-
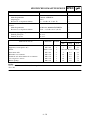 168
168
-
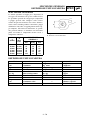 169
169
-
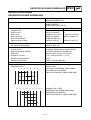 170
170
-
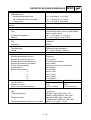 171
171
-
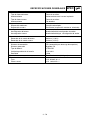 172
172
-
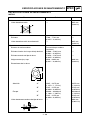 173
173
-
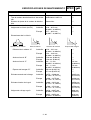 174
174
-
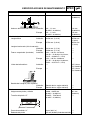 175
175
-
 176
176
-
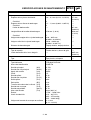 177
177
-
 178
178
-
 179
179
-
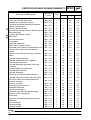 180
180
-
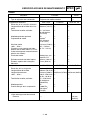 181
181
-
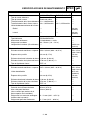 182
182
-
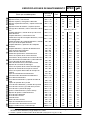 183
183
-
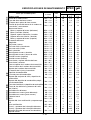 184
184
-
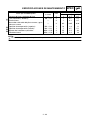 185
185
-
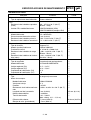 186
186
-
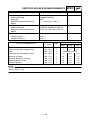 187
187
-
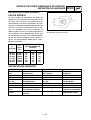 188
188
-
 189
189
-
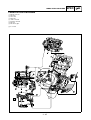 190
190
-
 191
191
-
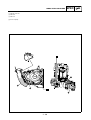 192
192
-
 193
193
-
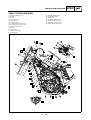 194
194
-
 195
195
-
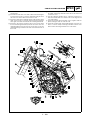 196
196
-
 197
197
-
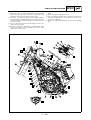 198
198
-
 199
199
-
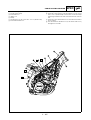 200
200
-
 201
201
-
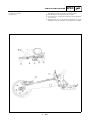 202
202
-
 203
203
-
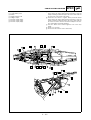 204
204
-
 205
205
-
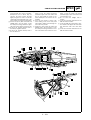 206
206
-
 207
207
-
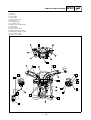 208
208
-
 209
209
-
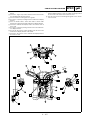 210
210
-
 211
211
-
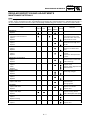 212
212
-
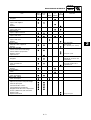 213
213
-
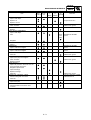 214
214
-
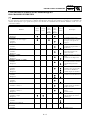 215
215
-
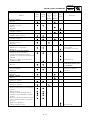 216
216
-
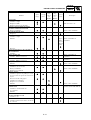 217
217
-
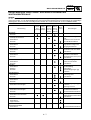 218
218
-
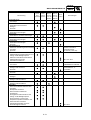 219
219
-
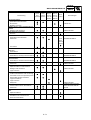 220
220
-
 221
221
-
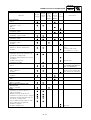 222
222
-
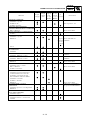 223
223
-
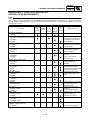 224
224
-
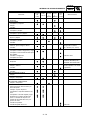 225
225
-
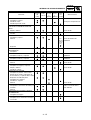 226
226
-
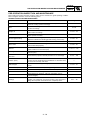 227
227
-
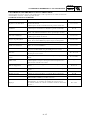 228
228
-
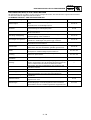 229
229
-
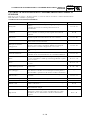 230
230
-
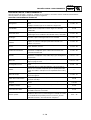 231
231
-
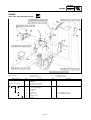 232
232
-
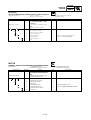 233
233
-
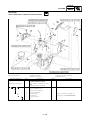 234
234
-
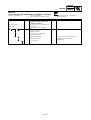 235
235
-
 236
236
-
 237
237
-
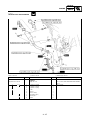 238
238
-
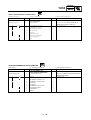 239
239
-
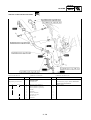 240
240
-
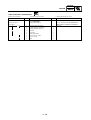 241
241
-
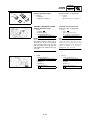 242
242
-
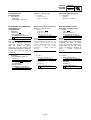 243
243
-
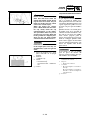 244
244
-
 245
245
-
 246
246
-
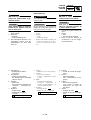 247
247
-
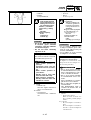 248
248
-
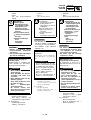 249
249
-
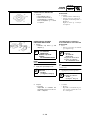 250
250
-
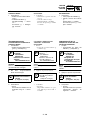 251
251
-
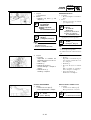 252
252
-
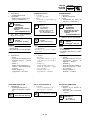 253
253
-
 254
254
-
 255
255
-
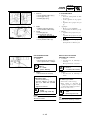 256
256
-
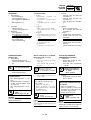 257
257
-
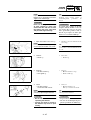 258
258
-
 259
259
-
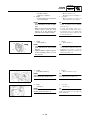 260
260
-
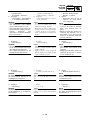 261
261
-
 262
262
-
 263
263
-
 264
264
-
 265
265
-
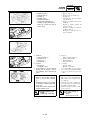 266
266
-
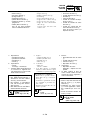 267
267
-
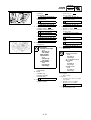 268
268
-
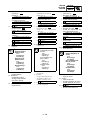 269
269
-
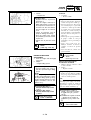 270
270
-
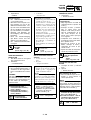 271
271
-
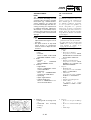 272
272
-
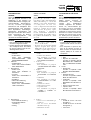 273
273
-
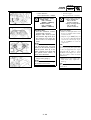 274
274
-
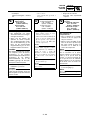 275
275
-
 276
276
-
 277
277
-
 278
278
-
 279
279
-
 280
280
-
 281
281
-
 282
282
-
 283
283
-
 284
284
-
 285
285
-
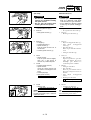 286
286
-
 287
287
-
 288
288
-
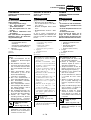 289
289
-
 290
290
-
 291
291
-
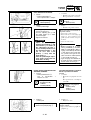 292
292
-
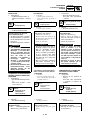 293
293
-
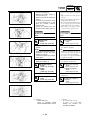 294
294
-
 295
295
-
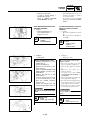 296
296
-
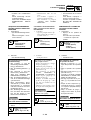 297
297
-
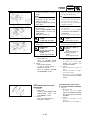 298
298
-
 299
299
-
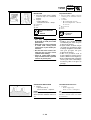 300
300
-
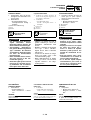 301
301
-
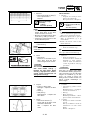 302
302
-
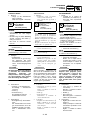 303
303
-
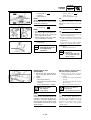 304
304
-
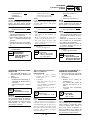 305
305
-
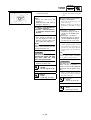 306
306
-
 307
307
-
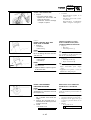 308
308
-
 309
309
-
 310
310
-
 311
311
-
 312
312
-
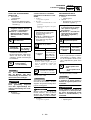 313
313
-
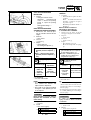 314
314
-
 315
315
-
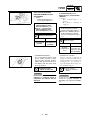 316
316
-
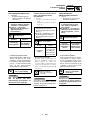 317
317
-
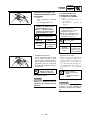 318
318
-
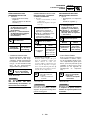 319
319
-
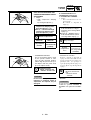 320
320
-
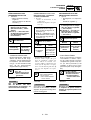 321
321
-
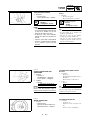 322
322
-
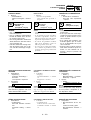 323
323
-
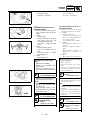 324
324
-
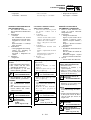 325
325
-
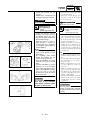 326
326
-
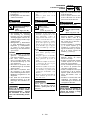 327
327
-
 328
328
-
 329
329
-
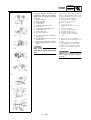 330
330
-
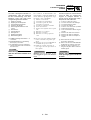 331
331
-
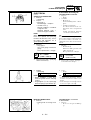 332
332
-
 333
333
-
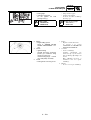 334
334
-
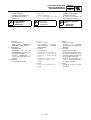 335
335
-
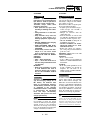 336
336
-
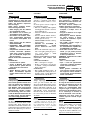 337
337
-
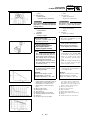 338
338
-
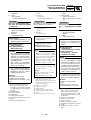 339
339
-
 340
340
-
 341
341
-
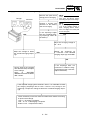 342
342
-
 343
343
-
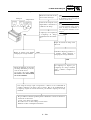 344
344
-
 345
345
-
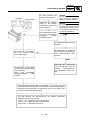 346
346
-
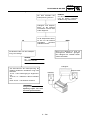 347
347
-
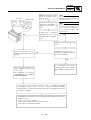 348
348
-
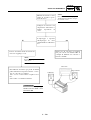 349
349
-
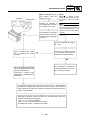 350
350
-
 351
351
-
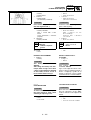 352
352
-
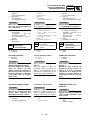 353
353
-
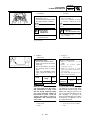 354
354
-
 355
355
-
 356
356
-
 357
357
-
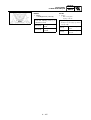 358
358
-
 359
359
-
 360
360
-
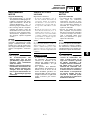 361
361
-
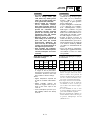 362
362
-
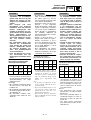 363
363
-
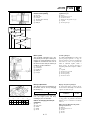 364
364
-
 365
365
-
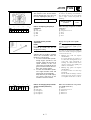 366
366
-
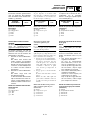 367
367
-
 368
368
-
 369
369
-
 370
370
-
 371
371
-
 372
372
-
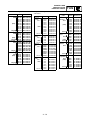 373
373
-
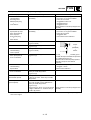 374
374
-
 375
375
-
 376
376
-
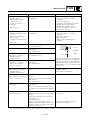 377
377
-
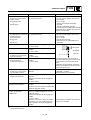 378
378
-
 379
379
-
 380
380
-
 381
381
-
 382
382
-
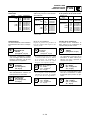 383
383
-
 384
384
-
 385
385
-
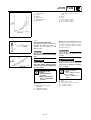 386
386
-
 387
387
-
 388
388
-
 389
389
-
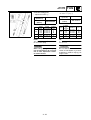 390
390
-
 391
391
-
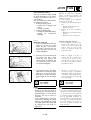 392
392
-
 393
393
-
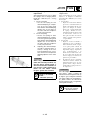 394
394
-
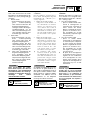 395
395
-
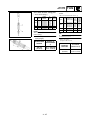 396
396
-
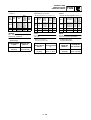 397
397
-
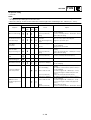 398
398
-
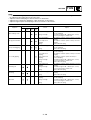 399
399
-
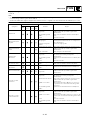 400
400
-
 401
401
-
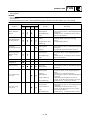 402
402
-
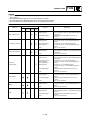 403
403
-
 404
404
-
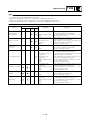 405
405
-
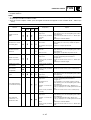 406
406
-
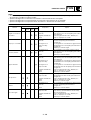 407
407
-
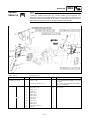 408
408
-
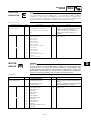 409
409
-
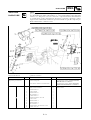 410
410
-
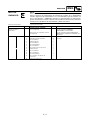 411
411
-
 412
412
-
 413
413
-
 414
414
-
 415
415
-
 416
416
-
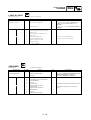 417
417
-
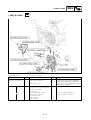 418
418
-
 419
419
-
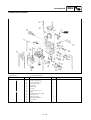 420
420
-
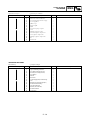 421
421
-
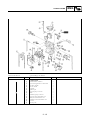 422
422
-
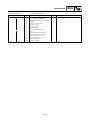 423
423
-
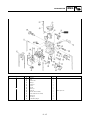 424
424
-
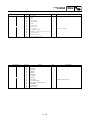 425
425
-
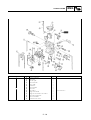 426
426
-
 427
427
-
 428
428
-
 429
429
-
 430
430
-
 431
431
-
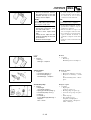 432
432
-
 433
433
-
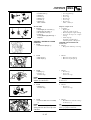 434
434
-
 435
435
-
 436
436
-
 437
437
-
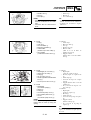 438
438
-
 439
439
-
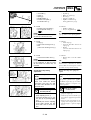 440
440
-
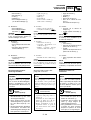 441
441
-
 442
442
-
 443
443
-
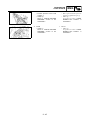 444
444
-
 445
445
-
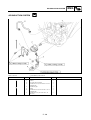 446
446
-
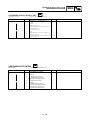 447
447
-
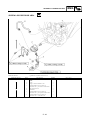 448
448
-
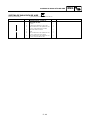 449
449
-
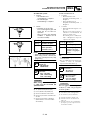 450
450
-
 451
451
-
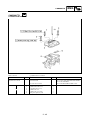 452
452
-
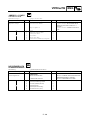 453
453
-
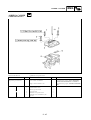 454
454
-
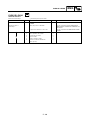 455
455
-
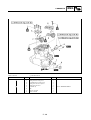 456
456
-
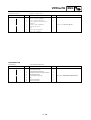 457
457
-
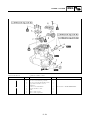 458
458
-
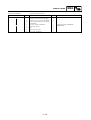 459
459
-
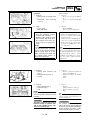 460
460
-
 461
461
-
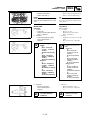 462
462
-
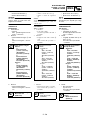 463
463
-
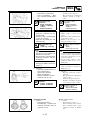 464
464
-
 465
465
-
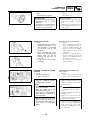 466
466
-
 467
467
-
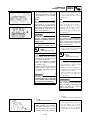 468
468
-
 469
469
-
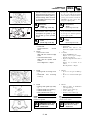 470
470
-
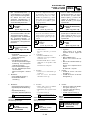 471
471
-
 472
472
-
 473
473
-
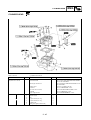 474
474
-
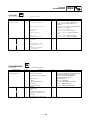 475
475
-
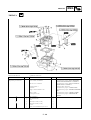 476
476
-
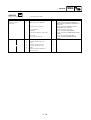 477
477
-
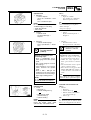 478
478
-
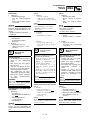 479
479
-
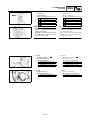 480
480
-
 481
481
-
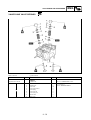 482
482
-
 483
483
-
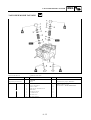 484
484
-
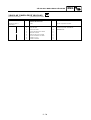 485
485
-
 486
486
-
 487
487
-
 488
488
-
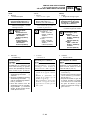 489
489
-
 490
490
-
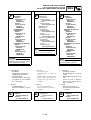 491
491
-
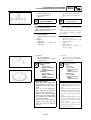 492
492
-
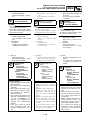 493
493
-
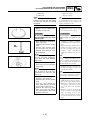 494
494
-
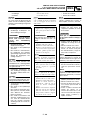 495
495
-
 496
496
-
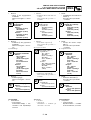 497
497
-
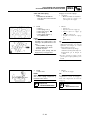 498
498
-
 499
499
-
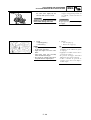 500
500
-
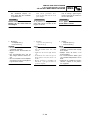 501
501
-
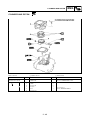 502
502
-
 503
503
-
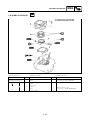 504
504
-
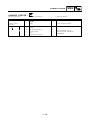 505
505
-
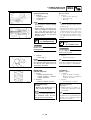 506
506
-
 507
507
-
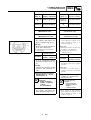 508
508
-
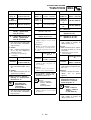 509
509
-
 510
510
-
 511
511
-
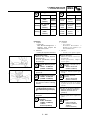 512
512
-
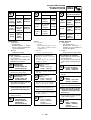 513
513
-
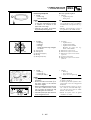 514
514
-
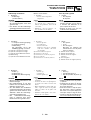 515
515
-
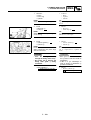 516
516
-
 517
517
-
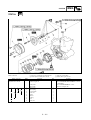 518
518
-
 519
519
-
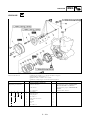 520
520
-
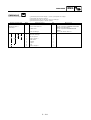 521
521
-
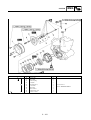 522
522
-
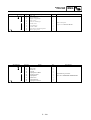 523
523
-
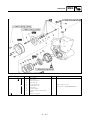 524
524
-
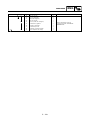 525
525
-
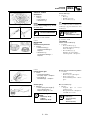 526
526
-
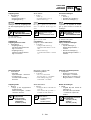 527
527
-
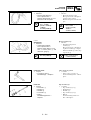 528
528
-
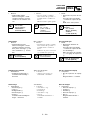 529
529
-
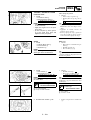 530
530
-
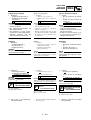 531
531
-
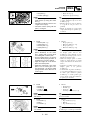 532
532
-
 533
533
-
 534
534
-
 535
535
-
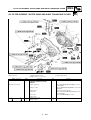 536
536
-
 537
537
-
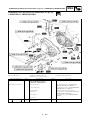 538
538
-
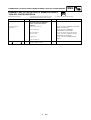 539
539
-
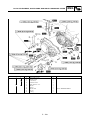 540
540
-
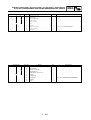 541
541
-
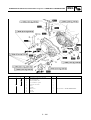 542
542
-
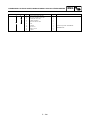 543
543
-
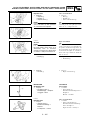 544
544
-
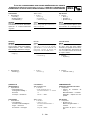 545
545
-
 546
546
-
 547
547
-
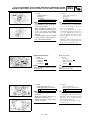 548
548
-
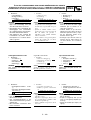 549
549
-
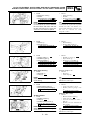 550
550
-
 551
551
-
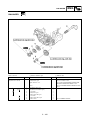 552
552
-
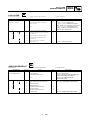 553
553
-
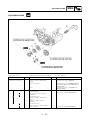 554
554
-
 555
555
-
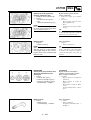 556
556
-
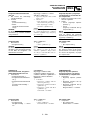 557
557
-
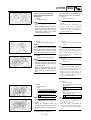 558
558
-
 559
559
-
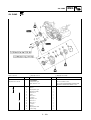 560
560
-
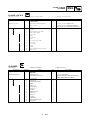 561
561
-
 562
562
-
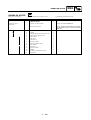 563
563
-
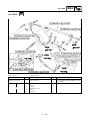 564
564
-
 565
565
-
 566
566
-
 567
567
-
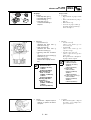 568
568
-
 569
569
-
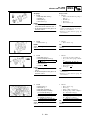 570
570
-
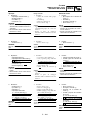 571
571
-
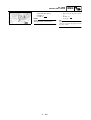 572
572
-
 573
573
-
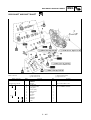 574
574
-
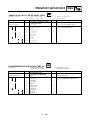 575
575
-
 576
576
-
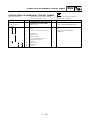 577
577
-
 578
578
-
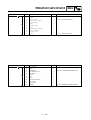 579
579
-
 580
580
-
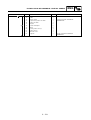 581
581
-
 582
582
-
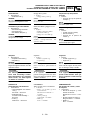 583
583
-
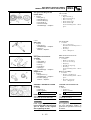 584
584
-
 585
585
-
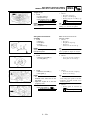 586
586
-
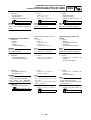 587
587
-
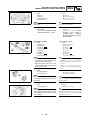 588
588
-
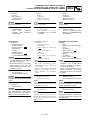 589
589
-
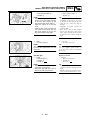 590
590
-
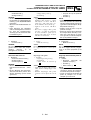 591
591
-
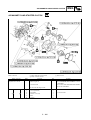 592
592
-
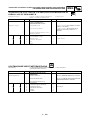 593
593
-
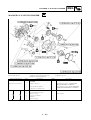 594
594
-
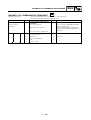 595
595
-
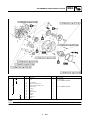 596
596
-
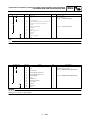 597
597
-
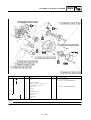 598
598
-
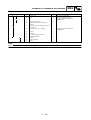 599
599
-
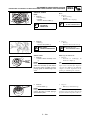 600
600
-
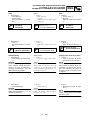 601
601
-
 602
602
-
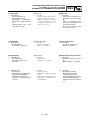 603
603
-
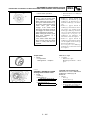 604
604
-
 605
605
-
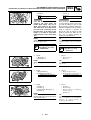 606
606
-
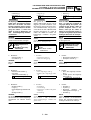 607
607
-
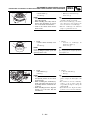 608
608
-
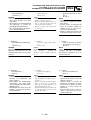 609
609
-
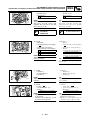 610
610
-
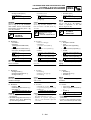 611
611
-
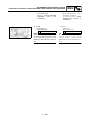 612
612
-
 613
613
-
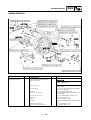 614
614
-
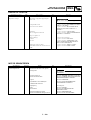 615
615
-
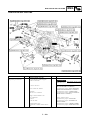 616
616
-
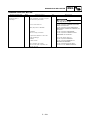 617
617
-
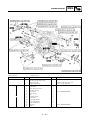 618
618
-
 619
619
-
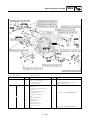 620
620
-
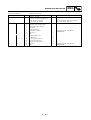 621
621
-
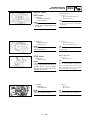 622
622
-
 623
623
-
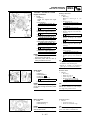 624
624
-
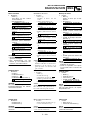 625
625
-
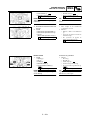 626
626
-
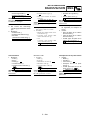 627
627
-
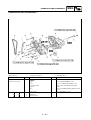 628
628
-
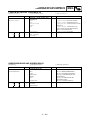 629
629
-
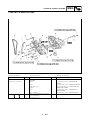 630
630
-
 631
631
-
 632
632
-
 633
633
-
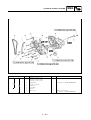 634
634
-
 635
635
-
 636
636
-
 637
637
-
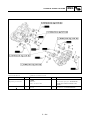 638
638
-
 639
639
-
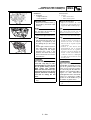 640
640
-
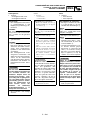 641
641
-
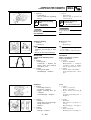 642
642
-
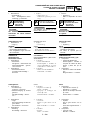 643
643
-
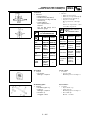 644
644
-
 645
645
-
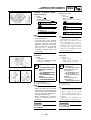 646
646
-
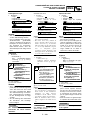 647
647
-
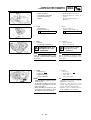 648
648
-
 649
649
-
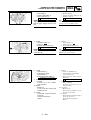 650
650
-
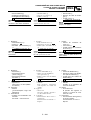 651
651
-
 652
652
-
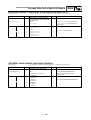 653
653
-
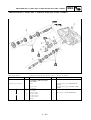 654
654
-
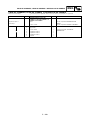 655
655
-
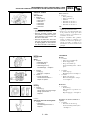 656
656
-
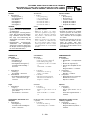 657
657
-
 658
658
-
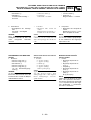 659
659
-
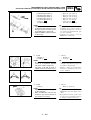 660
660
-
 661
661
-
 662
662
-
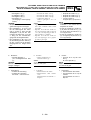 663
663
-
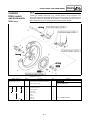 664
664
-
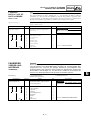 665
665
-
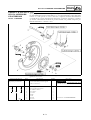 666
666
-
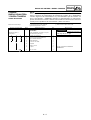 667
667
-
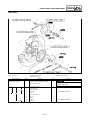 668
668
-
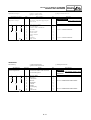 669
669
-
 670
670
-
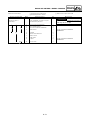 671
671
-
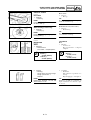 672
672
-
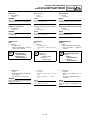 673
673
-
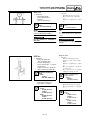 674
674
-
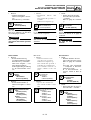 675
675
-
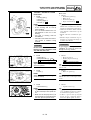 676
676
-
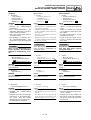 677
677
-
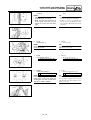 678
678
-
 679
679
-
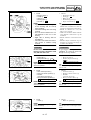 680
680
-
 681
681
-
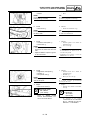 682
682
-
 683
683
-
 684
684
-
 685
685
-
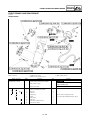 686
686
-
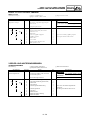 687
687
-
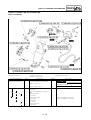 688
688
-
 689
689
-
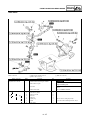 690
690
-
 691
691
-
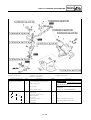 692
692
-
 693
693
-
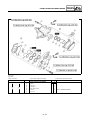 694
694
-
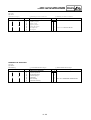 695
695
-
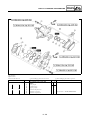 696
696
-
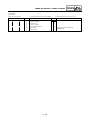 697
697
-
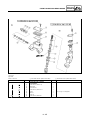 698
698
-
 699
699
-
 700
700
-
 701
701
-
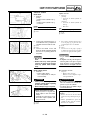 702
702
-
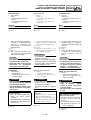 703
703
-
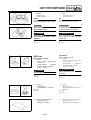 704
704
-
 705
705
-
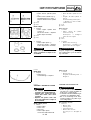 706
706
-
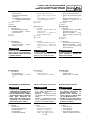 707
707
-
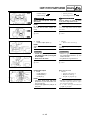 708
708
-
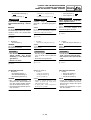 709
709
-
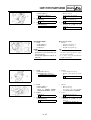 710
710
-
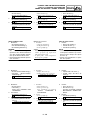 711
711
-
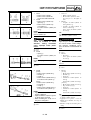 712
712
-
 713
713
-
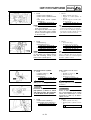 714
714
-
 715
715
-
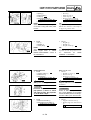 716
716
-
 717
717
-
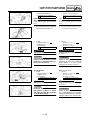 718
718
-
 719
719
-
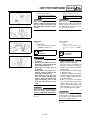 720
720
-
 721
721
-
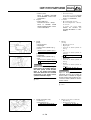 722
722
-
 723
723
-
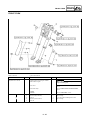 724
724
-
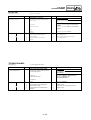 725
725
-
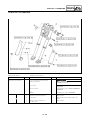 726
726
-
 727
727
-
 728
728
-
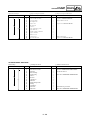 729
729
-
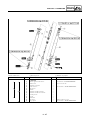 730
730
-
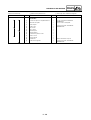 731
731
-
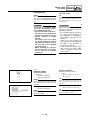 732
732
-
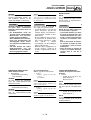 733
733
-
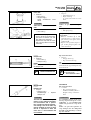 734
734
-
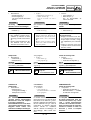 735
735
-
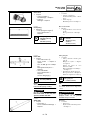 736
736
-
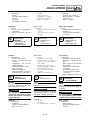 737
737
-
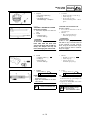 738
738
-
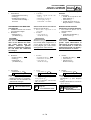 739
739
-
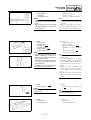 740
740
-
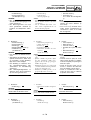 741
741
-
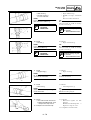 742
742
-
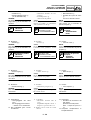 743
743
-
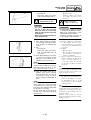 744
744
-
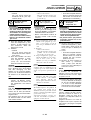 745
745
-
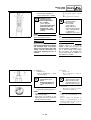 746
746
-
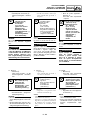 747
747
-
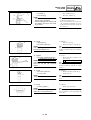 748
748
-
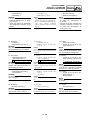 749
749
-
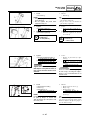 750
750
-
 751
751
-
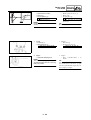 752
752
-
 753
753
-
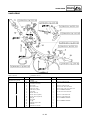 754
754
-
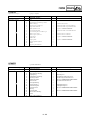 755
755
-
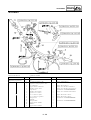 756
756
-
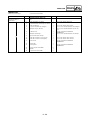 757
757
-
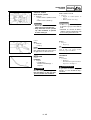 758
758
-
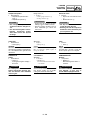 759
759
-
 760
760
-
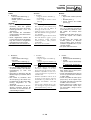 761
761
-
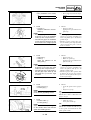 762
762
-
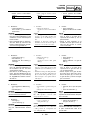 763
763
-
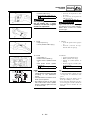 764
764
-
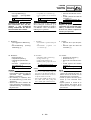 765
765
-
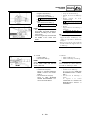 766
766
-
 767
767
-
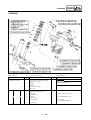 768
768
-
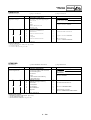 769
769
-
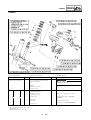 770
770
-
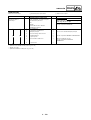 771
771
-
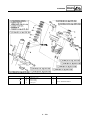 772
772
-
 773
773
-
 774
774
-
 775
775
-
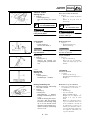 776
776
-
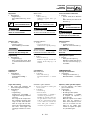 777
777
-
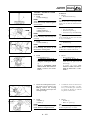 778
778
-
 779
779
-
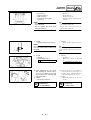 780
780
-
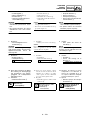 781
781
-
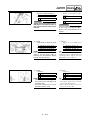 782
782
-
 783
783
-
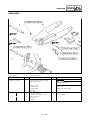 784
784
-
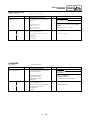 785
785
-
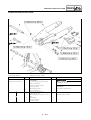 786
786
-
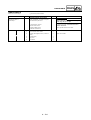 787
787
-
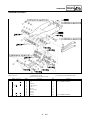 788
788
-
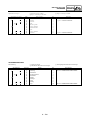 789
789
-
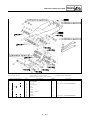 790
790
-
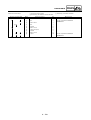 791
791
-
 792
792
-
 793
793
-
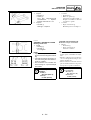 794
794
-
 795
795
-
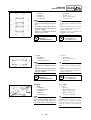 796
796
-
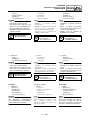 797
797
-
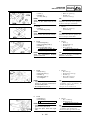 798
798
-
 799
799
-
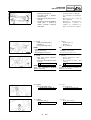 800
800
-
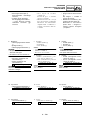 801
801
-
 802
802
-
 803
803
-
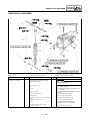 804
804
-
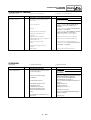 805
805
-
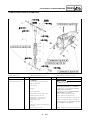 806
806
-
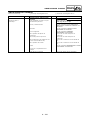 807
807
-
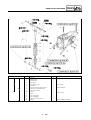 808
808
-
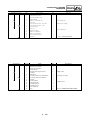 809
809
-
 810
810
-
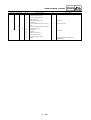 811
811
-
 812
812
-
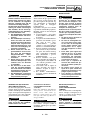 813
813
-
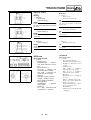 814
814
-
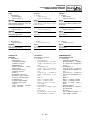 815
815
-
 816
816
-
 817
817
-
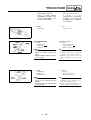 818
818
-
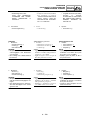 819
819
-
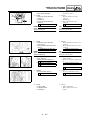 820
820
-
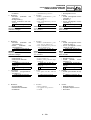 821
821
-
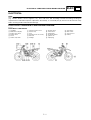 822
822
-
 823
823
-
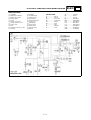 824
824
-
 825
825
-
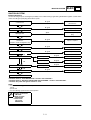 826
826
-
 827
827
-
 828
828
-
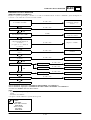 829
829
-
 830
830
-
 831
831
-
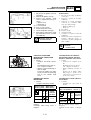 832
832
-
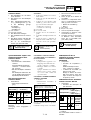 833
833
-
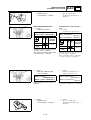 834
834
-
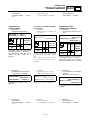 835
835
-
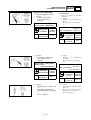 836
836
-
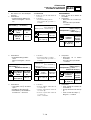 837
837
-
 838
838
-
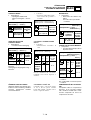 839
839
-
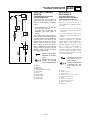 840
840
-
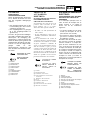 841
841
-
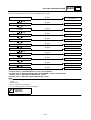 842
842
-
 843
843
-
 844
844
-
 845
845
-
 846
846
-
 847
847
-
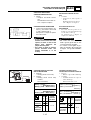 848
848
-
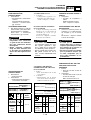 849
849
-
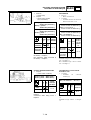 850
850
-
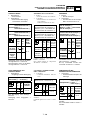 851
851
-
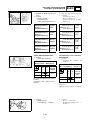 852
852
-
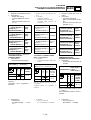 853
853
-
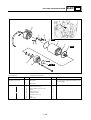 854
854
-
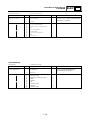 855
855
-
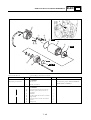 856
856
-
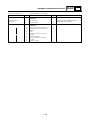 857
857
-
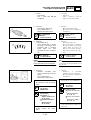 858
858
-
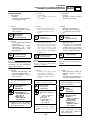 859
859
-
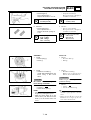 860
860
-
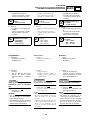 861
861
-
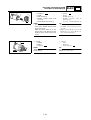 862
862
-
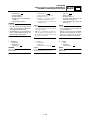 863
863
-
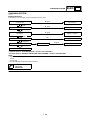 864
864
-
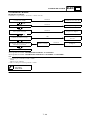 865
865
-
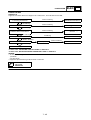 866
866
-
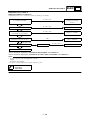 867
867
-
 868
868
-
 869
869
-
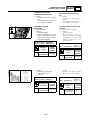 870
870
-
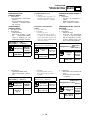 871
871
-
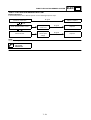 872
872
-
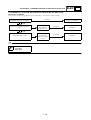 873
873
-
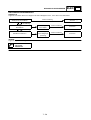 874
874
-
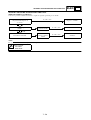 875
875
-
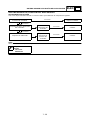 876
876
-
 877
877
-
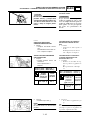 878
878
-
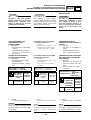 879
879
-
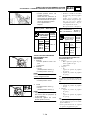 880
880
-
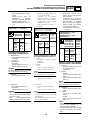 881
881
-
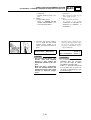 882
882
-
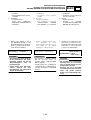 883
883
-
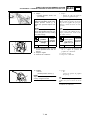 884
884
-
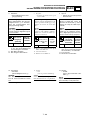 885
885
-
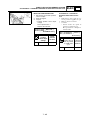 886
886
-
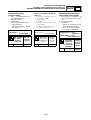 887
887
-
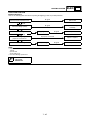 888
888
-
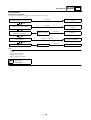 889
889
-
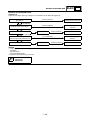 890
890
-
 891
891
-
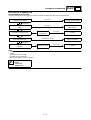 892
892
-
 893
893
-
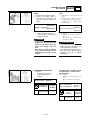 894
894
-
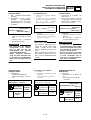 895
895
-
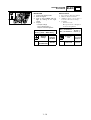 896
896
-
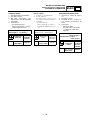 897
897
-
 898
898
-
 899
899
-
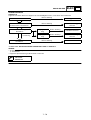 900
900
-
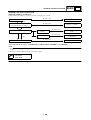 901
901
-
 902
902
-
 903
903
-
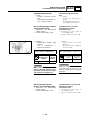 904
904
-
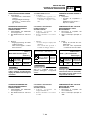 905
905
-
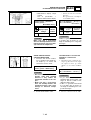 906
906
-
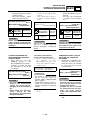 907
907
-
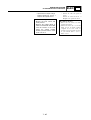 908
908
-
 909
909
-
 910
910
-
 911
911
-
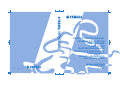 912
912


Yamaha 5UME Le manuel du propriétaire
- Catégorie
- Motocyclettes
- Taper
- Le manuel du propriétaire
- Ce manuel convient également à
dans d''autres langues
- italiano: Yamaha 5UME Manuale del proprietario
- English: Yamaha 5UME Owner's manual
- español: Yamaha 5UME El manual del propietario
- Deutsch: Yamaha 5UME Bedienungsanleitung
Documents connexes
-
Yamaha WR450F Le manuel du propriétaire
-
-
-
-
-
-
-
-
-
Autres documents
-
PUIG Levers 2.0 Mounting instructions
-
Derbi GPR 125 Racing Le manuel du propriétaire
-
Malaguti MADISON 250 Manuel utilisateur
-
GAS GAS MC 2008 Manuel utilisateur
-
Husqvarna WR 125 Le manuel du propriétaire
-
KTM 64102931044 Le manuel du propriétaire
-
-
-
-