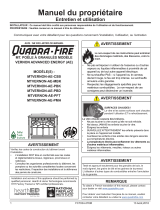
Quadra-Fire MTVERNON-AE-MBK Le manuel du propriétaire
- Catégorie
- Poêles
- Taper
- Le manuel du propriétaire
Ce manuel convient également à

1 7034-276 January 29, 2014
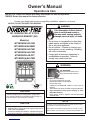
MT. VERNON PELLET STOVE
ADVANCED ENERGY (AE)
Model(s):
MTVERNON-AE-CSB
MTVERNON-AE-MBK
MTVERNON-AE-PBK
MTVERNON-AE-PDB
MTVERNON-AE-PFT
MTVERNON-AE-PMH
O-T L
Tested and
Listed by
Portland
Oregon USA
OMNI-Test Laboratories, Inc.
CUS
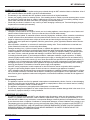
NOTICE: DO NOT DISCARD THIS MANUAL
Owner’s Manual
Operation & Care
INSTALLER: Leave this manual with party responsible for use and operation.
OWNER: Retain this manual for future reference.
Contact your dealer with questions regarding installation, operation, or service.
HOT SURFACES!
Glass and other surfaces are hot
during operation AND cool down.
Hot glass will cause burns.
• Do not touch glass until it is cooled
• NEVER allow children to touch glass
• Keep children away
• CAREFULLY SUPERVISE children in same room as
replace.
• Alert children and adults to hazards of high temperatures
• High temperatures may ignite clothing or other
ammablematerials.
• Keep clothing, furniture, draperies and other ammable
materials away.
WARNING
If the information in these instruc-
tions is not followed exactly, a
remayresultcausingproperty
damage, personal injury, or death.
• Donotstoreorusegasolineorotheram-
mablevaporsandliquidsinthevicinityof
this or any other appliance.
• Donotoverre-Ifheaterorchimneycon-
nectorglows,youareoverring.Overring
will void your warranty.
• Complywithallminimumclearancesto
combustiblesasspecied.Failureto
complymaycausehousere.
WARNING
CAUTION
Testedandapprovedforwoodpellets,shelledeld
corn,wheatandblackoilsunowerseeds.Burningof
any other type of fuel voids your warranty.
NOTE
ToobtainaFrenchtranslationofthismanual,pleasecontact
yourdealerorvisitwww.quadrare.com
Pourobtenirunetraductionfrançaisedecemanuel,s’ilvous
plaîtcontactervotrerevendeurouvisitezwww.quadrare.com
CAUTION
Checkbuildingcodespriortoinstallation.
• InstallationMUSTcomplywithlocal,regional,stateandna-
tional codes and regulations.
• Consultlocalbuilding,reofcialsorauthoritieshavingjuris-
dictionaboutrestrictions,installationinspection,andpermits.
061-S-68-6

2 7034-276 January 29, 2014
MT. VERNON AE
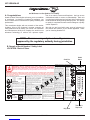
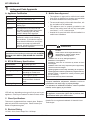
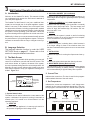
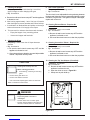
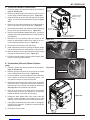
B. Sample of Serial Number / Safety Label
LOCATION: Back of Stove
CAUTION
:
HOT WHILE IN OPERATION DO NOT TOUCH, KEEP CHILDREN, CLOTHING AND
FURNITURE AWAY. CONTACT MAY CAUSE SKIN BURNS. SEE NAMEPLATE AND INSTRUCTIONS.
Operate this unit with fuel hopper lid closed. Failure to do so may result in emissions products' combustion from the
hopper under certain conditions. Maintain hopper seal in good condition. Do no over fill the hopper.
ATTENTION:
CHAUD LORS DE L'OPÉRATION. NE PAS TOUCHER. GARDEZ LES ENFANTS ET LES VÊTEMENTS LOIN DE L'ESPACE DÉSIGNÉ DE
L'INSTALLATION. LE CONTACT PEUT CAUSER DES BRÛLURES À LA PEAU. VOIR L'ÉTIQUETTE ET LES INSTRUCTIONS.
Opérez cet appareil avec le
couvercle de la trémie fermé. Le défaut de ne pas suivre les instructions peut résulter, sous certaines conditions, en une combustion des émissions des produits venant de
la trémie. Ne pas remplir la trémie trop pleine.
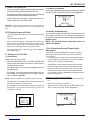
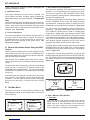
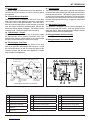
ESPACES LIBRES MINIMUM DES MATÉRIAUX COMBUSTIBLES:
INSTALLATION DE L’ALCÔVE
Une hauteur minimum de l'alcôve:
43
in.(
1092mm)
Une hauteur minimum m
ur de côté
de l'alcôve:
6 in. (152mm)
Une épaisseur
minimum m
ur de côté
de l'alcôve:
40 in. (1016mm)
La profondeur maximum de l'alcôve:
36 in. (914mm)
Note 1: Dans les installations résidentielles, lorsque les pièces
TPVNT-MV, (dessus de l'adapteur de ventilation 3 in. - 3 in.) et
812-3570 (le ressaut de l'adapteur 3 in. - 6 in.), un tuyau
connecteur de 6 in. pour mur simple de calibre 24 peut être
utilisé.
Note 2: Pour l'installation dans les maisons préfabriquées,
lorsque les pièces TPVNT-MV, (dessus de l'adapteur de
ventilation 3 in. - 3 in.) et 812-3570 (le ressaut de l'adapteur 3
in. - 6 in.), utilisez un tuyau connecteur enregistré pour mur
double. Un assemblage d'air extérieur (pièce 811-0872), doit
être utilisé pour l'installation dans les maisons préfabriquées.
PROTECTION
DU SOL
Installez et le poêle doit être placé sur une assise non combustible s’étendant
tout autour de lui, comme les schémas l’indiquent. Mesurez la distance du
devant (K) de la surface de la porte vitrée.
*Un protecteur incombustible de plancher doit s'étendre sous le conduit de
cheminée pour une installation de ventilation horizontale ou sous un adapteur de
ventilation de dessus pour une installation verticale. CANADA - REQUIRENT.
A
B
G
G
D
E
F
C
C
A 2 in (51mm)
B 6 in. (152mm)
C 2 in. (51mm)
D 3 in. (76mm)
E 6 in. (152mm)
F 8 in. (203mm)
G 3 in. (76mm)
Appareil de chauffage inséré de combustible solide/de type de boulettes. Accepté dans l'installation dans les maisons
mobiles. Cet appareil a été testé et enregistré pour l'usage dans les Maisons Mobiles en accord avec OAR 814-23-9000
jusqu'à 814-23-909.
Testé à: ASTM E1509-04, ULC S627-00, ULC/ORD-C1482-M1990
Room Heating. Pellet Burning Type, (UM) 84-HUD POUR USAGE
AVEC LES BOULETTES DE BOIS. VOIR LE MANUEL DU
PROPRI
É
TAIRE POUR D’AUTRES OPTIONS DE CARBURANT.
OMNI-Test Laboratories, Inc. a déterminé que cet appareil se conforme avec la
norme de l’Association Canadienne de normalisation (CSA) B415.1 ainsi que le
Titre 40 du Code Fédéral de Régulations des États-Unis, partie 60, sous-partie
AAA. Accréditations OMNI-Test Laboratories : Le Conseil Canadien des Normes
(CCN/SCC), l’Institue des Standards Nationaux Américain (ANSI) et l’Agence de
Protection Environnemental (EPA).
Puissance de Rendement: 60,000 Btu's/hr
Puissance Électrique: 115 VAC, 60 Hz, Début 5 Amps, Courir 1.25 Amps
Éloignez le fil électrique de l'appareil. Ne pas faire passer le fil électrique au
dessus ou en dessous de l'appareil. Ne pas bloquer l’espace au dessous de
l’appareil.
DANGER:
Il y a risque de décharge électrique. Déconnectez le fil électrique de
la prise de contact avant le service.
Remplacez la vitre seulement avec une vitre céramique de 5 mm disponible
chez votre fournisseur.
Pour allumer, monter la température du thermostat au dessus de la température de
la pièce, le poêle s'allumera automatiquement. Pour éteindre, descendre la
température du thermostat en dessous de la température de la pièce. Pour des
instructions supplémentaires, référez vous au manuel du propriétaire. Gardez la
porte d'ouverture et la porte des cendres fermées hermétiquement durant l'opération.
I
nstallez et utilisez en accord avec les instructions
d'installation et d'opération du fabricant. Contactez le bureau
de la construction ou le bureau des incendies au sujet des
restrictions et des inspections d'installation dans votre
voisinage. Ne pas obstruez l'espace en dessous de l'appareil.
A
VIS - Pour Les Maisons Mobiles: Ne pas installer dans
une chambre à coucher. Un tuyau extérieur de combustion
d'air doit être installé et ne doit pas être obstrué lorsque
l'appareil est en usage. La structure intégrale du plancher, du
plafond et des murs de la maison mobile doit être
maintenue
intacte.
Référez vous aux instructions du fabricant et des codes locaux
pour les précautions requises pour passer une cheminée à
travers un mur ou un plafond combustibles, et les
compensations maximums.
Inspectez et nettoyez la cheminée fréquemment. Ne pas
connecter cet appareil à une cheminée servant un autre
appareil.
Utilisez systèm de ventilation "L" ou "P" diamètre 76mm ou
102mm.
PRÉVENTION DES FEUX DE MAISON
PREVENT HOUSE FIRES
Install and use only in accordance with manufacturer's installation
and operating instructions. Contact local building or fire officials
about restrictions and inspection in our area.
WARNING - FOR MOBILE HOMES:
Do not install
appliance in a sleeping room. An outside combustion air inlet must
be provided. The structural integrity of the mobile home floor,
ceiling and walls must be maintained.
Refer to manufacturer's instructions and local codes for
precautions required for passing chimney through a combustible
wall or ceiling. Inspect and clean vent system frequently in
accordance with manufacturer's instructions.
DO NOT CONNECT THIS UNIT TO A CHIMNEY SERVING
ANOTHER APPLIANCE.
Use a 3 in. or 4 in. diameter type "L" or "PL" venting system.
I*
J
J
K
I* = 2 in. (51mm)
J = 2 in. (51mm)
K = 6 in. (152mm)
G
G
D
E
F
C
C
A
B
2013
2014
2015
JAN FEB MAR APR MAY JUN
JULY AUG SEPT OCT NOV DEC
Mt. Vernon Pellet
Stove AE
Report / Rapport
061-S-68-6
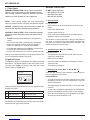
ALCOVE INSTALLATION:
Min. Alcove Height:
43 in. (
1092mm)
Min. Alcove Side Wall:
6 in. (152mm)
Min. Alcove Width:
40 in. (1016mm)
Max. Alcove Depth:
36 in. (914mm)
A 2 in (51mm)
B 6 in. (152mm)
C 2 in. (51mm)
D 3 In (76mm)
E 6 in (152mm)
F 8 in.(203mm)
G 3 in. (76mm)
MINIMUM CLEARANCES TO COMBUSTIBLE MATERIALS
FLOOR PROTECTION
Use a non-combustible floor protector, extending
beneath heater and to the front/sides/rear as indicated.
Measure front distance (K) from the surface of the
glass door.
I* = 2 in. (51mm)
J = 2 in. (51mm)
K = 6 in. (152mm)
I*
J
J
K
Note 1:
In residential
installations, when using
Parts TPVNT-MV, (3 in. - 3
in. Top Vent Adapter) and
812-3570 (3 in. - 6 in. Offset
Adapter), 24 gauge 6 in.
single wall flue connector
may be used.
*
Non-combustible floor protection must extend beneath the
flue pipe when installed with horizontal venting or under the
Top Vent Adapter with vertical installation. RECOMMENDED
IN USA
SERIAL NO.
/
NUMÉRO DU
007001
Listed Solid Fuel Room Heater/Pellet
Type Stove.
Also suitable for Mobile
Home Installation. This appliance has
been tested and listed for use in
Manufactured Homes in accordance with
OAR 814-23-9000 through 814-23-909.
Tested to: ASTM E1509-04, ULC S627-00,
ULC/ORD-C1482-M1990 Room Heating
Pellet Burning Type, (UM) 84-HUD FOR USE
ONLY WITH PELLETIZED WOOD. See Owner’s
Manual for other fuel options.
OMNI-Test Laboratories, Inc. has determined
that this appliance complies with Canadian
Standards Association (CSA) B415.1 and Title
40 of the U.S. Code of Federal Regulations, Part
60, SubPart AAA.OMNI-Test Laboratories
Accrediations: The Standards Council of
Canada, the American National Standards
Institute, and the U.S. Environmental Protection
Agency.
Input Rating: 60,000 Btu's/hr. Electrical
Rating:
115 VAC, 60 Hz, Start 5 Amps, Run
1.25 AMPS.
Route power cord away from unit. Do not route
cord under or in front of appliance. Do not obstruct
the space beneath the heater.
DANGER:
Risk of electrical shock.
Disconnect power supply before servicing.
Replace glass only with 5mm ceramic
available from your dealer. To start, set
thermostat above room temperature, the
stove will light automatically. To shutdown,
set thermostat to below room temperature.
For further instruction refer to owner's
manual.
Keep viewing and ash removal
doors tightly closed during operation.
DO NOT REMOVE THIS LABEL
NE PAS ENLEVER L’
É
QUETTE
7034-107E
Note 2: In manufactured home
installation, when using Part
TPVNT-MV, (3 in. - 3 in. Top Vent
Adapter) and 812-3570 (3 in. - 6 in.
Offset Adapter), use listed double
wall flue connector. An Outside Air
Kit (Part 811-0872), must be used
with manufactured home installation.
1445 Highway North,
Colville, WA 99114
www.quadrafire.com
Manufactured by / Fabriqu
é
par:
O-T L
Tested and
Listed by
Portland
Oregon USA
OMNI-Test Laboratories, Inc.
CUS
Made in U.S.A. of US and
imported parts.
Fabriqué aux États-Unis-d’Amérique
par des pièces d’origine américaine
et pièces importées.
Serial No.
Model
Name
TestLab&
Report No.
Mfg.Date
SAMPLE
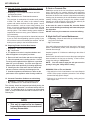
A. Congratulations
Hearth&HomeTechnologieswelcomesyoutoourtradition
of excellence! In choosing a Quadra-Fire appliance, you
haveourassuranceofcommitmenttoquality,durability,and
performance.
This commitment begins with our research of the market,
including ‘Voice of the Customer’ contacts, ensuring we
makeproductsthat will satisfy your needs. Our Research
and Development facility then employs the world’s most
advanced technology to achieve the optimum opera-
tionof ourstoves,insertsand replaces.Andyet we are
old-fashioned when it comes to craftsmanship. Each unit
ismeticulouslyfabricatedandgoldandnickelsurfacesare
hand-nishedforlastingbeautyandenjoyment.Ourpledge
to quality is completed as each model undergoes a quality
control inspection.
Wewishyouandyourfamilymany yearsofenjoymentin
the warmth and comfort of your hearth appliance. Thank
you for choosing Quadra-Fire.
NOTE: Clearances may only be reduced by means
approved by the regulatory authority having jurisdiction
and Welcome to the Quadra-Fire Family!

January 29, 2014 7034-276 3
MT. VERNON AE
TABLE OF CONTENTS
Safety Alert Key:
• DANGER! Indicates a hazardous situation which, if not avoided willresultindeathorseriousinjury.
• WARNING! Indicates a hazardous situation which, if not avoided mayresultindeathorseriousinjury.
• CAUTION! Indicates a hazardous situation which, if not avoided, mayresultinminorormoderateinjury.
• NOTICE: Indicates practices which may cause damage to the appliance or to property.
A. Congratulations..................................................................2
B.SampleofSerialNumber/SafetyLabel............................2
C. Warranty Policy .................................................................4
1 Listing and Code Approvals ..............6
A.ApplianceCertication ......................................................6
B.BTU&EfciencySpecications........................................6
C.GlassSpecications .........................................................6
D. Electrical Rating................................................................6
E.MobileHomeApproved .................................................... 6
2 Operating Instructions .......................7
A. Fire Safety .........................................................................7
B.Non-CombustibleMaterials ...............................................7
C.CombustibleMaterials ......................................................7
D.FuelMaterialandFuelStorage ........................................7
E. GeneralOperatingInformation .........................................8
F.BeforeYourFirstFire ........................................................9
G. Filling the Hopper with Fuel ...............................................9
H. Starting Your First Fire .....................................................9
I.FireCharacteristicsandFlameHeightAdjustment ............9
J. Clear Space.......................................................................10
K. Ignition Cycles ...................................................................10
L.FrequentlyAskedQuestions .............................................12
3 Wall Control Operating Instructions 13
A. Introduction .......................................................................13
B.LanguageSelection ..........................................................13
C.TheMainScreen ..............................................................13
D.GeneralInformationAboutUsingtheWallControl ...........14
E.TheMainMenu .................................................................14
F.QuickStartGuide ...............................................................18
G. Service Information ..........................................................20
H. Error Codes .......................................................................20
I.BatteryBack-upSystem(Optional) ....................................20
4 Maintenance and Service.................21
A. Proper Shutdown Procedure ............................................21
B.QuickReferenceMaintenanceChart................................21
C.GeneralMaintenanceandCleaning .................................22
D. Soot or Creosote Fire .......................................................26
E.HighAshFuelContentMaintenance .................................26
5 Troubleshooting Guide ....................27
6 Service Parts Replacement .............28
A.GlassReplacement-DoorAssembly ...............................28
B.BafeRemoval ................................................................28
C.ConvectionBlowerReplacement .....................................29
E.Combustion(Exhaust)BlowerReplacement ....................29
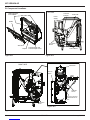
7 Reference Materials..........................30
A. Component Functions .......................................................30
B.ComponentLocations ........................................................32
C. Exploded Drawings............................................................33
D. Service Parts List...............................................................34

4 7034-276 January 29, 2014
MT. VERNON AE
Page 54 7022-122 January 19, 2011
R
Castile Pellet Insert
4
021-645C 12-29-10 Page 1 of 2
Hearth & Home Technologies Inc.
LIMITED LIFETIME WARRANTY
H
earth & Home Technologies Inc., on behalf of its hearth brands (”HHT”), extends the following warranty for
H
HT gas, wood, pellet, coal and electric hearth appliances that are purchased from an HHT authorized dealer.
W
ARRANTY COVERAGE:
H
HT warrants to the original owner of the HHT appliance at the site of installation, and to any transferee taking ownership
o
f the appliance at the site of installation within two years following the date of original purchase, that the HHT appliance
w
ill be free from defects in materials and workmanship at the time of manufacture. After installation, if covered compo-
n
ents manufactured by HHT are found to be defective in materials or workmanship during the applicable warranty period,
H
HT will, at its option, repair or replace the covered components. HHT, at its own discretion, may fully discharge all of its
o
bligations under such warranties by replacing the product itself or refunding the verified purchase price of the product
i
tself. The maximum amount recoverable under this warranty is limited to the purchase price of the product. This warranty
i
s subject to conditions, exclusions and limitations as described below.
W
ARRANTY PERIOD:
W
arranty coverage begins on the date of original purchase. In the case of new home construction, warranty coverage
begins on the date of first occupancy of the dwelling or six months after the sale of the product by an independent,
a
uthorized HHT dealer/ distributor, whichever occurs earlier. The warranty shall commence no later than 24 months
f
ollowing the date of product shipment from HHT, regardless of the installation or occupancy date. The warranty period fo
r
parts and labor for covered components is produced in the following table.
T
he term “Limited Lifetime” in the table below is defined as: 20 years from the beginning date of warranty coverage for
g
as appliances, and 10 years from the beginning date of warranty coverage for wood, pellet, and coal appliances. These
t
ime periods reflect the minimum expected useful lives of the designated components under normal operating conditions.
See conditions, exclusions, and limitations on next page.
Parts Labor Gas Wood Pellet EPA
Wood Coal Electric Venting
XXXXXXX
All parts and material except as
covered by Conditions,
Exclusions, and Limitations
listed
XXX Igniters, electronic components,
and
g
lass
XXXXX Factor
y
-installed blowers
X Molded refractor
yp
anels
X Fire
p
ots and burn
p
ots
5
y
ears 1
y
ear X X Castin
g
s and baffles
7 years 3 years X X X Manifold tubes,
HHT chimne
y
and termination
10
y
ears 1 year X Burners, logs and refractory
Limited
Lifetime 3 years X X X X X Firebox and heat exchanger
XXXXXXX All replacement parts
be
y
ond warrant
yp
eriod
Warranty Period HHT Manufactured Appliances and Venting
1 Year
Components Covered
3 years
2 years
90 Days
C. Warranty Policy

January 29, 2014 7034-276 5
MT. VERNON AE
R
January 19, 2011 7022-122 Page 55
Castile Pellet Insert
4021-645C 12-29-10 Page 2 of 2
WARRANTY CONDITIONS:
This warranty is void if:
LIMITATIONS OF LIABILITY:
WARRANTY EXCLUSIONS:
-
-
-
-
-

6 7034-276 January 29, 2014
MT. VERNON AE
EPACertied: 4.16 grams per hour
Efciency: 81.4% - 83.6%
EPA BTU Output: 14,620-52,460/hr
Heating Capacity: 2,400 - 3,800 square feet
depending on climate zone
Vent Size: 3” or 4” Type “L” or “PL”
Fuels: Pellets, Shelled Field Corn,
WheatandBlackSunower
Seeds
Shipping Weight: 429lbs
*BTUwillvary,dependingonthetypeoffuelyouuseinyour
appliance.ConsultyourQuadra-Firedealerforbestresults.
C.GlassSpecications
This stove is equipped with 5mm ceramic glass. Replace
glass only with 5mm ceramic glass. Please contact your
dealer for replacement glass.
D. Electrical Rating
115 VAC, 60 Hz, Start 5 Amps, Run 1.25 Amps
Model Mt.VernonPelletStove
Laboratory OMNITestLaboratories,Inc.
Report No. 061-S-68-6
Type SolidFuelRoomHeater/PelletFuel
BurningType
Standard ASTME1509-04,ULCS627-00and
ULC/ORD-C1482-M1990RoomHeater
PelletFuelBurningtypeand(UM)
84-HUD,MobileHomeApproved.
FCC Complies with Part 15 of FCC Rules.
Operationissubjecttothefollowing
twoconditions:(1)thisdevicemaynot
causeharmfulinterference,and(2)this
device must accept any interference
received, including interference that may
cause undesired operation.
• Installationanduseofanydamagedappliance.
• Modicationoftheappliance.
• Installation other than as instructed by Hearth & Home
Technologies.
• Installationand/oruseofanycomponentpartnotapprovedby
Hearth&HomeTechnologies.
• Operatingappliancewithoutfullyassemblingallcomponents.
• Operatingappliancewithoutlegsattached(ifsuppliedwithunit).
• DoNOTOverre-Ifapplianceorchimneyconnectorglows,
youareoverring.
Anysuchactionthatmaycausearehazard.
1 Listing and Code Approvals
A.ApplianceCertication
NOTE:Hearth&HomeTechnologies,manufacturerof
this appliance, reserves the right to alter its products, their
specicationsand/orpricewithoutnotice.
NOTICE: This installation must conform with local codes. In
theabsenceoflocalcodesyoumustcomplywiththeASTM
E1509-04, ULC S627-00, (UM) 84-HUD and ULC/ORD-
C-1482.
Improper installation, adjustment, alteration, service or
maintenancecancauseinjuryorpropertydamage.
Forassistanceoradditionalinformation,consultaqualied
installer, service agency or your dealer.
Quadra-FireisaregisteredtrademarkofHearth&Home
Technologies.
WARNING
FireRisk.
Hearth&HomeTechnologiesdisclaimsany
responsibilityfor,andthewarrantywillbe
voidedby,thefollowingactions:
B.BTU&EfciencySpecications
E. Mobile Home Approved
• Thisapplianceisapprovedformobilehomeinstalla-
tions when not installed in a sleeping room and when
anoutsidecombustionairinletisprovided.
• Thestructuralintegrityofthemobilehomeoor,ceil-
ing,andwallsmustbemaintained.
• The appliance must be properly grounded to the
frameofthemobilehomeanduseonlyListedpellet
vent Class “L” or “PL” connector pipe.
• OutsideAirKit,partOAK-ACCmustbeinstalledina
mobilehomeinstallation.

January 29, 2014 7034-276 7
MT. VERNON AE
User Guide
2 Operating Instructions
A. Fire Safety
To provide reasonable re safety, the following should be
given serious consideration:
• InstallatleastonesmokedetectorandCO monitor on each
oorofyourhome.
• Locatedetectorsawayfromtheheatingapplianceandclose
to the sleeping areas.
• Follow the detector’s manufacturer’s placement and
installation instructions and maintain regularly.
• ConvenientlylocateaClassAreextinguishertocontend
withsmallres.
• Intheeventofahopperre:
• Evacuatethehouseimmediately.
• Notifyredepartment.
B. Non-Combustible Materials
Materialwhichwillnotigniteandburn,composedofany
combinationofthefollowing:
- Steel - Plaster
-Brick -Iron
- Concrete - Tile
- Glass - Slate
MaterialsreportedaspassingASTM E 136, Standard
Test Method for Behavior of Metals, in a Vertical Tube
Furnace of 750° C.
C. Combustible Materials
Materialmadeof/orsurfacedwithanyofthefollowing
materials:
- Wood - Compressed Paper
-PlantFibers -Plastic
-Plywood/OSB -SheetRock(drywall)
Anymaterialthatcanigniteandburn:ameproofedornot,
plastered or un-plastered.
D. Fuel Material and Fuel Storage
Pelletfuelqualitycangreatlyuctuate.This appliance has
beendesignedtoburnawidevarietyoffuels,givingyouthe
choice to use the fuel that is most economical in your region.
Hearth&HomeTechnologiesstronglyrecommendsonlyusing
PelletFuelInstitute(PFI)certiedfuel.
FuelMaterial
• Madefromsawdustorwoodby-products
• Shelledeldcorn&otherbiomassfuels
• Dependingonthesourcematerialitmayhaveahighor
low ash content.
HigherAshContentMaterial
• Hardwoodswithahighmineralcontent
• Fuelthatcontainsbark
• Standardgradepellets,highashpellets,cornandother
biomassfuels
LowerAshContentMaterial
• Softwoods
• Fuelswithlowmineralcontent
• Premiumgradepellets
Shelled Field Corn
• Mustbe15%orlessmoisturecontent.
• Mustbecleanandfreefromdebris
• Neverburncornstraightfromtheeld
• Stalkparts,excessivenesandcobremnants,etc.willclog
the auger mechanism
• Cornwithexcessivegraindustmustbescreened bysifting
with3/16inch(4.7mm)meshscreening
CAUTION! Do not burn fuel that contains an additive;
(such as soybean oil).
• Maycausehopperres
• Damagetoproductmayresult
Readtheingredientslistonthepackage.Ifyouarebuying
cornorwheattheonlyingredientthatshouldbelistedis
cornorwheat.
WARNING! Risk of Chemical Poisoning!
DoNOTburntreatedseedcorn
•Chemicalpesticidesareharmfulorfatalifswallowed
•Burningtreatedseedcornwillvoidyourwarranty
Clinkers
Mineralsandothernon-combustiblematerialssuchassand
willturnintoahard,glass-likesubstancecalledaclinkerwhen
heatedintherepot.
Trees from different areas will vary in mineral content. That
iswhysomefuelsproducemoreclinkersthanothers.
Moisture
Alwaysburndryfuel.Burningfuelwithhighmoisturecontent
takes heat from the fuel and tends to cool the appliance,
robbingheatfromyourhome.Damppelletfuelcanclogthe
feed system.
FireRisk.
WARNING
• Donotoperateappliancebeforereadingand
understanding operating instructions.
• Failuretooperateapplianceproperlymaycause
ahousere.

8 7034-276 January 29, 2014
MT. VERNON AE
HOT WHILE IN OPERATION. KEEP CHILDREN, CLOTHING
AND FURNITURE AWAY. CONTACT MAY CAUSE SKIN
BURNS.
CAUTION
Size
•
Pelletsareeither1/4inchor5/16inch(6-8mm)indiameter
• Lengthshouldbenomorethat1-1/2inches(38mm)
• Pellet lengths can vary from lot to lot from the same
manufacturer
• Duetolengthvariations,theameheight(feedrate)may
needadjustingoccasionally.Seepage 9 for instructions.
Performance
• Higherashcontentrequirestheashdrawertobeemptied
more frequently
• Hardwoodsrequiremoreairtoburnproperly
• Setwallcontrolto“UtilityPellet”iftherepotandashpan
arellingquickly.Thiswillcausetheauto-cleansystem
toemptytherepotmoreoften.
• Premiumwoodpelletsproducethehighestheatoutput.
• Burningpelletslongerthan1-1/2inches(38mm)cancause
an inconsistentfuelfeedrateand/ormissedignitions.
Werecommendthatyoubuyfuelinmulti-tonlotswhenever
possible.However,wedorecommendtryingvariousbrands
beforepurchasingmulti-tonlotstoensureyour satisfaction.
CAUTION! Testedandapprovedforwoodpellets,shelled
eldcorn,wheatandblackoilsunowerseeds.Burningof
anyothertypeoffuelvoidsyourwarranty.
Changing to Different Fuel Type
• Empty the hopper of the previous fuel
•
Thoroughlyvacuumhopperbeforellingwiththenewfuel
• SelecttheappropriatesettingontheFUELSELECTION
screen on the thermostat wall control
The burn rate, BTU content and heat output will all vary
depending on the fuel selected.
Storage
• Woodpelletsshouldbeleftintheiroriginalsealedbaguntil
usingtopreventmoistureabsorption.
• Shelledcorn,wheatorsunowerseedsshouldbestoredin
atightcontainertopreventitfromabsorbingmoisturefrom
damporwetoors.
• Thiswillalsopreventrodentsfrombecomingaproblem
.
• Donotstoreanypelletfuelwithintheclearancerequirements
or in an area that would hinder routine cleaning and
maintenance.
E. General Operating Information
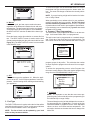
1. Thermostat Wall Control - Automatic Setting
The appliance is like most modern furnaces; when the
thermostat wall control calls for heat, your appliance will
automatically light and deliver heat.
When the room is up to temperature and the wall control is
satisedtheappliance will shut down.
Intheautomaticsettingtheheatoutputleveliscontrolledby
thewallcontrol.Select“Automatic”ontheAUTO/MANUAL
screen. Figure 8.1.
2. Thermostat Wall Control - Manual Setting
Whenyouselect“Manual”ontheAUTO/MANUALscreenthe
appliance will still automatically turn on and off according to
the temperature setting.
However,youwillbeabletomanuallycontroltheheatoutput
levels. Adjust the heat output levels by using the HEAT
OUTPUTLEVELscreen.Figure 8.2.
AUTO/MANUAL SETTINGS
Automatic
Manual
Off
Medium High
3. Auto-Clean Firepot System
Yourapplianceisequippedwithanautomaticrepotcleaning
systemthatwillchangethefrequencyofcleaningbasedon
thefuelbeingburned.
The auto-clean system will clean itself immediately on initial
plug in. If there is a power outage, as soon as power is
restoreditwillrecycleandcleanitselfifthereisnoreinthe
repot.
NOTE:Userisresponsiblefor removingthe ashfromthe
ash drawer.
Figure 8.1
Figure 8.2
Read and understand Section 3: Thermostat Wall
ControlOperatingInstructionsfordetailedoperating
instructions. The wall control is an integral part of how to
operate this appliance.
Testedandapprovedforwoodpellets,shelledeldcorn,
wheatandblackoilsunowerseeds.Burningofany
other type of fuel voids your warranty.
CAUTION

January 29, 2014 7034-276 9
MT. VERNON AE
3. Automatic or Manual Setting
Theautomaticsettingwillcontroltheheatoutputbasedon
the comfort level selection. The manual setting allows you
to manually control the heat output settings. See page 27,
Ignition Cycles.
NOTE: See the Wall Control Thermostat manual for
detailed instructions.
I. Fire Characteristics and Flame Height
Adjustment
(FeedRate)Aproperlyadjustedrewillhaveanactive
amepatternandtheamewillriseandfallsomewhat.
This is normal.
• OnHIGHsetting,theamewillextendapproximately8
inches(203mm)outoftherepot.Ifitisnot8inches
(203mm)tall,increasetheameheight.
• OnMEDIUMorLOWsettingtheamewillbeshorter.
• Reducetheameheightiftherehastallameswith
blacktailsandseemssomewhatlazy.Thismayalso
indicatethattherepotand/orheatexchangerneeds
tobecleaned.RefertoSection 4forMaintenanceand
Cleaning Instructions.
AdjustingtheFlameHeight(FeedRate)
• Setyourapplianceto“MANUAL”modeonthewallcon-
trol.
• SettheheatoutputleveltoHIGH.
• Adjusttheameheightusingthe“FLAMEHEIGHTAD-
JUST” screen on the wall control. Figure 9.3.
F. Before Your First Fire
• First,makesureyourappliancehasbeenproperlyinstalled
andthatallsafetyrequirementshavebeenmet.
• Payparticularattentiontothereprotection,ventingand
thermostat wall control installation instructions.
• Doublecheckthattheashpan,hopperandreboxare
emptyandthenclosethereboxdoor.
NOTICE:
Thetipofthermocouplemustbeincontactwiththe
inside end of the thermocouple cover or missed ignitions can
occur.
G. Filling the Hopper with Fuel
• Checkthehopperandmakesureitisemptybeforelling
with fuel.
• Openthecasttophopperlid.
• Donotoverllthehopper.Thehopperlidmustbecom-
pletely closed to maintain proper vacuum and for the
feedmotortooperate.AnerrorICONwillappearonthe
wall control if the hopper lid is not properly closed.
• Donot leave anypartof the fuelbagon the appliance
afterllinghopper.
H. Starting Your First Fire
1. Fuel Selection
Tostartyourrstre,youmust:
• Select the appropriate fuel on the FUEL SELECTION
screen on the thermostat wall control to match the fuel
youhavechosentoburn.
• Iftheproper fuelis notselected yourappliance willnot
operate properly.
• Forexample,ifyouhaveselectedwoodpelletsandyou
areburningcorn,theappliancemaynotlight,itmaygo
out or overfeed. Figure 9.1.
NOTE: Ifyouarelightingyourapplianceforthersttime:
• Thefeedtubewillbeemptyand itcantakesometimeto
llitwithfuelbeforeyouwillseeare
• Putahandfuloffuelintherepot(priming)tospeedup
the process. You can also do this when you have run
completely out of fuel.
Sunflower Seeds
Corn
Utility Pellet
Softwood Pellet
Wheat
Hardwood Pellet
DONE SELECT
FUEL SELECTION
2. Comfort Level Selection
Onceyourfuelisselected,selectthetemperatureatthedesired
settingontheSETCOMFORTLEVELscreen.Figure 9.2.
Figure 9.2
Figure 9.1
74ºF
Figure 9.3

10 7034-276 January 29, 2014
MT. VERNON AE
J. Clear Space
WARNING! RISK OF FIRE! DoNOTplacecombustible
objectsinfrontoftheappliance.Hightemperaturesmay
igniteclothing,furnitureordraperies.Maintainaminimum
clearanceof3feet(914mm)infrontofappliance.
Mantel:
Avoid placing candles and other heat-sensitive
objectsonmantelorhearth.Heatmaydamagethese
objects.
NOTICE: Clearancesmayonlybereducedbymeansap-
provedbytheregulatoryauthorityhavingjurisdiction.
WARNING! RISK OF FIRE! Keepcombustiblematerials,
gasolineandotherammablevaporsandliquidsclearof
appliance.
• DoNOTstoreammablematerialsintheappliance’s
vicinity.
DONOTUSEGASOLINE,LANTERNFUEL,KEROSENE,
CHARCOALLIGHTERFLUIDORSIMILARLIQUIDSTO
STARTOR“FRESHENUP”AFIREINTHISHEATER.
• DONOTBURNGARBAGEORFLAMMABLEFLUIDSSUCH
ASGASOLINE,NAPHTHAORENGINEOIL.
• DONOTUSECHEMICALSOFFLUIDSTOSTARTTHEFIRE.
Keepallsuchliquidswellawayfromtheheaterwhileitisin
useascombustiblematerialsmayignite.
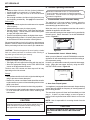
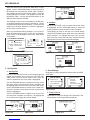
K. Ignition Cycles
Theapplianceengineiscontrolledbythedigitalthermostat
wall control. The digital display on the wall control will tell
you what your appliance is doing in the upper left corner
(SystemStatus).Figure 10.1.
READY
73 Set at: 73
12:30 PM
HEAT OUTPUT
MENU
System Status
Every time the thermostat calls for heat, the appliance steps
throughvecycles:
1 Start-Up Cycle 4 Shutdown Cycle
2 Soft-Start Cycle 5 Auto-Clean Cycle
3 Heating Cycle
Thedurationandcharacteristicsofthesecyclesmaybedif-
ferent with each type of fuel selected.
Figure 10.1
WARNING! RISK OF FIRE!
DoNOToperateappliance:
• Withappliancedooropen
• Withrepotooropen
• Withashpanremoved
1. Start-Up Cycle
During this cycle:
• Igniter turns on for 90 seconds to heat up the air in the
repot
• Combustionblowerstarts
• Vacuum switch comes on
• Feedmotorturnsonaddingfueltotherepotandthe
appliancewaitsfortheretostart
The duration of start-up depends on the type and quality of
fuelused.Itisnormaltoseesomesmokeduringtheigni-
tion process as moisture evaporates and the fuel lights. The
smokewillstoponcetherestarts.
2. Soft Start Cycle (SS-Low / SS-Med)
Oncethereislit:
• The appliance moves into the low soft-start cycle as it
continuestobuildthere
• Morefuelwillbeadded
• Astherebuilds,theappliancewillchangetomedium
soft-start mode
• Theheatingcyclebegins
3. Heating Cycle ( Auto / Man - L, ML, M, MH, H)
Thereare two choices in theAutomatic / Manual menu of
how your appliance will operate:
Automatic Mode
• The wall control will turn the heat output level up or down
depending on how far the room temperature is from the
desired temperature
• ThedigitaldisplaywillreadAUTO:M,i.e.automatic-medi-
um level
• As the room temperature approaches the desired tem-
perature, the appliance will turn down to lower settings
• Whenthehomereachesyoursettemperature,theappli-
ance will go into the shutdown cycle

January 29, 2014 7034-276 11
MT. VERNON AE
Manual Mode
• Set the heat output setting from the main screen
• TherightbottombuttonwillreadHEATOUTPUT
• Youcanoperatetheappliancefromanyofthe5levels
• Onthelowestlevel(MAN:L)theappliancewillstayon
longer,burnlessfuelperhour,andwilltakelongerto
bringthehomeuptoyourdesiredtemperature
• Onthehighestsetting(MAN:H)theappliancewillburn
morefuelperhour,andbringyourhomeuptotempera-
turemorequickly
•
InManualmodetheheatoutputdoesnotchangebutwill
stay at the setting you chose until the comfort level is
reached (meaning the thermostat has been satised).
TurntoOFFtostopoperation.
4. Shutdown Cycle
Onceyourhomehasreachedyoursettemperature:
• Appliancewillstopfeedingfuelandallowretodiminish
• Convectionblowerwillcontinuetorununtiltheappliance
cools to appropriate temperature
• Appliancewillbegintheauto-cleancycle
5. Auto-Clean Cycle
Therepotauto-cleansystemwillcycle:
• Whentheapplianceisrstpluggedin
• When the house reaches temperature and the appliance
shuts down
• Atprescribedintervals,dependingonthetypeoffuelse-
lected
• Whenstartingupafteranelectricalinterruption
If your appliance is running and the auto-clean cycle is initi-
ated, the appliance will revert to shutdown cycle.
• Theooroftherepotwillopenanddumptheashinto
the ash pan
• It takes approximately 2 minutes to complete the au-
to-clean cycle
• Theoorwillthenshut,andifthethermostatisstillcalling
forheat,therewillstartagain
• Duringthisauto-cleancycle,theconvectionblowermay
continuetorun.Thecombustionblowerwillcontinueto
run.
Additional Screen Messages:
READY It is telling you that the home is up to temperature
anddoesn’tneedanyheat.
- - - - - The screen will show 5 dashes when the wall
controlandthecontrolboardareNOTcommunicatingwith
eachother.Checkthatthewiringonthethermostatisprop-
erly connected.
MAINTENANCE BURN This indicates the appliance is
operating on battery backup, prior to the auto-clean. The
maintenanceburnwillkeepthesystemfromshuttingdown
as the appliance will not automatically re-light in battery
back-upmode.
OFF TheAUTO/MANUALSETTINGscreenhasbeenset
toOFF.SettheappliancetoOFFwhenperformingperiodic
maintenance to prevent an unexpected startup.
BLANK SCREEN TheON/OFFswitchmaybeinOFF
position or make sure electrical power is supplied to the
appliance.TurntoONposition.
WARNING
FireRisk
DoNOToperateappliance:
• Withappliancedooropen.
• Withrepotooropen.
DoNOTstorefuel:
• Closerthanrequiredclearancestocom-
bustiblestoappliance.
• Withinspacerequiredforloadingorash
removal.

12 7034-276 January 29, 2014
MT. VERNON AE
L. Frequently Asked Questions
ISSUES SOLUTIONS
1. Metallicnoise 1. Noiseiscausedbymetalexpandingandcontractingas
it heats up and cools down, similar to the sound pro-
ducedbyafurnaceorheatingduct.Thisnoisedoesnot
affect the operation or longevity of your appliance.
2. Ashbuild-uponglass 2. This is normal. Clean the glass.
3. Glass has turned dirty 3. Excessivebuildupofash.Thelowerburnsettingswill
producemoreash,thehigherburnsettingsproduce
less.Themoreitburnsonlowthemorefrequentclean-
ing of the glass is required.
4. Firehastallameswithblacktailsandislazy 4. Theameheightadjustmentneedstobereducedor
therepotneedscleaning.Heatexchangerorexhaust
blowerneedscleaning.
5. Excessivesmokeystart-up 5. Eithertherepotisdirtyorthereistoomuchfuelat
start-up and not enough air.
6. Largeameatstart-up 6. Thisisnormal.Flamewillsettledownoncethereis
established.Somesmokeisnormal.
7. MechanicalNoise 7. Theooroftherepotintheauto-cleansystemmay
makesomenoiseasitscrapestheashintotheash
pan.
Contact your dealer foradditionalinformationregardingoperationandtroubleshooting.
Visitwww.quadrare.comtolocateadealer.
Odorsandvaporsreleasedduringinitialoperation.
• Curingofhightemperaturepaint.
• Openwindowsforaircirculation.
Odorsmaybeirritatingtosensitiveindividuals.
CAUTION

January 29, 2014 7034-276 13
MT. VERNON AE
A. Introduction
Welcome to the Quadra-Fire family. This manual will help
you understand and operate the wall control attached to
your new pellet appliance.
TheQuadra-Fire WallControl is not just a traditionalther-
mostat,butanintegralpartofthepelletappliancesystem.
While it has many of the features one would expect from
an advanced thermostat, including programmable setback
capabilitiesandcurrenttemperaturedisplay,italsoindicates
thesystem’scurrentoperatingcycleandstate.Itdoesthis
bycommunicatingwiththeapplianceviaawiredconnection.
Additionally, it allows you to set parameters that will optimize
the performance of your pellet appliance system. These pa-
rameters are accessed with an easy to navigate menu sys-
tem.
B. Language Selection
The language selection function is under the USER
SETTINGS found on pages 17. Please refer to that
section for complete detailed instructions.
C. The Main Screen
Thekeytobeingcomfortablewhileoperatingyournewwall
control is to familiarize yourself with the main screen. The
main screen shows, at a glance, the status of the system,
the most important settings and the current temperature. Ad-
ditionally, the main screen indicates with simple icons many
useractionsrequiredtokeepyourapplianceworkingasin-
tended. Figure 13.1.
READY
73
Set at: 73
12:30 PM
HEAT OUTPUT
MENU
Current Time
System Status
Current Set
Temperature
Current
Temperature
Function Labels for the Function Buttons
Notifications
Icons
Figure 13.1
Figure 13.2
1. System Status Codes
The status area is used to indicate the current status of the
system. It indicates if the system is running in automatic or
manual cycle, if it is turned on or off and where it is in the
operating sequence.
a. START-UP
Indicates that the appliance is in start-up cycle and is in
the process of lighting an initial charge of fuel.
b. SS-LOW or SS-MED (SS = soft start)
Indicates the soft-start portion of the lighting sequence. In
thesestagestherebeginstograduallybuildtooperating
temperature.
c. AUTO: (x) or MAN: (x) (x) = heat output level
Indicatesboththeoperatingcycle(automaticormanual)
and the current heat output level. The heat output level
willbe“H”high,“MH”mediumhigh,“M”medium,“ML”me-
dium low and “L” low.
d. READY
Indicates that the system is turned on and is functioning
normally,butthereisnocallforheat(theroomtempera-
tureisnotbelowthesettemperature).
e. SHUTDOWN
Indicates the system is shutting down, either because it
is no longer calling for heat or the maximum burn time
hasbeenreachedandthesystemmustrunanauto-clean
cycle.
f. AUTO-CLEAN
Indicatesthesystemisrunningtherepotauto-cleancy-
cle.
g. OFF
Indicatesthesystemhasbeenshutdownbytheuser.
h. MAINT BURN (Battery Back-up Only)
Themaintenanceburnistokeepthesystemfromshutting
downwhenoperatingonbatterybackup.Theappliance
willnotautomaticallyre-lightinbatteryback-upmode.
2. Current Time
Indicates the current time. The time is used for the program-
mablesetbackfeaturesofthewallcontrol.
3. Set Temperature
Indicates the current set temperature. It will change auto-
matically as the control progresses through the 7 day set-
backprogram.IfthewallcontrolisinHOLDTEMPcyclethe
13 Volts 12 Volts 11 Volts Battery
Below
10 Volts
HopperLidOpen DoorOpen Low Fuel
Fully Charged 2/3Charge 1/3Charge No Charge
OperatingonOptionalBatteryBackup
3 Wall Control Operating Instructions

14 7034-276 January 29, 2014
MT. VERNON AE
Auto/Manual/Off
User Settings
Fuel Type
MENU
Set Comfort Level Program
Set Date
Service Info
MENU
Set Day/Time
Figure 14.1
“Set at:” indication will change to “Hold at:” and displays the
operating temperature setting.
4.NoticationIcons
The system notication area uses icons to indicate if an
action needs to be taken. In battery mode it indicates the
approximatechargelevelofthebattery.5. Function But-
tons
Thefunctionbuttonshavetwolabelsabovetheminthedis-
playarea.Theirlabelscanchangedependingonthemenu
screen.Onthemainscreentheleftbuttonwillbringupthe
systemmenu and therightbutton has functionalityonlyin
MANUALcycle.Figure 14.2.
5. Current Temperature
The current temperature area indicates the temperature of
the room where the wall control is located. The tempera-
turedisplayedcanbeinunitsofFahrenheitorCelsius.The
desired units can be selected via the system menu. See
Figure 6.5 on page 6.
D. General Information About Using the Wall
Control
Whenabuttonispressedandthescreenchangesfromthe
mainscreentooneoftheotherscreens,thebacklightwillil-
luminatethedisplayarea.Asbuttonsarepressed,theback-
lightcontinuestobeilluminated.
Most screens have a DONE button which can be used to
return to the previous screen ultimately returning to the main
screen.
Thewallcontrolwillautomaticallyrevertbacktothestarting
screen if there is no activity for 15 seconds except for the
COMFIRMFUELCHANGEscreen.Themainscreenwillbe
illuminated for an additional 10 seconds and the backlight
will shut off.
Ifthewallcontrolissubjectedtoastaticshock,thescreen
maygoblank.Ifthishappens,wait25secondsandpress
anybutton. This will reset the screenrestorefunctionality
andturnonthebacklight.Ifthisdoesnotwork,callyour
dealer.
E. The Main Menu
The menu is the heart of customizing the operation of the
pelletappliancesystemtoyourpersonalliking.Thechoices
on this menu are:
1. Set Comfort Level (Temperature)
The most basic operation of the wall control is to turn the
appliance on or off depending on the requirement for heat.
Fromthemainscreen,theSETCOMFORTLEVELscreen
canbeactivatedbypressingtheUPorDOWNbuttononthe
right side of the display area.
Thersttimeeitherbuttonispressedthedisplaychangesto
theSETCOMFORTLEVELscreenandshowsthecurrent
settemperature.SubsequentpressesorholdingtheUPor
DOWNbuttonwillchangethesettemperature. Figure 14.2.
You can override the programming either permanently or
temporarily. The HOLDTEMP button (lower right) on the
SET COMFORT LEVEL screen is used to override preset
programming. Figure 14.3. BypressingtheHOLDTEMP
button,thecurrentsettemperaturewillpermanentlyoverride
anyprogrammedtemperatureinthe7daysetbackprogram-
ming. This is a convenient way of overriding a program when
your schedule changes temporarily and you don’t want to
reprogramthesetbackfunctionsonthewallcontrol.
Toreleasethepermanentoverride,pressthebuttonlabeled
RESUMEwhenintheHOLDTEMPcycle.Pressingthebut-
ton again will resume the programming at the next program
interval. Figure 14.4.
To temporarily override the programming, use the UP and
DOWNbuttonsonlyanddonotpresstheHOLDTEMPbut-
ton. The display will show how long the new temperature will
hold before it returns to the next scheduled programming.
Figure 14.3.
SET COMFORT LEVEL
ON HOLD
RESUME
DONE
74ºF
Figure 14.3
Figure 14.2
Function Buttons
Buttons
Up
Down
Figure 14.4
2. Auto / Manual / Off Selection
a. Automatic
IntheAUTOMATICcyclethewallcontrolwillturntheap-
pliance on and off automatically and also turns the heat
output level up or down depending on the temperature
setting. The further away the room temperature is from
the set temperature, the higher the heat output.

January 29, 2014 7034-276 15
MT. VERNON AE
b. Manual
InMANUALcycle,theheatoutputremainsthesame
regardlessofthedifferencebetweenthesetandroom
temperatures. The wall control will function as a simple
on/offthermostat.WhenthesystemissettoMANUAL
theHEATOUTPUTselectionisaddedinthelowerright
corner.
Pressthebuttonunderthisselection toaccess thisfea-
ture.TheHEATOUTPUTscreenisusedtosetthelevel
of heat produced whenever the wall control calls for heat.
Figure 15.3. TheHEATOUTPUTscreenisnotaccessible
inAUTOMATICcycle.
AUTO/MANUAL SETTINGS
Manual
Off
Automatic
Manual
Medium
AUTO/MANUAL SETTINGS
Automatic
Manual
Off
Figure 15.1
Figure 15.2
Figure 15.3
3. Fuel Type
TheFUELTYPEscreenisusedtoselectthefuelthatwillbe
used with the pellet system. The list on this screen indicates
allfuelchoicesavailabletoburnintheappliance.
NOTE: The list of fuels can be updated by your local
dealer as they become available.
Figure 15.5
c. OFF
This selection turns the appliance off. When the appli-
anceissettoOFF,itwillnotlightregardlessofroomtem-
perature. Use this setting when cleaning and maintaining
your appliance.
Manual
Off
Automatic
Figure 15.4
Toselectafueltype,usetheUP/DOWNbuttonstoscrollto
thedesiredfueltypeandthenpressthebuttonunder“Se-
lect”. The arrow will change to indicate the currently select-
ed fuel.
NOTE:Ifyouareburningahighashfuelsetthefuelselec-
tion to “Utility Pellets”.
Whenpurchasingcornorwheattoburninyourappliance,
readtheingredientlabelverycarefully.Do NOT purchase
fuel that contains any additivessuchasoils(i.e.soybean
oil)andmealsasitwillresultinpoorapplianceperformance.
Ifyouarebuyingcornorwheattheonlyingredientthatshould
belistediscornorwheat.
4. Program (7 Day Programming)
The wall control is pre-programmed at 68oF for all time set-
tings. It will remain there until it is re-programmed.
Thewallcontrolcanbeprogrammedasasetbackthermo-
stat.Eachdayoftheweekhasfourprogramperiods.The
wallcontrolmenushavesomefeaturesthatmakeiteasyto
Monday
Full Week
Mon-Fri
Sat-Sun
PROGRAMMING RANGE
Figure 15.6
Sunflower Seeds
Corn
Utility Pellet
Softwood Pellet
Wheat
Hardwood Pellet
DONE SELECT
FUEL SELECTION
a. Full Week
NOTE: It is important to note that the most recent pro-
gramming entry will override all previous programming for
an individual day or range of days.
The small triangle on the left side indicates the current ac-
tive programming line. Figure 15.6. For each of the four
intervalsavailabletoprogramtherearethreeadjustable
values: set hour, set minutes and set temperature. You
will need to increase or decrease the hour to change from
AMtoPM.
programgroupsofdaysalike.Thisminimizesthenumber
of steps required to program the wall control for most appli-
cations.
To access the programming screen, select Program from
the menu screen and then select the desired programming
rangefromthePROGRAMMINGRANGEscreen.

16 7034-276 January 29, 2014
MT. VERNON AE
PROGRAM: Full Week
Wake: 6:30 AM 68 F
o
Day: 7:59 AM 68 F
o
Evening: 4:00 PM 68 F
o
Night: 11:00 PM 68 F
o
DONE SET/NEXT
PROGRAM: Full Week
Wake: 6:30 AM 68 F
o
Day: 7:59 AM 68 F
o
Evening: 4:00 PM 68 F
o
Night: 11:00 PM 68 F
o
DONE SET/NEXT
PROGRAM: Full Week
Wake: 6:30 AM 68 F
o
Day: 7:59 AM 68 F
o
Evening: 4:00 PM 68 F
o
Night: 11:00 PM 68 F
o
DONE SET/NEXT
Figure 16.1 Figure 16.2
Figure 16.3
5. Set Day/time
a. Set Day/Time
Inorderforthesetbackfunctiontoworkproperlythewall
controlmustbeawareofthecurrenttime.TheSETDAY/
TIMEscreen is usedtosetthe system clock. Whenthe
screenisenteredthedayoftheweekishighlighted.
UsetheUP/DOWNbuttonstochangethistothecurrent
dayoftheweek.Pressthebuttonunder“Set/Next”and
thehighlightwillbemovedtothecurrenthoureld.Again,
usetheUP/DOWNbuttonstosetthistothecurrenthour.
Pressthe“Set/Next”buttonagainandthecurrentminute
display is highlighted.
UsetheUP/DOWNbuttonstoadjust tothe correctmin-
utesandpress“Set/Next”onelasttime.Thehighlightwill
movebacktotheoriginaldayofweekdisplay.
Wednesday 10 47
DONE SET/NEXT
Figure 16.4
Wednesday 47
10
Wednesday 4710
Figure 16.5
Figure 16.6
b. Set Date
When the SET DATE screen is entered the month name
is highlighted. Use the UP/DOWN buttons to select the
propermonththenpressthebuttonunder“Set/Next.”
The highlight will move to the day of the month display.
UsingtheUP/DOWNbuttons,selectthecurrentdatethen
press“Set/Next.”Thehighlightwillmovetotheyeardis-
play.Selectthecurrentyearandpress“Set/Next”thenthe
highlightwillbebackonthemonthnamedisplay.
September
2007
September
2007
28
September
200728
Figure 16.7 Figure 16.8
Figure 16.9
6. User Settings
Items that are rarely changed are stored under the USER
SETTINGS.
a. Temp Units F/C
TEMPUNITSisusedtochangefromFahrenheittoCel-
siusandbackforthetemperaturesdisplayed.
Figure 16.10
Figure 16.11
USER SETTINGS
Temp Units F/C
Flame Height Adjust
Temp Differential
USER SETTINGS
Temp Cal
Properties
Elevations
Conv Blower Speed
Whenthescreenisrstenteredthe“WakeHour”ishigh-
lighted.UsetheUP/DOWNbuttonstoadjustthehourto
thedesiredhourandpressthebuttonunder“Set/Next”.
Thehighlightwillmovetotheminutesdisplay.Adjustthe
minutesandpress“Set/Next.”Thehighlightisnowonthe
temperature value. Set the desired temperature for the
Wakeperiodandpress“Set/Next.”
The highlight is now on the hour display for the Day peri-
od, and the triangle has moved to the second line. Contin-
ueprogrammingeachvalueasdesired.(Tostorethenal
valuebesuretopress“Set/Next”toreturnthehighlightto
therstvalueonthescreen.)
Whenyouarenishedmakingchanges,orifyoujusten-
tered the programming screen to view the set program,
press “Done” or let the display return to the main screen
automatically.

January 29, 2014 7034-276 17
MT. VERNON AE
b. Flame Height Adjust
FLAMEHEIGHTADJUSTisusedtoadjustameheight(fuel
feedrate)forspecicinstallationandfueltype.Thedealer
will usually adjust this if necessary on installation and can
adviseonspecicsettingsforaparticularapplication.
Figure 17.1
d. Temperature Calibration
TEMPERATURE CAL is used to calibrate the tempera-
ture on the wall control. If for some reason you feel the
wall control is not accurately reading the temperature you
cancalibrateittoathermostatthatyouknowisaccurate.
PresstheUP/DOWNbuttonstodesiredtemperature.
c. Temp Differential
TEMPERATURE DIFFERENTIAL is used to change the
setdefaulttemperaturedifferential.Thissetshowfarbe-
low the set point the wall control allows the room tempera-
turetofallbeforetheapplianceturnsbackon.Itisusually
set at time of installation.
Figure 17.2
TEMPERATURE CAL
71.6
O
FCal Adj:
-13
DONE SET
Figure 17.3
e. Properties
PROPERTIESshowstheversionofsoftwareforthecontrol
boardandwallcontrol.Ifyouareplacingaservicecallwith
yourdealer,theymayaskyoutogotothisscreenandread
them the information under “WC” and “SC”.
WC
SC
CB
CV
40h
6Bh
000
000
UFTI: 029
Rev: 004
TC: -28
PROPERTIES
DONE
Figure 17.4
f. Elevation
ELEVATION allows you to adjust the appliance to your
specicelevation.PresstheUP/DOWNbuttonstoselect
your elevation. The message in the center will change
betweenNORMALandHIGH.IfyouselectHIGH,itwill
replace the normal fuel tables with specic high fuel ta-
bles.YouMUST select a fuel type after selecting HIGH.
Please note that changing the elevation will delete any
customornewfueltableloadedintotheappliance.You
mustconrmyourchoiceontheCONFIRMELEVATION
CHANGE screen. This allows you to reverse your deci-
sion if necessary. Figure 17.6
ELEVATION
Over 4000 FT
Normal / High
Up to 4000 FT
DONE
Figure 17.5
CONFIRM ELEVATION CHANGE
YES
Changing elevations will
delete any custom or
new fuel tables loaded into
the stove.
Are you sure?
NO
Figure 17.6
g. Convection Blower Speed
CONVBLOWERSPEEDallowsyoutoadjusttheblower
speedtoyourindividualpreference.PresstheUP/DOWN
buttonstoselectyourblowerspeed.Themessageinthe
centerwillchangebetweenNORMALandQUIET.
NORMALallowstheconvectionblowertoreachmaximum
RPMat135degreesandQUIETat165degrees.
CONV BLOWER SPEED
Normal
Normal / Quiet
Quiet
DONE
Figure 17.7
h. Language Selection
LANGUAGE allows you to select from four different lan-
guages. To select a language scroll down to the last item
ontheUSERSETTINGscreenusingtheDOWNbutton.
Using the UP/DOWN buttons select the preferred lan-
guage and then press Select and then press Done.
LANGUAGE
SELECT
DONE
Français
Norvégien
Suédois
Anglais
Figure 17.8

18 7034-276 January 29, 2014
MT. VERNON AE
F. Quick Start Guide
NOTICE:
Anybuttonpressedwillturnonthebacklight.Wallcontrolwillautomati-
callyrevertbacktothestartingscreenifthereisnoactivityfor15seconds;except
forthe“CONFIRMFUELCHANGE”screen.
READY
71 Set at: 68
12:30 PM
MENU
1. At the starting screen, press “MENU”
button once or twice until “MENU”
screen appears.
2. Highlight “FUEL TYPE” using the “UP/
DOWN” buttons to the right side of the
display. Press “SELECT”.
Auto/Manual/Off
User Settings
Fuel Type
MENU
Set Comfort Level
3. Scroll down and highlight “HARD-
WOODPELLET”oryourfueltype.
Sunflower Seeds
Wheat
FUEL SELECTION
Softwood Pellet
Hardwood Pellet
5. Press “DONE” to conrm fuel
change.
CONFIRM FUEL CHANGE
Please empty hopper
of old fuel type and
ensure firebox is clean.
Please refer to
section 8 in manual.
DONE
2. Highlight“AUTO/MANUAL/OFF”.
Press “SELECT”.
User Settings
Fuel Type
MENU
Set Comfort Level
Auto/Manual/Off
3. Highlight“MANUAL”.Press“SELECT”.
AUTO/MANUAL SETTINGS
Manual
Off
Automatic
Manual
CHOOSING FUEL TYPE
TURNING ON APPLIANCE
7. Fill the hopper with fuel. If the hopper
was completely empty or has run out of
fuel,putapproximately 1/2cup of pel-
letsintotherepotforaquickrestart.
8. Besurethehopperlidandglassdoor
arebothclosed.
1. Atthestartingscreen,press“MENU”.
Function Buttons
Buttons
Up
Down
READY
73 Set at: 73
12:30 PM
HEAT OUTPUT
MENU
Room
Temp
Wall Control for Reference
6. Press “DONE” twice or wait 15 sec-
onds for starting screen to reappear.
4.
Press“DONE”twiceorwait15seconds
for starting screen to re-appear.
READY
71
Set at: 68
12:30 PM
MENU
4. Now press “SELECT” to choose new
fuel.
READY
71 Set at: 68
12:30 PM
MENU
1. Atthestartingscreen,press“MENU”
button once or twice until “MENU”
screen appears.
3. Highlight“TEMPUNITSF/C”usingthe
“UP/DOWN”buttonstotherightsideof
the display. Press “SELECT”.
CHOOSING TEMP UNIT:
°F or °C
5. Press“DONE”twiceagain,orwait15
seconds for starting screen to re-ap-
pear.
4. Press the “UP” or “DOWN” button
to set desired temperature unit and
press “SELECT”..
USER SETTINGS
Flame Height Adjust
Temp Differential
Temp Units F/C
Auto/Manual/Off
Fuel Type
Set Comfort Level
User Settings
MENU
2. Highlight “USER SETTINGS” using
the “UP/DOWN” buttons to the right
side of the display. Press “SELECT”.

January 29, 2014 7034-276 19
MT. VERNON AE
READY
71 Set at: 74
12:30 PM
HEAT OUTPUT
MENU
Hold at:
Medium High
1. At the starting screen, press “HEAT
OUTPUT”.
2. Usethe“UP”buttontochange“HEAT
OUTPUTLEVEL”to”MEDIUM-HIGH”.
SETTING HEAT OUTPUT
1. Pressandhold“UP”or“DOWN”but-
ton to set desired temperature.
74ºF
2. Press“HOLDTEMP”.
SETTING COMFORT LEVEL
READY
71 Set at: 68
12:30 PM
HEAT OUTPUT
MENU
NOTE: Set temperature must be 3
degrees higher than room
temperature for appliance to
start.
SET COMFORT LEVEL
ON HOLD
RESUME
DONE
74ºF
3. Press“DONE”.
3. Press “DONE” twice or wait 15 sec-
onds for starting screen to re-appear.
HOPPER OUT OF FUEL
SHUTDOWN
71 Set at: 74
12:30 PM
HEAT OUTPUT
MENU
Hold at:
STARTUP
71 Set at: 74
12:30 PM
HEAT OUTPUT
MENU
Hold at:
Min Firepot Temp
SERVICE
RETRY
ERROR LIST
1. If the appliance has stopped operat-
ing,checkthewallcontrolscreen.If
it is showing “Min Firepot Temp” the
hopper has run out of fuel.
2. Fill the hopper with fuel and press the
“RETRY”buttontwice.Thersttime
turns on the back light, the second
time starts the retry function.
3. If the wall control screen changes to
a “SHUTDOWN” screen that means
your appliance has not completed the
full shutdown cycle. Depending on
whereit wasin thecycle it can take
from one to ten minutes to restart.
When the shutdown cycle is complete
the wall control screen will display
“STARTUP”. Continue to Step 4.
4. If the wall control screen changes to
a “STARTUP” screen after pressing
“RETRY” that means your appliance
has already completed the shutdown
cycle. You must wait until the wall
control screen displays the startup
screenandthenput1/2cupofpellets
intherepotforaquickrestart.
5. Besurethehopperlidandglassdoor
arebothclosed.

20 7034-276 January 29, 2014
MT. VERNON AE
H. Error Codes
If a system error occurs that forces the system to stop op-
erating an error screen appears. Depending upon the error
type, up to three retry attempts are allowed after which a
service professional is required.
Press the ERROR LIST button to display the latest error.
See page 30 for a list of error codes.
G. Service Information
The SERVICE INFORMATION screen displays contact in-
formationfor Hearth & HomeTechnologiesCustomerSer-
vice Line. The local dealer may have changed this upon or
beforetheinstallationtoindicateadealerhotline.
www.quadrafire.com
to locate your nearest
dealer
DONE
ERROR LIST
Figure 20.2
MANUAL LIGHT PROCEDURE
Press “CONTINUE”
button to start manual
lighting sequence
Current Tem: 72 F
O
CONTINUE
MANUAL LIGHT PROCEDURE
Please wait while
feed charge is loading
into firepot
MANUAL LIGHT PROCEDURE
Open door...
Manually light fuel...
Close door
Figure 20.1
13 Volts 12 Volts 11 Volts Battery
Below
10 Volts
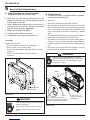
Refer to page ___forinstructionsonhowtoattachthecable
to appliance. The following are screens you will see when
usingaback-upbattery.
OperatingonBatteryBack-Up
• Abatteryiconappearsonyourwallcontroltoletyouknow
youarenowoperatingonbatterypower.Figure 20.3.
• Firemustbemanuallylitastheappliancewillnolonger
automatically light. See section G on page 9.
• Useonlyapprovedrestartinggeltostartre.
• Highburnrateisnolongeravailableonbatteryback-up.
• Each level drops down one level, i.e the high burn be-
comesmedium-highburnandsoon.
• Ifthebatterychargefallsbelow10voltitcannolonger
sustain the appliance operation and the appliance will
shutdown.Youmustdisconnectandreconnectthebat-
tery to start it up again.
RecommendedBattery
• 12voltdeepcyclebattery,(i.e.,marineorRVtype).
• A 12 volt battery cable is available through your local
dealer.
WARNING! Risk of Injury!
• Blowersmaycontinuetorunandwouldbeexposedto
human contact.
Figure 20.3
MAINT BURN
73
Set at: 73
12:30 PM
HEAT OUTPUT
MENU
“Maint Burn” will display when
the thermostat has reached the
set room temperature and will
run on low until it reaches its
auto-clean cycle time.
Battery icon.
Figure 20.4
Wall Control Display
Thewallcontrolwilldisplaythebatteryiconwhenoperating
inthebatteryback-upmode.Figure 20.4.
I. Battery Back-up System (Optional)
CAUTION!
• HookuptobatteryterminalsBEFOREyouplugbattery
into appliance.
• Damagetointernalelectroniccomponentsmayoccur.
Theappliancehasbeendesignedtooperateonanoptional
batteryback-upsystem.
If you have frequent power outages in your region, hook
theapplianceuptoa12voltbatteryanditwillautomatically
switchtobatterypowerintheeventofapowerfailure.The
12 volt power cord sold as a separate accessory does not
chargethebattery.
La page charge ...
La page charge ...
La page charge ...
La page charge ...
La page charge ...
La page charge ...
La page charge ...
La page charge ...
La page charge ...
La page charge ...
La page charge ...
La page charge ...
La page charge ...
La page charge ...
La page charge ...
La page charge ...
La page charge ...
La page charge ...
La page charge ...
La page charge ...
-
 1
1
-
 2
2
-
 3
3
-
 4
4
-
 5
5
-
 6
6
-
 7
7
-
 8
8
-
 9
9
-
 10
10
-
 11
11
-
 12
12
-
 13
13
-
 14
14
-
 15
15
-
 16
16
-
 17
17
-
 18
18
-
 19
19
-
 20
20
-
 21
21
-
 22
22
-
 23
23
-
 24
24
-
 25
25
-
 26
26
-
 27
27
-
 28
28
-
 29
29
-
 30
30
-
 31
31
-
 32
32
-
 33
33
-
 34
34
-
 35
35
-
 36
36
-
 37
37
-
 38
38
-
 39
39
-
 40
40


Quadra-Fire MTVERNON-AE-MBK Le manuel du propriétaire
- Catégorie
- Poêles
- Taper
- Le manuel du propriétaire
- Ce manuel convient également à
dans d''autres langues
Documents connexes
Autres documents
-
 Quadrafire Mt. Vernon AE Pellet Stove Manuel utilisateur
-
 Quadrafire Santa Fe Pellet Stove Manuel utilisateur
-
 Quadrafire Quadra-Fire CB1200M-MBK Le manuel du propriétaire
-
 Quadrafire Santa Fe Pellet Stove Le manuel du propriétaire
-
 Quadrafire Castile Pellet Stove Manuel utilisateur
-
 Quadrafire Mt. Vernon AE Pellet Insert Manuel utilisateur
-
 Quadrafire Castile Pellet Stove Le manuel du propriétaire
-
 Hampton Bay Greenfire GC60-2 Le manuel du propriétaire
-
 Quadrafire Castile Pellet Stove Manuel utilisateur
-
 Quadrafire Santa Fe Pellet Stove Manuel utilisateur


