La page est en cours de chargement...

701 S. RIDGE AVENUE
TROY, OHIO 45373
937 332-3000
www.hobartcorp.com FORM 45270 Rev. D (May 2021)
PORTION SCALE SLICER
MODEL
HS6-1PS ML-141162
HS7-1PS ML-141166

– 2 –
© HOBART, 2019
TABLE OF CONTENTS
GENERAL ............................................................................................................................................. 3
Warranty Disclaimer ........................................................................................................................ 4
General Information ......................................................................................................................... 4
INSTALLATION .................................................................................................................................... 4
Unpacking ........................................................................................................................................ 4
Display Icons ................................................................................................................................... 5
OPERATION ........................................................................................................................................ 7
Set Unit of Measure ......................................................................................................................... 7
30 Second Timeout .......................................................................................................................... 7
Zero Out Scale ................................................................................................................................ 7
Set Stacking Preference .................................................................................................................. 8
Set Target Weight ............................................................................................................................ 8
SUPERVISOR ACCESS ..................................................................................................................... 9
Message Conguration .................................................................................................................... 9
Create/Delete Message ................................................................................................................... 9
Speedkey Conguration ................................................................................................................ 10
Create/Delete Speedkey ............................................................................................................... 10
SETUP UTILITY .................................................................................................................................. 11
Calibrate Touchscreen ....................................................................................................................11
Time Edit ........................................................................................................................................ 12
Change Language ......................................................................................................................... 13
CLEANING ......................................................................................................................................... 14
Scale Platter .................................................................................................................................. 14
Display and DISPLAY TUBE ......................................................................................................... 14
TROUBLESHOOTING ...................................................................................................................... 14
Service ........................................................................................................................................... 14

– 3 –
Operation of
MODEL HS6-1PS & HS7-1PS Portion Scale Slicers
SAVE THESE INSTRUCTIONS
GENERAL
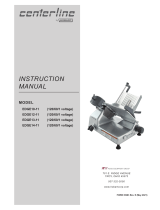
The Hobart Model HS6-1PS and HS7-1PS Portion Scale Slicers (Fig. 1) display the weight as the sliced
product falls to the platter.
This manual explains the platter scale and display features only. Refer to the current HS Series Slicer
Instruction Manual for detailed information about operating and cleaning the slicer.
The scale components of these slicers are extremely precise and sensitive. The unit MUST be
placed on a rigid surface that does not move or deect while the slicer is running. Failure to do so may
result in the scale not operating as intended.
Do not move or lift the slicer by the platter arm or display tube. Lift at the base of the slicer.
Failure to comply could result in weigher damage and void the warranty.
The scale display can tare to indicate net weight but is NOT LEGAL FOR TRADE.
Fig. 1
HS6-1PS HS7-1PS
DISPLAY DISPLAY
PLATTER
PLATTER
ARM
DISPLAY
TUBE
PLATTER
ARM
DISPLAY
TUBE
PLATTER

– 4 –
WARRANTY DISCLAIMER
Installations and repairs carried out by non-authorized service technicians may aect the slicer warranty.
Using other than original replacement parts may aect the slicer warranty. Technical alterations to the
slicer may aect the slicer warranty.
For warranty information, please contact Hobart Customer Care.
GENERAL INFORMATION
Hobart reserves the right to alter the design of its products without prior notice. If you have questions
regarding slicer details not included in this manual, contact your local Hobart Service Oce.
INSTALLATION
UNPACKING
The slicer was inspected before leaving the factory. The carrier assumes full responsibility for the safe
delivery of the slicer upon acceptance of the slicer for shipping. The customer must check for possible
shipping damage immediately upon receipt before moving, installing, or modifying the slicer.
If damage is found, keep all original packaging materials for inspection purposes. The customer must
complete the following steps to report the damage.
1. Carrier’s local terminal must be notied within 5 business days of shipment receipt (note time, date,
and who was spoken to), and follow up and conrm with written or electronic communication.
2. Notify the Hobart customer care at (800) 333-7447 within 5 business days of shipment receipt.

– 5 –
DISPLAY ICONS
ICON NAME DESCRIPTION
Weight Symbol TOUCH the Weight Symbol icon on the display screen to toggle
the weigh mode between pounds (lb) or ounces (oz). If the scale
is set to metric units then the Weight Symbol icon will toggle
between kilograms (kg) and grams (g).
Press to Zero TOUCH the Press to Zero area on the display screen to set the
scale weight to "0". Use this function to zero out the scale for any
tare value.
Slice Count (+1) This icon indicates the slicer will slice 1 extra slice after the
desired weight is achieved. The screen will ash when the set
weight is reached. TOUCH the icon to toggle to the Slice Count
(Multiple) mode.
Slice Count
(Manual Slicer)
This icon indicates the slicer will slice multiple batches of product
of desired weight. The screen will ash when the set weight is
reached. TOUCH the icon to toggle to the Slice Count (+1) mode.
(Only available on HS6-1PS model)
Slice Count
(Automatic
Slicer)
This icon indicates the slicer will slice multiple batches of product
of desired weight. The screen will ash and slicer will stop
when the set weight is reached. Any consecutive portions will
automatically be tared. TOUCH the icon to toggle to the Slice
Count (+1) mode. (Only available on HS7-1PS model)
Up Arrow TOUCH the Up Arrow to increase the target weight. Increasing the
weight above 10 lbs will set the scale to Innite Mode.
Down Arrow TOUCH the Down Arrow to decrease the target weight.
Decreasing the weight below 0 lbs will set the scale to Innite
Mode.
Innite Mode The scale will weigh up to 10 lbs with no interaction from the
display or slicer. TOUCH the Up or Down Arrow to set the scale
above 10 lbs or below 0 lbs to enter Innite Mode.
Menu Key TOUCH the Menu Key to select Supervisor Access or Service
Access.
Supervisor
Access
TOUCH the Supervisor Access icon to select Message
Conguration, Speedkey Conguration, or Setup Utility.
To nd this icon:
TOUCH Menu.
Service Access TOUCH the Service Access icon to select service features
available on the portion scale slicer. Only a trained service
technician can access this mode.
To nd this icon:
TOUCH Menu.

– 6 –
ICON NAME DESCRIPTION
Message
Conguration
TOUCH the Message Conguration icon to access this mode.
To nd this icon:
TOUCH Menu > Supervisor Access.
Speedkey
Conguration
TOUCH the Speedkey Conguration icon to access this mode.
To nd this icon:
TOUCH Menu > Supervisor Access.
Home TOUCH the Home icon to return to the main display screen.
Back Arrow TOUCH the Back Arrow icon to go back to the previous screen.
Setup Utility TOUCH the Setup Utility icon to access the scale setup features
such as Calibrate Touchscreen and Time Edit.
To nd this icon:
TOUCH Menu > Supervisor Access.
Calibrate
Touchscreen
TOUCH the Calibrate Touchscreen icon to calibrate the
touchscreen.
To nd this icon:
TOUCH Menu > Supervisor Access > Setup Utility.
Time Edit TOUCH the Time Edit icon to adjust the internal date and time.
To nd this icon:
TOUCH Menu > Supervisor Access > Setup Utility.
30 Second
Timeout (On)
The 30 second timeout function will put the slicer in standby mode
if the weigher senses no weight change for 30 seconds. TOUCH
the 30 Second Timeout On icon to enable this function.
30 Second
Timeout (O)
The 30 second timeout function will put the slicer in standby mode
if the weigher senses no weight change for 30 seconds. TOUCH
the 30 Second Timeout O icon to disable this function.
Keyboard Key TOUCH to close the pop-up keyboard after inputting text.
Keyboard Type TOUCH to toggle the pop-up keyboard between letters and
numbers with symbols.
Alt Key TOUCH to toggle special characters on the pop-up keyboard.

– 7 –
OPERATION
SET UNIT OF MEASURE
The scale display can be congured to display weight in pounds (Fig. 2) or ounces (Fig. 3). TOUCH the
Weight Symbol icon (Fig. 2) on the display screen to toggle the weigh mode between pounds (lb) or ounces
(oz). If the scale is set to metric units (Fig. 4) then the Weight Symbol icon will toggle between kilograms
(kg) and grams (g).
30 SECOND TIMEOUT
When enabled, the 30 second timeout
function will put the slicer in standby
mode if the weigher senses no weight
change for 30 seconds. TOUCH the 30
Second Timeout icon (Fig. 4) to enable/
disable this function.
ZERO OUT SCALE
If the scale is registering negative
weight, the display will show "under"
(Fig. 5). TOUCH the Press to Zero area
on the display screen (Fig. 5) to set the
scale weight to "0". Weight will clear out
and appear as 0 (Fig. 6).
NOTE: Use this function to zero out the
scale for any tare value up to 0.06 lbs
(or 0.3 kg).
NOTE: Clean o the scale platter and
TOUCH the Press to Zero area again if
the weight did not zero out.
Fig. 2 Fig. 4Fig. 3
Fig. 6Fig. 5

– 8 –
SET STACKING PREFERENCE
The stack preference can be congured to slice one extra slice (Fig. 7) after the target weight is reached
or multiple batches (Fig. 8) of product at a desired weight. TOUCH the icon to toggle between the Slice
Count (+1) mode and the Slice Count (Multiple) mode.
Manual Slicing Icon (HS6-1PS) (Fig. 8) will only ash when the target weight (or any multiple of the set
weight) is reached.
Auto Slicing Icon (HS7-1PS) (Fig. 9) will ash and pause the slicer when initial target weight is reached.
Consecutive portions sliced without removing the product from the platter will pause the slicer when the
target weight plus the last recorded weight on the platter is reached. This allows the operator to place
dividers on the platter in between portions without aecting the weight of the portions. This process will
continue until weight is removed from the platter.
SET TARGET WEIGHT
TOUCH the Up or Down Arrow (Fig. 10)
to select desired target weight. Once
desired weight is displayed on screen,
the target weight is set. If the target
weight is set below 0 lbs, or above
10 lbs, the scale will enter Innite
Mode (Fig. 11). Innite Mode will weigh
product, up to 10 lbs, with no interaction
from the display or slicer.
NOTE: Weight can be adjusted in
0.125 lb (2 oz) increments or in 0.01 kg
(10 g) increments.
Fig. 7 Fig. 8 Fig. 9
Fig. 10 Fig. 11

– 9 –
SUPERVISOR ACCESS
The Supervisor Access mode is where you can congure messages, set up speedkeys, and use the setup
utility. You can access the supervisor mode by touching the Menu icon.
MESSAGE CONFIGURATION
To access Message Conguration mode, TOUCH the Menu icon (Fig. 12), then TOUCH the Supervisor
Access icon (Fig. 13), then TOUCH the Message Conguration icon (Fig. 14). You should now be on the
Messages Setup screen (Fig. 15).
CREATE/DELETE MESSAGE
To create a new message, TOUCH
New on the Messages Setup screen
(Fig. 15). Enter the message title and the
message in the appropriate text boxes.
Select Alert on week day (Fig. 15) or
Alert on date(s) (Fig. 16) from the Type
dropdown box. Enter the date/day and
times you want the message to appear.
TOUCH Conrm.
To delete a message, TOUCH the
arrow keys until the desired message
appears. TOUCH Delete to delete
selected message.
NOTE: Preloaded messages cannot
be deleted.
TOUCH Conrm to save changes or
Cancel to escape Message Setup.
Fig. 12 Fig. 13 Fig. 14
Fig. 15 Fig. 16

– 10 –
SPEEDKEY CONFIGURATION
To access Speedkey Conguration mode, TOUCH the Menu icon (Fig. 17), then TOUCH the Supervisor
Access icon (Fig. 18), then TOUCH the Speedkey Conguration icon (Fig. 19). You should now be on the
Speed Key Setup screen (Fig. 20).
CREATE/DELETE SPEEDKEY
To create a speedkey, TOUCH New on
the Speed Key Setup screen (Fig. 20).
Type the text for the speedkey in Text box
(e.g. 5oz). Select Preset Weight from the
Key Type dropdown box. Select Lbs or
Oz from the Unit of Measure dropdown
box (or Kg or G if in Metric mode). Type a
Target Weight (e.g. 5) and type a Weight
Tolerance (e.g. 0.5). TOUCH Conrm
(Fig. 20) to save changes or Cancel to
escape Speed Key Setup.
OPTIONAL: To edit advanced options,
TOUCH Advanced Options (Fig. 21).
Select desired Text Color from the
dropdown box. Type the Text Font
Point Size (e.g. 12). Select the desired
Background Color from the dropdown
box. Choose the desired position for the
speedkey by selecting a box in the grid. The box will highlight green.
NOTE: After inputting text, TOUCH the Keyboard Key in the lower right corner to hide the keyboard.
To delete a speedkey, TOUCH the arrow keys until the desired speedkey is highlighted green. TOUCH
Delete to delete the selected speedkey. TOUCH Conrm to save changes or Cancel to escape Speed
Key Setup.
Fig. 17 Fig. 18 Fig. 19
Fig. 20 Fig. 21

– 11 –
SETUP UTILITY
The Setup Utility mode is where you can calibrate the touchscreen, adjust the internal clock, and change
the language on the portion scale slicer. You can access the Setup Utility mode from the Supervisor
Access mode.
CALIBRATE TOUCHSCREEN
To calibrate the touchscreen, TOUCH
the Menu icon (Fig. 22), then TOUCH the
Supervisor Access icon (Fig. 23), then
TOUCH the Setup Utility icon (Fig. 24),
then TOUCH the Calibrate Touchscreen
icon (Fig. 25). You should now be on
a screen with lines and a circle in the
lower left hand corner (Fig. 26).
TOUCH and hold the circle until it
becomes solid blue and moves to the
next location. The circles will appear in
all four corners. Calibration is complete
after touching and holding on all four
corners.
Fig. 22 Fig. 23
Fig. 24 Fig. 25 Fig. 26

– 12 –
TIME EDIT
To adjust the internal clock on the portion
scale slice, TOUCH the Menu icon
(Fig. 27), then TOUCH the Supervisor
Access icon (Fig. 28), then TOUCH
the Setup Utility icon (Fig. 29), then
TOUCH the Time Edit icon (Fig. 30).
You should now be on the Time Setup
screen (Fig. 31).
TOUCH the hours and use the up and
down arrows to adjust the hours.
TOUCH the minutes and use the up
and down arrows to adjust the minutes.
TOUCH the seconds and use the up
and down arrows to adjust the seconds.
Select the month from the dropdown
box. Use the up and down arrows to
select the year. TOUCH the date on
the calendar. TOUCH Conrm to save
changes or Cancel to escape Time
Setup.
Fig. 27 Fig. 28
Fig. 29 Fig. 30 Fig. 31

– 13 –
CHANGE LANGUAGE
To change the language on the portion
scale slicer, TOUCH the Menu icon
(Fig. 32), then TOUCH the Supervisor
Access icon (Fig. 33), then TOUCH the
Setup Utility icon (Fig. 34), then TOUCH
the Congure Slicer icon (Fig. 35).
You should now be on the General
Conguration screen (Fig. 36).
Select the language from the dropdown
box. TOUCH Close to save changes or
to escape General Conguration.
Fig. 32 Fig. 33
Fig. 34 Fig. 35 Fig. 36

– 14 –
FORM 45270 Rev. D (May 2021) PRINTED IN U.S.A.
CLEANING
In addition to the cleaning instructions found in the current HS Series Slicer Instruction Manual,
the following need to be performed for the HS6-1PS and HS7-1PS Portion Scale Slicers.
SCALE PLATTER
• Remove the Scale Platter by placing both
hands in the position shown (Fig. 37) and
lifting up.
• Wash, rinse, and sanitize the Scale Platter
in a sink or dishwasher.
DISPLAY AND DISPLAY TUBE
Use a clean cloth soaked in mild detergent and
warm water, and wipe all surfaces of the display
and display tube. Rinse using a fresh cloth and
clean water. Apply sanitizing solution to clean
surfaces. Make sure the slicer is clean of all food
soil before sanitizing. Use only products formulated
to be safe on stainless steel or aluminum. DO NOT
exceed chemical manufacturer’s recommended
concentrations for detergent or sanitizer.
TROUBLESHOOTING
Problem Corrective Action
Weight on display does not
change every time sliced product
falls on platter
Move unit to a more sturdy surface. Unit cannot be placed on a cart or table
that can move or bounce during operation.
Does not weigh correctly Remove any debris from platter - check under the platter.
Verify loadcell arm is not rubbing the bottom cover.
Verify subplatter is not rubbing the covers.
Check for loose hardware.
Display frozen at startup screen Disconnect from main power and reboot.
Display locked up Disconnect from main power and reboot.
"Under" or "Err" in weight eld Remove any debris from platter - check under the platter.
Rezero scale.
Verify subplatter is not rubbing the covers or internal wires.
"Err" in weight eld on startup Unplug slicer. Ensure scale platter is installed correctly before plugging in
the slicer.
If symptom still exists, contact your local Hobart Service oce.
Weight eld is blank Rezero scale.
SERVICE
Contact your local Hobart-authorized service oce for any repairs or adjustments needed on the slicer.
Fig. 37

701 S. RIDGE AVENUE
TROY, OHIO 45373
937 332-3000
www.hobartcorp.com
FO
NCTIO
NNE
M
ENT
FORMULAIRE 45270 Rév. D (mai 2021)
TRANCHEUSE AVEC BALANCE
DE PORTIONS
MODÈLE
HS6-1PS ML-141162
HS7-1PS ML-141166

– 2 –
© HOBART, 2019
TABLE DES MATIÈRES
RENSEIGNEMENTS GÉNÉRAUX ......................................................................................................................3
Déclaration De Garantie ..................................................................................................................................4
Informations Générales ....................................................................................................................................4
INSTALLATION .....................................................................................................................................................4
Déballage .........................................................................................................................................................4
Icônes d’achage ............................................................................................................................................5
FONCTIONNEMENT ............................................................................................................................................7
Dénir l’unité de mesure ..................................................................................................................................7
Temporisation De 30 Secondes .......................................................................................................................7
Régler la balance sur zéro ...............................................................................................................................7
Dénir les préférences d’empilement ............................................................................................................... 8
Dénir le poids cible .........................................................................................................................................8
ACCÈS SUPERVISEUR ......................................................................................................................................9
Conguration de message ...............................................................................................................................9
Créer/Supprimer message ...............................................................................................................................9
Conguration des touches rapides ................................................................................................................10
Créer/Supprimer touches rapides ..................................................................................................................10
OUTIL DE CONFIGURATION ............................................................................................................................11
Calibrer l’écran tactile ....................................................................................................................................11
Modier l’heure ..............................................................................................................................................12
Changer De Langue .......................................................................................................................................13
NETTOYAGE.......................................................................................................................................................14
Plateau de la balance ....................................................................................................................................14
Écran d’achage et Tube ..............................................................................................................................14
DÉPANNAGE ......................................................................................................................................................14
Entretien .........................................................................................................................................................14

– 3 –
Utilisation des trancheuses avec balance de portions
MODÈLES HS6-1PS et HS7-1PS
CONSERVEZ CES INSTRUCTIONS
RENSEIGNEMENTS GÉNÉRAUX
Les trancheuses avec balance de portions Hobart, modèles HS6-1PS et HS7-1PS, (g. 1) achent le poids lorsque
le produit tranché tombe sur le plateau.
Ce manuel explique uniquement le fonctionnement du plateau de balance et les caractéristiques d’achage.
Reportez-vous au manuel d’instructions à jour sur la trancheuse de série HS pour les informations détaillées sur
son utilisation et son nettoyage.
AVIS
La balance de ces trancheuses est extrêmement précise et sensible. L’appareil DOIT être placé sur
une surface rigide qui ne bouge pas pendant le fonctionnement de la trancheuse. Le non-respect de cette consigne
pourrait entraîner le dysfonctionnement de la balance.
AVIS
Ne déplacez pas et ne soulevez pas la trancheuse par le bras du plateau ou le tube de l’écran. Soulevez
la trancheuse par le bas. Le non-respect de cette consigne pourrait endommager la balance et annuler la garantie.
La balance peut tarer pour indiquer le poids net à l’écran mais cette fonction n’est PAS LÉGAL POUR LE COMMERCE.
Fig. 1
HS6-1PS HS7-1PS
ÉCRAN
D’AFFICHAGE
ÉCRAN
D’AFFICHAGE
PLATEAU
BRAS DU
PLATEAU
TUBE DE
L’ÉCRAN
BRAS DU
PLATEAU
TUBE DE
L’ÉCRAN
PLATEAU

– 4 –
DÉCLARATION DE GARANTIE
Les installations et réparations eectuées par des techniciens de service non agréés peuvent aecter la garantie
de la trancheuse. L’utilisation de pièces de rechange autres que d’origine peut aecter la garantie de la trancheuse.
Des modications techniques de la trancheuse peuvent aecter la garantie de la trancheuse.
Pour des informations sur la garantie, veuillez contacter le service à clientèle de Hobart.
INFORMATIONS GÉNÉRALES
Hobart se réserve le droit de modier la conception de ses produits sans préavis. Si vous avez des questions
concernant les détails de la trancheuse non inclus dans ce manuel, contactez votre bureau de service Hobart local.
INSTALLATION
DÉBALLAGE
Cette trancheuse a été inspectée avant de quitter l’usine. La société de transport assume l’entière responsabilité
de la livraison de la trancheuse en bon état du fait de l’acceptation de la trancheuse pour l’expédition. Le client doit
vérier les éventuels dommages dus au transport dès sa réception avant de déplacer, d’installer ou de modier la
trancheuse.
Si des dommages sont constatés, conservez tous les matériaux d’emballage d’origine à des ns d’inspection. Le
client doit eectuer les étapes suivantes pour signaler les dommages.
1. La société de transport doit être informée dans les 5 jours ouvrables suivant la réception de l’envoi (notez
l’heure, la date et la personne à qui vous avez parlé), et eectuez un suivi et conrmez par communication
écrite ou électronique.
2. Informez le service à la clientèle Hobart au 800 333-7447 dans les 5 jours ouvrables suivant la réception de
l’envoi.

– 5 –
ICÔNES D’AFFICHAGE
ICÔNE NOM DESCRIPTION
Symbole de poids TOUCHEZ l’icône de symbole de poids sur l’écran d’achage pour
basculer le mode de pesée en livres (lb) ou en onces (oz). Si la balance
est réglée pour mesurer en unités métriques, l’icône du symbole de
poids s’ache soit en kilogrammes (kg) ou en grammes (g).
Press to Zero
(appuyer pour
zéro)
TOUCHEZ la zone Press to Zero (appuyer pour zéro) sur l’écran
d’achage pour régler le poids de la balance sur « 0 ». Utilisez cette
fonction pour régler la balance sur zéro pour toute valeur de tare.
Nombre de
tranches (+1)
Cette icône indique que la trancheuse tranchera une tranche
supplémentaire après avoir atteint le poids souhaité. L’écran clignote
lorsque le poids déni est atteint. TOUCHEZ l’icône pour passer au
mode Nombre de tranches (multiple).
Nombre de
tranches
(tranchage
manuel)
Cette icône indique que la trancheuse tranchera de multiples lots de
produit au poids souhaité. L’écran clignote lorsque le poids déni est
atteint. TOUCHEZ l’icône pour passer au mode Nombre de tranches
(+1). (Uniquement disponible sur le modèle HS6-1PS)
Nombre de
tranches
(tranchage
automatique)
Cette icône indique que la trancheuse tranchera de multiples lots de
produit au poids souhaité. L’écran clignote et la trancheuse arrête
lorsque le poids déni est atteint. Toute portion consécutive sera
automatiquement tarée. TOUCHEZ l’icône pour passer au mode Nombre
de tranches (+1). (Uniquement disponible sur le modèle HS7-1PS)
Flèche vers le
haut
TOUCHEZ la èche vers le haut pour augmenter le poids cible.
Augmenter le poids au-dessus de 10 lb règle la balance en mode inni.
Flèche vers le bas TOUCHEZ la èche vers le bas pour diminuer le poids cible. Diminuer le
poids en dessous de 0 lb règle la balance en mode inni.
Mode Inni La balance peut peser jusqu’à 10 lb sans interaction de l’écran ou de la
trancheuse. TOUCHEZ les èches vers le haut ou vers le bas pour régler
la balance de plus de10 lb ou moins de 0 lb pour passer au mode inni.
Menu TOUCHEZ l’icône Menu pour sélectionner Accès superviseur ou Accès
service d’entretien.
Accès superviseur TOUCHEZ l’icône Accès superviseur pour sélectionner Conguration du
message, Conguration des touches rapides ou Outil de conguration.
Pour trouver cette icône :
TOUCHEZ Menu.
Accès service
d’entretien
TOUCHEZ l’icône Accès service d’entretien pour sélectionner les
fonctions de service d’entretien disponibles sur la trancheuse. Seul un
technicien d’entretien qualié peut accéder à ce mode.
Pour trouver cette icône :
TOUCHEZ Menu.

– 6 –
ICÔNE NOM DESCRIPTION
Conguration de
message
TOUCHEZ l’icône Conguration de message pour accéder à ce mode.
Pour trouver cette icône :
TOUCHEZ Menu > Accès superviseur.
Conguration des
touches rapides
TOUCHEZ l’icône Conguration des touches rapides pour accéder à ce
mode.
Pour trouver cette icône :
TOUCHEZ Menu > Accès superviseur.
Accueil TOUCHEZ l’icône Accueil pour revenir à l’écran principal.
Flèche de retour TOUCHEZ l’icône Flèche de retour pour revenir à l’écran précédent.
Outil de
conguration
TOUCHEZ l’icône Outil de conguration pour accéder aux fonctions de
conguration de la balance telles que Calibrer l’écran tactile et Modier
l’heure.
Pour trouver cette icône :
TOUCHEZ Menu > Accès superviseur.
Calibrer l’écran
tactile
TOUCHEZ l’icône Calibrer l’écran tactile pour calibrer l’écran tactile.
Pour trouver cette icône :
TOUCHEZ Menu > Accès superviseur > Outil de conguration.
Modier l’heure TOUCHEZ l’icône Modier l’heure pour régler la date et l’heure internes.
Pour trouver cette icône :
TOUCHEZ Menu > Accès superviseur > Outil de conguration.
Temporisation
de 30 secondes
(activé)
La fonction de temporisation de 30 secondes met la trancheuse en mode
veille si la balance ne détecte aucun changement de poids pendant 30
secondes. TOUCHEZ l’icône de temporisation de 30 secondes pour
activer cette fonction.
Temporisation
de 30 secondes
(désactivé)
La fonction de temporisation de 30 secondes met la trancheuse en mode
veille si la balance ne détecte aucun changement de poids pendant 30
secondes. TOUCHEZ l’icône de temporisation de 30 secondes pour
désactiver cette fonction.
Touche Clavier TOUCHEZ la touche Clavier pour fermer le clavier contextuel après la
saisie de texte.
Type de clavier TOUCHEZ la touche Type de clavier pour faire basculer le clavier
contextuel entre les lettres et les chires avec des symboles.
Touche Alt TOUCHEZ cette touche pour choisir parmi les caractères spéciaux sur le
clavier contextuel.
/