
All products are trademarks of Nostalgia Products LLC.
Worldwide design & utility patented or patents pending.
© 2020 Nostalgia Products LLC.
www.nostalgiaproducts.com
(rev. 04/08/20 SN)
All products are trademarks of Nostalgia Products LLC.
Worldwide design & utility patented or patents pending.
© 2020 Nostalgia Products LLC.
IGLOO® and the Igloo design are trademarks of Igloo Products Corp. All rights reserved.
www.nostalgiaproducts.com
(rev. 04/08/20 LM)

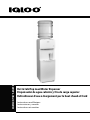
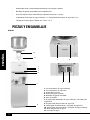
IWCTL352CHWH
Hot & Cold Top Load Water Dispenser
Dispensador de agua caliente y fría de carga superior
Refroidisseur d'eau à chargement par le haut chaud et froid
Instructions and Recipes
Instrucciones y recetas
Instructions et recettes


ENGLISH
2
Make everyday a party!
Visit www.nostalgiaproducts.com for more fun products.
CONTENTS
SAFETY . . . . . . . . . . . . . . . . . . . . . . . . . . . . . . . . . . . . . . . . . 2
IMPORTANT SAFEGUARDS . . . . . . . . . . . . . . . . . . . . . . . . . . . . . 3
ADDITIONAL IMPORTANT SAFEGUARDS . . . . . . . . . . . . . . . . . . . . 4
INTRODUCTION . . . . . . . . . . . . . . . . . . . . . . . . . . . . . . . . . . . . 4
PARTS & ASSEMBLY . . . . . . . . . . . . . . . . . . . . . . . . . . . . . . . . . . 5
HOW TO OPERATE . . . . . . . . . . . . . . . . . . . . . . . . . . . . . . . . . . 6
HELPFUL TIPS . . . . . . . . . . . . . . . . . . . . . . . . . . . . . . . . . . . . . 7
CLEANING & MAINTENANCE . . . . . . . . . . . . . . . . . . . . . . . . . . . 8
RETURNS & WARRANTY . . . . . . . . . . . . . . . . . . . . . . . . . . . . . . . 9
SAFETY
Appliance Specications:
115 Volts, 60 Hz, 580 Watts
THIS PRODUCT IS FOR USE IN 120V AC OUTLET ONLY.
Refer to www.nostalgiaproducts.com/user-manuals/ for the most updated manual.
Your safety and the safety of others is very important.
We have provided many important safety messages in this manual and
on your appliance. Always read and obey all safety messages.
This is the safety alert symbol.
This symbol alerts you to potential hazards that can
cause serious injury to you and others.
All safety messages will follow the safety alert symbol.
All safety messages will tell you what the potential hazard is, tell you how to reduce the
chance of injury, and tell you what can happen if the instructions are not followed.

ENGLISH
3
IMPORTANT SAFEGUARDS
A person who has not read and understood all operating and safety instructions
is not qualied to operate this appliance. All users of this appliance must read and
understand this Instruction Manual before operating or cleaning this appliance.
When using electrical appliances, basic safety precautions
should always be followed, including:
1. Read all instructions before operating this appliance.
2. DO NOT TOUCH the hot surfaces. Use handles or knobs.
3. This appliance is NOT A TOY.
4. This appliance is not intended for use by persons (including children) with reduced physical,
sensory, or mental capabilities, or lack of experience and knowledge, unless they are closely
supervised and instructed concerning use of the appliance by a person responsible for
their safety. Close supervision is necessary when any appliance is used by or near children.
Children should be supervised to ensure that they do not play with the appliance.
5. Close supervision is necessary when any appliance is used by or near children.
6. Turn the appliance OFF, then unplug from the outlet when not in use, before
assembling or disassembling parts and before cleaning. To unplug, grasp
the plug and pull from the outlet. Never pull from the power cord.
7. Do not operate any appliance with a damaged cord or plug or after the appliance
malfunctions, or is dropped or damaged in any manner. Contact the manufacturer
at their customer service telephone number for information on examination,
repair, or adjustment. Customer service number is (920) 347-9122.
8. Unplug from outlet when not in use, before removing parts and before cleaning.
Allow to cool before putting on or taking o any parts, and before cleaning.
9. DO NOT operate any appliance with a damaged cord or plug, or after the appliance
malfunctions, or if the appliance has been damaged in any manner. Return the
appliance to the nearest repair shop for examination, repair or adjustment.
10. The manufacturer does not recommend the use of accessory attachments other than
what is provided by the manufacturer. Use of attachments may cause injuries.
11. DO NOT use the appliance for other than its intended use.
12. DO NOT use outdoors. FOR HOUSEHOLD USE ONLY.
13. DO NOT place on or near a hot gas or electric burner, or in a heated oven.
14. DO NOT let cord hang over edge of table or counter, or touch hot surfaces.
15. NEVER leave unit unattended while in use or when plugged into an outlet.
16. Extreme caution must be used when moving an appliance containing hot food.
17. Always attach plug to appliance rst, then plug cord in the wall outlet. To
disconnect, turn any control to "o," then remove plug from wall outlet.

ENGLISH
4
ADDITIONAL IMPORTANT SAFEGUARDS
Operating Safety Precautions
1. Prior to use, this dispenser must be properly assembled
and installed in accordance with this manual.
2. This dispenser is intended only for water dispensing. Do NOT use other liquids.
Do NOT use for other purposes. Never use other liquids in the dispenser
other than known and microbiologically safe bottled water. Warranty is void
if used with any other liquids, such as coee, tea, juices, beer or wine.
1. Instructions for the Electrical Cord and Plug
1. ELECTRICAL SHOCK HAZARD: Failure to follow these instructions can result in death, re, or
electrical shock.
• Plug into a grounded 3 prong outlet.
• DO NOT remove ground prong.
• DO NOT use an adapter.
• DO NOT use an extension cord.
2. This unit MUST be grounded. In the event of an electrical short circuit, grounding reduces
the risk of electric shock by providing an escape wire for the electric current. This unit is
equipped with a cord having a grounding wire with a grounding plug. The plug must be
plugged into an outlet that is properly installed and grounded.
3. WARNING: Improper use of the grounding plug can result in a risk of electric shock. If the
plug does not t fully into the outlet, contact a qualied electrician. Do not attempt to
modify the plug in any way.
4. A short power supply cord is provided to reduce the risk resulting from becoming entangled
or tripping over a long cord.
The manufacturer does not recommend using this machine in countries that do
not support 120V AC even if a voltage adapter, transformer, or converter is in use.
SAVE THESE INSTRUCTIONS!
INTRODUCTION
Thank you for purchasing the HOT & COLD WATER TOP LOAD WATER COOLER from
IGLOO! With the Igloo Hot & Cold Top Load Water Cooler, ease is at your ngertips!
This top-loader gives you ice-cold and hot water in just seconds! This water cooler
allows you to load 3 or 5 gallon bottles with no plumbing required! There is a
child safety lock for the hot button so there are no accidents. Satisfy your thirst
with cool water or relax with a hot beverage using the brand you can trust!
• Top loading cooler for hot and cold water
• Uses standard 3 and 5 gallon bottles (not included)
• Compressor Cooling
• Direct water line hookup available

ENGLISH
5
• Adjustable front leveling legs
• Hot and cold dispensers with a hot-button safety lock
• Over heating protection for hot tank
• Removable drip tray for easy clean up
• Dispensing area suitable for up to 8.5” bottle
• Hot water tank capacity: 1L/ Cold water tank capacity: 3.2L
• Water temperature: Hot 203°F/ Cold 40°F
• Hot and Cold On/O switches
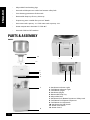
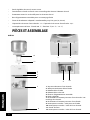
PARTS & ASSEMBLY
PARTS
1
2
3
4
5
6
9 10
7 8
1- Hot Water Indicator Light
2- Cold Water Indicator Light
3- Cold Water Spigot
4- Hot Water Spigot
5- Removable Drip Tray
6- Adjustable Feet
7- Hot Water Push Button Dispenser/Safety Lock
8- Cold Water Push Button Dispenser
9- Cold Water On/O Switch
10- Hot Water On/O Switch
11- Water Guard Base
12- Water Guard
11
12

ENGLISH
6
ASSEMBLY
Use EXTREME CAUTION when handling the appliance. When taking out of
package, it is recommended to lay the box safely on its side. For the most
part, the HOT & COLD WATER TOP LOAD WATER COOLER is assembled. Once
unpacked and standing up right, the drip tray will need to be inserted.
Location Requirements:
1. Install in the area where it is protected from the elements including direct sun.
2. Install and use only on a hard, at and level surface.
3. Do NOT place the dispenser inside an enclosed space or cabinet.
4. Position the dispenser no closer than 4 inches from the wall with at
least 4 inches clearance on the sides to permit free airow.
5. Service should only be performed by a certied technician.
WATER COOLERS
It is very easy to replace 3 or 5 gallon coolers (not included). NOTE:
Excessive weight hazard - It is recommended to use two or more people
to move and install bottles. Failure to do so can result in injury.
With reusable cap:
• If your water bottle has a reusable cap on the end
with a plug, safely place the 3 or 5 gallon bottle
onto the bottle probe and the nozzle should t
securely onto the base. Once secure, you will begin
to see water owing from the bottle to the tank.
If there is no reusable cap:
1. Stand with your feet shoulder-width apart and
bend down to grab the new water bottle.
2. Lift the bottle up and slowly tip it to a 45-degree angle
to allow water to begin dripping into the cooler.
3. Place the bottle into an upright position as the ow
of water into the cooler begins to increase, and then secure it onto
the base. Once secure, you will begin to see water owing from the bottle to the tank.
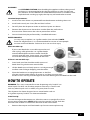
HOW TO OPERATE
WARNING: This unit is intended for water dispensing only. Do NOT use
other liquids. Do NOT use for other purposes. Warranty is void if used
with any other liquids such as coee, tea, juices, beer or wine.
This dispenser has been designed to use water bottles with a 3
or 5 gallon capacity. Do NOT use alternative bottles.
Initial Set Up
To avoid damage to the compressor, allow the unit to sit upright for at least
4 hours prior to operation. NOTE: Make sure that switches are ON. Each the
Hot and Cold switches are located in the back of the water cooler.
1. Remove the tamper seal from bottle cap. Do not remove plastic cap.

ENGLISH
7
2. Lift the bottle safely (see assembly above) and place
bottle until it's secure and bottle is seated.
3. Plug the cord into a properly grounded wall outlet. WARNING: Always
make sure that the cord is away from a water source.
Dispensing Cold Water
After setup, it will take up to 6 hours to get the water to its maximum cold
temperature. When it reaches max temperature, the green light will turn o.
1. Place bottle, glass, or pitcher below the cold water tap.
2. Press the cold water button downward
to start dispensing water.
3. Release the button once the desired ll
level is achieved.
Dispensing Hot Water
After setup, it will not take long to reach maximum
hottest temperature. When it reaches hottest
temperature, the red light will turn o. NOTE: For
safety, there is a lock on the dispensing button.
1. Place bottle, glass, pitcher, pot below the hot water tap.
2. Release child-safety lock by sliding the red button
and press the hot water button downward at
the same time to start dispensing water.
3. Release the button once desired ll level is achieved.
NOTE: Be careful when dispensing hot water as temperature can reach 203 °F.
Replacing An Empty Bottle
Replace the bottle as soon as you notice that it is empty.
1. Lift the bottle straight up to disengage it from the bottle probe.
2. Remove the tamper seal from the bottle cap of the NEW
bottle. DO NOT remove the plastic cap.
3. Lift the bottle and insert it (assembly directions above). Apply slight pressure
until the plug inside the cap pushes in and the bottle is secure.
HELPFUL TIPS
DISPENSER IS NOT WORKING
• Make sure that the power cord is properly connected to a working outlet.
WATER IS LEAKING
• Replace water bottle. Most common cause is a cracked bottle.
NO WATER IS COMING OUT
• Make sure bottle is not empty. If so, replace it.
• Make sure that you fully press the water control buttons.
WATER DISPENSER IS NOT COLD
• Make sure cold switch is ON. Switch is located in the back of the water cooler.

ENGLISH
8
• It can take up to six hours after setup to dispense coldest water.
• Make sure back of the dispenser is at least 4 inches from a wall
and that air is free to ow on all four sides of dispenser.
WATER DISPENSER IS NOT HOT
• Make sure cold switch is ON. Switch is located in the back of the water cooler.
• It can take up to 30 minutes after setup to dispense hottest water. Each
time hot water is dispensed, it needs time to heat up again.
• Make sure back of the dispenser is at least 4 inches from a wall
and that air is free to ow on all four sides of dispenser.
DISPENSER IS NOISY
• Make sure that the dispenser is positioned on a level surface.
CLEANING & MAINTENANCE
General Cleaning
General cleaning should be performed as needed and only takes ve minutes or less.
1. Clean the cabinet surfaces using a soft cloth and warm, soapy water. Rinse.
2. Wipe dust in the back of the water cooler to improve eciency.
3. Remove drip tray cover and hand wash. Take a cloth and warm,
soapy water to rinse the inside of the drip tray. Rinse.
4. Reattach drip tray.
Cleaning Water Lines & Cold Reservoir
Cleaning the water lines and reservoirs is recommended to happen once every three
months. NOTE: Recommended to do before loading a new 3 or 5 gallon jug.
1. Unplug power cord from outlet.
2. Remove water cooler bottle.
3. Remove the plastic water guard and clean
with warm, soapy water. Rinse.
4. Fill stainless steel reservoir with a mixture of
water and bleach and let it sit for 30 minutes.
5. Remove cleaning mixture by dispensing it
from both taps into a bowl or pitcher.
6. Wipe inside of reservoir with a soft cloth and ll with water.
7. Dispense water from both taps into a bowl or pitcher.
8. Repeat rinsing cycle if chlorine taste persists.
9. Install a new bottle of water and plug in the power cord into grounded outlet.

ENGLISH
9
RETURNS & WARRANTY
SHOULD YOUR UNIT NOT WORK OR IF DAMAGED WHEN YOU FIRST TAKE IT OUT OF
THE BOX, PLEASE RETURN IT TO THE PLACE OF PURCHASE IMMEDIATELY.
HOT & COLD TOP LOAD WATER DISPENSER / IWCTL352CHWH
Should you have any questions, please contact us via email or at the customer service number listed
below between the hours of 8:00 AM and 5:00 PM, Monday through Friday, Central Standard Time.
Distributed by:
Nostalgia Products LLC
1471 Partnership Dr.
Green Bay, WI 54304-5685
Customer Service
Phone: (920) 347-9122
Web: www.nostalgiaproducts.com
Customer Service Inquiry
To submit a Customer Service inquiry, go to www.nostalgiaproducts.com and ll
out the Customer Service Inquiry form and click the Submit button.
A representative will contact you as soon as possible.
Product Warranty Terms
Nostalgia Products LLC (the “Company”) hereby warrants that for a period of one (1) year from the
date of original purchase, this product will be free of defects in material and workmanship under
normal home use, provided that the product is operated and maintained in accordance with the
operating instructions. As the sole and exclusive remedy under this warranty, the Company will
at its discretion either repair or replace the product found to be defective, or issue a refund on the
product during the warranty period. This warranty is only available to the original retail purchaser of
the product from the date of initial retail purchase, and is only valid with the original sales receipt, as
proof of purchase date is required to obtain warranty benets. All warranty claims must be brought
to the attention of the Company within the warranty period and no later than 30 days of the failure
to perform. This warranty does not cover normal wear or damage caused by shipping, mishandling,
misuse, accident, alteration, improper replacement parts, or other than ordinary household use.
You may be required to return the product (with shipping prepaid by you) for inspection and
evaluation. Return shipping costs are not refundable. The Company is not responsible for returns
damaged or lost in transit. Unless otherwise specically permitted by the operating instructions, this
warranty applies to indoor household use only. In order to obtain service under this warranty, please
contact the Company at the telephone number listed above or by lling out the Customer Service
Inquiry Form located at www.nostalgiaproducts.com. Warranty valid only in USA and Canada.
This warranty is in lieu of all other warranties, expressed or implied, including warranties of
merchantability and tness for a particular purpose, which are hereby excluded to the extent
permitted by law. In no event shall the Company be liable for any indirect, incidental, consequential,
or special damages arising out of or in connection with this product or the use thereof. Some
states, provinces or jurisdictions do not permit the exclusion or limitation of incidental or
consequential damages, so the foregoing exclusion or limitation may not apply to you.
This warranty does not apply to re-manufactured merchandise.
Please read the operating instructions carefully. Failure to comply
with the operating instructions will void this warranty.
For more information, visit us online at www.nostalgiaproducts.com.
Like us on Facebook at www.facebook.com/NostalgiaElectrics.
Follow our boards on Pinterest at www.pinterest.com/nostalgiaelctrx.
Tweet along with us on Twitter at www.twitter.com/NostalgiaElctrx.

10
ESPAÑOL
10
¡Convierta todos los días en una etsa!
Visite www.nostalgiaproducts.com para
ver más productos divertidos.
CONTENIDO
SEGURIDAD . . . . . . . . . . . . . . . . . . . . . . . . . . . . . . . . . . . . . . 10
PROTECCIONES IMPORTANTES . . . . . . . . . . . . . . . . . . . . . . . . . . 11
PROTECCIONES IMPORTANTES ADICIONALES . . . . . . . . . . . . . . . . . 12
INTRODUCCIÓN . . . . . . . . . . . . . . . . . . . . . . . . . . . . . . . . . . . . 12
PARTES Y ENSAMBLAJE . . . . . . . . . . . . . . . . . . . . . . . . . . . . . . . 13
CÓMO FUNCIONA . . . . . . . . . . . . . . . . . . . . . . . . . . . . . . . . . . 14
CONSEJOS ÚTILES . . . . . . . . . . . . . . . . . . . . . . . . . . . . . . . . . . 15
LIMPIEZA Y MANTENIMIENTO . . . . . . . . . . . . . . . . . . . . . . . . . . . 16
DEVOLUCIONES Y GARANTÍA . . . . . . . . . . . . . . . . . . . . . . . . . . . 17
SEGURIDAD
Especicaciones del electrodoméstico:
115 Volts, 60 Hertz, 580 Watts
ESTE PRODUCTO ES PARA USO EN SALIDA 120V AC SOLAMENTE.
Visite www.nostalgiaproducts.com/user-manuals/ para ver el manual más actualizado.
Su seguridad y la de otras personas es muy importante.
Hemos proporcionado numerosos mensajes de seguridad importantes en este manual
y en su electrodoméstico. Siempre lea y obedezca todos los mensajes de seguridad.
Este es el símbolo de alerta de seguridad.
Este símbolo le avisa de los peligros potenciales
que pueden matar o herir a otros.
Todos los mensajes de seguridad estarán antecedidos por el símbolo de alerta.
Todos los mensajes de seguridad le dirán de qué peligro potencial se trata, cómo reducir
la posibilidad de lesiones y qué puede ocurrir si no se obedecen las instrucciones.

11
ESPAÑOL
11
PROTECCIONES IMPORTANTES
Una persona que no haya leído y comprendido todas las instrucciones
de uso y seguridad no está calicada para utilizar este aparato. Todos
los usuarios de este dispositivo deben leer y comprender este Manual
de instrucciones antes de utilizar o limpiar este aparato.
Cuando se utiliza aparatos eléctricos, siempre se deben seguir algunas
medidas básicas de seguridad que incluyen las siguientes:
1. Lea todas las instrucciones antes de utilizar este aparato.
2. NO TOQUE las supercies calientes. Use agarraderas o mangos.
3. Este aparato NO ES UN JUGUETE.
4. Este electrodoméstico no está diseñado para ser utilizado por personas (incluidos niños)
con capacidades físicas, sensoriales o mentales reducidas, o con falta de experiencia
y conocimiento, a menos que estén supervisados e instruidos sobre el uso del
electrodoméstico por una persona responsable de su seguridad. Es necesaria una estrecha
supervisión cuando cualquier electrodoméstico es utilizado por niños o cerca de ellos.
Los niños deben ser supervisados para asegurarse de que no jueguen con el aparato.
5. Una supervisión estricta se requiere cuando un aparato se use por niños o cerca de ellos.
6. Apague el aparato, luego desenchúfelo de la toma de corriente cuando no esté en
uso, antes de armar o desarmar piezas y antes de limpiarlo. Para desconectar, tome
el enchufe y tire de la toma de corriente. Nunca tire del cable de alimentación.
7. No opere ningún electrodoméstico con un cable o enchufe dañado o después
de un mal funcionamiento del electrodoméstico, o si se cae o se daña de
alguna manera. Póngase en contacto con el fabricante en su número de
teléfono de servicio al cliente para obtener información sobre el examen,
reparación o ajuste. El número de servicio al cliente es (920) 347-9122.
8. Como medida de protección contra el riesgo de descarga eléctrica, no sumerja el
cable, los enchufes ni ninguna otra parte de la unidad en agua ni en otros líquidos.
9. Desconéctelo del tomacorriente cuando no esté en uso, antes de
retirar piezas y antes de la limpieza. Déjelo enfriar antes de colocar
o retirar cualquiera de las piezas, y antes de la limpieza.
10. NO utilice ningún aparato con el cable o el enchufe dañados, ni después de que el
aparato funcione mal o SI el aparato se ha dañado de cualquier manera. Devuelva
el aparato al taller de reparación más cercano para su reparación o ajuste.
11. El fabricante no recomienda el uso de aditamentos accesorios diferentes de los
proporcionados por el fabricante. El uso de accesorios puede provocar lesiones.
12. NO utilice el aparato para usos no previstos.
13. NO utilice el aparato al aire libre. SÓLO PARA USO DOMÉSTICO.
14. NO lo coloque sobre una hornilla caliente, ni eléctrica ni de gas,
ni en un horno caliente ni cerca de ninguno de estos.
15. NO permita que el cable cuelgue sobre el borde de la mesa o
del mostrador, ni que toque supercies calientes.
16. NUNCA deje la unidad desatendida mientras esté en uso ni
cuando esté enchufada a una toma de corriente.
17. Siempre conecte primero el enchufe al aparato, luego enchufe el cable
a la toma de corriente. Para desconectar, mueva todos los controles
a “apagado”, luego retire el enchufe del tomacorriente.

12
ESPAÑOL
12
PROTECCIONES IMPORTANTES ADICIONALES
Precauciones de seguridad operativa
1. Antes del uso, este dispensador debe ensamblarse correctamente
e instalarse de acuerdo con este manual.
2. Este dispensador se destina solamente para dispensar agua. NO USE otros líquidos. NO
USE para otros propósitos. Nunca use otros líquidos en el dispensador que no sean agua
embotellada conocida y segura según criterios microbiológicos. La garantía quedará
invalidada si se usa con cualquier otro líquido, tal como café, té, jugos, cerveza o vino.
Instrucciones para el cable eléctrico y el enchufe
1. El aparato tiene un enchufe polarizado (una patita más ancha). Se diseñó para
reducir el riesgo de descarga eléctrica, dado que entra en un tomacorriente
polarizado solo en una posición. Si el enchufe no entra completo en el
tomacorriente, inviértalo. Si aún así no entra, comuníquese con un
electricista calicado. No modique el enchufe de ninguna manera.
2. Se provee un cable de alimentación corto para reducir el riesgo
resultante de enredarse o tropezar con un cable largo.
3. Si se utiliza un cable alargador o un cable de alimentación más largo:
• Unos cables de extensión se pueden utilizar si se tiene cuidado con su uso.
• Las características nominales del grupo de cables o del cable de
extensión deben ser al menos iguales a las del aparato.
• Cuando se utiliza un cable largo o cable de extensión, asegúrese de
que el cable no sobresalga de la encimera ni una mesa ya que se
puede halar o tropezarse con el cable involuntariamente.
4. El fabricante no recomienda el uso de esta máquina en países que no admiten 120 V
CA incluso si se está usando un adaptador, transformador o convertidor de voltaje.
¡GUARDE ESTAS INSTRUCCIONES!
INTRODUCCIÓN
¡Gracias por comprar el DISPENSADOR DE AGUA CALIENTE Y FRÍA DE CARGA SUPERIOR
de IGLOO! Con el Dispensador de agua caliente y fría de carga superior de Igloo, ¡la
comodidad está al alcance de la mano! ¡Este cargador superior le da agua helada y caliente
en solo segundos! ¡Este enfriador de agua le permite cargar botellas de 10 o 20 litros sin
necesidad de tuberías! Hay espacio disponible en el gabinete inferior y hay un cierre de
seguridad para niños para el botón caliente de manera que no haya accidentes. ¡Satisfaga
su sed con agua fría o relájese con una bebida caliente usando la marca de su conanza!
• Dispensador de carga superior para agua caliente y fría
• Usa botellas estándar de 10 y 20 litros (no incluidas)
• Enfriamiento por compresor
• Está disponible una conexión de línea directa de agua
• Patas delanteras de nivelación ajustables
• Dispensadores frío y caliente con un cierre de seguridad para el botón caliente

13
ESPAÑOL
13
PIEZAS Y ENSAMBLAJE
PIEZAS
• Protección contra sobrecalentamiento para el tanque caliente
• Bandeja de goteo removible para limpieza fácil
• Área de dispensación adecuada para botella de hasta 21,59 cm
• Capacidad de tanque de agua caliente: 1 L/ Capacidad de tanque de agua fría: 3,2 L
• Temperatura del agua: Caliente 93 °C/Fría -12 °C
1
2
3
4
5
6
9 10
7 8
1- Luz indicadora de agua caliente
2- Luz indicadora de agua fría
3- Espita de agua fría
4- Espita de agua caliente
5- Bandeja de goteo extraíble
6- Pies ajustables
7- Dispensador de botón de agua caliente / cerradura de
seguridad
8- Dispensador de pulsador de agua fría
9- Interruptor de encendido / apagado de agua fría
10- Interruptor de encendido / apagado de agua caliente
11- Base de guardia de agua
12- Guardia de agua
11
12

14
ESPAÑOL
14
CÓMO FUNCIONA
ADVERTENCIA: Esta unidad se destina para dispensar agua solamente. NO USE
otros líquidos. NO USE para otros propósitos. La garantía quedará invalidada si
se usa con cualquier otro líquido tal como café, té, jugos, cerveza o vino.
Este dispensador ha sido diseñado para usar botellas de agua con una
capacidad de 10 o 20 litros. NO USE botellas alternativas.
Conguración inicial
ENSAMBLE
Tenga SUMO CUIDADO cuando manipule el aparato. Cuando se saca del empaque,
se recomienda colocar la caja con cuidado sobre su lado. En su mayor parte, el
DISPENSADOR DE AGUA CALIENTE Y FRÍA DE CARGA SUPERIOR está ensamblado.
Una vez desempacado y en posición vertical, se deberá insertar la bandeja de goteo.
Requisitos de ubicación:
1. Instálelo en un área donde esté protegido de los
elementos, incluso de la luz solar directa.
2. Instálelo y úselo solamente sobre una supercie dura, plana y nivelada.
3. NO coloque el dispensador dentro de un espacio encerrado o gabinete.
4. Ubique el dispensador no más cerca de 10 centímetros de la pared con al menos
10 centímetros de holgura en los lados para permitir el libre ujo del aire.
5. El mantenimiento debe realizarlo solamente un técnico certicado.
ENFRIADORES DE AGUA
Es muy fácil remplazar los enfriadores de 10 o 20 litros (no incluidos). NOTA:
Riesgo de peso excesivo - Se recomienda que dos o más personas muevan e
instalen las botellas. De no ser así puede traer como consecuencia lesiones.
Con tapa reutilizable:
• Si su botella de agua tiene una tapa reutilizable
en el extremo con un tapón, coloque con cuidado
la botella de 10 o 20 litros sobre la sonda de
botella y la boquilla debe encajar rmemente
sobre la base. Una vez sujeta, comenzará a ver
uir el agua desde la botella hacia el tanque.
Si no hay tapa reutilizable:
1. Párese con los pies separados al ancho
de los hombros e inclínese para agarrar
la nueva botella de agua.
2. Levante la botella y lentamente inclínela hasta
un ángulo de 45 grados para dejar que el
agua comience a gotear hacia el enfriador.
3. Coloque la botella en una posición vertical cuando el ujo de agua hacia el
enfriador comience a aumentar, y después sujétela sobre la base. Una vez
sujeta, comenzará a ver uir el agua desde la botella hacia el tanque.

15
ESPAÑOL
15
Para evitar dañar el compresor, deje que la unidad repose derecha durante al menos 4 horas antes
de ponerla a funcionar. NOTA: Asegúrese de que los interruptores estén encendidos. Cada uno
de los interruptores de frío y calor se encuentran en la parte posterior del enfriador de agua.
1. Retire el sello de seguridad de la tapa de la botella. No retire la tapa plástica.
2. Levante la botella con cuidado (vea el ensamble anteriormente) y coloque
la botella hasta que esté sujeta y la botella esté asentada.
3. Enchufe el cordón en un tomacorriente de pared conectado a tierra correctamente.
ADVERTENCIA: Asegúrese siempre de que el cordón está lejos de las fuentes de agua.
Dispensar agua fría
Después de la instalación, tomará hasta 6 horas para que
el agua alcance su temperatura más baja. Cuando alcance
la temperatura más baja, la luz verde se apagará.
1. Coloque una botella, vaso o jarra debajo del grifo de agua fría.
2. Oprima el botón de agua fría para comenzar a dispensar agua.
3. Libere el botón una vez que se logre el nivel de
llenado deseado.
Dispensar agua caliente
Después de la instalación, no tardará en alcanzar la temperatura más
alta. Cuando alcance la temperatura más alta, la luz roja se apagará.
NOTA: Por seguridad, hay un cierre en el botón de dispensación.
1. Coloque una botella, vaso,
jarra, olla debajo del grifo de agua caliente.
2. Libere el cierre de seguridad para niños deslizando el botón rojo y oprima
el botón de agua caliente a la vez para comenzar a dispensar agua.
3. Libere el botón una vez que se logre el nivel de llenado deseado.
NOTA: Tenga cuidado cuando dispense agua caliente puesto
que la temperatura puede alcanzar 93 °C.
Reemplazar una botella vacía
Reemplace la botella tan pronto como advierta que está vacía.
1. Levante la botella recto hacia arriba para desacoplarla de la sonda de botella.
2. Retire el sello de seguridad de la tapa de la botella de la
botella NUEVA. NO retire la tapa plástica.
3. Levante la botella e insértela (vea las indicaciones de ensamble anteriormente). Aplique una
ligera presión hasta que el tapón dentro de la tapa empuje hacia adentro y la botella esté
sujeta.
CONSEJOS ÚTILES
EL DISPENSADOR NO FUNCIONA
• Asegúrese de que el cordón de alimentación está conectado
correctamente a un tomacorriente que funciona.
SE ESCAPA AGUA
• Reemplace la botella de agua. La causa más común es una botella rota.
NO SALE AGUA
• Asegúrese de que la botella no está vacía. Si es así, reemplácela.

16
ESPAÑOL
16
• Asegúrese de que presiona completamente los botones de control del agua.
EL DISPENSADOR DE AGUA NO ESTÁ FRÍO
• Asegúrese de que el interruptor de frío esté encendido. El interruptor
está ubicado en la parte posterior del enfriador de agua.
• Puede demorar hasta seis horas después de la instalación para que dispense el agua más fría.
• Asegúrese de que la parte posterior del dispensador está separada al menos 10
centímetros de la pared y que el aire uye libre en los cuatro lados del dispensador.
EL DISPENSADOR DE AGUA NO ESTÁ CALIENTE
• Asegúrese de que el interruptor de frío esté encendido. El interruptor
está ubicado en la parte posterior del enfriador de agua.
• Puede demorar hasta 30 minutos después de la instalación para que dispense el agua más
caliente. Cada vez que se dispensa agua caliente, se necesita tiempo para calentarla nuevamente.
• Asegúrese de que la parte posterior del dispensador está separada al menos 10
centímetros de la pared y que el aire uye libre en los cuatro lados del dispensador.
EL DISPENSADOR ESTÁ RUIDOSO
• Asegúrese de que el dispensador está ubicado sobre una supercie nivelada.
LIMPIEZA Y MANTENIMIENTO
Limpieza general
La limpieza general debe realizarse según sea necesario y
demora solamente cinco minutos o menos.
1. Limpie las supercies del gabinete con un paño suave y agua jabonosa tibia. Enjuague.
2. Limpie el polvo en la parte posterior del enfriador de agua para mejorar la eciencia.
3. Retire la cubierta de la bandeja de goteo y lávela a mano. Use un paño y agua
jabonosa tibia para fregar el interior de la bandeja de goteo. Enjuague.
4. Vuelva a colocar la bandeja de goteo.
Limpiar las líneas de agua y el depósito frío
Se recomienda limpiar las líneas de agua y los depósitos una vez cada tres meses.
NOTA: Se recomienda hacerlo antes de cargar una nueva jarra de 10 o 20 litros.
1. Desconecte el cordón de alimentación del tomacorriente.
2. Retire la botella del enfriador de agua.
3. Retire la guarda plástica del agua y límpiela con agua jabonosa tibia. Enjuague.
4. Rellene el depósito con una mezcla de agua y lavandina y déjela reposar durante 30 minutos.
5. Retire la mezcla de limpieza dispensándola desde ambos grifos en un bol o jarra.
6. Pase dentro del depósito un paño suave y rellene con agua.
7. Dispense el agua desde ambos grifos en un bol o jarra.
8. Repita el ciclo de enjuague si persiste el sabor a cloro.
9. Instale una nueva botella de agua y enchufe el cordón de
alimentación en el tomacorriente con conexión a tierra.

17
ESPAÑOL
17
DEVOLUCIONES Y GARANTÍA
SI LA UNIDAD NO FUNCIONA O ESTÁ DAÑADA AL SACARLA POR PRIMERA VEZ
DE LA CAJA, DEVUÉLVALA AL LUGAR DE COMPRA INMEDIATAMENTE.
Dispensador de agua caliente y fría de carga superior / IWCTL352CHWH
Si tiene preguntas, contacte con nosotros por correo electrónico o por el número
telefónico de servicio al cliente que aparece a continuación en el horario de
8:00 AM a 5:00 PM, de lunes a viernes, Hora Estándar del Este.
Distribuida por:
Nostalgia Products LLC
1471 Partnership Dr.
Green Bay, WI 54304-5685
Servicio al cliente
Teléfono: (833) 258-4210
Web: www.nostalgiaproducts.com
Solicitud de servicio al cliente
Para enviar una solicitud al Servicio al Cliente, vaya a www.nostalgiaproducts.com, llene
el formulario de Solicitud de Servicio al Cliente y haga clic en el botón Enviar.
Un representante le contactará tan pronto como sea posible.
Términos de garantía del producto
Po este medio, Nostalgia Products LLC (la “Compañía”) garantiza que por un período de un (1) año a
partir de la fecha de compra original, este producto estará sin defectos en cuanto a materiales y mano
de obra en uso normal en casa, siempre que el producto se maneje y mantenga de acuerdo con las
instrucciones de manejo. Como único y exclusivo remedio en virtud de esta garantía, la Compañía, a
su discreción, podrá optar por reparar o sustituir el producto que se encuentre defectuoso, o emitir un
reembolso por el producto durante el período de garantía. Esta garantía sólo está disponible para el
comprador original minorista del producto a partir de la fecha inicial de compra al por menor, y sólo es
válida con el recibo de compra original, y como prueba de la fecha de compra, es necesario obtener los
benecios de la garantía. Todos los reclamos de garantía deben hacerse a la atención de la Compañía
dentro del período de garantía y no más tarde que 30 días desde la imposibilidad de realizarlo. Esta
garantía no cubre el desgaste normal o daños ocasionados por el embarque, malos manejos, mal uso,
accidentes, alteración, piezas de cambio incorrectas, o algo distinto al uso doméstico normal. Es posible
que deba devolver el producto (con los gastos de envío pagados por usted) para inspección y evaluación.
Los costos de envío no son reembolsables. La empresa no se hace responsable por devoluciones
dañadas o perdidas en tránsito. A menos que se indique lo contrario especícamente permitido por
las instrucciones de manejo, esta garantía sólo se aplica al uso en interiores de las viviendas. Para
realizar una reparación bajo esta garantía, comuníquese con la Compañía mediante el número de
teléfono indicado anteriormente o al llenar el formulario de consulta para el servicio de Atención al
Cliente en www.nostalgiaproduct s.com. El período de garantía sólo es válido en EE.UU. y Canadá.
Esta garantía está en lugar de cualquier otra garantía, expresa o implícita, incluso las garantías de
comerciabilidad y conveniencia para un propósito en particular, que quedan excluidas en la medida
permitida por la ley. En ningún caso la compañía será responsable de cualquier daño indirecto, incidental,
consecuente, especial o daños que surjan o estén relacionados con este producto o la utilización del
mismo. Algunos estados, provincias o corregimientos no permiten la exclusión o la limitación de daños
incidentales o consecuentes, por lo que la exclusión o la limitación anterior quizás no se aplique a usted.
Esta garantía no se aplica a mercancía reelaborada.
Lea las instrucciones de manejo cuidadosamente. El incumplimiento
de las instrucciones de manejo anulará esta garantía.
Para obtener más información, visítenos en línea en www.nostalgiaproducts.com.
Me Gusta en Facebook en www.facebook.com / NostalgiaElectrics.
Siga nuestros consejos sobre Pinterest en www.pinterest.com / nostalgiaelctrx.
Tweet con nosotros en Twitter en www.twitter.com / NostalgiaElctrx.

18
FRANÇAIS
18
Faire une fête tous les jours!
Visiter le site Web www.nostalgiaproducts.com pour d’autres
produits agréables.
TABLE DES MATIÈRES
SÉCURITÉ . . . . . . . . . . . . . . . . . . . . . . . . . . . . . . . . . . . . . . . . 18
PRÉCAUTIONS IMPORTANTES . . . . . . . . . . . . . . . . . . . . . . . . . . . 19
PRÉCAUTIONS IMPORTANTES ADDITIONNEL . . . . . . . . . . . . . . . . . 20
INTRODUCTION . . . . . . . . . . . . . . . . . . . . . . . . . . . . . . . . . . . . 20
PIÈCES ET ASSEMBLAGE . . . . . . . . . . . . . . . . . . . . . . . . . . . . . . . 21
COMMENT FAIRE FONCTIONNER . . . . . . . . . . . . . . . . . . . . . . . . . 22
CONSEILS PRATIQUES . . . . . . . . . . . . . . . . . . . . . . . . . . . . . . . . 23
NETTOYAGE ET ENTRETIEN . . . . . . . . . . . . . . . . . . . . . . . . . . . . . 24
RETOURS ET GARANTIE . . . . . . . . . . . . . . . . . . . . . . . . . . . . . . . 25
SÉCURITÉ
Spécications des Appareils:
115 volts, 60 Hz, 580 watts
CE PRODUIT EST UTILISÉ DANS SORTIE ÉLECTRIQUE DE 120V AC SEULEMENT.
Reportez-vous à www.nostalgiaproducts.com/user-manuals/ pour la version la plus récente.
Votre sécurité tout comme celle des autres est primordiale.
Ce manuel renferme plusieurs avis importants sur la sécurité lors de l’utilisation
de votre appareil. Lire le manuel et conformez-vous aux avis contre-indiqués.
Ceci représente le symbole d'avertissement pour votre sécurité.
Ce symbole vous signale les dangers potentiels qui
peuvent blessures graves à vous et à d'autres.
Ce symbole d'alerte à la sécurité suivra tous les avis relatifs à la sécurité.
Tous les avis sécuritaires indiqueront le danger potentiel exact, la façon
dont vous pouvez réduire vos chances de blessure et vous indiquerons les
conséquences potentielles si vous ne suivez pas ces instructions à la lettre.
La page est en cours de chargement...
La page est en cours de chargement...
La page est en cours de chargement...
La page est en cours de chargement...
La page est en cours de chargement...
La page est en cours de chargement...
La page est en cours de chargement...
-
 1
1
-
 2
2
-
 3
3
-
 4
4
-
 5
5
-
 6
6
-
 7
7
-
 8
8
-
 9
9
-
 10
10
-
 11
11
-
 12
12
-
 13
13
-
 14
14
-
 15
15
-
 16
16
-
 17
17
-
 18
18
-
 19
19
-
 20
20
-
 21
21
-
 22
22
-
 23
23
-
 24
24
-
 25
25
-
 26
26
-
 27
27


dans d''autres langues
- English: Igloo IWCTL352CHWH User manual
- español: Igloo IWCTL352CHWH Manual de usuario
Documents connexes
Autres documents
-
Nostalgia INF300 Manuel utilisateur
-
Nostalgia Electrics KRS-6100SS Mode d'emploi
-
-
-
Waring WWB3G Manuel utilisateur
-
Whirlpool Hot water dispenser Mode d'emploi
-
Royal Sovereign RWD-500W Le manuel du propriétaire
-
Master Chef 043-2338-4 Manuel utilisateur
-
Frigidaire EFWC519 Manuel utilisateur