Tefal RK1558US Manuel utilisateur
- Catégorie
- Cuiseurs à riz
- Taper
- Manuel utilisateur

COOL TOUCH
INSTRUCTIONS FOR USE
EN
FR
T-FAL-COLTUCH-NC00027923-02 23/08/12 17:41 Page1

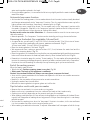
IMPORTANT SAFEGUARDS
When using electrical appliances, basic safety precautions should always be followed, including the following:
1. Read all instructions before using.
2. Do not touch hot surfaces. Use handles or knobs.
3. To protect against electric shock, do not immerse cord, plugs or appliance in water or other liquid.
4. Not intended for use by children. Close supervision is necessary for any appliance being used by or near children.
5. Unplug from outlet when not in use and before cleaning. Allow to cool before putting on or taking off parts, and
before cleaning the appliance.
6. Do not operate the appliance with a damaged cord or plug or after the appliance malfunctions,
or has been damaged in any manner. Return the appliance to the nearest authorized service facility for exam-
ination, repair or adjustment.
7. The use of accessory attachments not recommended by the appliance manufacturer may cause injuries.
8. Do not use outdoors.
9. Do not let the cord hang over the edge of a table or counter, or touch hot surfaces.
10.Do not place on or near a hot gas or electric burner, or in a heated oven.
11.Extreme caution must be used when moving an appliance containing hot oil or other hot liquids.
12.Do not use appliance for other than intended use.
SAVE THESE INSTRUCTIONS
FOR HOUSEHOLD USE ONLY
POLARIZATION INSTRUCTIONS
This appliance has a polarized plug (one blade is wider than the other). To reduce the risk of electric shock, this
plug is intented to fit into a polarized outlet only one way. If the plug does not fit fully into the outlet, reverse the
plug. If it still does not fit, contact a qualified electrician. Do not attempt to modify the plug in any way.
SHORT CORD INSTRUCTIONS
a) A short power-supply cord (or detachable power-supply cord) should be used to reduce the risk
resulting from becoming entangled in or tripping over a longer cord.
b) Longer detachable power-supply cords or extension cords are available and may be used if care is exercised
in their use.
c) If a longer detachable power-supply cord or extension cord is used:
1) The marked electrical rating of the cord set or extension cord should be at least as great as the electrical
rating of the appliance; and
2) The cord should be arranged so that it will not drape over the countertop or tabletop where it can be
pulled on by children or tripped over unintentionally.
If the appliance is of the grounded type, the extension cord should be a grounding-type 3-wire cord.
•
This appliance is not intended to be operated using an external timer or separate remote control system.
•
Check that the power supply voltage corresponds to that shown on the appliance (alternating current).
•
Given the diverse standards in effect, if the appliance is used in a country other than that in which it is pur-
chased, have it checked by an approved service center.
•
Do not place the appliance near a heat source or in a hot oven, as serious damage could result. This appli-
ance is designed for domestic use only. In case of professional use, inappropriate use or failure to comply with
the instructions, the manufacturer accepts no responsibility and the guarantee does not apply.
•
It is not intended to be used in the following applications, and the guarantee will not apply for:
- staff kitchen areas in shops, offices and other working environments;
- farm houses;
2
EN
T-FAL-COLTUCH-NC00027923-02 23/08/12 17:41 Page2

- by clients in hotels, motels and other residential type environments;
- bed and breakfast type environments.
•
Never leave the appliance in operation unattended. Keep away from children.
This appliance is not intended for use by persons (including children) with reduced physical, sensory or mental ca-
pabilities, or lack of experience and knowledge, unless they have been given supervision or instruction concerning use
of the appliance by a person responsible for their safety.
•
Do not use the appliance if:
- the appliance or the cord is damaged.
- the appliance has fallen or shows visible damage or does not work properly.
In these cases, the appliance must be sent to your nearest approved service center to avoid any possible danger.
Do not take the appliance apart yourself.
•
Do not leave the cord hanging.
•
Do not unplug the appliance by pulling on the cord.
•
Always unplug the appliance:
- immediately after use,
- when moving it,
- prior to any cleaning or maintenance,
- if it fails to function correctly.
•
Use a flat, stable, heat-resistant work surface away from any water splashes.
•
Children should be supervised to ensure that they do not play with the appliance.
•
Burns can occur by touching the hot surface of the appliance, the hot water, the steam or the food.
•
Never try to operate the appliance when the bowl is empty or without the bowl.
•
The cooking function/knob must be allowed to operate freely. Do not prevent or obstruct the function from auto-
matically changing to the keep warm function.
•
Do not remove the bowl while the appliance is working.
•
Do not put the appliance directly onto a hot surface, or any other source of heat or flame, as it will cause a
failure or danger.
•
The bowl and the heating plate should be in direct contact. Any object or food inserted between these two
parts could damage the correct operation.
•
Do not put any food or water into the appliance until the bowl is in place.
•
Respect the levels indicated in the recipes.
•
During cooking, the appliance gives out heat and steam. Keep face and hands away. Do not get face and
hands close to the steam outlet. Do not obstruct the steam outlet.
•
Do not immerse the body in water nor pour water into it, only into the bowl.
•
Any intervention should only be made by a service center with original spare parts.
•
CAUTION – To ensure continued protection against risk of electric shock, connect to properly grounded
outlets only.
•
CAUTION : to reduce the risk of electric shock, cook only in removable container.
For any problems or queries please contact our Customer Relations
Team or consult our web site: www.t-falusa.com or www.t-fal.ca
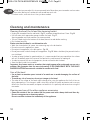
Protect the environment
• Your appliance has been designed to run for many years. However, when you decide to replace it, remember to
think about how you can contribute to protecting the environment.
• Before discarding your appliance you should remove the battery from the timer and dispose of it at a local civic
waste collection center (according to model).
3
Environment protection first!
Your appliance contains valuable materials which can be recovered or recycled.
Leave it at a local civic waste collection point.
EN
T-FAL-COLTUCH-NC00027923-02 23/08/12 17:41 Page3

Features
1
2
3
4
5
6
7
8a
10
8b
8c
9
13
11
12
4
EN
T-FAL-COLTUCH-NC00027923-02 23/08/12 17:41 Page4

5
Fig.1
Fig.4 Fig.5 Fig.6
Fig.2 Fig.3
Fig.7
Fig.10
Fig.8 Fig.9
Fig.11 Fig.12
EN
T-FAL-COLTUCH-NC00027923-02 23/08/12 17:41 Page5

6
Fig.15
Fig.17
Fig.18
Fig.19
Fig.16
Fig.14
Fig.13
1 H
OK
2cm
MIN
EN
T-FAL-COLTUCH-NC00027923-02 23/08/12 17:41 Page6

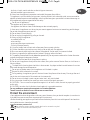
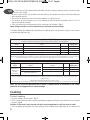
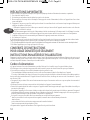
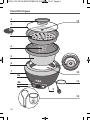
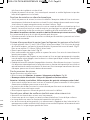
Features (see diagram page 4)
1. Lid handle
2. Glass lid
3. Steaming basket
4. Water level marks
5. Removable
non-stick bowl
6.
Up
p
er rin
g
7.
B
o
d
y o
f th
e ap
p
lian
ce
8.
Co
n
tro
l p
an
el
a.
Co
o
k
in
g
in
d
ic
ato
r (red
)
b
.
Keep
w
arm
in
d
ic
ato
r (o
r
an
g
e)
c.
Co
n
tro
l sw
itch
9. Non-slip base
10.Heating plate and sensor
11.Power cord
12.Spoon and rice measuring cup
13.Steam outlet
Before first use
Unpack the rice cooker
• Take the rice cooker and accessories out of their packaging.
• Take the lid off.
• Take out the printed documents.
• Take out the bowl and steaming basket.
• Clean the lid, bowl and steaming basket with a non-abrasive sponge, warm water and dish soap.
Clean the outside of the appliance with a slightly damp cloth.
• Dry carefully.
• The lid, steaming basket, spoon and rice measuring cup are dishwasher safe.
• To maintain the non-stick properties of the bowl condition, wipe the non-stick interior of the bowl
by spreading one teaspoon of cooking oil over the interior with a clean cloth. Wipe off any excess.
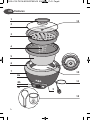
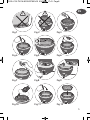
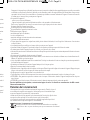
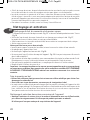
Preparation
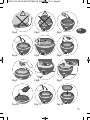
Before cooking
• Make sure the outside of the bowl, especially the base, is dry. Check that here is no foreign matter
under the bowl or on the heating plate
- Fig 1.
• Place the bowl inside the appliance and make sure that it is positioned correctly
- Fig 2.
• Twist the bowl from side to side to make sure that the bottom of the bowl makes good contact
with the heating plate.
Note: When the rice bowl is empty, without the lid fitted, it is normal for there to be a gap
between the body of the appliance and the rim of the bowl. Once the glass lid is fitted, the
bowl makes good contact with the spring loaded heat sensor and is ready for use.
• Place the ingredients and liquid in the bowl (see sections 'Preparing Rice' and 'Steaming in the Bas-
ket' for more details)
- Fig 3 and - Fig 4.
• Place the lid on the appliance, positioning the steam vent at the back
- Fig 6.
• Do not switch on appliance with an empty cooking bowl.
Preparing rice
• The measurement markings inside the bowl are in liters and cups. These are used for measuring
the amount of water when cooking rice
- Fig 5.
• Measure out the rice (see table page 8) using the measuring cup provided and rinse it thoroughly
under running water in a sieve for a long time. Place rinsed rice in the bowl ensuring it is evenly dis-
tributed.
Note: The plastic cup should only be used for measuring rice, not water.
• For best results, use ordinary rice rather than 'easy cook' type rice which tends to give a stickier rice
and adhere to the base.
7
EN
T-FAL-COLTUCH-NC00027923-02 23/08/12 17:41 Page7

8
To start cooking
• Plug the cooker into the outlet - Fig 7.
• Press the control button down and the red cooking indicator will light up to show that it has started
to cook
- Fig 8.
Caution: if the bowl is not inserted correctly into the appliance, it will not start to cook.
• The rice cooker will calculate the exact cooking time automatically, depending on the amount of
Cooking
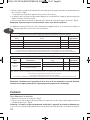
COOKING GUIDE FOR WHITE RICE
(Long Grain, Basmati, American, Thai, Jasmine, Risotto (Arborio), Thai Sticky Rice)
Measuring cups
of rice
Water level in bowl
(+ rice)
Serves Approximate
cooking time**
4 4 cup mark 5-6 20-25 min
6 6 cup mark 8-10 25-30 min
8 8 cup mark 13-14 30-35 min
10 10 cup mark 16-18 35-40 min
Before cooking, rinse rice thoroughly under running water in a sieve for a long time to remove any loose starch.
Weight will vary with other types of white rice such as Thai, Jasmine, Risotto (Arborio) and Thai Sticky Rice.** The rice cooker au-
tomatically determines the cooking time depending on the quantity of rice and water placed in the bowl.
COOKING GUIDE FOR BROWN RICE AND BROWN BASMATI RICE
Type
of rice
Measuring cups
of rice
Water level in bowl
(+ rice)
Serves Approximate
cooking time***
Wholegrain
Brown Rice or
Wholegrain
Brown
Basmati Rice
4 4.5 cup mark 5-6 40-45 min
6 6.5 cup mark 8-10 45-50 min
8 (maximum quantity for brown rice
and brown basmati rice)
8.5 cup mark 13-14 50-55 min
Before cooking rinse rice thoroughly under running water in a sieve for a long time to remove any loose starch.
For best results, we recommand cooking wild rice in a saucepan instead of your Cooltouch rice cooker as it tends to froth
during cooking.
Weight will vary slighty with different varieties of rice.
*** The rice cooker automatically determines the cooking time depending on the quantity of rice and water placed in the bowl.
Note: Do not place the appliance near a wall or a cabinet while in operation as the steam
produced by the appliance can cause damage.
• For white rice, fill the bowl with cold water up to the marking relating to the number of cups
of rice used
- Fig 5.
For other types of rice, such as brown rice and wild rice, the amount of water needs to be adjusted
and increased slightly.
• The minimum quantity of rice that can be cooked is 4 cups white rice.
• The amount of rice and water must never exceed the MAX level of the product, which is the 10
cups level mark of the bowl.
• Cover the bowl with the lid positioning the steam vent at the back
- Fig 6.
Note: Always add the rice first otherwise you will have too much water.
The tables below give additional information on cooking white rice and other types of rice (brown
rice and brown basmati rice).
EN
T-FAL-COLTUCH-NC00027923-02 23/08/12 17:41 Page8

arted
nt of
9
water and ingredients placed in the bowl.
• During the cooking process, it is normal for the lid to rise up slightly and for the water to bubble
around the edges.
Automatic keep warm function
• At the end of the cooking process, the rice cooker detects that the water has been totally absorbed
and changes automatically to the “keep warm” function. Then, the control button moves up to the
higher position and the orange “keep warm” indicator lights up
- Fig 9.
• The food stays warm, ready to be served. The rice cooker stays in the “keep warm” position while
the cooker is plugged in. Food left in the “keep warm” position should not be left to dry out and it
must be stirred to prevent it from burning or sticking to the bowl.
For best results serve rice within 30 minutes. It is recommended to serve the rice as soon as pos-
sible after cooking.
• Manual operation. The “keep warm” function can be started by pushing up the control button.
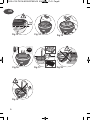
Steaming in the basket (for vegetables, fish and fruit)
• As a general rule, you will need 1/2 cup (100-150 ml) of water for each 15 to 20 minutes of steam-
ing time, except when cooking Brussels sprouts, potatoes and broccoli
- Fig 11.
In these cases, add 2 1/4 cups (500 ml) of cold water.
• Place the steaming basket in the bowl
- Fig 12.
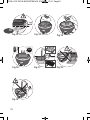
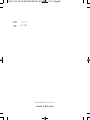
• We recommend there is always a space of at least 3/4" (2 cm) between the water level and the
base of the steaming basket
- Fig 13.
• Place the ingredients in the basket ensuring that they are not packed too tightly and that some steam
holes are left clear otherwise the food may cook unevenly. Cover the bowl with the lid
- Fig 14.
• Proceed as instructed on page 8 in section 'To start cooking'. The rice cooker will automatically de-
termine the steaming time depending on the quantity of water used and switch to the "keep warm"
function at the end of cooking. To manually interrupt steaming push up the control button.
End of the cooking process
When the food is ready to serve:
• Take the lid off. Caution: escaping steam is very hot
- Fig 10.
• Safety note: The body of the appliance is cooltouch.
Caution: the rice bowl will be hot. Always use oven gloves to remove the bowl.
• Serve with the spoon provided with the cooker and replace the lid. Never use metallic accessories
to stir or serve the rice.
• Food left in the rice cooker will stay warm to be served a second time.
• Unplug the cooker from the wall outlet.
• Remove the steaming basket using oven gloves as it will be hot.
Tips for better results with your rice cooker
• Measure the rice and wash it in a sieve under running water.
• Make sure the rice is spread over the entire surface of the bowl so that it cooks evenly.
• Cooking times will vary depending on the amount and type of rice cooked.
• When cooking small quantities, the rice will start sticking together on the bottom of the bowl. Greas-
ing with half a teaspoon of cooking oil can help prevent this layer from forming but it is not always
possible to avoid.
• At the end of the cooking time, when the “keep warm” function is turned on, stir the rice and leave
it in the rice cooker for a few minutes to get a perfect result.
• When cooking rice add salt to the water, if required. Allow about half a teaspoon of salt for 4 cups
EN
T-FAL-COLTUCH-NC00027923-02 23/08/12 17:41 Page9

10
Cleaning and maintenance
Cleaning the bowl, the lid and the steaming basket
• Unplug the rice cooker from the wall outlet - Fig 15 - and leave to cool for at least 1 hour - Fig 16.
• Use hot water, dish soap and a sponge to clean the bowl
- Fig 17,
Scouring powder and steel wool are not recommended.
• If there is food stuck to the bottom of the bowl, leave it to soak before washing.
• Dry the bowl carefully.
Please note that the bowl is not dishwasher safe.
• Wash the steam basket, lid, spoon, rice measuring cup in the dishwasher.
• Do not immerse the appliance in water.
• Do not put the appliance in the dishwasher
- Fig 18.
• Do not pour water inside the body of the appliance
- Fig 19. Water should only be poured into the
non-stick bowl.
• In order to keep the bowl in good condition, it is recommended that you recondition the surface
with oil. Periodically wipe the interior of the bowl with a small amount of cooking oil.
• In order to preserve the non-stick properties, do not cut food inside the bowl.
• Store the bowl inside the rice cooker.
Important: Any brown marks or scratches that might appear after prolonged use are not a
problem. We guarantee that the non-stick coating IS IN COMPLIANCE WITH THE RULES
AND REGULATIONS on materials suitable for contact with food.
Care of the bowl
• Use a plastic or wooden spoon instead of a metal one to avoid damaging the surface of
the bowl.
• To avoid any risk of corrosion, do not put vinegar in the bowl.
• The color of the surface of the bowl might change after using the appliance for the first time or
after prolonged use. This change in color is due to the effects of steam and water and in no way
affects the use of the rice cooker, and poses no health risk. It is perfectly safe to continue using the
rice cooker.
Cleaning and care of the other appliance accessories
• Clean the outside of the rice cooker and the power cord with a damp cloth and then dry.
Do not use aggressive or abrasive products.
Do not use water to clean the inside body of the appliance.
of rice, but you can adjust this to your personal taste. Remember your rice cooker uses less water
than when boiling rice, so take care not to add too much salt.
• For best results, serve rice when it has just been cooked.
EN
T-FAL-COLTUCH-NC00027923-02 23/08/12 17:41 Page10

PRÉCAUTIONS IMPORTANTES
Lorsque vous utilisez des appareils électriques, veillez à prendre quelques précautions élémentaires,les suivantes, en particulier :
1. Lisez le mode d’emploi en entier.
2. Ne touchez pas aux surfaces chaudes; utilisez les poignées ou les boutons.
3. Pour vous protéger d'un risque de choc électrique, n’immergez pas le cordon d’alimentation, les fiches ou l’appareil dans l’eau ni dans
aucun autre liquide.
4. Cet appareil n'est pas conçu pour être utilisé par des enfants. Une surveillance étroite est nécessaire lorsqu’un appareil électrique est
utilisé par des enfants ou à leur portée.
5. Débranchez l'appareil si vous ne l'utilisez pas ou avant de le nettoyer. Laissez refroidir l'appareil avant de monter ou de démonter
des pièces, et avant de le nettoyer.
6. N'utilisez aucun appareil dont le cordon d'alimentation ou la fiche est endommagé, s'il fonctionne mal, s'il a été échappé ou endom-
magé de quelque manière que ce soit. Retournez l'appareil à un centre de service autorisé en vue d'un examen ou d'une réparation.
7. L'utilisation d'accessoires non recommandés par le fabricant de l'appareil pourrait causer des blessures.
8. Ne l’utilisez pas à l’extérieur.
9. Ne laissez pas pendre le cordon du bord d'une table ou d'un plan de travail, et ne le laissez pas en contact avec toute surface chaude.
10. Ne posez pas cet appareil sur une cuisinière à gaz ou électrique ou près de celle-ci ni dans un four chauffé.
11. Des précautions particulières doivent être prises lors du déplacement d'un appareil contenant de l'huile chaude ou tout autre liquide chaud.
12. N'utilisez l'appareil que pour l'usage pour lequel il a été conçu.
CONSERVEZ CES INSTRUCTIONS
POUR USAGE DOMESTIQUE SEULEMENT
INSTRUCTIONS EN MATIERE DE POLARISATION
Cet appareil a une fiche polarisée (une lame est plus large que l'autre). Afin de limiter tout risque de décharge électrique, cette prise ne peut
s'enficher que dans un sens. Inverser la fiche si elle ne s'enfonce pas complètement dans la prise. Si elle ne s'adapte toujours pas, contacter
un électricien qualifié. Ne tenter d'aucune façon de modifier la fiche.
Cordon d'alimentation
a) L’appareil est muni d’un cordon d’alimentation court afin d’éviter qu'il ne s'emmêle ou que l’on puisse trébucher dessus.
b) Des rallonges et des cordons plus longs peuvent être utilisés mais des mesures de sécurité doivent être prises par l’utilisateur.
c) Si vous utilisez une rallonge ou un cordon d’alimentation plus long, veillez à ce que :
1) les caractéristiques électriques mentionnées sur le cordon soient au minimum égales à celles indiquées sur l’appareil;
2) le cordon d’alimentation soit disposé de façon qu’il ne pende pas du plan de travail ou du haut de la table car un enfant pourrait tirer
dessus ou trébucher accidentellement. Si l’appareil est muni d’une fiche de terre, la rallonge soit aussi un cordon 2 conducteurs + 1 pour la
mise à la terre (3 fils).
•
Cet appareil n’est pas destiné à être mis en fonctionnement au moyen d’une minuterie extérieure ou par un système de commande à
distance séparé.
•
Vérifier que la tension du réseau corresponde bien à celle indiquée sur l’appareil (courant alternatif).
• En raison de la grande diversité de normes en vigueur, si l’appareil est utilisé dans un pays autre que le pays d’achat, faites-le contrôler par
un centre de service agréé.
•
Ne pas placer l’appareil près d’une source de chaleur ou dans un four chaud, car il y aurait risque de le détériorer gravement. Cet appareil
est uniquement destiné à un usage domestique. En cas d’utilisation professionnelle, d’utilisation inappropriée ou du non-respect des in-
structions, le fabricant décline toute responsabilité et la garantie ne s’applique pas.
•
Il n’a pas été conçu pour être utilisé dans les cas suivants qui ne sont pas couverts par la garantie :
- dans les coins cuisines réservés au personnel des magasins, bureaux et autres environnements professionnels
- dans les fermes
- par les clients des hôtels, motels et autres environnements à caractère résidentiel
- dans les environnements de type chambre d’hôtes.
•
Ne jamais utiliser l’appareil sans surveillance. Tenir l'appareil hors de portée des enfants.
12
FR
T-FAL-COLTUCH-NC00027923-02 23/08/12 17:41 Page12

ni dans
que est
monter
endom-
n.
aude.
aud.
ne peut
ntacter
ait tirer
pour la
ande à
ôler par
ppareil
des in-
Cet appareil n’est pas prévu pour être utilisé par des personnes (y compris les enfants) dont les capacités physiques, sensorielles ou mentales
sont réduites, ou des personnes dénuées d’expérience ou de connaissance, sauf si elles ont pu bénéficier, par l’intermédiaire d’une personne
responsable de leur sécurité, d’une surveillance ou d’instructions préalables concernant l’utilisation de l’appareil. Il convient de surveiller
les enfants pour s’assurer qu’ils ne jouent pas avec l’appareil.
•
Ne pas utiliser l’appareil si :
- celui-ci ou son cordon est défectueux,
- l’appareil est tombé et présente des détériorations visibles ou des anomalies de fonctionnement.
Dans ces cas, l’appareil doit être envoyé à un centre de service agréé le plus proche de votre domicile.
Ne jamais démonter l’appareil vous-même.
•
Ne laissez pas pendre le cordon d’alimentation.
•
Ne pas débrancher l’appareil en tirant sur le cordon.
• Débranchez toujours l’appareil :
- immédiatement après son utilisation,
- lors de tout déplacement,
- avant tout nettoyage ou toute intervention de maintenance,
- s’il présente un dysfonctionnement.
•
Toujours placer votre appareil sur un plan ferme, stable, plat et résistant à la chaleur; le tenir éloigné des éclaboussures d’eau et autres
sources de chaleur.
• Les enfants doivent être surveillés pour s’assurer qu’ils ne jouent pas avec l’appareil.
• La surface brûlante de l’appareil, l’eau chaude, la vapeur ou la nourriture peuvent provoquer des brûlures de contact.
• De tentez jamais d’utiliser l’appareil lorsque le bol est vide ou en l’absence de ce dernier.
• La fonction/bouton de cuisson doit fonctionner librement. N’empêchez pas la fonction de passer automatiquement à la fonction de main-
tien au chaud.
• Ne retirez pas le bol pendant le fonctionnement de l’appareil.
• Ne placez pas l’appareil directement sur une surface chaude, ou sur tout autre source de chaleur ou flamme nue, cela entraînerait une dé-
faillance de l’appareil ou créerait un danger.
• Le bol et la plaque chauffante doivent être en contact direct. Tout objet ou aliment inséré entre ces deux pièces pourrait compromettre le
bon fonctionnement de l’appareil.
• Ne mettez pas d’aliments ou d’eau dans l’appareil tant que le bol n’est pas en place.
• Respectez les niveaux indiqués dans les recettes.
• Pendant la cuisson, l’appareil produit de la chaleur et de la vapeur. Évitez d’approcher la figure et les mains de l’appareil. N’approchez pas
la figure et les mains de la sortie de vapeur. N’obstruez pas la sortie de vapeur.
• Ne plongez pas le corps de l’appareil dans l’eau, seulement le bol.
• Toute intervention doit être confiée uniquement à un centre de service utilisant exclusivement les pièces de rechange d’origine.
• ATTENTION – Pour garantir une protection continue contre les risques d’électrocution, branchez l’appareil uniquement sur des prises
mises à la terre.
• ATTENTION : pour réduire les risques d’électrocution, cuisez les aliments uniquement dans le contenant amovible.
Pour tout problème ou toute question, contactez notre équipe de service à la clientèle ou consultez notre site Web : www.t-
falusa.com ou www.t-fal.ca
Protection de l’environnement
• Votre appareil est conçu pour fonctionner durant de longues années. Toutefois, le jour où
vous envisagez de remplacer votre appareil, n’oubliez pas de penser à la contribution que
vous pouvez apporter à la protection de l’environnement.
• Avant mise au rebut de votre appareil, la pile du minuteur doit être retirée et déposée dans
un centre de collecte spécialisé ou un centre de service agréé (selon modèle).
• Les Centres de service agréés vous reprendront vos appareils usagés afin de procéder à
leur destruction dans le respect des règles de l’environnement.
13
Participons à la protection de l’environnement !
Votre appareil contient de nombreux matériaux valorisables ou recyclables.
Confiez celui-ci dans un point de collecte pour que son traitement soit effectué.
FR
T-FAL-COLTUCH-NC00027923-02 23/08/12 17:41 Page13

Caractéristiques
1
2
3
4
5
6
7
8a
10
8b
8c
9
13
11
12
14
FR
T-FAL-COLTUCH-NC00027923-02 23/08/12 17:41 Page14

15
Fig.1
Fig.4 Fig.5 Fig.6
Fig.2 Fig.3
Fig.7
Fig.10
Fig.8 Fig.9
Fig.11 Fig.12
FR
T-FAL-COLTUCH-NC00027923-02 23/08/12 17:41 Page15

16
Fig.15
Fig.17
Fig.18
Fig.19
Fig.16
Fig.14
Fig.13
1 H
OK
2cm
MIN
FR
T-FAL-COLTUCH-NC00027923-02 23/08/12 17:41 Page16

Composants (voir l'illustration en page 4)
1. Poignée du couvercle
2. Couvercle en verre
3. Panier vapeur
4. Repères de niveau d'eau
5. Bol antiadhésif amovible
6. Anneau supérieur
7
.
Co
rp
s d
e l'ap
p
areil
8
.
Pan
n
eau
d
e co
m
m
an
d
e
a.
V
oyan
t d
e cu
isso
n
(ro
u
g
e)
b
.
V
oyan
t d
e m
ain
tien
au
ch
au
d
(o
r
an
g
e)
c.
Co
m
m
u
t
at
eu
r d
e co
m
m
an
d
e
9. Base antidérapante
10.Plaque chauffante et capteur
11.Cordon d'alimentation
12.Cuillère et tasse à mesurer
13.Orifice de sortie de la vapeur
Avant la première utilisation
Déballez le cuiseur à riz
• Sortez de l'emballage le cuiseur à riz et les accessoires.
• Retirez le couvercle.
• Sortez les documents imprimés.
• Sortez le bol et le panier vapeur.
• Nettoyez le couvercle, le bol et le panier vapeur avec une éponge non abrasive, de l'eau chaude et
du savon à vaisselle. Nettoyez l'extérieur de l'appareil avec un chiffon légèrement humide.
• Séchez soigneusement.
• Le couvercle, le panier vapeur, la cuillère et la tasse à mesurer le riz vont au lave-vaisselle.
• Pour maintenir les propriétés antiadhésives du bol, essuyez l'intérieur antiadhésif du bol en y appli-
quant une cuillère à thé d'huile de cuisson au moyen d'un chiffon propre. Essuyez soigneusement.
Préparation
Avant la cuisson
• Assurez-vous que l'extérieur du bol, notamment la base, est sec. Assurez-vous qu'il n'y a pas de
corps étranger sous le bol ou sur la plaque chauffante
- Fig 1.
• Placez le bol à l'intérieur de l'appareil et assurez-vous qu'il est correctement positionné
- Fig 2.
• Faites tourner le bol d'un côté, puis de l'autre pour vous assurer que le bas du bol établit un bon
contact avec la plaque chauffante.
Remarque : Lorsque le bol de riz est vide et sans couvercle, il est normal qu'il y ait un espace
entre le corps de l'appareil et le bord du bol. Une fois le couvercle en verre mis en place, le bol
établit un bon contact avec le capteur thermique à ressort et est prêt pour utilisation.
• Mettez les ingrédients et le liquide dans le bol (voir les sections « Préparation du riz » et « Cuisson à
vapeur dans le panier » pour plus de détails)
- Fig 3 et Fig 4.
• Mettez le couvercle sur l'appareil, en plaçant l'orifice de sortie de la vapeur à l'arrière
- Fig 6.
• Ne mettez pas l'appareil sous tension avec un bol de cuisson vide.
Préparation du riz
• Les repères de mesure à l'intérieur du bol sont indiqués en litres et en tasses. Ils servent à mesurer
la quantité d'eau lors de la cuisson du riz
- Fig 5.
• Mesurez le riz (voir le tableau 8) en utilisant la tasse à mesurer fournie et rincez-le longuement à
l'eau courante dans un tamis. Mettez le riz rincé dans le bol en vous assurant qu'il est réparti uni-
formément.
Remarque : La tasse en plastique doit uniquement servir à mesurer le riz, pas l'eau.
• Pour garantir les meilleurs résultats, utilisez du riz ordinaire plutôt que du riz "minute" ayant tendance
à donner un riz plus collant, qui adhère à la base.
17
FR
T-FAL-COLTUCH-NC00027923-02 23/08/12 17:41 Page17

18
Pour démarrer la cuisson
• Branchez le cuiseur à riz sur la prise - Fig 7.
• Poussez vers le bas le bouton de commande et le voyant de cuisson rouge s'allume pour confirmer
le début de la cuisson
- Fig 8.
Attention : si le bol n'est pas correctement inséré dans l'appareil, la cuisson ne démarre pas.
• Le cuiseur à riz calcule automatiquement le temps de cuisson avec précision, en fonction de la quan-
Cuisson
GUIDE DE CUISSON POUR LE RIZ BLANC
(grain long, basmati, américain, thaïlandais, jasmin, risotto (Arborio), riz gluant thaïlandais)
Tasses de mesure
de riz
Niveau d'eau dans le bol
(+ riz)
Portions Temps de cuisson
approximatif**
4 Repère 4 tasses 5-6 20-25 min
6 Repère 6 tasses 8-10 25-30 min
8 Repère 8 tasses 13-14 30-35 min
10 Repère 10 tasses 16-18 35-40 min
Avant la cuisson, rincez longuement le riz sous l'eau courante dans un tamis pour éliminer l'excès d'amidon.
Le poids varie selon les types de riz tels que thaïlandais, jasmin, risotto (Arborio) et riz gluant thaïlandais.
** Le cuiseur à riz détermine automatiquement le temps de cuisson selon la quantité de riz et l'eau mises dans le bol.
GUIDE DE CUISSON POUR LE RIZ BRUN ET LE RIZ BRUN BASMATI
Type
de riz
Tasses
à mesurer le riz
Niveau d'eau dans le bol
(+ riz)
Portions Temps de cuisson
approximatif***
Riz brun
entier
ou riz brun
basmati
4 Repère 4,5 tasses 5-6 40-45 min
6 Repère 6,5 tasses 8-10 45-50 min
8 (Quantité maximale pour le riz brun
et le riz brun basmati)
Repère 8,5 tasses 13-14 50-55 min
Avant la cuisson, rincez longuement le riz sous l'eau courante dans un tamis pour éliminer l'excès d'amidon.
Pour obtenir les meilleurs résultats, nous recommandons de cuire le riz sauvage dans une casserole et non dans votre cuiseur à
riz Cooltouch car il a tendance à mousser en cours de cuisson.
Le poids varie légèrement selon la variété de riz utilisé.
*** Le cuiseur à riz détermine automatiquement le temps de cuisson selon la quantité de riz et l'eau mises dans le bol. .
Remarque : Ne placez pas l'appareil près d'un mur ou d'une armoire en cours de fonction-
nement car la vapeur produite par l'appareil pourrait produire des dommages.
• Pour le riz blanc, remplissez le bol avec de l'eau froide jusqu'au repère indiquant le nombre de tasses
de riz utilisées
- Fig 5.
La quantité minimale de riz pouvant être cuite est de 4 tasses.
• La quantité de riz et d'eau ne doit jamais dépasser le niveau MAX de l'appareil, qui correspond au
repère du niveau 10 tasses du bol.
• Couvrez le bol avec le couvercle en positionnant l'orifice de sortie de la vapeur à l'arrière
- Fig 6.
Remarque : Ajoutez toujours le riz en premier, sinon, vous aurez trop d'eau.
Les tableaux ci-dessous fournissent des informations supplémentaires sur la cuisson du riz blanc et
d'autres types de riz (riz brun et riz brun basmati).
FR
T-FAL-COLTUCH-NC00027923-02 23/08/12 17:41 Page18

irmer
pas.
quan-
19
tité d'eau et des ingrédients mis dans le bol.
• Pendant le processus de cuisson, il est normal que le couvercle se soulève légèrement et que des
bulles d'eau apparaissent sur les bords.
Fonction de maintien au chaud automatique
• À la fin du processus de cuisson, le cuiseur à riz détecte l'absorption totale de l'eau et active au-
tomatiquement la fonction de maintien au chaud. Ensuite, le bouton de commande revient en po-
sition haute et le voyant orange de maintien au chaud s'allume
- Fig 9.
• Le riz reste chaud, prêt à servir. Le cuiseur à riz reste en mode de maintien au chaud tant qu'il est
branché. La nourriture laissée en mode de maintien au chaud pour une période prolongée
pourrait se dessécher et doit être remuée pour l'empêcher de brûler ou de coller au bol.
Pour obtenir les meilleurs résultats, servez le riz dans les 30 minutes qui suivent sa cuisson.
Il est recommandé de servir le riz le plus tôt possible après la cuisson.
• Utilisation manuelle. La fonction de maintien au chaud peut être activée en poussant vers le haut
le bouton de commande.
Cuisson à la vapeur dans le panier (pour les légumes, les poissons et les fruits)
• En règle générale, il faut 1/2 tasse (100 à 150 ml) d'eau pour chaque 15 à 20 minutes de temps
de cuisson à la vapeur, sauf pour les choux de Bruxelles, les pommes de terre et le brocoli
- Fig 11.
Dans ces cas, ajoutez 2 1/4 tasses (500 ml) d'eau froide.
• Placez le panier vapeur dans le bol
- Fig 12.
• Nous recommandons de toujours prévoir un espace d'au moins 2 cm entre le niveau d'eau et la
base du panier vapeur
- Fig 13.
• Mettez les ingrédients dans le panier en vous assurant qu'ils ne sont pas trop compressés et que des
trous de vapeur restent dégagés, sinon les aliments ne cuiront pas de façon uniforme. Couvrez le bol
avec le couvercle
- Fig 14.
• Procédez de la manière indiquée à la page 8 dans la section « Pour démarrer la cuisson ». Le cuiseur
à riz détermine automatiquement le temps de cuisson en fonction de la quantité d'eau utilisée et
active la fonction de maintien au chaud en fin de cuisson. Pour interrompre manuellement la cuisson
à la vapeur, poussez vers le haut le bouton de commande.
Fin du processus de cuisson
Lorsque la nourriture est prête à servir :
• Retirez le couvercle. Attention : la vapeur s'échappant est brûlante
- Fig 10.
• Remarque relative à la sécurité : le corps de l'appareil est froid au toucher.
Attention : le bol de riz est brûlant. Utilisez toujours des gants de cuisine pour retirer le bol.
• Servez avec la cuillère fournie avec le cuiseur et remettez en place le couvercle. N'utilisez jamais
d'accessoires métalliques pour remuer ou servir le riz.
• La nourriture laissée dans le cuiseur à riz restera chaude pour être servie une deuxième fois.
• Débranchez le cuiseur de la prise murale.
• Retirez le panier vapeur en utilisant des gants de cuisine car il est brûlant.
Conseils pour obtenir de meilleurs résultats avec votre cuiseur à riz
• Mesurez le riz et lavez-le dans un tamis sous l'eau courante.
• Assurez-vous que le riz est réparti sur toute la surface du bol afin qu'il cuise de façon uniforme.
• Les temps de cuisson varient en fonction de la quantité et du type de riz.
• Lors de la cuisson de petites quantités, le riz commencera à s'agglomérer dans le bas du bol. Un
graissage avec une demi-cuillère à thé d'huile de cuisson contribue à prévenir la formation de cette
couche, mais il n'est pas toujours possible de l'éviter.
FR
T-FAL-COLTUCH-NC00027923-02 23/08/12 17:41 Page19

20
Nettoyage et entretien
Nettoyage du bol, du couvercle et du panier vapeur
• Débranchez le cuiseur à riz de la prise murale - Fig 15- - et laissez-le refroidir pendant au moins 1 heure
- Fig 16.
• Utilisez de l'eau chaude, du savon à vaisselle et une éponge pour nettoyer le bol
- Fig 17,
La poudre à récurer et la laine d'acier ne sont pas recommandées.
• Si de la nourriture s'est incrustée au fond du bol, laissez ce dernier tremper avant de le nettoyer.
• Séchez soigneusement le bol.
Notez que le bol ne va pas au lave-vaisselle.
• Lavez le panier vapeur, le couvercle, la cuillère, la tasse à mesurer le riz dans le lave-vaisselle.
• Ne plongez pas l'appareil dans l'eau.
• Ne mettez pas l'appareil au lave-vaisselle
- Fig 18.
• Ne versez pas d'eau à l'intérieur du corps de l'appareil
- Fig 19. L'eau peut uniquement être versée
dans le bol antiadhésif.
• Pour maintenir le bol en bonne condition, nous recommandons d'en traiter la surface avec de l'huile.
Périodiquement, essuyez l'intérieur du bol avec une petite quantité d'huile de cuisson.
• Pour préserver les propriétés antiadhésives, ne coupez pas les aliments à l'intérieur du bol.
• Rangez le bol à l'intérieur du cuiseur à riz.
Important : Les marques brunâtres ou les rayures pouvant apparaître après un usage prolongé
ne posent aucun problème. Nous garantissons que le revêtement antiadhésif EST CONFORME
AUX RÈGLES ET RÉGLEMENTATIONS relatives aux matériaux convenant à un contact ali-
mentaire.
Soin à apporter au bol
•Utilisez une cuillère en plastique ou en bois et non une cuillère métallique pour éviter d'en-
dommager la surface du bol.
• Pour éviter tout risque de corrosion, ne versez pas de vinaigre dans le bol.
• La couleur de la surface du bol pourrait changer après la première utilisation de l'appareil ou à la
suite d'un usage prolongé. Ce changement de couleur est attribuable aux effets de la vapeur et de
l'eau, n'altère en rien les conditions d'utilisation du cuiseur à riz et ne crée aucun risque sanitaire.
Vous pouvez continuer à utiliser le cuiseur à riz en toute sécurité.
Nettoyage et entretien des autres accessoires de l'appareil
• Nettoyez l'extérieur du cuiseur à riz et le cordon d'alimentation avec un chiffon humide,
puis séchez-les soigneusement. N'utilisez pas de produits puissants ou abrasifs.
N'utilisez pas d'eau pour nettoyer le corps intérieur de l'appareil.
• À la fin du temps de cuisson, lorsque la fonction de maintien au chaud se met en marche, remuez
le riz et laissez-le dans le cuiseur à riz quelques minutes pour obtenir un résultat parfait.
• Lors de la cuisson du riz, ajoutez du sel à l'eau, si nécessaire. Prévoyez environ une demi-cuillère à
thé de sel pour 4 tasses de riz, mais vous pouvez adapter cette quantité en fonction de vos goûts
personnels. Rappelons que votre cuiseur à riz utilise moins d'eau qu'une cuisson à l'eau bouillante,
il convient donc de veiller à ne pas mettre trop de sel.
• Pour obtenir les meilleurs résultats, servez le riz lorsqu'il vient d'être cuit.
FR
T-FAL-COLTUCH-NC00027923-02 23/08/12 17:41 Page20

Ref. NC00027923-02 - 07/12
www.t-fal.com
2 - 11
12 - 20
EN
FR
T-FAL-COLTUCH-NC00027923-02 23/08/12 17:41 Page28
-
 1
1
-
 2
2
-
 3
3
-
 4
4
-
 5
5
-
 6
6
-
 7
7
-
 8
8
-
 9
9
-
 10
10
-
 11
11
-
 12
12
-
 13
13
-
 14
14
-
 15
15
-
 16
16
-
 17
17
-
 18
18
-
 19
19
-
 20
20


Tefal RK1558US Manuel utilisateur
- Catégorie
- Cuiseurs à riz
- Taper
- Manuel utilisateur
dans d''autres langues
- English: Tefal RK1558US User manual