
Documentation is also available on
the D-Link website
This document will guide you through the basic
installation process for your new D-Link
Nuclias Cloud-Managed AX1800 Access Point
DBA-X1230P
Quick Installation Guide
Access Point

2
ENGLISH
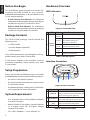
Hardware Overview
LED Indicators
1
Figure 1: Front Panel LED
# LED Status Description
1Power/
Cloud
Solid
orange
The DBA-X1230P is booting up.
Blinking
orange
The DBA-X1230P is resetting
to its default settings or is
upgrading its rmware.
Blinking
green
The DBA-X1230P is connecting
to the D-Link Nuclias cloud.
Solid
green
The DBA-X1230P is in cloud mode.
Solid
red
The DBA-X1230P is not working
properly in cloud mode.
Table 1: LED Description
Interface Connectors
1
23 4
Figure 2: Rear Connectors
# Connector Description
1 Lock slot
Slot to use with the lock plate for inserting
a physical lock to secure the DBA-X1230P
to the mounting plate (optional).
2Console port Directly manage the AP with no wireless
connection through the console port.
3PoE LAN
port
Gigabit RJ-45 port for data and
Power over Ethernet (PoE) power.
4 Power input Input for the power adapter (optional).
Table 2: Interface Description
Before You Begin
This installation guide provides instructions for
installing the DBA-X1230P on your network.
Additional documentation is also available on the
D-Link support website.
• D-Link Nuclias User Manual: For additional
information and instructions on how to congure
the device using the D-Link Nuclias Cloud.
• DBA-X1230P User Manual: For additional
information and instructions on how to congure
the device using the web user interface.
Package Contents
This DBA-X1230P package should include the
following items:
• 1 x DBA-X1230P
• 1 x Power adapter (optional)*
• 1 x Mounting kit
If any of the above items are damaged or missing,
please contact your local D-Link reseller.
*If the power adapter is not included, it can be
purchased separately. Please contact your local
D-Link reseller.
Setup Preparation
Please ensure that the following items are readily
available before continuing the installation process:
• An active D-Link Nuclias account.
• An active Internet connection to connect to the
D-Link Nuclias cloud.
• A valid device license. Contact your D-Link Nuclias
service provider for more information.
System Requirements
• A PC or laptop with a working Ethernet adapter
or wireless interface.
• Mozilla Firefox 52.0 or higher, Internet Explorer
11 or higher, Safari 10.1 or higher, Google
Chrome 59 or higher.
• OS X 10.8.5, Windows 7, Linux (Ubuntu 12).

3
ENGLISH
Powering the Access Point
The DBA-X1230P can be powered using one of the
following two methods:
Using Power over Ethernet (PoE)
Use a standard Ethernet cable to connect the LAN
port on the DBA-X1230P to a PoE power source
device such as a PoE switch or PoE injector.
(Optional) Using the Power Adapter
Connect the power connector of the adapter to
the power input on the DBA-X1230P and plug the
adapter into a nearby power outlet.
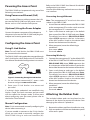
Conguring the Access Point
Using D-Link Nuclias
Note: To use D-Link Nuclias, the DBA-X1230P must
be connected to the Internet.
The DBA-X1230P is designed to be managed through
the D-Link Nuclias cloud. Refer to the D-Link Nuclias
User Manual for detailed conguration instructions.
D-Link DBA-1510P Quick Install Guide
6
ENGLISH
Switch or RouterSwitch or Router
Switch or Router
Management
Management
DBA-X1230P
DBA-1510P
DBA-1510P
DBA-1510P
Management
Management
D-Link Nuclias
Figure 3: Connecting through D-Link Nuclias
1. On an Internet-connected PC, open a web
browser and go to www.nuclias.com.
2. Enter your D-Link Nuclias user name and
password.
If a device’s login credentials are modied using
Nuclias Cloud, the local username and password
will also reect the changes made. To learn more
about conguring your password, please refer to
the Nuclias Cloud manual.
Manual Conguration
Note: D-Link recommends manually conguring the
device before mounting it.
If you are unable to connect to the D-Link Nuclias
cloud, you may need to manually configure the
DBA-X1230P using its web user interface (UI).
Refer to the DBA-X1230P User Manual for detailed
conguration instructions.
Use one of the following methods to access the web
user interface:
Connecting through Ethernet
Note: The management PC must be in the same
subnet as the DBA-X1230P.
1. Use an Ethernet cable to connect the DBA-X1230P
to the management PC or to the switch or router
the management PC is connected to.
2. Open a web browser and type in the default
host name of the DBA-X1230P and press Enter.
The default host name is DBA-X1230P-XXXX
where XXXX represents the last 4 characters
of the MAC address listed on the device label
located on the bottom of the device.
3. When prompted, enter the default login
credentials:
User name: admin
Password: admin
Connecting Wirelessly
1. Connect the management PC to the default SSID
of the DBA-X1230P. The SSID will be in the format
DBA-X1230P-XXX where XXXX represents the
last 4 characters of the MAC address listed on the
device label located on the bottom of the device.
2. Open a web browser and type in the default
host name of the DBA-X1230P and press Enter.
The default host name is DBA-X1230P-XXXX
where XXXX represents the last 4 characters
of the MAC address listed on the device label
located on the bottom of the device.
3. When prompted, enter the default login
credentials:
User name: admin
Password: admin
Attaching the Rubber Pads
The included rubber pads can be placed on the
bottom of the device to prevent the device from
damaging the surface it is placed on.
1. Remove the rubber pads from the adhesive strip.
2. Stick one pad on each foot on the bottom panel
of the access point.

4
ENGLISH
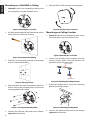
Mounting on a Solid Wall or Ceiling
1. (Optional) Attach the included lock plate to the
mounting plate using the included screws.
Figure 4: Attaching the Lock Plate
2. Use the mounting plate to mark the location where
to drill the holes in the wall or ceiling.
Figure 5: Mounting Panel Marking
3. Drill holes on the markings and place the included
anchors into the drilled holes.
Figure 6: Placing Anchors
4. Align and place the mounting plate on top of the
anchors and use the included screws to secure the
mounting plate to the surface.
Figure 7: Securing the Mounting Plate
5. Connect the Ethernet cable and power adapter
(optional) to the device.
6. Slide the DBA-X1230P onto the mounting plate.
Figure 8: Placing The Access Point
Mounting on a Ceiling Crossbar
1. (Optional) Attach the included lock plate to the
mounting plate using the included screws.
Figure 9: Attaching the Lock Plate
2. Clip the two included ceiling brackets onto the
ceiling crossbar. Make sure both brackets are
positioned in line with each other.
Ceiling bracket
Ceiling crossbar
Figure 10: Attaching the Ceiling Brackets
3. Using the included screws, secure the mounting
plate to the ceiling brackets.
Figure 11: Attaching Mounting Plate
4. Connect the Ethernet cable and power adapter
(optional) to the device.

5
ENGLISH
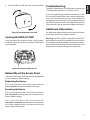
5. Slide the DBA-X1230P onto the mounting plate.
Figure 12: Securing the Access Point
Locking the DBA-X1230P
If the lock plate was attached, insert a lock through
the device’s lock slot to secure the DBA-X1230P to the
mounting plate.
Figure 13: Inserting a Physical Lock
Reboot/Reset the Access Point
If necessary, the DBA-X1230P can be manually rebooted
or reset to factory default settings.
Rebooting the Device
Press and hold down the reset button between
2 to 5 seconds and release to reboot the device.
Resetting the Device
Press and hold down the reset button between
6 to 15 seconds and release to reset the device to its
factory default settings.
Press and hold down the reset button for
more than 15 seconds and release to reset the device
to its factory default settings and force the device to
load an alternate rmware.
Troubleshooting
The DBA-X1230P receives its conguration settings and
is managed through the D-Link Nuclias cloud.
If you are experiencing problems connecting to the
D-Link Nuclias cloud, check your Internet connection.
If you still cannot connect to the service, additional
conguration on the device may be required. Refer to
the DBA-X1230P User Nuclias Cloud Manual for detailed
information on how to manually congure the device.
Additional Information
For additional support, please refer to the user manual,
or visit your local D-Link support website.
Warning: The DBA-X1230P is designed to receive PoE
power only from an 802.3at compliant source, or from a
D-Link-approved power adapter. Connecting an access
point to a Power over Ethernet (PoE) device that is not
approved by D-Link can damage the equipment.

6
ENGLISH
Appendix - Statements
ErP Power Usage
This device is an Energy Related Product (ErP) that automatically switches to a power-saving Network
Standby mode within 1 minute of no packets being transmitted. It can also be turned o through a
power switch to save energy when it is not needed.
Network Standby: 7.27 watts
Switched O: 0.06 watts
Federal Communication Commission Interference Statement
This equipment has been tested and found to comply with the limits for a Class B digital device, pursuant
to Part 15 of the FCC Rules. These limits are designed to provide reasonable protection against harmful
interference in a residential installation. This equipment generates, uses and can radiate radio frequency
energy and, if not installed and used in accordance with the instructions, may cause harmful interference
to radio communications. However, there is no guarantee that interference will not occur in a particular
installation. If this equipment does cause harmful interference to radio or television reception, which
can be determined by turning the equipment o and on, the user is encouraged to try to correct the
interference by one of the following measures:
- Reorient or relocate the receiving antenna.
- Increase the separation between the equipment and receiver.
- Connect the equipment into an outlet on a circuit dierent from that to which the receiver is
connected.
- Consult the dealer or an experienced radio/TV technician for help.
Non-modications Statement:
Any changes or modications not expressly approved by the party responsible for compliance could
void the user’s authority to operate this equipment.
Caution:
This device complies with Part 15 of the FCC Rules. Operation is subject to the following two conditions:
(1) This device may not cause harmful interference, and (2) this device must accept any interference
received, including interference that may cause undesired operation.
This device and its antenna(s) must not be co-located or operating in conjunction with any other
antenna or transmitter except in accordance with FCC multi-transmitter product procedures. For product
available in the USA/Canada market, only channel 1~11 can be operated. Selection of other channels is
not possible.
Note
The country code selection is for non-USA models only and is not available to all USA models. Per FCC
regulations, all WiFi product marketed in the USA must be xed to USA operational channels only.
RF Frequency Requirements
This device is for indoor use only when using all channels in the 5.15 to 5.25 GHz frequency range. High
power radars are allocated as primary users of the 5.25 to 5.35 GHz and 5.65 to 5.85 GHz bands. These
radar stations can cause interference with and/or damage this device. This device will not operate on
channels which overlap the 5600-5650 MHz band.
It is restricted to indoor environments only.

7
ENGLISH
IMPORTANT NOTICE:
FCC Radiation Exposure Statement
This equipment complies with FCC radiation exposure limits set forth for an uncontrolled environment.
This equipment should be installed and operated with minimum distance 23.7cm between the radiator
and your body.
Innovation, Science and Economic Development Canada (ISED) Statement:
This Class B digital apparatus complies with Canadian ICES-003.
Cet appareil numérique de la classe B est conforme à la norme NMB-003 du Canada.
Innovation, Science and Economic Development Canada (ISED) Statement:
This device complies with ISED licence-exempt RSS standard(s). Operation is subject to the following two
conditions:
(1) this device may not cause interference, and
(2) this device must accept any interference, including interference that may cause undesired
operation of the device.
Le présent appareil est conforme aux CNR d’ISED applicables aux appareils radio exempts de licence.
L’exploitation est autorisée aux deux conditions suivantes :
(1) l’appareil ne doit pas produire de brouillage, et
(2) l’utilisateur de l’appareil doit accepter tout brouillage radioélectrique subi, même si le brouillage
est susceptible d’en compromettre le fonctionnement.
(i) the device for operation in the band 5150-5250 MHz is only for indoor use to reduce the potential for
harmful interference to co-channel mobile satellite systems;
(i) les dispositifs fonctionnant dans la bande 5150-5250 MHz sont réservés uniquement pour une
utilisation à l’intérieur an de réduire les risques de brouillage préjudiciable aux systèmes de satellites
mobiles utilisant les mêmes canaux;
Operations in the 5.25-5.35 GHz band are restricted to indoor usage only.
Les opérations dans la bande de 5.25-5.35 GHz sont limités à un usage intérieur seulement.
Radiation Exposure Statement
This equipment complies with ISED radiation exposure limits set forth for an uncontrolled environment.
This equipment should be installed and operated with minimum distance 26.6cm between the radiator
and your body.
Déclaration d’exposition aux radiations
Cet équipement est conforme aux limites d’exposition aux rayonnements ISED établies pour un
environnement non contrôlé. Cet équipement doit être installé et utilisé avec un minimum de 26.6cm de
distance entre la source de rayonnement et votre corps.
Japan Voluntary Control Council for Interference Statement
この装置は、クラス B情報技術装置です。この装置は、家庭環境で使用することを目的としてい
ますが、この装置がラジオやテレビジョン受信機に近接して使用されると、受信障害を引き起こ
すことがあります。
取扱説明書に従って正しい取り扱いをして下さい。 VCCI-B

8
ENGLISH
Japan Voluntary Control Council for Interference Statement
This is a Class B product based on the standard of the VCCI Council. If this is used near a radio or
television receiver in a domestic environment, it may cause radio interference. Install and use the
equipment according to the instruction manual.
電波法により5GHz帯は屋内使用に限ります。
Product and Warranty Information
To nd out more about D-Link products or marketing information, please visit the website http://www.
dlink.com.
The D-Link Limited Lifetime Warranty information is available at
http://warranty.dlink.com/

Ver. 1.00(WW)_90x130
2021/02/02
-
 1
1
-
 2
2
-
 3
3
-
 4
4
-
 5
5
-
 6
6
-
 7
7
-
 8
8
-
 9
9


D-Link BAX1230P Access Point Guide d'installation
- Taper
- Guide d'installation
- Ce manuel convient également à
dans d''autres langues
Documents connexes
Autres documents
-
Edmax Technology STC07 Manuel utilisateur
-
Legrand Player Portfolio Manual (P10, P20, P30) Guide d'installation
-
Nuvo NVP5200NA Mode d'emploi
-
Nuvo NV-P4300 series Manuel utilisateur
-
-
Eurotech ReliaGATE 20-25 Le manuel du propriétaire
-
Watchguard AP327X Hardware Guide
-
Eurotech ReliaGATE 10-12 Le manuel du propriétaire
-
-