
Cover.frame Black #2
USERS MANUAL
GUIDE D’UTILISATION
BEDIENUNGSHANDBUCH
MANUALE OPERATIVO
LC-240C
LC-240
DOT MATRIX PRINTER
IMPRIMANTE MATRICIELLE
PUNKT-MATRIX-DRUCKER
STAMPANTE AD AGHI
HBA-ML 80825300

Hyo2-TradeMark.frame Black #1
VDE Statement
This device carries the VDE RFI protection mark to certify that it meets the radio
interference requirements of the Postal Ordinance No. 243/1991. The additional
marking “Vfg. 243/P” expresses in short form that this is a peripheral device (not
operable alone) which only individually meets the Class B RFI requirements in
accordance with the DIN VDE 0878 part 3/11.89 and the Postal Ordinance 243/
1991.
If this device is operated in conjunction with other devices within a set-up, in order
to take advantage of a “General (Operating) Authorization” in accordance with the
Postal Ordinance 243/1991, the complete set-up must comply with the Class B
limits in accordance with the DIN VDE 0878 part 3/11.89, as well as satisfy the
preconditions in accordance with §2 and the prerequisites in accordance with §3 of
the Postal Ordinance 243/1991.
As a rule, this is only fulfilled when the device is operated in a set-up which has been
type-tested and provided with a VDE RFI protection mark with the additional
marking “Vfg 243”.
Machine Noise Information Ordinance 3. GSGV, January 18, 1991: The sound
pressure level at the operator position is equal or less than 70 dB(A) according to
ISO 7779.
The abo
ve statement applies only to printers marketed in Germany.
Trademark acknowledgments
LC-240C, LC-240, LC24-30, NX-2450, PT
-10Y, SPC-8K: Star Micronics Co. Ltd.
LQ850, LQ860, LQ1050, LQ1060: Seiko Epson Corporation
IBM PC, IBM Proprinter X24E, IBM Proprinter XL24E, IBM Proprinter X24,
IBM Proprinter XL24: International Business Machines Corporation.
TrueType: Apple Computer Inc.
MS-DOS, Microsoft Windows, Windows 3.1: Microsoft Corporation
Notice
• All rights reserved. Reproduction of any part of this manual in any form
whatsoever, without STAR’s express permission, is strictly forbidden.
• The contents of this manual are subject to change without notice.
• All efforts have been made to ensure the accuracy of the contents of this manual
at the time of printing. However, should any errors be found, STAR would
greatly appreciate being informed of them.
• The above notwithstanding, STAR can assume no responsibility for any errors in
this manual.
© Copyright 1994 Star Micronics Co., Ltd
Note concernant les marques déposées
LC-240C, LC-240, LC24-30, NX-2450, PT-10Y, SPC-8K: Star Micronics Co. Ltd.
LQ850, LQ860, LQ1050, LQ1060: Seiko Epson Corporation
IBM PC, IBM Proprinter X24E, IBM Proprinter XL24E, IBM Proprinter X24,
IBM Proprinter XL24: International Business Machines Corporation.
TrueType: Apple Computer Inc.
MS-DOS, Microsoft Windows, Windows 3.1: Microsoft Corporation
Avis
• Tous droits réservés. Il est interdit de reproduire tout ou partie de ce manuel sous
quelque forme que ce soit sans le consentement préalable de STAR.
• Le contenu de ce manuel pourra être modifié sans préavis.
• Tous les efforts nécessaires ont été mis en oeuvre pour garantir l’exactitude de ce
manuel au moment de la mise sous presse. STAR aimerait toutefois être tenu
informé des erreurs éventuellement relevées.
• Nonobstant la clause ci-dessus, STAR décline toute responsabilité pour les
erreurs éventuellement contenues dans ce manuel.
© Copyright 1994 Star Micronics Co., Ltd.

Hyo2-TradeMark.frame Black #2
Zur Einhaltung der FTZ-Vorschriften ist es notwendig, daß alle Verbindungen zum
Drucker mit abgeschirmten Kabeln ausgeführt sind.
Das Öffnen des Gerätes, sowie das Wechseln des Netzkabels darf nur durch geschultes
Fachpersonal vorgenommen werden.
Maschinenlärminformationsverordnung 3. GSVG, 18.01, 1991: Der arbeitsplatz-
bezogene Schalldruckpegel beträgt 70 dB (A) oder weniger gemäß ISO 7779.
Die obige Angabe bezieht sich nur auf in Deutschland vertriebene Drucker.
Warenzeichen-Hinweis
LC-240C, LC-240, LC24-30, NX-2450, PT-10Y, SPC-8K: Star Micronics Co. Ltd.
LQ850, LQ860, LQ1050, LQ1060: Seiko Epson Corporation
IBM PC, IBM Proprinter X24E, IBM Proprinter XL24E, IBM Proprinter X24,
IBM Proprinter XL24: International Business Machines Corporation.
TrueType: Apple Computer Inc.
MS-DOS, Microsoft Windows, Windows 3.1: Microsoft Corporation
Hinweis
• Alle Rechte vorbehalten. Reproduktionen dieses Handbuchs sowie
irgendwelcher Teile und Ausschnitte sind ohne ausdrückliche Genehmigung
durch STAR streng untersagt.
• Der Inhalt dieses Handbuchs unterliegt Änderungen ohne vorherige
Ankündigung.
• Es wurden alle denkbaren Bemühungen unternommen, die Genauigkeit des
Inhalts dieses Handbuchs zur Zeit der Drucklegung zu gewährleisten. Sollten Sie
jedoch Fehler feststellen, würde STAR es sehr begrüßen, von Ihnen darüber
informiert zu werden.
• Ungeachtet des vorher Gesagten übernimmt STAR keine Verantwortung für
Fehler in diesem Handbuch.
© Copyright 1994 Star Micronics Co., Ltd.
Dieses Gerät trägt als Hinweis, daß es den Funk-Entstöranforderungen der DBP-
Verfügung Nr. 243/1991 entspricht, das VDE-Funkschutzzeichen. Der Zusatz
“Vfg. 243/P” soll in Kurzform ausdrücken, daß es sich um ein peripheres (nicht
selbständig betreibbares) Gerät handelt, das nur einzeln den Funk-Entstöranforde-
rungen der Grenzwertklasse B nach DIN VDE 0878 Teil 3/11.89 und der DBP-
Verfügung 243/1991 entspricht.
Wird das Gerät innerhalb einer Anlage zusammen mit anderen Geräten betrieben,
muß bei Inanspruchnahme der “Allgemeinen (Betriebs-) Genehmigung” nach der
DBP-Verfügung 243/1991 die gesamte Anlage der Grenzwertklasse B nach DIN
VDE 088 Teil 3/11.89 sowie den Voraussetzungen nach §2 und den Auflagen
nach §3 der DBP-Verfügung 243/1991 entsprechen.
Dies ist in der Regel nur dann erfüllt, wenn das Gerät in einer Anlage betrieben
wird, die typgeprüft und mit dem VDE-Funkschutzzeichen mit dem Zusatz “Vig.
243” gekennzeichnet ist.
Riconoscimento di marchio registrato
LC-240C, LC-240, LC24-30, NX-2450, PT-10Y, SPC-8K: Star Micronics Co. Ltd.
LQ850, LQ860, LQ1050, LQ1060: Seiko Epson Corporation
IBM PC, IBM Proprinter X24E, IBM Proprinter XL24E, IBM Proprinter X24,
IBM Proprinter XL24: International Business Machines Corporation.
TrueType: Apple Computer Inc.
MS-DOS, Microsoft Windows, Windows 3.1: Microsoft Corporation
Avvertenze
• Tutti i diritti riservati. La riproduzione di qualsiasi parte di questo manuale in
qualsiasi forma o mezzo, senza il diretto consenso della STAR, è severamente
proibita.
• Le informazioni contenute nel presente manuale sono soggette a modifiche
senza preavviso.
• Malgrado siano state prese tutte le precauzioni per garantire l’accuratezza delle
informazioni contenute nel presente manuale al momento della stampa, la STAR
sarà ben lieta di ricevere segnalazioni degli eventuali errori riscontrati.
• Nonostante quanto citato sopra, la STAR non si assume nessuna responsabilità
per eventuali errori contenuti nel presente manuale.
© Copyright 1994 Star Micronics Co., Ltd.

Hyo2-TradeMark.frame Black #3
About this manual
This manual describes how to set up, use, and care for the Star LC-240C color
printer, and the LC-240 monochrome printer. All of the operations contained in this
manual apply to all of these models, except where specifically noted otherwise.
The following is a list of what you can expect to find in each chapter.
Chapter 1 Choosing a place for your printer, unpacking and setup,
ribbon cassette installation, loading paper, connecting to your
printer
Chapter 2 Installing and starting up, and using User Setup Utility
Chapter 3 How to set up for printing with Microsoft Windows 3.1, how
to prepare for printing, how to print a document, how to
install TrueType fonts, how to select fonts from within an
application
Chapter 4 How to use the control panel
Chapter 5 Selecting the best type of paper, adjusting for paper
thickness, manual sheet feeding, clearing paper jams
Chapter 6 How to set up for printing with MS-DOS, how to select fonts
from within an application
Chapter 7 How to pause printing, paper feed operations, form feeding
Appendix A How to deal with printing problems
Appendix B Specifications
Appendix C Interface information
Appendix D Character sets
Appendix E Printer control codes
A propos de ce manuel
Ce manuel décrit la configuration, l’utilisation et l’entretien des imprimantes couleur
Star LC-240C, ainsi que des imprimantes monochrome LC-240. Sauf indication
contraire, toutes les opérations décrites dans ce manuel sont applicables à ces deux
modèles.
Le contenu des différents chapitres est indiqué ci-dessous :
Chapitre 1 Choix d’un emplacement, déballage et configuration de
l’imprimante, installation d’une cassette de ruban,
chargement du papier, connexion de l’imprimante.
Chapitre 2 Installation et démarrage au moyen de l’utilitaire de
configuration.
Chapitre 3 Configuration de l’impression sous Microsoft Windows 3.1,
préparation à l’impression, impression d’un document,
installation de polices TrueType, sélection de polices dans
une application.
Chapitre 4 Utilisation du panneau de commande.
Chapitre 5 Sélection du meilleur type de papier, réglage d’épaisseur du
papier, alimentation manuelle, suppression des bourrages
papier.
Chapitre 6 Configuration de l’impression sous MS-DOS, sélection de
polices dans une application.
Chapitre 7 Interruption provisoire de l’impression, opérations
d’alimentation du papier, alimentation de formulaires.
Annexe A Résolution des problèmes d’impression.
Annexe B Caractéristiques techniques.
Annexe C Informations sur l’interface.
Annexe D Jeux de caractères.
Annexe E Codes de commande d’imprimante.

Hyo2-TradeMark.frame Black #4
Über dieses Handbuch
Dieses Handbuch beschreibt, wie Sie den Star Farbdrucker LC-240C sowie den
Monochrom-Drucker LC-240 einrichten, benutzen und pflegen können. Alle in
diesem Handbuch beschriebenen Vorgänge gelten für beide genannten Modelle
Ausnahmen sind ausdrücklich angemerkt.
Die folgende Liste zeigt Ihnen, was Sie in den einzelnen Kapiteln finden können.
Kapitel 1 Wahl eines Stellplatzes für Ihren Drucker, Auspacken und
Grundeinstellung (Setup), Einsetzen der Farbbandkassette,
Einlegen von Papier, Anschluß Ihres Druckers
Kapitel 2 Aufstellung und Inbetriebnahme einschließlich der
Verwendung des Drucker Setup Programms
Kapitel 3 Wie erfolgt die Grundeinstellung (Setup) zum Druck unter
Microsoft Windows 3.1, wie wird der Druckvorgang
vorbereitet, wie wird ein Schriftstück gedruckt, wie werden
TrueType-Schriftarten installiert, wie erfolgt die Wahl von
Schriftarten innerhalb einer Anwendung
Kapitel 4 Wie benutzt man das Bedienerfeld
Kapitel 5 Wahl der besten Papierart, Einstellung der Papierstärke,
manueller Einzelblatteinzug, Beseitigung eines Papierstaus
Kapitel 6 Wie erfolgt die Grundeinstellung (Setup) zum Drucken unter
MS-DOS, wie wählt man Schriftarten innerhalb einer
Anwendung aus
Kapitel 7 Wie wird der Druck vorübergehend unterbrochen, wie erfolgt
die Papierzufuhr und die Eingabe von Formularen
Anhang A Wie verhält man sich bei Druckproblemen
Anhang B Technische Daten
Anhang C Informationen über Schnittstellen
Anhang D Zeichensätze
Anhang E Steuercodes des Druckers
Informazioni sul manuale
Questo manuale descrive le procedure di installazione, utilizzo e manutenzione
relative alla stampante a colori Star LC-240C e alla stampante monocromatica
LC-240. Tutte le operazioni contenute in questo manuale si riferiscono ai modelli di
stampante precedentemente indicati, tranne dove specificato altrimenti.
Di seguito viene presentato il contenuto di ciascun capitolo.
Capitolo 1 Scelta del luogo dove installare la stampante, disimballaggio
e installazione, installazione della cartuccia nastro,
inserimento della carta, collegamento della stampante al
computer
Capitolo 2 Installazione, avviamento ed utilizzo del programma User
Setup Utility
Capitolo 3 Installazione della stampante sotto Microsoft Windows 3.1,
configurazione della stampante, stampa di un documento,
installazione dei caratteri TrueType, selezione dei caratteri
dall’interno di un’applicazione
Capitolo 4 Istruzioni sull’utilizzo del pannello di controllo
Capitolo 5 Selezione del tipo di carta più idoneo, regolazione della
distanza di stampa, inserimento manuale dei fogli, rimozione
della carta inceppata
Capitolo 6 Installazione della stampante in ambiente MS-DOS,
selezione dei caratteri dall’interno di una applicazione
Capitolo 7 Esecuzione di una pausa di stampa, avanzamento carta, salto
pagina
Appendice A Ricerca e soluzione dei problemi di stampa
Appendice B Specifiche tecniche
Appendice C Informazioni sull’interfaccia
Appendice D Set di caratteri
Appendice E Codici di controllo della stampante

HBA10-ECTOC.frame Black #1
Contents
Chapter 1: Printer Setup
......................................................................... 1
Choosing a place for the printer ................................................................. 1
Unpacking the printer ................................................................................. 3
General guide .............................................................................................3
Opening the front cover ..............................................................................5
Removing the print head protector (LC-240C only) .................................. 5
About ribbon cartridges ............................................................................. 5
Installing the ribbon cartridge .................................................................... 7
Installing the paper support ........................................................................ 9
Connecting to your computer ..................................................................... 9
Connecting to a power outlet ................................................................... 11
Loading paper .......................................................................................... 13
Detaching the automatic sheet feeder ......................................................17
Re-installing the automatic sheet feeder ..................................................19
Chapter 2: User Setup Utility ............................................................. 21
Installing the User Setup Utility ............................................................... 21
Starting up the User Setup Utility ............................................................ 25
Changing User Setup Utility parameter settings ...................................... 27
Using the General window ....................................................................... 29
Using the Font window ............................................................................ 33
Using the Paper window .......................................................................... 37
Adjusting the printer’s vertical alignment ............................................... 39
Changing the printer port .........................................................................43
Saving setup data as a new configuration file .......................................... 43
Saving changed setup data in the current configuration file .................... 45
Importing setup data from a configuration file ........................................45
Returning to default settings .................................................................... 47
Exiting the User Setup Utility .................................................................. 47
Using the Help window ............................................................................ 49
Chapter 3: Using the Printer with Windows 3.1 ........................ 51
Setting up for printing with Microsoft Windows 3.1 ............................... 51
Getting ready to print ...............................................................................55
Printing a document ................................................................................. 59
Installing TrueType fonts ......................................................................... 61
Selecting fonts in Windows applications ................................................. 63
Table des matières
Chapitre 1 : Configuration de l’imprimante ................................. 1
Choix d’un emplacement pour l’imprimante ............................................. 1
Déballage de l’imprimante ......................................................................... 4
Guide général ............................................................................................. 4
Ouverture du capot avant ........................................................................... 6
Retrait de la protection de la tête d’impression (LC-240C uniquement) ... 6
A propos des cartouches de ruban .............................................................. 6
Installation d’une cartouche de ruban ........................................................ 8
Installation du support papier ................................................................... 10
Connexion de l’imprimante à l’ordinateur ............................................... 10
Connexion à une prise secteur ................................................................. 12
Chargement du papier .............................................................................. 14
Retrait de l’introducteur feuille à feuille .................................................. 18
Réinstallation de l’introducteur feuille à feuille ....................................... 20
Chapitre 2 : Utilitaire de configuration ......................................... 21
Installation de l’utilitaire de configuration ............................................... 21
Lancement de l’utilitaire de configuration ............................................... 25
Modification des paramètres de l’utilitaire de configuration ................... 27
Utilisation de la fenêtre Générale.............................................................. 29
Utilisation de la fenêtre Police ................................................................. 33
Utilisation de la fenêtre Papier ................................................................. 37
Réglage de l’ajustement vertical de l’imprimante ................................... 39
Changement du port d’imprimante .......................................................... 43
Sauvegarde des données de configuration dans un nouveau
fichier de configuration ...................................................................... 43
Sauvegarde des données de configuration modifiées dans
le fichier courant ............................................................................... 45
Importation des données de configuration à partir d’un
fichier de configuration ...................................................................... 45
Rétablissement des valeurs par défaut ..................................................... 47
Sortie de l’utilitaire de configuration ....................................................... 47
Utilisation de la fenêtre d’aide ................................................................. 49
Chapitre 3 : Utilisation de l’imprimante sous Windows 3.1.. 51
Configuration de l’impression sous Microsoft Windows 3.1 ................... 51
Préparation à l’impression ....................................................................... 55
Impression d’un document ....................................................................... 59
Installation des polices TrueType ............................................................. 61
Sélection des polices dans les applications Windows .............................. 63

HBA10-ECTOC.frame Black #2
Inhaltsverzeichnis
Kapitel 1: Grudeinstellung (Setup) des Druckers .......................2
Wahl eines Stellplatzes für den Drucker..................................................... 2
Auspacken des Druckers............................................................................. 4
Allgemeiner Leitfaden ................................................................................4
Öffnen der Frontabdeckung ........................................................................ 6
Abnehmen des Druckkopfschutzes (nur beim LC-240C)........................... 6
Über die Farbbandkassetten........................................................................ 6
Einsetzen der Farbbandkassette .................................................................. 8
Anbringen des Papierhalters .....................................................................10
Anschluß an Ihren Computer....................................................................10
Anschluß an eine Netzsteckdose............................................................... 12
Einlegen von Papier .................................................................................. 14
Abnehmen der automatischen Papierzufuhr ............................................. 18
Wiedereinsetzen der automatischen Papierzufuhr....................................20
Kapitel 2: Drucker Setup Programm............................................... 22
Installieren des Drucker Setup Programms............................................... 22
Starten des Drucker Setup Programms .....................................................26
Änderung der Parametereinstellungen des Drucker Setup Programms.... 28
Benutzung des Fensters Allgemein........................................................... 30
Benutzung des Fensters Schrift................................................................. 34
Benutzung des Fensters Papier ................................................................. 38
Einstellung der Vertikalen Punktausrichtung ........................................... 40
Änderung der Schnittstelle........................................................................ 44
Speichern der Setup-Daten in einer neuen Konfigurationsdatei.............. 44
Speichern der geänderten Setup-Daten in der aktuellen
Konfigurationsdatei............................................................................ 46
Laden von Drucker Setup-Daten aus einer Konfigurationsdatei .............. 46
Rückkehr zu den Defaulteinstellungen ..................................................... 48
Beenden des Drucker Setup Programms................................................... 48
Benutzung des Fensters Hilfe ................................................................... 50
Kapitel 3: Einsatz des Druckers unter Windows 3.1................. 52
Grundeinstellung (Setup) zum Drucken unter Microsoft Windows 3.1...... 52
Vorbereitung für den Druck...................................................................... 56
Drucken eines Schriftstücks...................................................................... 60
Installieren von TrueType-Schriftarten..................................................... 62
Wahl von Schriftarten in Windows-Anwendungen.................................. 64
Sommario
Capitolo 1: Installazione della stampante........................................ 2
Scelta del luogo dove installare la stampante ............................................. 2
Disimballaggio della stampante.................................................................. 4
Panoramica generale della stampante......................................................... 4
Apertura del coperchio frontale .................................................................. 6
Rimozione dell’imballo di protezione della testina di stampa
(solo per il modello LC-240C)............................................................. 6
Due parole sulle cartucce nastro ................................................................. 6
Installazione della cartuccia nastro............................................................. 8
Installazione del supporto appoggia-carta................................................. 10
Collegamento della stampante al computer.............................................. 10
Collegamento alla presa elettrica.............................................................. 12
Inserimento della carta.............................................................................. 14
Smontaggio dell’alimentatore automatico di fogli singoli........................ 18
Reinstallazione dell’alimentatore automatico di fogli singoli .................. 20
Capitolo 2: Il programma User Setup Utility.............................. 22
Installazione del programma User Setup Utility...................................... 22
Avviamento del programma User Setup Utility ...................................... 26
Modifica dei parametri di configurazione del programma
User Setup Utility.............................................................................. 28
Uso della schermata Generale.................................................................. 30
Uso della schermata Carattere.................................................................. 34
Uso della schermata Carta........................................................................ 38
Regolazione dell’allineamento verticale.................................................. 40
Modifica della porta della stampante....................................................... 44
Memorizzazione delle impostazioni in un nuovo file di configurazione ... 44
Memorizzazione delle modifiche alle impostazioni nel file
di configurazione corrente.................................................................. 46
Importazione delle impostazioni da un file di configurazione.................. 46
Ripristino delle impostazioni predefinite.................................................. 48
Uscita dal programma User Setup Utility................................................. 48
Uso della schermata “?” Aiuto.................................................................. 50
Capitolo 3: Utilizzo della stampante con Windows 3.1............ 52
Installazione della stampante sotto Microsoft Windows 3.1 .................... 52
Impostazione della stampante................................................................... 56
Stampa di un documento........................................................................... 60
Installazione dei caratteri TrueType ......................................................... 62
Selezione dei caratteri all’interno delle applicazioni Windows................ 64

HBA10-ECTOC.frame Black #3
Chapter 4: Control Panel Operations ............................................. 65
To enter the Sleep Mode .......................................................................... 65
To restore full power from the Sleep Mode ............................................. 65
To switch between the Ready and Not-Ready Modes ............................. 67
To feed single-sheet paper into the printer ............................................... 67
To eject single-sheet paper from the printer ............................................67
To advance paper ..................................................................................... 67
Errors ........................................................................................................ 67
Chapter 5: Paper Handling ................................................................. 69
Selecting paper types ............................................................................... 69
Adjusting for paper thickness .................................................................. 71
Automatic sheet feeding ........................................................................... 71
Manual sheet feeding ............................................................................... 73
Clearing paper jams ................................................................................. 73
Chapter 6: Using the Printer with MS-DOS................................. 75
Setting up for printing with MS-DOS ...................................................... 75
Selecting fonts in MS-DOS applications ................................................. 77
Chapter 7: Other Printing Features ................................................ 79
How to pause printing .............................................................................. 79
Line feed .................................................................................................. 79
Form feed ................................................................................................. 79
Appendix A: Troubleshooting ........................................................... 81
Testing the printer ....................................................................................81
Troubleshooting guide............................................................................... 87
Checking system software settings in Windows.....................................101
Checking system software settings in MS-DOS..................................... 103
Checking the port settings in the User Setup Utility .............................. 103
Appendix B: Specifications ...............................................................105
Appendix C: Interface Pin Outs ..................................................... 109
Appendix D: Character Sets............................................................. 110
Appendix E: Printer Control Codes.............................................. 113
Chapitre 4 : Utilisation du panneau de commande................... 66
Passage en mode de veille ........................................................................ 66
Sortie du mode de veille ........................................................................... 66
Passage du mode Ready au mode Not-Ready et vice versa ..................... 67
Alimentation de feuilles individuelles dans l’imprimante ....................... 67
Ejection d’une feuille individuelle de l’imprimante ................................ 67
Comment faire avance le papier ............................................................... 67
Erreurs ...................................................................................................... 67
Chapitre 5 : Manipulation du papier............................................... 69
Sélection du type de papier ...................................................................... 69
Réglage de l’épaisseur du papier ............................................................. 72
Alimentation automatique ........................................................................ 72
Alimentation manuelle ............................................................................. 74
Suppression des bourrages de papier ....................................................... 74
Chapitre 6 : Utilisation de l’imprimante sous MS-DOS.......... 75
Configuration de l’impression sous MS-DOS ......................................... 75
Sélection de polices dans les applications MS-DOS ............................... 77
Chapitre 7 : Autres fonctions d’impression.................................. 79
Pauses en cours d’impression .................................................................. 79
Saut de ligne ............................................................................................. 79
Saut de page ............................................................................................. 79
Annexe A : Dépannage ........................................................................... 81
Comment tester l’imprimante .................................................................. 81
Guide de dépannage.................................................................................. 87
Vérification des paramètres du logiciel système sous Windows............. 101
Vérification des paramètres du logiciel système sous MS-DOS............. 103
Vérification des paramètres de port définis dans
l’utilitaire de configuration .............................................................. 103
Annexe B : Caractéristiques techniques....................................... 105
Annexe C : Disposition des broches pour interfaces............... 109
Annexe D : Jeux de caractères.......................................................... 110
Annexe E : Codes de commande d’imprimante........................ 113

HBA10-ECTOC.frame Black #4
Kapitel 4: Handhabung des Bedienerfeldes.................................. 66
Drucker in den Sleep-Modus schalten ...................................................... 66
Drucker aus dem Sleep-Modus in den Bereit-Modus schalten................. 66
Schaltung zwischen den Betriebsarten Ready (Bereit)
und Not-Ready (Nicht-Bereit)............................................................ 68
Einzug von Einzelblättern in den Drucker................................................ 68
Auswerfen von Einzelblättern aus dem Drucker ......................................68
Papiervorschub.......................................................................................... 68
Fehler ........................................................................................................ 68
Kapitel 5: Papierhandhabung............................................................. 70
Wahl der Papierart..................................................................................... 70
Einstellung der Papierstärke...................................................................... 72
Automatische Papierzufuhr....................................................................... 72
Manueller Papiereinzug ............................................................................74
Beseitigung eines Papierstaus................................................................... 74
Kapitel 6: Verwendung des Druckers unter MS-DOS............. 76
Grundeinstellung (Setup) unter MS-DOS................................................. 76
Wahl von Schriftarten in MS-DOS-Anwendungen .................................. 78
Kapitel 7: Sonstige Druckerfunktionen........................................... 80
Wie man den Druck unterbricht................................................................ 80
Zeilenvorschub.......................................................................................... 80
Blattvorschub ............................................................................................ 80
Anhang A: Fehlerbehebung ................................................................. 82
Testen des Druckers.................................................................................. 82
Anleitung zur Fehlerbehebung.................................................................. 88
Überprüfen der System-Software-Einstellungen unter Windows........... 102
Überprüfen der Einstellungen der System-Software unter MS-DOS..... 104
Überprüfung der Anschlußeinstellungen im Drucker Setup Programm.... 104
Anhang B: Technische Daten............................................................. 106
Anhang C: Interface-Pin-Belegung................................................. 109
Anhang D: Zeichensätze....................................................................... 110
Anhang E: Steuercodes des Druckers............................................ 113
Capitolo 4: Il pannello di controllo e le sue funzioni................. 66
Attivazione del modo “Sleep”................................................................... 66
Disattivazione del modo “Sleep” e ripristino dell’ alimentazione normale.... 66
Passaggio dal modo “Ready” al modo “Not-Ready”................................ 68
Alimentazione di fogli singoli nella stampante......................................... 68
Espulsione di fogli singoli dalla stampante............................................... 68
Avanzamento della carta........................................................................... 68
Segnalazioni d’errore................................................................................ 68
Capitolo 5: Uso della carta.................................................................... 70
Selezione della carta.................................................................................. 70
Regolazione della distanza di stampa ....................................................... 72
Alimentazione automatica dei fogli.......................................................... 72
Alimentazione manuale dei fogli.............................................................. 74
Rimozione della carta inceppata............................................................... 74
Capitolo 6: Utilizzo della stampante in ambiente MS-DOS... 76
Installazione della stampante in ambiente MS-DOS ................................ 76
Selezione dei caratteri all’interno delle applicazioni MS-DOS................ 78
Capitolo 7: Altre funzionalità della stampante............................ 80
Come mettere in pausa la stampante......................................................... 80
Avanzamento linea.................................................................................... 80
Salto pagina............................................................................................... 80
Appendice A: Ricerca e soluzione dei problemi.......................... 82
Esecuzione dei test di stampa.................................................................... 82
Guida alla risoluzione dei problemi.......................................................... 88
Controllo delle impostazioni del software di sistema in Windows......... 102
Controllo delle impostazioni del software di sistema in MS-DOS......... 104
Controllo dell’impostazione della porta nel programma
User Setup Utility............................................................................. 104
Appendice B: Specifiche tecniche................................................... 106
Appendice C: Uscite a terminale interfaccia.............................. 109
Appendice D: Set di caratteri............................................................ 110
Appendice E: Codici di controllo della stampante................... 113

Chapter1.frame Black #1
1
Chapter 1: Printer Setup
This chapter contains important information on setting up your printer. Be sure to
read this chapter carefully before using the printer for the first time. In this chapter
you will learn about:
❏
Choosing a place for the printer
❏ Unpacking and setting up the printer
❏ Installing the ribbon cassette
❏ Loading paper
❏ Connecting to your computer
Choosing a place for the printer
Before actually unpacking the printer, you should take a few minutes to think about
where you plan to use it. Remember the following points when doing this.
✓ Choose a firm, level surface where the printer will not be exposed to vibration.
✓ The power outlet you plan to connect to for power should be nearby and
unobstructed.
✓ Make sure that the printer is close enough to your computer for you to connect
the two with your printer cable.
✓ Allow six inches (15 centimeters) of free space on either side of the printer. If
you are going to use fanfold paper, make sure that there is adequate space for
paper behind the printer.
✓ Make sure that the printer is not exposed to direct sunlight.
✓ Make sure that the printer is well away from heaters.
✓ Make sure that the surrounding area is clean, dry, and free of dust.
✓ Make sure that the printer is connected to a reliable power outlet. It should not
be on the same electric circuit as copiers, refrigerators, or other appliances that
cause power spikes.
✓
Use a power outlet that matches the power rating noted on the label affixed to the
bottom of your printer.
✓ Make sure that the room where you are using the printer is not too humid.
Chapitre 1: Configuration de l’imprimante
Ce chapitre contient des informations importantes pour la configuration de
l’imprimante. Il doit être lu attentivement avant d’utiliser l’imprimante pour la
première fois. Ce chapitre est destiné à vous familiariser avec les aspects suivants :
❏ Choix d’un emplacement pour l’imprimante
❏ Déballage et configuration de l’imprimante
❏ Installation d’une cassette de ruban
❏ Chargement du papier
❏ Connexion de l’imprimante à l’ordinateur
Choix d’un emplacement pour l’imprimante
Avant de commencer à déballer l’imprimante, il est préférable de réfléchir quelques
instants à l’endroit où elle va être utilisée. Veuillez tenir compte des points suivants:
✓ Choisissez une surface solide et plate qui n’exposera pas l’imprimante aux
vibrations.
✓ La prise de courant à laquelle l’imprimante va être connectée doit être située à
proximité et être libre de toute obstruction.
✓
Vérifiez que l’imprimante est suffisamment proche de l’ordinateur pour pouvoir
la relier à celui-ci par le câble d’imprimante.
✓ Prévoyez 15 cm de dégagement des deux côtés de l’imprimante. Si vous
envisagez d’utiliser du papier à pliage accordéon, vérifiez qu’il y a assez de
place derrière l’imprimante pour placer le papier.
✓ Vérifiez que l’imprimante n’est pas exposée directement à la lumière du soleil.
✓ Vérifiez que l’imprimante est éloignée des sources de chaleur.
✓ Vérifiez que l’imprimante se trouve dans un environnement propre, sec et non
poussiéreux.
✓
Vérifiez que l’imprimante est connectée à une source d’alimentation stable. Elle
ne doit pas être connectée au même circuit électrique que les photocopieurs,
réfrigérateurs ou autres équipements susceptibles de générer des pointes de
tension.
✓ Utilisez une prise de courant ayant la puissance nominale indiquée sur
l’étiquette collée sur la base de l’imprimante.
✓ Vérifiez que la salle dans laquelle l’imprimante est installée n’est pas trop
humide.

Chapter1.frame Black #2
2
Kapitel 1: Grudeinstellung (Setup) des Druckers
Dieses Kapitel enthält wichtige Informationen über die Grudeinstellung (Setup)
Ihres Druckers. Lesen Sie dieses Kapitel unter allen Umständen sorgfältig durch,
bevor Sie Ihren Drucker erstmals einsetzen. In diesem Kapitel lernen Sie:
❏ Einen Stellplatz für Ihren Drucker auszusuchen
❏ Ihren Drucker auszupacken und die Grudeinstellung (Setup) vorzunehmen
❏ Die Farbbandkassette einzusetzen
❏ Papier einzulegen
❏ Ihren Drucker anzuschließen
Wahl eines Stellplatzes für den Drucker
Bevor Sie damit beginnen, den Drucker auszupacken, sollten Sie einige Minuten
darüber nachdenken, wo Sie den Drucker einzusetzen beabsichtigen. Beachten Sie
dabei folgende Punkte:
✓
Wählen Sie eine feste, waagerechte Unterlage, damit der Drucker nicht vibrieren
kann.
✓ Die Netzsteckdose, die Sie zum Anschluß verwenden, sollte ganz in der Nähe
des Druckers und unbehindert zugänglich sein.
✓ Stellen Sie sicher, daß der Drucker nah genug am Computer steht, damit Sie
beide mit Ihrem Druckerkabel verbinden können.
✓ Lassen Sie auf allen Seiten des Druckers 15 cm Freiraum. Wenn Sie
Endlospapier verwenden, sorgen Sie auch für genügend Platz hinter dem
Drucker.
✓ Stellen Sie sicher, daß der Drucker keinem direkten Sonnenlicht ausgesetzt ist.
✓ Stellen Sie sicher, daß der Drucker weit genug von Heizungen entfernt steht.
✓ Stellen Sie sicher, daß die Druckerumgebung sauber, trocken und staubfrei ist.
✓
Stellen Sie sicher, daß der Drucker an eine zuverlässig arbeitende Netzsteckdose
angeschlossen wird. Er sollte nicht am gleichen Stromkreis mit Kopiergeräten,
Kühlaggregaten und sonstigen Geräten hängen, die Impulsspitzen verursachen.
✓ Verwenden Sie eine Netzsteckdose, die den Anschlußwerten entspricht, die auf
dem Typenschild auf der Unterseite Ihres Druckers angegeben sind.
✓ Stellen Sie sicher, daß der Raum, in dem Sie Ihren Drucker einsetzen, nicht zu
feucht ist.
Capitolo 1: Installazione della stampante
Questo capitolo contiene informazioni importanti su come installare la stampante.
Leggete attentamente questo capitolo prima di usare la stampante per la prima volta.
In questo capitolo troverete istruzioni relative ai seguenti argomenti:
❏ scelta del luogo dove installare la stampante
❏ disimballaggio e installazione della stampante
❏ installazione della cartuccia nastro
❏ inserimento della carta
❏ collegamento della stampante al computer
Scelta del luogo dove installare la stampante
Prima di disimballare la stampante, soffermatevi un momento a pensare al luogo in
cui volete utilizzarla, osservando le seguenti indicazioni.
✓ Scegliete una superficie solida e piana dove la stampante non sarà esposta a
vibrazioni.
✓ La presa di alimentazione a cui intendete collegare la stampante dovrà trovarsi
nelle vicinanze e non dovrà essere occupata da altre spine.
✓ La distanza fra la stampante e il computer dovrà essere tale da consentirvi di
collegare le due apparecchiature con il vostro cavo stampante.
✓
Lasciate almeno 15 centimetri di spazio libero su entrambi i lati della stampante.
Se intendete usare carta a modulo continuo, accertatevi che vi sia spazio
sufficiente per la carta dietro la stampante.
✓ Non esponete la stampante alla luce diretta del sole.
✓ Tenete la stampante lontana da fonti di calore.
✓ Scegliete un luogo pulito, asciutto e al riparo dalla polvere.
✓ Collegate la stampante ad una presa di alimentazione con tensione stabile,
possibilmente non sullo stesso circuito di fotocopiatrici, frigoriferi o altre
apparecchiature che potrebbero causare sbalzi di tensione.
✓ Usate una presa di alimentazione di tensione corrispondente a quella indicata
sull’etichetta applicata sul fondo della stampante.
✓ Usate la stampante in un locale non eccessivamente umido.

Chapter1.frame Black #3
3
Unpacking the printer
Check to make sure that the carton contains each of
the items shown in the following illustration.
If anything is missing, contact the store where you
bought the printer and ask them to supply the missing
part.
A push tractor unit (PT-10Y) and a Serial-To-Parallel
Interface Converter (SPC-8K) are also available as
options. Consult with your dealer for details on these
options.
General guide
The following illustrations show the major
component parts of the your printer.
Note:
It is a good idea to keep the original box and all the
packing materials just in case you later need to pack
the printer up again and send it somewhere at a later
date.
Printer
Imprimante
Drucker
Stampante
Ribbon cartridges
Cartouches de ruban
Farbbandkassetten
Cartucce nastro
For Monochrome model
Pour modèle monochrome
Für Monochrom-Modelle
Per il modello monocromatico
Paper support
Support papier
Papierhalter
Supporto appoggia-carta
User’s manual
Guide d’utilisation
Bedienungshandbuch
Manuale utente
3.5” Floppy disk
Disquette 3,5 pouces
3,5” Diskette
Dischetto da 3,5”
For Color printer model
Pour imprimante couleur
Für Farbdrucker
Per il modello di stampante a colori
Paper tray cover
Capot de bac papier
Abdeckung des Papierschachts
Coperchio vassoio carta
Platen
Rouleau
Druckwalze
Rullo guida
Print head
Tête d’impression
Druckkopf
Testina di stampa
Cartridge
Cartouche
Kassette
Cartuccia nastro
Control panel
Panneau de commande
Bedienerfeld
Pannello di controllo
Front cover
Capot avant
Frontabdeckung
Coperchio frontale
Automatic sheet feeder
Introducteur feuille à feuille
Automatische Papierzufuhr
Alimentatore automatico di
fogli singoli
Paper support
Support papier
Papierhalter
Supporto
appoggia-carta
Interface connector
Connecteur d’interface
Interface-Anschluß/
Schnittstelle
Connettore d’interfaccia
Paper button
Bouton papier
Papiertaste
Tasto Paper
Power button
Bouton marche-arrêt
Netzschalter
Tasto Power

Chapter1.frame Black #4
4
Déballage de l’imprimante
Vérifiez que le carton contient tous les éléments
illustrés ci-dessous :
Si l’un des éléments illustrés manque, adressez-vous
au magasin dans lequel vous avez acheté
l’imprimante et demandez que la pièce manquante
vous soit fournie.
Une unité d’entraînement (PT-10Y) et un
convertisseur d’interface série/parallèle (SPC-8K)
sont également disponibles en option. Pour plus de
détails sur ces options, consultez votre revendeur.
Guide général
Les principaux éléments de l’imprimante sont
illustrés aux figures ci-dessous.
Remarque:
Il est préférable de conserver le carton d’origine et
tous les matériaux d’emballage pour pouvoir
réemballer l’imprimante par la suite et la déplacer
si nécessaire.
Auspacken des Druckers
Überprüfen und vergewissern Sie sich, daß der
Versandkarton alle in der nachstehenden Abbildung
aufgezeigten Teile enthält.
Wenn etwas fehlt, wenden Sie sich an das Geschäft,
in dem Sie Ihren Drucker gekauft haben und bitten
Sie dieses, die fehlenden Teile zu liefern.
Ein Schubtraktor (PT-10Y) und ein Serieller
Interface-Adapter (SPC-8K) sind wahlweise
ebenfalls verfügbar. Über Einzelheiten zu diesem
Zubehör gibt Ihnen der Händler gerne Auskunft.
Allgemeiner Leitfaden
Die folgenden Abbildungen zeigen die
Hauptbestandteile Ihres Druckers.
Hinweis:
Es ist empfehlenswert, den Originalkarton und das
gesamte Verpackungsmaterial aufzubewahren, um es
später für Lagerung oder Transport verwenden zu
können.
Disimballaggio della stampante
Verificate che la confezione contenga tutte le parti
illustrate nella seguente figura.
Qualora mancasse qualcosa, rivolgetevi al negoziante
presso cui avete acquistato la stampante e
richiedetegli il componente mancante.
Sono inoltre disponibili accessori come l’unità di
trascinamento (PT-10Y) e il convertitore
d’interfaccia seriale-parallelo (SPC-8K). Richiedete
al vostro rivenditore ulteriori informazioni su questi
accessori.
Panoramica generale della stampante
Le seguenti figure illustrano le parti principali che
compongono la vostra stampante.
Nota:
E’ consigliabile conservare l’imballo originale e
tutti i materiali d’imballaggio nel caso dobbiate
successivamente reimballare la stampante per
trasferirla altrove.

Chapter1.frame Black #5
5
Opening the front cover
❏ Hook your fingers under the two small tabs on
either side of the front cover and pull upwards to
swing the front cover open.
Removing the print head protector
(LC-240C only)
If your printer is a color model, its print head will be
enclosed in a protector that guards against damage
during shipping. Before using the printer, you must
remove the print head protector as shown in the
following illustration.
About ribbon cartridges
The type of ribbon cartridge that comes with your
printer depends on whether it is a color printer or a
monochrome printer. Monochrome printer models
come with a monochrome ribbon cartridge with a
built-in print head shield, while color printer models
come with a color cartridge without a print head
shield (this is because the color printer has its own
print head shield). In addition, monochrome ribbon
cartridges for use on a color printer model are
available as an option.
Note:
You can completely remove the front cover from the
printer. However, we recommend that you normally
leave it in place. The cover protects against objects
getting into the printer, and it cuts down on printer
noise.
Color ribbon cartridge (accessory)
Cartouche de ruban couleur (accessoire)
Color-Farbbandkassette (Zubehör)
Cartuccia nastro a colori (accessorio)
Monochrome ribbon cartridge
(option for color printer)
Cartouche de ruban monochrome
(option sur imprimante couleur)
Monochrom (einfarbige)-Farbbandkassette
(Option bei Color-Druckern)
Cartuccia nastro nero
(accessorio per stampante a colori)
Monochrome ribbon cartridge
(accessory)
Cartouche de ruban monochrome
(accessoire)
Monochrom (einfarbige)-
Farbbandkassette (Zubehör)
Cartuccia nastro nero (accessorio)
Print head shield
Protection de tête d’impression
Druckkopfführung
Protezione della testina di stampa

Chapter1.frame Black #6
6
Ouverture du capot avant
❏ Placez les doigts sous les deux petits onglets des
deux côtés du panneau avant et soulevez-le pour
l’ouvrir en le faisant pivoter.
Retrait de la protection de la tête
d’impression (LC-240C uniquement)
Si vous disposez du modèle couleur, la tête
d’impression est recouverte d’une protection destinée
à la protéger contre tout risque d’endommagement
pendant le transport. Avant d’utiliser l’imprimante,
vous devez retirer la protection de la tête
d’impression en procédant comme illustré ci-
dessous.
A propos des cartouches de ruban
Le type de cartouche de ruban fourni avec
l’imprimante dépend du modèle choisi : couleur ou
monochrome. Les imprimantes monochromes sont
fournies avec une cartouche de ruban monochrome
munie d’une protection intégrée de tête d’impression,
tandis que les modèles couleurs sont, eux, livrés avec
une cartouche couleur sans protection de tête
d’impression (parce que l’imprimante couleur
possède sa propre protection de tête d’impression).
En outre, il existe en option des cartouches de ruban
monochromes destinées aux imprimantes couleurs.
Remarque:
Vous pouvez enlever totalement le capot avant de
l’imprimante. Il est cependant recommandé de le
conserver en position. Le capot avant protège
l’imprimante des objets qui risqueraient de s’y
introduire et réduit aussi le bruit lors de
l’impression.
Öffnen der Frontabdeckung
❏ Finger unter die beiden Vorsprünge auf jeder
Seite der Frontabdeckung ansetzen, fest
zugreifen und hochziehen. Die Frontabdeckung
sollte sich öffnen.
Abnehmen des Druckkopfschutzes
(nur beim LC-240 C)
Wenn Sie einen Farbdrucker besitzen, befindet sich
der Druckkopf in einem Transportschutz. Vor Einsatz
des Druckers müssen Sie die Schutzvorrichtung des
Druckkopfs, wie in der nebenstehenden Abbildung
gezeigt, entfernen.
Über die Farbbandkassetten
Die Ausführung der Farbbandkassette, die mit Ihrem
Drucker geliefert wird, richtet sich danach, ob Ihr
Drucker in Farbe oder monochrom druckt.
Monochrom-Drucker werden mit einer einfarbigen
Farbbandkassette geliefert, die eine eingebaute
Druckkopfführung besitzt. Color-Druckermodelle
werden mit einer mehrfarbigen Farbbandkassette
ohne Druckkopfführung geliefert (das liegt daran,
daß Color-Drucker eigene Druckkopfführungen
besitzen). Darüber hinaus gibt es einfarbige Longlife
Farbbandkassetten für den Einsatz in Color-Druckern
als Option.
Hinweis:
Sie können die Frontabdeckung Ihres Druckers
vollständig abnehmen. Wir empfehlen Ihnen jedoch,
sie im Normalfall an ihrem Platz zu lassen. Die
Abdeckung schützt den Drucker vor eindringenden
Fremdkörpern und vermindert das Geräusch beim
Drucken.
Apertura del coperchio frontale
❏ Aprite il coperchio frontale afferrandolo da
entrambe le linguette laterali e tirandolo verso
l’alto.
Rimozione dell’imballo di protezione
della testina di stampa (solo per il
modello LC-240C)
Se il modello della vostra stampante è a colori, avrete
notato che la sua testina di stampa è avvolta da un
imballo che la protegge dagli urti durante il trasporto.
Prima di utilizzare la stampante dovete rimuovere
l’imballo di protezione come illustrato nella seguente
figura.
Due parole sulle cartucce nastro
Il tipo di cartuccia nastro fornita con la vostra
stampante è diverso in base al modello della
stampante, a colori o monocromatica. Il modello di
stampante monocromatica viene fornito con una
cartuccia di nastro nero dotata di una protezione della
testina di stampa, mentre il modello a colori viene
fornito con una cartuccia a colori priva di questa
protezione (in quanto il modello a colori ha una
testina di stampa dotata di una propria protezione).
Inoltre è disponibile una cartuccia di nastro nero
come accessorio per la stampante a colori.
Nota:
Il coperchio frontale può essere staccato
completamente dalla stampante. Tuttavia vi
consigliamo di lasciarlo normalmente sulla
stampante, in quanto tale coperchio funge da
protezione contro eventuali oggetti che potrebbero
introdursi nella stampante, oltre a ridurne la
rumorosità.

Chapter1.frame Black #7
7
Installing the ribbon cartridge
❏ Rotate the knob on the cartridge clockwise to
take up any slack in the ribbon.
❏ Carefully push the cartridge holder by hand all
the way to the left side as far as it will go.
❏ Carefully place the cartridge onto the cartridge
holder making sure that the spindle of the holder
fits into the socket on the bottom of the cartridge.
❏ If you have a color printer model, be sure to
carefully position the ribbon between the print
head and the print head shield as shown in the
illustration.
❏ Press down gently but firmly on the cartridge to
make sure that it is securely in place. The
cartridge should move slightly (about 1/10” or
2.5mm) when you press down on it.
❏ Rotate the knob on the cartridge again to take up
any slack.
❏
Replace the front cover of the printer. Press down
on the raised parts at the back of the cover until it
snaps securely shut.
Important!
Never try to move the print head while the printer is
plugged in. Doing so can damage the printer. If you
have just used the printer, let the print head cool for
a few minutes before you touch it.
Important!
If you have a color printer model, be sure to double
check that the ribbon is properly positioned between
the print head and print head shield. If it isn’t, you
may get poor print quality or even end up damaging
the ribbon.
Knob
Bouton
Drehknopf
Manopola
Print head shield
Protection de tête d’impression
Druckkopfführung
Protezione della testina di stampa
Ribbon
Ruban
Farbband
Nastro
Print head
Tête d’impression
Druckkopf
Testina di stampa
Color ribbon cartridge
Cartouche de ruban couleur
Color-Farbbandkassette
Cartuccia nastro a colori
Print head shield
Protection de tête d’impression
Druckkopfführung
Protezione della testina di stampa
Ribbon
Ruban
Farbband
Nastro
Print head
Tête d’impression
Druckkopf
Testina di stampa
Monochrome ribbon cartridge
Cartouche de ruban monochrome
Monochrom (einfarbige)-Farbbandkassette
Cartuccia nastro nero

Chapter1.frame Black #8
8
Installation d’une cartouche de ruban
❏ Faites tourner le bouton de la cartouche vers la
droite pour bien tendre le ruban.
❏ Poussez le support de cartouche à fond vers la
gauche sans forcer.
❏
Placez avec précaution la cartouche sur le support
de cartouche en vérifiant que la broche du
support s’insère dans l’orifice au bas de la
cartouche.
❏ Si vous disposez d’un modèle couleur, veillez à
bien positionner le ruban entre la tête
d’impression et la protection de tête d’impression
comme illustré ci-dessous.
❏ Appuyez doucement mais fermement sur la
cartouche pour la fixer en position. Lorsque vous
appuyez sur la cartouche, elle doit se déplacer
légèrement (de 2,5 mm environ).
❏ Faites tourner à nouveau le bouton de la
cartouche pour tendre le ruban.
❏ Remettez le capot avant de l’imprimante en
place. Appuyez sur les éléments soulevés à
l’arrière du capot jusqu’à ce qu’il se ferme
correctement.
Important!
Ne jamais déplacer la tête d’impression lorsque
l’imprimante est connectée, sous peine de
l’endommager. Si vous venez d’utiliser l’imprimante,
laissez la tête d’impression refroidir pendant
quelques minutes avant de la toucher.
Important!
Si vous disposez d’un modèle couleur, revérifiez que
le ruban est correctement positionné entre la tête
d’impression et la protection de tête d’impression. Si
ce n’est pas le cas, la qualité d’impression risque
d’en être affectée et le ruban risque aussi d’être
endommagé.
Einsetzen der Farbbandkassette
❏
Knopf an der Farbbandkassette im Uhrzeigersinn
drehen, um das Band leicht zu spannen.
❏ Sorgfältig Kassettenhalter von Hand soweit wie
möglich nach links schieben.
❏ Farbbandkassette vorsichtig auf den
Kassettenhalter legen und vergewissern, daß die
Spindel des Kassettenhalters in der vorgesehenen
Aussparung am Boden der Kassette sitzt.
❏
Wenn Sie einen Farbdrucker besitzen, achten Sie
verstärkt darauf, daß das Farbband einwandfrei
zwischen Druckkopf und Druckkopfführung
verläuft.
❏ Kassette vorsichtig, aber kräftig nach unten
drücken, um sicherzustellen, daß sie einwandfrei
sitzt. Die Kassette sollte sich etwas bewegen
lassen (etwa 2,5 mm), wenn Sie darauf drücken.
❏
Drehen Sie den Knopf an der Kassette erneut, um
das Farbband leicht zu spannen.
❏ Abdeckung des Drucker wieder anbringen.
Drücken Sie die Abdeckung an den erhöhten
Teilen nach unten, bis sie fest einrastet.
Wichtig!
Versuchen Sie niemals, den Druckkopf zu bewegen,
wenn der Drucker ans Netz angeschlossen ist. Dies
kann zu Schäden am Drucker führen. Drucker nach
Gebrauch abkühlen lassen, bevor sie ihn anfassen.
Wichtig!
Wenn Sie einen Color-Drucker besitzen, darauf
achten, daß Sie zweimal überprüfen, ob das
Farbband einwandfrei zwischen Druckkopf und
Druckkopfführung verläuft. Falls nicht, erhalten Sie
schlechte Druckergebnisse oder beschädigen sogar
das Farbband.
Installazione della cartuccia nastro
❏
Girate la manopola sulla cartuccia in senso orario
per mettere in tensione il nastro.
❏ Spingete delicatamente con la mano il supporto
portanastro completamente a sinistra finché non
si arresta.
❏ Applicate accuratamente la cartuccia sul
supporto portanastro, controllando che lo
spinotto del supporto combaci con il foro
praticato sul fondo della cartuccia.
❏ Se il modello della vostra stampante è a colori,
assicuratevi di far passare il nastro fra la testina di
stampa e la protezione della testina stessa, come
mostrato nella figura.
❏ Spingete leggermente ma con decisione la
cartuccia, in modo da inserirla nella sua sede.
Spingendo la cartuccia, questa dovrebbe spostarsi
di pochi millimetri (circa 2,5 mm).
❏ Girate nuovamente la manopola sulla cartuccia
per tendere il nastro.
❏ Rimettete a posto il coperchio frontale,
spingendolo dalle parti sporgenti in fondo al
coperchio fino a richiuderlo con uno scatto.
Importante!
Non tentate mai di spostare la testina di stampa
mentre la stampante è collegata, perché ciò può
provocare guasti alla stampante. Se avete appena
utilizzato la stampante, lasciate raffreddare la testina
di stampa per alcuni minuti prima di toccarla.
Importante!
Se il modello della vostra stampante è a colori,
controllate attentamente che il nastro sia inserito
correttamente fra la testina di stampa e la relativa
protezione. In caso contrario, la qualità della
stampa risulterà scadente e il nastro potrebbe
persino rompersi.

Chapter1.frame Black #9
9
Installing the paper support
❏ Insert the ends of the paper support into the
slots on the printer as shown in the
following illustration.
Connecting to your computer
The computer sends data to the printer through a
cable. This printer does not come with a cable, so you
must purchase one of your own. You will probably
want to use a standard parallel cable for connection,
but note that you can also use an optional Serial-To-
Parallel Interface Converter (SPC-8K).
For an IBM-compatible personal computer:
✓ Use a standard 36-pin Centronics parallel cable.
✓ The parallel cable should be no longer than six
feet (two meters). Longer cables can result in
poor transfer of information.
Important!
The following instructions apply to the Centronics
parallel cable that is used with an IBM-compatible
personal computer. Note that they do not apply to all
types of computers and cables. If you are unsure
about what type of cable you should use to connect
with your computer, consult with your dealer.
Important!
Make sure that the printer is unplugged from the AC
outlet and that the computer is switched off before
connecting them.

Chapter1.frame Black #10
10
Installation du support papier
❏ Insérez les extrémités du support papier dans les
fentes prévues à cet effet comme illustré ci-
dessous.
Connexion de l’imprimante à
l’ordinateur
L’ordinateur transmet les données à l’imprimante par
l’intermédiaire d’un câble. Ce câble n’est pas fourni
avec l’imprimante. Vous devez vous le procurer
séparément. Vous utiliserez probablement un câble
parallèle standard. A noter toutefois que vous pouvez
aussi utiliser le convertisseur d’interface série/
parallèle (SPC-8K) en option.
Pour un ordinateur personnel compatible IBM :
✓ Utilisez un câble parallèle Centronics à 36
broches.
✓
Le câble ne doit pas mesurer plus de deux mètres,
sous peine d’affecter la qualité du transfert
d’informations.
Important!
Les instructions suivantes sont applicables au câble
parallèle Centronics généralement utilisé avec un
ordinateur personnel compatible IBM. A noter
qu’elles ne sont pas applicables à tous les types
d’ordinateurs et de câbles. Si vous n’êtes pas sûr du
type de câble à connecter à l’ordinateur, prenez
conseil auprès de votre revendeur.
Important!
Vérifiez que l’imprimante est déconnectée de la prise
secteur et que l’ordinateur est hors tension avant
d’effectuer la connexion.
Anbringen des Papierhalters
❏ Die Enden des Papierhalters in die dafür
vorgesehenen Öffnungen des Druckers, wie
nebenstehend abgebildet, einschieben.
Anschluß an Ihren Computer
Der Computer sendet über ein Kabel Daten an den
Drucker. Dieser Drucker wird nicht mit einem Kabel
geliefert. Daher müssen Sie Ihr Kabel käuflich
erwerben. Sie werden wahrscheinlich ein Standard-
Parallelkabel zum Anschluß verwenden wollen.
Beachten Sie aber bitte, daß Sie auch wahlweise
einen Seriellen Interface-Adapter (SPC-8K)
verwenden können.
Bei einem IBM-kompatiblen PC:
✓ Verwenden Sie ein 36-Pin Standard-Centronics-
Parallelkabel.
✓
Das Parallelkabel sollte nicht länger als 2 m sein.
Längere Kabel können zu Störungen bei der
Datenübertragung führen.
Wichtig!
Die nachstehenden Anweisungen gelten für das
Centronics-Parallelkabel, das bei IBM-kompatiblen
Personalcomputern verwendet wird. Beachten Sie
bitte, daß sie nicht für alle Arten von Computern und
Kabeln einsetzbar sind. Wenn Sie nicht genau
wissen, welche Art Kabel Sie zum Anschluß Ihres
Computers verwenden müssen, wenden Sie sich an
Ihren Händler.
Wichtig!
Vergewissern Sie sich, daß der Drucker nicht an die
Netzsteckdose angeschlossen ist und daß der
Computer vor dem Anschließen abgeschaltet ist.
Installazione del supporto appoggia-
carta
❏ Inserite le estremità del supporto appoggia-carta
nelle apposite fessure della stampante, come
illustrato nella seguente figura.
Collegamento della stampante al
computer
Il computer invia i dati alla stampante attraverso un
cavo. Questa stampante viene fornita senza cavo di
collegamento, per cui dovrete acquistarne uno voi
stessi. Nella maggior parte dei casi, il collegamento
verrà effettuato tramite un cavo parallelo standard,
tuttavia potreste applicare anche il convertitore
d’interfaccia seriale-parallelo opzionale (SPC-8K).
Per collegare la stampante ad un personal computer
IBM compatibile:
✓ Utilizzate un cavo parallelo Centronics a 36 pin.
✓ Tale cavo non dovrà essere più lungo di due
metri. L’utilizzo di cavi di lunghezza superiore
può compromettere la corretta trasmissione dei
dati.
Importante!
Le istruzioni che seguono si riferiscono in
particolare ad un cavo parallelo Centronics
collegato ad un personal computer IBM compatibile;
tali istruzioni non sono valide per tutti i tipi di
computer e di cavi. Se non siete sicuri sul tipo di
cavo da adottare per il collegamento della
stampante al vostro computer, rivolgetevi al vostro
rivenditore per ulteriori chiarimenti.
Importante!
Prima di collegare la stampante al computer,
accertatevi di aver staccato la stampante dalla presa
elettrica e di aver spento il computer.

Chapter1.frame Black #11
11
❏
Plug one end of the parallel cable into the parallel
port of your computer. The parallel port should
be labelled “Printer”, “Parallel”, “PRN”, “LPT1”,
or something similar.
❏ Plug the other end of the parallel cable into the
socket on the side of the printer and secure it in
place with the clips.
Connecting to a power outlet
❏
Plug the power cord of the printer into a standard
power outlet whose voltage matches the power
rating noted on the label affixed to the bottom of
your printer.
Note that the printer does not have a power switch to
turn power on and off. Instead, its Sleep Mode
automatically reduces power consumption whenever
you leave the printer unattended. For full details
about the Sleep Mode, see “Sleep” on page 33 of this
manual.
Note:
Consult with your dealer for details on how to set up
your computer when using the optional SPC-8K
Serial-To-Parallel Interface Converter.
Important!
We recommend that you unplug the printer from the
power outlet whenever you do not plan to use it for
long periods. Because of the this, you should locate
the printer so that the power outlet it is plugged into
is nearby and easy to access.
La page est en cours de chargement...
La page est en cours de chargement...
La page est en cours de chargement...
La page est en cours de chargement...
La page est en cours de chargement...
La page est en cours de chargement...
La page est en cours de chargement...
La page est en cours de chargement...
La page est en cours de chargement...
La page est en cours de chargement...
La page est en cours de chargement...
La page est en cours de chargement...
La page est en cours de chargement...
La page est en cours de chargement...
La page est en cours de chargement...
La page est en cours de chargement...
La page est en cours de chargement...
La page est en cours de chargement...
La page est en cours de chargement...
La page est en cours de chargement...
La page est en cours de chargement...
La page est en cours de chargement...
La page est en cours de chargement...
La page est en cours de chargement...
La page est en cours de chargement...
La page est en cours de chargement...
La page est en cours de chargement...
La page est en cours de chargement...
La page est en cours de chargement...
La page est en cours de chargement...
La page est en cours de chargement...
La page est en cours de chargement...
La page est en cours de chargement...
La page est en cours de chargement...
La page est en cours de chargement...
La page est en cours de chargement...
La page est en cours de chargement...
La page est en cours de chargement...
La page est en cours de chargement...
La page est en cours de chargement...
La page est en cours de chargement...
La page est en cours de chargement...
La page est en cours de chargement...
La page est en cours de chargement...
La page est en cours de chargement...
La page est en cours de chargement...
La page est en cours de chargement...
La page est en cours de chargement...
La page est en cours de chargement...
La page est en cours de chargement...
La page est en cours de chargement...
La page est en cours de chargement...
La page est en cours de chargement...
La page est en cours de chargement...
La page est en cours de chargement...
La page est en cours de chargement...
La page est en cours de chargement...
La page est en cours de chargement...
La page est en cours de chargement...
La page est en cours de chargement...
La page est en cours de chargement...
La page est en cours de chargement...
La page est en cours de chargement...
La page est en cours de chargement...
La page est en cours de chargement...
La page est en cours de chargement...
La page est en cours de chargement...
La page est en cours de chargement...
La page est en cours de chargement...
La page est en cours de chargement...
La page est en cours de chargement...
La page est en cours de chargement...
La page est en cours de chargement...
La page est en cours de chargement...
La page est en cours de chargement...
La page est en cours de chargement...
La page est en cours de chargement...
La page est en cours de chargement...
La page est en cours de chargement...
La page est en cours de chargement...
La page est en cours de chargement...
La page est en cours de chargement...
La page est en cours de chargement...
La page est en cours de chargement...
La page est en cours de chargement...
La page est en cours de chargement...
La page est en cours de chargement...
La page est en cours de chargement...
La page est en cours de chargement...
La page est en cours de chargement...
La page est en cours de chargement...
La page est en cours de chargement...
La page est en cours de chargement...
La page est en cours de chargement...
La page est en cours de chargement...
La page est en cours de chargement...
La page est en cours de chargement...
La page est en cours de chargement...
La page est en cours de chargement...
La page est en cours de chargement...
La page est en cours de chargement...
La page est en cours de chargement...
La page est en cours de chargement...
La page est en cours de chargement...
La page est en cours de chargement...
La page est en cours de chargement...
La page est en cours de chargement...
La page est en cours de chargement...
La page est en cours de chargement...
La page est en cours de chargement...
La page est en cours de chargement...
-
 1
1
-
 2
2
-
 3
3
-
 4
4
-
 5
5
-
 6
6
-
 7
7
-
 8
8
-
 9
9
-
 10
10
-
 11
11
-
 12
12
-
 13
13
-
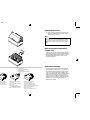 14
14
-
 15
15
-
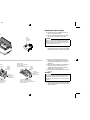 16
16
-
 17
17
-
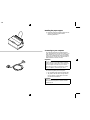 18
18
-
 19
19
-
 20
20
-
 21
21
-
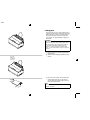 22
22
-
 23
23
-
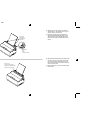 24
24
-
 25
25
-
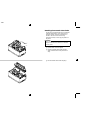 26
26
-
 27
27
-
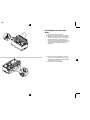 28
28
-
 29
29
-
 30
30
-
 31
31
-
 32
32
-
 33
33
-
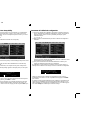 34
34
-
 35
35
-
 36
36
-
 37
37
-
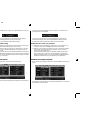 38
38
-
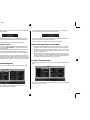 39
39
-
 40
40
-
 41
41
-
 42
42
-
 43
43
-
 44
44
-
 45
45
-
 46
46
-
 47
47
-
 48
48
-
 49
49
-
 50
50
-
 51
51
-
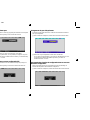 52
52
-
 53
53
-
 54
54
-
 55
55
-
 56
56
-
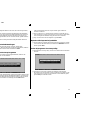 57
57
-
 58
58
-
 59
59
-
 60
60
-
 61
61
-
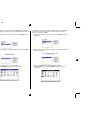 62
62
-
 63
63
-
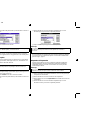 64
64
-
 65
65
-
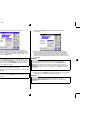 66
66
-
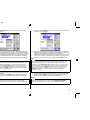 67
67
-
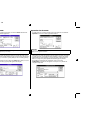 68
68
-
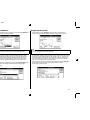 69
69
-
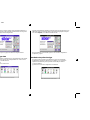 70
70
-
 71
71
-
 72
72
-
 73
73
-
 74
74
-
 75
75
-
 76
76
-
 77
77
-
 78
78
-
 79
79
-
 80
80
-
 81
81
-
 82
82
-
 83
83
-
 84
84
-
 85
85
-
 86
86
-
 87
87
-
 88
88
-
 89
89
-
 90
90
-
 91
91
-
 92
92
-
 93
93
-
 94
94
-
 95
95
-
 96
96
-
 97
97
-
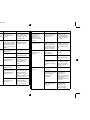 98
98
-
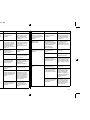 99
99
-
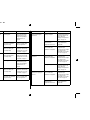 100
100
-
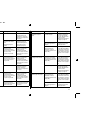 101
101
-
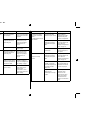 102
102
-
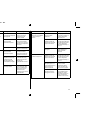 103
103
-
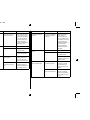 104
104
-
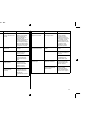 105
105
-
 106
106
-
 107
107
-
 108
108
-
 109
109
-
 110
110
-
 111
111
-
 112
112
-
 113
113
-
 114
114
-
 115
115
-
 116
116
-
 117
117
-
 118
118
-
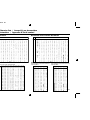 119
119
-
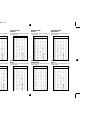 120
120
-
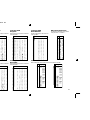 121
121
-
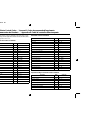 122
122
-
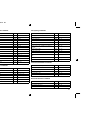 123
123
-
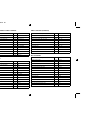 124
124
-
 125
125
-
 126
126
-
 127
127
-
 128
128
-
 129
129
-
 130
130
-
 131
131


Star Micronics LC-240C Manuel utilisateur
- Taper
- Manuel utilisateur
- Ce manuel convient également à
dans d''autres langues
- italiano: Star Micronics LC-240C Manuale utente
- English: Star Micronics LC-240C User manual
- Deutsch: Star Micronics LC-240C Benutzerhandbuch
Documents connexes
-
Star Micronics LC-240 Manuel utilisateur
-
-
-
-
-
-
-
-
-
Autres documents
-
Olivetti ARTJET 22 Le manuel du propriétaire
-
Epson LQ-300 - Impact Printer Guide de démarrage rapide
-
Epson LC-7211 Manuel utilisateur
-
TALLY T2130-24 Le manuel du propriétaire
-
TALLY T2240-24 Le manuel du propriétaire
-
-
TallyGenicom T6215N Le manuel du propriétaire