TEAC AG-H600NT Le manuel du propriétaire
- Catégorie
- Radios
- Taper
- Le manuel du propriétaire

ENGLISH
D01039120B
Z
AG-H600NT
Stereo Receiver
OWNER’S MANUAL
MODE D’EMPLOI
MANUAL DEL USUARIO
FRANÇAIS
ESPAÑOL

2
IMPORTANT SAFETY INSTRUCTIONS
1) Read these instructions.
2) Keep these instructions.
3) Heed all warnings.
4) Follow all instructions.
5) Do not use this apparatus near water.
6) Clean only with dry cloth.
7) Do not block any ventilation openings. Install in accordance with
the manufacturer’s instructions.
8) Do not install near any heat sources such as radiators, heat
registers, stoves, or other apparatus (including amplifiers) that
produce heat.
9) Do not defeat the safety purpose of the polarized or grounding-
type plug. A polarized plug has two blades with one wider
than the other. A grounding type plug has two blades and
a third grounding prong. The wide blade or the third prong
are provided for your safety. If the provided plug does not fit
into your outlet, consult an electrician for replacement of the
obsolete outlet.
10) Protect the power cord from being walked on or pinched
particularly at plugs, convenience receptacles, and the point
where they exit from the apparatus.
11) Only use attachments/accessories specified by the
manufacturer.
12) Use only with the cart, stand, tripod, bracket,
or table specified by the manufacturer,
or sold with the apparatus. When a cart is
used, use caution when moving the cart/
apparatus combination to avoid injury from
tip-over.
13) Unplug this apparatus during lightning storms or when unused
for long periods of time.
14) Refer all servicing to qualified service personnel. Servicing is
required when the apparatus has been damaged in any way,
such as power-supply cord or plug is damaged, liquid has
been spilled or objects have fallen into the apparatus, the
apparatus has been exposed to rain or moisture, does not
operate normally, or has been dropped.
CAUTION: TO REDUCE THE RISK OF ELECTRIC SHOCK, DO
NOT REMOVE COVER (OR BACK). NO USER-SERVICEABLE
PARTS INSIDE. REFER SERVICING TO QUALIFIED SERVICE
PERSONNEL.
The lightning flash with arrowhead symbol, within an
equilateral triangle, is intended to alert the user to the
presence of uninsulated “dangerous voltage” within the
product’s enclosure that may be of sufficient magnitude
to constitute a risk of electric shock to persons.
The exclamation point within an equilateral triangle is
intended to alert the user to the presence of important
operating and maintenance (servicing) instructions in
the literature accompanying the appliance.
Operation is subject to the following two conditions :
(1) this device may not cause interference, and
(2) this device must accept any interference, including interference
that may cause undesired operation of the device.
L’utilization de ce dispositif est autorisée seulement aux
conditions suivantes :
(1) il ne doit pas produire de brouillage et
(2) l’utilisateur du dispositif doit être prêt à accepter tout
brouillage radioélectrique reçu, même si ce brouillage est
susceptible de compromettre le fonctionnement du dispositif.
To reduce potential radio interference to other users, the antenna
type and its gain should be so chosen that the equivalent
isotropically radiated power (e.i.r.p.) is not more than that
permitted for successful communication.

3
ENGLISH
< Do not expose this apparatus to drips or splashes.
< Do not place any objects filled with liquids, such as vases, on the
apparatus.
< Do not install this apparatus in a confined space such as a book
case or similar unit.
< The apparatus draws nominal non-operating power from the
AC outlet with its POWER or STANDBY/ON switch not in the ON
position.
< The apparatus should be located close enough to the AC outlet
so that you can easily grasp the power cord plug at any time.
< The mains plug is used as the disconnect device, the disconnect
device shall remain readily operable.
< Products with Class I construction are equipped with a power
supply cord that has a 3-prong grounding plug. The cord of
such a product must be plugged into an AC outlet that has a
protective grounding connection.
< If the product uses batteries (including a battery pack or installed
batteries), they should not be exposed to sunshine, fire or
excessive heat.
< CAUTION for products that use replaceable lithium batteries:
there is danger of explosion if a battery is replaced with an
incorrect type of battery. Replace only with the same or
equivalent type.
< Caution should be taken when using earphones or headphones
with the product because excessive sound pressure (volume)
from earphones or headphones can cause hearing loss.
CAUTION
< DO NOT REMOVE THE EXTERNAL CASES OR CABINETS TO EXPOSE
THE ELECTRONICS. NO USER SERVICEABLE PARTS ARE WITHIN!
< IF YOU ARE EXPERIENCING PROBLEMS WITH THIS PRODUCT,
CONTACT TEAC FOR A SERVICE REFERRAL. DO NOT USE THE
PRODUCT UNTIL IT HAS BEEN REPAIRED.
WARNING: TO PREVENT FIRE OR SHOCK HAZARD,
DO NOT EXPOSE THIS APPLIANCE TO RAIN OR
MOISTURE.
CAUTION Regarding Placement
To maintain proper ventilation, be sure to leave a space
around the unit (from the largest outer dimensions including
projections) equal to, or greater than, shown below.
Left and Right Panels: 20 cm (8”)
Rear Panel: 10 cm (4”)
Top Panel: 5 cm (2”)
iPod is a trademark of Apple Inc., registered in the U.S. and other
countries.
“Made for iPod” means that an electronic accessory has been
designed to connect specifically to iPod and has been certified by
the developer to meet Apple performance standards.
Apple is not responsible for the operation of this device or its
compliance with safety and regulatory standards.
MPEG Layer-3 audio coding technology licensed from Fraunhofer IIS
and Thomson.
This product is protected by certain intellectual property rights of
Microsoft.
Use or distribution of such technology outside of this product is
prohibited without a license from Microsoft.
Windows XP and Windows Vista are either registered trademarks
or trademarks of Microsoft Corporation in the United States and/or
other countries.
RealAudio and the Real Enabled logo are trademarks or registered
trademarks of RealNetworks, Inc.
This equipment has been tested and found to comply with the
limits for a Class B digital device, pursuant to Part 15 of the FCC
Rules. These limits are designed to provide reasonable protection
against harmful interference in a residential installation. This
equipment generates, uses, and can radiate radio frequency energy
and, if not installed and used in accordance with the instructions,
may cause harmful interference to radio communications. However,
there is no guarantee that interference will not occur in a particular
installation. If this equipment does cause harmful interference to
radio or television reception, which can be determined by turning
the equipment off and on, the user is encouraged to try to correct
the interference by one or more of the following measures:
• Reorient or relocate the receiving antenna.
• Increase the separation between the equipment and receiver.
• Connect the equipment into an outlet on a circuit different from
that to which the receiver is connected.
• Consult the dealer or an experienced radio/TV technician for
help.
CAUTION
Changes or modifications to the equipment not expressly
approved by TEAC CORPORATION for compliance could void the
user’s authority to operate this equipment.
In order to comply with FCC radio-frequency radiation exposure
guidelines for an uncontrolled exposure, this device and its antenna
must not be co-located or operating in conjunction with any other
antenna or transmitter.
FCC RF Radiation Exposure Statement Caution : To maintain
compliance with the FCC’s RF exposure guidelines, place the
product at least 20cm from nearby persons.
For the LAN port, shielded cable must be used with this unit to
ensure compliance with the Class B FCC limits.
For U.S.A.

4
Before Use
Read this before attempting any operations.
< When the unit is turned on, switching on the TV may cause lines
to appear on the TV screen, depending on the condition of the
electric waves of the TV broadcast. This is not malfunction in the
unit or the TV. In this case, turn off the unit.
< As the unit may become warm during operation, always leave
sufficient space around the unit for ventilation.
Make sure there is at least 20 cm of space above and at least 5 cm
of space on each side of the unit. Do not place anything on top
of the unit.
< The voltage supplied to the unit should match the voltage as
printed on the rear panel. If you are in any doubt regarding this
matter, consult an electrician.
< Choose the installation location of your unit carefully. Avoid
placing it in direct sunlight or close to a source of heat. Also avoid
locations subject to vibrations and excessive dust, heat, cold or
moisture.
< Do not place the unit on an amplifier/receiver.
< Do not open the cabinet as this might result in damage to the
circuitry or electrical shock. If a foreign object should get into the
unit, contact your dealer or service company.
< When removing the power plug from the wall outlet, always pull
directly on the plug, never yank on the cord.
< Do not attempt to clean the unit with chemical solvents as this
might damage the finish. Use a clean, dry or slightly damp cloth.
< Keep this manual in a safe place for future reference.
Contents
Thank you for choosing TEAC. Read this manual carefully to
get the best performance from this unit.
Contents. . . . . . . . . . . . . . . . . . . . . . . . . . . . . . . . . . . . . . . . . . . . . . . . . . . . . . 4
Before Use ....................................................4
Connecting Antennas (AM/FM) ................................5
Connection ...................................................6
Internet Connection ..........................................8
System Connection ...........................................8
Speaker Connection ..........................................9
Remote Control Unit ..........................................9
Parts Identification ...........................................10
Basic Operation ..............................................12
Adjusting Bass, Midrange, Treble, and Balance of Speakers .....13
Listening to iPod .............................................14
Listening to FM/AM ..........................................16
Preset Tuning ................................................17
Internet Radio Initial Setup ...................................19
Listening to Internet Radio ...................................20
Internet Radio Menu Operations ..............................22
Network Configuration .......................................23
Radio Portal ..................................................24
Setting up Music Player ......................................24
Media Player Initial Setup .....................................28
Listening to Music Player (Shared Media) ......................29
Listening to Music Player (Shared Folders) .....................30
Troubleshooting .............................................31
Specifications ................................................33

5
ENGLISH
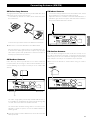
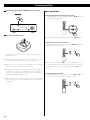
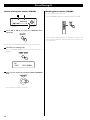
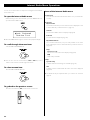
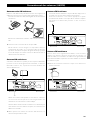
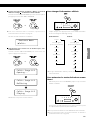
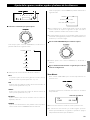
FM Indoor Antenna
Connect the lead-type FM antenna to the FM 75Ω socket, extend
the lead and tune in your favourite station (page 16).
Adjust the antenna in a suitable location like a window frame or
wall which gives the best reception and then fix the antenna in
that position with thumb tacks or the like.
FM Outdoor Antenna
In an area where FM signals are weak, it will be necessary to use
an outdoor FM antenna. Generally, a 3-element antenna will be
sufficient; if you live in an area where the FM signals are particularly
weak, it may be necessary to use one with 5 or more elements.
< Disconnect the FM indoor antenna when using an outdoor
antenna.
Connecting Antennas (AM/FM)
AM Indoor Loop Antenna
The high-performance AM loop antenna provided with this unit is
sufficient for good reception in most areas.
To stand the loop antenna on a surface, fix the claw to the slot in
the antenna base.
Connect the loop antenna‘s wires to the AM antenna terminals.
< Make sure to connect the black wire to the GND terminal.
Place the antenna on a shelf or hang it on a window frame, etc.,
in the direction which gives the best reception. Keep all other
wires such as power cords, speaker wires or interconnect wires as
far away as possible from the antenna.
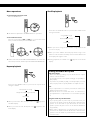
AM Outdoor Antenna
If the AM loop antenna provided does not deliver sufficient
reception (often due to being too far from the transmitter or in a
concrete building, etc.), it may be necessary to use an outdoor AM
antenna.
Use either a high quality commercially available AM antenna or,
if not available, an insulated wire more than 16 ft (5 m) long, strip
one end, and connect this to the terminal as shown.
The antenna wire should be strung outdoors or indoors near a
window. For better reception, connect the GND terminal to a
reliable ground.
< Even when using an outdoor AM antenna, do not disconnect the
AM loop antenna.

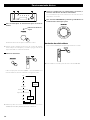
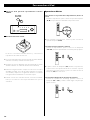
6
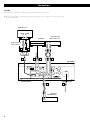
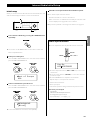
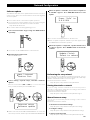
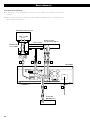
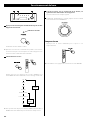
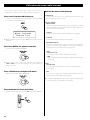
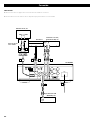
Connection
VIDEO
IN
S-VIDEO
IN
LINE
OUT
LINE
OUT
LINE
IN
RLRL
RL
F G
A
A
D
E
CB
Turntable
Cassette deck,
CD recorder, etc.
AG-H600NT
CD player
(PD-H600, etc.)
CAUTION
< Connect the power plug to a wall socket after completing all other connections.
< Be sure to thoroughly read through the instruction manuals of the equipment you will connect and
observe all instructions.
TV monitor, etc.
Connect one of
these cables.

7
ENGLISH
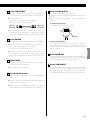
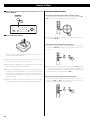
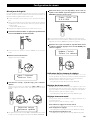
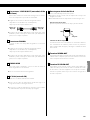
E
iPod dock port
Connect the iPod dock (option) to this port.
< Make sure the label A side of the plug is up.
< Securely insert the plug until a slight “click” is heard.
To disconnect the dock
Push the buttons of the plug and pull.
Compatible iPod Software
If your iPod does not work with the unit or with the remote
control unit, software update may solve the problem. Visit the
Apple web site and download the latest iPod Software.
F
VIDEO OUT terminal
This terminal outputs video signal from iPod. Use a composite
video cable to connect the dock to the composite video
connector of a television or monitor.
G
S-VIDEO OUT terminal
This terminal outputs S-video signal from iPod. Use an S-video
cable to connect the dock to the S-video input of a suitably
equipped television or monitor. Use this connection in
preference to a composite video connection.
A
LINE IN/OUT jacks
These jacks transmit an analog 2-channel audio signal. Connect
the components using RCA cables.
< Make sure to connect the cables as follows:
white plug q white jack (L: left channel)
red plug q red jack (R: right channel)
< Be sure to insert each plug securely. To prevent hum and noise,
avoid bundling the cables together with the AC power cord or
speaker cables.
B
PHONO jacks
Connect the turntable’s RCA pin cord to the PHONO jacks.
< Make sure to connect the cables as follows:
white plug q white jack (L: left channel)
red plug q red jack (R: right channel)
< Be sure to insert each plug securely. To prevent hum and noise,
avoid bundling the cables together with the AC power cord or
speaker cables.
C
SIGNAL GND
To prevent hum and noise, connect the ground lead of the
turntable to this terminal.
< This is not a safety earth.
D
AC Inlet
Use only the supplied power cord.
< Use of other power cord may result in fire or electric shock.
< Unplug the power cord when you are not going to use the unit
for an extended period of time.
label
White (L)
Red (R)
White (L)
Red (R)

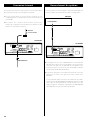
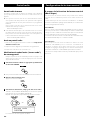
8
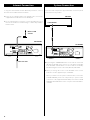
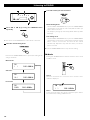
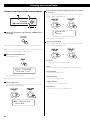
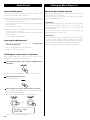
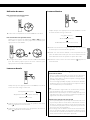
If you have TEAC compact disc player PD-H600, convenient system
control functions are possible.
< By pressing the STANDBY/ON button on the remote control unit
(RC-1181) of AG-H600 series receiver, you can switch on/standby
both AG-H600 and PD-H600. You cannot switch on/standby
PD-H600 using the remote control unit (RC-1182) of PD-H600.
< When you change the source on the AG-H600 series receiver
from CD to another, playback stops on PD-H600.
When you want to use the system control functions, connect the
SYSTEM CONTROL jack of each component by a system control
connection cord (supplied with PD-H600), and set the SYSTEM
CONTROL SELECTOR switch on the rear panel of the PD-H600 to
”SYSTEM”.
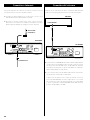
Ethernet cable
System ConnectionInternet Connection
PD-H600
SYSTEM CONTROL
AG-H600NT
AG-H600NT
Wireless LAN
antenna
To enjoy the Internet Radio and the Music Player function, connect
the unit to the broadband internet network.
< If you can use a wireless LAN in your installation site, connect the
supplied wireless LAN antenna to the WLAN jack.
< To use a wired Internet connection, connect the Ethernet port of
this unit to the Ethernet network using a commercially available
Ethernet cable.

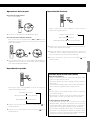
9
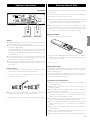
ENGLISH
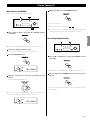
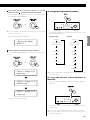
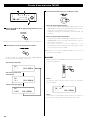
Caution
< Check the impedance of your speakers. Connect speaker with an
impedance of between 4 ohms and 8 ohms.
< The red speaker terminals are + (positive) and the black speaker
terminals are _ (negative).
Generally, the + side of the speaker cable is marked to make
it distinguishable from the _ side of the cable. Connect the
marked side to the + terminal and the unmarked side to the
black _ terminal.
< The metal portions of the two separate wires should not touch
or an electrical short can occur. Shorted wires can create a fire
hazard or induce a failure in your equipment.
< Be sure to insert each plug securely. To prevent hum and noise,
avoid bundling the cables together with the AC power cord or
other cables.
How to connect:
1. Turn the terminal cap counterclockwise to loosen it. The speaker
terminal caps cannot be fully removed from the base.
2. Insert the wire into the terminal and turn the terminal cap
clockwise to securely connect it:
< Make sure none of the wire insulation is under the terminal and
only the bare, stripped wire is touching the terminal.
3. Make sure the cable is fastened firmly by pulling the cable lightly.
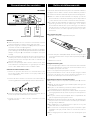
AG-H600NT
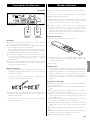
The provided Remote Control Unit allows the unit to be operated
from a distance.
When operating the remote control unit, point it towards the
remote sensor on the front panel of the unit.
< Even if the remote control unit is operated within the effective
range, remote control operation may be impossible if there are
any obstacles between the unit and the remote control.
< If the remote control unit is operated near other appliances which
generate infrared rays, or if other remote control devices using
infrared rays are used near the unit, it may operate incorrectly.
Conversely, the other appliances may operate incorrectly.
Battery Installation
1. Remove the battery compartment cover.
2. Insert two “AAA” (R03, UM-4) dry batteries. Make sure that the
batteries are inserted with their positive “+” and negative “_”
poles positioned correctly.
3. Close the cover.
Battery Replacement
If the distance required between the remote control unit and main
unit decreases, the batteries are exhausted. In this case replace the
batteries with new ones.
For more information about collection of batteries, please contact
your local municipality, your waste disposal service or the point of
sale where you purchased the items.
Precautions concerning batteries
< Be sure to insert the batteries with correct positive “+” and
negative “_” polarities.
< Use batteries of the same type. Never use different types of
batteries together.
< Rechargeable and non-rechargeable batteries can be used. Refer
to the precautions on their labels.
< When the remote control unit is not to be used for a long time
(more than a month), remove the batteries from the remote
control unit to prevent them from leaking.
< If the batteries leak, wipe away the liquid inside the battery
compartment and replace the batteries with new ones.
< Do not use any other batteries not specified. Do not mix new
batteries with old ones or use different types of batteries
together.
< Do not heat or disassemble batteries and never throw them in
the fire or water.
< Do not carry or store batteries with other metallic objects. The
battery may short circuit, leak or explode.
< Never recharge a battery unless it is a verified rechargeable type.
Remote Control UnitSpeaker Connection
Right Speaker Left Speaker

10
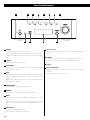
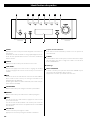
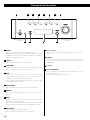
Parts Identification
A B C D E F G H
LJ KI
A
POWER
Press this switch to turn the unit on or off.
The standby indicator lights orange when the unit is in the
standby mode. When the unit is turned on, the indicator lights
blue.
B
SOURCE
Press this button to select a source.
C
TONE DIRECT
When this button is pressed, the tone control is bypassed. Press it
again to turn to normal.
D
INFO
While listening to the Internet Radio and Music Player, use this
button to change the information on the second line of the
display.
Please ignore “RDS” of the remote control unit. (RDS function
does not work on this unit.)
E
TUNING MODE
Use this button to change the tuning mode.
F
MEMORY
Use this button to store preset stations into memory.
G
MENU
While listening to the Internet Radio, press this button to open
menus.
While listening to iPod, use this button to go back to previous
menu. This button is equivalent to the MENU button on your
iPod.
H
VOLUME/SET
Turn this knob to adjust the volume.
Press this knob to adjust tones and balance.
I
Remote Sensor
When using the remote control unit, point it towards the remote
sensor.
J
PHONES
For private listening, insert the headphones plug into this jack,
and adjust the volume by turning the VOLUME/SET knob.
K
Display
L
MULTI JOG/ENTER
Turn this knob to tune in FM/AM stations or to select parameters
in menus.
Press this knob to enter your selection.

11
ENGLISH
o
p
m
n
F
D
H
G
L
a
b
c
d
e
f
g
h
i
j
k
l
C
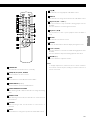
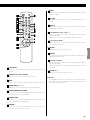
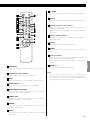
i
Stop (H)
Use this button to stop playback of PD-H600 or iPod.
j
SHUFFLE
Use this button to change the random mode of PD-H600 or iPod.
k
Skip/Scroll (.°//‡)
Use these buttons to skip tracks/files during playback of the
PD-H600.
Use these buttons to scroll through menu items.
l
Play/Pause (y/J)
Use this button to start or pause playback of the PD-H600 or
iPod.
m
MUTING
Use this button to mute the sound.
n
DIMMER
You can use this button to dim the display among three levels.
o
Search (m/,)
Use these buttons to search for a track/file during playback of the
PD-H600.
Use these buttons to skip tracks during playback of the iPod.
p
VOLUME (+/–)
Use these buttons to adjust the volume.
Note:
To simplify explanations, instructions refer to names of buttons
and controls on the front panel, making no mention of the use of
remote control unit.
a
STANDBY/ON
Press this button to turn the unit on or standby.
b
TUNER, CD, iPod, AUX , PHONO
Use these buttons to select a source.
c
BAND
Use this button to select FM, AM or Internet Radio.
d
TUNING/PRESET (‡/°)
Use these buttons to tune in FM/AM stations.
e
TUNING MODE/AUTO TUNING
While listening to FM or AM, use this button to change the tuning
mode.
f
MEMORY SCAN
While listening to FM or AM, use this button to check the list of
preset stations.
g
FM MODE
While listening to FM, use this button to select stereo or
monaural.
h
REPEAT
Use this button to change the repeat mode of PD-H600 or iPod.

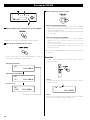
12
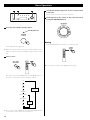
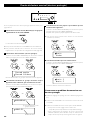
3
Start playback of the component, or tune in a radio station
on this unit.
Please read the instructions of each component.
4
Gradually turn up the volume to the required level by
turning the VOLUME/SET knob.
Muting
Press the MUTING button to mute the sound temporarily.
< To restore the sound, press the MUTING button again.
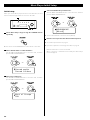
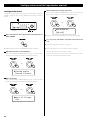
Basic Operation
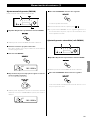
1
Press the power switch to turn the unit on.
The standby indicator lights blue.
< When the system control functions are activated, always set this
switch on, and turn the unit on/standby using the remote control
unit.
2
Select a source.
Each time you press the SOURCE button or the BAND button on
the remote control unit, the source changes as follows:
CD
iPod
AUX
PHONO
Internet Radio
Music Player
FM
AM
< You can also use the TUNER, CD, iPod, AUX and PHONO buttons
on the remote control unit to select each source.
421
standby indicator
SOURCE
button
BAND
button

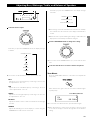
13
ENGLISH
1
Select the item to adjust.
Each time you press the VOLUME/SET knob, the display changes
as follows:
VOLUME (volume)
BASS
MID
TREBLE
BALANCE
DIMMER
< You can also use the SET button on the remote cntrol unit.
BASS
Adjusts the level of low frequency sound range. The level can
be adjusted from –12 to +12.
MID
Adjusts the level of middle frequency sound range. The level
can be adjusted from –12 to +12.
TREBLE
Adjusts the level of high frequency sound range. The level can
be adjusted from –12 to +12.
BALANCE
Adjusts the balance of the volume level between left and right
speakers.
DIMMER
Adjusts the dimming level of the display in 3 levels using the
DIMMER button of the remote control unit.
Each time you press the DIMMER button, the display changes
as follows:
NORMAL (Normal)
DIMMER (Dimmed)
LIGHT OFF (Display off)
< This setting is not memorized when the unit turns into standby.
The next time the unit is turned on, the display is illuminated as
normal.
< When the unit is operated during the setting is “LIGHT OFF“, the
display turns normal briefly and will turn off again.
2
Turn the VOLUME/SET knob to change the setting.
< You can also use the VOLUME buttons (+/–) on the remote cntrol
unit.
3
Leave the unit idle for 3 seconds to exit the setup mode.
Tone Direct
Press the TONE DIRECT button to cancel the tone adjustments
temporarily.
When this function gets active, the Tone Direct indicator lights
up temporarily.
< To cancel the Tone Direct function, press the button again.
< When this function is active and no operation is done for about
5 seconds, the display is turned off regardless of the dimmer
setting.
Tone Direct indicator
FM
CH01 98.1MHz
Adjusting Bass, Midrange, Treble, and Balance of Speakers
21

14
Basic operations
To suspend playback temporarily (pause mode)
During playback, press the play/pause button (G/J). Playback
stops at the current position.
< To resume playback, press the play/pause button (G/J) again.
To skip to the next or a previous track
During playback, press the search buttons (m/,) repeatedly
until the desired track is found.
< When the search button (m) is pressed during playback, the
current track will be played from the beginning. If you want to
play the previous tracks, press the search button (m) twice or
more.
To search for a part of a track
During playback, hold down the search button (m or ,) and
release it when the part you want to listen to is found.
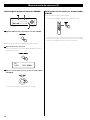
1
Select iPod by pressing the SOURCE button repeatedly.
2
Insert the iPod into the dock.
The iPod automatically turns on and starts playback from the
iPod’s music list.
< When the iPod is inserted while a source other than iPod is
selected, the iPod will turn on and enter the pause mode.
< Make sure to use an appropriate dock adapter (see “Getting
Started” on the owner’s manual of the iPod dock).
< The iPod is recharged when it is plugged into the dock and the
AG-H600 series receiver is on. While the unit is on standby, the
iPod is not recharged because the unit’s power consumption is
minimised to meet the regulation of IEA.
< When headphones are plugged into the iPod, sound comes
from both the speakers of the AG-H600 series receiver and the
headphones.
Listening to iPod

15
ENGLISH
Shuffle playback
Each time the SHUFFLE button is pressed, the shuffle mode
changes as follows:
Song (shuffle songs)
Album (shuffle albums)
Shuffle Off
< When you select “Song“, the iPod shuffles songs within the list
you choose to play.
< When you select “Album“, the iPod plays all the songs on an
album in order, and then randomly selects another album in the
list and plays through it in order.
< During playback, the Shuffle icon (
) appears in the iPod’s
display.
Menu operations
To go back to the previous menu
Press the MENU button.
< This button is equivalent to the MENU button on your iPod.
To select the menu item
Press the scroll buttons (.°//‡) to scroll to the menu
item you want, and then press the ENTER button.
< On the main unit, turn the MULTI JOG/ENTER knob to scroll to the
menu item you want, and then press the MULTI JOG/ENTER knob.
Repeat playback
Each time the REPEAT button is pressed, the repeat mode
changes as follows:
One (repeat one song)
All (repeat all the songs in the list)
Repeat Off
< When you select the “One”, the Repeat One icon (
) appears in
the iPod’s display.
< When you select the “All”, the Repeat icon ( ) appears in the
iPod’s display.
Docking an iPod to this system
iPod video output
Make the following settings on your iPod’s menu to output
video to a TV via the dock.
In the [Video] menu, select [Video Settings]. Set [TV OUT] to
[On] or [Ask].
If you have set [TV OUT] to [Ask], your iPod prompts you each
time you play a video to specify whether to output it to a TV.
Note
< If you output video to a TV from your iPod, the video is not
displayed on the iPod’s screen.
< iPod touch does not contain this menu. You will have to
specify whether to a output video to a TV each time you play
it.
Using the alarm on your iPod touch
If you specify [Slide to power off] on your iPod touch, you
cannot use the alarm even if the iPod touch is docked to this
system. To use the alarm on your iPod touch, do not select
[Slide to power off]. (The screen can be turned off without
any problem.)
< When video is displayed on your iPod touch’s screen, you
cannot use the alarm even if the iPod touch is docked to this
system. To use the alarm on your iPod touch, select any item
other than video.

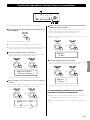
16
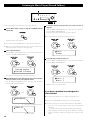
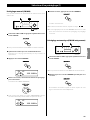
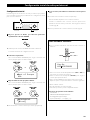
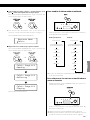
3
Select the station you want to listen to.
Manual tuning mode
Turn the MULTI JOG/ENTER knob (or press the TUNING/PRESET
‡/° button on the remote control unit) until the station you
want to listen to is found.
The frequency changes by a fixed step (FM: 50 kHz steps, AM: 9
kHz steps).
Auto tuning mode
Turn the MULTI JOG/ENTER knob (or press the TUNING/PRESET
‡/° button on the remote control unit) to begin auto tuning.
When a station is found, the unit tunes in the station
automatically. Repeat this step until the station you want to
listen to is found.
< Press the TUNING MODE button to stop the auto tuning.
FM Mode
Pressing the FM MODE button alternates between Stereo mode
and Mono mode.
Stereo:
FM stereo broadcasts are received in stereo and the stereo
indicator is displayed.
Mono:
Select this mode when the signal is weak. Reception will be
forced monaural, reducing unwanted noise.
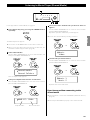
Listening to FM/AM
1
Select FM or AM by pressing the SOURCE button
repeatedly.
< You can also use the BAND button on the remote control unit.
2
Select the desired tuning mode.
Each time the TUNING MODE button is pressed, the tuning mode
changes as follows:
Manual tune
Auto tune
Preset tune
1
3
2
FM ¤S
<
>
108.00MHz
FM
<
A
>
108.00MHz
FM
<
>
108.00MHz
FM
CH01 108.00MHz

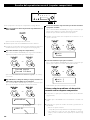
17
ENGLISH
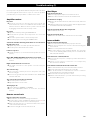
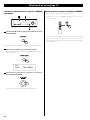
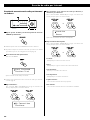
5
Within 4 seconds, press the MEMORY button.
The station is stored.
< To store more stations, repeat steps
2
to
5
.
< If you do not press the MEMORY button within 4 seconds after
selecting the preset number, presetting will be cancelled.
Presetting Automatically
1
Select FM or AM by pressing the SOURCE button
repeatedly.
< You can also use the BAND button on the remote control unit.
2
Press and hold the MEMORY button for more than 3
seconds.
Up to 30 of the best received stations in your area will be stored
automatically.
Preset Tuning (1)
1 2
Manual Preset (FM/AM)
You can store up to 30 FM and 30 AM stations.
1
Select AM or FM by pressing the SOURCE button
repeatedly.
< You can also use the BAND button on the remote control unit.
2
Tune in the station you want to store.
See the previous page for the procedure of tuning.
3
Press the MEMORY button.
4
Within 4 seconds, select the preset number for this
station.
Turn the MULTI JOG/ENTER knob.
< You can also use the TUNING/PRESET buttons (‡/°) on the
remote control unit to scroll through menu items.
1
2 4
3 5
FM ¤S
CH01 108.00MHz
FM ¤S
CH12 108.00MHz

18
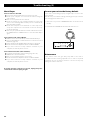
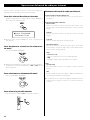
Checking preset stations (FM/AM)
You can see the list of preset stations.
Press the MEMORY SCAN button while listening to FM or AM.
Preset number and its frequency is displayed in turn. The unit
turns to the preset tuning mode after all the preset stations have
been displayed.
How to select preset stations (FM/AM)
1
Select FM or AM by pressing the SOURCE button
repeatedly.
< You can also use the BAND button on the remote control unit.
2
Select the preset tuning mode.
Press the TUNING MODE button repeatedly until “CH” is
displayed.
3
Select a preset channel by turning the MULTI JOG/ENTER
knob.
The selected preset channel is tuned in.
1
3
2
FM
CH01 108.00MHz
Preset Tuning (2)

19
ENGLISH
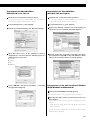
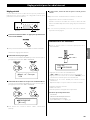
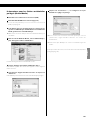
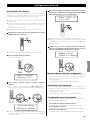
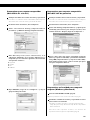
4
Enter the correct password for the network if required.
< See “How to input characters” below.
Now the unit starts to connect to the Internet.
When connection is established successfully, the Internet radio
menu is displayed. See page 20 to select a station.
< If you have a problem connecting to the Internet, see page 23.
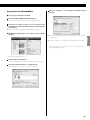
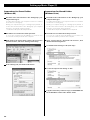
Internet Radio Initial Setup
Initial setup
When you use the Internet radio function for the first time, the unit
starts an initial setup procedure to connect to the Internet.
1
Select Internet Radio by pressing the SOURCE button
repeatedly.
< You can also use the BAND button on the remote control unit.
Initial setup wizard starts.
2
Select your country/area.
Turn the MULTI JOG/ENTER knob to select the item, and then
press the MULTI JOG/ENTER knob.
3
Select a network name you want to use.
Turn the MULTI JOG/ENTER knob to select the item, and then
press the MULTI JOG/ENTER knob.
< To use a wired Internet connection, select “[Wired]”.
Most of Europe
USA
1
2
3
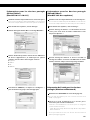
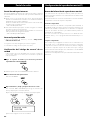
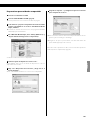
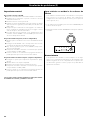
How to input characters
< You can input characters only from the remote control unit.
1. Press the skip/scroll buttons (.°//‡) to select a set
of characters.
2. Press the search buttons (m/,) to select the character
you want to input.
3. Press the ENTER button to input the selected letter.
Repeat steps 1 to 3 to input next characters.
<: Deletes the last character.
E: Enters your input.
C: Cancels the operation and goes back to the previous screen.
Characters you can input
0123456789
ABCDEFGHIJKLMNOPQRSTUVWXYZ
abcdefghijklmnopqrstuvwxyz
(space)!”#$%&’()*+,-./:;<=>?@[\]^_`{|}~
Key:Ge
0123456789
<
EC
005AD904JM2
[Wired]
T
T
/Ò
ڰ/Ƈ
ENTER

20
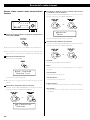
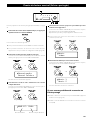
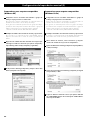
4
Select “Stations” for Internet Radio stations, or “Podcasts”
for Podcasts.
Turn the MULTI JOG/ENTER knob to select the item, and then
press the MULTI JOG/ENTER knob.
A list of search methods appears.
5
Select a search method.
Turn the MULTI JOG/ENTER knob to select the item, and then
press the MULTI JOG/ENTER knob.
Location:
Search by the location of the broadcaster.
Genre:
Search by the genre of music played on the station/Podcast.
Search stations:
Search by the station’s name.
Search podcasts:
Search by the Podcast’s name.
Popular stations:
Select from a list of popular stations.
New stations:
Select from a list of recently added stations.
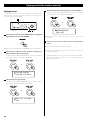
Listening to an Internet Radio station/a Podcast
1 2
3
4
5 6 7
1
Select Internet Radio by pressing the SOURCE button
repeatedly.
< You can also use the BAND button on the remote control unit.
< When you use the Internet Radio function for the first time, the
unit starts an initial setup procedure. (page 19)
2
Open the Internet Radio menu.
Press the MENU button.
Last listened
Station list
The Internet Radio menu appears.
< See page 22 for the details of the Internet Radio menu.
3
Select “Station list”.
Turn the MULTI JOG/ENTER knob to select the item, and then
press the MULTI JOG/ENTER knob.
Location
Genre
Listening to Internet Radio
T
T
T
My Favourites
Stations
La page est en cours de chargement...
La page est en cours de chargement...
La page est en cours de chargement...
La page est en cours de chargement...
La page est en cours de chargement...
La page est en cours de chargement...
La page est en cours de chargement...
La page est en cours de chargement...
La page est en cours de chargement...
La page est en cours de chargement...
La page est en cours de chargement...
La page est en cours de chargement...
La page est en cours de chargement...
La page est en cours de chargement...
La page est en cours de chargement...
La page est en cours de chargement...
La page est en cours de chargement...
La page est en cours de chargement...
La page est en cours de chargement...
La page est en cours de chargement...
La page est en cours de chargement...
La page est en cours de chargement...
La page est en cours de chargement...
La page est en cours de chargement...
La page est en cours de chargement...
La page est en cours de chargement...
La page est en cours de chargement...
La page est en cours de chargement...
La page est en cours de chargement...
La page est en cours de chargement...
La page est en cours de chargement...
La page est en cours de chargement...
La page est en cours de chargement...
La page est en cours de chargement...
La page est en cours de chargement...
La page est en cours de chargement...
La page est en cours de chargement...
La page est en cours de chargement...
La page est en cours de chargement...
La page est en cours de chargement...
La page est en cours de chargement...
La page est en cours de chargement...
La page est en cours de chargement...
La page est en cours de chargement...
La page est en cours de chargement...
La page est en cours de chargement...
La page est en cours de chargement...
La page est en cours de chargement...
La page est en cours de chargement...
La page est en cours de chargement...
La page est en cours de chargement...
La page est en cours de chargement...
La page est en cours de chargement...
La page est en cours de chargement...
La page est en cours de chargement...
La page est en cours de chargement...
La page est en cours de chargement...
La page est en cours de chargement...
La page est en cours de chargement...
La page est en cours de chargement...
La page est en cours de chargement...
La page est en cours de chargement...
La page est en cours de chargement...
La page est en cours de chargement...
La page est en cours de chargement...
La page est en cours de chargement...
La page est en cours de chargement...
La page est en cours de chargement...
La page est en cours de chargement...
La page est en cours de chargement...
La page est en cours de chargement...
La page est en cours de chargement...
La page est en cours de chargement...
La page est en cours de chargement...
La page est en cours de chargement...
La page est en cours de chargement...
-
 1
1
-
 2
2
-
 3
3
-
 4
4
-
 5
5
-
 6
6
-
 7
7
-
 8
8
-
 9
9
-
 10
10
-
 11
11
-
 12
12
-
 13
13
-
 14
14
-
 15
15
-
 16
16
-
 17
17
-
 18
18
-
 19
19
-
 20
20
-
 21
21
-
 22
22
-
 23
23
-
 24
24
-
 25
25
-
 26
26
-
 27
27
-
 28
28
-
 29
29
-
 30
30
-
 31
31
-
 32
32
-
 33
33
-
 34
34
-
 35
35
-
 36
36
-
 37
37
-
 38
38
-
 39
39
-
 40
40
-
 41
41
-
 42
42
-
 43
43
-
 44
44
-
 45
45
-
 46
46
-
 47
47
-
 48
48
-
 49
49
-
 50
50
-
 51
51
-
 52
52
-
 53
53
-
 54
54
-
 55
55
-
 56
56
-
 57
57
-
 58
58
-
 59
59
-
 60
60
-
 61
61
-
 62
62
-
 63
63
-
 64
64
-
 65
65
-
 66
66
-
 67
67
-
 68
68
-
 69
69
-
 70
70
-
 71
71
-
 72
72
-
 73
73
-
 74
74
-
 75
75
-
 76
76
-
 77
77
-
 78
78
-
 79
79
-
 80
80
-
 81
81
-
 82
82
-
 83
83
-
 84
84
-
 85
85
-
 86
86
-
 87
87
-
 88
88
-
 89
89
-
 90
90
-
 91
91
-
 92
92
-
 93
93
-
 94
94
-
 95
95
-
 96
96


TEAC AG-H600NT Le manuel du propriétaire
- Catégorie
- Radios
- Taper
- Le manuel du propriétaire
dans d''autres langues
- English: TEAC AG-H600NT Owner's manual
- español: TEAC AG-H600NT El manual del propietario
Documents connexes
Autres documents
-
Sangean WFT-1 Manuel utilisateur
-
-
Yamaha RX V3900 - AV Network Receiver Manuel utilisateur
-
ONKYO HT-R758 Le manuel du propriétaire
-
-
Yamaha RX-Z7 Le manuel du propriétaire
-
Yamaha RX V661 - AV Receiver Manuel utilisateur
-
Sony Wrr-862B Manuel utilisateur