Master Forge MFJ576DNC Le manuel du propriétaire
- Catégorie
- Barbecues
- Taper
- Le manuel du propriétaire


2
Lowes.com/masterforge
TABLE OF CONTENTS
Package Contents ............................................................................................................... 3
Hardware Contents.............................................................................................................. 4
Preparation .......................................................................................................................... 4
Safety Information ............................................................................................................... 5
Assembly Instructions.......................................................................................................... 6
Operating Instructions ....................................................................................................... 14
Care and Maintenance ...................................................................................................... 16
Warranty ............................................................................................................................ 16
Replacement Parts List ..................................................................................................... 17
Downloaded from www.Manualslib.com manuals search engine

3
Lowes.com/masterforge
3
A
B
C
D
H
I
G
J
L
M
N
O
P
Q
R
S
T
U
V
W
F
E
K
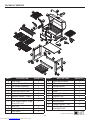
PART DESCRIPTION QUANTITY
A Side Shelf 2
B
Lid and Firebox Assembly 1
C Lid Handle Assembly 1
D Smoke Stack Assembly 1
E Charcoal Access Door 1
F Crank Handle 1
G Damper Handle – Right 1
H Damper 2
I Side Shelf Support – Right
Rear/Left Front
2
J Ash Tray 1
K Ash Tray Handle 1
L Cart Brace 2
PART DESCRIPTION QUANTITY
M Right Leg Assembly 1
N
Caster 2
O Storage Basket 1
P Axle 1
Q Wheel 2
R Left Leg Assembly 1
S Charcoal Tray 1
TGrate 3
U Warming Rack 1
V Damper Handle – Left 1
W Side Shelf Support – Left
Rear/Right Front
2
PACKAGE CONTENTS
Downloaded from www.Manualslib.com manuals search engine

4
Lowes.com/masterforge
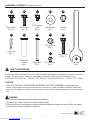
M6x12 Bolt
Qty. 27
M6x20 Bolt
Qty. 14
M5 Shoulder
Bolt
Qty. 8
M8 Washer
Qty. 2
M8 Nut
Qty. 2
Wheel Axle
Sleeve
Qty. 2
Hinge Bolt
Qty. 2
M6 Lock Nut
Qty. 3
M5 Lock Nut
Qty. 8
M6x30 Bolt
Qty. 2
AA
BB CC DD EE
GG HH II
JJ
LL
Wrench
Qty. 1
Cotter Pin
Qty. 7
FF
KK
Please read and understand this entire manual before attempting to assemble, operate or install the
product. If you have any questions regarding the product, please call customer service at:
1-800-963-021
1, 8:00 a.m. – 6:00 p.m. EST, Monday – Thursday, 8:00 a.m. – 5:00 p.m. EST, Friday.
CAUTION
7+,681,7,6+($9<7:23(23/(5(48,5(')256$)($66(0%/<6RPHSDUWVPD\
contain sharp edges. Wear protective gloves if necessary. Read and follow all safety statements,
warnings, assembly instructions, and use and care instructions before attempting to assemble and
use.
WARNING
.HHSD¿UHH[WLQJXLVKHUQHDUWKLVSURGXFWDWDOOWLPHV
7KLVJULOOLVIRURXWGRRUXVHRQO\LQZHOOYHQWLODWHGDUHDV
7KHXVHRIDOFRKROSUHVFULSWLRQRUQRQSUHVFULSWLRQGUXJVPD\LPSDLUWKHXVHU¶VDELOLW\WRSURSHUO\
assemble and safely operate this appliance.
SAFETY INFORMATION
HARDWARE CONTENTS (shown actual size)
Downloaded from www.Manualslib.com manuals search engine

5
Lowes.com/masterforge
PREPARATION
8VHFDXWLRQZKHQOLIWLQJDQGPRYLQJWKHXQLWWRDYRLGEDFNVWUDLQRUEDFNLQMXU\'RQRWPRYHWKH
unit while it is in use.
DO NOTRSHUDWHWKHXQLWQHDURUXQGHUÀDPPDEOHRUFRPEXVWLEOHPDWHULDOVVXFKDVGHFNVSRUFKHV
or carports. A minimum clearance of 36 in. is recommended. DO NOT operate the unit under
overhead construction.
$PLQLPXPFOHDUDQFHWRFRPEXVWLEOHFRQVWUXFWLRQLVLQIURPVLGHVDQGEDFN
DO NOT use this appliance as a heater.
2SHUDWHWKHXQLWRQDVWDEOHOHYHOQRQÀDPPDEOHVXUIDFHVXFKDVDVSKDOWFRQFUHWHRUVROLG
ground. DO NOTRSHUDWHWKHXQLWRQÀDPPDEOHPDWHULDOVXFKDVFDUSHWRUZRRGGHFN
8VHFDXWLRQZKHQDVVHPEOLQJDQGRSHUDWLQJWKLVXQLWWRDYRLGFXWVDQGVFUDSHVIURPHGJHV
DO NOT use this product in a manner other than its intended purpose. It is NOT intended for
commercial use. It is not intended to be installed or used in or on a recreational vehicle and/or boats.
DO NOT store this unit near gasoline or other combustible liquids or where other combustible
vapors may be present.
DO NOT store or operate this product in an area accessible to children or pets. Store this unit in a
dry protected location.
DO NOT leave the unit unattended while in use.
DO NOT leave hot ashes unattended until the grill cools completely.
DO NOT move the unit while in use or while ashes are still hot. Allow the unit to cool completely
before moving or storing.
NEVERXVHJDVROLQHRURWKHUKLJKO\YRODWLOHÀXLGVDVDVWDUWHU
$OZD\VFRRN\RXUIRRGRQWKHJUDWHDIWHUWKHÀDPHLVEXUQHGRXW
'LVSRVHRIFROGDVKHVE\ZUDSSLQJWKHPLQKHDY\GXW\DOXPLQXPIRLODQGSODFLQJLQD
noncombustible container. Make sure that there are no other combustible materials in or near the
container.
,I\RXPXVWGLVSRVHRIDVKHVLQOHVVWLPHWKDQLWWDNHVIRUWKHDVKHVWRFRPSOHWHO\FRROGRZQWKHQ
remove the ashes from the unit, keeping them in the heavy-duty foil, and soak them completely with
water before disposing of them in a noncombustible container.
$OORZWKHXQLWWRFRROFRPSOHWHO\EHIRUHFRQGXFWLQJDQ\URXWLQHFOHDQLQJRUPDLQWHQDQFH
CALIFORNIA PROPOSITION 65
)XHOVXVHGLQJDVRURLO¿UHGDSSOLDQFHVDQGWKHSURGXFWVRIFRPEXVWLRQRIVXFKIXHOVFRQWDLQ
chemicals known to the state of California to cause cancer, birth defects or other reproductive
harm. This product contains chemicals, including lead and lead compounds, known to the state of
California to cause cancer, birth defects or other reproductive harm. Wash hands after handling.
SAFETY INFORMATION
Before beginning assembly of product, make sure all parts are present. Compare parts with package
contents list and hardware contents list. If any part is missing or damaged, do not attempt to
assemble the product.
Estimated Assembly Time: 50 minutes with two people
7RROV5HTXLUHGIRU$VVHPEO\QRWLQFOXGHG3KLOOLSVVFUHZGULYHUDGMXVWDEOHZUHQFK
Downloaded from www.Manualslib.com manuals search engine

6
ASSEMBLY INSTRUCTIONS
Lowes.com/masterforge
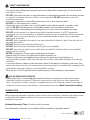
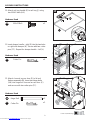
3. Attach two cart braces (L) to left leg assembly (R)
using two M6x12 bolts (AA) on each side.
2. Attach two casters (N) to right leg assembly (M)
and secure with wrench (KK).
Hardware Used
Hardware Used
M8 Washer
M8 Nut
x 2
x 2
DD
EE
1. Insert axle (P) into left leg assembly (R).
Attach
one wheel (Q) to each side of axle (P) using one
wheel axle sleeve (GG), one M8 washer (DD),
and one M8 nut (EE).
1
1
2
R
AA
L
3
1
1
2
M
KK
N
2
2
2
1
1
R
P
Q
GG
DD
EE
1
Hardware Used
M6x12 Bolt
x 4
AA
Wheel axle
sleeve
Wrench
(not to scale)
x 2
x 1
GG
KK
Downloaded from www.Manualslib.com manuals search engine

7
ASSEMBLY INSTRUCTIONS
Lowes.com/masterforge
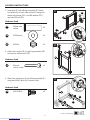
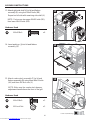
6. With the help of a second person, set lid and
¿UHER[DVVHPEO\%RQWRSRIOHIWOHJ
assembly (R) and right leg assembly (M).
5. Attach storage basket (O) to cart braces (L).
NOTE: Make sure four hooks on storage
basket (O) are fully inserted into holes on cart
braces (L).
4. Attach two cart braces (L) to right leg assembly (M)
using two M6x12 bolts (AA) on each side.
R
B
M
6
O
L
5
1
1
2
M
AA
L
4
Hardware Used
M6x12 Bolt
x 4
AA
Downloaded from www.Manualslib.com manuals search engine

8
ASSEMBLY INSTRUCTIONS
Lowes.com/masterforge
1
1
2
AA
9
A
W
I
1
2
CC
JJ
8
B
H
BB
7
R
B
M
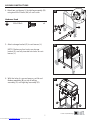
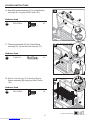
6HFXUHOLGDQG¿UHER[DVVHPEO\%RQWRSRI
left leg assembly (R) and right leg assembly (M)
using six M6x12 bolts (BB).
$WWDFKGDPSHU+WRLQVLGHRIOLGDQG¿UHER[
assembly (B) using four M5 shoulder bolts (CC)
and four M5 lock nuts (JJ). Repeat for remaining
damper (H).
NOTE: For clarity, illustration is shown with front
RIOLGDQG¿UHER[DVVHPEO\%UHPRYHG
9. With shelf upside down, attach side shelf
support – left rear/right front (W) and side shelf
support – left front/right rear (I) to side shelf
(A) using four M6x12 bolts (AA) on each side.
Repeat for remaining shelf (A).
Hardware Used
Hardware Used
Hardware Used
M6x20 Bolt
M5 Shoulder Bolt
M6x12 Bolt
M5 Lock Nut
x 6
x 8
x 8
x 8
BB
CC
AA
JJ
Downloaded from www.Manualslib.com manuals search engine

9
ASSEMBLY INSTRUCTIONS
Lowes.com/masterforge
1
2
3
HH
FF
12
E
B
1
2
2
FF
G
G
H
11
1
2
AA
10
J
K
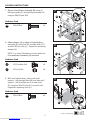
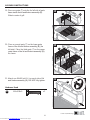
10. Attach ash tray handle (K) to ash tray (J) using
two M6x12 bolts (AA).
11. Insert damper handle – right (G) into the two holes
on right side damper (H). Secure with two cotter
pins (FF). Repeat for damper handle – left (V).
12. Attach charcoal access door (E) to lid and
¿UHER[DVVHPEO\%,QVHUWWZRKLQJHEROWV
(HH) into hinges on charcoal access door (E)
and secure with two cotter pins (FF).
Hardware Used
Hardware Used
Hardware Used
M6x12 Bolt
Cotter Pin
Cotter Pin
Hinge Bolt
x 2
x 4
x 2
x 2
AA
FF
FF
HH
Downloaded from www.Manualslib.com manuals search engine

10
ASSEMBLY INSTRUCTIONS
Lowes.com/masterforge
1
2
II
AA
15
B
D
14
B
J
1
2
BB
13
B
A
$WWDFKULJKWVLGHVKHOI$WROLGDQG¿UHER[
assembly (B) using four M6x20 bolts (BB).
Repeat on left side with remaining side shelf (A).
NOTE: First secure two upper M6x20 bolts (BB),
then lower M6x20 bolts (BB).
,QVHUWDVKWUD\-LQWROLGDQG¿UHER[
assembly (B).
15. Attach smoke stack assembly (D) to lid and
¿UHER[DVVHPEO\%XVLQJWKUHH0[EROWV
(AA) and three M6 lock nuts (II).
NOTE: Make sure the smoke stack damper
DGMXVWPHQWKDQGOHIDFHVWKHIURQWRIWKHJULOO
Hardware Used
M6x12 Bolt
M6 Lock Nut
x 3
x 3
AA
II
Hardware Used
M6x20 Bolt
x 8
BB
Downloaded from www.Manualslib.com manuals search engine

11
ASSEMBLY INSTRUCTIONS
Lowes.com/masterforge
1
2
18
B
S
AA
1
2
3
17
F
FF
B
1
2
AA
16
B
C
$WWDFKOLGKDQGOHDVVHPEO\&WROLGDQG¿UHER[
assembly (B) using two M6x12 bolts (AA).
7KUHDGFUDQNKDQGOH)LQWROLGDQG¿UHER[
assembly (B). Secure with one cotter pin (FF).
18. Attach charcoal tray (S) to inside of lid and
¿UHER[DVVHPEO\%XVLQJIRXU0[EROWV
(AA).
Hardware Used
Hardware Used
Hardware Used
M6x12 Bolt
M6x12 Bolt
Cotter Pin
x 2
x 4
x 1
AA
AA
FF
Downloaded from www.Manualslib.com manuals search engine

12
ASSEMBLY INSTRUCTIONS
Lowes.com/masterforge
1
1
2
21
B
LL
1
2
20
T
B
1
2
19
T
B
19. Place one grate (T) onto the far left side of grate
IUDPHLQVLGHWKHOLGDQG¿UHER[DVVHPEO\%
Slide to center of grill.
20. Place a second grate (T) on the lower grate
IUDPHRIWKHOLGDQG¿UHER[DVVHPEO\%IDU
left side). Place the third grate (T) on the upper
JUDWHIUDPHRIWKHOLGDQG¿UHER[DVVHPEO\%
as shown.
21. Attach one M6x30 bolt (LL) on each side of lid
DQG¿UHER[DVVHPEO\%'2127IXOO\WLJKWHQ
Hardware Used
M6x30 Bolt
x 2
LL
Downloaded from www.Manualslib.com manuals search engine

13
ASSEMBLY INSTRUCTIONS
Lowes.com/masterforge
23
LL
B
22
LL
B
U
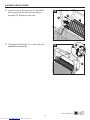
22. Insert one end of warming rack (U) onto M6x30
EROW//DQGLQWRWKHKROHRQOLGDQG¿UHER[
assembly (B). Repeat for other side.
23. Fully tighten M6x30 bolts (LL) on each side of lid
DQG¿UHER[DVVHPEO\%
Downloaded from www.Manualslib.com manuals search engine

14
Lowes.com/masterforge
OPERATING INSTRUCTIONS
DANGER
CARBON MONOXIDE HAZARD. Burning charcoal inside can kill you. It gives off carbon monoxide,
which has no odor. NEVER burn charcoal inside homes, vehicles or tents.
7KLVJULOOKDVDQDGMXVWDEOHFKDUFRDOWUD\%\WXUQLQJWKHFUDQNKDQGOHWKHFKDUFRDOWUD\FDQEHUDLVHG
or lowered to desired height. This allows for different heat settings depending on the food you are
cooking and the temperature at which you want to cook. It also allows easy cleaning of the interior of
WKH¿UHER[DIWHUWKHXQLWKDVFRROHGGRZQFRPSOHWHO\,WLVQRWUHFRPPHQGHGWRUDLVHDIXOO\ORDGHG
charcoal tray higher than the middle height setting.
NOTE: The grate is coated with porcelain which is a fragile coating. Handle with care to avoid
damage. DO NOT cool the grate in cold water while it is still hot or the coating may crack. Let the
grate cool off by itself.
Charcoal Lighting Instructions
2SHQJULOOWRS
5HPRYHFRRNLQJJUDWHV
$GMXVWFKDUFRDOWUD\WRWKHFHQWHUSRVLWLRQ
3ODFHRQHHYHQURZRIFKDUFRDOEULTXHWWHVLQWKHFKDUFRDOWUD\0DNHVXUHWKDWFKDUFRDOGRHVQRWJR
above the top of the tray.
/LJKWEULTXHWWHV
0RYHFKDUFRDOWUD\WRWKHERWWRPSRVLWLRQ
:LWKWKHWRSRSHQDOORZWKHEULTXHWWHVWRIXOO\LJQLWHWRWKHSRLQWZKHUHWKHUHLVQRIXUWKHUÀDPH
2QFHWKHEULTXHWWHVDUHOLWSXWWKHJUDWHVEDFNLQWKHJULOO
$GMXVWFKDUFRDOWUD\DVUHTXLUHGWRDFKLHYHWKHSURSHUWHPSHUDWXUH
7KHWZRVLGHDLUYHQWVRQWKHOLGVKRXOGEHNHSWRSHQGXULQJFRRNLQJWRDOORZDLUÀRZ
Adjusting Temperature
)RUPD[LPXPKHDWWHPSHUDWXUHRSHQERWKVLGHDLUYHQWVORFDWHGRQWKHVLGHRIWKHPDLQERG\DV
required. To reduce the heat/temperature, close the air vents on the side of the main body.
NOTE: The temperature should not go above 500ºF. If the temperature goes above 500ºF, you
should reduce the quantity of briquettes that you have placed in the charcoal tray. The proper cooking
temperature should not exceed 500ºF.
Seasoning Unit
%HIRUH\RXU¿UVWFRRNLQJ\RXVKRXOGVHDVRQWKHXQLWWRHQKDQFHWKHFRRNLQJDQGWRSURYLGHEHWWHU
RYHUDOOGXUDELOLW\)DLOXUHWRSURSHUO\IROORZWKHVHVWHSVPD\GDPDJHWKH¿QLVKDQGRULPSDUW
PHWDOOLFÀDYRUVWRIRRGV
2. Remove all retail hangtags that are on the unit, making sure NOT to remove safety markings from
the unit.
3. Place about 60 briquettes in the charcoal pan. Do not place any briquettes against walls of the pan.
4. Coat interior surfaces with vegetable cooking oil.
5. Light briquettes and set ash pan at medium height by cranking the crank handle.
6. Sustain burn for about two hours with lid closed and all dampers to 1/4 of the way open. Allow the
unit to cool down properly.
7. Once this is completed, the unit is ready for use.
Downloaded from www.Manualslib.com manuals search engine

15
Lowes.com/masterforge
OPERATING INSTRUCTIONS
Rust can appear on the inside of your grill. Maintaining a light coating of vegetable oil on interior
surfaces will aid in the protection of your grill. Exterior surfaces of the grill may need occasional touch
up. We recommend the use of commercially available black high temperature spray paint.
NEVER PAINT THE INTERIOR OF THE UNIT!
Operating The Front Door, Dampers, And Smoke Stack
WARNING: These metal parts could be very hot while grilling. Always operate these parts while
wearing a heat-resistant glove.
7RRSHQWKHGRRUOLIWWKHGRRUVOLJKW\DQGSXOO
7RFORVHWKHGRRUOLIWWKHGRRUVOLJKWO\DQGSXVKWKHGRRUWRWKHGRRUIUDPHFDWFK
7RDGMXVWWKHVLGHGDPSHUVSXOORUSXVKGDPSHUKDQGOHXQWLOGHVLUHGDLUÀRZLVDFKLHYHG
7RDGMXVWWKHVPRNHVWDFNPRYHWKHVPRNHVWDFNDGMXVWPHQWKDQGOHDZD\IURPWKHVPRNHVWDFN
DQGUDLVHRUORZHUWKHDGMXVWPHQWKDQGOHXQWLOWKHGHVLUHGDLUÀRZLVDFKLHYHG
Grilling
Charcoal is recommended, however wood or a combination of both may be used as the fuel source
IRUJULOOLQJLIWKHIXHOVRXUFHLVSODFHGDQGLJQLWHGRQWKHFKDUFRDOSDQ'RQRWEXLOGWRRODUJHD¿UH
:HUHFRPPHQGVWDUWLQJD¿UHZLWKQRPRUHWKDQOEVRIFKDUFRDODSSUR[LPDWHO\EULTXHWWHVDQG
DGGLQJPRUHDVQHHGHGGXULQJFRRNLQJ$IWHUDOORZLQJWKH¿UHWREXUQGRZQSODFHWKHFRRNLQJJUDWHV
in the unit. Failure to read and follow instructions for lighting charcoal may result in serious personal
LQMXU\DQGRUSURSHUW\GDPDJH
WARNING
0RVWVXUIDFHVRQWKLVXQLWDUHKRWZKHQLQXVH8VHH[WUHPHFDXWLRQ.HHSRWKHUVDZD\IURPXQLW
$OZD\VZHDUSURWHFWLYHFORWKLQJWRSUHYHQWLQMXU\
.HHSFKLOGUHQDQGSHWVDZD\
DO NOT move this unit during operation.
1HYHUVXEVWLWXWHJDVROLQHNHURVHQHRUDOFRKROIRUFKDUFRDOVWDUWHU,QVRPHVWDWHVWKHXVHRI
FKDUFRDOVWDUWHULVSURKLELWHGE\ODZ,QWKLVFDVHSDUDI¿QEDVHGVWDUWHUFXEHVFDQEHVXEVWLWXWHGIRU
FKDUFRDOVWDUWHU1HYHUXVHFKDUFRDOVWDUWHUÀXLGZLWKDQHOHFWULFVWDUWHU
Downloaded from www.Manualslib.com manuals search engine

16
Lowes.com/masterforge
2-Year Limited Warranty
This charcoal grill is warranted for 2 years against broken or damaged parts at the time of purchase.
It is warranted to be free of defects. Paint is warranted to be free of defects except for rust, which may
appear after repeated use.
7KLVZDUUDQW\GRHVQRWFRYHUGDPDJHRULVVXHVUHODWHGWRQHJOHFWDEXVHRUPRGL¿FDWLRQVWRWKH
appliance. Repair labor is not covered.
All parts that meet the warranty requirements will be shipped at no charge via the discretion of MSG
6HUYLFHVJURXQGVKLSPHQWV860DLORU3DUFHO3RVW21/<$Q\VSHFLDOKDQGOLQJFKDUJHVLH6HFRQG
Day, overnight, etc.) will be the responsibility of the consumer.
All warranty claims apply only to the original purchaser and require a proof of purchase verifying
purchase date. This service is available by calling toll free 1-800-963-0211, 8:00 a.m. – 6:00 p.m. EST,
Monday – Thursday, 8:00 a.m. – 5:00 p.m. EST, Friday.
NOTICE: Some states do not allow the exclusion or limitations of incidental or consequential damages
or limitations on how long an implied warranty lasts, so the above limitations or exclusions may not
DSSO\WR\RX7KLVZDUUDQW\JLYHV\RXVSHFL¿FOHJDOULJKWVDQG\RXPD\DOVRKDYHRWKHUOHJDOULJKWV
which may vary from state to state.
Manufactured by:
GHP Group Inc.
8280 Austin Avenue
Morton Grove, IL, USA
60053-3207
Item Name: Heavy-Duty Charcoal Grill
Model #: MFJ576DNC
Item #: 0404331
Product Dimensions Assembled: 60.79 in. L x 27.36 in. W x 51.57 in. H
(154.4 cm L x 69.5 cm W x 131 cm H)
Product Weight:
90.4 lbs (41 kgs)
W
ARRANTY
CARE AND MAINTENANCE
Grill Maintenance
Frequency of cleaning is determined by how often the grill is used. Make sure coals are completely
extinguished and the grates are cooled down before cleaning inside of the unit. To remove the stains
on the lid and front panel caused by fumigation while grilling, use of a cleaning pad is recommended.
Wipe out the interior of unit with a cloth or paper towel. Clean the grates with warm water and pat dry.
The coating is fragile. Do not knock, hit or drop the grates.
Downloaded from www.Manualslib.com manuals search engine

17
Lowes.com/masterforge
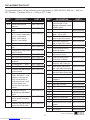
REPLACEMENT PARTS LIST
For replacement parts, call our customer service department at 1-800-963-0211, 8:00 a.m. – 6:00 p.m.
EST, Monday – Thursday, 8:00 a.m. – 5:00 p.m. EST, Friday.
PART DESCRIPTION PART #
N/A
Hardware pack
404-03023-00
N/A
2ZQHU¶VLQVWUXFWLRQ
manual
404-03022-00
1
Smoke stack-stainless
steel
403-01002-05
2
Lid assembly – WITH-
OUT handle, temperature
gauge, temperature
bezel, smoke stack,
Master Forge badge.
404-03002-01
3
Master Forge badge
404-02002-02
4
Temperature gauge – with
nut
403-01002-03
5
Temperature gauge bezel
with hardware
403-01002-04
6
Lid pin with cotter pin
404-03002-03
7
Lid handle with hardware
403-01002-02
8
Warming rack with
supports
403-03007-00
9
Cooking grate – 1 piece
403-01006-00
10
Charcoal tray
404-01003-02
11
&KDUFRDOWUD\DGMXVWPHQW
arm assembly
403-01003-04
12
Firebox bottom assembly
21/<:,7+287 – side
damper, charcoal pan/
tray, arm assembly to
charcoal pan/tray, crank
arm assembly, front
access door, and bottle
opener
404-03003-01
13
Threaded mount for
FKDUFRDOWUD\DGMXVWPHQW
crank
404-02003-10
14
&KDUFRDOWUD\DGMXVWPHQW
crank handle bezel-with
screws
403-02003-04
15
&KDUFRDOWUD\DGMXVWPHQW
crank only (left or right)
403-02003-02
PART DESCRIPTION PART #
16
&KDUFRDOWUD\DGMXVWPHQW
crank handle or side
GDPSHUDGMXVWPHQWFUDQN
handle (same)
403-02003-05
17
Side shelf
403-03004-00
18
6LGHGDPSHUDGMXVWPHQW
plate – left or right
403-02003-08
19
Side shelf support-left
front or right rear (same)
403-01004-01
20
Side shelf support-left
rear or right front (same)
403-01004-02
21
Bottle opener
403-01003-05
22
Charcoal access door
IUDPHIRU¿UHER[
401-01013-01
23
Frame for charcoal
access door insert
404-03014-01
24
Charcoal access door
insert with hardware
404-03013-02
25
Charcoal access door
hinge pin with cotter pin
401-01013-03
26
6LGHGDPSHUDGMXVWPHQW
bar – left (without wire grip)
404-02003-06
27
6LGHGDPSHUDGMXVWPHQW
bar-right (without wire grip)
404-02003-07
28
Ash pan without handle
403-03005-01
29
Ash pan handle with
hardware
403-01005-02
30
Left leg assembly
403-03001-01
31
Right leg assembly
403-03001-02
32
Upper lid hinge
404-03002-01
33
Lower lid hinge
404-03002-02
34
Axle rod for wheels
403-01018-00
35
Wheel
403-01019-00
36
Sleeve for wheel axle
403-01021-00
37
Caster (includes wrench)
403-01014-02
38
Bottom brace-front or rear
(same)
403-03016-00
39
Storage basket
403-01015-00
40
Lid bumper
403-01002-07
Downloaded from www.Manualslib.com manuals search engine

18
Lowes.com/masterforge
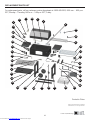
REPLACEMENT PARTS LIST
1
3
2
7
33
5
4
12
17
20
19
21
26
16
14
9
28
29
30
8
10
11
15
13
18
27
24
22
25
23
39
31
36
37
38
35
34
32
6
40
For replacement parts, call our customer service department at 1-800-963-0211, 8:00 a.m. – 6:00 p.m.
EST, Monday – Thursday, 8:00 a.m. – 5:00 p.m. EST, Friday.
Printed in China
Master Forge & M Design® are registered
trademarks of LF, LLC. All rights reserved.
Downloaded from www.Manualslib.com manuals search engine
-
 1
1
-
 2
2
-
 3
3
-
 4
4
-
 5
5
-
 6
6
-
 7
7
-
 8
8
-
 9
9
-
 10
10
-
 11
11
-
 12
12
-
 13
13
-
 14
14
-
 15
15
-
 16
16
-
 17
17
-
 18
18


Master Forge MFJ576DNC Le manuel du propriétaire
- Catégorie
- Barbecues
- Taper
- Le manuel du propriétaire