
User’s Guide >
Guide de l’utilisateur >
MD450 Series
Digital 2.4 GHz
Expandable Cordless Telephone System
Système téléphonique
sans fil évolutif numérique 2,4 GHz
MD450_EN_CA-Only.book Page 1 Friday, July 16, 2004 12:12 AM

MD450_EN_CA-Only.book Page 2 Friday, July 16, 2004 12:12 AM

1
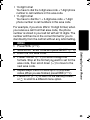
Congratulations on your purchase of a Motorola product!
Please retain your original dated sales receipt for
your records. For warranty service of your Motorola
product, you will need to provide a copy of your dated
sales receipt to confirm warranty status. Registration
is not required for warranty coverage.
For product related questions, please call:
1-800-461-4575 (Canada)
1-888-390-6456 TTY (Text Telephone)
On the Web:
www.motorola.com/cordless
Copyright © 2004 by Motorola, Inc.
All rights reserved. No part of this publication may be reproduced in any
form or by any means or used to make any derivative work (such as
translation, transformation or adaptation) without written permission from
Motorola, Inc.
Motorola reserves the right to revise this publication and to make changes
in content from time to time without obligation on the part of Motorola to
provide notification of such revision or change. Motorola provides this guide
without warranty of any kind, either implied or expressed, including, but not
limited to, the implied warranties of merchantability and fitness for a
particular purpose. Motorola may make improvements or changes in the
product(s) described in this manual at any time.
MOTOROLA, the Stylized M Logo, and PhoneWrap are registered in the US
Patent & Trademark Office. All other
product or service names are the
property of their respective owners.
516536-002
MD450_EN_CA-Only.book Page 1 Friday, July 16, 2004 12:12 AM

2
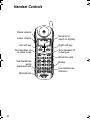
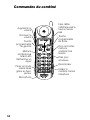
Handset Controls
Turn handset on
to make a call
Earphone jack
Raise volume
Redial
Scroll up or
down on display
Left soft key
Right soft key
Turn handset off
to hang up
Use handset as
intercom
Talk handsfree
using
speakerphone
Lower volume
Microphone
MD450_EN_CA-Only.book Page 2 Friday, July 16, 2004 12:12 AM

3
Industry Canada (IC) Information
This equipment meets the applicable Industry Canada (IC) radio and
terminal equipment technical specifications. This is confirmed by the
certification/registration number found on the label on the bottom of
the base unit. The abbreviation IC before the certification/registration
number only signifies that registration was performed based on a
Declaration of Conformity and that the Industry Canada technical
specifications were met. It does not imply that Industry Canada
approved the equipment. The term “IC:” before the certification/
registration number only signifies that the Industry Canada technical
specifications were met.
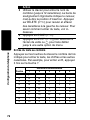
The Ringer Equivalency Number (REN) for this equipment is 0.0. The
REN is useful in determining the maximum number of devices you
may connect to your telephone line and still have all of these devices
ring when your telephone number is called. The sum of the RENs of all
devices connected to one line may not exceed 5.
Before installing this cordless phone, you should make sure that it is
permissible to be connected to the facilities of the local
telecommunications company. The equipment must be installed using
an acceptable method of connection. In some cases, the
telecommunications company’s inside wiring associated with a single
line individual service may be extended by means of a certified
connector assembly (telephone extension cord). You should be aware
that compliance with the above conditions may not prevent
degradation of service in some situations.
The plug and jack used to connect this equipment to the premises
wiring and telephone network must comply with the rules and
requirements in Industry Canada’s CS-03. A compliant telephone cord
and modular plug is provided with this product. It is designed to be
connected to a compatible modular jack that is also compliant.
For your protection, ensure that the electrical ground connections of
the power utility, telephone lines, and internal metallic water pipe
MD450_EN_CA-Only.book Page 3 Friday, July 16, 2004 12:12 AM

4
system, if present, are connected together. This precaution may be
particularly important in rural areas.
Caution:
You should not attempt to make such connections yourself.
Contact the appropriate electrical inspection authority or an
electrician, as appropriate.
Note:
If your home has specially wired alarm equipment connected to
the telephone line, ensure the installation of this cordless phone does
not disable your alarm equipment. If you have questions about what
will disable alarm equipment, consult your telephone company or a
qualified installer.
Repairs
Repairs to this equipment should be made by an authorized Canadian
maintenance facility designated by Motorola. Any repairs or alterations
made by the consumer, or any malfunctions of this equipment, may
give the telecommunications company cause to request that you
disconnect the equipment, and may void the limited warranty.
Privacy
Privacy of communications may not be ensured when using this
telephone. Other devices, including other cordless telephones, may
interfere with the operation of this cordless phone or cause noise
during operation. Units without code access may be accessed by other
radio communications devices.
Hearing Aid Compatibility
This telephone system meets Industry Canada standards for hearing
aid compatibility.
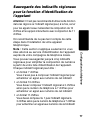
Interference Information
This device complies with Industry Canada’s RSS-210. Operation is
subject to the following two conditions:
(1) This device may not cause harmful interference; and
(2) This device must accept any interference received, including
interference that may cause undesired operation.
IC Information
MD450_EN_CA-Only.book Page 4 Friday, July 16, 2004 12:12 AM

5
This equipment has been tested and found to comply with the limits for
a Class B digital device, pursuant to Industry Canada’s ICES-003.
These limits are designed to provide reasonable protection against
harmful interference in a residential installation.
This equipment generates, uses, and can radiate radio frequency
energy and, if not installed and used in accordance with the
instructions, may cause harmful interference to radio communications.
However, there is no guarantee that interference will not occur in a
particular installation.
If this equipment does cause harmful interference to radio or television
reception, which can be determined by turning the equipment on and
off, the user is encouraged to try to correct the interference with one or
more of the following measures:
•
Reorient or relocate the receiving antenna (that is, the antenna for
radio or television that is “receiving” the interference).
•
Reorient or relocate and increase the separation between the
telecommunications equipment and the receiving antenna.
•
Connect the telecommunications equipment into an outlet on a
circuit different from that to which the receiving antenna is
connected.
If these measures do not eliminate the interference, please consult
your dealer or an experienced radio/television technician for additional
suggestions.
Industry Canada publishes several publications to assist consumers
with solving interference problems, which are available from its offices
or from its web site (strategis.gc.ca).
ITC02-173s
IC Information
MD450_EN_CA-Only.book Page 5 Friday, July 16, 2004 12:12 AM

6
Important Safety Instructions
Follow these safety precautions when using your cordless phone to
reduce the risk of fire, electric shock, and injury to persons or property:
1. Keep all slits and openings of the phone unblocked. Do not set the
phone on a heating register or over a radiator. Ensure that proper
ventilation is provided at the installation site.
2. Do not use while wet or while standing in water.
3. Do not use this product near water (for example, near a bath tub,
kitchen sink, or swimming pool).
4. Do not allow anything to rest on the power cord. Place the power
cord so that it will not be walked on.
5. Never insert objects of any kind into the product slits as that may
result in fire or shock.
6. Unplug this product from the wall outlet before cleaning. Do not
use liquid cleaners or aerosol cleaners. Use a damp cloth for
cleaning.
7. Do not disassemble this product. If service or repair work is
required, contact the Motorola address found in the back of this
user’s guide.
8. Do not overload wall outlets and extension cords.
9. Avoid using during an electrical storm. Use a surge protector to
protect the equipment.
10. Do not use this cordless phone to report a gas leak, especially if
you are in the vicinity of the gas line.
Caution:
To reduce the risk of fire, use only No. 26 AWG or larger UL
Listed or CSA Certified Telecommunication Line Cord.
MD450_EN_CA-Only.book Page 6 Friday, July 16, 2004 12:12 AM

7
Unplug this cordless phone immediately from an outlet if:
•
The power cord or plug is damaged or frayed.
•
Liquid has been spilled into the product.
•
The product has been exposed to rain or water. Do not retrieve
the handset or base until after you have unplugged the power
and phone from the wall. Then retrieve the unit by the
unplugged cords.
•
The product has been dropped or the cabinet has been
damaged.
•
The product exhibits a distinct change in performance.
Installation Guidelines
1. Read and understand all instructions and save them for future
reference.
2. Follow all warnings and instructions marked on the product.
3. Do not install this product near a bath tub, sink, or shower.
4. Operate this phone using only the power source that is indicated
on the marking label. If you are unsure of the power supply to your
home, consult with your dealer or local power company.
5. Do not place this product on an unstable cart, stand, or table. This
product may fall, causing serious damage to the product.
6. Adjust only those controls that are covered by the operating
instructions. Improper adjustment of other controls may result in
damage and will often require extensive work to restore the
product to normal operation.
7. Clean this product with a soft, damp cloth. Do not use chemicals
or cleaning agents to clean this phone.
MD450_EN_CA-Only.book Page 7 Friday, July 16, 2004 12:12 AM

8
8. Use only the power supply that came with this unit. Using other
power supplies may damage the unit.
9. Because cordless phones operate on electricity, you should have
at least one phone in your home that is not cordless in case the
power in your home goes out.
10. To avoid interference to nearby appliances, do not place the base
of the cordless phone on or near a TV, microwave oven, or VCR.
Caution:
To maintain compliance with the FCC’s RF exposure
guidelines, place the base unit at least 20 cm from nearby persons.
Battery Safety Instructions
•
Do not burn, disassemble, mutilate, or puncture the battery. The
battery contains toxic materials that could be released, resulting
in injury.
• Caution:
There is a risk of explosion if you replace the battery
with an incorrect battery type. Use only the battery that came
with your phone or an authorized replacement recommended by
the manufacturer.
•
Keep batteries out of the reach of children.
•
Remove batteries if storing over 30 days.
•
Do not dispose of batteries in fire, which could result in
explosion.
•
The rechargeable batteries that power this product
must be disposed of properly and may need to be
recycled. Refer to your battery’s label for battery type.
Contact your local recycling center for proper disposal methods.
MD450_EN_CA-Only.book Page 8 Friday, July 16, 2004 12:12 AM

9
Contents
Handset Controls . . . . . . . . . . . . . . . . . . . . . . . . . . . . . . 2
Industry Canada (IC) Information . . . . . . . . . . . . . . . . . 3
Important Safety Instructions . . . . . . . . . . . . . . . . . . . . 6
Getting Started . . . . . . . . . . . . . . . . . . . . . . . . . . . . . . . 11
Powering the Base Station . . . . . . . . . . . . . . . . . . . . . 12
Setting Up the Charging Bases . . . . . . . . . . . . . . . . . 13
Installing Batteries in the Handsets . . . . . . . . . . . . . . 13
Charging the Handsets . . . . . . . . . . . . . . . . . . . . . . . . 13
Phone Line Connection . . . . . . . . . . . . . . . . . . . . . . . 14
Wall Mounting the Base Station . . . . . . . . . . . . . . . . . 14
Removing the Base Station and Wall Mount . . . . . . . 16
Removing the Base Station from the Wall Mount . . . . 17
Using the Handset Display . . . . . . . . . . . . . . . . . . . . . 17
Using the Soft Keys . . . . . . . . . . . . . . . . . . . . . . . . 17
Using the Navigation Key . . . . . . . . . . . . . . . . . . . . 18
Setting Up Your Phone . . . . . . . . . . . . . . . . . . . . . . . . . 19
Registering an Expansion Handset . . . . . . . . . . . . . . 19
Personalizing Your Handset . . . . . . . . . . . . . . . . . . . . 19
Setting the Ring Tone and Ring Volume . . . . . . . . . 20
Turning the Key Beeps ON or OFF . . . . . . . . . . . . . 22
Naming a Handset . . . . . . . . . . . . . . . . . . . . . . . . . 23
Entering Text on the Handset . . . . . . . . . . . . . . . . . 24
Storing Area Codes for Caller ID . . . . . . . . . . . . . . . . 24
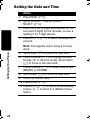
Setting the Date and Time . . . . . . . . . . . . . . . . . . . . . 26
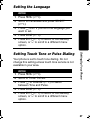
Setting the Language . . . . . . . . . . . . . . . . . . . . . . . . . 27
Setting Touch Tone or Pulse Dialing . . . . . . . . . . . . . . 27
Using the Handset . . . . . . . . . . . . . . . . . . . . . . . . . . . . 28
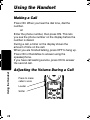
Making a Call . . . . . . . . . . . . . . . . . . . . . . . . . . . . . . . 28
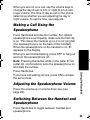
Adjusting the Volume During a Call . . . . . . . . . . . . . . 28
Making a Call Using the Speakerphone . . . . . . . . . . . 29
Adjusting the Speakerphone Volume . . . . . . . . . . . . . 29
Switching Between the Handset and
Speakerphone . . . . . . . . . . . . . . . . . . . . . . . . . . . . . . 29
Muting a Call . . . . . . . . . . . . . . . . . . . . . . . . . . . . . . . 30
MD450_EN_CA-Only.book Page 9 Friday, July 16, 2004 12:12 AM

10
Putting a Call on Hold . . . . . . . . . . . . . . . . . . . . . . . . 30
Redialing a Number . . . . . . . . . . . . . . . . . . . . . . . . . . 30
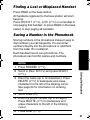
Finding a Lost or Misplaced Handset . . . . . . . . . . . . . 31
Saving a Number in the Phonebook . . . . . . . . . . . . . 31
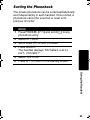
Sorting the Phonebook . . . . . . . . . . . . . . . . . . . . . . . 33
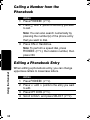
Calling a Number from the Phonebook . . . . . . . . . . . 34
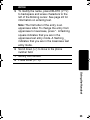
Editing a Phonebook Entry . . . . . . . . . . . . . . . . . . . . 34
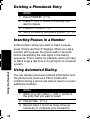
Deleting a Phonebook Entry . . . . . . . . . . . . . . . . . . . 36
Inserting Pauses in a Number . . . . . . . . . . . . . . . . . . 36
Using Automated Dialing . . . . . . . . . . . . . . . . . . . . . . 36
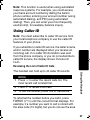
Using Caller ID . . . . . . . . . . . . . . . . . . . . . . . . . . . . . . 37
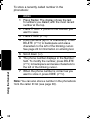
Reviewing the List of Caller ID Calls . . . . . . . . . . . 37
Store a Caller ID Number in the Phonebook . . . . . 38
Deleting Caller ID Calls . . . . . . . . . . . . . . . . . . . . . 39
Multihandset Functions . . . . . . . . . . . . . . . . . . . . . . . . 40
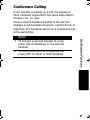
Conference Calling . . . . . . . . . . . . . . . . . . . . . . . . . . 41
Using the Intercom . . . . . . . . . . . . . . . . . . . . . . . . . . . 42
Intercom Setup . . . . . . . . . . . . . . . . . . . . . . . . . . . . 42
Handset to Handset Intercom . . . . . . . . . . . . . . . . . 43
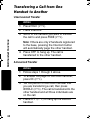
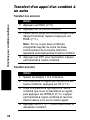
Transferring a Call from One Handset to Another . . . 44
Unannounced Transfer . . . . . . . . . . . . . . . . . . . . . . 44
Announced Transfer . . . . . . . . . . . . . . . . . . . . . . . . 44
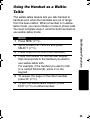
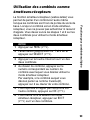
Using the Handset as a Walkie-Talkie . . . . . . . . . . . . 45
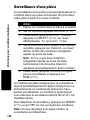
Monitoring a Room . . . . . . . . . . . . . . . . . . . . . . . . . . 46
Deregistering All Handsets . . . . . . . . . . . . . . . . . . . . 47
Warranty . . . . . . . . . . . . . . . . . . . . . . . . . . . . . . . . . . . . 48
MD450_EN_CA-Only.book Page 10 Friday, July 16, 2004 12:12 AM

11
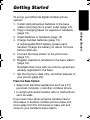
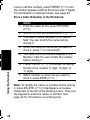
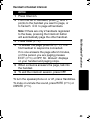
Getting Started
Getting Started
To set up your Motorola digital cordless phone
system:
1. Install optional backup batteries in the base
station and plug into a power outlet (page 12).
2. Plug in charging bases for expansion handsets
(page 13).
3. Install batteries in handsets (page 13).
4. Charge handset batteries (page 13).
A rechargeable NiCd battery powers each
handset. Charge the battery for about 12 hours
before initial use.
5. Connect the base station to the phone line
(page 14).
6. Register expansion handsets to the base station
(page 19).
Handsets that come with your phone system are
already registered to the base.
7. Set the ring tone, date, time, and other features of
your phone (page 20).
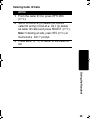
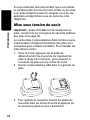
Place the Base Station:
• Away from electrical appliances such as a TV,
personal computer, or another cordless phone.
• In a high and central location with no obstructions,
such as walls.
If you hear noise while using the handset near a
microwave or another cordless phone’s base unit,
move away from the microwave or base unit and
closer to your handset’s base station.
MD450_EN_CA-Only.book Page 11 Friday, July 16, 2004 12:12 AM

12
Getting Started
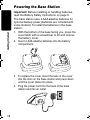
Powering the Base Station
Important: Before installing or handling batteries,
read the Battery Safety Instructions on page 8.
The base station uses 4 AAA alkaline batteries for
optional backup power (batteries are included with
some models). To install the batteries in the base
station:
1. With the bottom of the base facing you, press the
cover latch with a screwdriver to lift and remove
the battery cover.
2. Insert 4 AAA alkaline batteries into the battery
compartment.
3. To replace the cover, insert the tabs of the cover
into the slots on the base station and press down
until the cover clicks into place.
4. Plug the power cord into the back of the base
station and into an outlet.
MD450_EN_CA-Only.book Page 12 Friday, July 16, 2004 12:12 AM

13
Getting Started
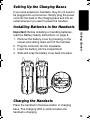
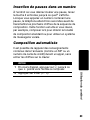
Setting Up the Charging Bases
If you have expansion handsets, they do not need to
be plugged into a phone line. Simply plug the power
cord into the back of the charging base and into an
outlet wherever you want to place the handset.
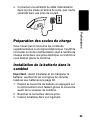
Installing Batteries in the Handsets
Important: Before installing or handling batteries,
read the Battery Safety Instructions on page 8.
1. Remove the battery cover by pressing on the
recess and sliding down and off the handset.
2. Plug the connector into the receptacle.
3. Insert the battery into the compartment.
4. Slide and snap the battery cover back into place.
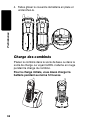
Charging the Handsets
Place the handset in the base station or charging
base. The charging LED is solid red when the
handset is charging.
Black
Red
MD450_EN_CA-Only.book Page 13 Friday, July 16, 2004 12:12 AM

14
Getting Started
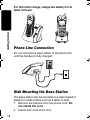
For the initial charge, charge the battery for at
least 12 hours.
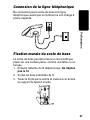
Phone Line Connection
Do not connect the base station to the phone line
until the handset is fully charged.
Wall Mounting the Base Station
The base station can be mounted on a wall instead of
placed on a flat surface such as a table or desk.
1. Remove the twist-tie from the phone cord. Do
not unfold the cord.
2. Untuck both ends of the cord.
charge
MD450_EN_CA-Only.book Page 14 Friday, July 16, 2004 12:12 AM

15
Getting Started
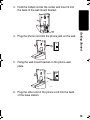
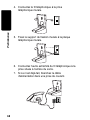
3. Hold the folded cord at the center and insert it into
the back of the wall mount bracket.
4. Plug the phone cord into the phone jack on the wall.
5. Hang the wall mount bracket on the phone wall
plate.
6. Plug the other end of the phone cord into the back
of the base station.
020930o
020929o
MD450_EN_CA-Only.book Page 15 Friday, July 16, 2004 12:12 AM

16
Getting Started
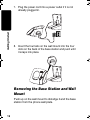
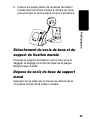
7. Plug the power cord into a power outlet if it is not
already plugged in.
8. Insert the four tabs on the wall mount into the four
slots on the back of the base station and push until
it snaps into place.
Removing the Base Station and Wall
Mount
Push up on the wall mount to dislodge it and the base
station from the phone wall plate.
MD450_EN_CA-Only.book Page 16 Friday, July 16, 2004 12:12 AM

17
Getting Started
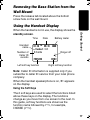
Removing the Base Station from the
Wall Mount
Press the release tab located above the bottom
screw hole on the wall mount.
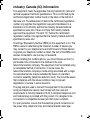
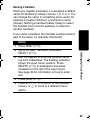
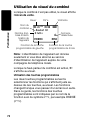
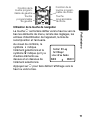
Using the Handset Display
When the handset is not in use, the display shows the
standby screen.
Note: Caller ID information is supplied only if you
subscribe to caller ID service from your local phone
company.
When the handset speakerphone is on,
V appears
on the display.
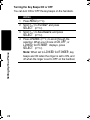
Using the Soft Keys
The 2 soft keys are used to select the functions listed
above these keys on the display. The functions
change as you move from one screen to the next. In
this guide, soft key functions are shown as the
function name followed by
a, for example,
CHANGE (a).
9
04:26
PM
09/26
Handset (1)
PHONEBK MENU
6 Calls
Time
Ringer off
Left soft key function
Battery meterDate
^
Handset
name
Number of
Caller ID
records
Right soft key function
MD450_EN_CA-Only.book Page 17 Friday, July 16, 2004 12:12 AM

18
Getting Started
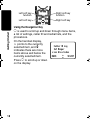
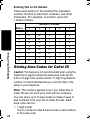
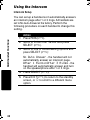
Using the Navigation Key
c is used to scroll up and down through menu items,
a list of settings, caller ID and redial lists, and the
phonebook.
On the handset display,
points to the currently
selected item, and b
indicates there are more
items above and below the
currently selected item.
Press c to scroll up or down
on the display.
Left soft key Right soft key
Left soft key
function
Right soft key
function
Caller ID Log
Set Ringer
Loc Area Codes
BACK SELECT
MD450_EN_CA-Only.book Page 18 Friday, July 16, 2004 12:12 AM
La page est en cours de chargement...
La page est en cours de chargement...
La page est en cours de chargement...
La page est en cours de chargement...
La page est en cours de chargement...
La page est en cours de chargement...
La page est en cours de chargement...
La page est en cours de chargement...
La page est en cours de chargement...
La page est en cours de chargement...
La page est en cours de chargement...
La page est en cours de chargement...
La page est en cours de chargement...
La page est en cours de chargement...
La page est en cours de chargement...
La page est en cours de chargement...
La page est en cours de chargement...
La page est en cours de chargement...
La page est en cours de chargement...
La page est en cours de chargement...
La page est en cours de chargement...
La page est en cours de chargement...
La page est en cours de chargement...
La page est en cours de chargement...
La page est en cours de chargement...
La page est en cours de chargement...
La page est en cours de chargement...
La page est en cours de chargement...
La page est en cours de chargement...
La page est en cours de chargement...
La page est en cours de chargement...
La page est en cours de chargement...
La page est en cours de chargement...
La page est en cours de chargement...
La page est en cours de chargement...
La page est en cours de chargement...
La page est en cours de chargement...
La page est en cours de chargement...
La page est en cours de chargement...
La page est en cours de chargement...
La page est en cours de chargement...
La page est en cours de chargement...
La page est en cours de chargement...
La page est en cours de chargement...
La page est en cours de chargement...
La page est en cours de chargement...
La page est en cours de chargement...
La page est en cours de chargement...
La page est en cours de chargement...
La page est en cours de chargement...
La page est en cours de chargement...
La page est en cours de chargement...
La page est en cours de chargement...
La page est en cours de chargement...
La page est en cours de chargement...
La page est en cours de chargement...
La page est en cours de chargement...
La page est en cours de chargement...
La page est en cours de chargement...
La page est en cours de chargement...
La page est en cours de chargement...
La page est en cours de chargement...
La page est en cours de chargement...
La page est en cours de chargement...
La page est en cours de chargement...
La page est en cours de chargement...
La page est en cours de chargement...
La page est en cours de chargement...
La page est en cours de chargement...
La page est en cours de chargement...
La page est en cours de chargement...
La page est en cours de chargement...
La page est en cours de chargement...
La page est en cours de chargement...
La page est en cours de chargement...
La page est en cours de chargement...
La page est en cours de chargement...
La page est en cours de chargement...
La page est en cours de chargement...
La page est en cours de chargement...
La page est en cours de chargement...
La page est en cours de chargement...
La page est en cours de chargement...
La page est en cours de chargement...
La page est en cours de chargement...
La page est en cours de chargement...
La page est en cours de chargement...
La page est en cours de chargement...
La page est en cours de chargement...
La page est en cours de chargement...
-
 1
1
-
 2
2
-
 3
3
-
 4
4
-
 5
5
-
 6
6
-
 7
7
-
 8
8
-
 9
9
-
 10
10
-
 11
11
-
 12
12
-
 13
13
-
 14
14
-
 15
15
-
 16
16
-
 17
17
-
 18
18
-
 19
19
-
 20
20
-
 21
21
-
 22
22
-
 23
23
-
 24
24
-
 25
25
-
 26
26
-
 27
27
-
 28
28
-
 29
29
-
 30
30
-
 31
31
-
 32
32
-
 33
33
-
 34
34
-
 35
35
-
 36
36
-
 37
37
-
 38
38
-
 39
39
-
 40
40
-
 41
41
-
 42
42
-
 43
43
-
 44
44
-
 45
45
-
 46
46
-
 47
47
-
 48
48
-
 49
49
-
 50
50
-
 51
51
-
 52
52
-
 53
53
-
 54
54
-
 55
55
-
 56
56
-
 57
57
-
 58
58
-
 59
59
-
 60
60
-
 61
61
-
 62
62
-
 63
63
-
 64
64
-
 65
65
-
 66
66
-
 67
67
-
 68
68
-
 69
69
-
 70
70
-
 71
71
-
 72
72
-
 73
73
-
 74
74
-
 75
75
-
 76
76
-
 77
77
-
 78
78
-
 79
79
-
 80
80
-
 81
81
-
 82
82
-
 83
83
-
 84
84
-
 85
85
-
 86
86
-
 87
87
-
 88
88
-
 89
89
-
 90
90
-
 91
91
-
 92
92
-
 93
93
-
 94
94
-
 95
95
-
 96
96
-
 97
97
-
 98
98
-
 99
99
-
 100
100
-
 101
101
-
 102
102
-
 103
103
-
 104
104
-
 105
105
-
 106
106
-
 107
107
-
 108
108
-
 109
109
-
 110
110


Motorola MD450 Series Manuel utilisateur
- Catégorie
- Téléphones
- Taper
- Manuel utilisateur
dans d''autres langues
- English: Motorola MD450 Series User manual
Documents connexes
-
Motorola MD490 Manuel utilisateur
-
-
-
-
-
-
-
-
Motorola B801 Manuel utilisateur
-