
Colour Television
OWNER’S MANUAL
Please read this manual carefully before operating your set.
Retain it for future reference.
Record model number and serial number of the set.
See the label attached on the back cover and quote this infor-
mation to your dealer when you require service.
Model number :
Serial number :
P/NO : MFL42109853(CW62D)

Contents
2
Installation
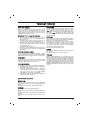
Connection of external equipment
You can connect additional equipment, such as
VCRs, camcorders etc. to your set.
What is shown here may
be somewhat different
from your set.
Aerial socket
1. Connect the RF out socket of the VCR to the
aerial socket on the back of the set.
2. Connect the aerial cable to the RF aerial in
socket of the VCR.
3. Store the VCR channel on a desired pro-
gramme number using the ‘Manual pro-
gramme tuning’ section.
4. Select the programme number where the
VCR channel is stored.
5. Press the PLAY button on the VCR.
Audio/Video in/out sockets (option)
1. Connect the audio/video out sockets of the VCR
to audio/video in sockets of the set and in sock-
ets of the VCR to RF OUT sockets of the set.
2. If the VCR is connected to the AV sockets on the
set, press the TV/AV button to select AV 1 or AV 2 .
3. Press the PLAY button on the VCR.The VCR
playback picture appears on the screen.
You can also record programmes received by the
TV on video tape via audio/video out sockets.
Note : If you have a mono VCR, connect the
audio cable from the VCR to the AUDIO L/MONO
socket of the set.
Euro scart socket (option)
1. Connect the Euro scart socket of the VCR to
the Euro scart socket of the set.
2. Press the PLAY button on the VCR.
If your VCR outputs a switching voltage when
connected to Euro scart socket, the set will
switch to AV 1 mode automatically. But if you
want to keep on watching TV mode, press the
DD
/
EE
or NUMBER buttons.Otherwise press
the TV/AV button on the remote control
handset to select AV 1 The VCR playback pic-
ture appears on the screen.
You can also record programmes received by the
TV on video tape.
Note : Signal type RGB, i.e. the signals red, green
and blue can only be selected for the Euro scart
socket. These signals are transmitted, for exam-
ple, by a pay TV decoder, game machine or photo
CD unit, etc.
Component in sockets (option)
1. Connect the COMPONENT video output
sockets (Y Cb Cr, Y Pb Pr or Y B-Y R-Y) of the
COMPONENT (480i) to the COMPONENT
INPUT sockets (Y PB PR) on the set.
2. Connect the audio cable from the COMPO-
NENT to AUDIO IN sockets of AV IN2.
3. Press the TV/AV button to select COMPO-
NENT.
4. Press the PLAY button on the COMPONENT.
The COMPONENT playback picture appears
on the screen.
Installation.........................................................2
Connection of external equipment..................2
Location and function of controls...................3
Basic operation.................................................5
On screen menus..............................................5
Setting up TV stations......................................6
Picture adjustment............................................7
Sound adjustment.............................................8
Time setting.......................................................9
Other functions.................................................9
PIP operation (option)....................................10
Teletext (option)..............................................10
Troubleshooting check list............................12
Power
This set operates on an AC mains supply, the volt-
age is as indicated on the label on the back cover.
Never apply DC power to the set. In the event of
thunderstorms or powercuts, please pull out the
aerial and mains plugs.
Press the POWER button on the front panel or side panel
to turn off the TV when the TV set is not being used for a
long time.It is recommended to remove the plug from the
wall outlet(Power point).
Disconnecting device from mains
Mains plug is the disconnecting device. The plug
must remain readily operable
Warning
To prevent fire or shock hazard, do not expose the set
to rain or moisture.Do not place anything containing liq-
uid on top of the set, this may cause a fire or could give
an electric shock.
Service
Never remove the back cover of the set as this can
expose you to very high voltage and other hazards. If
the set does not operate properly, unplug it and call
your dealer.
Aerial
Connect the aerial cable to the socket on the back
cover. For the best reception an outdoor aerial
should be used.
Location
Position your set so that no bright light or sunlight
falls directly onto the screen. Care should be
taken not to expose the set to any unnecessary
vibration, moisture, dust or heat. Also ensure that
the set is placed in a position to allow a free flow
of air. Do not cover the ventilation openings on the
back cover.
Note:
To remove dirt or fingerprint on the surface of your
TV, please rub with a line-free cloth supplied in
the accessory.Do not pose too much pressure in
cleaning so as to prevent any risk of damage to
the product.

3
All the functions can be controlled with the remote control handset.
Some functions can also be adjusted with the buttons on the front
panel of the set.
Remote control handset
Before you use the remote control handset, please install the bat-
teries. See the next page.
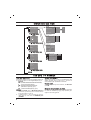
1. POWER
switches the set on from standby or off to standby.
2. NUMBER BUTTONS
Switches the set on from standby or directly select a number.
3. MENU
selects a menu.
4.
DD
/
EE
(Programme Up/Down)
selects a programme or a menu item.
switches the set on from standby.
scans programmes automatically.
FF
/
GG
(Volume Up/Down)
adjusts the volume.
adjusts menu settings.
OK
accepts your selection or displays the current mode.
5. TELETEXT BUTTONS (option)
These buttons are used for teletext.
For further details, see the ‘Teletext’ section.
6.
SLEEP
sets the sleep timer.
7. PIP BUTTONS (option)
PIP
switches the sub picture on or off.
PR +/-
selects a programme for the sub picture.
SWAP
alternates between main and sub picture.
INPUT
selects the input mode for the sub picture.
SIZE
adjusts the sub picture size.
STILL
freezes motion of the sub picture.
POSITION
relocates the sub picture in clockwise direction.
Location and function of controls
(With TELETEXT / PIP)
123
4
5
6
7
8
9
0
PR
PR
VOL
VOL
OK
1
2
3
4
6
5
7
12
8
11
14
13
9
10
0
PR
PR
VOL
VOL
OK
UPDATE/
HOLD/
(With TELETEXT / Without PIP)
5

4
Location and function of controls
8. FAVOURITE
selects a favorite programme.
9.
EYE/
*
(option)
switches the eye function on or off.
10. MUTE
switches the sound on or off.
11. TV/AV
selects TV or AV mode.
switches the set on from standby.
exits the Teletext mode.
12.
I/II/
*
selects the language during dual language broadcast.
selects the sound output (option).
13. Q.VIEW (or YELLOW)
returns to the previously viewed programme.
14.
LIST (or BLUE)
displays the programme table.
*
: No function
COLOURED BUTTONS : These buttons are used for teletext (only
TELETEXT models) or programme edit.
Battery installation
The remote control handset is powered by AAA type batteries.
Install batteries as indicated by the polarity symbols ( and )
marked inside the compartment.
Note : To avoid damage from possible battery leakage, remove the
batteries if you do not plan to use the remote control handset for an
extended period of time.
+
-
(Without TELETEXT / PIP)
123
4
5
6
7
8
9
0
PR
PR
VOL
VOL
OK
(With PIP / Without TELETEXT)
123
4
5
6
7
8
9
0
PR
PR
VOL
VOL
OK
Q.VIEW LIST
4
1
3
2
8
12
13
11
14
6
9
10
7
or

The dialogue between you and your set takes
place on screen with an operator menu. The but-
tons required for the operating steps are also dis-
played.
Menu selection
1. Press the MENU button and then
DD
/
EE
but-
ton to display each menu.
2. Press the
GG
button and then
DD
/
EE
button to
select a menu item.
3. Press the
GG
button to display the sub menu or
the pull-down menu.
4. Change the setting of an item in the sub or
pull-down menu with the
FF
/
GG
or
DD
/
EE
.
You can move to the higher level menu with
the OK or
FF
button and to move to the lower
level menu press the
GG
button.
Note :
a. In the teletext mode, menus are not displayed.
b. In some models, the
Normal/Turbo search
will not display, only the Start will display in the
Auto programme menu.
c. In some models, Tilt, Booster or Degauss
will not display.
d. On some models, the Language, X-WAVE
will not display.
On screen menus
5
Location and function of controls
MAIN POWER (ON/OFF)
switches the set on or off.
POWER/STANDBY INDICATOR
illuminates brightly when the set is in standby
mode.
dims when the set is switched on.
REMOTE CONTROL SENSOR
Note : Only use the supplied remote control
handset. (When you use others, they will not
be able to function.)
MENU
selects a menu.
OK
accepts your selection or displays the current
mode.
FF
/
GG
(Volume Down/Up)
adjusts the volume.
adjusts menu settings.
DD
/
EE
(Programme Up/Down)
selects a programme or a menu item.
switches the set on from standby.
AUDIO/VIDEO/USB IN SOCKETS (AV
IN2)(option)
Connect the audio/video/USB out sockets of
external equipment to these sockets.
Note :
What is shown here may be somewhat dif-
ferent from your set or can not be supplied
on your area.
Basic operation
On and off
1. Press the main power button to switch the set on.
2. If the set is in standby mode, press the
POWER,
DD
/
EE
, TV/AV or NUMBER buttons on
the remote control handset to switch it on fully.
3. Press the POWER button on the remote con-
trol handset.
The set reverts to standby mode.
4. Press the main power button again to switch
the set off.
Note : If, while the set is switched on, the mains
plug is disconnected the set will switch to standby
or power on when the mains plug is replaced in
the mains power socket.
Programme selection
You can select a programme number with the
DD
/
EE
or NUMBER buttons.
Volume adjustment
Press the
FF
/
GG
button to adjust the volume.
Q.VIEW (or YELLOW)
Press the Q.View (or YELLOW) button to view
the last programme you were watching.
Mute function
Press the MUTE button. The sound is switched off
and the display
W
appears.
You can cancel it by pressing the MUTE,
FF
/
GG
,
I/II/
*
(option), button.
On screen language selection
The menu can be displayed on the screen in
desired language. First select your language.
1. Press the MENU button and then
DD
/
EE
but-
ton to select the Special menu.
2. Press the
GG
button to select Language.
3. Press the
GG
button and then
DD
/
EE
button to
select your desired language.
All the on screen displays will appear in the
selected language.Press the OK or
FF
button
to select the Special menu.
4. Repeatedly press the MENU button to return
to normal TV viewing.

6
Setting up TV stations
Auto programme tuning
All stations that can be received are stored by this
method. It is recommended that you use auto pro-
gramme during installation of this set.
System :
BG :(Asia/NewZealand/ M.East/Africa/Australia)
I :(Hong Kong/South Africa)
DK :(East Europe/China/Africa/CIS)
L :(SECAM L/L’ (France) (option)
M : (USA/Korea/Philippines) (option)
Note :
a.
Turbo search is faster than Normal search
and in some models, these searches will auto-
matically store all receivable stations.
b. If the programmed station has poor quality
and sound, select the system again in the
Manual programme menu.
Manual programme tuning
Manual programme lets you manually tune and
arrange the stations in whatever order you desire.
Also you can assign a station name with five char-
acters to each programme number.
Booster (option)
If the reception is poor at the fringe area of the TV
signal, select Booster to On.
Fine tuning
Normally fine tuning is only necessary if reception
is poor.The finely tuned programme will be indi
cated by yellow number during programme selection.
BG
I
DK
M
or
TV programme
Auto
O
programme {
Manual
O
programme {
Program me
O
edit {
FavouriteOprogramme
{
()O}{OOKOMENU
0OOARO1DOOO5OOSO69
O1OOCO03OOO6OOSO17
O2OOCO12OOO7OOSO22
O3OOSO66OOO8OOCO09
O4OOSO67OOO9OOCO11
DeleteOOOOCopy
MoveOOOOOOSkip
O0OOCO03
Picture menu
Station menu
PSM {
XD {
Contrast {
Brightness {
Colour {
Sharpness {
()O}{OOKOMENU
Sound menu
()O}{OOKOMENU
Special menu
()O}{OOKOMENU
Time menu
()O}{OOKOMENU
Storage {
System {
Channel {
Fine {
Search {
Name {
()O}{OOKOMENU
()} {OOKOMENU
Storage {
Station
Picture
Sound
Time
Special
Manual programme
Programme edit
2
SSM {
Turbo oSound {
AVL {
Balance {
X-WAVE {
Clock {
Offotime {
Onotime {
Autoosleep {
Language {
Input {
Childolock {
Degauss {
On screen menus
System {
StorageO from {
NormalO search {
TurboO search {
()O}{OOKOMENU
System {
Auto programme
BG
I
DK
L
56n Ca 05
Favourite programme
56n Ca 05
Auto
O
programme {
Manual
O
programme {
Program me
O
edit {
FavouriteOprogramme
{
}{O0_9O()OOKOMENU

Note: Picture menu options are not available for
the RGB input source.
PSM (Picture Status Memory)
The picture Dynamic, Standard, Mild and
Game are programmed for good picture repro-
duction at the factory and cannot be changed.
XD
You can enjoy the vivid and hi-definition picture
with LG’s excellent Digital Reality processor tech-
nology.
Picture adjustment
You can adjust picture Contrast, Brightness,
Colour intensity, Sharpness and tint (NTSC
input only) to the levels you prefer.
Setting up TV stations
7
Picture adjustment
Programme edit
This function enables you to delete or skip the
stored programmes. You can also move some
stations to other programme numbers or insert a
blank station data into the selected programme
number.
Deleting a programme
1. Select a programme to be deleted with the
DD
/
EE
or
FF
/
GG
button.
2. Press the RED button twice.
The selected programme is deleted, and all the
following programmes are shifted up one posi-
tion.
Copying a programme
1. Select a programme to be copied with the
DD
/
EE
or
FF
/
GG
button.
2. Press the GREEN button.
All the following programmes are shifted down
one position.
Moving a programme
1. Select a programme to be moved with the
DD
/
EE
or
FF
/
GG
button.
2. Press the YELLOW button.
3. Move the programme to the desired pro-
gramme number with the
DD
/
EE
or
FF
/
GG
but-
ton.
4. Press the YELLOW button again to release
this function.
Skipping a programme number
1. Select a programme number to be skipped with
the
DD
/
EE
or
FF
/
GG
button.
2. Press the BLUE button. The skipped pro-
gramme turns to blue.
3. Press the BLUE button again to release the
skipped programme. When a programme
number is skipped it means that you will be
unable to select it using the
DD
/
EE
button dur-
ing normal TV viewing. If you want to select
the skipped programme, directly enter the pro-
gramme number with the NUMBER buttons or
select it in the programme edit or table menu.
Repeatedly press the MENU button to return to
normal TV viewing.
Favourite programme
This function lets you select your favourite pro-
grammes directly.
Calling the programme table
You can check the programmes stored in the
memory by displaying the programme table.
Note :
a. You may find some blue programmes. They
have been set up to be skipped by auto pro-
gramming or in the programme edit mode.
b. Some programmes with the channel number
shown in the programme table indicate there
is no station name assigned.

8
Sound adjustment
SSM (Sound Status Memory)
You can select your preferred sound setting; Flat,
Music, Movie or Sports and you can also adjust
the sound frequency of equalizer.
Sound Frequency Adjustment
Press the
GG
button in User to display the
User sub menu.
The sound
Flat, Music, Movie and Sports are
programmed for good sound reproduction at the
factory and cannot be changed.
Turbo sound selection
When this function is on, the sound will be more
emphasized and amplified than normal sound.
Sound adjustment
You can adjust balance, AVL (Auto Volume
Leveler), AVL automatically keeps on an equal
volume level even if you change programmes.
The Turbo sound creates an all around sound as
in a concert hall.
X-WAVE (Wireless Sound) (option)
You can also listen to the sound through the FM
receiver.
Note:
a. If the reception is poor or weak, select a dif-
ferent frequency.
b. For best results, there should be no more
than 5m (16.4ft) between the TV and FM
Receiver.
c. In certain areas, the FM transmitter ability
may be weak, such as near a broadcast
tower.
d. The reception sensitivity may depend on the
kinds of receiver (FM radio).
Sound output selection
In AV mode, you can select output sound for the
left and right loudspeakers.
Repeatedly press the I/II/
*
button to select the
sound output.
L+R :Audio signal from audio L input is sent to left
loud-speaker and audio signal from audio R
input is sent to right loud-speaker.
L+L :Audio signal from audio L input is sent to left
and right loud-speakers.
R+R:Audio signal from audio R input is sent to
left and right loud-speakers.
Stereo/Dual reception
When a programme is selected, the sound infor-
mation for the station appears after the pro-
gramme number and station name disappear.
Mono sound selection
In stereo reception if the stereo signal is weak,
you can switch to mono by pressing the I/II/
*
but-
ton twice. In mono reception the depth of sound is
improved. To switch back to stereo, press the
I/II/
*
button twice again.
Language selection for dual language broadcast
If a programme is received in two languages (dual
language), you can switch to
DUAL I, DUAL II or
DUAL I+II by pressing the I/II/
*
button repeatedly.
DUAL I sends the primary broadcast language to
the loudspeakers.
DUAL II sends the secondary broadcast lan-
guage to the loudspeakers.
DUAL I+II sends a separate language to each
loudspeaker.
NICAM reception (option)
If your set is equipped with the receiver for NICAM
reception, the high quality NICAM (Near
Instantaneous Companding Audio Multiplex) digi-
tal sound can be received.
Sound output can be selected according to the
type of received broadcast by pressing the I/II/
*
button repeatedly.
1. When NICAM mono is received, you can
select
NICAM MONO or FM MONO.
2. When NICAM stereo is received, you can
select
NICAM STEREO or FM MONO. If the
stereo signal is weak, switch to FM mono.
3. When NICAM dual is received, you can select
NICAM DUAL I, NICAM DUAL II or
NICAM DUAL I+II or MONO. When FM
mono is selected the display
MONO appears
on the screen.
()O}{OOKOMENU
0.1O0.5O1.5O5.0O10OkHz
Broadcast
Mono
Stereo
Dual
On Screen Display
MONO
STEREO
DUAL I

Other functions
TV and AV modes
AV mode is used when a video cassette recorder
(VCR), or other equipment is connected to the set.
Note : When a VCR is connected via the aerial
socket the set is used in TV mode. See the
‘Connection of external equipment’ section.
AV1 : VCR connected to the Euro scart sock-
et or AV IN 1 sockets on the set
AV2 : VCR connected to the AV IN 2 sockets
on the set.
COMPONENT : DVD Player connected to the
COMPONENT sockets on the set (option)
Alternatively you can select the TV or AV mode by
pressing the TV/AV button.
In AV mode, to return to TV mode, press the
DD
/
EE
or NUMBER buttons.
Auto AV switching (option)
If your VCR outputs switching voltage when it is
switched to playback with the VCR connected to the
Euro scart socket. The set is automatically switched
to
AV1 mode when an AV signal is input. But if you
want to keep on watching TV mode, press the
DD
/
EE
or NUMBER buttons. Press the TV/AV button to
return to AV modes.
Child lock
The TV can be set so that the remote control hand-
set is needed to control it. This feature can be used
to prevent unauthorized viewing.
With the lock on, the display
Child lock on
appears on the screen if any button on the front
panel is pressed while viewing the TV.
Blue back (option)
If you select On on the Blue back pull-down
menu, the blue background appears on the
screen when there is no or poor signal.
Tilt (option)
The TV picture may tilt to the left or right if the TV
set moves to another position. This function can
be used to compensate the tilt.
Degaussing (option)
Due to the super large Tube in the set. The colour
purity of the picture may be affected by other
magnetic influences such as speakers. Stripes
may appear on the screen or there may be colour
patches.
Note : If you cannot adjust the screen condition
by degaussing, try it again after about 4 minutes.
Sleep timer
You don’t have to remember to switch the set off
before you go to sleep. The sleep timer automati-
cally switches the set to standby after the preset
time elapses.
Repeatedly press the SLEEP button to select the
number of minutes. The display
rr
- - - will appear
on the screen, followed by 10, 20, 30, 60, 90, 120,
180 and 240. The timer begins to count down from
the number of minutes selected.
Note :
a. To view the remaining sleep time, press the
SLEEP button once.
b. To cancel the sleep time, repeatedly press the
SLEEP button until the display
rr
- - -
appears.
c. When you switch the set off, the set releases
the preset sleep time.
9
Setting the On/Off timer
By using this function, the set automatically
switches on or off at a preset time. You must set
the time correctly before using the on/off time
function.
Note :
a.
On time works only in standby mode.
b. To view the remaining on/off time, select the
Time menu.
c. When you switch the main power off, the
Clock is reset .
Auto sleep
If you select On on the Auto sleep pull-down
menu, the set will automatically switch itself to
standby mode approximately ten minutes after a
TV station stops broadcasting.
Time Setting

Teletext (or TOP text) is an optional function,
therefore only a set with the teletext system can
receive the teletext broadcast.
Teletext is a free service broadcast by most TV
stations which gives up-to-the-minute information
on news, weather, television programmes, share
prices and many other topics.
The teletext decoder of this TV can support the
SIMPLE, TOP and FASTEXT systems. SIMPLE
(standard teletext) consists of a number of pages
which are selected by directly entering the corre-
sponding page number. TOP and FASTEXT are
more modern methods allowing quick and easy
selection of teletext information.
Switch on/off
Press the TEXT button to switch to teletext.
The initial page or last page appears on the
screen.
Two page numbers, TV station name, date and
time are displayed on the screen headline. The
first page number indicates your selection, while
the second shows the current page displayed.
Press the TEXTor TV/AV button to switch off tele-
text. The previous mode reappears.
SIMPLE text
Page selection
1. Enter the desired page number as a three
digit number with the NUMBER buttons. If
during selection you press a wrong number,
you must complete the three digit number and
then re-enter the correct page number.
2. The
DD
/
EE
button can be used to select the
preceding or following page.
Programming a colour button in LIST mode
(option)
Press the button to switch to LIST mode.
Four teletext page numbers of your choice can be
colour coded and easily selected by pressing the
corresponding coloured button on the remote
control handset.
1. Press a coloured button.
2. Using the NUMBER buttons, select the page
you wish to programme.
3. Press the OK button. Then the selected page
is stored as the selected page number with
blinking once. From now on, you can select
this page with the same coloured button.
4. The three other coloured buttons are pro-
grammed in the same way.
Teletext (option)
PIP operation (option)
Option :
PIP (Picture in Picture) displays a picture within a
picture.
On and off
Press the PIP button to switch on the sub picture.
Press this button again to switch it off.
Input mode selection for sub picture
Press the INPUT button to select the input mode
for the sub picture.
Swapping between main and sub pic-
tures
Press the SWAP button to exchange the main
and sub pictures.
Programme selection for sub picture
Press the PR +/- buttons to select a programme
for the sub picture. (In some models, the sub pic-
ture programme selection is available when the
sub picture is TV mode.)
Sub picture size
Repeatedly press the SIZE button to select the
desired sub picture size. The sub picture appears
as below.
Note : When the sub picture size is 1/2 of the
main picture, the picture quality might get poor.
Sub picture freeze
Press the STILL button to freeze motion of the
sub picture.
Press this button again to restore motion.
Sub picture position change
Press the POSITION button repeatedly until
desired position is achieved. The sub picture
moves clockwise.
Programme number
AV 1
AV 2
COMPONENT
(option)
10
1/16 size of the main picture
1/9 size
1/2 size (
option)
M

TOP text (option)
The user guide displays four fields-red, green, yel-
low and blue at the bottom of the screen. The yel-
low field denotes the next group and the blue field
indicates the next block.
Block / group / page selection
1. With the blue button you can progress from
block to block.
2. Use the yellow button to proceed to the next
group with automatic overflow to the next
block.
3. With the green button you can proceed to the
next existing page with automatic overflow to
the next group.
Alternatively the
DD
button can be used.
4. The red button permits to return to previous
selection. Alternatively the
EE
button can be
used.
Direct page selection
Corresponding to the SIMPLE teletext mode, you
can select a page by entering it as a three digit
number using the NUMBER buttons in TOP mode.
FASTEXT
The teletext pages are colour coded along the bot-
tom of the screen and are selected by pressing
the corresponding coloured button.
Page selection
1. Press the button to select the index page.
2. You can select the pages which are colour
coded along the bottom line with the same
coloured buttons.
3. Corresponding to the SIMPLE teletext mode,
you can select a page by entering its three
digit page number with the NUMBER buttons
in FASTEXT mode.
4. The
DD
/
EE
button can be used to select the
preceding or following page.
Special teletext functions
REVEAL
Press this button to display concealed informa-
tion, such as solutions of riddles or puzzles.
Press this button again to remove the information
from the display.
SIZE
Selects double height text.
Press this button to enlarge the top half of the
page.
Press this button again to enlarge the bottom half
of the page.
Press this button again to return to the normal dis-
play.
UPDATE
Displays the TV picture on the screen while waiting
for the new teletext page. The display will
appear at the top left hand corner of the screen. When
the updated page is available then the display
will change to the page number. Press this button to
view the updated teletext page.
HOLD
Stops the automatic page change which will occur
if a teletext page consists of 2 or more sub pages.
The number of sub pages and the sub page dis-
played is, usually, shown on the screen below the
time. When this button is pressed the stop symbol
is displayed at the top left-hand corner of the
screen and the automatic page change is inhibit-
ed.
To continue press this button again.
MIX
Displays the teletext pages superimposed on the
TV picture.
To switch the TV picture off press this button
again.
TIME
When viewing a TV programme, press this button
to display the time at the top right hand corner of
the screen. Press this button again to remove the
display. In the teletext mode, press this button to
select a sub page number. The sub page number
is displayed at the bottom of the screen. To hold or
change the sub page, press the RED/GREEN,
DD
/
EE
or NUMBER buttons. Press again to exit this
function.
Teletext (option)
11
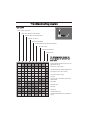
i

Troubleshooting check list
Symptoms
No picture, no sound
Sound OK, poor picture
Picture OK, poor sound
Picture blurred
Lines or streaks in picture
Poor reception on some channels
No colour
Poor colour
Remote control does not work
The mains plug-(plugged in and
switched on)
Is the TV switched on
Try another channel (weak signal)
Check aerial (plugged into TV?)
Check aerial (broken lead?)
Check aerial
Check for local interference
Adjust contrast
Adjust brightness
Adjust colour
Adjust volume
Check the batteries in remote control
Check Audio/Video sockets (VCR only)
Check these items and try to
adjust these

Telebijin mai launi
TAKARDAN HANUN NA TELEBIJIN
TAKARDAN HANUN NA TELEBIJIN
Dan allah karanta wannan takardan hanuia hankali kafin kafara
infani da telebijin.
Ajiye so ba da amfani na gaba.
Ka rubuta nomba kwatanchi da na kashi-kashi na telebijin.
Duba yar takarda wanda aka lika a baya sai ka rubuta wadannan
labarai zuwa ga mai sayarwa idan kana nemar karin bayani.
Nomba kwatanchi :
Nomba kashi-kashi :

2
Karfi
Karfi
Wannan telebijin na aiki da AC lantarki, karfin-sa na
rubace a kelle a murufin baya. Kada ka yi amfani
da DC da ya-sha kafi n telebijin. Idan lokaci tsawa
ko an dauke wutan lantarki, don allah chire waya
dake fi towa a bayyan telebijin da kuma fulogi.
Kadanna anun
POWER
POWER daga dama ko daga
gepe domin a kese TV idan bayi kalo ba achinkin
lokachi mai yawa TV. Ayi kokarin chire wayan
daga bango (Wojen kese).
ANA CIRE HAƊI NA'URA DAGA MANYA
ANA CIRE HAƊI NA'URA DAGA MANYA
- Filogin manya shine na'urar cire haɗi. Dolene
fi logi ya zama a shirye mai aiki.
Gargadi
Gargadi
Domin kawas da hatsarin gobara ko jan wutan
latarki kada a ajiye telebijin a ruwan sama ko inda
yana da daushi.
Kada a ajiye duk wani abu mai ruwa, ko ruwa a
saman telebijin, wanan yana iya haifar da hatsarin
gobara ko jan wutan lantarki.
Aiki
Aiki
Kadaka bude bayan telebijin domin yana iya
hadasa ka da jan wutan lantarki mai tsananin yawa
da wassu makamanchin yanayi. Idan telebijin ya
ki amfani kamar yadda ya kamata, chire fulogi sai
ka kira lakani na ainihi.
Eriya
Eriya
Hada eriya kebur daga soketi zuwa marufi n bayan
telebijin. Domin aiki mai kyau sai an hada eriya ya
fi to daga bayan telebijin zuwa sararin sama.
Inda ya kamata
Inda ya kamata
Ka ajiye telebijin yanda haske ko hasken wutan
lantarki bazasu haskaka kwalben telebijin ban.
Hankali ye tabbata kada a girgiza telebijin ko
ajiyan ruwa, kusa ka kura ko kuma zafi mai tsanani
sosai. Tabatar da ciwa telebijin yana ajiya a inda
akai ishasshen iska. Kada ka rufe ramukan iski a
bayyan telebijin.
Rubutu don tunani:
Rubutu don tunani:
Domin chire datti ko alamar hannu a kwalban TV,
ayi amfani da kelle da kayan yazo da shi. Kada a
hadasa nauyi lokacin sharewa soboda lalachewan
telebijin.
Zaka iya hada karin na’urar kamar VCRs cam-
corder da sauran su zuwa ga telebijin.
Ibanda yake nunawa anan zai iya zuwa da dan
banbanchi daga wanda yana telebijin naka.
Wayar soketi
Wayar soketi
1. Hada wayar RF mai fitowa daga VCR zuwa ga
wayar soketi abayan telebijin.
2. Hada eriya kebur zuwa wayan RF a chikin
soketi VCR.
3. Yi ajiyan magudanan VCR a shirin da kafiso
kayi amfani da ‘Tuntuban shirin hannu’.
4. Zaba nomba shiri inda magudanan VCR yana
ajiye.
5. Danna maballin
PLAY
PLAY a VCR.
Soketi Audio
Soketi Audio/
Video in
Video in/
out (zabi)
out (zabi)
1. Hada soketi magana/hoto na VCR zuwa ga
magana/hoto a chikin soketi telebijin da soketin
VCR zuwa soketi RF OUT a telebijin.
2. Idan an hada wayan VCR zuwa soketi
AV na
telebijin, dana maballin
TV/AV
TV/AV ka zaba AV 1 ko
AV 2 .
3. Danna maballin
PLAY
PLAY daga VCR. Alamar sake
nuna hoton VCR zai nuna a kwalban telebijin.
Zaka iya yi ajiyan shiri daga TV a pepen vidiyo
da taimokan soketi na hoto da magana.
Rubutu don tunani :
Rubutu don tunani :
Idan kana da VCR guda,
hada keburan magana daga VCR zuwa ga soketi
AUDIO L/MONO
AUDIO L/MONO na telebijin.
Soketi Euro scart (zabi)
Soketi Euro scart (zabi)
1. Hada soketi Euro scart na VCR zuwe soketi
Euro scart na telebijin.
2. Danna maballin
PLAY
PLAY a VCR.
Idan an hada soketi VCR zuwa ga soketi Euro
scart, telebijin zai kuna suwa
AV 1 da kansa.
Amma idan kana so ka chigaba dakallan TV,
danna maballin na
D
/
E
kokuna maballin
NOMBOBI.
Ko kuma ka danna maballin
TV
TV/
AV
AV akan na’urar
mai nisa na hannu don zabi
AV 1 . Alamar sake
nuna hoton VCR zai nuna a kwalban telebijin.
Zaka iya yi ajiyan shiri daga TV pepen vidiyo.
Rubutu don tunani :
Rubutu don tunani :
Alamar irin RGB, wato ja,
ruwa ganye da shudi da zama alamar kawowan
wajan soketi Euro scart. Wadannan alamum
aikowa, misali diko da da ake biya TV, na’uran
wassanni ko kuma hoton CD guda.
Kayayakin a soketi (zabi)
Kayayakin a soketi (zabi)
1. Hada COMPONENT soketi wajen vidiyo (Y Cb
Cr, Y Pb Pr ko Y B-Y R-Y) na COMPONENT
(480i) zuwa COMPONENT INPUT (Y P
B
P
R
) a
telebijin.
2. Hada wayan magana daga COMPONENT
zuwa wurin AUDIO IN a soketi
AV IN2
AV IN2.
3. Danna maballin
TV
TV/
AV
AV ka zaba COMPONENT.
4. Danna maballin
PLAY
PLAY a jikin COMPONENT.
COMPONENT sake hoto ya nuna a kwalban
telebijin.
Haduwan
Haduwan
............................................................
............................................................
2
Alaka daduwan na’ura na waje
Alaka daduwan na’ura na waje
..........................
..........................
2
Wuri da aikin iko
Wuri da aikin iko
.................................................
.................................................
3
Tsarin aiki
Tsarin aiki
...........................................................
...........................................................
5
Tsarin kwalban telebijin
Tsarin kwalban telebijin
......................................
......................................
5
Shiryawa tashon TV
Shiryawa tashon TV
...........................................
...........................................
6
Daidaitanwan hoto
Daidaitanwan hoto
..............................................
..............................................
7
Daidaitanwan Sauti
Daidaitanwan Sauti
............................................
............................................
8
Setin lokaci
Setin lokaci
.........................................................
.........................................................
9
Wassu aiki
Wassu aiki
..........................................................
..........................................................
9
Aikin PIP (zabi)
Aikin PIP (zabi)
................................................
................................................
10
Tafireran sakkonni (zabi)
Tafireran sakkonni (zabi)
..................................
..................................
10
Jerin matsalolin domin dubawa
Jerin matsalolin domin dubawa
........................
........................
12
2
Haduwan
Haduwan
Alaka daduwan na’ura na waje
Alaka daduwan na’ura na waje
Abinda ke chiki
Abinda ke chiki

3
Anna iya gabatar da aiki da iko da na’urar mai nisa na hannu. Anna
iya gabatar da wasu iko da taimakon maballin na gaban telebijin.
Ikon na’urar mai nasa na hannu
Ikon na’urar mai nasa na hannu
Kafi n ka yi amfani da na’urar mai nisa na hannu ka hada batir a
jikin sa. Duba shifi na gaba.
1. POWER
1. POWER
kunna telebijin da wutan tsaye ko zuwa wutan tsaye.
2. MABALLIN NOMBOBI
2. MABALLIN NOMBOBI
kunna telebijin da wutan tsaye ko ka a yi sabi daga maballin
nombobi.
3. MENU
3. MENU
zaba tsari.
4.
4.
D
/
E
(Programme Sama
(Programme Sama/
Kasa)
Kasa)
zaba shiri daga tsarin bayanai.
kunna telebijin da wutan tsaye.
zai zaba shiri da kansa.
F
/
G
(Volume Kasa
(Volume Kasa/
Sama)
Sama)
daidaita karfin murya.
daidaita tsarin bayanai.
OK
OK
yadda da zabin ka ko kuma ka nuna.
5. MABALLIN TAFIRERAN WAYAN SAKONNI (zabi)
5. MABALLIN TAFIRERAN WAYAN SAKONNI (zabi)
Wadannan maballin a wuran tafireran wayan sakonni.
Domin karin bayanni dubi shafin ‘Tafireran sakonni’.
6. SLEEP
6. SLEEP
daskare alaman barci.
7. MABALLIN PIP (zabi)
7. MABALLIN PIP (zabi)
PIP
PIP
kunna ko ka kashe wasu hoton a ayarin hotuna.
PR +
PR +/
-
zaba shiri na hoton karkashi.
SWAP
SWAP
canjin tsakanin asalin hoto da hoton karkashi.
INPUT
INPUT
zabi alamar aikin shiga na hoton karkashi.
SIZE
SIZE
daidata girman karkashin.
STILL
STILL
daskarewan hoton karkashi.
POSITION
POSITION
canjin hoton karkashi a umurmin agogo.
(Da TELETEXT
(Da TELETEXT /
PIP)
PIP)
(Da TELETEXT
(Da TELETEXT /
babu PIP)
babu PIP)
Wuri da aikin iko
Wuri da aikin iko
1
3
2
4
6
5
7
12
8
11
9
10
123
4
5
6
7
8
9
0
PR
PR
VOL
VOL
OK
0
PR
PR
VOL
VOL
OK
UPDATE/
HOLD/
5
14
13

4
8. FAVOURITE
8. FAVOURITE
zaba shirin da kafiso.
9. EYE
9. EYE/
*
(zabi)
(zabi)
kunna wajan aiki ko ka kashe.
10. MUTE
10. MUTE
kunna ko kunnawa sauti.
11. TV
11. TV/
AV
AV
zabi yanayin TV ko AV.
kunna telebijin da wutan tsaye.
chirewan tafiretan sakkoni.
12. I
12. I/
II
II/
*
zaba harshe lokaci daka ake nuna shirin harsuna.
zaba sauti mai fitowa (zabi).
13. Q.VIEW (ko RUWAN KWAI)
13. Q.VIEW (ko RUWAN KWAI)
koma zuwa shirin da aka kalla.
14. LIST (ko SHUDI)
14. LIST (ko SHUDI)
nuna tebur shiri.
*
: Ba iko
: Ba iko
MABALLIN MAI LAUNI :
MABALLIN MAI LAUNI : Wadannan maballi ana amfani da su wurin
tafiretan sakkonni daga (TELETEXT kawai) ko kuma daidaita shiri.
Wuri da aikin iko
Wuri da aikin iko
(Babu TELETEXT
(Babu TELETEXT /
PIP)
PIP)
(Da PIP
(Da PIP /
babu TELETEXT)
babu TELETEXT)
123
4
5
6
7
8
9
0
PR
PR
VOL
VOL
OK
Q.VIEW LIST
4
1
3
2
8
12
13
11
14
9
10
6
123
4
5
6
7
8
9
0
PR
PR
VOL
VOL
OK
7
Haduwan batir
Haduwan batir
Na'ura mai nisar na amfani da AAA batir. Idan za’a sa batir juye
na’urar mai nisa na hannu sai a bude bayan. Yi amfani da batir guda
biyu kamar yadda karfi ya nuna a bayyan na’urar na hannu ( da ).
Rubutu don tunani :
Rubutu don tunani : Domin kawas da yoyon batir, chere batir
idan baza ka yi amfani da na’urar mai nisa na hannu zuwa wani
lokaci.
ko
ko

5
KARFIN MASAMMA (KUNNA
KARFIN MASAMMA (KUNNA /
KASHE)
KASHE)
kunnawa ko kashewa telebijin.
ALAMAR KARFIN
ALAMAR KARFIN/
DA JIRAN
DA JIRAN
shude hasken idan telebijin yana tsaye.
alamar karfin wutan lantarki.
AZANCHIN NA’URA MAI NISA NA
AZANCHIN NA’URA MAI NISA NA
HANNU
HANNU
Rubutu don tunani :
Rubutu don tunani : Idan kayi amfani da
sauran baza su yi aiki ba. (A lokacin da ka yi
amfani da sauran, to bazasu iya aiki ba.)
TSARI
TSARI
zaba tsar.
OK
OK
yadda da zabi ko kuma ka nuna.
F
F
/
G
(Volume Kasa
(Volume Kasa/
Sama)
Sama)
daidata karan murya.
daidata tsari shiri.
D
D
/
E
(Programme Sama
(Programme Sama/
Kasa)
Kasa)
zaba shiri ko a fanin tsari.
kunna telebijin da wutan tsaye.
SOKETI MAGANA/HOTO/USB (AV IN2)
SOKETI MAGANA/HOTO/USB (AV IN2)
(zabi)
(zabi)
Hada soketi magana/hoto/USB zuwa soketi
na’uran waje.
Rubutu don tunani :
Rubutu don tunani :
An numa palala yanda gaba ko gefe yake.
Ambi da an nuna yana iya banbanchi da tele-
bijin ko ba a kawowa a anuwan ku.
Wuri da aikin iko
Wuri da aikin iko
Kunna da kashe
Kunna da kashe
1. Danna maballin kannawa a kunna telebijin.
2. Idan telebijin yana nan a kunne, danna
POWER
POWER,
D
/
E
,
TV
TV/
AV
AV ko NOMBOBI maballin a jikin
na’ura mai nisa na hannu ka kunna chikekiya.
3. Danna maballin
POWER
POWER a jikin na’urar mai
nisa na hannu.
Telebijin ya koma tsarin jirawa.
4. Danna asalin daballin kunnawa ka kashe
telebijin.
Rubutu don tunani :
Rubutu don tunani : Idan telebijin na nan a kunne,
baa hada asalin fulogi ka mayar da asalin soketi
wutan.
Zaban shiri
Zaban shiri
Za a iya zaban shiri daga maballin
D
/
E
ko
NOMBOBI.
Daidata karin murya
Daidata karin murya
Danna maballin
F
/
G
ka diadata karan murya.
Q.VIEW (ko
Q.VIEW (ko
RUWAN KWAI
RUWAN KWAI
)
Danna maballin
Q.VIEW (ko
Q.VIEW (ko
RUWAN KWAI
RUWAN KWAI
)
) ka
kallo shirin karshe da ka kalla.
Aiki mai shuru
Aiki mai shuru
Danna maballin
MUTE
MUTE. Sautin ya dauke sai ala-
mar W ya fito.
Zaka iya kashe shi idan ka danna maballin
MUTE
MUTE,
F
/
G
,
I
I/
II
II/
*
(zabi).
Zaben harshuna dake nuna a kwalban
Zaben harshuna dake nuna a kwalban
Isari kan iya nunawa a kwalban telebijin harshen
da ake so. Na farko zaba harshen ka.
1. Danna maballin
MENU
MENU da kuma maballin
D
/
E
sai ka zaba Tsari na masamma.
2. Danna maballin
G
ka zaba Language.
3. Danna maballin
G
da kuma maballin
D
/
E
sai
ka zaba harshon da kafiso.
Duk abinda ke nunawa a kwalban telebijin zai
fito a harshon na kasaba. Danna maballin
OK
OK
ko maballin
F
ka zaba tsari na Masamma.
4. So dayawa sake danna maballin
MENU
MENU ka
komo kallan TV.
Tsarin aiki
Tsarin aiki
Mamalan tsakanin kai da telebijin naka na faruwa
a kwalban telebijin da aikin tsari. Maballin da ake
amfani wajen aikin daya bayan na nunawa.
Zaban tsari
Zaban tsari
1. Danna maballin
MENU
MENU da kuma maballin
D
/
E
kafin ya nuna kowanda tsari.
2. Danna maballin
G
da kuma maballin
D
/
E
domin zaban tsari.
3. Danna maballin
G
ya nuna tsari na karkashi ko
ja tsari kasa.
4. Canjin tsarin karkashi ko kaja tsarin kasa da
maballin
F
/
G
ko
D
/
E
.
Zaka iya zawa tsarin mataki na gaba idan ka
danna maballin
OK
OK ko maballin
F
sai ka gusa
zuwa tsarin mataki na baya idan an danna
maballin
G
.
Rubutu don tunani :
Rubutu don tunani :
a. A chikin tafireran sakkonni, tsari ba su nunawa
ba.
b. A wasu kwatanchi siffa, shirye shirye
Normal
/
Turbo search
ba zai nuna kadai ba, kai kai
Start
zai nuna tsari
Auto Programme
.
c. A wasu kwatanchi siffa,
Tilt
,
Booster
ko
Degauss
mai gefe bu zai nuna ba.
d. A wasu kwatanchi siffa,
Language
,
X-WAVE
mai gefe bu zai nuna ba.
Tsarin kwalban telebijin
Tsarin kwalban telebijin

6
Tsarin kwalban telebijin
Tsarin kwalban telebijin
Tuntuba shiri da kansu
Tuntuba shiri da kansu
Dukan tashon da aka kama ana iya ijiyan su da
wanan hanyar. Ya kamata ka yi amfani da tsarin shi-
rin na ainihi lokacin da ake hada wayoyin telebijin.
System:
BG
:
(Asia/NewZealand/M.East/Africa/Australia)
I : (Hong Kong/South Africa)
DK : (East Europe/China/Africa/CIS)
L : (SECAM L/L’(France) (zabi)
M : (USA/Korea/Philippines) (zabi)
Rubutu don tunani :
Rubutu don tunani :
a. Neman
Turbo search
yana da
Normal
search
a wasu kwantanchi, wannan tuntuba
zai yi ajiya duk tashon da aka kama da kansa.
b. Idan tashon shirin ya ba gurbata chiyan sauti, sake
zaban hadin da tsarin
Manual Programme
.
Tuntuban shirin hannu
Tuntuban shirin hannu
Tantuban shirin hannu zai baka dama ka tantuba
da shiryawan tashon a kowace oda da kake so.
Kuma zaka iya shirya sunan tasha da hali biyar a
kowanda shirin nomba.
Booster (zabi)
Booster (zabi)
Idan baya aiki mai kyau da wurin hadin siginal TV,
zaba
Booster zuwa On.
Tuntuba mai kyau
Tuntuba mai kyau
Tuntuba mai kyau zai taashi ne idan kallo ba kyau.
Shiri masu kyau zasu nuna kallan niwan kwai
lokachin zabi nomba shiri.
Shiryawa tashon TV
Shiryawa tashon TV
BG
I
DK
M
Auto
O
programme {
Manual
O
programme {
Program me
O
edit {
FavouriteOprogramme
{
()O}{OOKOMENU
0OOARO1DOOO5OOSO69
O1OOCO03OOO6OOSO17
O2OOCO12OOO7OOSO22
O3OOSO66OOO8OOCO09
O4OOSO67OOO9OOCO11
DeleteOOOOCopy
MoveOOOOOOSkip
O0OOCO03
{MSP
{DX
Contrast {
Brightness {
Colour {
Sharpness {
()O}{OOKOMENU
()O}{OOKOMENU
()O}{OOKOMENU
()O}{OOKOMENU
Storage {
System {
Channel {
{eniF
Search {
{emaN
()O}{OOKOMENU
()} {OOKOMENU
Storage {
2
{MSS
Turbo oSound {
{LVA
Balance {
X-WAVE {
Clock {
Offotime {
Onotime {
Autoosleep {
Language {
Input {
Childolock {
Degauss {
System {
StorageO from {
NormalO search {
TurboO search {
()O}{OOKOMENU
System {
BG
I
DK
L
56n Ca 05
56n Ca 05
Auto
O
programme {
Manual
O
programme {
Program me
O
edit {
FavouriteOprogramme
{
}{O0_9O()OOKOMENU
ko
ko
Station
Picture
Sound
Time
Special
Auto programme
Manual programme
Favourite programme
Programme edit
Menu na hoto
Menu na hoto
Menu na sauti
Menu na sauti
Menu na lokaci
Menu na lokaci
Menu na tasha
Menu na tasha
Tsare-tsaren TV
Tsare-tsaren TV
Menu na musamman
Menu na musamman

7
Editan shiri
Editan shiri
Wannan aiki zai baka dama ka zaba ko sharewa
shiri ajiyoyu. Zaka iya gusar ta tashon zuwa wassu
shirye-shirye ko kuma kasu tashon da ba shiri
zuwa zabbabu shirye-shirye nomba.
Sharewan shiri
Sharewan shiri
1. Zaba shiri da za a share da maballin
D
/
E
ko
F
/
G
.
2. Danna maballin JA SO biyu.
Ka share zabeben shiri sai dukan shirye-shirye
sun biyo baya daya bayan daya.
Kwashewon shiri
Kwashewon shiri
1. Zaba shiri na kwashewa da maballin
D
/
E
ko
F
/
G
.
2. Danna maballin RUWAN GANYE.
Dukan shirye-shirye sun gusa da mataki daya.
Matsar da shiri
Matsar da shiri
1. Zaba shirin gusarwa da maballin
D
/
E
ko
F
/
G
.
2. Danna maballin RUWAN KWAI.
3. Gusar da shiri zuwa ga shirin da a kafiso da
maballin
D
/
E
ko
F
/
G
.
4. Danna maballin RUWAN KWAI kuma saboda
aiki ya fito.
Tsallaka nombobin shiri
Tsallaka nombobin shiri
1. Zaba shiri da za’a tsallaka da maballin
D
/
E
ko
F
/
G
.
2. Danna maballin SHUDI. Shirin da aka tsallake
sai juye shudi.
3. Sak danna maballin SHUDI ka sako tsallaka
kiyan shiri. Idan tsallaka nomba shiri, ya
kasance chewa baza a iya amfani da maballin
D
/
E
lokachin kallan TV. Idan kana so ka
za tsallakakiyan shiri, shiga gaba daya zuwa
maballin NOMBOBI ko zaba shiri a tebur tsari.
So dayawa sake danna maballin
MENU
MENU ka komo
kallan TV.
Shiri mafiso
Shiri mafiso
Wannan aiki zai baka dama zuwa shirin da kafi
so.
Kiran tebur shiri
Kiran tebur shiri
Zaka iya duba yiyoyin shirye-shirye a chikin tunani
da taimakon tebur shiri.
Rubutu don tunani :
Rubutu don tunani :
a. Zaka iya samo shirye-shirye shudi. An shirya
su suyi shirya da kansu ko a editan shiri.
b. Wasu shirye-shirye a hadin nomba sona nuna
tebur shiri amma ba sunan tashon.
Rubutu don tunani :
Rubutu don tunani : Tsarin hoto bayana a shigowar
RGB.
PSM (Umurnin Tunawa Hoto)
PSM (Umurnin Tunawa Hoto)
Anshirya hoto Dynamic, Standard, Mild da
Game domin hoto mai kyau bazala iya canjin
shirin kampani.
XD
XD
Za’a ji dadin hoton da LG mai bada kimiya na vividi
da hi-definition kuma da Dijital mai fitda hoton mai
kyau.
Daidaitanwan hoto
Daidaitanwan hoto
Zaka iya daidata banbanchin hoto inganchi (NTSC
shigawa kadai) zuwa ga matakin da kake so.
Daidaitanwan hoto
Daidaitanwan hoto
Shiryawa tashon TV
Shiryawa tashon TV

8
SSM (Umurnin Tunawa Sauti)
SSM (Umurnin Tunawa Sauti)
Zaka iyan zaba sautin da kake so na fina finai, ko
wassani kuma zaka iya daidaita sauti.
Daidaita nisan sauti
Daidaita nisan sauti
Danna maballin
G
a User mai amfani domin User
nunawa karkashin tsari.
()O}{OOKOMENU
0.1O0.5O1.5O5.0O10OkHz
Sautin Flat, Music, Movie da Sports ana tsara
su domin aiki mai kyau inda baza iya chanzaba.
Sautin zabin Turbo
Sautin zabin Turbo
Idan aiki yana a kunne, sauti zai kara karfi da murya
fiye da farko.
Daidaitanwan sauti
Daidaitanwan sauti
Zaka iya daidaita zama, AVL (karin muryan kansa),
AVL kansa yana ajiyan karin murya iri daya koda
shiri ya chanza. Sautin Turbo yana kera dukanni
sauti a chikin tsari.
X-WAVE (Sautin rashin waya) (zabi)
X-WAVE (Sautin rashin waya) (zabi)
Zaka iya sauran sauti daga sanadarin FM.
Rubutu don tunani :
Rubutu don tunani :
a. Idan umurni ba kyau zaba kara dabam.
b. Domin wanzuwa, kada a sa nisan TV da
sanadarin FM ya wule mita biyar ko kafa
(16.4ft).
c. A wassu wurare tirasmita na FM zai rage karfi,
kamar kusa da muganar wayalis.
d. Karfin kamawa ya danganta da sanadarin
(FM radiyo).
Zaban yanayin fitan sauti
Zaban yanayin fitan sauti
A matakin AV, zaka iya zaba fitowan sauti a dama
ko hagan na sanadani mai karan murya.
Sake danna maballin
I
I/
II
II/
*
ka zaba fitowar sauti.
L+R : Wajan alamar murya na L ansa sa a speaker
na hagu kuma na R ansa sa a speaker na
dama.
L+L : Alamar magana daga shigawar L an aika
zuwa hagu da dama sanadri mai karan
murya.
R+R : Alamar magana daga maganar R da shiga-
war zuwa hagu ko dama sanadarin mai
karan murya.
Karbuwan stereo
Karbuwan stereo/
Dual
Dual
Idan an zaba shiri, sauti aika zuwa tashon zai fito
da shirin nomba da sunar tashon zai bata.
Watsa Abunda da kaskon zai nuna
Daya
MONO
Steriyo
STEREO
Guda biyu
DUAL I
Zaban sauti
Zaban sauti
A karbuwan stereo idan alamar stereo baya da
kyau, zaka iya kunna mono idan ka danna mabal-
lin
I
I/
II
II/
*
sau biyu. A karbuwa mono karan sautin
na kanuwa. Idan kana so ka dawo stereo danna
maballin
I
I/
II
II/
*
sau biyu kuma.
Zaban harshuna domin shirin harshuna
Zaban harshuna domin shirin harshuna
Idan shiri yana karbuwa a harsshuna biyu, za ka iya
matsowa azuwa
DUAL I, DUAL II ko DUAL I+II
idan ka danna maballin
I
I/
II
II/
*
in an sake.
DUAL I aiko da saklomin farko na harsuna zuwa
sanadarin mai kara murya.
DUAL II aiko da sakonni na biyu zuwa na harsuna
zuwa sanadarin mai karan murya.
DUAL I+II aiko da harsuna daban da ban zuwa ga
kowanda sanadarin karan murya.
NICAM na karbawa (zabi)
NICAM na karbawa (zabi)
Idan telebijin naka a shirye yeke da sanadarin kar-
ban sako na NICAM, wata NICAM maigagarumin
inganchi (Near Instantaneous Companding Audio
Multiplex).
Sauti dake fitowa, za’a iya zabansa akan yande
yeke idan an danna maballin
I
I/
II
II/
*
a sake kuma.
1. Idan NICAM mono ya karbu za’a iya zaban
NICAM MONO ko FM MONO.
2. Idan NICAM stereo ya karibu za’a iya zaban
NICAM STEREO ko FM MONO. Idan karbuwan
ba kyau ka chanza zuwa FM MONO.
3. Idan NICAM dual ya karbu zaba iya zaban
NICAM DUAL I, NICAM DUAL II ko
NICAM DUAL I+II ko MONO. Idan FM mono
ya karbi zabuwa MONO zai nuna a kwalban
telebijin.
Daidaitanwan Sauti
Daidaitanwan Sauti
La page est en cours de chargement...
La page est en cours de chargement...
La page est en cours de chargement...
La page est en cours de chargement...
La page est en cours de chargement...
La page est en cours de chargement...
La page est en cours de chargement...
La page est en cours de chargement...
La page est en cours de chargement...
La page est en cours de chargement...
La page est en cours de chargement...
La page est en cours de chargement...
La page est en cours de chargement...
La page est en cours de chargement...
La page est en cours de chargement...
La page est en cours de chargement...
La page est en cours de chargement...
La page est en cours de chargement...
La page est en cours de chargement...
La page est en cours de chargement...
La page est en cours de chargement...
La page est en cours de chargement...
La page est en cours de chargement...
La page est en cours de chargement...
La page est en cours de chargement...
La page est en cours de chargement...
La page est en cours de chargement...
La page est en cours de chargement...
La page est en cours de chargement...
La page est en cours de chargement...
La page est en cours de chargement...
La page est en cours de chargement...
La page est en cours de chargement...
La page est en cours de chargement...
La page est en cours de chargement...
La page est en cours de chargement...
La page est en cours de chargement...
La page est en cours de chargement...
La page est en cours de chargement...
La page est en cours de chargement...
-
 1
1
-
 2
2
-
 3
3
-
 4
4
-
 5
5
-
 6
6
-
 7
7
-
 8
8
-
 9
9
-
 10
10
-
 11
11
-
 12
12
-
 13
13
-
 14
14
-
 15
15
-
 16
16
-
 17
17
-
 18
18
-
 19
19
-
 20
20
-
 21
21
-
 22
22
-
 23
23
-
 24
24
-
 25
25
-
 26
26
-
 27
27
-
 28
28
-
 29
29
-
 30
30
-
 31
31
-
 32
32
-
 33
33
-
 34
34
-
 35
35
-
 36
36
-
 37
37
-
 38
38
-
 39
39
-
 40
40
-
 41
41
-
 42
42
-
 43
43
-
 44
44
-
 45
45
-
 46
46
-
 47
47
-
 48
48
-
 49
49
-
 50
50
-
 51
51
-
 52
52
-
 53
53
-
 54
54
-
 55
55
-
 56
56
-
 57
57
-
 58
58
-
 59
59
-
 60
60


Documents connexes
-
LG 29FX4BLE Le manuel du propriétaire
-
LG 15FC2RB Le manuel du propriétaire
-
LG RZ-14LA60 Le manuel du propriétaire
-
LG 29FS4RN Le manuel du propriétaire
-
LG WF-32A20TM Le manuel du propriétaire
-
LG CF-29C60XM Le manuel du propriétaire
-
-
-
LG 29FS4RNX Le manuel du propriétaire
-
LG 32FS4RMB Le manuel du propriétaire