Worx WG175.1 Le manuel du propriétaire
- Catégorie
- Coupe-herbe
- Taper
- Le manuel du propriétaire

WG160 WG160.1 WG160.2 WG160.3
WG160.9 WG175 WG175.1
P06
P15
P25
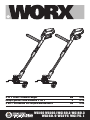
3 in 1 Grass Trimmer/Edger
Coupe gazon/Taille-bordure 3 en 1
3 en 1 Cortadora de cesped/Ribeteadora
EN
F
ES


4
6
7
9 10
2
1
5
8
3
14
15
13
12
11

9 10
14
11
15
b
a
16
A B1 B2
B3 C D
E F1 F2
G H1 H2

22
18
19
20
21
RIGHT
WRONG
17
H3 I1 I2
J1 J2
K1
K2 K3
L1
L2 L3
L4

6
3 in 1 Grass Trimmer/Edger
EN
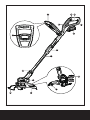
1. REAR HANDLE
2. BATTERY PACK
3. TELESCOPIC SHAFT
4. PIVOT HEAD LOCKING KNOB
5. SAFETY GUARD
6. FLOWER GUARD/EDGER GUIDE
7. AUXILIARY HANDLE
8. TELESCOPIC SHAFT ADJUSTMENT TRIGGER
9. LOCK OFF BUTTON
10. ON/OFF SWITCH
11. AUXILIARY HANDLE LOCKING LEVER
12. EDGER/TRIMMING SUPPORT WHEELS
13. LINE CUTTER
14. LOWER SHAFT COUPLING
15. UPPER SHAFT
16. MOTOR HOUSING OF TRIMMER HEAD (See Fig. H2)
17. LINE FEED BUTTON (See Fig. K1)
18 SPOOL CAP COVER (See Fig. K2)
19 CAP RELEASE LATCH (See Fig. K2)
20. SPOOL (See Fig. K2)
21. CUTTING HEAD (See Fig. K2)
22. EYELET (See Fig. K2)
Not all the accessories illustrated or described are included in standard delivery.

7
3 in 1 Grass Trimmer/Edger
EN
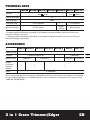
TECHNICAL DATA
WG160 WG160.1 WG160.2 WG160.3 WG160.9 WG175 WG175.1
Voltage
20V
Max* 32V Max**
Cutting diameter 12”
Line diameter 0.065”
Charging time 3-5 hr approx. / 3 hr approx.
Machine weight 5.7lbs (2.6kg)
4.9lbs
(2.2kg)
6.2lbs(2.8kg)
* Voltage measured without workload. Initial battery voltage reaches maximum of 20 volts.
Nominal voltage is 18 volts.
** Voltage measured without workload. Initial battery voltage reaches maximum of 32 volts.
Nominal voltage is 28.8 volts.
ACCESSORIES
WG160 WG160.1 WG160.2 WG160.3 WG160.9 WG175 WG175.1
Safety guard 1
Charger 1 (WA3732/WA3742) / 1 (WA3740)
Battery pack 1 (WA3525) 2 (WA3525)
/
1 (WA3537) 2 (WA3537)
Edger/
trimming
support
wheels
1 2 1
Spool 3 (WA0004)
Only use the appropriate accessories intended for this tool. Accessory information can be found
on the product packaging, at a WORX dealer or on our website at www.worx.com or by calling
1-866-354-WORX(9679).

8
3 in 1 Grass Trimmer/Edger
EN
IMPORTANT SAFETY
INSTRUCTIONS
WARNING: When using cordless
gardening appliances, basic safety
precautions should always be followed to
reduce the risk of fire, electric shock, and
personal injury, including the following:
WARNING: Read all instructions
WARNING: This product maybe
contains lead, phthalate or other
chemicals known to the State of
California to cause cancer, birth defects
and other reproductive harm. Please
wash your hands after use.
FOR ALL APPLIANCES
1) Avoid Dangerous Environment - Don’t use
appliances in damp or wet locations.
2) Don’t Use In Rain.
3) Keep Children Away - All visitors should
be kept at a distance from work area.
4) Dress Properly - Do not wear loose
clothing or jewelry. They can be caught in
moving parts. Wear protective clothing;
use of work gloves, long pants, a long
sleeved shirt and substantial footwear is
recommended when working outdoors.
Wear protective hair covering to contain
long hair.
5) Use Safety Glasses - Always use face or
dust mask if operation is dusty.
6) Use Right Appliance - Do not use
appliance for any job except that for which
it is intended.
7) Don’t Force Appliance - It will do the
job better and with less likelihood of a
risk of injury at the rate for which it was
designed.
8) Don’t overreach - Keep proper footing and
balance at all times.
9) Stay Alert - Watch what you are doing.
Use common sense. Do not operate
appliance when you are tired.
10) Store Idle Appliances Indoors - When
not in use, appliances should be stored
indoors in dry, and high or locked-up place
- out of reach of children.
11) Maintain Appliance With Care - Keep
cutting edge sharp and clean for best
performance and to reduce the risk of
injury. Follow instructions for lubricating
and changing accessories. Keep handles
dry, clean, and free from oil and grease.
12) Check Damaged Parts - Before further use
of the appliance, a guard or other part that
is damaged should be carefully checked
to determine that it will operate properly
and perform its intended function. Check
for alignment of moving parts, binding
of moving parts, breakage of parts,
mounting, and any other condition that
may affect its operation. A guard or other
part that is damaged should be properly
repaired or replaced by an authorized
service center unless indicated elsewhere
in this manual.
SAVE THESE INSTRUCTIONS
FOR ALL BATTERY – OPERATED
GARDENING APPLIANCES
1. The instruction manual for all battery-
operated gardening appliances shall
contain the following or equivalent
instructions:
1) Do not charge appliance in rain, or in wet
locations.
2) Do not use battery-operated appliance in
rain.
3) When replacing batteries, all batteries
should be replaced at the same time.
Mixing fresh and discharged batteries
could increase internal cell pressure and
rupture the discharge battery (ies).
4) When inserting batteries into this product,
the proper polarity or direction must be
observed. Reverse insertion of batteries
can result in leakage or explosion.
Always remove or disconnect
battery pack before adjusting,
cleaning, servicing or transporting
the lawn trimmer.
2. The instruction manual for all
battery-operated products employing
a detachable or separable battery shall
contain the following or equivalent
instructions:
1) Use only the following type and size
battery(ies): WORX model WA3525 (for

9
3 in 1 Grass Trimmer/Edger
EN
WG160 WG160.1 WG160.2 WG160.3).
WA3537 (WG175 WG175.1)
2) Do not dispose of the battery (ies) in a
fire. The cell may explode. Check with
local codes for possible special disposal
instructions or contact Call2Recycle at
1-800-822-8837.
3) Do not open or mutilate the battery (ies).
Released electrolyte is corrosive and may
cause damage to the eyes or skin. It may
be toxic if swallowed.
4) Exercise care in handling batteries in order
not to short the battery with conducting
materials such as rings, bracelets, and
keys. The battery or conductor may
overheat and cause burns.
3. Avoid Unintentional Starting – Do not
insert battery with finger on switch.
Be sure switch is off when inserting
battery.
SAVE THESE INSTRUCTIONS
ADDITIONAL SAFETY
RULES FOR LAWN
TRIMMER AND EDGE
TRIMMER
1. Keep guards in place and in working order
2. Do not use this product without the guard
being fitted.
3. Keep hands and feet away from cutting
area.
4. Do not use heavier lines than
recommended in this manual.
5. Do not use line materials of other types –
for example, metal wire, rope, and the like.
SAVE THESE INSTRUCTIONS
GENERAL SAFETY
WARNINGS FOR BATTERY
PACK
1) WARNING: Risk of fire and
burns. Do not disassemble, heat
above 100°C (212°F), or incinerate.
Do not expose cells or batteries to
heat or fire. Avoid storage in direct
sunlight.
2) Dispose of used battery promptly.
When disposing of secondary cells
or batteries, keep cells or batteries
of different electrochemical systems
separate from each other.
3) Keep battery out of reach of children
and in original package until ready to
use.
4) Never put batteries in mouth. If
swallowed, contact your physician or
local poison control center.
5) CAUTION – The battery used in this
device may present a risk of fire or
chemical burn if mistreated. Replace
battery with (WORX) only. Use of
another battery may present a risk of
fire or explosion
6) Warning: Do not use a visibly
damaged battery pack or appliance
as applicable.
7) Warning: Do not modify or attempt
to repair the appliance or the battery
pack as applicable.
8) BATTERY MUST BE RECYCLED.
9) Do not short-circuit a cell or battery.
Do not store cells or batteries
haphazardly in a box or drawer where
they may short-circuit each other
or be short-circuited by conductive
materials.
10) Do not subject cells or batteries to
mechanical shock.
11) Keep cells and batteries clean and
dry. Wipe the cell or battery terminals
with a clean dry cloth if they become dirty.
12) Do not maintain secondary cells and
batteries on charge when not in use.
13) Retain the original cell and battery
literature for future reference.
14) Do not use any charger other than
that specifically provided for use
with the equipment. Secondary cells
and batteries need to be charged before
use. Always use the correct charger and
refer to the manufacturer’s instructions
or equipment manual for proper charging
instructions.
15) When possible, remove the battery from
the equipment when not in use.
SAVE THESE INSTRUCTIONS

10
3 in 1 Grass Trimmer/Edger
EN
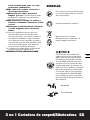
To reduce the risk of injury, user
must read instruction manual
Wear ear protection
Li-ion battery. separate collection,
and battery must be recycled
POSITEC Inc. has established
a partnership with the RBRC
Corporation to recycle any
Positec batteries with the
RBRC-call2recycle seal. For
environmental protection, please
do not discard batteries in the
trash. After the batteries’ life
cycle is ended, then please call
1-800-822-8837 for a free service
that will properly dispose of the
battery.
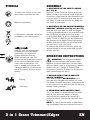
Edging
Trimming
SYMBOLS ASSEMBLY
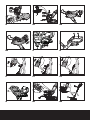
1. ASSEMBLY OF THE SAFETY GUARD
(See Fig. A)
Remove a screw from the Guard; attach the
Safety Guard to the trimmer head. Align the
Guard so it slides into the slots located on the
trimmer head. Turn the tool over and secure
the Safety Guard onto the trimmer head with
the screw (a) provided.
2. ASSEMBLY OF THE EDGER/TRIMMING
SUPPORT WHEELS (See Fig. B1, B2, B3)
With the tool right side up, slide the Edger/
Trimming Support Wheels (12) assembly onto
the metal plate located on the side of the
Cutting Head (See Fig. B1) or underneath the
Safety Guard (5) (See Fig. B2, B3). Make sure
the grooves of the Edger/Trimming Support
Wheels assembly locks onto the metal plate,
you will hear it click into place.
To remove the wheels assembly, press the
release button (b) on the wheel and pull the
wheels outside.
OPERATION INSTRUCTIONS
WARNING! The charger and Battery
Pack are specially designed to work
together so do not attempt to use any other
devices. Never insert or allow foreign metallic
objects into your charger or Battery Pack
connections because of electrical failure and
other hazards that will occur.
1. BEFORE USING YOUR CORDLESS
GRASS TRIMMER
Your Battery Pack is UNCHARGED and it
must be fully charged once before it is used.
The battery charger supplied is matched to the
Li-Ion battery for use with this tool. Do not use
another battery charger.
2. CHARGING YOUR BATTERY PACK
The Li-Ion battery is protected against deep
discharging. When the battery is empty,
the trimmer will switch off by means of a
protective circuit: The trimmer head will stop
rotating.
NOTE: In a warm environment or after heavy
use, the Battery Pack may become too hot to

11
3 in 1 Grass Trimmer/Edger
EN
permit charging. Allow time for the battery to
cool down before recharging.
3. TO REMOVE OR INSTALL BATTERY
PACK (See Fig. C)
Depress the battery release button to remove
Battery Pack (2) from your trimmer. After
recharging, insert the Battery Pack onto
trimmer’s battery bracket. A simple push and
slight pressure will be sufficient.
4. SAFETY ON/OFF SWITCH (See Fig. D)
The safety switch is locked off to prevent
accidental starting. Depress the Lock Off
Button (9) then depress the On/Off Switch (10)
and release Lock Off Button. Your trimmer is
now on. To switch off, just release the on/off
switch.
WARNING! The cutting head
continues to rotate after the
trimmer has been switched off; wait until
it has completely stopped then lay down
the tool.
5. ADJUSTMENT OF THE TELESCOPIC
SHAFT (See Fig. E)
Step one foot on the Safety Guard, then
use one hand to pull up the Telescopic Shaft
Adjustment Trigger (8), adjust the length of
the Telescopic Shaft to the most comfortable
length. Release the Telescopic Shaft.
Adjustment Trigger to lock in position.
6. MAIN HANDLE ROTATION
(See Fig. F1, F2)
First, hold down the lower housing with your
foot and pull upward on the Upper Shaft (15).
Then rotate the Upper Shaft clockwise 90
degrees (See Fig. F1) and release; the Shaft
will be locked in position automatically (See
Fig. F2).
7. ADJUSTMENT OF AUXILIARY HANDLE
Pull up the Auxiliary Handle Locking Lever (11).
Hold the Locking Lever and rotate the Auxiliary
Handle to the most comfortable and balanced
position (See Fig. G).
Release the lever, your Auxiliary Handle has
been locked.
8. ADJUSTMENT OF THE TRIMMER
HEAD ANGLE TO THE SHAFT
(See Fig. H1, H2 & H3)
WARNING: Make Sure the Safety
Switch is Locked Off to Prevent
Accidental Starting.
To adjust the Upper Shaft angle or convert the
tool from trimming mode and edging mode,
unlock the Pivot Head Locking Knob by hand,
and using adequate force, pull the trimmer
head into the desired position, then lock the
Pivot Head Locking Knob.
9. FLOWER GUARD/EDGER GUIDE
Pull the Flower Guard/Edger Guide out before
trimming, as shown in Fig. I1.
When edging, pull Flower Guard/Edger Guide
out also, and keep to a side (See Fig. I2).
Before trimming or edging make sure the
flower guard is locked firmly in position.
OPERATION
WARNING: Always wear the eye
protection. Never lean over the trimmer
head. Rocks or debris can ricochet or be
thrown into eyes and face and cause
blindness or other serious injury. When
operating unit, check for the following:
Wear eye protection and heavy clothing. Hold
front handle with one hand and Auxiliary
Handle with the other hand. Keep unit below
waist level. Work only from your right to your
left to ensure debris is thrown away from you.
Without bending over, keep line near and
parallel to the ground (perpendicular when
edging) and not crowded into material being
cut.
WARNING: Make sure that line is
fed out before operation. Make
sure motor is up to full speed before
trimming or edging.
WARNING: Only use 0.065”(1.65mm)
diameter cutting line. Other sizes of line
will not feed properly and will result in
improper cutting head function or can cause
serious injury. Do not use other material such
as wire, string, rope, etc. Wire can break off
during cutting and become a dangerous
projectile that can cause serious injury.

12
3 in 1 Grass Trimmer/Edger
EN
EDGER/TRIMMING SUPPORT WHEELS
There are three optional positions for the
Edger/Trimming Support Wheels to attach
when assisting in Trimming and Edging.
POSITION 1: USING THE GUIDE WHEELS
WHEN TRIMMING IN A FORWARD OR
REVERSE DIRECTION (See Fig. J1)
Position the Grass Trimmer in the trimming
position. Underneath the Safety Guard there is
a metal plate that the Edger/Trimming Support
Wheels will attach to. Slide the Support
Wheels horizontally onto the metal plate until
they lock into position so both the wheels are
facing in the forward direction (See Fig. B3).
The wheels should provide support when
you are trimming in the forward or reverse
direction.
POSITION 2: USING THE GUIDE WHEELS
WHEN TRIMMING SIDE TO SIDE
Position the Grass Trimmer in the trimming
position. Underneath the Safety Guard there is
a metal plate that the Edger/Trimming Support
Wheels will attach to. Slide the Support Wheels
vertically onto the metal plate until it locks
into position (See Fig. B2). The wheels should
provide support when you are trimming in a
horizontal side to side direction (See Fig. J2).
NOTE: you could also use the machine
without the guide wheels on guard when
trimming.
POSITION 3: USING THE GUIDE WHEELS
WHEN EDGING (See Fig. I2)
WARNING: Make Sure the Safety
Switch is Locked Off to Prevent
Accidental Starting.
Change the tool from trimming into the edging
mode, the Edger /Trimming Support Wheels
(12) will attach on the side the trimmer head
as shown in Fig. B1, rotate the main handle as
described in ‘’MAIN HANDLE ROTATION’’,
then unlock the Pivot Head Locking Knob, and
using adequate force, pull the trimmer head
into the desired position. Make sure to adjust
the trimmer head angle to be in the lowest
horizontal setting. Finally, lock the Pivot Head
Locking Knob and position the wheel on the
ground for the edging mode. While edging,
keep the Flower Guard/Edger Guide aligned
with the sidewalk edge, this will assist to
edge in a straight path. Only the tip of the line
will make contact with area being worked
on. Do not force the line. The edging wheels
help protect the unit and keep the unit from
contacting the ground. Take extra caution
while edging, as objects can be thrown from
the trimmer line.
AUTOMATIC LINE FEED SYSTEM
When initially switching on the trimmer, a
small length of line is fed out. Each time the
tool is started from rest it will advance about
0.25 inches of trimmer line.
A ‘clattering’ noise will be heard when
the lines hit the Line Cutter. DO NOT BE
ALARMED this is quite normal. After about
5 seconds the line will be cut to the correct
length and the noise will reduce as the motor
gains full speed.
If the noise of the line being cut can’t be heard,
more line will need to be fed out.
To feed more line, it is first necessary to allow
the trimmer to stop completely; it must come
to a complete rest, then restart, allowing the
motor to reach full speed.
Repeat above until you hear the line hitting
against the Line Cutter.
TO MANUALLY FEED THE LINE
(See Fig. K1)
Turn off the trimmer and remove the battery.
If required, line can be fed out manually.
To operate, press and release manual Line
Feed Button (17), while gently pulling out the
line until it is long enough to reach the Line
Cutter.
If the line extends past the Line Cutter, too
much line has been fed out.
If too much line is fed out, remove the Spool
Cap and turn Spool counter-clockwise until the
line is at the desired length.
TO REMOVE THE SPOOL CAP COVER
(See Fig. K2)
Press and hold in the two Cap Release Latches
(19) (See Fig. K2).
Pull the Spool Cap Cover (18) away from the

13
3 in 1 Grass Trimmer/Edger
EN
Cutting Head (21). Keep the Spool Cap Cover
and the inside of the Cutting Head clean from
debris. To replace the Spool Cap Cover, press
it firmly onto the Spool Holder. Ensure that
it is correctly connected by trying to remove
it without depressing the two Cap Release
Latches.
REPLACE THE TRIMMER LINE AND
SPOOL (See Fig. K3).
Turn off the trimmer and remove the battery.
Remove Spool Cap Cover.
For your convenience it is recommended you
buy replacement spools with the trimmer line
preinstalled. You can order your Free Spools
for Life WORX spools at www.worx.com or by
calling 1-866-354-WORX(9679).
Remove the old Spool from Spool Holder.
Clear any broken line or cutting debris from
the spool area. Pull the line from the new
replacement Spool through the eyelet of the
Spool Holder. Place new Spool into the holder
with the cut out areas of the Spool facing
inward or down. When installed into the
Spool Holder, the smooth side of the
Spool should be visible.
Release line from cleat on the Spool.
Refit the Spool Cap Cover.
TO MANUALLY WIND LINE
(See Fig. L1-L4)
Take approximately 10ft (3m) of line. Insert
5/8”(15mm) of line into the Spool holes and
wind line in the direction of the arrows on the
top of the Spool.
Leave approximately 4” (100mm) of line
unwound and place into the cleat.
Ensure that the line is neatly coiled on
the Spool. Failure to do so will impair the
efficiency of the automatic line feed.
Then fit the Spool as described above in “Rep
lace the trimmer line and Spool”
MAINTENANCE
After use, disconnect the battery from the tool
and check for damage.
Your power tool requires no additional
lubrication or maintenance. There are no
user serviceable parts in your power tool.
Never use water or chemical cleaners to
clean your power tool. Wipe clean with a dry
cloth. Always store your power tool in a dry
room temperature location. Keep the motor
ventilation slots clean. Keep all working
controls free of dust.

14
3 in 1 Grass Trimmer/Edger
EN
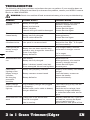
TROUBLESHOOTING
The following table gives problems and actions that you can perform if your machine does not
operate correctly. If these do not identify and correct the problem, contact your WORX Customer
Service at 1-866-354-WORX.
WARNING: Switch the machine off and remove the battery prior to any troubleshooting.
Problems Possible Causes Corrective Action
Trimmer fails to
operate.
Battery discharged.
Battery too hot/cold.
Motor is broken.
Internal wiring of machine damaged.
Recharge battery; also see the
content in charger manual.
Allow to cool/warm.
Contact Service Agent.
Contact Service Agent.
Trimmer runs
intermittently.
Motor is broken.
Battery not fully charged.
On/Off switch defective.
Contact Service Agent.
Recharge battery.
Contact Service Agent.
Excessive
vibrations/noise.
Machine defective.
Line spool is not wound well.
Contact Service Agent.
Rewind the line. See ’’ To fit spool
and line assembly.’’
Cutting time per
battery charge
too short.
Battery has not been used for long
period or only charged for short term.
Grass is too high.
Battery defective.
Fully charge battery; also see
the content in charger manual.
Cut in stages.
Replace the battery.
Machine does not
cut.
Line broken.
Battery not fully charged.
Motor is broken (speed is too low).
Grass entangled around cutting head.
Replace the line.
Recharge battery; also see the
content in charger manual.
Contact Service Agent.
Remove grass.
Continuous
lighting of the
battery charge
indicator.
No charging
procedure
possible.
Battery not (properly) inserted.
Battery contacts contaminated.
Battery defective.
Properly insert battery into battery
charger.
Clean the battery contacts or
replace the battery.
Replace the battery.
Battery charge
indicator does not
light up.
Plug of battery charger not plugged
in (properly).
Socket outlet, mains cable or battery
charger defective.
Insert mains plug (fully) into the
socket outlet.
Check the mains voltage; have
the battery charger checked by
an authorized after-sales service
agent.
Auto feed does not
work
Cutting line is not wound well.
The line is tangled.
Line is used up.
Manually feed the line, if still can
not feed out, remove the Spool
out and rewind the line.
Replace with a new spool of line.

15
Coupe gazon/Taille-bordure 3 en 1
F
1. POIGNÉE ARRIÈRE
2. BLOCS-PILES
3. ARBRE TÉLÉSCOPIQUE
4. BOUTON DE VERROUILLAGE DE LA TÊTE PIVOTANTE
5. GARDE DE SÉCURITÉ
6. PROTECTION DES FLEURS/GUIDE DE COUPE
7. GARDE DE SÉCURITÉ
8. BOUTON DE RÉGLAGE DU MANCHE TÉLESCOPIQUE
9. BOUTON DE VERROUILLAGE
10. INTERRUPTEUR MARCHE/ARRÊT
11. DÉGAGEMENT DE POIGNÉE
12. ROUE DE SUPPORT COUPE-BORDURES/ÉLAGAGE
13. COUPEUR DE CORDON DE COUPE
14. BOÎTIER INFÉRIEUR D’ENGRENAGE
15. POIGNÉE SUPÉRIEURE
16. HABITACLE DU MOTEUR DE LA TÊTE DU COUPE-HERBE (Voir Fig. H2)
17. BOUTON D’ALIMENTATION DU CORDON DE COUPE (Voir Fig. K1)
18 COUVERCLE DE BOBINE (Voir Fig. K2)
19 MÉCANISME DE DÉVERROUILLAGE DU COUVERCLE (Voir Fig. K2)
20. BOBINE (Voir Fig. K2)
21. TÊTE DE COUPE (Voir Fig. K2)
22. OEILLET (Voir Fig. K2)
Les accessoires illustrés ou décrits ne sont pas tous compris dans le cadre de la
livraison standard.

16
Coupe gazon/Taille-bordure 3 en 1
F
DONNÉES TECHNIQUES
WG160 WG160.1 WG160.2 WG160.3 WG160.9 WG175 WG175.1
Tension
20V
Max* 32V Max**
Diamètre de coupe
30cm (12po)
Diamètre du fil 1.65mm (0.065po)
Temps de
chargement
Environ 3-5 hr / Environ 3 hr
Poids de la machine
2.6kg (5.7lbs)
2.2kg
(4.9lbs)
2.8kg (6.2lbs)
* Tension mesurée hors fonctionnement. La tension initiale de la batterie atteint le maximum de
20 volts. La tension nominale est de 18V.
** Tension mesurée hors fonctionnement. La tension initiale de la batterie atteint le maximum de
32 volts. La tension nominale est de 28.8V.
ACCESSOIRES
WG160 WG160.1 WG160.2 WG160.3 WG160.9 WG175 WG175.1
Garde de sécurité
1
Chargeur 1 (WA3732/WA3742) / 1 (WA3740)
Bloc-Piles 1 (WA3525) 2 (WA3525)
/
1 (WA3537) 2 (WA3537)
Roue de
support
coupe-
bordures /
élagage
1 2 1
Bobine 3 (WA0004)
N’utilisez que les accessoires compatibles à cet outil. Les informations des accessoires peuvent
être trouvées sur l’emballage du produit, chez un détaillant WORX ou sur notre site Web
www.worx.com ou en appelant au1-866-354-WORX(9679).

17
Coupe gazon/Taille-bordure 3 en 1
F
INSTRUCTIONS
IMPORTANTES DE
SÉCURITÉ
AVERTISSEMENT! Lors de l’utilisation
d’appareils électriques de jardinage,
des précautions de base doivent être
observées afin de réduire les risques de feu,
choc électrique, et blessure grave, incluant ce
qui suit :
AVERTISSEMENT: Lisez Toutes Les
Instructions
AVERTISSEMENT: Ce produit peut
contenir du plomb, des phtalates
ou d’autres agents chimiques connus
dans l’État de Californie pour causer le
cancer, des malformations congénitales
et d’autres problèmes lies à la
reproduction. Lavez vos mains après
chaque utilisation.
POUR TOUS LES APPAREILS
1) Évitez les environnements dangereux.
N’utilisez pas les appareils dans des
environnements très humides ou mouillés.
2) N’utilisez pas sous la pluie.
3) Tenez les enfants éloignés. Tous les
visiteurs devraient se tenir éloignés de
l’aire de travail.
4) Habillez-vous convenablement. Ne portez
pas des vêtements lâches ou des bijoux.
Ils peuvent se prendre dans les pièces
en mouvement. L’utilisation de gants de
caoutchouc et chaussures épaisses est
recommandée lors de travaux extérieurs.
Portez une protection pour cheveux afin de
contenir les cheveux longs.
5) Utilisez des lunettes de sécurité Toujours
porter un masque pour le visage ou
pour la poussière si l’opération est
poussiéreuse.
6) Utilisez le bon appareil. N’utilisez pas
l’appareil pour tout autre travail que pour
celui auquel il est destiné.
7) Ne forcez pas l’appareil. Il va faire un
meilleur travail et avec moins de risques
de blessure en travaillant au taux de
charge pour lequel il a été conçut.
8) N’essayez pas d’utiliser l’appareil hors
de votre portée normale. Gardez votre
équilibre et les pieds bien ancrés en tout
temps.
9) Restez alerte. Faites attention à ce que
vous faites. Utilisez le bon sens. N’utilisez
pas l’appareil lorsque vous êtes fatigué.
10) Entreposez à l’intérieur les appareils
qui ne sont pas utilisés fréquemment.
Lorsqu’inutilisés, les appareils devraient
êtres entreposés à l’intérieur dans un
endroit sec, élevé et gardé sous clef, hors
de la portée des enfants.
11) Entretenez les appareils avec soins.
Gardez les arêtes de coupe aiguisées et
propres pour une meilleure performance
et risque réduit de blessure. Suivez les
instructions pour lubrifier et changer les
accessoires. Gardez les poignées sèches,
propres, et libres d’huile et de graisse.
12) Vérifier les pièces endommagées. Avant
d’employer l’appareil, une garde ou
autre pièce endommagée devrait être
soigneusement vérifiée afin de déterminer
qu’elle fonctionnera correctement et
exécutera la fonction pour laquelle
elle a été conçue. Vérifier l’alignement
des parties mobiles, leur pincement, la
brisure de pièces, montage, et toute autre
condition qui peut affecter son opération.
Une garde ou autre pièce endommagée
devrait être correctement réparée ou
remplacée par un centre de service
autorisé à moins d’avis contraire ailleurs
dans ce manuel.
CONSERVEZ CES INSTRUCTIONS
INSTRUCTIONS ADDITIONNELLES DE
SÉCURITÉ POUR LE TAILLE BORDURE À
BATTERIES.
1. Le mode d’emploi pour tous les
appareils de jardinage fonctionnant
avec des batteries doit contenir
les instructions suivantes ou des
instructions équivalentes:
1) Ne chargez pas l’outil sous la pluie, ou
dans des endroits mouillés.
2) N’utilisez pas des outils alimentés à piles
sous la pluie.
3) Lorsque vous remplacez les batteries,
remplacez-les toutes à la fois. Mélanger
des batteries rechargées et des batteries
déchargées peut augmenter les risques de

18
Coupe gazon/Taille-bordure 3 en 1
F
pression interne des cellules et de rupture
de la (des) batterie(s) déchargée(s)
4) Lorsque vous insérez les batteries dans
ce produit, veillez à respecter la polarité
ou le sens d’insertion. Des batteries mal
insérées ou inversées peuvent provoquer
une fuite ou une explosion.
RETIREZ TOUJOURS LA PILE
AVANT DE PROCÉDER AU
POSITIONNEMENT DE LA TÊTE DU
COUPE - HERBE/TAILLE-BORDURE.
2. Le mode d’emploi pour tous les
produits fonctionnant avec une batterie
détachable ou séparable doit contenir
les instructions suivantes ou des
instructions équivalentes:
1) Utilisez seulement des piles de type ou
grosseurs suivants: WA3525 (for WG160
WG160.1 WG160.2 WG160.3). WA3537
(WG175 WG175.1)
2) Ne disposez pas des piles en les jetant
dans feu. La cellule peut exploser.
Vérifiez les réglementations locales pour
de possibles instructions spéciales de
disposition ou appelez Call2Recycle 1-800-
822-8837.
3) N’ouvrez pas et ne mutilez pas la(les)
pile(s). L’électrolyte qui peut s’en échapper
est corrosif et peut causer des dommages
à vos yeux ou à votre peau. Il peut être
toxique si avalé.
4) Lorsque vous manipulez des piles, faites
attention de ne pas les court-circuiter
avec des matériaux conducteurs tels que
bagues, bracelets, et clefs. La pile ou le
conducteur peut surchauffer et causer des
brûlures.
3. Le manuel d’instruction concernant
la batterie pour un appareil de jardinage
utilisant une pile cellulaire ventilée
et humide destinée à être rechargée
périodiquement par l’utilisateur doit
comporter la mention “ATTENTION” suivi
par le texte suivant ou son équivalent.
CONSERVEZ CES INSTRUCTIONS
PRÉCAUTIONS
SUPPLÉMENTAIRES POUR
L’UTILISATION DU COUPE-
BORDURES
1. Gardez les carters en place et en bon état
de fonctionnement.
2. N’UTILISEZ JAMAIS cet appareil SANS
que le dispositif de protection ne soit en
place.
3. Gardez les mains et les pieds éloignés de
la zone de coupe.
4. N’utilisez pas de fils plus épais que ceux
recommandés dans ce manuel.
5. N’utilisez pas d’autres types de matériaux
pour les fils- par exemple, fil métallique,
corde, etc.
CONSERVEZ CES INSTRUCTIONS
CONSIGNES GÉNÉRALES DE
SÉCURITÉ CONCERNANT LA
BATTERIE
1) AVERTISSEMENT: Risque d’incendie
et de brûlures. Ne démontez pas,
ne chauffez pas à une température
supérieure à 100°C (212°F) et
n’incinérez pas l’appareil. N’exposez
pas les piles cellulaires ou la batterie
à la chaleur ou au feu. Evitez de
ranger la batterie dans un endroit
exposé à la lumière directe du soleil.
2) Jetez rapidement les piles usagées.
Lors de l’élimination des piles
cellulaires ou des batteries, gardez
les piles ou les batteries de types
électrochimiques différents séparés
les uns des autres.
3) Gardez les piles hors de portée
des enfants et dans leur emballage
d’origine jusqu’au moment de vous
en servir.
4) Ne mettez jamais les piles dans la
bouche. En cas d’ingestion, consultez
avec votre médecin ou un centre
antipoison.
5) ATTENTION – La batterie utilisée
dans cet appareil peut présenter
un risque d’incendie ou de brûlure

19
Coupe gazon/Taille-bordure 3 en 1
F
Afin de réduire les risques de
blessure, l’utilisateur doit lire ce
mode d’emploi.
Portez une protection auditive
Batterie Li-ion. Les batteries
doivent être recyclées en collecte
sélective.
POSITEC Inc. a formé un
partenariat avec RBRC
Corporation pour le recyclage
des batteries Positec portant le
sceau RBRC-call2recycle. Pour la
protection de l’environnement,
veillez à ne pas jeter les batteries
aux poubelles. À la fin du cycle de
vie de la batterie, appelez 1-800-
822-8837 pour un service gratuit
qui mettra la batterie au rebut
selon les règles de l’art.
Tonte de bordure
Tonte
chimique si elle n’est pas utilisée
avec soin. Remplacez la batterie
usée uniquement avec une batterie
(WORX). L’utilisation de toute autre
batterie peut engendrer un risque
d’incendie ou d’explosion.
6) Avertissement : N’utilisez pas
la batterie ou l’appareil s’il est
visiblement endommagé.
7) Avertissement : Ne modifiez pas et
n’essayez pas de réparer l’appareil ou
la batterie vous-même.
8) LA BATTERIE DOIT ÊTRE RECYCLÉE;
9) Les bornes de contact d’une pile
cellulaire ou d’une batterie ne doivent
pas être mises en court-circuit. Ne
placez pas en vrac les piles ou les
batteries dans une boîte ou un tiroir
où leurs bornes pourraient être mises
en court-circuit par un matériau
conducteur.
10) N’exposez pas la pile cellulaire ou la
batterie à des chocs mécaniques.
11) Gardez les piles cellulaires et les
batteries propres et sèches. Essuyez
les bornes de la pile cellulaire ou de la
batterie avec un chiffon propre et sec si
elles sont sales.
12) Ne laissez pas la pile cellulaire ou
la batterie en charge lorsqu’elles ne
sont pas utilisées.
13) Conservez les instructions originales
accompagnant la pile cellulaire ou la
batterie pour toute future référence.
14) N’utilisez pas un chargeur autre que
celui spécifiquement conçu pour être
utilisé avec l’équipement. Accumulateurs
besoin d’être rechargée avant l’utilisation.
Les piles cellulaires et les batteries
doivent toujours être chargées
avant l’utilisation. Utilisez toujours le
chargeur adapté et reportez-vous aux
instructions du fabricant ou au manuel de
l’équipement pour suivre les instructions
concernant la procédure de charge.
15) Si possible, enlevez la batterie de
l’équipement lorsqu’il n’est pas utilisé.
CONSERVEZ CES INSTRUCTIONS
SYMBOLES

20
Coupe gazon/Taille-bordure 3 en 1
F
ASSEMBLAGE
1. CONNEXION DE LA GARDE DE
SÉCURITÉ (Voir Fig. A)
Glissez la garde de sécurité sur la tête de
coupe en employant les cannelures de la tête
de coupe. Aligner la garde pour qu’elle se
glisse dans les orifices situés sur le coupe-
herbe. Sécurisez la garde de sécurité en
utilisant la vis fournie à cet effet, localisé à
l’intérieure de la garde.
2. ASSEMBLAGE DE LA ROUE DE
SUPPORT DE COUPE-BORDURES/
ÉLAGAGE (Voir Fig. B1, B2, B3)
Avec l’outil à l’endroit, faites glisser
l’assemblage de la roue de support de
coupe-bordure/élagage (12) sur la plaque
métallique située sur le côté de la tête de
coupe (Voir Fig. B1) ou en dessous du carter
de sécurité (5) (Voir Fig. B2, B3). Assurez-
vous que les rainures de l’assemblage de la
roue de support de coupe-bordure/élagage
s’enclenche dans la plaque métallique, vous
entendrez un déclic.
Pour retirer le disque, appuyez sur le bouton
de déblocage (b) de la roue et tirez sur la roue
pour la sortir.
INSTRUCTIONS
D’OPÉRATION
AVERTISSEMENT: Le chargeur et le
bloc-piles ont été conçus
spécifiquement pour travailler ensemble, alors
ne tentez pas d’utiliser d’autres dispositifs. Ne
jamais insérer ou permettre que des objets
métalliques soient introduits dans les bornes
de connections de votre chargeur ou bloc-pile,
parce qu’une défaillance électrique et un
danger vont se produire.
1. AVANT D’UTILISER VOTRE TAILLE-
BORDURE SANS FIL
Votre bloc-pile n’est PAS CHARGÉ. If faut
donc le recharger une fois avant d’utiliser
l’outil. Le chargeur de batterie fourni s’adapte
à la batterie au Lithium ion installée dans
l’appareil. Ne pas utiliser d’autre chargeur de
batterie.
2. CHARGEMENT DE VOTRE BLOC-PILES
La batterie au Lithium ion est protégée contre
une décharge importante. Lorsque la batterie
est vide, la machine s’éteint grâce à un circuit
de protection. La poignée de l’outil s’arrête de
tourner.
Dans un environnement chaud ou après une
utilisation prolongée, le pack de la batterie est
trop chaud pour permettre un chargement.
Laisser la batterie se refroidir un moment
avant de recharger.
3. RETRAIT/RÉINSTALLATION DE LA
BATTERIE (Voir Fig. C)
Enfoncez le système de verrouillage de la
batterie et retirez la batterie de l’outil. Une
fois rechargée, replacez la batterie dans son
emplacement. Une simple pression d’insertion
sera suffisante.
4. COMMUTATEUR DE SÉCURITÉ « ON/
OFF » (Voir Fig. D)
Votre commutateur est verrouillé afin de
prévenir les démarrages accidentels. Appuyez
sur le bouton de déverrouillage (9), ensuite
le commutateur « ON/OFF » (10) et relâchez
le commutateur de déverrouillage. Votre
commutateur est maintenant « ON ». Pour
commuter à « OFF », relâchez le commutateur
« ON/OFF ».
AVERTISSEMENT: La tete coupante
continue de tourner apres avoir
eteint l’alimentation de la tondeuse,
attendez que le moteur soit
completement arrete pour coucher
l’outil.
5. AJUSTEMENT DE LA HAUTEUR
(Voir Fig. E)
Mettez un pied sur le carter de sécurité, puis
utilisez une main pour tirer vers le haut l’arbre
le bouton de réglage du manche télescopique
(8), ajustez la longueur du manche
télescopique à la longueur la plus confortable.
Relâchez le bouton de réglage du manche
télescopique pour le verrouiller en position.
6. ROTATION DE LA POIGNÉE
PRINCIPALE (Voir Fig. F1, F2)
Retenez d’abord du pied la partie inférieure et
tirez le manche télescopique (15) vers le haut.
Tournez ensuite le manche télescopique à 90
La page charge ...
La page charge ...
La page charge ...
La page charge ...
La page charge ...
La page charge ...
La page charge ...
La page charge ...
La page charge ...
La page charge ...
La page charge ...
La page charge ...
La page charge ...
La page charge ...
La page charge ...
La page charge ...
-
 1
1
-
 2
2
-
 3
3
-
 4
4
-
 5
5
-
 6
6
-
 7
7
-
 8
8
-
 9
9
-
 10
10
-
 11
11
-
 12
12
-
 13
13
-
 14
14
-
 15
15
-
 16
16
-
 17
17
-
 18
18
-
 19
19
-
 20
20
-
 21
21
-
 22
22
-
 23
23
-
 24
24
-
 25
25
-
 26
26
-
 27
27
-
 28
28
-
 29
29
-
 30
30
-
 31
31
-
 32
32
-
 33
33
-
 34
34
-
 35
35
-
 36
36


Worx WG175.1 Le manuel du propriétaire
- Catégorie
- Coupe-herbe
- Taper
- Le manuel du propriétaire
dans d''autres langues
- English: Worx WG175.1 Owner's manual
- español: Worx WG175.1 El manual del propietario
Documents connexes
-
Worx WG160.4 Le manuel du propriétaire
-
-
-
-
-
-
-
-
-