


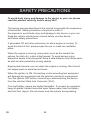
To avoid body injury and damage to the device or your car, please
read this manual carefully before using V007.
The testing process described in the manual is generally the experience of
technician. Safety precaution is required in most of the process to avoid
body injury and damage to the device or your car. Read the vehicle
maintenance manual before use this device and follow safety precautions.
1
It generates CO and other poisonous air when engine is running. To avoid
this kind of hurt, please repair the car in a well-air-ventilated place.
When the engine is running, many parts (such as the coolant fan, pulleys,
fan belt etc.) rotate at high speed. To avoid serious injury, always be
aware of moving parts. Keep a safe distance from these parts as well as
other potentially moving objects.
Engine parts become very hot when the engine is running. Don’t touch hot
engine parts to avoid severe burns.
When the ignition is ON, Connecting or disconnecting test equipment will
damage test equipment and the vehicle's electronic components. Turn the
ignition OFF before connecting or disconnecting the device from the
vehicle's Data Link Connector (DLC).
Fuel and battery vapors are highly flammable. To prevent an explosion,
keep all sparks, heated items and open flames away from the battery and
fuel/ fuel vapors. Do not smoke near the vehicle during testing.
Safety precautions
EN

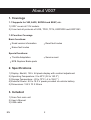
1. Coverage
2. Specifications
1) V007 covers all 12V models.
2) It can test all protocols of UDS, TP20, TP16, KWP2000 and KWP1281.
1) Display: Backlit, 128 × 64 pixels display with contrast adjustment
2) Operating Temperature: 0 to 60°C (32 to 140 F°)
3) Storage Temperature: -20 to 70°C (-4 to 158 F°)
4) External Power: 8.0 to 18.0 V power provided via vehicle battery
5) Dimensions: 125 X 70 X 22mm
3. Included
1) Scan Tool main unit
2) User’s Manual
3) USB cable
2
1.1 Supports for VW, AUDI, SKODA and SEAT, etc.
Basic functions:
Read version information
Erase fault codes
Read fault codes
Special functions:
Throttle Adaptation
EPB Replace Brake pads
Service reset
1.2 Function Coverage
About V007
EN

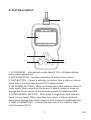
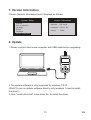
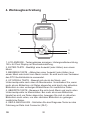
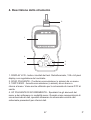
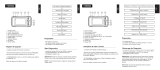
4.Tool Description
1. LCD DISPLAY – Indicate test results. Backlit, 128 x 64 pixels display
with contrast adjustment.
2. ENTER BUTTON – Confirm a selection (or action) from a menu.
3. EXIT BUTTON – Cancel a selection (or action) from a menu or returns
to the menu. It is also used for exit DTC Lookup screen.
4. UP SCROLL BUTTON – Move up through menu and submenu items in
menu mode. When more than one screen of data is retrieved, move up
through the current screen to the previous screens for additional data.
5. DOWN SCROLL BUTTON – Move down through menu and submenu
items in menu mode. When more than one screen of data is retrieved,
move down through the current screen to next screens for additional data.
6. OBD II CONNECTOR – Connect the scan tool to the vehicle’s Data
Link Connector (DLC).
3
ENTER EXIT
1
6
3
5
4
2
EN

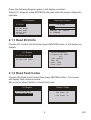
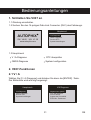
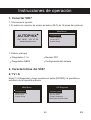
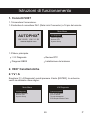
1. Connect V007
2. V007 Features
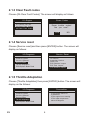
2.1 V / A
Choose [V/A Diagnosis] then press [ENTER] button. The screen will display
as follows:
4
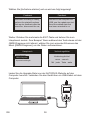
1.1 Turn the ignition on.
1.2 Locate the vehicle's 16-pin Data Link Connector (DLC).
1.3 Main menu
V/ A Diagnosis
OBDII Diagnosis
Review DTC
System Setup
Operation instructions
Main Menu
V/A Diagnosis
OBDII Diagnosis
Review DTC
System Setup
Main Menu
V/A Diagnosis
OBDII Diagnosis
Review DTC
System Setup
V/A Diagnosis
Common system
V/A A11 Systems
Service Reset
Throttle Adaptation
EPB Replace Brake Pads
EN
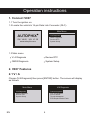
AUTOPHIX
www.autophix.com
SW V8.60 HW V1.1B

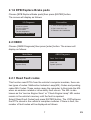
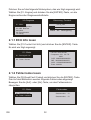
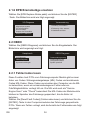
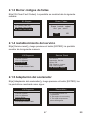
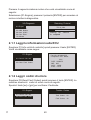
2.1.2 Read Fault Codes
Choose [02-Read Fault Codes] then press [ENTER] button. The screen
will display fault codes as below:
Move [up] or [down] button to check fault code.
2.1.1 Read ECU Info
Choose [01-Control Unit Info] then press [ENTER] button. It will display as
follows:
Press the following Engine system it will display as below:
Select [01- Engine], press [ENTER] button will enter the engine diagnostic
interface
5
Trouble Codes
Total Codes 09
Fault Codes 09
01--Engine
01--Control Unit Info
02--Read Fault Codes
05--Clear Fault Codes
01--Engine
01--Control Unit Info
02--Read Fault Codes
05--Clear Fault Codes
Part NO: 06G906057G
Component: 2.01 88KW
3311
COD: 0000075
IMP: 666
WSC: 19460
Extra: 01231
EN
V/A Diagnosis
01--Engine
02--Auto Trans
03--ABS Brakes
08--Auto HVAC
09--Cent Elect
15--Airbass
Deteoting Protocol
Waiting for vehicle
to respond
TP2.0_CAN

6
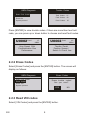
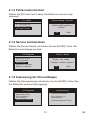
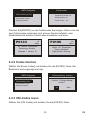
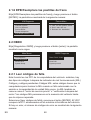
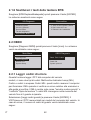
2.1.4 Service reset
Choose [Service reset] and then press [ENTER] button. The screen will
display as follows:
2.1.3 Clear Fault codes
Choose [05-Clear Fault Codes]. The screen will display as follows:
V/A Diagnosis
Common system
V/A A11 Systems
Service Reset
Throttle Adaptation
EPB Replace Brake Pads
Service Reset
Oil Service
Inspeotion Service
Reset ESI
ESI: Distance inspect
FIX: Distance inspect
ESI: Time inspect
V/A Diagnosis
Common system
V/A A11 Systems
Service Reset
Throttle Adaptation
EPB Replace Brake Pads
Precondition
1.The ignition switch on.
Trouble-free
2.The engine is not running
3.The water temperature
above 85 degrees
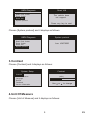
2.1.5 Throttle Adaptation
Choose [Throttle Adaptation] then press [ENTER] button. The screen will
display as the follows:
01--Engine
01--Control Unit Info
02--Read Fault Codes
05--Clear Fault Codes
Erase Codes
Erase trouble codes!
Are you sure?
YES NO
EN

Main Menu
V/A Diagnosis
OBDII Diagnosis
Review DTC
System Setup
OBDII Diagnosis
Read Fault Codes
Erase Codes
Read VIN
System protocol
V/A Diagnosis
Common system
V/A A11 Systems
Service Reset
Throttle Adaptation
EPB Replace Brake Pads
Precondition
1. Turn on the ignition switch.
2. Don’t start the car.
3. Release the handbrake.
7
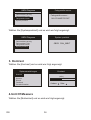
2.2 OBDII
Choose [OBDII Diagnosis] then press [enter] button. The screen will
display as follows:
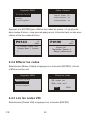
2.1.6 EPB Replace Brake pads
Choose [EPB Replace Brake pads] then press [ENTER] button.
The screen will display as follows:
2.2.1 Read Fault codes
This function read DTCs from the vehicle's computer modules, there are
two types of codes: Malfunction Indicator Lamp(MIL) Codes and pending
codes MIL Codes: These codes cause the computer to illuminate the MIL
when an emission related or drive ability fault occurs. The MIL is also
known as the “service Engine Soon” or “Check Engine Lamp” MIL codes
remain in the vehicle's memory until the fault is repaired.
Select [Read Fault Codes] and press [ENTER] button, The V007retrieves
the DTCs stored in the vehicle's computer modules. If there is fault, the
number of fault codes will be displayed as follows:
EN

OBDII Diagnosis
Read Fault Codes
Erase Codes
Read VIN
System protocol
Trouble Codes
Total Codes 07
Fault Codes 00
Pend Codes 07
OBDII Diagnosis
Read Fault Codes
Erase Codes
Read VIN
System protocol
Erase Codes
Erase trouble codes!
Are you sure?
YES NO
Hing Speed CAN
Communication Bus
Performance
U0002
Pend 1/7
OBDII
Throttle / Pedal
Position Sensor /
Switch A Circuit Low
U0002
Pend 2/7
OBDII
8
Press [ENTER] to view trouble codes. if there are more than two fault
code, you can press up or down button to choose and read fault codes.
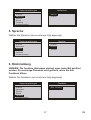
2.2.2 Erase Codes
Select [Erase Codes] and press the [ENTER] button. The screen will
display as follows:
2.2.3 Read VIN codes
Select [VIN Codes] and press the [ENTER] button.
EN

OBDII Diagnosis
Read Fault Codes
Erase Codes
Read VIN
System protocol
Read VIN
The vehicle dose
not support
Press any key to cont
OBDII Diagnosis
Read Fault Codes
Erase Codes
Read VIN
System protocol
System protocol
Low KWP2000
9
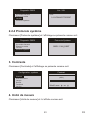
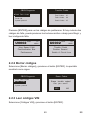
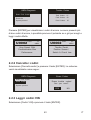
Choose [System protocol] and it displays as follows:
3.Contrast
Choose [Contrast] and it displays as follows:
4.Unit Of Measure
Choose [Unit of Measure] and it displays as follows:
EN
System Setup
Contrast
Unit Of Measure
Language
Record
Feedback
Version Information
Contrast
(48%)
Use or to change

System Setup
Contrast
Unit Of Measure
Language
Record
Feedback
Version Information
Unit Of Measure
Metric
English
System Setup
Contrast
Unit Of Measure
Language
Record
Feedback
Version Information
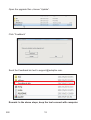
Language
Deutsch
English
System Setup
Contrast
Unit Of Measure
Language
Record
Feedback
Version Information
Feedback
Start recording
10
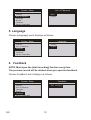
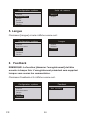
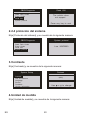
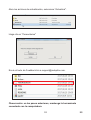
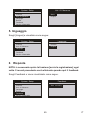
6Feedback
NOTE: Must open the [start recording] function every time.
The previous record will be deleted when you open the feedback.
Choose Feedback and it displays as follows
5. Language
Choose [Language] and it displays as follows:
EN

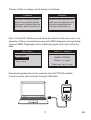
Feedback
Automatic recording is ready,
perform the related functions
that require feedback after the
execution, disconnect the car,
Feedback
connect to the computer via
USB, use the update.exe tool.
Send the related data that
has been recorded to us.
Main Menu
V/A Diagnosis
OBDII Diagnosis
Review DTC
System Setup
Failed to connect
LINKING ERROR!
- Please try again -
Press any key to cont
11
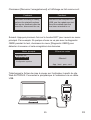
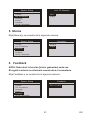
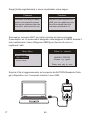
Next : Press EXIT Button several times and return to the main menu. For
example: If there is something wrong with OBDII diagnosis during testing,
choose [OBDII Diagnosis] menu to detecting again and it will record the
data.
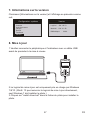
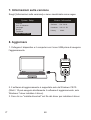
Download upgrade file on the computer from AUTOPHIX website.
Connect device with computer through USB cable.
Choose [ Start recording ] and it displays as follows
EN
V/A+OBDII/EOBD
AUTOPHIX
V007
ENTER EXIT

12
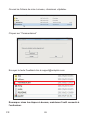
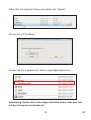
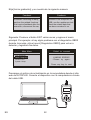
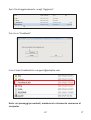
Click “Feedback”
Send the Feedback.bin text to [email protected] .
Remark: In the above steps, keep the tool connect with computer.
Open the upgrade files ,choose “Update”.
EN

System Setup
Contrast
Unit Of Measure
Language
Record
Feedback
Version Information
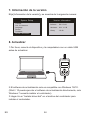
Version Information
Software SW V8.60
Hardware HW V1.1B
Library V2.80
13
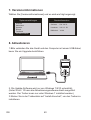
8. Update
1.Please connect device and computer with USB cable before upgrading.
2.The update software is only supported by windows 7/8/10.
(Win8/10 can run update software directly, only windows 7 need to install
the driver.)
3.Click "install driver.bat" in the driver file to install the driver.
7. Version Information
Choose [Version Information] and it displays as follows:
EN
V/A+OBDII/EOBD
AUTOPHIX
V007
ENTER EXIT

14
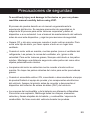
Pour éviter les blessures ou les dommages aux véhicules et/ou à l'outil
d’analyse, lisez d'abord ce manuel d’instructions et respectez au minimum
les précautions de sécurité suivantes lorsque vous travaillez sur un
véhicule :
Effectuez toujours des essais automobiles dans un environnement sûr.
N’essayez pas de faire fonctionner ou d'observer l'outil lorsque vous
conduisez un véhicule. L'utilisation ou l'observation de l'outil entraînera
une distraction du conducteur et pourrait causer un accident mortel.
Portez une protection oculaire de sécurité conforme aux normes ANSI.
Faites fonctionner le véhicule dans une zone de travail bien ventilée : Les
gaz d'échappement sont Toxiques.
Gardez l’outil d’analyse sec, propre, exempt d’huile/d’eau ou de graisse.
Utilisez un détergent doux sur un chiffon propre pour nettoyer l’extérieur
de l’outil de balayage, lorsque Nécessaire.
Mettez la transmission en position PARK (pour la transmission automa-
tique) ou NEUTRAL (pour la transmission manuelle) et assurez-vous que
le frein de stationnement est engagé.
Précautions de sécurité
FR

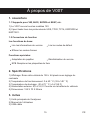
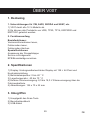
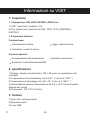
1. couverture
2. Spécifications
1) Le V007 couvre tous les modèles 12V.
2) Il peut tester tous les protocoles de UDS, TP20, TP16, KWP2000 et
KWP1281.
1) Affichage: Écran rétro-éclairé de 128 × 64 pixels avec réglage du
contraste
2) Température de fonctionnement: 0 à 60 ° C (32 à 140 ° F)
3) Température de stockage: -20 à 70 ° C (-4 à 158 F)
4) Alimentation externe: 8,0 à 18,0 V fournie via la batterie du véhicule
5) Dimensions: 125 X 70 X 22mm
3. inclus
1) Unité principale de l'analyseur
2) Manuel de l’utilisateur
3) USB câble
15
1.1 Supports pour VW, AUDI, SKODA et SEAT, etc.
Les fonctions de base:
Lire les informations de version
Effacer les codes d'erreur
Lire les codes de défaut
Fonctions spéciales:
Adaptation du papillon
EPB Remplacer les plaquettes de frein
Réinitialisation du service
1.2 Couverture de fonction
À propos de V007
FR

ENTER EXIT
1
6
3
5
4
2
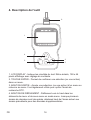
4. Description de l'outil
1. LCD DISPLAY - Indique les résultats du test. Rétro-éclairé, 128 x 64
pixels affichage avec réglage du contraste
2. TOUCHE ENTER - Permet de confirmer une sélection (ou une action)
dans un menu.
3. BOUTON SORTIE - Annule une sélection (ou une action) d’un menu ou
retourne au menu. Il est également utilisé pour quitter l'écran de
recherche DTC.
4. BOUTON DE DÉFILEMENT - Défilement vers le haut dans les
éléments de menu et de sous-menu en mode menu. Lorsque plusieurs
écrans de données sont récupérés, déplacez haut de l'écran actuel aux
écrans précédents pour des données supplémentaires.
16FR

5. BOUTON DE DÉFILEMENT VERS LE BAS - Permet de naviguer dans
le menu éléments de sous-menu en mode menu. Lorsque plus d’un écran
de données est récupéré, déplacez-vous de l'écran actuel vers les écrans
suivants pour donnée supplémentaire.
6. CONNECTEUR OBD II - Connectez l’outil de numérisation au véhicule
Connecteur de liaison de données (DLC)
17 FR

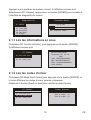
Diagnostic V/A
Système commun
Tous les Systèmes
Réinitialiser Service
Adapt. papillon gaz
EPB Replace Brake Pads
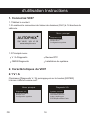
1. Connectez V007
2. Caractéristiques du V007
2.1 V / A
Choisissez [Diagnostic V / A] puis appuyez sur le bouton [ENTER].
L’écran s’affiche comme suit:
1.1 Mettez le contact.
1.2 Localisez le connecteur de liaison de données (DLC) à 16 broches du
véhicule.
18
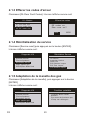
1.3 Principal menu
V / A Diagnostic
OBDII Diagnostic
Review DTC
Installation du système
d'utilisation Instructions
FR
Menu principal
Diagnostic V/A
Diagnostic OBDII
Review DTC
Configuration système
Menu principal
Diagnostic V/A
Diagnostic OBDII
Review DTC
Configuration système
AUTOPHIX
www.autophix.com
SW V8.60 HW V1.1B
La page est en cours de chargement...
La page est en cours de chargement...
La page est en cours de chargement...
La page est en cours de chargement...
La page est en cours de chargement...
La page est en cours de chargement...
La page est en cours de chargement...
La page est en cours de chargement...
La page est en cours de chargement...
La page est en cours de chargement...
La page est en cours de chargement...
La page est en cours de chargement...
La page est en cours de chargement...
La page est en cours de chargement...
La page est en cours de chargement...
La page est en cours de chargement...
La page est en cours de chargement...
La page est en cours de chargement...
La page est en cours de chargement...
La page est en cours de chargement...
La page est en cours de chargement...
La page est en cours de chargement...
La page est en cours de chargement...
La page est en cours de chargement...
La page est en cours de chargement...
La page est en cours de chargement...
La page est en cours de chargement...
La page est en cours de chargement...
La page est en cours de chargement...
La page est en cours de chargement...
La page est en cours de chargement...
La page est en cours de chargement...
La page est en cours de chargement...
La page est en cours de chargement...
La page est en cours de chargement...
La page est en cours de chargement...
La page est en cours de chargement...
La page est en cours de chargement...
La page est en cours de chargement...
La page est en cours de chargement...
La page est en cours de chargement...
La page est en cours de chargement...
La page est en cours de chargement...
La page est en cours de chargement...
La page est en cours de chargement...
La page est en cours de chargement...
La page est en cours de chargement...
La page est en cours de chargement...
La page est en cours de chargement...
La page est en cours de chargement...
La page est en cours de chargement...
La page est en cours de chargement...
-
 1
1
-
 2
2
-
 3
3
-
 4
4
-
 5
5
-
 6
6
-
 7
7
-
 8
8
-
 9
9
-
 10
10
-
 11
11
-
 12
12
-
 13
13
-
 14
14
-
 15
15
-
 16
16
-
 17
17
-
 18
18
-
 19
19
-
 20
20
-
 21
21
-
 22
22
-
 23
23
-
 24
24
-
 25
25
-
 26
26
-
 27
27
-
 28
28
-
 29
29
-
 30
30
-
 31
31
-
 32
32
-
 33
33
-
 34
34
-
 35
35
-
 36
36
-
 37
37
-
 38
38
-
 39
39
-
 40
40
-
 41
41
-
 42
42
-
 43
43
-
 44
44
-
 45
45
-
 46
46
-
 47
47
-
 48
48
-
 49
49
-
 50
50
-
 51
51
-
 52
52
-
 53
53
-
 54
54
-
 55
55
-
 56
56
-
 57
57
-
 58
58
-
 59
59
-
 60
60
-
 61
61
-
 62
62
-
 63
63
-
 64
64
-
 65
65
-
 66
66
-
 67
67
-
 68
68
-
 69
69
-
 70
70
-
 71
71
-
 72
72


dans d''autres langues
- italiano: AutoPhix V007 Manuale utente
- English: AutoPhix V007 User manual
- español: AutoPhix V007 Manual de usuario
- Deutsch: AutoPhix V007 Benutzerhandbuch
Autres documents
-
ANCEL 8542040151 Manuel utilisateur
-
VDO CONTISYS OBD Mode d'emploi
-
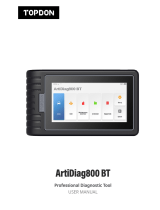 Topdon ArtiDiag800 BT Professional Diagnostic Tool Manuel utilisateur
-
 Topdon ArtiDiag500 Manuel utilisateur
-
 Topdon ArtiDiag600 Guide de démarrage rapide
-
 Topdon Phoenix Elite Manuel utilisateur
-
Perel AOBD2 Manuel utilisateur
-
Topdon ArtiDiag500 S Manuel utilisateur
-
 Topdon ArtiDiag600 S Manuel utilisateur
-
Topdon Phoenix Lite 2 Manuel utilisateur


