In Common With 7519624560810 Manuel utilisateur
- Catégorie
- Accessoires de moto
- Taper
- Manuel utilisateur

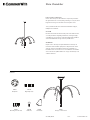
Flora Chandelier
Assembly Guide incommonwith.com1 of 4
How to Install Your New Light
Please check that you received all of the components pictured in
this guide. Reach out to us if anything is missing. It’s very rare, but it
happens. Don’t forget to turn o the electrical power source.
Tools you will need that aren’t included: standard wire stripper,
Phillips head screwdriver.
CAUTION
Electrical shock risk. Turn o electrical power at the main fuse box
or circuit panel before beginning installation, servicing the light,
or installing accessories. We recommend working with a qualified
electrician familiar with the type of work you’d like done.
ATTENTION
Risque de choc électrique. Coupez l’alimentation électrique au
niveau de la boîte à fusibles principale ou du panneau de circuits
avant de commencer l’installation, l’entretien de la lumière ou
l’installation d’accessoires. Nous vous recommandons de travailler
avec un électricien qualifié familier avec le type de travail que vous
souhaitez eectuer.
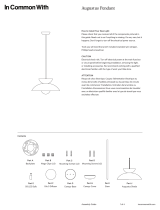
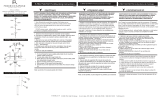
Contents
Part D
Bulb (x7)
Part E
Shade (x7)
Part F
Canopy + 7 Arm Stem
Part A
Backplate
Part B
Wago Clips (x3)
Part C
Mounting Screws (x4)

Flora Chandelier
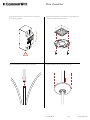
Step 1: Turn o electrical power at the main fuse box or circuit panel
before beginning installation.
Assembly Guide incommonwith.com2 of 4
Step 4: Gently slide the canopy cover down the stem (F).
E
F
!
Step 2: Mount the backplate (A) to the junction box using a phillips head
screwdriver to tighten the mounting screws (C).
A
C
Step 3: Attach additional stem if the drop is over 36 inches.

Flora Chandelier
Assembly Guide incommonwith.com3 of 4
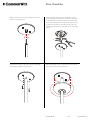
Step 6: Use the wago clips (B) to connect the fixture’s wires to the
corresponding wires from the junction box in the wall or ceiling. White
is neutral; Black is live; Green/ Yellow is ground. One ground wire will
be attached to the backplate, the other ground wire should come from
the junction box. If needed use a wire stripper to remove 3/8” of the
insulation from each wire before inserting them into the corresponding
wago clip.
Step 7: Mount the canopy base (B) into the backplate using a phillips
head screwdriver to tighten mounting screws (C).
Step 8: Gently slide the canopy cover back up the stem (F). Rotate the
canopy cover clockwise to secure firmly in place.
B
A
C
Step 5: Secure the brass stem to the canopy base. Rotate the stem
clockwise to secure firmly in place.
F

Flora Chandelier
Assembly Guide incommonwith.com4 of 4
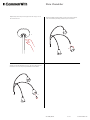
Step 11: Screw included bulbs (D) into place. Turn the power back on at
the main fuse box or circuit panel you disabled before installation.
Step 10: Carefully feed the shade (E) onto the end of each chandelier
stem. Atach shade by threading clockwise. Repeat for all stems.
E
D
Step 9: Gently remove the protective paper from the canopy cover on
the stem (F). Discard.
F
-
 1
1
-
 2
2
-
 3
3
-
 4
4


In Common With 7519624560810 Manuel utilisateur
- Catégorie
- Accessoires de moto
- Taper
- Manuel utilisateur
dans d''autres langues
Documents connexes
-
 In Common With 4613904466008 Manuel utilisateur
-
In Common With GEMMA Manuel utilisateur
-
 In Common With Variania Manuel utilisateur
-
 In Common With PALOMA Manuel utilisateur
-
In Common With Calla Manuel utilisateur
-
In Common With Luca Manuel utilisateur
-
In Common With Glass Up Down Sconce Manuel utilisateur
-
 In Common With TP-100011 Guide d'installation
-
In Common With Fazzo Manuel utilisateur


Autres documents
-
 Hinkley Lighting 4811KZ Guide d'installation
-
 Hinkley 29307 Rhodes 1 Light Outdoor Hanging Lantern Manuel utilisateur
-
Canarm ICH740A03RBB-D Guide d'installation
-
Lithonia Lighting Ferros Mini-Pendant Guide d'installation
-
-
Signature Hardware 953461 Guide d'installation
-
 Hinkley FR47758BNG Manuel utilisateur
-
 Hinkley IS 4558 18.25 Inch Height Outdoor Lantern Wall Sconce Manuel utilisateur
-


