Danby DBSH02213WD13 Le manuel du propriétaire
- Catégorie
- Chauffe-eau
- Taper
- Le manuel du propriétaire
Ce manuel convient également à

*
*
Danby Products Limited, Guelph, Ontario, Canada N1H 6Z9
Danby Products Inc. Findlay, Ohio, U.S.A. 45840
www.Danby.com
Printed in China
Imprimé en Chine
Impreso en China
*Trademark of Danby Products
* Marque de commerce de Danby Products
* Marca comerciales de Danby Products
2022.08.23
OSCILLATING CERAMIC SPACE HEATER
Owner’s Manual.....................................................1 - 12
CHAUFFE-EAU EN CÉRAMIQUE OSCILLANT
Manuel du propriétaire.........................................13 - 24
CALENTADOR DE ESPACIOS DE CERÁMICA OSCILANTE
Manual del propietario.........................................25 - 36
MODEL • MODÈLE • MODELO
DBSH02213WD13

WARNING: Read and understand this entire owner’s manual,
including all safety information, before plugging in or using this
heater. Failure to do so could result in fi re, electric shock or serious
personal injury.
CAUTION: Keep this owner’s manual for future reference.
CAUTION: Risk of electric shock. Do not open or try to repair the
heater yourself.
This heater may get hot when in use. To avoid burns, do not let bare
skin touch hot surfaces. Use handles when moving this heater. Do not
place the heater against walls, furniture, curtains, etc.
Keep combustible materials, such as furniture, pillows, bedding,
paper, clothes and curtains at least 3 feet from the front of the heater
and keep them away from the sides, top and rear. Do not place
towels or other objects on the heater.
Extreme caution is necessary when any heater is used by or near
children or invalids and whenever the heater is left operating and
unattended.
The heater is not intended for use in bathrooms, laundry areas,
showers or swimming pools and similar locations. Never locate the
heater where it may fall into a bathtub or other water container. To
protect against electrical hazards, do not immerse in water or other
liquids.
1
Important Safety Information
READ AND FOLLOW ALL SAFETY INSTRUCTIONS
SAVE THESE INSTRUCTIONS!

Do not touch the control panel or plug with a wet hand.
Always use on a dry, level surface.
Do not use outdoors.
Always use in an upright position.
WARNING: To reduce the risk of fi re or electric shock, do not use
this heater with any solid-state speed control devices.
Do not operate any heater with a damaged power cord or after the
heater malfunctions, has been dropped or damaged in any manner.
Return the heater to an authorized service facility for examination,
electrical or mechanical adjustment or repair.
Do not run the power cord under carpeting. Do not cover the power
cord with throw rugs, runners or similar coverings. Arrange the
power cord away from traffi c area where it will not be tripped over.
Do not insert or allow foreign objects to enter any ventilation or
exhaust opening as this may cause an electric shock or fi re or
damage to the heater.
To prevent possible fi re, do not block the air intakes or exhaust in
any manner. Do not use the heater on soft surfaces like a bed or
thick carpeting where the air intakes may become blocked.
2
Important Safety Information
READ AND FOLLOW ALL SAFETY INSTRUCTIONS
SAVE THESE INSTRUCTIONS!

A heater has hot and arcing or sparking parts inside. Do not use the
heater in areas where gasoline, paint, explosive and/or fl ammable
liquids are used or stored. Keep the heater away from heated
surfaces and open fl ames.
Always plug the heater directly into a wall outlet or receptacle.
Never use an extension cord or power strip. To avoid fi re or shock
hazard, plug the heater directly into a 120 V AC electrical outlet.
To disconnect the heater, turn the controls to OFF and then remove
the plug from the outlet. Pull fi rmly on the plug, do not unplug by
pulling on the cord.
Always unplug the heater before moving or cleaning it. Unplug the
heater when it is not in use.
Use only for intended household use as described in this manual.
Any other use not recommended by the manufacturer may cause
fi re, electric shock or injury to persons. The use of attachments is not
recommended.
Do not attempt to repair or adjust any electrical or mechanical
functions on this unit. Doing so will void your warranty. The inside of
the heater does not contain any user serviceable parts.
3
Important Safety Information
READ AND FOLLOW ALL SAFETY INSTRUCTIONS
SAVE THESE INSTRUCTIONS!

4
Tip Over Safety Feature
This heater is equipped with a shut-off safety feature. If the heater is
tipped over, an internal switch will automatically shut the heater off.
When the heater is returned to an upright position, the heater will
reset. To continue operation, turn on the heater using the supplied
remote control or the control panel on the heater.
Overheat Safety Feature
This heater is equipped with an overheat safety feature. When the
heater’s internal components reach a certain temperature that could
cause overheating and possible fi re, the heater will automatically
shut off.
A thermal overload protector is built in to prevent overheating.
When an “overheat” temperature is reached, the heater will
automatically shut off. Operation can only resume when the user
resets the heater.
To reset the heater, ensure the power is turned off, unplug the unit
and wait 15 to 20 minutes for the internal components to cool down.
Follow the instructions for use to return the heater to normal
functioning.
WARNING: It is normal for the power cord to feel warm to the
touch; however, a loose fi t between the outlet and the plug may
cause overheating of the plug. If this occurs, try inserting the plug
into a different outlet. Contact a qualifi ed electrician to inspect the
original outlet for damage.
SAFETY FEATURES

5
OPERATING INSTRUCTIONS
IMPORTANT WARNING
Do not leave this appliance
unattended in a space where
people or animals who cannot
react to a malfunction are
located. A malfunction can
cause extreme overheating
or death in an enclosed,
unattended space.
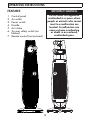
FEATURES
1. Control panel
2. Air outlet
3. Power switch
4. Handle
5. Air intake
6. Tip over safety switch (on
bottom)
7. Remote control (not pictured)
1
2
3
4
5
6

6
OPERATING INSTRUCTIONS
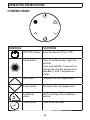
CONTROL PANEL
CONTROLS FUNCTIONS
ON/OFF button Turns the heater ON or OFF.
Mode button Press to set the mode; high, low
and fan.
Press and hold for 3 seconds to
change the display temperature
between C and F temperature
scales.
Up button Increases the set temperature.
Down button Decreases the set temperature.
Oscillation
button Starts and stops the oscillation
feature.
Timer button Used to set the timer.

7
OPERATING INSTRUCTIONS
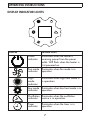
DISPLAY INDICATOR LIGHTS
DISPLAY DESCRIPTION
Power
indicator Illuminates when the heater is
receiving power from the power
outlet. Will fl ash when the heater is
fi rst powered on.
Fan mode
indicator Illuminates when fan mode is in
operation.
High
mode
indicator
Illuminates when high heat mode is
in operation.
Low mode
indicator Illuminates when low heat mode is in
operation.
Oscillation
indicator Illuminates when the oscillation
feature is in operation.
Timer
indicator Illuminates when the timer is in
operation.

8
OPERATING INSTRUCTIONS
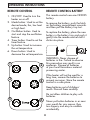
REMOTE CONTROL
1. ON/OFF: Used to turn the
heater on or off.
2. Mode button: Used to set the
desired mode; fan, low heat
or high heat.
3. Oscillation button: Used to
start and stop the oscillation
feature.
4. Timer button: Used to set the
timer feature.
5. Up button: Used to increase
the set temperature.
6. Down button: Used to
decrease the set temperature.
REMOTE CONTROL BATTERY
This remote control uses one CR2025
battery.
To remove the battery, push the latch
on the battery compartment upwards
and then pull the battery tray out.
To replace the battery, place the new
battery in the battery tray and push it
gently into the remote control until it
clicks into place.
CR2025
WARNING: Never dispose of
batteries in fi re. Failure to observe
this precaution may result in an
explosion. Dispose of batteries
at your local hazardous material
processing center.
If the heater will not be used for a
long time, remove the batteries to
prevent corrosion. Store the remote
control in a safe place.
Keep batteries out of childrens’
reach. Discard them carefully.
Do not allow children to play with
batteries.
Never put button batteries in or near
your mouth for any reason, they
are slippery and easy to swallow
accidentally.
12
34
56

9
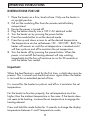
INSTRUCTIONS FOR USE
1. Place the heater on a fi rm, level surface. Only use the heater in
an upright position.
2. Pull out the insulating fi lm from the remote control battery
compartment.
3. Ensure the power is turned off.
4. Plug the heater directly into a 120 V AC electrical outlet.
5. Turn the heater on by pressing the power button.
6. Press the mode button to set the desired mode.
7. Press the up and down arrows to set the desired temperature.
The temperature can be set between 15C - 30C (59F - 86F). The
heater will remain on until the set temperature is reached and it
will then cycle on and off to maintain the set temperature.
8. Turn the heater off by pressing the power button. When the
power is turned off the heating element will stop working
immediately but the fan will continue to run for 30 seconds or
until the heater has cooled.
Important
When the heat feature is used for the fi rst time, a slight odor may be
present. This is normal and should not occur again unless the heater
is not used for an extended period of time.
It is normal for the heater to cycle on and off as it maintains the set
temperature.
For the heater to function properly, the set temperature must be
higher than the ambient temperature in the room. If the heater does
not seem to be heating, increase the set temperature to engage the
heating element.
Press and hold the mode button for 3 seconds to change the display
temperature between C and F temperature scales.
OPERATING INSTRUCTIONS

10
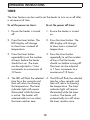
TIMER
The timer feature can be used to set the heater to turn on or off after
a set amount of time.
OPERATING INSTRUCTIONS
To set the power off timer:
1. Ensure the heater is turned
on.
2. Press the timer button. The
LED display will change
to show hours instead of
temperature.
3. Press the timer button
repeatedly to set the number
of hours that the heater
should run before turning off.
The timer can be adjusted
in 1 hour increments to a
maximum of 12 hours.
4. The LED will fl ash the selected
time for a few seconds and
then will return to showing
the temperature. The timer
indicator light will remain
illuminated while the timer
is active. The heater will
automatically turn off when
the timer reaches zero.
To set the power on timer:
1. Ensure the heater is turned
off.
2. Press the timer button. The
LED display will change
to show hours instead of
temperature.
3. Press the timer button
repeatedly to set the number
of hours before the heater
should turn on. The timer
can be adjusted in 1 hour
increments to a maximum of
12 hours.
4. The LED will fl ash the selected
time for a few seconds and
then will return to showing
the temperature. The timer
indicator light will remain
illuminated while the timer
is active. The heater will
automatically turn on when
the timer reaches zero.

OSCILLATION
Press the oscillation button to
begin the oscillation feature. The
heater will oscillate back and forth
while this feature is in operation.
Press the oscillation button again
to stop the oscillation feature.
CLEANING
1. Ensure the power is turned OFF
and the heater is unplugged.
2. Allow the heater to completely
cool before attempting any
cleaning.
3. The outer shell may be cleaned
with a soft, damp cloth. A
mild detergent can be used if
necessary.
4. After cleaning, dry the heater
with a soft, dry cloth.
5. Wait until the heater is
completely dry before using.
WARNING: Do not immerse the
heater in water or allow water to
enter the heater.
WARNING: Do not use alcohol,
gasoline, abrasive powders,
furniture polish or rough brushes
to clean the heater. This may cause
damage or deterioration to the
surface of the heater.
TROUBLESHOOTING
If the heater will not operate,
check the following:
1. Check that the power cord
is plugged into a 120 V AC
electrical outlet. Do not use
extension cords.
2. Check that the power
indicator light on the control
panel is illuminated to show
that the heater is getting
power from the outlet.
3. Check if the battery in the
remote control needs to be
replaced.
4. Unplug the heater, wait
15 minutes for the internal
components to reset and then
plug it back in.
5. Ensure that the heater is
placed on a fl at, fi rm surface
and that the tip over switch is
engaged.
STORAGE
Store the heater in a cool, dry
location when not in use. To
prevent dust and dirt build-up,
use the original packaging to
repack the heater.
11
OPERATING INSTRUCTIONS

This quality product is warranted to be free from manufacturer’s defects in material and
workmanship, provided that the unit is used under the normal operating conditions
intended by the manufacturer.
This warranty is available only to the person to whom the unit was originally sold by
Danby Products Limited (Canada) or Danby Products Inc. (U.S.A.) (hereafter “Danby”)
or by an authorized distributor of Danby, and is non-transferable.
TERMS OF WARRANTY
First 12 months: During the fi rst twelve (12) months, any replaceable parts of this
product found to be defective, will be replaced, at warranter’s option, at no charge to
the original purchaser.
To obtain service: For help with troubleshooting or for warranty replacement parts,
contact Danby Consumer Serivce by visiting www.Danby.com/Support or call 1-800-
263-2629.
EXCLUSIONS
Save as herein provided, by Danby, there are no other warranties, conditions,
representations or guarantees, express or implied, made or intended by Danby or
its authorized distributors and all other warranties, conditions, representations or
guarantees, including any warranties, conditions, representations or guarantees under
any Sale of Goods Act or like legislation or statute is hereby expressly excluded. Save
as herein provided, Danby shall not be responsible for any damages to persons or
property, including the unit itself, howsoever caused or any consequential damages
arising from the malfunction of the unit and by the purchase of the unit, the purchaser
does hereby agree to indemnify and hold harmless Danby from any claim for damages
to persons or property caused by the unit.
GENERAL PROVISIONS
No warranty or insurance herein contained or set out shall apply when damage or
repair is caused by any of the following:
1. Damage in transit.
2. Accident, alteration, abuse or misuse of the appliance.
3. Improper power supply such as low voltage, defective house wiring or inadequate
fuses.
4. Use for commercial or industrial purposes (i.e.. If the appliance is not installed in a
domestic residence).
5. Fire, water damage, theft, war, riot, hostility, acts of God such as hurricanes, fl oods
etc.
6. Service calls resulting in customer education.
7. Improper Installation.
Proof of purchase date will be required for warranty claims; retain bills of sale.
Danby Products Ltd.
Guelph, Ontario, Canada Danby Products Inc.
Findlay, Ohio, U.S.A.
1-800-263-2629
LIMITED “EXCHANGE ONLY” WARRANTY

13
AVERTISSEMENT:Lisez et comprenez l’intégralité de ce manuel du
propriétaire, y compris toutes les informations de sécurité, avant de
brancher ou d’utiliser cet appareil de chauffage. Le non-respect de
cette consigne pourrait entraîner un incendie, un choc électrique ou
des blessures graves.
ATTENTION : Conservez ce manuel du propriétaire pour référence
future.
ATTENTION : Risque de choc électrique. N’ouvrez pas et n’essayez
pas de réparer le radiateur vous-même.
Cet appareil de chauffage peut devenir chaud lorsqu’il est utilisé.
Pour éviter les brûlures, ne laissez pas la peau nue toucher les
surfaces chaudes. Utilisez les poignées pour déplacer ce radiateur.
Ne placez pas le radiateur contre des murs, des meubles, des
rideaux, etc.
Gardez les matériaux combustibles, tels que les meubles, les
oreillers, la literie, le papier, les vêtements et les rideaux à au moins
3 pieds de l’avant du radiateur et éloignez-les des côtés, du haut
et de l’arrière. Ne placez pas de serviettes ou d’autres objets sur le
radiateur.
Une extrême prudence est nécessaire lorsqu’un appareil de
chauffage est utilisé par ou à proximité d’enfants ou de personnes
invalides et chaque fois que l’appareil de chauffage est laissé en
marche et sans surveillance.
Le radiateur n’est pas destiné à être utilisé dans les salles de bains,
les buanderies, les douches ou les piscines et autres endroits
similaires. Ne placez jamais l’appareil de chauffage à un endroit où
il pourrait tomber dans une baignoire ou un autre récipient d’eau.
Pour se protéger contre les risques électriques, ne pas immerger
dans l’eau ou d’autres liquides.
Consignes de sécurité importantes
LIRE ET SUIVRE TOUTES LES INSTRUCTIONS DE SÉCURITÉ
GARDER CES INSTRUCTIONS!

Ne touchez pas le panneau de commande ou la prise avec les mains
mouillées.
Utilisez toujours sur une surface sèche et plane.
Ne pas utiliser à l’extérieur.
Utilisez toujours en position verticale.
AVERTISSEMENT : Pour réduire le risque d’incendie ou de choc
électrique, n’utilisez pas cet appareil de chauffage avec des
dispositifs de contrôle de vitesse à semi-conducteurs.
Ne faites pas fonctionner un radiateur avec un cordon
d’alimentation endommagé ou après un dysfonctionnement, une
chute ou un dommage de quelque manière que ce soit. Renvoyez
l’appareil de chauffage à un centre de service autorisé pour
examen, réglage électrique ou mécanique ou réparation.
Ne faites pas passer le cordon d’alimentation sous un tapis. Ne
couvrez pas le cordon d’alimentation avec des carpettes, des
tapis de course ou des revêtements similaires. Disposez le cordon
d’alimentation loin de la zone de circulation où il ne sera pas
trébuché.
N’insérez pas et ne laissez pas des objets étrangers pénétrer dans
les ouvertures de ventilation ou d’échappement car cela pourrait
provoquer un choc électrique ou un incendie ou endommager
l’appareil de chauffage.
Pour éviter tout risque d’incendie, n’obstruez en aucun cas les
entrées ou les sorties d’air. N’utilisez pas le radiateur sur des
surfaces molles comme un lit ou un tapis épais où les entrées d’air
pourraient se bloquer.
14
Consignes de sécurité importantes
LIRE ET SUIVRE TOUTES LES INSTRUCTIONS DE SÉCURITÉ
GARDER CES INSTRUCTIONS!

Un appareil de chauffage a des pièces chaudes et produisant des
arcs ou des étincelles à l’intérieur. N’utilisez pas le radiateur dans
des zones où de l’essence, de la peinture, des liquides explosifs et/
ou infl ammables sont utilisés ou stockés. Éloignez le radiateur des
surfaces chauffées et des fl ammes nues.
Branchez toujours le radiateur directement dans une prise murale ou
une prise. N’utilisez jamais de rallonge ou de multiprise. Pour éviter
tout risque d’incendie ou d’électrocution, branchez le radiateur
directement dans une prise électrique de 120 V CA.
Pour débrancher l’appareil de chauffage, mettez les commandes sur
OFF, puis retirez la fi che de la prise. Tirez fermement sur la fi che, ne
débranchez pas en tirant sur le cordon.
Débranchez toujours le radiateur avant de le déplacer ou de le
nettoyer. Débranchez le radiateur lorsqu’il n’est pas utilisé.
Utilisez uniquement pour un usage domestique prévu tel que
décrit dans ce manuel. Toute autre utilisation non recommandée
par le fabricant peut provoquer un incendie, un choc électrique
ou des blessures corporelles. L’utilisation d’accessoires n’est pas
recommandée.
N’essayez pas de réparer ou de régler les fonctions électriques ou
mécaniques de cet appareil. Cela annulera votre garantie. L’intérieur
de l’appareil de chauffage ne contient aucune pièce réparable par
l’utilisateur.
15
Consignes de sécurité importantes
LIRE ET SUIVRE TOUTES LES INSTRUCTIONS DE SÉCURITÉ
GARDER CES INSTRUCTIONS!

16
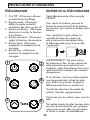
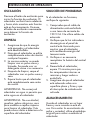
DES DISPOSITIFS DE SÉCURITÉ
Fonction de sécurité anti-basculement
Ce radiateur est équipé d’un dispositif de sécurité d’arrêt. Si
l’appareil de chauffage est renversé, un interrupteur interne arrêtera
automatiquement l’appareil de chauffage. Lorsque le radiateur est
remis en position verticale, le radiateur se réinitialise. Pour continuer
le fonctionnement, allumez le radiateur à l’aide de la télécommande
fournie ou du panneau de commande sur le radiateur.
Fonction de sécurité contre la surchauffe
Cet appareil de chauffage est équipé d’une fonction de sécurité
contre la surchauffe. Lorsque les composants internes de l’appareil
de chauffage atteignent une certaine température qui pourrait
provoquer une surchauffe et un éventuel incendie, l’appareil de
chauffage s’éteindra automatiquement.
Un protecteur de surcharge thermique est intégré pour éviter la
surchauffe. Lorsqu’une température de «surchauffe» est atteinte,
le radiateur s’éteint automatiquement. Le fonctionnement ne peut
reprendre que lorsque l’utilisateur réinitialise le radiateur.
Pour réinitialiser le radiateur, assurez-vous que l’alimentation est
coupée, débranchez l’appareil et attendez 15 à 20 minutes pour
que les composants internes refroidissent.
Suivez les instructions d’utilisation pour remettre le radiateur en
fonctionnement normal.
AVERTISSEMENT: il est normal que le cordon d’alimentation soit
chaud au toucher; cependant, un ajustement lâche entre la prise
et la fi che peut provoquer une surchauffe de la fi che. Si cela se
produit, essayez d’insérer la fi che dans une autre prise. Contactez
un électricien qualifi é pour inspecter la prise d’origine à la recherche
de dommages.

17
INSTRUCTIONS D’UTILISATION
AVERTISSEMENT IMPORTANT
Ne laissez pas cet appareil
sans surveillance dans un
espace où se trouvent des
personnes ou des animaux
incapables de réagir à un
dysfonctionnement. Un
dysfonctionnement peut
provoquer une surchauffe
extrême ou la mort dans
un espace clos et sans
surveillance.
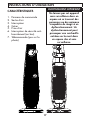
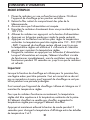
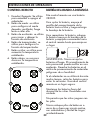
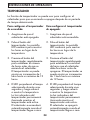
CARACTÉRISTIQUES
1. Panneau de commande
2. Sortie d’air
3. Interrupteur
4. Gérer
5. Prise d’air
6. Interrupteur de sécurité anti-
basculement (en bas)
7. Télécommande (pas sur la
photo)
1
2
3
4
5
6

18
INSTRUCTIONS D’UTILISATION
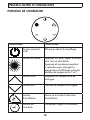
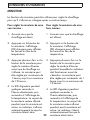
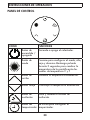
PANNEAU DE COMMANDE
CONTRÔLES FONCTIONS
Bouton marche/
arrêt Allume ou éteint le chauffage.
Bouton de mode Appuyez sur pour régler le mode;
haut, bas et ventilateur.
Appuyez et maintenez pendant
3 secondes pour changer la
température d’affi chage entre les
échelles de température C et F.
Bouton haut Augmente la température de
consigne.
Bouton bas Diminue la température réglée.
Bouton
d’oscillation Démarre et arrête la fonction
d’oscillation.
Bouton de
minuterie Utilisé pour régler la minuterie.

19
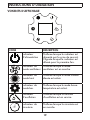
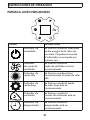
VOYANTS D’AFFICHAGE
ICÔNE DESCRIPTION
Indicateur
d’alimentation S’allume lorsque le radiateur est
alimenté par la prise de courant.
Clignote lorsque le radiateur est
allumé pour la première fois.
Indicateur de
mode ventilateur S’allume lorsque le mode
ventilateur est en marche.
Indicateur de
mode haut S’allume lorsque le mode chaleur
élevée est activé.
Indicateur de
mode bas S’allume lorsque le mode basse
température est activé.
Indicateur
d’oscillation S’allume lorsque la fonction
d’oscillation est en service.
Indicateur de
minuterie S’allume lorsque la minuterie est
en marche.
INSTRUCTIONS D’UTILISATION
La page est en cours de chargement...
La page est en cours de chargement...
La page est en cours de chargement...
La page est en cours de chargement...
La page est en cours de chargement...
La page est en cours de chargement...
La page est en cours de chargement...
La page est en cours de chargement...
La page est en cours de chargement...
La page est en cours de chargement...
La page est en cours de chargement...
La page est en cours de chargement...
La page est en cours de chargement...
La page est en cours de chargement...
La page est en cours de chargement...
La page est en cours de chargement...
La page est en cours de chargement...
La page est en cours de chargement...
La page est en cours de chargement...
La page est en cours de chargement...
-
 1
1
-
 2
2
-
 3
3
-
 4
4
-
 5
5
-
 6
6
-
 7
7
-
 8
8
-
 9
9
-
 10
10
-
 11
11
-
 12
12
-
 13
13
-
 14
14
-
 15
15
-
 16
16
-
 17
17
-
 18
18
-
 19
19
-
 20
20
-
 21
21
-
 22
22
-
 23
23
-
 24
24
-
 25
25
-
 26
26
-
 27
27
-
 28
28
-
 29
29
-
 30
30
-
 31
31
-
 32
32
-
 33
33
-
 34
34
-
 35
35
-
 36
36
-
 37
37
-
 38
38
-
 39
39
-
 40
40


Danby DBSH02213WD13 Le manuel du propriétaire
- Catégorie
- Chauffe-eau
- Taper
- Le manuel du propriétaire
- Ce manuel convient également à
dans d''autres langues
Documents connexes
-
Danby DDEF03813BD13 Le manuel du propriétaire
-
-
Danby DPA060B1WDB Le manuel du propriétaire
-
Danby DPA100B9IWDB-6 Le manuel du propriétaire
-
Danby DAC100B6IWDB-6 Le manuel du propriétaire
-
Unbranded DAC145EB6WDB-6 Le manuel du propriétaire
-
-