Aosom 370-109V80WT Assembly Instructions
- Taper
- Assembly Instructions

ASSEMBLY INSTRUCTION
CHILDREN ELECTRIC MOTORCYCLE MANUAL
●Suitable age 18-60 months.
●This product should be assembled by adult.
●This instruction contains important safety information
content,please keep it as a reference.
● Music,light
● Forward and backward
IN230800099V01_US_CA
370-109V80
IMPORTANT, RETAIN FOR FUTURE REFERENCE: READ CAREFULLY

-1-
1
1
1
1
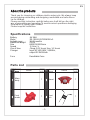
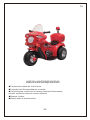
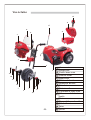
About the products
Thank you for choosing our children electric motorcycle. We always keep
pursuing being outstanding and designing comfortable and safe ride on
car for children.
Please read this instruction carefully before use,it will tell you the right
way of assembling and operating.To avoid incorrect operations damaging
the product or injuring your children.
Please keep this instruction.
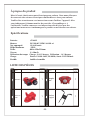
Specifications
Part
Name
Part
Name
Part
Name
Picture Picture
Q'ty
(pcs)
Q'ty
(pcs)
Part
Number
Part
Number
Main
body
Front
fork
Front
fender
Head
Parts List
Battery 6V 4AH
Motor RS-380-6V,RPM14000 x1
Suitable ages 18-60 months
Maximum weight 25 KG
Size 800X350X520mm
Speed 2-3 km / h
Use of time Charg: 8-12 hours Use: 1-2 hours
Charger Input AC100-240V, 50/60Hz,
output DC6V500mA
Fuse Resettable Fuse
EN

1
1
1
1
2
1
1 1
1
-2-
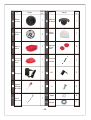
Part
Name
Part
Name
Part
Name
Picture Picture
Q'ty
(pcs)
Q'ty
(pcs)
Part
Number
Part
Number
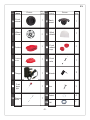
Charger
Front
axle
Wrench
Front
wheel
Dash
board
Wheel
Cover
Wind
shield
Toolbox
Toolbox
cover
Trunk
alarm
light
Steering
screw
Nut
Gasket
Front
wheel
cap
17
18
19
2
2
1
9
Screw
4
2
EN


-4-
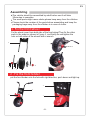
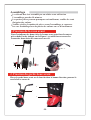
Assembling
The vehicle should be assembled by adult before use.It will take
30minutes to complete.
The small parts might cause choke,please keep away from the children.
Please check the number of the parts before assembling,and keep the
packaging bags away from the children in in case of choke.
1. Fix the front wheel
Fix the wheel cover from both side of the front wheel.Then fix the other
parts in the order as shown in Figure 1, and finally fix and tighten the
nuts on both sides of the wheels with a wrench
2 . Fix the front fender
put the front fender onto the fork with right direction, push down and tight up.
EN

-5-
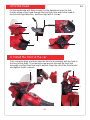
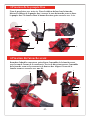
3.Fix the head
Fix the windshield with three screws.Fix the dashboard onto the fork;
Put the wiring of the head through the front fork hole and fix the head to
the fork with right direction, and then tight with 3 screws.
4. Install the front of the car
First connector plug, and then align the front fork assembly with the hole in
the front of the body. The steering screw passes through the front fork
assembly and the body from top to bottom. Align the nut of the front fender
and tighten it with a wrench.
EN

-6-
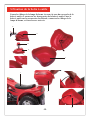
5.Installation kit toolbox
Put the alarm lamp wiring through the hole on the toolbox cover, and pair the
two parts of the toolbox.Fix the toolbox on the car body, connect the wiring on
the alarm light, and fix it with three screws.
EN

-7-
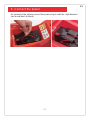
6. Connect the power
As showed in the picture,connect the power plug-in with the right direction
(red to red,black to black)
EN

-8-
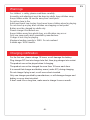
Warnings
Charging notification
For the first use, please charge 10 hours, or will damage the battery.
Plug charger DC line into charge hole first, then plug charger into socket.
The product can not be played when it charging.
The product can not be charged for more than 18 hours each time.
It is normal that charger and battery warm (under 60°) during charging.
Do not charge if plug is wet, or will occur short-circuited.
Only use charger provided by manufacturer, or will damage charger and
battery or occur short-circuited.
If don't used it for a long time, make sure to charge it once a month.
For children' s safety, please read these carefully.
Assembly and adjustment must be done by adults, keep children away.
Keep children under 18 months away from small parts.
Do not be close to fire.
Adult must teach how to play it and never leave children alone for playing.
Do not stand up or play when children are stepping on foot pedal.
Battery must be charged by adults only.
Please charge it first before use.
Keep children away from plastic bag, or suffocation may occur.
Only use spare parts which provided by manufacturer.
Charger is not a toy for playing.
Maximum loading capacity is 25KG. Do not overload.
Suitable age: 18-60 months.
EN

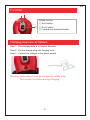
Button function
Horn button
Music button
Forward stop backward button
-9-
Function
③
②
①
Charging steps are as follows:
Step 1 : The charging hole is in front of the seat.
Step 2 : Put the charger plug into the plug hole.
Step 3 : Connect the charger to the power socket.
Warning: This product must be charged by adults only.
This product is useless during charging
EN

-10-
Maintenance and Service
• Check battery, charger and other spare parts regularly. If any problem,
please fix it before playing.
• Use lubricating oil to care iron parts. Keep car away from fire and
sunshine.
• Park it on the even place, not reversal or gradient.
• Park it indoor and cover it with waterproof cloth.
• Keep car away from fire, like stove or heater, or plastic may melt.
• Keep away from flammable things, or may occur fire accident.
• Charge it after use and must be done by adults only.
• If not used for a long time, please charge the battery once a month to
ensure the normal use of the battery.
• Clean the vehicle with dry cloth only. Do not use chermical solvent to wipe
p lastic parts. Do not wash it with water or play it when raining or snowing.
• When stop using the motorcycle, cut off the power,turn all the buttons to
“stop” or “off”.
• Do not use inconsistent fuse.
• Do not change the line system,structure and additional electric system of
the vehicle by yourself,repair work must be done by career man or under
profess ional supervision.
EN

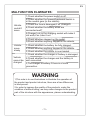
0$/)81&7,21(/,0,1$7(6
9HKLFOH
FRXOGQW
PRYH
&KHFNZKHWKHUWKHSRZHUVZLWFKLVRII
&KHFNZKHWKHUWKHIRUZDUGEDFNZDUGVZLWFKLV
LQWKHQHXWUDOJHDULQWKHPLGGOH
&KHFNWKHIXVHLVGDPDJHGLIVRFKDQJHLW
&KHFNZKHWKHUWKHEDWWHU\ZLUHVDUH
FRQQHFWHGZHOO"
&KDUJHUVGFLQWKHFKDUJLQJVRFNHWZLOOPDNHLW
QRWZRUNLIVRWDNHLWRXW
&KHFNZKHWKHUVWHSSHGRQWKHSHGDO
&KHFNZKHWKHUDQ\WKLQJWUDSSHGLQWKHZKHHOV
9HKLFOH
PRYH
VORZO\
&KHFNZKHWKHUWKHEDWWHU\EHIXOO\FKDUJHG
&KHFNZKHWKHUDQ\WKLQJWUDSSHGLQWKHZKHHOV
&KHFNZKHWKHUWKHYHKLFOHLVRYHUORDGHG
9HKLFOH
FDQQRWEH
FKDUJHG
&KHFNZKHWKHUWKHFKDUJHURUEDWWHU\LVGDPDJHG
&KHFNZKHWKHUWKHFKDUJHUDQGWKHEDWWHU\LV
ZHOOFRQQHFWHG
7KHFKDUJHURUEDWWHU\LIWKHUHLVDORRVH
FRQQHFWLRQ
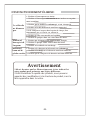
:$51,1*
7KLVQRWHLVWRXVHLOOXVWUDWLRQVWRLOOXVWUDWHWKHRSHUDWLRQRI
WKHSURGXFWDQGSURGXFWVWUXFWXUHWKHUHDUHDIHZGLႇHUHQFHV
LQNLQGSUHYDLO
,QRUGHUWRLPSURYHWKHTXDOLW\RIWKHSURGXFWVXQGHUWKH
FRQGLWLRQRIZLWKRXWWHOOLQJZHPD\PDNHFKDQJHVWRWKHSURGXFW
SDUWRIWKHVWUXFWXUHZLWKWKHDSSHDUDQFHSOHDVHXQGHUVWDQGLQJ
EN

FR
-12-
MANUEL DE LA MOTO ÉLECTRIQUE POUR ENFANTS
●Convient aux enfants de 18 à 60 mois.
●Ce produit doit être assemblé par un adulte.
●Ces instructions contiennent un contenu important d’informations
sécurité, veuillez la conserver comme référence.
●Musique, lumière
●Marche avant et marche arrière

-13-
1
1
1
1
À propos du produit
Merci d’avoir choisi notre moto électrique pour enfants. Nous nous efforçons
de concevoir des voitures électriques confortables et sûres pour enfants.
Veuillez lire attentivement ces instructions avant d'utiliser l'appareil, elles
vous indiqueront la bonne manière de procéder à l'assemblage et à
l’utilisation. Veuillez conserver ces instructions afin d’éviter que des
opérations incorrectes n’endommagent le produit ou ne blessent vos enfants.
Spécifications
Nom de
pièce
Nom de
pièce
Image Image
Qté
(pcs) Qté
(pcs)
No.
No.
Carrosserie
Fourchette
de poignée
Garde-boue
avant
Poupée
fixe
Batterie: 6V4AH
Moteur: RS-380-6V, RPM 14000 x1
Âge approprié: 18 à 60 mois
Poids maximum: 25KG
Taille : 800x 350x520mm
Vitesse: 2 à 3km/h
Utilisation du temps: Charge : 8 à 12 heures Utilisation : 1 à 2 heures
Charge: Entrée CA100-240V,50/60Hz; Sortie CC6V500mA
Fusible: fusible réarmable
LISTE DES PIÈCES:

-14-
1
1
1
1
2
1
1 1
1
Nom de
pièce
Nom de
pièce
Image Image
Qté
(pcs)
Qté
(pcs)
No.
Chargeur
Essieu
avant
Clé
Roue
avant
Tableau
de bord
Enjoliveur
de roue
Pare-
brise
Boîte à
outils
Couvercle
de boîte à
outils
Lumière
d’alarme
de coffre
Vis de
direction
Ecrou
Joint
Capuchon
de roue
avant
17
18
19
2
2
1
9
Vis
4
2
No.

18
4
10
12
18
4
19
15
11
9
17
6
8
2
1
3
7
5
7
18
19
18
10
4
Vue éclatée
-15-
1
2
3
4
8
9
10
11
12
15
17
18
19
6
7
5
Carrosserie
Poupée fixe
Garde -boue avant
Fourche avant
Roue avant
Tableau de bord
Enjoliveur de roue
Pare-brise
Boîte à outils
Capuchon de roue avant
Couverture de boîte à
outils
Essieu avant
Voyant d’alarme du coffre
Vis de direction
Joint
Ecrou

-16-
Assemblage
Le véhicule doit être assemblé par un adulte avant utilisation.
L’assemblage prendra 30 minutes.
Les petites pièces peuvent provoquer un étouffement, veuillez les tenir
éloignées des enfants.
Veuillez vérifier le nombre de pièces avant l'assemblage et conserver
les sacs d'emballage hors de portée des enfants en cas d'étouffement.
1.Fixation de la roue avant
Fixez l'enjoliveur des deux côtés de la roue avant, puis fixez les autres
pièces dans l'ordre indiqué sur la Figure 1, et enfin fixez et serrez les
écrous des deux côtés des roues avec une clé.
2. Fixation du garde-boue avant
Placez le garde-boue avant sur la fourche dans la bonne direction, poussez-le
vers le bas et serrez-le.
4
19
18
2
4
11 75
3
4
4
14
3

-17-
3.Fixation de la poupée fixe
Fixez le pare-brise avec trois vis. Fixez le tableau de bord sur la fourche ;
Mettez le câblage de la poupée fixe à travers le trou de fourche avant et fixez
la poupée fixe à la fourche dans la bonne direction, puis serrez-le avec 3 vis.
4.Fixation du farouche avant
Branchez d’abord le connecteur, puis alignez l’ensemble de la fourche avant
avec le trou de l'avant de la carrosserie. La vis de direction traverse l'ensemble
de la fourche avant et la carrosserie de haut en bas. Alignez l'écrou de la
fourche avant et serrez-le avec une clé.
4
6
8
4
16
2
16
17 1
14
17
17

5.Fixation de la boîte à outils
1
11
15
11
15
9
9
16
-18-
Passez le câblage de la lampe d'alarme à travers le trou du couvercle de la
boîte à outils, et connectez les deux parties de la boîte à outils. Fixez la
boîte à outils sur la carrosserie du véhicule, connectez le câblage de la
lampe d'alarme, et fixez-la avec trois vis.

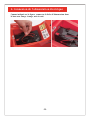
6. Connexion de l’alimentation électrique
Comme indiqué sur la figure, connectez la fiche d'alimentation dans
le bon sens (rouge à rouge, noir à noir).
-19-
La page est en cours de chargement...
La page est en cours de chargement...
La page est en cours de chargement...
La page est en cours de chargement...
La page est en cours de chargement...
-
 1
1
-
 2
2
-
 3
3
-
 4
4
-
 5
5
-
 6
6
-
 7
7
-
 8
8
-
 9
9
-
 10
10
-
 11
11
-
 12
12
-
 13
13
-
 14
14
-
 15
15
-
 16
16
-
 17
17
-
 18
18
-
 19
19
-
 20
20
-
 21
21
-
 22
22
-
 23
23
-
 24
24
-
 25
25


Aosom 370-109V80WT Assembly Instructions
- Taper
- Assembly Instructions
dans d''autres langues
- English: Aosom 370-109V80WT
Autres documents
-
HOMCOM B31-331BK Assembly Instructions
-
Peg Perego John Deere Gator XUV550 Midnight Black Mode d'emploi
-
Maverick Maverick Scout RC Manuel utilisateur
-
Generic TR 125 Manuel utilisateur
-
Samsung SR8F40 NAVIBOT FRESH Manuel utilisateur
-
Samsung SR8F50 Le manuel du propriétaire
-
Hitachi RPI-4.0FSN2SQ Installation & Maintenance Manual
-
mundoclima Series MUP-HK Le manuel du propriétaire
-
Panasonic EY7206GQW Operating Instructions Manual
-
Horizon Hobby 9320977 Manuel utilisateur