Kawasaki 691309 Manuel utilisateur
- Catégorie
- Pulvérisateur de peinture
- Taper
- Manuel utilisateur

87-1904-60957
KAWASAKI IS A TRADEMARK LICENSED BY KAWASAKI MOTORS CORP.,
U.S.A., WHICH DOES NOT MANUFACTURE OR
DISTRIBUTE THIS PRODUCT. CONSUMER INQUIRES SHOULD BE
DIRECTED TO:
KAWASAKI EST UNE MARQUE DE COMMERCE DE KAWASAKI MOTORS
CORP., U.S.A., QUI NE FABRIQUE PAS ET NE DISTRIBUE PAS CE PRO-
DUIT THIS PRODUCT. LES QUESTIONS DES CONSOMMATEURS DOIVENT
ÊTRE ADRESSÉES À :
KAWASAKI ES UNA MARCA REGISTRADA CON LICENCIA DE KAWASAKI
MOTORS CORP., E.U.A., QUE NO FABRICA NI
DISTRIBUYE ESTE PRODUCTO. LAS CONSULTAS DE LOS
CONSUMIDORES DEBEN DIRIGIRSE A:
©COPYRIGHT 2011 ALLTRADE TOOLS, LLC.
1431 VIA PLATA
LONG BEACH, CA 90810-1462 USA
840762 – High Pressure Spray Gun, Pistolet de pulvérisation à haute pres-
sion, Pistola de rociado de alta presión - Rev. 10/13/11
FOR CUSTOMER SERVICE
POUR LE SERVICE APRÉS VENTE
OU DU CONSOMMATEUR
PARA EL SERVICIO
PARA EL CONSUMIDOR
1-800-590-3723
Printed in China
Imprimé dans la Chine
Impreso en China
COMPONENT
COMPOSANT
COMPONENTE
N°691309
THIS MANUAL CONTAINS IMPORTANT INFORMATION REGARDING SAFETY, OPERATION, MAINTENANCE AND STORAGE
OF THIS PRODUCT. BEFORE USE, READ CAREFULLY AND UNDERSTAND ALL CAUTIONS,WARNINGS, INSTRUCTIONS AND
PRODUCT LABELS. FAILURE TO DO SO COULD RESULT IN SERIOUS PERSONAL INJURY AND/OR PROPERTY DAMAGE.
CE MANUEL CONTIENT DES INFORMATIONS IMPORTANTES CONCERNANT LA SÉCURITÉ, LE FONCTIONNEMENT ET LE
REMISAGE DE CE PRODUIT. LIRE, ÉTUDIER ET VEILLER À BIEN COMPRENDRE TOUTES LES MISES EN GARDE ET
INSTRUCTIONS ET AUTOCOLLANTS APPOSÉS SUR LE PRODUIT AVANT DE L’UTILISER. NE PAS RESPECTER CES
INSTRUCTIONS POURRAIT ENTRAÎNER DES BLESSURES ET/OU DES DOMMAGES MATÉRIELS.
ESTE MANUAL CONTIENE INFORMACIÓN IMPORTANTE SOBRE LA SEGURIDAD, OPERACIÓN, MANTENIMIENTO Y ALMA-
CENAMIENTO DE ESTE PRODUCTO. ANTES DE USARLO, LEA Y COMPRENDA TODAS LAS PRECAUCIONES, ADVERTEN-
CIAS, INSTRUCCIONES Y ETIQUETAS DEL PRODUCTO. DE LO CONTRARIO PODRÍA SUFRIR LESIONES GRAVES O CAUSAR
DAÑOS MATERIALES.
IF YOU SHOULD HAVE ANY QUESTIONS OR EXPERIENCE A PROBLEM WITH YOUR ALLTRADE PRODUCT, DO NOT RETURN
THIS PRODUCT TO THE STORE. PLEASE CALL OUR CUSTOMER SERVICE DEPARTMENT AT 1-800-590-3723. BEFORE
YOU CALL, HAVE THE FOLLOWING INFORMATION AVAILABLE: MODEL No., DATE PURCHASED AND STORE LOCATION.
AN ALLTRADE REPRESENTATIVE CAN RESOLVE YOUR PROBLEM OVER THE PHONE. IF YOU WOULD LIKE TO MAKE A
SUGGESTION OR COMMENT, GIVE US A CALL OR EMAIL US AT: INFO@ALLTRADETOOLS.COM. YOUR FEEDBACK IS VITAL
TO US.
POUR TOUTE QUESTION OU EN CAS DE PROBLÈME AVEC LE PRODUIT ALLTRADE, NE PAS LE RETOURNER AU MAGA-
SIN OÙ IL A ÉTÉ ACHETÉ. APPELER LE SERVICE APRÈS-VENTEAU 1-800-590-3723. AVANT D’APPELER, VEILLER À SE
PROCURER LES INFORMATIONS SUIVANTES : No. DE MODÈLE, DATE DE L’ACHAT ET ADRESSE DU MAGASIN.
UN REPRÉSENTANT D’ALLTRADE PEUT RÉSOUDRE VOTRE PROBLÈME PAR TÉLÉPHONE. POUR TOUT COMMENTAIRE
OU SUGGESTION, N’HÉSITEZ PAS À NOUS APPELER OU NOUS CONTACTER PAR COURRIEL À L’ADRESSE :
INFO@ALLTRADETOOLS.COM. VOS COMMENTAIRES NOUS SONT EXTRÊMEMENT PRÉCIEUX.
SI TIENE DUDAS O SURGEN PROBLEMAS CON SU PRODUCTO ALLTRADE, NO LO DEVUELVA A LA TIENDA LLAME A NUE-
STRO DEPARTAMENTO DE SERVICIO AL CLIENTE AL 1-800-590-3723. ANTES DE LLAMAR, TENGA A MANO LA SIGU-
IENTE INFORMACIÓN: No. DE MODELO, FECHA DE COMPRA Y DIRECCIÓN DE LA TIENDA. UN REPRESENTANTE DE ALL-
TRADE PUEDE RESOLVER SU PROBLEMA POR TELÉFONO. SI DESEA HACER ALGUNA SUGERENCIA O COMENTARIO,
LLÁMENOS O ENVÍENOS UN MENSAJE DE CORREO ELECTRÓNICO A. INFO@ALLTRADETOOLS.COM. SUS COMENTAR-
IOS SON FUNDAMENTALES PARA NOSOTROS.
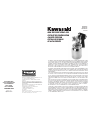
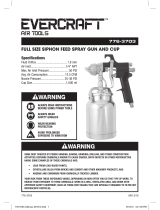
HIGH PRESSURE SPRAY GUN
PISTOLET DE PULVÉRISATION
À HAUTE PRESSION
PISTOLA DE ROCIADO
DE ALTA PRESIÓN

PERSONAL HAZARD WARNINGS
During cleaning and flushing, solvents can be forcefully expelled from fluid and air passages. Some
solvents can cause eye injury. Be sure user and bystanders in the area are wearing impact resistant
eye and face protection. Even small projectiles can injure eyes and cause blindness.
Air under pressure can cause severe injury. Always shut off air supply, drain hose of air pressure and
disconnect tool from air supply when not in use, before changing accessories or when making repairs.
Never direct air at yourself or anyone else. Whipping hoses can cause serious injury. Always check for
damaged or loose hoses and fittings. Never use quick-change couplings at tool. They add weight and
could fail due to vibration. Instead, add a hose whip and connect coupling between air supply and hose
whip, between hose whip and leader hose whip, or between hose whip and leader hose. DO NOT EXCEED
MAXIMUM AIR PRESSURE OF 90 PSI. Always use tool a safe distance from other people in work area.
Maintain tools with care. Keep tools clean and oiled for best and safest performance. Follow instructions
for lubricating and changing accessories. Wiping or cleaning rags and other flammable waste materials
must be placed in a tightly closed metal container and disposed of later in the proper fashion.
Do not wear loose or ill-fitting clothing. Remove watches and rings. Do not over reach. Keep proper
footing and balance at all times. Slipping, tripping and falling can be a major cause of serious injury or
death. Be aware of excess hose left on the walking or work surface. Do not abuse hoses or connectors.
Never carry tool by the hose or yank it to disconnect from power supply. Keep hoses from heat, oil
and sharp edges. Check hoses for weak or worn condition before each use, making certain that all
connections are secure.
High sound levels can cause permanent hearing loss. Protect yourself from noise. Noise levels vary with
work surface. Wear ear protectors. When possible secure work with clamps or vise so both hands are
free to operate tool.
Repetitive work motions, awkward positions and exposure vibration can be harmful to hands and
arms. Avoid inhaling dust or handling debris from work processes, which can be harmful to your health.
Operators and maintenance personnel must be physically able to handle the bulk, weight and power of
the tool. This tool is not intended for using in explosive atmospheres and is not insulated for contact with
electric power sources. Solvent and coatings can be highly flammable or combustible especially when
sprayed. Adequate exhaust must be provided to keep air free of accumulations of flammable vapors.
Smoking must never be allowed in the spray area. Fire extinguishing equipment must be present in the
spray area. Never spray near sources of ignition such as pilot lights, welders, etc.
2
• FAILURE TO HEED ALL WARNINGS COULD RESULT IN SEVERE PERSONAL OR BYSTANDER INJURY,
EVEN DEATH.
• ONLY USE TOOLS FOR PURPOSE THEY ARE INTENDED FOR.
• YOU MUST WEAR PROTECTIVE EYEWEAR AND SUITABLE RESPIRATORY PROTECTION (OSHA
APPROVED) WHILE SPRAYING OR CLEANING THIS GUN OR ITS ATTACHMENTS.
• NEVER AIM SPRAY GUN AT PEOPLE. SOLVENTS AND THINNERS CAN CAUSE INJURY.
• DO NOT EXCEED RATED OPERATING PRESSURE.
• CAUTION: POTENTIAL FLAMMABILITY OF SPRAYED PAINT, AND AVOID SPRAYING NEAR FLAMES
OR SPARKS.
• USE PAINT MASK/RESPIRATOR WHILE OPERATING PRODUCT.
• USE PRODUCT ONLY IN WELL-VENTILATED AREAS.
• WEAR EAR PROTECTORS.
• HALOGENATED HYDROCARBON SOLVENTS. FOR EXAMPLE: METHYLENE IS NOT CHEMICALLY
COMPATIBLE WITH THE ALUMINUM THAT MIGHT BE USED IN MANY SYSTEM COMPONENTS.

HALOGENATED HYDROCARBON SOLVENTS. For example: Methylene is not chemically compatible with
the aluminum that might be used in many system components. The chemical reaction caused by these
solvents reacting with aluminum can become violent and lead to an equipment explosion. Guns with
stainless steel fluid passages can be used with these solvents. However aluminum is widely used in
other spray application equipment such as material pumps and cups. Make sure these can also be used
safely with these solvents. Read the label or data sheet for the material you intend to spray. If in doubt
as to whether or not a coating or cleaning material is compatible, contact your material supplier.
Spray materials may be harmful if inhaled, or if there is contact with the skin. Adequate exhaust must
be provided to keep the air free of accumulations of toxic materials. Use a mask or respirator whenever
there is a chance of inhaling sprayed materials. The mask must be compatible with the material being
sprayed and its concentration.
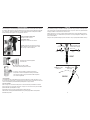
SPECIFICATIONS: HIGH PRESSURE SPRAY GUN (691309)
Fluid Tip Size: 0.071 inches (1.8 mm) Diameter
Air Inlet: 1/4" inch (6.35mm) NPS
Air Consumption: 10 CFM @ 50 PSI (17
m3
⁄Hr @ 344.5 kPa)
Capacity of Cup: 33.8 fl. oz. (1 liter)
Maximum Pressure: 90 PSI (620 kPa)
FIGURE 1
Air Nozzle
Air Cap
Pressure Tube
Container Lock
Container
External Needle Pack
Adjustment (Packing Nut)
Fluid Control
Knob
Spray Pattern
Adjustment Knob
Trigger Handle
Trigger Pivot
Point
3
AIR SUPPLY
Never mount oil and water extractor on or near the air compressor. During compression, air temperature
is greatly increased. As the air cools down to room temperature, moisture condenses in the air line, on
its way to the spray supply system where the compressed air temperature is lowest. Drain air lines
properly. Pitch all air lines back towards the compressor so that condensed moisture will flow back into
the air receiver where it can be drained off. Each low point in an air line acts as a water trap. Such
points should be fitted with an easily accessible drain. See diagram above.
4
AIR FLOW LENGTH OF PIPE
CFM 50 ft. [15,24m] 100 ft. [30,48m] 150 ft. [45,72m] 200 ft. [60,96m]
10 [17 m
3
/h] 1/2" [12,7mm] 3/4" [19mm] 3/4" [19mm]
—
20 [34 m
3
/h] 3/4" [19mm] 3/4" [19mm] 3/4" [19mm] 3/4" [19mm]
30 [51 m
3
/h] 3/4" [19mm] 3/4" [19mm] 1" [2,5cm] 1" [2,5cm]
40 [68 m
3
/h] 1" [2,5cm] 1" [2,5cm] 1" [2,5cm] 1" [2,5cm]
50 [85 m
3
/h] 1" [2,5cm] 1" [2,5cm] 1" [2,5cm] 1" [2,5cm]
70 [119 m
3
/h] 1" [2,5cm] 1" [2,5cm] 1-1/4" [3,2cm] 1-1/4" [3,2cm]
25 ft. (7,62 meters) OR MORE
Oil and Water Extractor should be at least 25 ft. (7,62 meters) from the compressor, farther if possible.
Tilt pipe back toward Air Receiver
Install drain at
each low point
Drain
Drain
Oil and Water
Extractor
Compressor Unit

SPRAY GUN HANDLING
Your new spray gun is exceptionally rugged in construction and is built to stand up under hard continuous
use. However, like any other fine precision instrument, its most efficient operation depends on knowledge
of its construction, operation, and maintenance. Properly handled and cared for, it will produce beautiful,
uniform finishing results long after other spray guns have worn out.
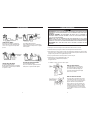
SPRAY PATTERN ADJUSTMENT KNOB:
Turn right for round, left for fan.
FLUID CONTROL KNOB:
Turn right to decrease flow, left to increase.
As width of spray gun is increased, more material
must be allowed to pass through the gun to obtain
same coverage on the increased area.
Spray pattern may be infinitely adjusted
from round to flat.
In normal use, the nozzle wings are horizontal as shown here.
This provides a vertical fan-shaped pattern which gives maximum,
even, material coverage as the gun is moved back and forth parallel
to the surface being finished.
SIPHON SPRAYING
Set atomization pressure at approximately 50 PSI for lacquer and 60 PSI for enamel. Try spray. If it is too
fine, then decrease the air pressure or open fluid control screw. If the spray is too thick, then close the fluid
control screw. Regulate the pattern width and repeat adjustment of spray as needed.
PRESSURE SPRAYING
After selecting correct size fluid, set fluid pressure for the desired flow. Open atomization air and test
spray. If spray is too fine, then reduce air pressure. If spray is too coarse, then raise air pressure. Adjust
pattern width and repeat adjustment of spray.
Keeping fluid control screw in open position will reduce fluid needle wear.
NOTE: To reduce overspray and obtain maximum efficiency, always spray with the lowest possible
atomization air pressure.
5
The spray pattern of the gun is variable
from round to flat with all patterns in between.
OPERATION
Proper handling of the gun is essential for obtaining a good finish. The gun should be held at right angle
to the surface being covered, moving parallel with the surface. For precise control of the gun and material,
the trigger should be released before the end of the stroke.
Hold the gun from 6 to 12 inches (15,24cm to 30,48cm) away from the surface depending on material
and atomizing pressure. For a uniform finish, lap each stroke over the preceding stroke, making sure the
spray is smooth and wet.
Using the lowest possible atomizing air pressure will reduce over-spray and provide maximum efficiency.
Start
stroke
End of
stroke
Pull
trigger
Release
trigger
TRAVEL OF GUN
6
RIGHT
WRONG
Coating should be even
and wet when spraying
6 to 12 INCHES
(15,24CM to 30,48CM)
Coating will be heavy
at this point
Coating will be light
at this point

SIPHON FEED CUP HOOKUP
Air pressure for atomization is regulated at
extractor. Amount of fluid is adjusted by fluid
control screw on gun, paint viscosity and air
pressure.
PRESSURE FEED TANK HOOKUP
For portable painting operations
(Double regulator) Air pressure for atomization
and fluid supply is regulated by two individual
air regulators on tank.
PRESSURE FEED TANK HOOKUP
For medium production spraying
(Single regulator) Air pressure for atomization is
regulated at extractor. Fluid pressure is regulated
at tank regulator.
PRESSURE FEED CIRCULATING HOOKUP
For heavy production spraying
Air pressure atomization regulated at extractor.
Fluid pressure is regulated at fluid regulator.
TYPES OF INSTALLATION
7
CLEANING AND MAINTENANCE
SPRAY GUN
1. Submerge the front end of the gun in solvent just until the fluid connection is covered.
2. Paint that has built up on the gun should be removed using a bristle brush and solvent.
3. Never submerge all of the spray gun in solvent. This will dissolve the lubricant in the leather packing
and on wear surfaces, causing them to dry out and resulting in difficult operation and faster wear. Air
passages in the gun will become clogged with dirty solvent.
4. Using a rag moistened with solvent, wipe down the outside of the gun.
5. Oil gun daily. Use a drop of lightweight machine oil on:
A. External Needle Pack Adjustment (Packing Nut)
B. Trigger Pivot Point
See FIGURE 1 on page 3 for location of above points.
WHEN USED WITH SIPHON CUP
A compatible thinner or solvent should be
siphoned through gun by inserting tube in
open container of that liquid. Trigger gun
repeatedly to flush passageway thoroughly
and to clean tip of needle.
WHEN USED WITH PRESSURE TANK
Shut off air supply to tank and release pressure
on tank. Open vent and loosen air nozzle. Hold
a piece of cloth over the air nozzle and squeeze
trigger. Air will back up through fluid nozzle,
and force fluid out of hose into tank. Next, put
enough thinner into tank to wash hose and gun
thoroughly. Spray thinner through the gun until
it is clean. Attach fluid hose to air line and blow
it out thoroughly to remove all traces of materials
and dry hose.
• RESPONSIBILITY. IT SHALL BE THE TOOL OWNER'S RESPONSIBILITY TO ASSURE THAT TOOLS ARE
MAINTAINED IN A SAFE OPERATING CONDITION. IF TOOLS ARE DAMAGED, REMOVE FROM SERVICE
IMMEDIATELY.
• AUTHORIZED PERSONNEL. TOOL MAINTENANCE AND REPAIR SHALL BE PERFORMED BY
AUTHORIZED, TRAINED, COMPETENT PERSONNEL. PLEASE CALL OUR CUSTOMER SERVICE AT
1-800-423-3598 FOR INFORMATION.
• REPAIRS. TOOLS SHALL BE DISCONNECTED FROM THEIR COMPRESSED AIR SUPPLY BEFORE
REPAIR IS ATTEMPTED. REPAIRS SHALL BE CONSISTENT WITH MANUFACTURER'S RECOMMENDED
PROCEDURES. PLEASE REFER TO CLEANING AND MAINTENANCE OR TROUBLESHOOTING SECTIONS.
• REPLACEMENT. TOOLS, HOSES AND FITTINGS SHALL BE REPLACED IF UNSUITABLE FOR SAFE
OPERATION.
8

AIR PRESSURE
Oil and water extractor is important.
Achieving a fine spray finish without the use of a good oil and water extractor is virtually impossible.
The extractor eliminates blistering and spotting by keeping air free of oil and water and gives precise
air pressure control at the gun.
AIR NOZZLE, FLUID NOZZLE, AND NEEDLE ASSEMBLY
1. All nozzles and needles are precision made and should be handled with care.
2. Except as described in #5, do not make any alterations to the gun.
3. To clean nozzles, soak them in solvent to dissolve any dried material. Afterwards, blow the
nozzles clean with air.
4. Do not probe any of the holes in the nozzles with metal instruments. If probing is necessary,
use only a tool that is softer than brass.
5. Adjust the fluid needle valve so when gun is triggered, air flow occurs before fluid flow.
9
DO NOT USE LUBRICANTS CONTAINING SILICONE.
SILICONE MAY CAUSE DEFECTS IN THE FINISH APPLICATION.
ALL PARTS ON A SPRAY GUN SHOULD BE SCREWED IN BY HAND AT FIRST.
THIS WILL AVOID THE POSSIBILITY OF CROSS THREADING THE PARTS. IF THE PARTS
CANNOT BE TURNED BY HAND EASILY, MAKE SURE YOU HAVE THE CORRECT PARTS,
UNSCREW, REALIGN, AND TRY AGAIN. NEVER USE UNDUE FORCE IN MATING PARTS.
10
SPRAY PATTERN
CONDITION
PROBLEM SOLUTION
One side of nozzle wing is clogged. Soak nozzle in solvent to loosen
clogs, then blow air through until
clean. To clean orifices use a
toothpick. Never try and detach
dried material with sharp tool.
a) Loose air nozzle.
b) Material around outside of air
nozzle has dried.
a) Trigger air nozzle.
b) Take off air nozzle and
wipe off fluid tip, using
rag moistened with thinner.
a) Atomization air pressure is set
too high.
b) Trying to spray a thin material
in too wide a pattern.
a) Reduce air pressure.
b) Increase material control by
turning fluid. Control screw
to left, while reducing spray
width by turning spray width
adjustment screw to right.
Spitting
a) Packing around needle valve is
dried out.
b) Fluid nozzle loosely installed or
dirt between nozzle and body.
c) Needle sealing damaged.
a) Back up knurled nut and put
a few drops of machine oil
on packing. Retighten nut.
b) Take off fluid nozzle. Clean rear
of nozzle and seat in gun body.
Replace nozzle and bring in tight
to body.
c) Replace #27 sealing.
Improper spray pattern a) Gun improperly adjusted.
b) Dirty air cap.
c) Fluid tip obstructed.
d) Sluggish needle.
a) Readjust gun.
Follow instructions carefully.
b) Clean air cap.
c) Clean.
d) Lubricate.
Unable to get round spray Fan adjustment screw
not seating properly.
Clean or replace.
Will not spray a) No air pressure at gun.
b) Fluid pressure too low with
internal mix cap and pressure
tank.
c) Fluid control screw not open
enough.
d) Fluid too heavy for suction feed.
a) Check air supply and air lines.
b) Increase fluid pressure at tank.
c) Open fluid control screw.
d) Thin material or change to
pressure feed.
TROUBLESHOOTING

11
SPRAY PATTERN
CONDITION
PROBLEM SOLUTION
Fluid leakage from
packing nut
a) Packing nut loose.
b) Packing worn or dry.
a) Tighten, but not so tight as to
grip needle.
b) Replace packing or lubricate.
Dripping from fluid tip a) Dry packing.
b) Sluggish needle.
c) Tight packing nut.
d) Worn fluid nozzle or needle.
a) Lubricate.
b) Lubricate.
c) Adjust.
d) For pressure feed, replace with
new fluid nozzle and needle.
Thin, sandy, and coarse
finish
a) Gun held too far from surface.
b) Atomization pressure set too
high.
a) Move gun closer to surface.
b) Adjust atomization pressure.
Thick, dimpled finish
resembling orange peel
Gun held too close to surface. Move gun further away
from surface.
ITEM NO. DESCRIPTION QTY. ITEM NO. DESCRIPTION QTY.
1S Air Cap with Ring 1
18 Seat Housing 1
2S
Spray Pattern Adjustment Assembly
1
19 Gasket 1
3S Fluid Control Assembly 1 20 Spring 1
4 Fluid Nozzle 1 21 Air Inlet 1
5 Container Inlet Assembly 1 22 Screw 1
6 Needle Seat 1 23 Spring 1
7 Felt Washer 1 24 Valve 1
8 Air Valve Set 1 25 Air Regulator Housing 1
9 Pivot 1 26 Gasket 1
10 Trigger 1 27 Packing Material (Sealing) 1
11 C-Clip 2 28 Packing Nut 1
12 Valve Stem 1 29 O-Ring 1
13 O-Ring 1 30 Container 1
14 Spray Pattern Control Knob 1 31 Complete Lid Assembly 1
15 Needle Valve 1 32 Gasket 1
16 Body 1
33 Gasket 1
17 Valve Seat 1
PARTS LIST 691309
12
-
 1
1
-
 2
2
-
 3
3
-
 4
4
-
 5
5
-
 6
6
-
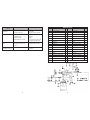 7
7


Kawasaki 691309 Manuel utilisateur
- Catégorie
- Pulvérisateur de peinture
- Taper
- Manuel utilisateur
dans d''autres langues
- English: Kawasaki 691309 User manual
Documents connexes
Autres documents
-
Kobalt SGY-AIR160TZ Guide d'installation
-
-
3M Accuspray™ ONE Spray Gun Kit Mode d'emploi
-
Power Fist 0450071 Le manuel du propriétaire
-
Binks Pressure Cup Outfits Manuel utilisateur
-
 Binks 2100 series Manuel utilisateur
-
-
-
Campbell Hausfeld Spray Gun Manuel utilisateur
-
 Evercraft 776-3703 Manuel utilisateur

