Power Fist 0450071 Le manuel du propriétaire
- Catégorie
- Pulvérisateur de peinture
- Taper
- Le manuel du propriétaire

V 1.45
Professional
HVLP Paint Gun
0450071
OWNER'S MANUAL
Read and understand all instructions before use.
Retain this manual for future reference.

V 1.45
SPECIFICATIONS
Standard Nozzle: 1.0 mm
Cup size: 2 Quart
Hose Length: 5 ft.
Operating Pressure: 15 to 43 PSI
Average Air Consumption: 3.5 CFM @ 43 PSI
Continuous Air Consumption: 13.9 CFM @ 43 PSI
IMPORTANT SAFETY PRECAUTIONS
WARNING! Read and understand all instructions before using this tool. Failure to follow all
instructions may result in electric shock, fire and/or personal injury. Keep this manual for
the safety warnings and precautions, operating, inspection and maintenance instructions.
When using this tool, basic precautions should always be followed to reduce the risk of
personal injury and/or damage to the equipment. Note that when this manual refers to a
part number, it refers to the parts list included.
WORK AREA
1. Keep your work area clean and well lit. Cluttered and dark areas invite accidents.
2. Operate in a safe work environment. Do not use in damp or wet locations. Do not expose to rain. Do not
use in the presence of flammable gases or liquids.
3. Keep children, bystanders and visitors away from the work area. Distraction can cause you to lose
control. Do not let them handle tools, hoses or extension cords. No one should be in the work area if they are
not wearing suitable protective equipment.
4. Store unused equipment. When not in use, tools must be stored in a dry location to prevent rust. Always
lock up tools and keep them out of reach of children.
PERSONAL SAFETY
1. Use eye and breathing protection. Always wear ANSI approved impact safety goggles, which must provide
both frontal and side protection. Protect your hands with suitable gloves. Wear an ANSI approved dust mask
or respirator when working around metal, wood and chemical dusts and mists.
2. Do not over reach; keep proper footing and balance at all times. Proper footing and balance enables
better control of the tool in unexpected situations.
3. Dress properly, wear protective equipment. Do not wear loose clothing or jewelry as they can be caught
in moving parts. Tie back long hair. Protective, electrically non-conductive clothes and non-skid footwear are
recommended when working.
4. Stay alert, watch what you are doing and use your common sense. Do not operate any machine or tool
when you are tired, under the influence of drugs, alcohol or medications.
5. Use clamps or other practical ways to secure and support the work piece to a stable platform. Holding
the work piece by hand or against your body is unstable and may lead to loss of control.
6. Do not allow the spray to strike you and do not spray toward people or animals. Do not spray the tool
itself or any electrical source.
For any technical questions, please call 1-800-665-8685
2
0450071
Professional
HVLP Paint Gun

0450071
V 1.45
TOOL USE AND CARE
1. Use the right tool for the job. Do not attempt to force a small tool or attachment to do the work of a larger
industrial tool. The tool will perform better and more safely at the task for which it was intended. Do not
modify this tool or use for a purpose for which it was not designed.
2. Securely hold this tool using both hands. Using tools with only one hand can result in loss of control.
3. Maintain tools with care. Keep tools clean and in good condition for a better and safer performance. Follow
instructions for lubricating and changing accessories. Inspect tool fittings, alignment and hoses periodically
and, if damaged, have them repaired by an authorized technician or replaced. The handle must be kept
clean, dry and free from oil and grease at all times. A properly maintained tool reduces the risk of binding and
is easier to control.
5. Avoid unintentional starts. Be sure that the throttle is in neutral or OFF position when not in use and before
connecting it to any air source. Do not carry the tool with fingers near or on the switch.
6. Only use the lubricants supplied with the tool or specified by the manufacturer. Other lubricants may
not be suitable and may damage the tool or even make the tool explode.
7. When not in use for an extended period, apply a thin coat of lubricant to the steel parts to avoid rust.
8. Maintain label and name plate on the tool. These carry important information. If unreadable or missing,
contact Princess Auto for a replacement.
SERVICE
1. Check for damaged parts. Before using any tool, any part that appears to be damaged should be carefully
checked to determine that it will operate properly and perform its intended functions. Check for alignment
and binding of moving parts, for broken parts or mounting fixtures, or for any other condition that may affect
proper operation. Any part that is damaged should be repaired or replaced by a qualified technician.
2. When servicing, use only identical replacement parts. Only use accessories intended for use with this
tool. Replace damaged parts immediately.
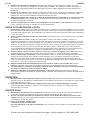
AIR SOURCE
1. Disconnect air supply. Disconnect tools from air
pressure source when not in use, before cleaning,
servicing or changing a piece or accessory. After
disconnecting, discharge any residual air pressure.
2. Do not use tools if the trigger switch does not
function properly. Any tool that cannot be controlled
with the ON/OFF switch is dangerous and must be
repaired.
3. Use proper size and type of air pressure line and
fittings. The recommended air line for this tool is 1/4"
NPT air inlet.
4. Always verify prior to using a tool that the air
source has been adjusted to the rated air pressure
or within the rated air-pressure range. Over
pressurizing a tool may cause bursting, abnormal
operation, breakage of the tool or serious injury to
persons. Use only clean, dry, regulated compressed
air at the rated range as marked on the tool.
5. Never use pure oxygen, carbon dioxide,
combustible gases or any bottled gas as an air
source for a tool. Such gases are capable of causing an explosion and serious injury to persons.
Do not use an air source besides an air compressor to power this tool.
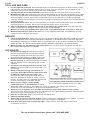
6. Always use an air regulator, an in-line filter and a moisture trap in your compressed air system.
These accessories will increase the tool's life and keeps the tool in good working condition. See the diagram
above for recommended components of an air line.
7. Drain the air tank daily. Water in the air line will damage the tool.
8. Clean air inlet filter weekly.
9. Avoid using an unnecessarily long air hose. Choose a hose that is appropriate for the situation, as a hose
that is too long and running across the floor can be more dangerous than helpful.
10. Keep hose away from heat, oil and sharp edges. Check hose for wear, and make certain that all
connections are secure.
For any technical questions, please call 1-800-665-8685
3
* see Lubrication section for details on whether or
not an in-line oiler is appropriate for your needs.

0450071
V 1.45
11. Always carry a tool by its handle, never carry the tool by the air hose.
12. Line pressure should be increased to compensate for unusually long air hoses (over 8 metres).
The hose diameter should be 3/8" l.D.
13. Air tool CFM consumption ratings are based upon a 25% duty cycle. If you require continuous duty, a
larger compressor will be required (eg. 4.0 CFM tool at continuous duty requires 16.0 CFM to function at
maximum torque).
LUBRICATION
1. The texture gun is different from most air tools in that it does not require typical lubrication. Air tool oil
introduced in the gun could mix with the material to be plasted and clog the gun, which could damage the
tool. Do not use this tool on an air line which contains an automatic in-line lubricator.
2. After cleaning the gun, add a few drops of oil to the back of the air stem to lubricate the rear bushing
through the slot that holds the trigger stop in place. Then, turn the gun upside down, pull back the trigger
and apply some oil to the front part of the air stem to lubricate the front bushing.
Note:
It is very important to properly clean the gun after lubricating it, excess oil can cause clogging or create poor
quality work during the next use.
VIBRATION PRECAUTIONS
This tool vibrates during use. Repeated or long-term exposure to vibration may cause temporary or permanent
physical injury, particularly to the hands, arms and shoulders.
1. Anyone using vibrating tools regularly or for an extended period should first be examined by a doctor
and then have regular medical check ups to ensure medical problems are not being caused by or
worsened from tool use. Pregnant women or people who have impaired blood circulation to the hands,
past hand injuries, nervous system disorders, diabetes or Raynaud's Disease should not use this tool. If you
feel any medical symptoms related to vibrations (such as tingling, numbness, and white or blue fingers), seek
medical attention as soon as possible.
2. Do not smoke during use. Nicotine reduces the blood flow to the hands and fingers, increasing the risk of
vibration-related injury.
3. Wear suitable gloves to reduce the vibration effects on the user.
4. Use tools with the lowest amount of vibration when there is a choice between different processes.
5. Do not use for extended periods. Take frequent breaks when using this tool.
6. Let the tool do the work. Grip tool as lightly as possible (while still keeping safe control of it).
7. To reduce vibrations, maintain tool as explained in this manual. If abnormal vibrations occur, stop using
this tool immediately.
8. This tool will not stop moving immediately. Do not lay the tool down or leave it unattended until it has
come to a complete stop. A part that is moving could make the tool jump or grab a surface and pull the tool
out of your control.
SPECIFIC SAFETY INSTRUCTIONS
1. Do not utilize halogen-type hydrocarbon solvents (trichloromethyl or trichloroethylene, etc.) because
they can trigger chemical reactions with some of the materials in the paint spray gun and create the
risk of dangerous explosions.
2. Make sure that all the paint and solvent products used are compatible by cross-checking the
respective product technical safety cards.
3. Ground both the spray painting machine and the object to be painted in order to reduce the risk of
sparks caused by static electricity.
4. Only use this tool ina reas that are properly ventillated. Many paint products contain highly flammable
solvents or chemicals.
UNPACKING
1. Carefully remove the parts and accessories from the box.
2. Make sure that all items listed in the parts lists are included.
3. Inspect the parts carefully to make sure no breakage or damage occurred during shipping.
4. Do not discard the packaging material until you have carefully inspected and satisfactorily operated
the tool.
WARNING! If any part is missing, do not operate the tool until the missing parts are
replaced. Failure to do so could result in serious personal injury.
For any technical questions, please call 1-800-665-8685
4

0450071
V 1.45
For any technical questions, please call 1-800-665-8685
5
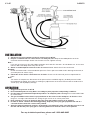
INSTALLATION
1. Set the air pressure regulator on the air compressor to 90 PSI.
2. Prepare a standard 1/4" air connector for use with your tool. Wrap the threaded portion of the air
connector with thread tape. Attach it to the tool's air inlet. Tighten securely.
Note :
If you are not using an in-line oiler, add a few drops of air tool oil in the tool's air inlet before use. In the same
manner, add a few drops after every hour of use.
3. Attach a standard quick connector to the air source's hose. Attach the air hose to the tool.
Warning:
Do not exceed the tool's recommended air pressure. Excess pressure could result in damage to the tool, to
your work piece or serious injury.
4. Check the air line and its connections for air leaks. Do not use this tool until you have repaired all air
leaks.
Note:
Turn off the air compressor, disconnect the air pressure hose and discharge any residual pressure inside
the tool before changing accessories or making any adjustments to the tool. Failure to do so could result in
severe injury, tool or property damage.
OPERATION
1. Suggested air pressure is 43 PSI
2. Recommended paint viscosity differs according to paint properties and painting conditions.
3. Use the lowest possible fluid output that produces an adequate paint coverage. Finer atomization leads
to a better finish.
4. The gun should be held so that it is perpendicular to the surface of the workpiece at all times. Move
the gun in a straight and horizontal line. Arcing the gun results in an uneven paint finish.
5. Keep a distance of 6" to 12" between the paint spray gun and the surface to be painted.
6. In order to obtain a uniform finish during painting, keep the paint spray gun perpendicular and at a
constant distance from the surface to be painted.
7. Spray the paint in horizontal swatches. If the finish is not adequate, make sure that the pressure is not
too low and that the paint spray gun is not being held too far from the surface to be painted.

V 1.45
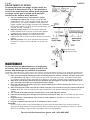
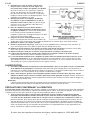
ADJUSTMENT OF SPRAY
In normal operation the wings on the nozzle are
horizontal as illustrated in Fig. 4. This provides a
vertical fan shaped pattern which gives maximum
coverage as the gun is moved back and forth
parallel to the surface being finished.
1. The first requirement for a good finish is proper
handling of the Spray gun. The gun should be held
perpendicular to the surface being covered, and moved
parallel with it. The stroke should be started before the
trigger is pulled and the trigger should be released before
the stroke is ended. This gives accurate control of gun and
material. See Fig. 1 and Fig. 2.
2. Adjusting spray pattern. Turn the pattern adjusting
knob completely to the right for a circular spray pattern,
completely to the left for oval shaped spray pattern
3. Adjusting spray volume. Turn fluid control screw
clockwise to reduce volume, counter-clockwise to increase
volume.
4. Adjusting air flow. Turn the air regulator dial clockwise
to reduce air volume, counter-clockwise to increase air
volume.
For any technical questions, please call 1-800-665-8685
6
0450071
Spray adjustment
Fluid control screw
Fig. 2
Fig. 3
Fig. 4
Fig. 1
MAINTENANCE
Before making any adjustments or changing any
accessory, turn off the tool, unplug it from it's air
source and discharge any residual air pressure.
If painting is paused for only a few minutes, the machine can be left without cleaning. If the spray gun will be left to
sit for a few hours or more before its next use, it must be cleaned to prevent the paint from drying inside the ducts.
1. After you have finished painting, pour the remaining paint into another container and then clean paint
passage and air cap. Spray a small amount of thinner to clean paint passages. Incomplete cleaning will
cause adverse pattern shapes and particles to appear on your work. Promptly clean components after use.
2. Add clean, good quality solvent to the tank and then pull the trigger to clean the internal paint spray
gun's passages from all traces of paint before disassembly.
3. Unscrew and remove the paint spray gun's head, submerge it in solvent and brush it clean. Do not use
metal objects for cleaning.
4. After removing the needle, unscrew the nozzle using the correct wrench, insert it in solvent and brush
it clean. Wash the inside of the paint spray gun and brush it clean; do not submerge it completely in the
solvent.
5. The outside of the body must be cleaned with a clean cloth dipped in solvent.
6. Lubricate the moving parts with grease or Vaseline from time to time. Do not use lubricants that contain
silicone.
7. Regularly inspect all mountings and screws to ensure tightness. Should any screws become loose,
tighten immediately.
8. If repair is required, take the tool to an authorized service center.
CAUTION:
Never use wire or other sharp, pointed objects to clean nozzle or fluid needle. The smallest amount of
damage may badly influence the spray pattern. Never immerse spray gun completely in thinner or solvent.
When re-assembling, always dry parts thoroughly to prevent dust build up.

V 1.45
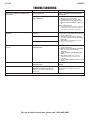
TROUBLE SHOOTING
Problems Possible causes Suggested solutions
Tool runs at normal speed but loses
under load.
Motor parts worn. Have a qualified technician replace
worn parts.
Cam clutch worn or sticking due to
lack of lubricant.
1. Lubricate clutch housing.
2. Check for excess clutch oil.
3. Overfilling can cause drag on high
speed clutch parts, ie, a typical oiled/
lubricated wrench requires ½ Ounce of
oil.
Grease lubricated note:
Heat usually indicates insufficient grease
in chamber. Severe operating conditions
may require more frequent lubrication.
Tool runs slowly. Air flows slightly from
exhaust.
Motor parts jammed with dirt
particles.
1. Check air inlet filter for blockage.
2. Pour air tool lubricating oil into air inlet
as per instructions.
3. Operate tool in short bursts quickly
reversing rotation back and forth where
applicable.
4. Repeat above as needed. If this fails
return to service center.
Power regulator in closed position.
Air flow blocked by dirt.
Tools will not run. Air flows freely from
exhaust.
O-rings throttle valve dislodged from
seat inlet valve.
1. Pour air tool lubricating oil into air inlet
as per instructions.
2. Operate tool in short bursts of forward
and / or reverse rotation where
applicable.
3. Tap motor housing gently with plastic
mallet.
4. Disconnect supply. Free motor by
rotating drive shank manually where
applicable
5. If tool remains jammed return to service
centre.
Tool will not shut off. O-rings throttle valve dislodged from
seat inlet valve.
Have a qualified technician replace the
O-ring.
Loss of power or erratic performance. Excessive drain on the air line.
Moisture or restriction in the air
pipe. Incorrect size or type of hose
connectors.
Check the air supply. If tool is not
corrected to a 1/4" line, connect it
properly.
Note: Repairs should be carried out by a qualified person
For any technical questions, please call 1-800-665-8685
7
0450071

0450071
V 1.45
For any technical questions, please call 1-800-665-8685
8
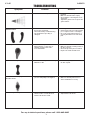
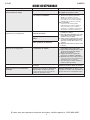
TROUBLESHOOTING
Symptom Problem Solution
Intermittent spray
• Presence of air in the paint circuit. • Tighten the nozzle using the wrench
provided.
• Make sure that the tank is empty.
• Check that the connecting hole is not
obstructed.
• Tighten the gland screw or replace the
gasket if worn.
Pattern arched
• Material residue in the holes obstructs
the passage of material.
• The nozzle is dirty or malfunctioning.
• The atomization cap is dirty or
damaged.
• Submerge the head in solvent.
• Clean and open all closed holes with a
jet or compressed air or a toothpick.
• Do not use pointed metal objects, or
you may deform the hole of the head
part.
Uneven pattern
• Material builds up on the outside of
fluid nozzle tip, or center hole, or
partially clogged nozzle orifice.
• Loose fluid nozzle.
• Clean the head and nozzle.
• Make sure that the centering between
the two is precise.
• Check the tip of the pin is not ruined.
• Replace the nozzle and the head.
The center of the pattern is too narrow
• Atomization of air pressure is too high
• Material too thin
• Reduce the quantity of air and increase
the flow of paint.
Poor atomization / Spray concentrated
into the centre
• The flow of paint is greater than the
pressure and quality of air supplied.
• Clean the head and the nozzle.
• Make sure that the paint is not too
dense and dilute if necessary.
Little or no paint output
• Fluid passage is clogged with dirt.
• Air holes in the cover are blocked.
• Fluid needle stroke is small.
• Remove obstructions.
• Adjust fluid needle stroke.

0450071
V 1.45
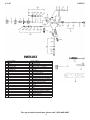
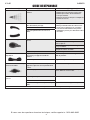
# Description
1
Air Nozzle
2
Ring
3
Brass Cup
4
Fluid Nozzle
5
Pacing Screw for Paint Needle
6
Teflon Seal
7
Washer
8
Screw
9
Brass Ring
10
Gasket
11
Connector to 0.6 litre cup
12
Gun Body
13
Screw
13A
Air Valve Assembly
13C
Teflon Seal
13D
Air Valve Body
13E
PC Seal
13F
Valve
13G
Valve
13H
Screw
14
Washer
14A
Spray Regulating Screw
14B
Spray Regulating Nut
For any technical questions, please call 1-800-665-8685
9
#
Description
14C
O-Ring
15
Control Knob
15A
Countersunk Screw
16
Paint Needle - Complete
17
Spring for Paint Needle
18
Washer
19
Housing
20
Fluid Control Knob
21
Screw
22
Pin
23
Trigger
24
Air Connector Piece 1/4" BSP
32
Material Sleeve (Filters)
34
Screw
35
O-Ring
36
Nut
37
Stem
38
Teflon Seal
39
Air Adjusting Valve Assembly
40
Spanner
41
Socket Spanner
42
Brush
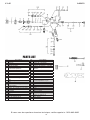
PARTS LIST

V 1.45
For any technical questions, please call 1-800-665-8685
10
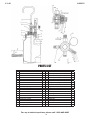
# Description Qty
1 5/16 Hex Jam Nut 1
2 No. 6-32 x 1/4 Round Head M Screw 1
3 Check Valve Washer 1
4 Center Post Assembly 1
5 Cup (2 Quart) 1
6 Cover Gasket (Rubber) 1
7 Relief Valve Stem 1
8 Check Valve 1
9 Check Valve Spring 1
10 Fluid Outlet 1
11 Fluid Tube (2 Quart) 1
12 Cover Assembly 1
13 Container Cover 1
14 Check Valve Bracket 1
15 Handle 1
16 Regulator Assembly 1
17 1/4 Dia. Brass Ball 1
18 Air Connection, 1/4 NPS 1
19/H Valve Spring 1
0450071
# Description Qty
20 Air Connection, 1/4 NPS 1
21 Adjusting Cap 1
22 Safety Valve Spring 1
23 Air Gauge (15 PSI) 1
24 Adjusting Spring 1
25 Safety Valve Body 1
26 Safety Valve Spring Screw 1
27 Safety Valve (10 PSI) 1
28 Regulator Body 1
29 Gauge Lens (Replacement) 1
30 Support 1
31 Rear Cap 1
32 Adjusting Valve 1
33 Valve Seat 1
34 Diaphragm Disc 1
35 Diaphragm 1
36 Front Cap 1
37 Valve Washer 1
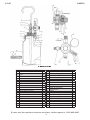
PARTS LIST

0450071
V 1.45
For any technical questions, please call 1-800-665-8685
11
# Description Qty
5 Gauge 60# 1-1/2" Dia. 1
6 Gasket Kit 1
7 Lid
1
8
Nut 1/4" NPS 1
9
Fluid Tube 1
10
Regulator Protector Assembly 1
11
Gasket Kit 1
12
Gasket Kit 1
13
Cup 1
14
Air Regulator Assembly 1
15
Knob Assembly 1
16
Spring Depressor Button 1
# Description Qty
17
Spring 1
18
Diaphragm Retaining Nut 1
19 Pilot Valve & Diaphragm Assembly 1
20
Diaphragm Assembly 1
21
Valve Seat Holder 1
22
Pilot Regulator Valve Assembly 1
23
Spring 1
24
Spring Expander 1
25
Body 1
26
Air Adjusting Valve 1
27
O-Ring 1
28
Adjusting Screw 1
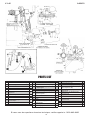
PARTS LIST
#
Description Qty
29
Spring Kit 1
30
Valve & Disc Assembly 1
31 Coupling
1/4" NPS (M) x 1/8" NPT (M)
1
32
Control Valve Assembly 1
33
Adapter - Loose Nut for DL-519 1
34 Union Body 1
35 Ball 1
36 Union Tail Piece for DL-520 1
37 Nut 1
38 Spacer 2
39 Screw 2

V 1.45
For any technical questions, please call 1-800-665-8685
12
0450071

Pistolet à Peinture
Professionnel
HVBP
0450071
MANUEL DU PROPRIÉTAIRE
Vous devez lire et comprendre toutes les instructions avant d'utiliser l'appareil.
Conservez ce manuel afin de pouvoir le consulter plus tard.
V 1.45

Si vous avez des questions de nature technique, veuillez appeler le 1-800-665-8685
2
FICHE TECHNIQUE
Buse standard :
1,0 mm
Taille de godet :
1 litre
Longueur de tuyau :
5 pi
Pression de service :
15 à 43 lb/po carré
Consommation d’air moyenne :
3,5 pi cube/min à 43 lb/po carré
Consommation d’air continue :
13,9 pi cube/min à 43 lb/po carré
CONSIGNES IMPORTANTES DE SÉCURITÉ
AVERTISSEMENT ! Vous devez lire attentivement toutes les instructions pour bien
les comprendre avant de vous servir de cet outil. Conservez ce manuel afin de vous
familiariser avec les précautions et les avertissements, ainsi qu'avec les procédures
d'inspection, d'opération, d'entretien et de nettoyage. Gardez ce manuel dans un endroit
sûr pour pouvoir le consulter plus tard. Lorsque vous utilisez cet outil, vous devez toujours
respecter les précautions fondamentales. Notez bien que quand ce manuel donne un
numéro à une pièce de l'outil, il faut se référer à la liste de pièces du manuel.
AIRE DE TRAVAIL
1. Votre lieu de travail doit toujours être propre et bien éclairé. Des établis encombrés et des zones
obscures invitent les accidents.
2. Servez vous de cet outil dans un endroit sécuritaire. N'utilisez pas d'outils mécaniques dans des
endroits humides ou mouillés. N'exposez pas cet outil à la pluie. Ne vous servez pas de cet outil dans
une atmosphère explosive comme, par exemple, en présence d'un liquide, d'un gaz ou de poussières
inflammables. Les outils mécaniques produisent des étincelles qui peuvent enflammer la poussière ou les
fumées.
3. Quand vous utilisez cet outil, tenez les spectateurs, les enfants et les visiteurs à une distance
prudente. Ne les laissez pas manipuler des outils ou des rallonges. Aucune personne qui ne porte pas
l'équipement de protection approprié devrait être dans l'aire de travail. Un moment de distraction pourrait
vous faire perdre la maîtrise de l'outil.
4. N'oubliez pas de bien ranger l'équipement non utilisé. Quand on ne se sert pas d'un outil, il devrait être
placé dans un endroit sec pour l'empêcher de rouiller. Gardez toujours vos outils sous clé et hors de la
portée des enfants et des personnes non autorisées. Entre les mains de telles personnes, les outils peuvent
devenir dangereux.
SÉCURITÉ PERSONNELLE
1. Employez l'équipement de sécurité proposé. Portez toujours des gants résistants et une protection
efficace pour la vue approuvée par l'ANSI, une protection pour l'ouïe, des chaussures de sécurité
antidérapantes et un casque protecteur. Portez un écran facial si vous êtes en train de créer des limailles de
métal ou des copeaux de bois. Portez un masque antipoussières ou un respirateur quand vous êtes autour
des poussières produites par le métal, le bois ou les produits chimiques.
2. Ne vous étirez pas trop. Vous devez avoir les pieds bien plantés pour maintenir votre équilibre en tout
temps. Advenant une situation inattendue, cela vous permettra de mieux maîtriser l'outil.
1234567
Pistolet à Peinture
Professionnel
HVBP
V 1.45

0450071
3. Habillez-vous de manière appropriée. Ne portez pas de bijoux ni de vêtements amples. Tenez vos
cheveux, vos vêtements et vos gants à l'écart des pièces mobiles. Des vêtements amples, des bijoux ou
des cheveux longs qui pourraient être happés par une pièces mobile augmentent le risque de blessures
corporelles.
4. Restez sur vos gardes. Faites attention à votre travail et fiez-vous à votre bon sens quand vous employez
cet outil. Ne vous en servez pas si vous êtes fatigués ou sous l'influence de drogues, d'alcool, ou d'un
médicament. Un moment d'inattention accroît le risque de blessures.
5. Employez des brides de serrage ou un autre dispositif pratique pour immobiliser et soutenir l'ouvrage
de manière stable. Si vous tentez de tenir la pièce dans une main ou contre votre corps, cela pourrait
entraîner une perte de la maîtrise.
6. Ne vous aspergez pas vous-même et n'aspergez pas les spectateurs ou les animaux. Ne laissez pas
l'outil s'asperger soi-même ou asperger une source d'électricité.
SOIN ET UTILISATION DE L'OUTIL
1. Ne forcez pas l'outil. Choisissez le bon outil pour la tâche à effectuer. Avec l'outil approprié, on peu achever
le travail d'une manière plus efficace et plus sécuritaire. N'utilisez pas un petit outil quand la tâche nécessite
un modèle industriel plus gros. Ne modifiez pas cet outil et ne l'utilisez pas pour des tâches pour lesquelles il
n'a pas été conçu.
2. Tenez cet outil solidement à l’aide des deux mains. Un outil tenu d’une seule main peut causer une perte
de contrôle.
3. Entretenez bien vos outils. Gardez vos outils propres, affutés et en bonne condition. Faites une
inspection régulière des raccords, de l'alignement, des boyaux et faites-les réparés ou remplacés si ils sont
endommagés. Gardez les manches propres, sec et exempt d'huiles ou de graisses. Lorsqu'un outil est bien
entretenu, le risque de coincement est réduit et il est plus facile à maîtriser. Un outil affilé est plus sécuritaire
qu'un outil obtus parce qu'il nécessite moins de force pour couper. L'application d'une force excessive
sur un outil pourrait le faire glisser et ceci pourrait endommager votre travail ou vous causer des blessures
corporelles. Suivez les instructions relatives à la lubrification et au changement des accessoires.
4. Avant de mettre l'outil en marche, retirez les clés et les clavettes de réglage, s'il y a lieu. Toute clé ou
clavette qu'on laisse attachée à une pièce rotative de l'outil pose un risque de blessures corporelles.
5. Évitez les démarrages accidentels. Avant de raccorder l'outil à sa source d'air comprimé/d'alimentation,
assurez-vous que le levier de la soupape à air/l'interrupteur est à sa position arrêt (OFF). Quand vous
déplacez l'outil, votre doigt ne doit jamais être sur le levier de la soupape pneumatique/l'interrupteur. En
outre, ne raccordez jamais l'outil à sa source d'air/d'alimentation quand le levier de la soupape/l'interrupteur
est enfoncé, c'est-à-dire en position de marche (ON).
6. Employez uniquement des lubrifiants fournis avec l'outil ou stipulés par son fabricant. D'autres
lubrifiants pourraient ne pas être convenables et pourraient endommager l'outil ou même exploser.
7. Avant d'entreposer l'outil pour un longue période de temps, appliquez une mince couche de lubrifiant
sur toutes les parties en acier pour éviter la rouille.
8. Gardez les étiquettes et les plaques d'identitées en bon état. Elles démontrent des informations
importantes. Si elles sont illisibles ou endommagées, contactez Princess Auto pour obtenir des étiquettes de
remplacement.
ENTRETIEN
1. Examinez bien l'outil chaque fois avant de vous en servir. Ne l'utilisez pas si vous découvrez une pièce
deserrée, coinçée, désalignée ou endommagée. Si vous découvrez quoi que ce soit d'anormal, faites réparer
l'outil avant de vous en servir.
2. Pour réparer un outil, il faut utiliser uniquement des pièces de rechange identiques. Employez
seulement des pièce autorisées. Suivez les conseils donnés dans la section sur l'entretien que vous
trouverez dans ce manuel.
SOURCE D'AIR
1. Débranchez l'alimentation en air comprimé. Quand vous ne vous servez pas de l'outil, déconnectez sa
source d'air comprimé et purgez toute la pression d'air résiduelle qui se trouve dans l'outil.
2. Ne vous servez pas de l'outil si le levier de la soupape est incapable de le mettre en marche et de
l'arrêter. Tout outil qu'il est impossible de contrôler au moyen du commutateur de marche/arrêt (ON/OFF)
est dangereux et doit être réparé.
3. Pour l'air comprimé, employez une
canalisation et des raccords d'une
grosseur appropriée et du type recommandé. Pour cet outil, on recommande une canalisation mesurant
1/4 po NPT.
Si vous avez des questions de nature technique, veuillez appeler le 1-800-665-8685
3
V 1.45

0450071
4. Avant de vous servir de l'outil, assurez-vous
toujours que la source d'air a été réglée à la
pression prévue ou dans une gamme acceptable.
Si l'outil est soumis à une surpression, il pourrait
éclater, mal fonctionner ou être endommagé, en
plus de causer des blessures graves à l'utilisateur.
Employez seulement de l'air comprimé propre, sec et
régulé de façon indiquée sur l'outil.
5. N'employez jamais de l'oxygène, du dioxyde
de carbone, un gaz combustible ou un gaz en
bouteille comme source d'air. Ces genres de gaz
peuvent causer une explosion et des blessures
sérieuses à l'utilisateur.
6. Dans la conduite d'air, vous devez toujours
maintenir un bon régulateur, un filtre pour l'air et
un piège à humidité. Ces accessoires prolongeront
le vie utile de l'outil et le garderont en bonne
condition. Référez-vous au diagramme plus haut pour
voir le circuit d'air recommandé.
7. Purgez le réservoir d'air quotidennement. L'air
dans le réservoir pourrait contenir de l'humidité, qui
endomagera votre compresseur d'air. Purgez complètement le réservoir après avoir fini de l'utiliser..
8. Nettoyez les filtres à air chaque semaine.
9. Évitez les tuyaux d'air trop longs. Choissisez un tuyau approprié pour la tâche que vous exécutez. Un
tuyau très long qui traîne sur le plancher peut être plus dangereux qu'utile.
10. Gardez les tuyaux éloignés de la chaleur, de l'huile et des bords tranchants. Examinez le tuyau pour
toute trace d'usure et assurez-vous que toutes les connexions sont sécuritaires.
11. Déplacez toujours l'outil par sa manche, ne portez jamais un outil par son tuyau d'air.
12. La pression d'air devrait être ajustée pour compenser les longues distances (8 mètres ou plus).
Utilisez seulement un tuyau avec un diamètre interne de 1/4 po.
13. La consommation nominale d’air comprimé (en pieds cubes par minute) d’un outil est basée sur un
facteur de marche de 25 %. Si l’appareil doit fonctionner continuellement, vous aurez besoin d’un plus
gros compresseur (Par exemple, un outil qui consomme 4 pi
3
/min d’air en service continu a besoin d’une
alimentation de 16 pi
3
/min pour fonctionner à son régime maximal).
LUBRIFICATION
1. Cet outil est différent de la majorité des outils pneumatiques dans le sens qu'il n'est pas recommandé
de le lubrifier de façon typique. Introduire de l'huile pour outils pneumatiques dans cet outil pourrait se
mélanger avec le produit à être pulvérisé et boucher le pistolet, ce qui pourrait endommager l'outil. N'utilisez
pas cet outil sur une canalisation d'air qui contient un lubrificateur en ligne.
2. Après avoir nettoyé le pistolet, versez quelques gouttes d'huile sur l'arrière de la tige à air, afin de
lubrifier la douille arrière à travers la rainure qui retient l'arrête-gâchette en place. Ensuite, retournez le
pistolet sens dessus dessous, reculez la gâchette et mettez un peu d'huile sur la partie avant de la tige à air,
an de lubrier la douille avant.
Remarque:
Il est très important de bien nettoyer le pistolet après l'avoir lubrié de cette manière. De l'huile excéssive
dans le pistolet pourrait affecter la qualité de votre travail et boucher l'orice de sortie.
PRÉCAUTIONS CONCERNANT LA VIBRATION
Cet outil vibre quand il fonctionne. Une exposition répétée ou prolongée aux vibrations peut causer des problèmes
physiques temporaires ou permanents, affectant particulièrement les mains, les bras et les épaules. Vous trouverez
ci-dessous des conseils pour diminuer le risque de tels problèmes reliés à la vibration.
1. Toute personne qui utilise n'importe quel outil vibrant de façon régulière ou durant une période
prolongée devrait d'abord consulter un médecin, puis subir des examens médicaux réguliers pour
s'assurer que des problèmes médicaux ne sont pas causés ou empirés par l'emploi de cet outil. Les
femmes enceintes, ainsi que les gens dont la circulation sanguine est mauvaise dans leurs mains, qui ont
subi des blessures aux mains ou qui souffrent de troubles neurologiques, de diabète ou de la maladie de
Raynaud ne devraient pas se servir de cet outil. Si vous ressentez des symptômes médicaux ou physiques
reliés à la vibration (tels qu'une sensation de picotements, un engourdissement ou des doigts blancs ou
bleus), consultez un médecin aussitôt que possible.
Si vous avez des questions de nature technique, veuillez appeler le 1-800-665-8685
4
V 1.45

0450071
2. On ne doit pas fumer quand on utilise cet outil. La nicotine a pour effet de réduire l'apport sanguin vers
les mains et les doigts, ce qui accroît le risque de problèmes causés par la vibration.
3. Portez des gants appropriés qui seront en mesure de réduire les effets de la vibration de l'outil.
4. Quand vous avez le choix, utilisez des outils qui produisent le moins de vibration possible.
5. N'utilisez pas cet outil pour des périodes prolongées. Prenez des pauses fréquentes.
6. Laissez l'outil faire le travail. Saisissez l'outil aussi légèrement que possible (mais sans en perdre la
maîtrise).
7. Pour réduire la vibration, procédez à l'entretien de l'outil de la manière expliquée dans ce manuel. Si
vous remarquez une vibration anormale, cessez immédiatement d'utiliser l'outil.
8. Cet outil n’arrête pas de fonctionner immédiatement. Ne pas déposer l’outil, ni le laisser sans surveillance
avant son arrêt complet. Un composant en mouvement peut entraîner le saut de l’outil ou encore s’accrocher
à une surface, ce qui vous en fera perdre le contrôle.
CONSIGNES SPÉCIFIQUES DE SÉCURITÉ
1. Do not utilize halogen-type hydrocarbon solvents (trichloromethyl or trichloroethylene, etc.) because
they can trigger chemical reactions with some of the materials in the paint spray gun and create the
risk of dangerous explosions.
2. Make sure that all the paint and solvent products used are compatible by cross-checking the
respective product technical safety cards.
3. Ground both the spray painting machine and the object to be painted in order to reduce the risk of
sparks caused by static electricity.
4. Only use this tool ina reas that are properly ventillated. Many paint products contain highly flammable
solvents or chemicals.
DÉBALLAGE
1. Retirez soigneusement les pièces et les accessoires de la boîte.
2. Assurez-vous que vous avez reçu tous les articles mentionnés sur la liste des pièces.
3. Examinez soigneusement les pièces pour vous assurer qu'aucun bris ni dommage n'est survenu
durant l'expédition.
4. Ne jetez pas le matériau d'emballage avant d'avoir soigneusement examiné le moteur et de l'avoir fait
fonctionner de manière satisfaisante.
ATTENTION! Si vous trouvez qu'il y a une piece manquante ou défectueuse, n'utilisez pas cet outil jusqu'à
ce que le problème a été réglé. En utilisant un outil défectueux vous prenez le risque de vous blesser
sérieusement.
Si vous avez des questions de nature technique, veuillez appeler le 1-800-665-8685
5
V 1.45

0450071
INSTALLATION
1. Set the air pressure regulator on the air compressor to 90 PSI.
2. Prepare a standard 1/4" air connector for use with your tool.
Wrap the threaded portion of the air connector with thread tape.
Attach it to the tool's air inlet. Tighten securely.
Note :
If you are not using an in-line oiler, add a few drops of air tool oil
in the tool's air inlet before use. In the same manner, add a few
drops after every hour of use.
3. Attach a standard quick connector to the air source's hose.
Attach the air hose to the tool.
Warning:
Do not exceed the tool's recommended air pressure. Excess
pressure could result in damage to the tool, to your work piece or
serious injury.
4. Check the air line and its connections for air leaks. Do not use
this tool until you have repaired all air leaks.
Note:
Turn off the air compressor, disconnect the air pressure hose and
discharge any residual pressure inside the tool before changing
accessories or making any adjustments to the tool. Failure to do
so could result in severe injury, tool or property damage.
OPERATION
1. Suggested air pressure is 43 PSI
2. Recommended paint viscosity differs according to paint
properties and painting conditions.
3. Use the lowest possible fluid output that produces an
adequate paint coverage. Finer atomization leads to a better
finish.
4. The gun should be held so that it is perpendicular to the
surface of the workpiece at all times. Move the gun in a straight
and horizontal line. Arcing the gun results in an uneven paint
finish.
5. Keep a distance of 6" to 12" between the paint spray gun and
the surface to be painted.
6. In order to obtain a uniform finish during painting, keep the
paint spray gun perpendicular and at a constant distance
from the surface to be painted.
7. Spray the paint in horizontal swatches. If the finish is not
adequate, make sure that the pressure is not too low and that
the paint spray gun is not being held too far from the surface
to be painted.
Si vous avez des questions de nature technique, veuillez appeler le 1-800-665-8685
6
V 1.45
Fig. 3
Fig. 4
Fig. 2
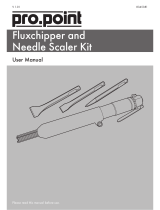
CORRECT
Relâchez la
gâchette à
la fin de la
passe.
6 à 12 po
Commencez
à tirer sur la
gâchette.
La couche devrait être
uniforme et mouillée
lors de la vaporisation.
Parcours
du pistolet
Fig. 1
Couche trop
épaisse
INCORRECT
Couche trop
mince
ADJUSTMENT OF SPRAY
In normal operation the wings on the nozzle are horizontal as illustrated in Fig. 4. This
provides a vertical fan shaped pattern which gives maximum coverage as the gun is moved
back and forth parallel to the surface being finished.
1. The first requirement for a good finish is proper handling of the Spray gun. The gun should be held
perpendicular to the surface being covered, and moved parallel with it. The stroke should be started before
the trigger is pulled and the trigger should be released before the stroke is ended. This gives accurate control
of gun and material. See Fig. 1 and Fig. 2.
2. Adjusting spray pattern. Turn the pattern adjusting knob completely to the right for a circular spray pattern,
completely to the left for oval shaped spray pattern
3. Adjusting spray volume. Turn fluid control screw clockwise to reduce volume, counter-clockwise to increase
volume.
4. Adjusting air flow. Turn the air regulator dial clockwise to reduce air volume, counter-clockwise to increase
air volume.
Réglage de la vaporisation
Vis de contrôle du fluide

0450071
Si vous avez des questions de nature technique, veuillez appeler le 1-800-665-8685
7
V 1.45
MAINTENANCE
Before making any adjustments or changing any accessory, turn off the tool, unplug it from
it's air source and discharge any residual air pressure.
If painting is paused for only a few minutes, the machine can be left without cleaning. If the spray gun will be left to
sit for a few hours or more before its next use, it must be cleaned to prevent the paint from drying inside the ducts.
1. After you have finished painting, pour the remaining paint into another container and then clean paint
passage and air cap. Spray a small amount of thinner to clean paint passages. Incomplete cleaning will
cause adverse pattern shapes and particles to appear on your work. Promptly clean components after use.
2. Add clean, good quality solvent to the tank and then pull the trigger to clean the internal paint spray
gun's passages from all traces of paint before disassembly.
3. Unscrew and remove the paint spray gun's head, submerge it in solvent and brush it clean. Do not use
metal objects for cleaning.
4. After removing the needle, unscrew the nozzle using the correct wrench, insert it in solvent and brush
it clean. Wash the inside of the paint spray gun and brush it clean; do not submerge it completely in the
solvent.
5. The outside of the body must be cleaned with a clean cloth dipped in solvent.
6. Lubricate the moving parts with grease or Vaseline from time to time. Do not use lubricants that contain
silicone.
7. Regularly inspect all mountings and screws to ensure tightness. Should any screws become loose,
tighten immediately.
8. If repair is required, take the tool to an authorized service center.
CAUTION:
Never use wire or other sharp, pointed objects to clean nozzle or fluid needle. The smallest amount of
damage may badly influence the spray pattern. Never immerse spray gun completely in thinner or solvent.
When re-assembling, always

0450071
Si vous avez des questions de nature technique, veuillez appeler le 1-800-665-8685
8
V 1.45
GUIDE DE DÉPANNAGE
Problème(s) Cause(s) possible(s) Solution(s) suggérée(s)
L'outil marche à sa vitesse normale,
mais il ralentit en charge.
Pièces usées dans le moteur. Demandez à un technicien compétent
de remplacer les pièces usées.
Mécanisme usé ou grippé à cause
d'un manque de lubrifiant.
1. Lubrifiez le boîtier.
2. Assurez-vous qu'il n'y a pas trop
d'huile. Une quantité excessive
d'huile peut nuire au fonctionnement.
Normalement, une clé de serrage bien
lubrifiée exige une demi-once d'huile.
Graisse lubrifiante :
La présence de chaleur indique
habituellement un manque de graisse
dans la chambre. Si les conditions
d'utilisation sont difficiles, il faudra peut-
être lubrifier l'outil plus fréquemment.
L'outil marche lentement. L'air sort
légèrement de l'échappement.
Pièces du moteur encrassées de
particules de saleté.
1. Vérifiez le filtre de l'entrée d'air, car il
pourrait être obstrué.
2. Versez de l'huile lubrifiante pour outils
pneumatiques dans l'entrée d'air, en
suivant le mode d'emploi.
3. Faites marcher l'outil par petits coups,
en changeant rapidement la rotation
dans un sens puis dans l'autre, le cas
échéant.
4. Répétez la manoeuvre ci-dessus selon
le besoin.
Régulateur de puissance en position
fermée.
Saleté qui bloque le débit d'air.
L'outil refuse de marcher. L'air sort
librement de l'échappement.
Moteur coincé à cause d'une
accumulation de matière.
1. Versez de l'huile lubrifiante pour outils
pneumatiques dans l'entrée d'air.
2. Faites marcher l'outil par petits coups
de marche avant et/ou de marche
arrière, le cas échéant.
3. Frappez doucement le boîtier du
moteur avec un maillet en plastique.
4. Débranchez la source d'air. Dégagez le
moteur en tournant manuellement la tige
d'entraînement, le cas échéant.
5. Si le moteur reste coincé, retournez
l'outil au centre de service.
L'outil refuse de s'arrêter.
Joint torique de la soupape délogé de
son siège.
Remettez le joint torique en place ou
retournez l'outil au centre de service.
Perte de puissance ou rendement
erratique.
Drainage excessif sur la canalisation
d'air. Humidité ou obstruction dans
le tuyau ou boyau à air. Raccords de
diamètre ou de type incorrect.
Vérifiez l'alimentation en air. Si l'outil
n'est pas raccordé à une canalisation de
1/4 po, effectuez le changement requis.
N.B. : Les travaux de réparation devraient toujours être confiés à une personne compétente.
La page est en cours de chargement...
La page est en cours de chargement...
La page est en cours de chargement...
La page est en cours de chargement...
-
 1
1
-
 2
2
-
 3
3
-
 4
4
-
 5
5
-
 6
6
-
 7
7
-
 8
8
-
 9
9
-
 10
10
-
 11
11
-
 12
12
-
 13
13
-
 14
14
-
 15
15
-
 16
16
-
 17
17
-
 18
18
-
 19
19
-
 20
20
-
 21
21
-
 22
22
-
 23
23
-
 24
24


Power Fist 0450071 Le manuel du propriétaire
- Catégorie
- Pulvérisateur de peinture
- Taper
- Le manuel du propriétaire
dans d''autres langues
- English: Power Fist 0450071 Owner's manual
Documents connexes
-
Power Fist 8261562 Parts list
-
-
-
-
-
-
-
-
-
Autres documents
-
 Valex BX1800 Operating Instructions Manual
-
Kobalt SGY-AIR88TZ Manuel utilisateur
-
Kawasaki 691309 Manuel utilisateur
-
-
Matco Tools MTPGHV19 Manuel utilisateur
-
-
-
 pro.point 8345381 Manuel utilisateur
-
PROPOINT 8685281 Le manuel du propriétaire
-
Powerfist 9039652 Le manuel du propriétaire

