
1
Thank you for purchasing the VIF4 Video Interface Board for the Korg Pa-series Profes-
sional Arrangers! This card allows to connect your Pa2X/Pa800 to a video monitor, a TV
set, or a video recorder. The card can be installed by the user. Korg is not responsible for
any damage or injury caused by incorrect installation.
Félicitations et merci d'avoir choisi la carte d'interface vidéo pour Korg Pa-series Profes-
sional Arrangers. Cette carte permet de brancher votre Pa2X/Pa800 à un moniteur vidéo,
un appareil de télévision ou un magnétoscope. L'utilisateur peut installer lui-même la
carte. Korg décline toutes responsabilités envers des dommages aux personnes ou aux
choses provoqués par l'installation de la carte.
Vielen Dank dafür, dass Sie sich für den Kauf einer Videoschnittstellenkarte für den Korg
Pa-series Professional Arrangers entschieden haben. Mit dieser Karte können Sie den
Pa2X/Pa800 Arranger an einen Videomonitor, einen Fernseher oder an ein Videogerät anschließen. Kann die Karte vom Verbraucher selbst
installiert werden. Korg übernimmt keine Haftung für Sach- oder Personenschäden bei Installation der Karte.
Grazie per avere acquistato la scheda di interfaccia video per gli strumenti Korg della serie Pa (Professional Arranger). Questa scheda per-
mette di collegare Pa2X/Pa800 ad un monitor video, un televisore o un videoregistratore. La scheda può essere installata dall’utente. Korg
non si assume responsabilità per danni a cose o persone causati dall’installazione della scheda.
NTSC, PAL, SECAM
The VIF4 is compatible with the NTSC, PAL and SECAM TV standard. When connecting a SECAM-compliant TV set, select the PAL stan-
dard. However, in this latter case, the image will be shown in black and white.
La carte d’interface vidéo VIF4 est compatible avec les standards NTSC, PAL et SECAM. Lorsque vous connectez un appareil de télévision stan-
dard SECAM, sélectionnez le standard PAL, sinon l’image sera affichée en noir et blanc.
Die VIF4 unterstützt folgende Fernsehnormen: NTSC, PAL und SECAM. Wenn Sie einen SECAM-kompatiblen Bildschirm verwenden,
müssen Sie die „PAL”-Norm wählen. Bedenken Sie jedoch, dass die Anzeige dann schwarz/weiß ist.
La VIF4 è compatibile con gli standard TV NTSC, PAL e SECAM. Quando si collega un televisore in standard SECAM, occorre selezionare il
sistema PAL. Tenete però presente che in questo caso l’immagine apparirà in bianco e nero.
Precautions / Précautions / Warnhinweise / Precauzioni
• Installation of the card is done at the user’s own risk. Korg will assume no responsibility for any damage or injury resulting from its
improper installation or use.
• Be sure to disconnect the instrument from the AC plug, before opening it.
• To prevent your body’s static electricity from damaging the board’s components, touch an unpainted metallic component before proceed-
ing with the installation.
• L’installation de la carte est aux risques de l’utilisateur. Korg décline toutes responsabilités envers tous dommages ou blessures provoqués par une
installation ou une utilisation incorrectes.
• Avant d’ouvrir l'instrument, enlever la fiche de l’instrument de la prise secteur.
• Avant de procéder à l'installation, touchez un élément métallique non peint, afin de décharger l'éventuelle électricité statique dont vous êtes por-
teur, car celle-ci est en mesure d'endommager les composants de la carte.
• Die Installation der Karte erfolgt auf eigene Gefahr des Benutzers. Korg übernimmt keine Haftung für eventuelle Personen- oder Sach-
schäden aufgrund von unsachgemäßer Installation bzw. Gebrauch.
• Vor dem Öffnen des Instruments lösen Sie bitte den Netzstecker.
• Um eine Beschädigung der Bauteile des Boards durch die statische Elektrizität Ihres Körpers zu vermeiden, sollten Sie ein unlackiertes
Metallteil berühren, bevor Sie mit der Installation beginnen.
VIF4
Pa-Series Video Interface

2
• L’installazione della scheda va eseguita sotto la responsabilità dell’utente. Korg non si assume alcuna responsabilità per eventuali danni a cose o
persone derivanti dalla non corretta installazione o dall’uso errato della scheda.
• Scollegate la spina dalla presa di corrente prima di aprire lo strumento.
• Per evitare che l’elettricità statica del vostro corpo danneggi i componenti della scheda, toccate un elemento metallico non verniciato prima di
procedere con l’installazione.
Installation / Montage / Montage / Installazione
For installation, you will need a cross-point screwdriver (not supplied). / Pour le montage, se munir d'un tournevis cruciforme (non fourni). /
Für die Montage sind ein Kreuzschlitzschraubenzieher erforderlich (nicht im Lieferumfang enthalten). / Per il montaggio è richiesto un cacciavite
a croce (non fornito).
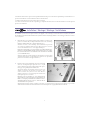
1. Extract the video card (a) from its package, being careful not to touch any com-
ponent on its surface with your fingers. Remove the four screws (b) and keep
them apart. Unfasten the board (a) from the metal support (c).
Prélevez la carte vidéo (a) de son emballage : faites très attention à ne pas toucher
avec vos doigts les composants installés en surface. Enlevez les quatre vis (b) et met-
tez-les de côté. Détachez la carte (a) de son support métallique (c).
Packen Sie die Videoplatine (a) aus, aber berühren Sie auf keinen Fall die Leiter-
platte bzw. die darauf befindlichen Komponenten. Entfernen Sie die vier Schrau-
ben (b) und bewahren Sie sie an einem sicheren Ort auf. Ziehen Sie die Platine
(a) aus dem Metallsockel (c).
Estraete la scheda video (a) dalla confezione, facendo attenzione a non toccare alcun
componente sulla superficie con le dita. Rimuovete le quattro viti (b) e riponetele da
parte. Staccate la scheda (a) dal supporto metallico (c).
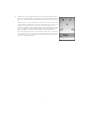
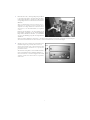
2. From the bottom of the instrument, remove the four fixing
screws (d), and keep them apart. Open the cover (e) to gain
access to the inside of the video board slot. Remove the protec-
tive stopper (f) by pushing it from inside the slot.
Sur la partie supérieure de l’instrument, enlevez les quatre vis de
fixation (d) et mettez-les de côté. Ouvrez le couvercle (e) pour
accéder à l’intérieur de la fente de la carte vidéo. Enlevez le
stoppeur de protection (f) en exerçant une pression à l’intérieur de
la fente pour le pousser vers l’extérieur.
Entfernen Sie die vier Schrauben (d) an der Geräteunterseite
und bewahren Sie sie an einem sicheren Ort auf. Öffnen Sie die
Blende (e), um Zugang zu bekommen zur Steckleiste der Video-
schnittstelle. Entfernen Sie den Stopper (f), indem Sie ihn von
der Schachtinnenseite wegdrücken.
Dal fondo dello strumento, rimuovete le quattro viti di tenuta (d) e riponetele da parte. Aprite la piastra di copertura (e) per accedere
all’interno dello slot dedicato alla scheda video. Rimuovete il tassello di protezione (f) spingendolo dall’interno dello slot.
La page est en cours de chargement...

4
6. Slide the cover (e) up to the original position. The video connector protruding from the cir-
cuit board (a) will pass through the corresponding hole on the back of the instrument. Attach
the cover (e) to the bottom of the instrument by using the four previously removed screws
(d).
Glissez le couvercle (e) sur sa position originale. La borne de la carte vidéo (a) qui fait saillie
s’enfile dans le trou correspondant prévu en face arrière de l’instrument. Fixez le couvercle (e) sur
la partie supérieure de l’instrument à l’aide des quatre vis (d) précédemment mises de côté.
Schieben Sie die Blende (e) in die ursprüngliche Position. Der Video-Anschluss auf der Pla-
tine (a) passt genau in die Aussparung auf der Rückseite des Instruments. Befestigen Sie die
Blende (e) mit Hilfe der vier zuvor entfernten Schrauben (d) an der Geräteunterseite.
Fate scivolare la piastra di protezione (e) verso l’esterno fino a collimare i fori per le viti. Il connet-
tore video della scheda (a) passerà attraverso il foro dedicato sul pannello posteriore dello stru-
mento. Utilizzate le quattro viti (d) precedentemente rimosse per bloccare in sede la piastra di
protezione (e) sul fondo dello strumento.

5
Installation / Montage / Montage / Installazione
For installation, you will need a cross-point screwdriver (not supplied). / Pour le montage, se munir d'un tournevis cruciforme (non fourni). /
Für die Montage sind ein Kreuzschlitzschraubenzieher erforderlich (nicht im Lieferumfang enthalten). / Per il montaggio è richiesto un cacciavite
a croce (non fornito).
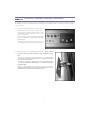
1. On the back of the instrument, unscrew the two screws (a)
and extract the cover (b), to gain access to the video slot.
Sur la face arrière de l’instrument, enlevez les deux vis (a) pour
accéder au boîtier de logement, protégé par le couvercle (b), de
la carte d’interface vidéo.
Lösen Sie die beiden rückseitigen Schrauben (a) und entneh-
men Sie die Blende (b), zu Zugang zum Videoplatinen-
schacht zu haben.
Dal retro dello strumento, rimuovere le due viti (a) per acce-
dere all’alloggio della scheda video protetto dal coperchio (b).
2. Fully remove the cover (b) by unfasteing the ground cable (c). Be very careful not
to let the ground cable (c) and the attached power cable (d) fall inside the instru-
ment.
Enlevez le couvercle de protection (b) en décrochant le bornier (c). Faites très atten-
tion : ni le bornier, ni le câble d’alimentation (d) qui y est branché, ne doivent glis-
ser à l’intérieur de l’instrument.
Um die Blende (b) komplett entnehmen zu können, müssen Sie das Massekabel (c)
lösen. Gehen Sie behutsam vor, damit das Masse- (c) und Netzkabel (d) nicht ins
Geräteinnere fallen.
Rimuovere il coperchio di protezione (b) sganciando da esso il rilancio di massa (c).
Prestate particolare attenzione a non far rientrare tale rilancio ed il cavo di ali-
mentazione (d), ad esso bloccato, all’interno dello strumento.

6
3. Extract the video card (e) from its package, being careful not
to touch any component on its surface with your fingers.
Connect the ground cable (c) and the power cable (d) to the
corresponding connectors on the video card, as shown in the
illustration.
Ouvrez le conditionnement de la carte d’interface vidéo (e) :
manipulez-la avec précaution et surtout ne touchez pas les
composants avec les doigts. Branchez-la à l’instrument en insé-
rant le bornier (c) et le câble d’alimentation (d), tel qu’illustré
ci-contre.
Packen Sie die Videoplatine (e) aus, aber berühren Sie auf
keinen Fall die Leiterplatte bzw. die darauf befindlichen
Komponenten. Verbinden Sie das Masse- (c) und Netzkabel
(d) wie in der Abbildung gezeigt mit den entsprechenden
Anschlüssen.
Estrarre dal relativo imballaggio la scheda video (e), facendo particolare attenzione a non toccarne i componenti con le dita. Collegarla
allo strumento connettendo ad essa il rilancio di massa (c) ed il cavo di alimentazione (d), come mostrato in figura.
4. Slide the video card (e) inside the slot, and attach it to the
instrument using the two previously removed screws (a).
Insérez la carte d’interface vidéo (e) dans le boîtier prévu dans
l’instrument et la fixer à l’aide des deux vis (a) que vous avez
précédemment enlevées.
Schieben Sie die Videoplatine (e) in den Schacht und arretie-
ren Sie sie mit den beiden zuvor entfernten Schrauben (a).
Inserire la scheda video (e) nel relativo alloggio all’interno dello
strumento, e fissarla ad esso tramite le due viti (a) precedente-
mente rimosse.

7
RCA
RCA
SCART
Connections and setup / Connexion et programmation / Anschluss und
Konfiguration / Collegamento e configurazione
1. Connect the instrument’s video output to the video input
of the television set. Depending on the type of television
set, you can use a cable of the type “RCA-to-RCA” (if the
television set is equipped with a Video Composite input),
or “RCA-to-SCART” (if the television set is equipped with a
SCART connector). You can buy the needed cables at a store
that sells television equipment.
Connecter la sortie vidéo de l’instrument à l’entrée vidéo du
poste de télévision. Selon le type de poste de télévision, on peut
utiliser un câble du type “de RCA à RCA” (si le poste est doté
d’entrée Vidéo Composite) ou “de RCA à SCART” (si le poste
est doté de prise SCART). Voir chez les revendeurs d’appareils
TV les câbles nécessaires.
Verbinden Sie den Videoausgang des Instruments an den
Ausgang des Fernsehers. Je nach Fernsehermodell können
Sie ein Kabel des Typs “von RCA zu RCA” (wenn der Fern-
seher mit einem mehrteiligen Videoausgang versehen ist)
oder des Typs “von RCA zu SCART” verwenden (wenn der
Fernseher mit einem SCART-Anschluss versehen ist). Die
entsprechenden Kabel können in jedem Fernsehfachge-
schäft erworben werden.
Collegate l’uscita video
dello strumento
all’ingresso video del
televisore. A seconda del
tipo di televisore, potete
usare un cavo di tipo “da
RCA ad RCA” (se il tele-
visore è dotato di
ingresso Video Compo-
sito), o “da RCA a
SCART” (se il televisore
è dotato di presa
SCART). I cavi necessari
sono reperibili presso
qualsiasi negozio di televisori.
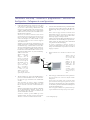
2. Turn the instrument on, and press the GLOBAL button to
gain access to the Global edit mode. Go to the “Video Inter-
face: Video Out” page, and select the video standard (PAL
or NTSC).
Mettre l’instrument sous tension et appuyer sur GLOBAL
pour accéder à l’environnement Global. Afficher page “Video
Interface: Video Out” et sélectionner le standard vidéo PAL ou
NTSC.
Schalten Sie das Instrument ein und drücken Sie GLOBAL,
um die Global-Umgebung aufzurufen. Steuern Sie die
“Video Interface: Video Out” Seite an und selektieren Sie
den Videostandard PAL oder NTSC.
Accendete lo strumento, e premete GLOBAL per accedere
all’ambiente Global. Selezionate la pagina “Video Interface:
Video Out” e selezionate lo standard video PAL o NTSC.
3. Select the “Write Global-Global Setup” command from the
page menu to save the settings in memory. The Write Glo-
bal-Global Setup dialog box will appear. Press OK to con-
firm.
Dans le menu de la page, sélectionner la commande “Write
Global-Global Setup” pour sauvegarder les réglages dans la
mémoire. L’écran affiche la boîte de dialogue Write Global-
Global Setup. Appuyer sur OK pour confirmer
Selektieren Sie den Befehl “Write Global-Global Setup” aus
dem Seitenmenü, um die Einstellungen zu speichern. Dar-
aufhin erscheint das Dialogfenster Write Global-Global
Setup. Drücken Sie OK zur Bestätigung .
Per salvare le impostazioni in memoria, selezionate il
comando “Write Global-Global Setup”. Apparirà la finestra di
dialogo Write Global-Global Setup. Premete il tasto OK nel
display per confermare.
4. Turn the television set on, and tune it on the AV1 or AV2
input.
Allumer le poste de
télévision et le régler
sur les entrées AV1
ou AV2.
Schalten Sie den
Fernseher ein und
wählen Sie den
Video-Kanal AV1
oder AV2.
Accendete il televi-
sore, e sintonizzatevi
sull’ingresso AV1 o
AV2.
5. In the same page of the Global, use the Colors parameter to
choose the preferred set of colors for the lyrics and the
background.
Toujours dans la page Global, utiliser le paramètre Colors
pour sélectionner les couleurs préférées pour le texte et le fond.
Verwenden Sie den Parameter Colors auf der Global-Seite
zur Auswahl der gewünschten Farbzusammenstellungen für
den Text und den Hintergrund.
Nella stessa pagina del Global, usate il parametro Colors per
scegliere l’abbinamento di colori preferito per testo e sfondo.
© 2006-08 Korg Italy SpA
-
 1
1
-
 2
2
-
 3
3
-
 4
4
-
 5
5
-
 6
6
-
 7
7


Korg PA800 Manuel utilisateur
- Catégorie
- Caméscopes
- Taper
- Manuel utilisateur
dans d''autres langues
- italiano: Korg PA800 Manuale utente
- English: Korg PA800 User manual