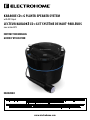
Electrohome EAKAR300 Manuel utilisateur
- Catégorie
- Systèmes de karaoké
- Taper
- Manuel utilisateur

Thank you for your purchase of this Electrohome product. Please read this instruction manual carefully before using product to ensure
proper use. Keep this manual in a safe place for future reference.
Merci d’avoir fait l’achat de cet appareil Electrohome. Veuillez lire ce manuel attentivement avant de faire fonctionner l’appareil pour
vous assurer de l’utiliser correctement. Conservez ce manuel dans un endroit sûr an de pouvoir vous y référer au besoin.
www.electrohome.com
INSTRUCTION MANUAL
GUIDE D’UTILISATION
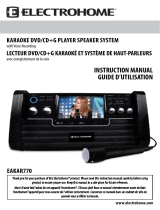
KARAOKE CD+G PLAYER SPEAKER SYSTEM
with MP3 Input
LECTEUR KARAOKÉ CD+G ET SYSTÈME DE HAUT-PARLEURS
avec entrée MP3
EAKAR300

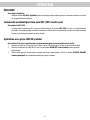
NEED
HELP?
DO NOT RETURN THIS
PRODUCT TO THE STORE
Please contact an ELECTROHOME customer support representative rst regarding any
additional information on product features, specications or assistance with setup.
Please contact us via one of the methods below:
For more product information visit: www.electrohome.com
Support:
www.electrohome.com/support
Online Live Web Chat:
www.electrohome.com
-2 -

NE RETOURNEZ PAS CE
PRODUIT AU MAGASIN
Veuillez contacter d’abord un représentant du soutien à la clientèle ELECTROHOME® pour toute
information supplémentaire sur les caractéristiques du produit, les spécications ou pour de
l’aide avec l’installation.
Veuillez nous contacter par l’une des méthodes ci-dessous:
Pour plus d’information sur nos produits, visitez: www.electrohome.com
BESOIN
D’AIDE?
ARRÊT
Soutien:
www.electrohome.com/support
Clavardage en ligne:
www.electrohome.com
-3 -

- 4 -
TABLE OF CONTENTS
NEED HELP?............................................................................................................................................. 2
TABLE OF CONTENTS ................................................................................................................................ 4
WHAT’S INCLUDED ................................................................................................................................... 4
SAFETY AND WARNINGS ........................................................................................................................... 5
BUTTONS AND CONNECTIONS ................................................................................................................... 8
SETTING UP YOUR KARAOKE SYSTEM ......................................................................................................... 10
CONNECTING THE POWER CORD ..................................................................................................................................10
CONNECTING TO A TV OR VCR/DVD PLAYER ................................................................................................................. 10
SELECTING THE KARAOKE PLAYER AS THE SOURCE INPUT ......................................................................................... 10
AUDIO CONNECTION .................................................................................................................................................... 11
CONNECTING KARAOKE TO HDTV...................................................................................................................................12
OPERATION ............................................................................................................................................. 13
PREPARATION .............................................................................................................................................................. 13
TURNING ON/OFF ........................................................................................................................................................ 13
LOADING A DISC ........................................................................................................................................................... 13
PLAY/PAUSE MODE ...................................................................................................................................................... 13
STOP MODE .................................................................................................................................................................. 13
SKIP FORWARD OR BACK DURING PLAYBACK .............................................................................................................. 14
SEARCH MODE AUDIO DISCS ONLY ............................................................................................................................ 14
REPEAT MODE .............................................................................................................................................................. 14
PROGRAM .................................................................................................................................................................... 14
ECHO ............................................................................................................................................................................ 14
BALANCE ...................................................................................................................................................................... 14
AUTO VOICE CONTROL AVC ........................................................................................................................................14
LINE IN OPERATION ......................................................................................................................................................15
TROUBLESHOOTING ................................................................................................................................. 15
MAINTENANCE ........................................................................................................................................ 16
SPECIFICATIONS ...................................................................................................................................... 17
GLOSSARY OF KARAOKE TERMS ................................................................................................................. 17
ELECTROHOME WARRANTY ...................................................................................................................... 34
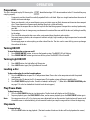
• Karaoke CD+G Player Speaker System
• Dynamic Microphone (10ft cord)
• CD+G Multiplex Karaoke Disc with Music from Various Artists
• RCA Audio/Video Composite Connection Cable
• Instruction Manual
• 1 Year Warranty
• Lifetime Customer Support
WHAT’S INCLUDED

- 5 -
SAFETY AND WARNINGS
The lightning ash with arrowhead symbol, within an
equilateral triangle is intended to alert the user to the
presence of uninsulated dangerous voltage within the
product’s enclosure that may be of sucient magnitude
to constitute a risk of electric shock.
The exclamation point within an equilateral triangle is
intended to alert the user to the presence of important
operating and maintenance (servicing) instructions in
the literature accompanying the appliance.
DRIPPING WARNING
The product shall not be exposed to dripping or splashing and that no objects lled with liquids, such as vases, shall be placed on the
product.
VENTILATION WARNING
The normal ventilation of the product shall not be impeded for intended use.
This CD player is made and tested to meet exacting safety standards. It meets FCC requirements and complies with safety performance
standards of the U.S. Department of Health and Human Services.
WARNINGS
• This CD player employs a laser light beam. Only a qualied service person should remove the cover or attempt to service this device, due
to possible eye injury.
• The use of controls, adjustments, or procedures other than those specied herein might result in hazardous radiation exposure.
CAUTION
This compact disc player is classied as a CLASS 1 LASER product. The CLASS 1 LASER PRODUCT
label is located on the bottom panel.
CAUTION
Invisible laser radiation when open and interlocks defeated. Avoid exposure to beam.
IMPORTANT
Since CD circuitry may cause interference to other radio tuners nearby, switch this unit o when not in use or move it away from the
aected radio tuner.
This class[B] digital apparatus complies with Canadian ICES-003.
NOTE:
This digital apparatus does not exceed the Class B limits for radio noise emissions from digital apparatus as set out in the Radio Interference
Regulations of Industry Canada. These limits are designed to provide reasonable protection against harmful interference in a residential
installation. This equipment generates, uses and can radiate radio frequency energy and, if not installed and used in accordance with the
instructions, may cause harmful interference to radio communications. However, there is no guarantee that interference will not occur in
a particular installation. If this equipment does cause harmful interference to radio or television (which can be determined by turning the
equipment o), the user is encouraged to try to correct the interference by one or more of the following measures:
• Reorient or relocate the receiving antenna.
• Increase the separation between the equipment and receiver.
• Connect the equipment into an outlet on a circuit dierent from that to which the receiver is connected.
• Consult the dealer or an experienced radio/TV technician for help.
WARNING: To reduce the risk of re or shock hazard, do not
expose this product to rain or moisture.
The CAUTION marking is located on the bottom panel.

- 6 -
SAFETY AND WARNINGS
1. ENERGY STAR is a set of power-saving guidelines by the U.S. Environmental Protection Agency (EPA). ENERGY STAR is a
joint program of the U.S. Environmental Protection Agency and the U.S. Department of Energy helping us all save money
and protect the environmental through energy ecient practices.
2. Read all instructions.
3. Keep these instructions.
4. Heed all warnings.
5. Follow all warnings.
6. Do not use this apparatus near water.
7. Clean only with a dry cloth.
8. Do not block any ventilation openings. Install in accordance with the manufacturer’s instructions.
9. Do not install near any heat sources such as radiators, heat registers, stoves, or other apparatus (incl. ampliers) that
produce heat.
10. Do not defeat the safety purpose of the polarized or grounding-type plug. A polarized plug has two blades with one
wider than the other. A grounding type plug has two blades and a third grounding prong. The wide blade or the third
prong are provided for your safety. If the provided plug does not t into your outlet, consult an electrician for replacement
of the obsolete outlet.
11. Protect the power cord from being walked on or pinched particularily at plugs, convenience receptacles, and the point
where they exit from the apparatus.
12. Only use attachments/accessories specied by the manufacturer.
13. Use only with cart, stand, tripod, bracket, or table specied by the manufacturer, or sold with the
apparatus. When a cart is used, use caution when moving the cart/apparatus combination to avoid
injury from tip-over.
14. Unplug this apparatus during lightning storms or when unused for long periods of time.
15. Refer all servicing to qualied service personnel. Servicing is required when the apparatus has been damaged in any
way, such as power-supply cord or plug is damaged. Liquid has been spilled or objects have fallen into the apparatus, the
apparatus has been exposed to rain or moisture, does not operate normally, or has been dropped.
16. Apparatus should not be exposed to dripping or splashing, and objects lled with liquids, such as vases, should
not be placed on the apparatus.
17. An outside antenna system should not be located in the vicinity of overhead power lines or other electric light or power
circuits, or where it can fall into such power lines or circuits. When installing an outside antenna system, extreme care
should be taken to keep from touching such power lines or circuits, as contact with them might be fatal.
18. Do not overload wall outlets and extension cords, as this can result in a risk of re or electric shock.
19. Do not push objects through any openings in this unit, as they may touch dangerous voltage points or short out parts
that could result in re or electric shock. Never spill or spray any type of liquid into the unit.
20. If an outside antenna or cable system is connected to the unit, be sure the antenna or cable system is grounded to provide
some protection against voltage surges and built-up static charges, Section 810 of the National Electrical Code, ANSI/
NFPA 70, provides information with respect to proper grounding of the mast and supporting structure, grounding of the
lead-in wire to an antenna discharge unit, size of grounding conductors, location of antenna discharge unit, connection
to grounding electrodes, and requirements for the grounding electrode.
21. When replacement parts are required, be sure the service technician uses replacement parts specied by the manufacturer
or those that have the same characteristics as the original part. Unauthorized substitutions may result in re, electric
shock or other hazards.
22. Upon completion of any service or repairs to this unit, ask the service technician to perform safety checks to determine
that the unit is in proper operating condition.

- 7 -
SAFETY AND WARNINGS
23. When you connect the product to other equipment, turn o the power and unplug all of the equipment from the wall
outlet. Failure to do so may cause an electric shock and serious personal injury. Read the owner’s manual of the other
equipment carefully and follow the instructions when making any connections.
24. Sudden high volume sound may cause hearing or speaker damage. When you use headphones, (if the unit is equipped
with a headphone connection) keep the volume at a moderate level. If you use headphones continuously with high
volume sound, it may cause hearing damage.
25. Do not allow the product to output distorted sound for an extended period of time. It may cause speaker overheating and
re.
26. This reminder is provided to call the cable TV system installer’s attention to Article 820-40 of the NEC that provides
guidelines for proper grounding and, in particular, species that the cable ground shall be connected to the grounding
system of the building, as close to the point of cable entry as practical.
27. The socket-outlet must be installed near the unit and easily accessible.
The unit emits heat when in operation. Do not place any covers or blankets on the unit, this may cause overheating. Do not
block ventilation holes, or set up near radiators. Do not place in direct sunshine. When placing on a shelf leave 10 cm (4 inches)
free space around the entire unit.
WARNING:
To reduce the risk of re or electric shock, do not expose this apparatus to rain or moisture.
WARNING:
The batteries shall not be exposed to excessive heat such as sunshine, re or the like.
WARNING:
Never place heavy or sharp objects on the LED panel or frame.
WARNING:
The excessive sound pressure from earphones and headphones can cause hearing loss.
This marking indicates that this product should not be disposed with other household wastes throughout North
America. To prevent possible harm to the environment or human health from uncontrolled waste disposal, recycle
it responsibly to promote the sustainable reuse of material resources. To return your used device, please use the
return and collection systems or contact the retailer where the product was purchased. They can take this product
for environmental safe recycling.
FCC warning
Changes or modications not expressly approved by the party responsible for compliance with the FCC Rules could void the
user’s authority to operate this equipment.
DHHS and FDA safety certication
This product is made and tested to meet safety standards of the FCC, requirements and compliance with safety performance of
the U.S. Department of Health and Human Services, and also with FDA Radiation Performance Standards 21 CFR Subchapter J.
Canada ICES-003 statement
This Class B digital apparatus complies with Canadian ICES-003.

- 8 -
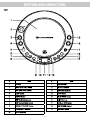
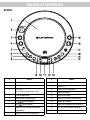
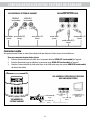
BUTTONS AND CONNECTIONS
TOP

- 9 -
BUTTONS AND CONNECTIONS
BACK PANEL

- 10 -
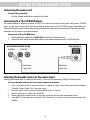
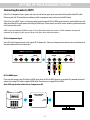
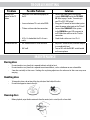
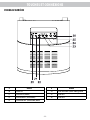
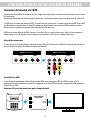
SETTING UP YOUR KARAOKE SYSTEM
REAR VIEW OF KARAOKE SYSTEM REAR VIEW OF TV
VIDEO OUT AUDIO OUT
R L
Video Output
(Yellow Jack)
Video Input
(Yellow Jack)
Selecting the karaoke system as the source input
Selecting your karaoke system as a source input on your TV is very similar to connecting a VCR/DVD or satellite system.
To set your karaoke system as the source input (common instructions):
1. In the set up menu of the TV player there may be an option for “Input Select” where you can choose between
“Cable/Ant., Video 1, Video 2, etc” as the input source.
2. There may also be a button on your TV remote labelled “Input“ or “Source”.
3. Choose a source input. (i.e AUX, LINE 1 or LINE IN).
4. Choosing one of the available sources, in most cases, will display the lyrics from your karaoke system.
5. Some older TV’s may require you to switch the TV to channel 3 or 4, in these cases, no input source needs to be
selected.
Connecting the power cord
To connect the power cord:
• Plug the AC power cord into the standard AC wall socket.
Connecting to a TV or VCR/DVD player
Your karaoke machine is designed to connect to your TV the same way you would connect most video cameras, VCR/DVD
players or video games consoles. RCA cables are provided to connect your unit to a TV, VCR/DVD player, video device or an
external audio/sound system. The RCA cables have three connections at each end (white and red are for left and right audio
connections and the yellow is for video connections).
To connect to a TV, or VCR/DVD player:
1. Connect video cable (yellow) to the VIDEO OUT of the back of the karaoke system.
2. Connect the other end of the video cable (yellow) to the video connection on your TV or VCR/DVD player.

- 11 -
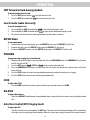
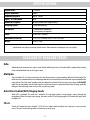
SETTING UP YOUR KARAOKE SYSTEM
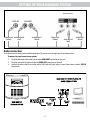
Audio connection
As an alternative to listening to the audio through your TV, you can listen through your home stereo system.
To connect to your home stereo system:
1. Plug the white end of the cable into the white AUDIO OUT connection on the unit.
2. Plug the red end of the cable into the red AUDIO OUT connection on the unit.
3. Connect the other end of the cable’s white (left) and red (right) plugs to your home stereo system’s AUX IN
connections.
REAR VIEW OF KARAOKE SYSTEM
REAR VIEW OF TV
Video Output
(Yellow)
Audio Output R
(Red)
Audio Output L
(White)
Audio Input L
(White)
Video Input
(Yellow)
VIDEO OUT AUDIO OUT
R L
Audio Input R
(Red)

- 12 -
SETTING UP YOUR KARAOKE SYSTEM
Connecting Karaoke to HDTV
If the TV has Component inputs (green, red, blue, red, white) the green input may work with the yellow video RCA cable.
Please consult with TV manufacturer to determine if the component input can be used with RCA cables.
If the TV only has HDMI® inputs, a 3rd party product may be required. RCA to HDMI signal converters are available which will
allow the analog RCA signal to work with a digital HDMI input. Please keep in mind that we are unable to guarantee function
with 3rd party accessories.
HDMI is a registered trademark of HDMI Licensing, LLC in the United States and/or other countries. All other trademarks and registered
trademarks are the property of their respective owners in the Unites States and/or other countries.
RCA to Component Input
Some TVs have Component inputs that support RCA (Composite). Check your Component connections for any indication that
the yellow video cable can be connected.
RCA to HDMI Input
If you can only connect your RCA cables to HDMI inputs then an RCA to HDMI Converter is required. This powered device will
convert the analog RCA cable to a digital HDMI cable. The device must support RCA to HDMI.
Note: RCA may also be referred to as Composite or AV.
RCA to HDMI
Converter
RCA
INPUT
HDMI
OUTPUT
AUDIO
LRYPb/Cb Pr/Cr
INPUT (component)
VIDEO AUDIO
LRYPb/Cb Pr/Cr
INPUT (component)
VIDEO

- 13 -
OPERATION
Preparation
This unit is designed to play CD’s bearing the identication logo. If CD’s do not conform to the CD standard they may
not play properly.
• Fingerprints and dust should be carefully wiped o with a soft cloth. Wipe in a straight motion from the centre of
the disc to the outside edge.
• Never use chemicals, such as record cleaning spray, antistatic sprays or uids, benzene or thinner to clean compact
discs. These chemicals will permanently damage the plastic surface of the disc.
• Always place the compact disc on the disc tray with the label facing upward. Compact discs can be played on only
one side.
• To remove a disc from its storage case, press down on the centre of the case and lift the disc out, holding it carefully
by the edges.
• Discs should be returned to their cases after use to protect them from dust and scratches.
• To prevent warping the disc, do not expose it to direct sunlight, high humidity or high temperatures for extended
periods of time.
• Do not apply paper or write anything on either side of the disc. The inks used in some felt-tip pens may damage
the surfaces of the disc.
Turning ON/OFF
To turn the karaoke system on or o:
1. Press POWER ON/OFF button, to turn on the karaoke system. The ON/OFF LED will light up.
2. Press POWER ON/OFF button again to turn o the system. The ON/OFF LED will turn o.
Turning Light ON/OFF
1. Press LIGHT button, the light eect will illuminate.
2. Press LIGHT button again, the light eect will turn o.
Loading a disc
To place a karaoke disc in the karaoke player:
1. Press the OPEN button to open CD+G compartment door. Place a disc in the compartment with the printed
side upwards.
2. Gently close the CD door to the CD+G compartment. The karaoke system will begin to read the disc.
3. Press PLAY/ PAUSE to play the disc. If no disc is loaded, it will display “- -”. (Refer to the TROUBLESHOOTING guide
on page 11 if a disc has loaded but the total tracks do not appear).
Play/Pause Mode
To play/pause a disc:
1. Press the PLAY/PAUSE button to start playing disc. The rst track will display on the LED display.
2. To pause playback, press the PLAY/PAUSE button, and to resume playback, press the PLAY/PAUSE button again.
Note: Pressing pause when a CD+G is playing may cause distorted lyrics on the monitor. Any distortion will remain until
the whole screen is refreshed during an instrumental break or you stop the song and start it from the beginning.
Stop mode
To stop playback:
• Press the STOP button to stop playback. (The total number of tracks on the disc will be displayed on the screen)

- 14 -
OPERATION
SKIP forward or back during playback
To skip forward or back a track:
1. Press the SKIP forward button to skip to the next track.
2. Press the SKIP backward button to skip to the previous track.
Search mode (audio discs only)
To search through a track:
1. Press and hold the SKIP forward button to search quickly through a track.
2. Press and hold the SKIP backward button to search quickly backwards through a track.
3. The current track will resume at normal speed when the skip button is released.
REPEAT Mode
To use repeat mode:
1. To repeat the track currently playing, press the REPEAT button once. The REPEAT LED will blink.
2. To repeat all tracks, press the REPEAT button twice. The REPEAT LED will stay lit.
3. To clear the REPEAT function, press the REPEAT button again. The REPEAT LED will turn o.
PROGRAM
To program songs to play in a selected order:
1. Programming should be done in the stop mode only. Press the PROGRAM button. The PROGRAM LED will turn on
and the LED will read “01“.
2. Press the SKIP forward or SKIP back buttons to select a desired track.
3. Press the PROGRAM button again to select tracks, the LED display will display the number order in which the
tracks will play.
4. Press the PLAY button when you have completed programming and you are ready to start singing.
5. Press the STOP button twice to clear all the programmed entries.
ECHO
To adjust the ECHO:
• Turn the ECHO knob on the karaoke system to enhance your voice for more or less ECHO.
BALANCE
To adjust the balance:
• Adjust the BALANCE knob between the prerecorded singer’s voice and the music when using a multiplex karaoke
disc.
Auto Voice Control (AVC) Singing Coach
To adjust the AVC:
• Auto Voice Control can be activated by the AVC knob. The vocals on the multiplex recording will be muted when
the singer starts to sing through the microphone. When the singer stops singing, the vocals will resume to normal.

- 15 -
OPERATION
LINE IN operation
To use the karaoke player as a speaker for another audio device:
1. Connect a 3.5mm cable (not included) into the LINE IN connection on the back of the karaoke system.
2. Connect the other end of a 3.5mm cable to the AUDIO OUT connection of your external audio device.
3. Operate the external audio device as you normally would, use the VOLUME knob of the karaoke system to adjust
the volume.
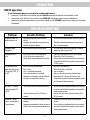
TROUBLESHOOTING
Problem Possible Problem Solution
No power when the
power button is on
• No power plug connection at the AC
outlet.
• Improper connection between the unit
and the AC power adapter.
• Insert the AC power adapter into the AC outlet.
• Check the connection between the unit and
the AC power adapter.
No power when
plugged in
• The AC outlet may not have power. • Test the power outlet by plugging in another
appliance and turning it on.
No sound from TV
or PA
• TV or PA system is set to minimum.
• TV or PA system is powered o.
• Patch cables are not connected securely.
• Turn up the volume on the TV or PA system.
• Power the TV or PA system on.
• Ensure white and red patch cables are securely
inserted into both the karaoke system and the
TV/PA system.
CD Player does not
work normally or the
LED displays “NO”, “E”
or “00”
• Disc is inserted upside down.
• Disc is dirty.
• Disc is scratched or warped
• A non-standard disc is inserted.
• Moisture has formed inside the CD deck.
• Karaoke system needs resetting.
• Insert the disc correctly.
• Wipe clean with a soft cloth.
• Use a new disc.
• Only use discs bearing the standard logo.
• Wait about 20 - 30 mins to let it dry out.
• Disconnect the machine from the power source
for 30 seconds then reconnect.
No sound − If audio
is going through TV
or VCR
• Patch cables are not connected securely.
• Source selection on TV or VCR is not
correct.
• Ensure white and red patch cables are securely
inserted into both the karaoke system and the
home stereo system.
• Ensure that the source selection on the TV or
VCR is correct.
No sound − When
audio is connected to
a home stereo
• Source selection on your stereo is not set
properly.
• Improper connection to stereo system or
patch cables are not connected securely.
• Select AUX IN as the source for your home
stereo.
• Ensure white and red patch cables are securely
inserted into both the karaoke system and the
home stereo system.

- 16 -
Storing discs
• Do not store discs in a place that is exposed to direct sunlight or heat.
• Do not store discs in a place that is exposed to moisture and dust, such as a bathroom or near a humidier.
• Store discs vertically in their cases. Stacking discs or placing objects on discs when not in their cases may cause
warping.
Handling discs
• To keep a disc clean, do not touch the play side (non-label side) of the disc.
• Do not attach paper or tape to the disc.
Cleaning discs
• Before playback, wipe the disc outwards from the center (not in a circle) with a clean cloth.
TROUBLESHOOTING
Problem Possible Problem Solution
No song lyrics
appear on the TV
screen
• Video cable is not connected properly to
the TV.
• Source selector on TV is not set to VIDEO.
• TV does not have video line connection.
• A CD+G is loaded but the CD+G icon is
not lit.
• Connect the video cable to the karaoke
system’s VIDEO OUT and to the TV VIDEO
IN. Refer to page 7 under “Connecting to
your TV or VCR / DVD player”.
• Using your TV remote to select video input or
select the proper video input on the TV itself.
• Connect from VIDEO OUT of the system
to the VIDEO IN on your VCR or connect to
an RF Modulator and then to the TV cable
connection.
• Check the disc to be sure it is a CD+G.
No sound from mic • MIC volume control is set to minimum.
• MIC is o.
• Adjust MIC volume to max, and then readjust
to a comfortable level.
• Turn on MIC with the ON/OFF switch located
on the microphone.
MAINTENANCE

- 17 -
SPECIFICATIONS
Output Power 1 x 2W RMS
Output Impedance 4 ohms
Frequency Response 100 Hz - 20 kHz
Signal - To - Noise Ratio 50 dB
Number Of Programs 20 steps random access programming
Sampling System 8 times oversampling
Microphone -73 dB 600 ohms impedance
6.3mm dynamic microphone
Power AC100-240V~50/60Hz
Dimensions (H x W x D) 8.1 × 8.9 × 9.8 inches (20.6 × 22.6 × 24.9 cm)
Weight 4.8 lbs (2.2 kg)
Specications are subject to change without notice. Measurements and weights may vary slightly.
GLOSSARY OF KARAOKE TERMS
Echo
• Adds depth and resonance to a singer’s voice without aecting the music. The echo eect is produced by creating
minor controlled feed-back in the singer’s voice.
Multiplex
• Some multiplex CD+Gs have two versions of a song. One version is a stereo recording without the lead singer. The
other version is recorded with music and background vocals on the left channel and the lead singer recorded on the
right channel. The “split-track” recording lets you control the volume of the lead singer by rotating the BALANCE
knob. You can sing a duet with the lead singer or use the lead singer as a guide while you learn the song, gradually
fading out the lead singer voice until you can sing the song alone.
Auto Voice Control (AVC) Singing Coach
• When AVC is activated, the vocals on a multiplex CD stop playing when a singer begins singing through the
microphone. When the singer stops singing, the vocals on the CD start playing again. This feature only works with
multiplex CDs.
CD+G
• Stands for “Compact Disc plus Graphics.” A CD+G has a video track that displays the song lyrics in sync with the
music. The lyrics usually change color as when they are to be sung.

- 18 -
TABLE DES MATIÈRES
BESOIN D’AIDE? ................................................................................................................................ 3
TABLE DES MATIÈRES ...................................................................................................................... 18
CE QUI EST INCLUS .......................................................................................................................... 18
SÉCURITÉ ET MISES EN GARDE ......................................................................................................... 20
TOUCHES ET CONNEXIONS ............................................................................................................... 22
CONFIGURATION DE VOTRE SYSTÈME KARAOKÉ ................................................................................. 24
CONNEXION DU CORDON D’ALIMENTATION ....................................................................................................... 24
CONNEXION À UN TÉLÉVISEUR OU À UN LECTEUR DVD/MAGNÉTOSCOPE ........................................................24
CHOISIR LE LECTEUR KARAOKÉ COMME SOURCE D’ENTRÉE ..............................................................................24
CONNEXION AUDIO ............................................................................................................................................25
CONNEXION DU KARAOKÉ À LA TVHD ................................................................................................................ 26
OPÉRATION .................................................................................................................................... 27
PRÉPARATION.....................................................................................................................................................27
ACTIVER ET DÉSACTIVER LE SYSTÈME KARAOKÉ ............................................................................................... 27
LECTURE D’UN DISQUE .......................................................................................................................................27
MODE PLAY/PAUSE LECTURE/PAUSE ..............................................................................................................27
MODE STOP ARRÊT ..........................................................................................................................................28
AVANCER OU RECULER PENDANT LA LECTURE ..................................................................................................28
MODE DE RECHERCHE DISQUES AUDIO SEULEMENT ...................................................................................... 28
MODE REPEAT RÉPÉTITION .............................................................................................................................28
PROGRAM ..........................................................................................................................................................28
ÉCHO ..................................................................................................................................................................28
ÉQUILIBRE .......................................................................................................................................................... 29
COMMANDE AUTOMATIQUE DE LA VOIX AVC CAV ...........................................................................................29
OPÉRATION AVEC PRISE LINE IN.........................................................................................................................29
DÉPANNAGE ................................................................................................................................... 30
ENTRETIEN ..................................................................................................................................... 31
SPÉCIFICATIONS ............................................................................................................................. 32
GLOSSAIRE DES TERMES DE KARAOKÉ .............................................................................................. 32
GARANTIE ELECTROHOME ............................................................................................................... 33
CE QUI EST INCLUS
• Lecteur karaoké CD+G avec système de haut-parleurs
• Microphone dynamique (cordon de 10pi)
• Disque karaoké CD+G multiplex avec compilation de musique de divers artistes
• Câble à connexion composite audio/vidéo RCA
• Manuel d’instructions
• Garantie d’un an
• Soutien à la clientèle pour la vie

- 19 -
SÉCURITÉ ET MISES EN GARDE
Le symbole représentant un éclair dans un triangle
équilatéral a pour but d’avertir l’utilisateur du danger
présenté par des pièces non isolées à l’intérieur de
l’appareil et dont la tension est susante pour provoquer
des décharges électriques dangereuses.
Le point d’exclamation dans un triangle équilatéral a pour
but d’avertir l’utilisateur que des instructions importantes
relatives à l’utilisation et à l’entretien se trouvent dans le
manuel accompagnant l’appareil.
A
VERTISSEMENT: An d’éviter tout risque d’incendie ou
d’électrocution, n’exposez pas cet appareil à
la pluie ni à l’humidité.
L’AVERTISSEMENT est situé sur le panneau inférieur.
AVERTISSEMENT CONTRE LES DÉGOUTTEMENTS
Le produit ne doit pas être exposé à des gouttes ou des éclaboussures de liquides et qu’aucun objet rempli de liquide, tels que des vases, doit être
placé sur le produit.
AVERTISSEMENT DE VENTILATION
La ventilation normale du produit ne sera pas empêchée pour l’usage voulu.
Ce lecteur CD est fabriqué et testé pour répondre aux normes de sécurité. Il répond aux exigences de la FCC et est conforme aux normes de sécurité
du Département de la Santé et des Services sociaux des États-Unis.
AVERTISSEMENTS
• Ce lecteur CD utilise un rayon laser. Seulement une personne qualiée devrait retirer le couvercle ou essayer de réparer cet appareil, puisqu’il y a
une possibilité de blessures aux yeux.
• L’utilisation de commandes, réglages ou procédures autres que celles spéciées ici pourrait causer une exposition dangereuse
aux radiations.
AVERTISSEMENT
CE LECTEUR DE DISQUE COMPACT EST CLASSÉ COMME UN PRODUIT LASER DE CLASSE 1. L’ÉTIQUETTE PRODUIT LASER DE CLASSE 1 EST SITUÉE
SUR LE PANNEAU INFÉRIEUR.
AVERTISSEMENT
Radiation laser invisible quand ouvert et verrous désengagés. Evitez l’exposition aux rayons solaire.
IMPORTANT
Puisque les circuits de CD peuvent provoquer des interférences aux syntoniseurs à proximité, éteignez cet
appareil lorsqu’il n’est pas utilisé ou éloignez l’appareil du syntoniseur aecté.
Cet appareil numérique de classe [B] est conforme à la norme canadienne NMB-003.
REMARQUE:
Cet appareil numérique ne dépasse pas les limites de classe B pour les émissions de bruits radioélectriques applicables aux appareils numériques
énoncées dans le Règlement sur le brouillage radioélectrique d’Industrie Canada. Ces limites sont conçues pour fournir une protection raisonnable
contre les interférences nuisibles dans une installation résidentielle. Cet équipement génère, utilise et peut émettre des fréquences radio et, s’il
n’est pas installé et utilisé conformément aux instructions, peut causer des interférences nuisibles aux communications radio. Cependant, il n’existe
aucune garantie que des interférences ne se produiront pas dans une installation particulière. Si cet équipement cause des interférences nuisibles
à la radio ou à la télévision (qui peut être déterminé en éteignant l’équipement), l’utilisateur est encouragé à essayer de corriger l’interférence par
une ou plusieurs des mesures suivantes:
• Réorienter ou déplacer l’antenne de réception.
• Augmenter la distance entre l’équipement et le récepteur.
• Branchez l’appareil dans une prise sur un circuit diérent de celui auquel le récepteur est branché.
• Consultez le revendeur ou un technicien spécialisé en radios et téléviseurs.
ATTENTION: POUR RÉDUIRE LE RISQUE DE CHOC ÉLECTRIQUE,
NE RETIREZ PAS LE PANNEAU ARRIÈRE. AUCUNE
PIÈCE RÉPARABLE PAR L’UTILISATEUR. VEUILLEZ
CONSULTER LE PERSONNEL DE SERVICE QUALIFIÉ.
ATTENTION
RISQUE DE CHOC ÉLECTRIQUE
NE PAS OUVRIR

- 20 -
SÉCURITÉ ET MISES EN GARDE
1. ENERGY STAR est un ensemble de directives d’ecacité energétique de l’Agence gouvernementale des États-Unis pour
l’environnement (EPA). ENERGY STAR est un programme conjoint de l’Agence gouvernementale des États-Unis pour
l’environnement (EPA) et le Département de l’énergie des États-Unis qui nous aide tous à économiser de l’argent et protéger
l’environnement par des pratiques d’ecacité énergétique.
2. Lisez ces consignes.
3. Gardez ces consignes.
4. Conformez-vous à tous les avertissements.
5. Suivez toutes les consignes applicables.
6. N’utilisez pas cet appareil près de l’eau.
7. Nettoyez uniquement à I’aide d’un chion sec.
8. N’obstruez jamais les orices d’aération de l’appareil et installez-le en conformité avec les instructions du fabricant.
9. N’installez pas l’appareil à proximité d’une source de chaleur telle que radiateurs, registres de chaleur, poêles ou autre appareil
(y compris les amplicateurs) qui produisent de la chaleur.
10. N’allez pas à l’encontre de I’objectif de sécurité de la che polarisée ou avec mise à la terre. Une che polarisée a deux lames,
une étant plus large que I’autre. Une che avec mise à la terre a deux lames et une troisième broche de terre. La lame large ou la
troisième broche est destinée à vous protéger. Si la che fournie ne s’insère pas dans votre prise, contactez un électricien pour
faire remplacer la prise désuète.
11. Empêchez Ie cordon d’être piétiné ou pincé, surtout aux ches, prises de courant, et au point de leur sortie de I’appareil.
12. Utilisez uniquement les accessoires précisés par Ie fabricant.
13. N’utilisez cet appareil qu’avec un chariot, un socle, un trépied, une console ou une table conçu pour supporter
le poids et la taille de l’appareil. Si vous utilisez un chariot, manoeuvrez avec précaution l’ensemble chariot/
appareil pour éviter toute blessure résultant d’un basculement.
14. Débranchez cet appareil durant des orages électriques ou lorsqu’il n’est pas utilisé pendant des périodes prolongées.
15. Conez toutes les réparations de cet appareil à du personnel qualié. Une réparation peut être requise lorsque l’appareil a été
endommagé de quelque manière que ce soit, tel qu’un cordon ou une che endommagé, du liquide déversé ou des objets
tombés dans I’appareil, I’appareil a été exposé à la pluie ou a I’humidité, un appareil qui ne fonctionne pas normalement ou
qui est tombé.
16. L’appareil ne doit pas être exposé à des égouttements d’eau ou des éclaboussures, et de plus aucun objet rempli de
liquide, tel que des vases, ne doit être placé sur I’appareil.
17. L’antenne extérieure ne doit pas être placée à proximité de lignes d’alimentation aériennes ni de circuits électriques, ni de
telle façon qu’elle puisse toucher ces lignes ou ls en tombant. Faites preuve d’extrême prudence pendant l’installation d’une
antenne extérieure et veillez à ne pas toucher ces lignes ou circuits car leur contact peut être fatal.
18. Ne surchargez pas les prises électriques murales ni les cordons de rallonge, car cela risque de causer un incendie ou des chocs
électriques.
19. Ne tentez jamais d’insérer un objet, quel qu’il soit, à l’intérieur du boîtier de l’appareil, ni de laisser un liquide pénétrer dans les
orices de l’appareil, car cela peut toucher des points de tension dangereux, causer un court-circuit, un incendie ou des chocs
électriques. Ne versez, ni ne vaporisez jamais de liquide sur l’appareil.
20. Si une antenne extérieure ou un système de transmission par câble est relié à l’appareil, vous devez vous assurer que l’antenne
ou le système de transmission par câble est convenablement mis à la terre de manière à être protégé, dans toute la mesure du
possible, contre les surtensions et les charges d’électricité statique. La section 810 du code national de l’électricité (ANSI/ NFPA
70) vous renseigne sur les moyens appropriés de mettre le mât et la structure de support à la terre, de la mise à la terre du l de
descente vers un élément de décharge de l’antenne, et du raccordement des électrodes de mise à la terre.
21. Quand il est nécessaire de remplacer certaines pièces de l’appareil, assurez-vous que le réparateur utilise des pièces
recommandées par le fabricant ou ayant les mêmes caractéristiques que les pièces originales. Le remplacement par des pièces
non autorisées peut causer un incendie, des chocs électriques ou être la source d’autres dangers.
22. Après le service ou une réparation, demandez au technicien d’eectuer des vérications de sécurité pour s’assurer que l’appareil
soit en bon état de fonctionnement.
La page est en cours de chargement...
La page est en cours de chargement...
La page est en cours de chargement...
La page est en cours de chargement...
La page est en cours de chargement...
La page est en cours de chargement...
La page est en cours de chargement...
La page est en cours de chargement...
La page est en cours de chargement...
La page est en cours de chargement...
La page est en cours de chargement...
La page est en cours de chargement...
La page est en cours de chargement...
La page est en cours de chargement...
-
 1
1
-
 2
2
-
 3
3
-
 4
4
-
 5
5
-
 6
6
-
 7
7
-
 8
8
-
 9
9
-
 10
10
-
 11
11
-
 12
12
-
 13
13
-
 14
14
-
 15
15
-
 16
16
-
 17
17
-
 18
18
-
 19
19
-
 20
20
-
 21
21
-
 22
22
-
 23
23
-
 24
24
-
 25
25
-
 26
26
-
 27
27
-
 28
28
-
 29
29
-
 30
30
-
 31
31
-
 32
32
-
 33
33
-
 34
34


Electrohome EAKAR300 Manuel utilisateur
- Catégorie
- Systèmes de karaoké
- Taper
- Manuel utilisateur
dans d''autres langues
- English: Electrohome EAKAR300 User manual
Documents connexes


Autres documents
-
The Singing Machine ISM-370 Manuel utilisateur
-
-
-
-
-
-
-
Lexibook K5000BB Le manuel du propriétaire
-
-
GPX J085B v1101-01 Manuel utilisateur