Yardistry Seneca Privacy Room Manuel utilisateur
- Taper
- Manuel utilisateur

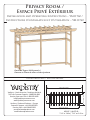
HEIGHT: / HAUTEUR :
7’11” or 2.42m / 7’11” ou 2.42 m.
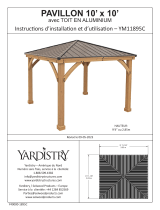
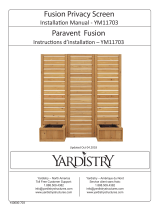
Privacy Room /
Espace Privé Extérieur
Installation and Operating Instructions – YM11760 /
Instructions d’installation et d’utilisation – YM11760
Yardistry – North America / Amérique du Nord
Toll Free Customer Support: 1.888.509.4382
Service client sans frais: 1.888.509.4382
info@yardistrystructures.com
www.yardistrystructures.com
Yardistry / Selwood Products – Europe
Customer Support: +44 1284 852569
Service client: +44 1284 852569
parts@selwoodproducts.com
www.selwoodproducts.com
Revised 06/01/2015 / Révisé 01/06/2014
3’1 11/16”
(0.96 m)
4’-7 13/16” (1.42 m)
3.41 m (11’-2 3/8”)
4.04 m (13’-3 1/8”)
Panels and Toppers Sold Separately /
Panneaux et éléments de toiture vendus séparément

2 support@yardistrystructures.com
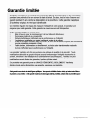
Important Safety Notice!
Yardistrycomponentsareintendedforprivacy,decorativeandornamentaluseonly.
Product is NOT INTENDED for the following:
•Asafetybarriertopreventunsupervisedaccesstopools,hottubs,spasorponds.
•Asloadbearingsupportforabuilding,structure,heavyobjectsorswings.
•Usedinstructuresthattrapwind,rainorsnowthatwouldcreateextraloadonthe
product.
Permanent structures may require a building permit. Asthepurchaserandorinstaller
ofthisproductyouareadvisedtoconsultlocalplanning,zoningandbuildinginspection
departmentsforguidanceonapplicablebuildingcodesand/orzoningrequirements.
Wood is NOT ame retardant and will burn.Grills,repitsandchimineasareare
hazardifplacedtooclosetoaYardistrystructure.Consultuser’smanualofthegrill,re
pitorchimneaforsafedistancesfromcombustiblematerials.
Wear gloves to avoid injuryfrompossiblesharpedgesofindividualelementsbefore
assembly.
During installation, follow all safety warnings provided with your tools and use
OHSA approved safety glasses.Somestructuresmayrequiretwoormorepeopleto
installsafely.
Check for underground utilities before digging or driving stakes into the ground!
.
General Information:WoodcomponentsaremanufacturedwithCedar(C.Lanceolata)
whichisprotectedwithfactoryappliedwater-basedstain.Knots,smallchecks(cracks)
andweatheringarenaturallyoccurringanddonotaffectthestrengthoftheproduct.
Annualapplicationofawater-basedwaterrepellentsealantorstainwillhelpreduce
weatheringandchecks.
www.yardistrystructures.com
Questions?
Calltollfreeorwriteusat:
1(888)509-4382
PatentsPending
General Information

3support@yardistrystructures.com
Avis important de sécurité!
LescomposantesYardistrysontconçuesuniquementpourdesnsd’intimité,dedécoration
etded’ornementation.
Le produit N’EST PAS CONÇU pour les usages suivants:
•Barrièredesécuritépourempêcherl’accèsàdespiscines,spasouétangs.
•Supportstructuralpourbâtiment,structure,objetlourdoubalançoire.
•Utilisationentantquestructurebrise-vent,ouservantàaccumulerlapluieoula
neige,cequicréeraitunechargesupplémentairesurleproduit.
Des structures permanentes pourraient nécessiter un permis. Entantqu’acheteur
ouinstallateurdeceproduit,nousvousconseillonsdeconsulterlesdépartementslocaux
d’urbanisme,dezonage,etd’inspectiondebâtimentspourlesindicationsrelativesaucode
dubâtimentetauxexigencesdezonage.
Le bois n’est PAS ignifuge et peut s’en ammer.Lesbarbecues,foyersextérieurset
cheminéesreprésententunrisqued’incendies’ilssontsituéstropprèsdelastructure
Yardistry.Consultezlemanueld’utilisationdubarbecue,foyerextérieuroudelacheminée
pourconnaîtrelesdistancessécuritairespourlesmatériauxcombustibles.
Portez des gants pour éviter les blessurespouvantêtrecauséesparlesbordures
tranchantesdesélémentsindividuelsavantl’assemblage.
Lors de l’installation, respectez toutes les normes de sécurité de vos outils et portez
des lunettes de protection certi ées par l’OHSA.Certainesstructurespourraient
nécessiterl’aidededeuxpersonnesoupluspouruneinstallationsécuritaire.
Véri ez les installations souterraines avant de creuser ou de forer!
It is important during assembly to closely follow the instructions,competethe
assemblyonasolidlevelsurfaceandthatyoufollowtheinstructiontosquareup,leveland
anchorthestructure,thiswillreducethegapatwoodconnectionsduringassembly.
Information générale:Lescomposantesenboissontfabriquéesencèdreetsont
protégéesàl’aided’uneteintureàbased’eauappliquéeenusine.Lesnoeuds,petites
ssuresetcraqueluresainsiquelesaltérationsatmosphériquessontdesphénomènes
naturels,etn’affectentpaslasoliditéduproduit.Annualapplicationofawater-basedwater
repellentsealantorstainisimportantandwillhelpreduceweatheringandchecks.
www.yardistrystructures.com
Questions?
Appelez-noussansfraisouécrivez-nousau:
1(888)509-4382
Brevetseninstance
Information générale

4 support@yardistrystructures.com
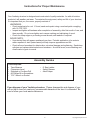
Limited Warranty
Yardistry warrants that this product is free from defect in materials and workmanship
for a period of one year from the original date of purchase. In addition, all lumber is
warranted for 5 years against rot and decay. This warranty applies to the original owner
and registrant and is non-transferable.
Regular maintenance is required to assure the integrity of your product and is a requirement of
the warranty. This warranty does not cover any inspection cost.
This Limited Warranty does not cover:
• Labor for replacement of any defective item(s);
• Incidental or consequential damages;
• Cosmetic defects which do not affect performance or integrity;
• Vandalism; improper use or installation; acts of nature;
• Actsofnatureincludingbutnotlimitedtowind,storms,hail,oods,excessivewater
exposure;
• Minor twisting, warping, checking, or any other natural occurring properties of wood that
do not affect performance or integrity.
Yardistryproductshavebeendesignedforsafetyandquality.Anymodicationsmadetothe
original product could damage the structural integrity of the product leading to failure and
possibleinjury.Yardistrycannotassumeanyresponsibilityformodiedproducts.Furthermore,
modicationvoidsanyandallwarranties.
This product is warranted for RESIDENTIAL USE ONLY. Yardistry disclaims all other
representations and warranties of any kind, express or implied.
This Warranty gives you specic legal rights. You may have other rights as well which vary from state to state or province to
province. This warranty excludes all consequential damages, however, some states do not allow the limitation or exclusion of
consequential damages, and therefore this limitation may not apply to you.

5support@yardistrystructures.com

6 support@yardistrystructures.com
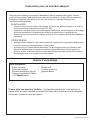
Instructions for Proper Maintenance
YourYardistrystructureisdesignedandconstructedofqualitymaterials.Aswithalloutdoor
productsitwillweatherandwear.Tomaximizetheenjoyment,safetyandlifeofyourstructure
itisimportantthatyou,theowner,properlymaintainit.
If you dispose of your Yardistry structure: Pleasedisassembleanddisposeofyour
unitsothatitdoesnotcreateanyunreasonablehazardsatthetimeitisdiscarded.Be
suretofollowyourlocalwasteordinances.
HARDWARE:
• Checkmetalpartsforrust.Iffound,sandandrepaintusinganon-leadpaintcomplying
with16CFR1303.
• Inspectandtightenallhardwareaftercompletionofassembly;afterrstmonthofuse;and
thenannually.Donotover-tightenastocausecrushingandsplinteringofwood.
• Checkforsharpedgesorprotrudingscrewthreads,addwashersifrequired.
WOODPARTS:
• Unprotectedtheywillappearweatheredovertime.Periodicapplicationofanexterior
waterrepellentorstain(water-based)willhelpimproveappearanceandlife.
• Checkallwoodmembersfordeterioration,structuraldamageandsplintering.Sanddown
splintersandreplacedeterioratedwoodmembers.Aswithallwood,somecheckingand
smallcracksingrainisnormal
• TapeMeasure
• CarpentersLevel
• StandardorCordlessDrill
• #2PhillipsBitorScrewdriver
• 7/16”WrenchorSocket
Assembly Guides
• 8’StepLadder
• SafetyGlasses
• AdultHelper
Tools Required:

7support@yardistrystructures.com
Instructions pour un entretien adéquat
VotrestructureYardistryestconçueetfabriquéeàl’aidedematériauxdequalité.Comme
pourtouslesproduitsd’extérieur,elleserasoumiseauclimatetàl’usure.Andemaximiser
l’utilisation,lasécuritéetladuréedeviedevotrestructure,ilestimportantquevous
l’entreteniezadéquatement.
Symboles:
Danscesinstructions,dessymbolesapparaissentauhaut,danslecoindroitdespages.
Si vous jetez une structure Yardistry: Veuillezdémonteretjeterl’unitédefaçonà
nepascréerderisqueexcessifaumomentdel’élimination.Assurez-vousderespecter
vosnormeslocalesdemiseauxrebuts.
QUINCAILLERIE:
• Assurez-vousqu’aucunerouillen’estprésente.Sic’estlecas,sablezetrepeignezàl’aidede
peinturesansplombrespectantlanormeCFR1303.
• Inspectezetresserreztoutelaquincaillerieaprèsl’assemblage;aprèslepremiermoisd’usage;
etensuiteannuellement.Nepastropserrerandenepasécraseroufendillerlebois.
• Assurezvousqu’aucunebordurecoupanteouletdevisnedépasse,ajoutezdesrondellessi
nécessaire.
PIÈCESDEBOIS:
• Applyingawaterrepellentorstain(water-based)onayearlybasisisimportantmaintenanceto
maintainmaximumlifeandperformanceoftheproduct.
• Assurez-vousqu’iln’existepasdedétérioration,dedommagestructureloud’éclatsdebois.
Sablezleséclatsdeboisetremplacezlespiècesdeboisdétériorées.Commepourtoute
structureenbois,quelquescraqueluresetdepetitsfendillementsdansleboissontnormaux.
• Somegappingmayoccuratsomewoodconnections.
• Rubanàmesurer
• Niveaudemenuisier
• Perceusestandardousansl
• Tournevisoumèche#2Phillips
• 7/16”&9/16”Wrench
Guides d’assemblage
• Échellede8’
• Lunettesdesécurité
• Assistantadulte
• Gants
• Casquedesécurité
Outils nécessaires:
• Obtenirdel’aide.Oùcesymboleapparaît,
2,3ou4personnessontrequisespour
complétercetteétape.And’éviterdes
blessuresoudesdommagesàlastructure,
assurez-vousd’obtenirdel’aide.
• Utiliserunrubanàmesurerpourassurer
unpositionnementjuste
• Pré-perceruntrouavantlaposedelavis
ouvisàboisand’éviterdefairecraquer
lebois.
• 6’StepLadderx2
• Square
• Rachet
• 7/16,1/2&9/16Socket
Wrench
4 support@yardistrystructures.com
Instructions pour un entretien adéquat
VotrestructureYardistryestconçueetfabriquéeàl’aidedematériauxdequalité.Comme
pourtouslesproduitsd’extérieur,elleserasoumiseauclimatetàl’usure.Andemaximiser
l’utilisation,lasécuritéetladuréedeviedevotrestructure,ilestimportantquevous
l’entreteniezadéquatement.
Symboles:
Danscesinstructions,dessymbolesapparaissentauhaut,danslecoindroitdespages.
Si vous jetez une structure Yardistry: Veuillezdémonteretjeterl’unitédefaçonà
nepascréerderisqueexcessifaumomentdel’élimination.Assurez-vousderespecter
vosnormeslocalesdemiseauxrebuts.
QUINCAILLERIE:
• Assurez-vousqu’aucunerouillen’estprésente.Sic’estlecas,sablezetrepeignezàl’aidede
peinturesansplombrespectantlanormeCFR1303.
• Inspectezetresserreztoutelaquincaillerieaprèsl’assemblage;aprèslepremiermoisd’usage;
etensuiteannuellement.Nepastropserrerandenepasécraseroufendillerlebois.
• Assurezvousqu’aucunebordurecoupanteouletdevisnedépasse,ajoutezdesrondellessi
nécessaire.
PIÈCESDEBOIS:
• Applyingawaterrepellentorstain(water-based)onayearlybasisisimportantmaintenanceto
maintainmaximumlifeandperformanceoftheproduct.
• Assurez-vousqu’iln’existepasdedétérioration,dedommagestructureloud’éclatsdebois.
Sablezleséclatsdeboisetremplacezlespiècesdeboisdétériorées.Commepourtoute
structureenbois,quelquescraqueluresetdepetitsfendillementsdansleboissontnormaux.
• Somegappingmayoccuratsomewoodconnections.
• Rubanàmesurer
• Niveaudemenuisier
• Perceusestandardousansl
• Tournevisoumèche#2Phillips
• 7/16”&9/16”Wrench
Guides d’assemblage
• Échellede8’
• Lunettesdesécurité
• Assistantadulte
• Gants
• Casquedesécurité
Outils nécessaires:
• Obtenirdel’aide.Oùcesymboleapparaît,
2,3ou4personnessontrequisespour
complétercetteétape.And’éviterdes
blessuresoudesdommagesàlastructure,
assurez-vousd’obtenirdel’aide.
• Utiliserunrubanàmesurerpourassurer
unpositionnementjuste
• Pré-perceruntrouavantlaposedelavis
ouvisàboisand’éviterdefairecraquer
lebois.
• 6’StepLadderx2
• Square
• Rachet
• 7/16,1/2&9/16Socket

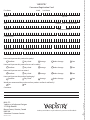
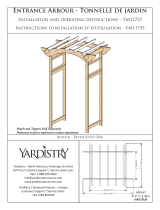
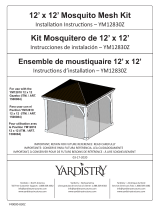
4pc. (390) Y50119-390 - Trellis Beam 38.1 x 139.7 x 2059mm / Poutre de treillis 38.1 x 139.7 x 2059mm
11pc. (389) Y50119-389 - Trellis 25.4 x 82.6 x 1417.7mm / Treillis 25.4 x 82.6 x 1417.7 mm.
2pc. (391) Y50119-391 - Trellis Beam Brace 31.8 x 139.7 x 957.3mm / Renfort de poutre pour treillis
31.8 x 139.7 x 957.3mm
1pc. - #2 x 2"
Robertson Driver /
#2 x 2"
Mèche Robertson
(9200014)
4pc. (396) Y50119-396 - Panel Brace Long 31.8 x 82.6 x 1582.8mm / Long renfort de panneau 31.8 x 82.6 x 1582.8mm
24pc. - Pan Screw #8 x 1"
(52433510)
14pc. - Tee Nut 1/4" / Écrou en T 1/4"
(54503200)
4pc. (394) Y50119-394 - Panel Brace 31.8 x 82.6 x 792.2mm / Renfort de panneau 31.8 x 82.6 x 792.2mm
4pc. (397) Y50119-397 - Panel Brace Long Top 31.8 x 82.6 x 1582.8mm /
4pc. (395) Y50119-395 - Panel Brace Top 31.8 x 82.6 x 792.2mm / Partie supérieure du renfort de
panneau 31.8 x 82.6 x 792.2mm
NOTE:
All Toppers and
Panels sold
seperately.
Tous les éléments de
toiture et panneaux
vendus séparément
Part Identification ( )
Dimensions are approximate and are shown to assist in the identification of parts for
assembly. Actual dimensions may be smaller or larger.
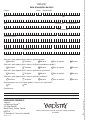
24pc. - Wood Screw #8 x 2" - (52043520) / Vis à bois #8 x 2"
46pc. - Wood Screw #8 x 3" - (52043530) / Vis à bois #8 x 3"
5pc. - Hex Bolt 1/4 x 4-3/4" - (53703243)
Boulon hex 1/4 x 4-3/4"
22pc. -1/4" Flat Washer
Rondelle de 1/4”
(51103200)
14pc. -1/4" Lock Washer /
Rondelle de blocage de 1/4”
(51303200)
4pc. (398) Y50119-398 - Splice 25.4 x 38.1 x 1016mm / Épissure 25.4 x 38.1 x 1016mm
4pc. - Hex Bolt 1/4 x 4-1/2" - (53703242) /
Boulon hex 1/4 x 4-1/2"
8pc. - Hex Lag 1/4 x 2-1/2" - (52213222)
Tirefond 1/4 x 2-1/2"
5pc. - Hex Bolt 1/4 x 1-1/2" - (53703212) /
Boulon hex 1/4 x 1-1/2"
64pc. - Truss Screw #8 x 7/8" / Vis à tête goutte de suifs #8 x 7/8"
(5204505)
1pc. - Jamb Mount Set (16 Pk)
Ensemble de montant
de jambage (16 Pk)
(Y70819-101)
38pc. - Wood Screw #8 x 2-1/2" - (52043522) / Vis à bois #8 x 2-1/2"
5pc. (392) Y50119-392 - Post 82.6 x 82.6 x 2336.8mm / Montant 82.6 x 82.6 x 2336.8mm
Longue partie supérieure du renfort de panneau 31.8 x 82.6 x 1582.8mm /
Identification de la quincaillerie (
Les dimensions sont approximatives et sont présenté es pour faciliter l’identification)
des pièces pour l’assemblage. Les dimensions réelles pourraient varier.
Vis à tête bombee #8x1" /
8

9 support@yardistrystructures.com
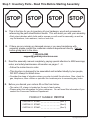
PRODUCTNUMBER:YM11755
CARTONI.D.STAMP:_____________(Box1)
CARTONI.D.STAMP:_____________(Box2)
CARTONI.D.STAMP:_____________(Box3)
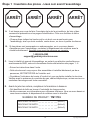
STOP STOPSTOP STOP
1-888-509-4382
C. Readtheassemblymanualcompletely,payingspecialattentiontoANSIwarnings;
notes;andsafety/maintenanceinformationonpages1-4.
•Followtheinstructionsinorder.
•Thisstructureisdesignedtobeassembledandinstalledideallybytwopeople,
DONOTattempttoinstallalone.
•Considertheslopeofelevationwhereyouplantoinstallthestructure.Also,checkfor
gas,telephone,otherutilitiesorsprinklerlinelocationspriortoexcavatinganyholes.
D. Beforeyoudiscardyourcartonsllouttheformbelow.
•ThecartonI.D.stampislocatedontheendofeachcarton.
•Pleaseretainthisinformationforfuturereference.Youwillneedthisinformationifyou
contacttheConsumerRelationsDepartment.
•Eachstepindicateswhichboltsand/orscrewsyouwillneedforassembly,aswellas
anyatwashers,lockwashers,t-nutsorlocknuts.
A.Thisisthetimeforyoutoinventoryallyourhardware,woodandaccessories,
referencingthepartsidenticationsheets.Thiswillassistyouwithyourassembly.
Step 1: Inventory Parts - Read This Before Starting Assembly
B.Ifthereareanymissingordamagedpiecesoryouneedassistancewith
assemblypleasecontacttheconsumerrelationsdepartmentdirectly.Callus
beforegoingbacktothestore.

10 support@yardistrystructures.com
NUMÉRODEPRODUIT:YM11685
IDENTIFIANTDEBOÎTE:_____________(Boîte1)
IDENTIFIANTDEBOÎTE:_____________(Boîte2)
IDENTIFIANTDEBOÎTE:_____________(Boîte3)
1-888-509-4382
C. Lisezlatotalitédumanueld’assemblage,enportantuneattentionparticulièreaux
avertissementsANSI,notesetinformationsdesécurité/entretienauxpages1-4.
•Suivezlesinstructionsdansl’ordre.
•Cettestructureestconçuepourêtreassembléeetinstalléeidéalementpardeux
personnes,NETENTEZPASdel’installerseul.
•Considérezl’inclinaisonduterrainàl’endroitoùvoussouhaitezinstallerlastructure.
Vériezaussilaprésencedeconduitesdegaz,câblestéléphonique,autresservicesou
conduitesd’arrosageavanttouteexcavation.
D.
Avantdejeterlescartons,remplissezleformulaireci-dessous.
•Cetidentiantdeboîtesetrouveàl’extrémitédechaquecarton.
•Veuillezconservezcesinformationspourréférenceultérieure.Vousenaurezbesoinsi
vousdevezcontacterledépartementderelationsaveclaclientèle.
•Chaqueétapeindiquelesboulonset/ouvisdontvousaurezbesoinpour
l’assemblage,ainsiquetouterondelle,contre-écrou,ouécrouàpointeàenfoncer.
A. Ilesttempspourvousdefairel’inventairedetoutelaquincaillerie,duboisetdes
accessoiresprésentéssurlespagesd’identication.Celavousfaciliteralatâche
d’assemblage.
Étape 1 : Inventaire des pièces - Lisez ceci avant l’assemblage
B. Sidespiècessontmanquantesouendommagées,ousivousavezbesoin
d’assistancepourl’assemblage,contactezledépartementdesrelationsavecla
clientèledirectement.Appelez-nousavantderetournerenmagasin.
ARRÊT ARRÊT ARRÊT ARRÊT
YM11755

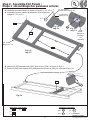
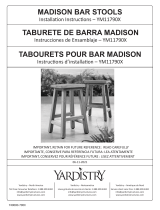
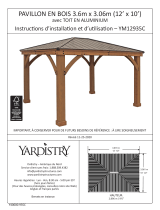
Fig. 2.1 /
Img. 2.1
391
1/4” t-nut /
Écrou en T 1/4”
Step 2: Assemble End Panels /
Étape 2 : Assemblage des panneaux arrières
Hardware / QuincaillerieWood Parts / Pièce de bois
32 x S0
4 x
4 x
2 x
394
392
391
B: Attach one (395) between each (392), fl ush to top of (394), as shown in fi g. 2.4.
B: Posez un (395) entre chaque (392), affl eurant avec le haut de (394), tel qu’illustré à l’img. 2.4.
394
392
3”
53”
1/4” fl at washer /
Rondelle de 1/4”
1/4” lock washer /
Rondelle de blocage de 1/4”
S0
X 4 Jamb
Mount /
Montant de
jambage
de
ensemble
H4
X 2
Fig. 2.4
Fig. 2.2 /
Img. 2.2 Fig. 2.3 /
Img. 2.3
H4
4 x
395
S3
S3
1 0 x
2 x 395
A: Assemble two panel frames as shown in Figure 2.1, 2.2, & 2.3.
A: Assemblez les deux cadres de panneaux, tel qu’illustré aux
images 2.1, 2.2, et 2.3.
8 x Jamb Mount /
Montant de Jambage

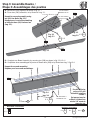
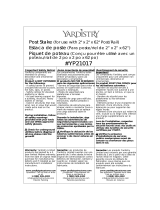
A: Secure two (390) together as shown in fi g. 3.1. /
A: Fixez deux (390) ensemble, tel qu’illustré à l’img. 3.1.
Repeat for second assembly using
two (H1) Hex Bolts (fi g. 3.2). /
Répétez pour le second assemblage
en utilisant deux (H1) Boulons hex
(img. 3.2).
Wood Parts / Pièce de bois
B: Complete one Beam Assembly, by securing two (398) as shown in fi g. 3.3 & 3.4. /
B: Complétez deux assemblages de poutre en fi xant deux (398) tel qu’illustré aux img. 3.3 et 3.4.
Repeat for second assembly. /
Répétez pour le second assemblage.
Fig. 3.3
Step 3: Assemble Beams /
Étape 3: Assemblages des poutres
390
H1
Hardware / Quincaillerie
5 x H1
Fig. 3.4
Img. 3.4
Fig. 3.2
Img. 3.2
Fig. 3.1
Img. 3.1
1/4” lock washer /
Écrou en T 1/4”
1/4” fl at washer /
Rondelle de 1/4”
398
Pre-drill all holes
using a 1/8” drill
bit before installing
screws. /
Pré-percez tous les
orifi ces à l’aide d’une
mèche 1/8” avant de
poser les vis.
390
026
H1
X 3
X 2
1/4” fl at washer /
Rondelle de 1/4”
LS2
X 4
8 x LS2
4 x 398
4 x 390
1/4” t-nut / Écrou e n T 1/4”
S4
S4
x 8
16 x

Wood Parts / Pièce de bois
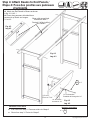
Fig. 4.1
Img. 4.1
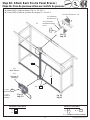
Step 4: Attach Beams to End Panels /
Étape 4: Pose des poutres aux panneaux
d’extrémité
Hardware / Quincaillerie
4 x
x 4
A: Attach two End Panels to Beams as shown
in fi g. 4.1 & 4.2. /
A: Posez deux panneaux d’extrémité aux
poutres tel qu’illustré aux images.
4.1 et 4.2.
Fig. 4.2
Img. 4.2
H6
H6
Beam with unused hole
towards the back. /
Poutre à l’orifi ce inutilisé
vers l’arrière
2 x
End Panel from step 2 / Panneau arrière de l’étape 2
2 x Beam from step 3 / Poutre de l’étape 3
Fig. 4.3
img 4.3
1/4” fl at washer /
Rondelle de 1/4”
1/4” lock washer /
Rondelle de blocage de 1/4”
1/4” t-nut /
Écrou en T 1/4”

Wood Parts / Pièce de bois
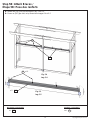
A: Attach (392) & (396) as shown in fi g. 5.1, 5.2 & 5.3. /
A: Posez (392) et (396) tel qu’illustré aux images 5.1, 5.2 et 5.3.
Fig. 5.1
Img 5.1
Step 5A: Attach Back Post & Panel Braces /
Étape 5A: Pose du panneau arrière aux renforts de panneau
1 x 392
B
Hardware / Quincaillerie
1 x
S0
x 4
392
Fig. 5.2
Img. 5.2
Fig. 5.3
Img. 5.3 3”
396
53”
H6
1/4” fl at washer /
Rondelle de 1/4”
1/4” lock washer /
Rondelle de blocage
de 1/4”
1/4” t-nut / Écrou en T 1/4”
4 x 396
8 x Jamb Mount / montant de jambage
H6 S0
x 4 per
Jamb Mount /
x 4 par
montant de
jambage
32 x
x 8
Jamb Mount /
x 8
Montant de
jambage

Wood Parts / Pièce de bois
B: Attach one (397) per side as shown in fi g. 5.4 & 5.5.
B: Posez un (397) par côté, tel qu’illustré aux images 5.4 et 5.5
Fig. 5.4
Img. 5.4
Step 5B: Attach Braces /
Étape 5B: Pose des renforts
Hardware / Quincaillerie
397
Fig. 5.5
Img. 5.5
12 x S3
S3 x 12
2 x 397
397
x 2
S3

Wood Parts / Pièce de bois
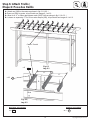
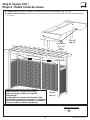
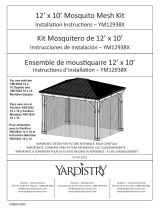
A: Attach one (389) in the centre as shown in fi g. 6.1 & 6.2. /
A: Posez un (389) au centre, tel qu’illustré aux images 6.1 et 6.2.
Fig. 6.1
Img. 6.1
Step 6: Attach Trellis /
Étape 6: Pose des treillis
Hardware / Quincaillerie
389
Fig. 6.2 /
Img. 6.2
22 x S4
S4
x 18
11 x 389
x 9
B: Allow for a 11” or 28cm gap between each (389) Trellis as shown in fi g. 6.1 & 6.2. /
B: Laissez un espace de 11” ou 28 cm entre chaque (389), tel qu’illustré aux images 6.1 et 6.2.
Centre / Centré
11” 11”

Wood Parts / Pièce de bois
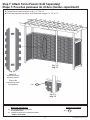
A: Attach Fence Panels as shown in fi g. 7.1, 7.2 & 7.3. /
A: Posez les panneaux de clôture tel qu’illustré aux images 7.1, 7.2 et 7.3.
Fig. 7.1 /
Img. 7.1
Step 7: Attach Fence Panels (Sold Seperately)
Étape 7: Pose des panneaux de clôture (Vendus séparément)
Hardware / Quincaillerie
24 x S11
6 x Fence Panel (with insert connectors)
(SOLD SEPERATELY) /
6 x Panneau de clôture (avec connecteurs à insérer)
(VENDUS SÉPARÉMENT)
Fig. 7.3
Img. 7.3
S11
x 24
Fig. 7.2
Img. 7.2
Insert connectors
between panels /
Insérez les
connecteurs entre
les panneaux

A: Square unit and attach remaining (S4) screws into (392) Posts as shown in fi g. 8.1 & 8.2.
A: Mettez l’unité de niveau et fi xez les vis (S4) restantes dans les (392) montants, tel qu’illustré aux images
8.1 et 8.2.
Step 8: Square Unit /
Étape 8 : Mettre l’unité de niveau
Hardware / Quincaillerie
8 x S4
S4
Notice: Posts must be securely installed to
support structure. Consult local building
codes and ground conditions for required
footing design. /
Avertissement: Les montants doivent être solide-
ment installés à la structure de soutien. Consultez les
codes locaux du bâtiments et obtenez les conditions
du sol pour défi nir le meilleur empiètement.
Fig. 8.1 /
Img. 8.1
Fig. 8.2 /
Img. 8.2
392
392
2 per corner /
2 par coin
Post /
Montant
x 8

Wood Parts / Pièce de bois
A: Secure Topper Panels to upper (395) and (397) as shown in fi g. 9.1, 9.2 using bottom Topper mount clips shown
in fi g. 9.3.
A: Fixez les éléments de toiture à (395) et (397) tel qu’illustré aux images 9.1, 9.2 en utilisant les pinces de montage
illustrées à l’image. 9.3.
Step 9: Attach Toppers (Sold Seperately)
Étape 9: Pose des éléments de toiture (Vendus séparément)
Hardware / Quincaillerie
16 x S3
Fig. 9.1 /
Img. 9.1
Fig. 9.3 /
Img. 9.3
Fig. 9.2 x 6
Topper Panels
( Sold Seperately) /
Panneaux pour
élément de toiture
(Vendus séparément)
S3
x 4 per Brace /
x 4 par renfort
(Optional) / (Optionnel)
395 397
x 2 x 2
S10
x 4
per Topper /
x 4
par élément de toiture
Topper mount clip /
Pince pour élément de toiture
S10
24 x
Fence Topper (SOLD SEPERATELY) /
Élément de toiture (VENDU SÉPARÉMENT)

20support@yardistrystructures.com
NOTES
La page est en cours de chargement...
La page est en cours de chargement...
La page est en cours de chargement...
-
 1
1
-
 2
2
-
 3
3
-
 4
4
-
 5
5
-
 6
6
-
 7
7
-
 8
8
-
 9
9
-
 10
10
-
 11
11
-
 12
12
-
 13
13
-
 14
14
-
 15
15
-
 16
16
-
 17
17
-
 18
18
-
 19
19
-
 20
20
-
 21
21
-
 22
22
-
 23
23


Yardistry Seneca Privacy Room Manuel utilisateur
- Taper
- Manuel utilisateur
dans d''autres langues
Documents connexes
-
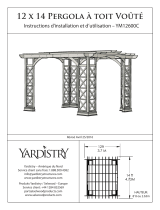 Yardistry 12 x 14 Preston Arched Roof Pergola Manuel utilisateur
-
 Yardistry Meridian 10 x 10 Gazebo Manuel utilisateur
-
 Yardistry Milan Entrance Arbors Manuel utilisateur
-
 Yardistry 12 ft. Gazebo Wood Counter Manuel utilisateur
-
 Yardistry MADISON YM11790 Manuel utilisateur
-
 Yardistry 12 x 10 Meridian Mosquito Mesh Kit Manuel utilisateur
-
 Yardistry YM11703 Mode d'emploi
-
 Yardistry 12 x 12 Gazebo Mosquito Mesh Kit Manuel utilisateur
-
 Yardistry 12 x 10 Wood Gazebo Manuel utilisateur
-
 Yardistry YP21017 Guide d'installation


