ES
GUÍA DE USO Y SEGURIDAD
SHELLY PLUS 1
Este documento contiene información técnica y de seguridad im-
portante sobre el aparato, su uso y su instalación segura. Antes
de comenzar la instalación, lea atentamente y en su totalidad esta
guía y cualquier otro documento que acompañe a la unidad. El
incumplimiento de los procedimientos de instalación puede pro-
vocar un mal funcionamiento, un peligro para su salud y su vida,
una violación de la ley o la denegación de la garantía legal y/o
comercial (si procede). Allterco Robotics no se hace responsable
de cualquier pérdida o daño debido a una instalación incorrecta o
al mal funcionamiento de este dispositivo como resultado de no
seguir las instrucciones de uso y seguridad de esta guía.
Presentación de Shelly
Shelly® es una línea de dispositivos innovadores que permiten el
control remoto de los electrodomésticos a través de un teléfono
móvil, una tableta, un PC o un sistema domótico. Shelly® puede
funcionar de forma autónoma en la red WiFi local, sin necesidad
de ser gestionado por un controlador domótico, o también puede
funcionar a través de servicios domóticos en el Cloud. Los dis-
positivos Shelly® se pueden manejar, controlar y supervisar a
distancia desde cualquier lugar en el que el usuario disponga de
una conexión a Internet, siempre que los dispositivos estén conec-
tados a un router WiFi y a Internet. Shelly® tiene un servidor web
incorporado, a través del cual el usuario puede ajustar, controlar y
supervisar el dispositivo. La función de la nube se puede utilizar, si
se habilita a través del servidor web del Dispositivo o de los ajus-
tes de la aplicación móvil Shelly Cloud. El usuario puede registrar-
se y acceder a Shelly Cloud mediante la aplicación móvil Android
o iOS, o con cualquier navegador web en https://my.shelly.cloud/.
Los dispositivos Shelly® tienen dos modos de WiFi - punto de
acceso (AP) y modo cliente (CM). Para funcionar en modo clien-
te, debe haber un router WiFi dentro del alcance del dispositivo.
Los dispositivos pueden comunicarse directamente con otros
dispositivos WiFi a través del protocolo HTTP. El fabricante puede
proporcionar una API.
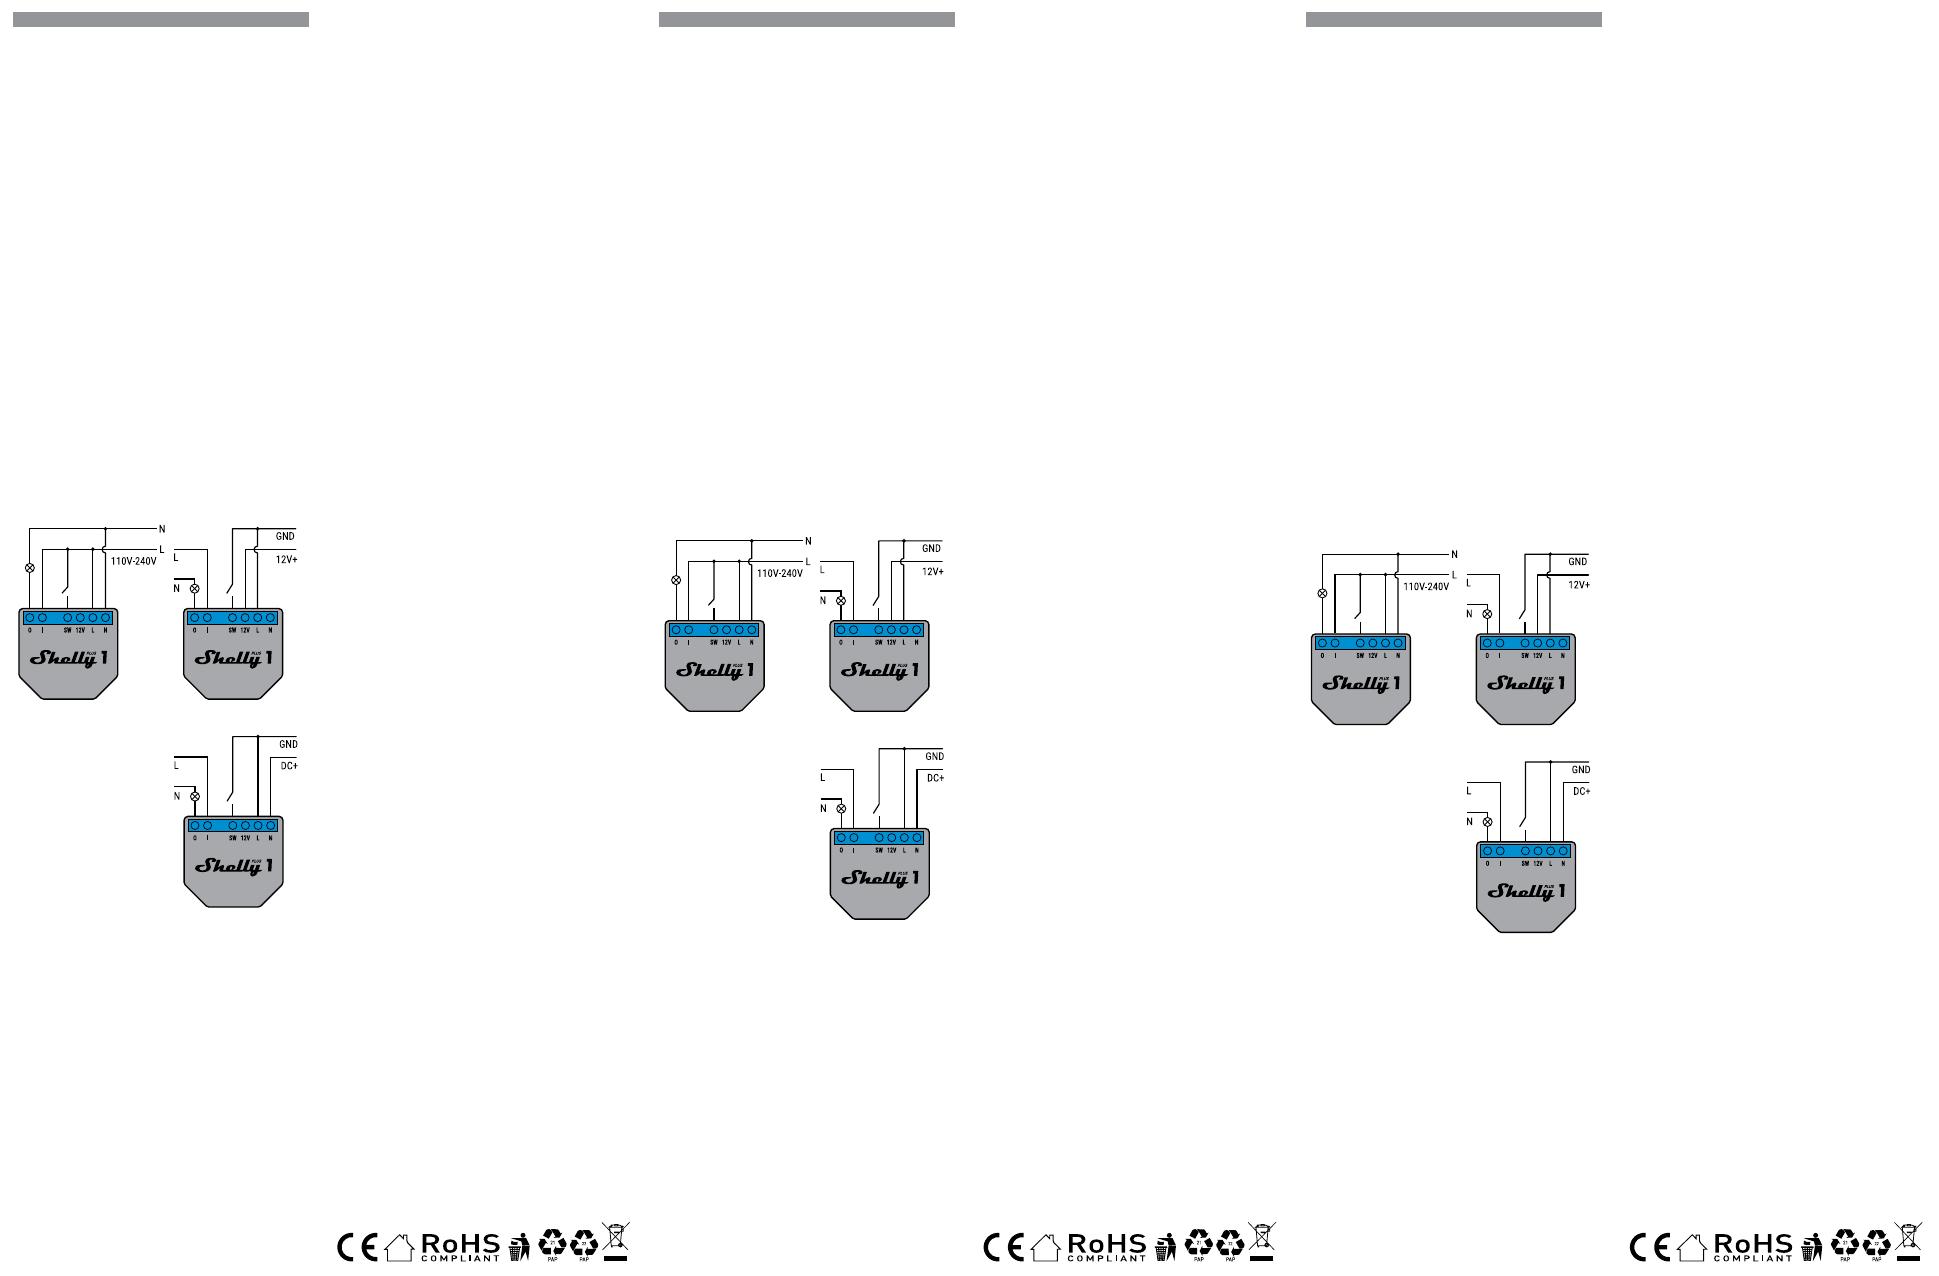
Img. 1 Img. 2
Img. 3
Leyenda
• N - Entrada neutra (cero)
• L - Entrada de línea (110-
240V)
• O - Salida de relé
• I - Entrada de relé
• SW - Conmutador (entrada)
que controla O
• 12V - CC estabilizada
INSTRUCCIONES DE INSTALACIÓN
El interruptor de relé WiFi Shelly® PLUS 1 puede controlar 1 circui-
to eléctrico de hasta 3,5 kW. Está pensado para ser montado en
una consola de pared estándar, detrás de las tomas de corriente
y los interruptores de la luz o en otros lugares donde el espacio
es limitado. Shelly puede funcionar como dispositivo autónomo o
como accesorio de otro controlador domótico.
⚠ ¡Precaución! Peligro de descarga eléctrica. El montaje/insta-
lación del aparato debe ser realizado por una persona cualicada
(electricista).
⚠¡CUIDADO! No conecte el aparato a dispositivos que superen la
carga máxima indicada.
⚠¡CUIDADO! Conecte el dispositivo sólo de la manera especi-
cada en estas instrucciones. Cualquier otro método podría causar
daños y/o lesiones.
⚠ ¡ATENCIÓN! Utilice el aparato sólo con una fuente de alimen-
tación y aparatos que cumplan con todas las normas vigentes. Un
cortocircuito en la fuente de alimentación o en cualquier dispositivo
conectado al aparato puede dañar el aparato.
⚠ ¡RECOMENDACIÓN! El aparato sólo puede conectarse y contro-
lar circuitos y aparatos eléctricos si éstos cumplen con las normas
de seguridad correspondientes.
⚠ ¡RECOMENDACIÓN! El aparato puede conectarse con cables
sólidos unipolares con una resistencia térmica aumentada en el
aislamiento no inferior a PVC T105°C.
Antes de instalar/montar el aparato, asegúrese de que la red eléc-
PT
MANUAL DO UTILIZADOR E DE
SEGURANÇA
SHELLY PLUS 1
Este documento contém importante informação técnica e de
segurança relativa ao dispositivo, sua utilização segura e insta-
lação. Antes de iniciar a instalação, por favor leia atentamente
e na íntegra este manual e quaisquer outros documentos que
acompanhem o dispositivo. A falha em seguir os procedimentos
de instalação pode originar mau funcionamento, perigo à sua
saúde e vida, violação da lei ou a recusa de garantia legal e/ou
comercial (se aplicável). A Allterco Robotics não se responsabi-
liza pelos danos ou perdas em caso de instalação incorreta ou
utilização imprópria deste dispositivo devido ao incumprimento
das instruções neste manual.
Apresentação de Shelly
Shelly® é uma linha de dispositivos inovadores, que permitem
o controlo remoto de eletrodomésticos através de um telefone
móvel, tablet, PC ou sistema de domótica. Shelly® pode funcio-
nar isoladamente na rede WiFi local sem necessidade de um
controlador de domótica, ou pode também funcionar através de
serviços de domótica na “cloud”. Os dispositivos Shelly® podem
ser acedidos, controlados e monitorizados remotamente pelo
Utilizador a partir de qualquer localização em que exista aces-
so à internet. Shelly® possui um servidor de internet integrado,
através do qual o Utilizador pode ajustar, controlar e monitorizar
o Dispositivo. A função “cloud” pode ser utilizada se ativada atra-
vés do servidor de internet do Dispositivo ou nas congurações
da aplicação Shelly Cloud. O Utilizador pode registar e aceder a
Shelly Cloud utilizando aplicações em Android ou iOS, ou com
um browser de internet em https://my.shelly.cloud/
Os Dispositivos Shelly® possuem dois modos WiFi - Ponto de
Acesso (AP) e modo de Cliente (CM). Para operar em Modo de
Cliente, um router WiFi tem de estar ao alcance do dispositivo.
Dispositivos podem comunicar diretamente com outros disposi-
tivos WiFi através do protocolo HTTP. Uma App pode ser dispo-
nibilizada pelo Fabricante.
g. 1 g. 2
g. 3
Legenda
• N - Entrada Neutro (Zero)
• L - Entrada de linha (110-
240V)
• O – Saída da Relé
• I – Entrada da Relé
• SW - Interruptor (entrada)
controlando O
• 12V - CC estabilizada
INSTRUÇÕES DE INSTALAÇÃO
O Interruptor Relé WiFi Shelly® PLUS 1 permite o controlo de 1
circuito elétrico até 3.5 kW. Foi desenhado para ser instalado em
consolas de parede standard, por trás das tomadas e interrupto-
res de iluminação ou outros locais com espaço limitado. Shelly
pode funcionar como um Dispositivo autónomo ou como aces-
sório de um sistema de domótica.
⚠ATENÇÃO! Perigo de eletrocussão. A montagem/ligação do
Dispositivo deve ser executada por um prossional (eletricista).
⚠ATENÇÃO! Não ligue eletrodomésticos ao Dispositivo se exce-
derem a sua carga máxima!
⚠ATENÇÃO! Ligue o Dispositivo apenas como ilustrado nestas
instruções. Qualquer outra forma poderá causar avarias ou danos.
⚠ATENÇÃO! Utilize o Dispositivo apenas com uma rede elétrica
e eletrodomésticos que cumpram as especicações. Um curto-
-circuito na rede elétrica ou noutro aparelho ligado ao dispositivo
poderá danicar o próprio Dispositivo.
⚠RECOMENDAÇÃO! O Dispositivo pode ser conetado e pode
controlar circuitos elétricos e eletrodomésticos apenas se estes
estiverem em conformidade com os respectivos standards e nor-
mas de segurança.
⚠RECOMENDAÇÃO! O Dispositivo pode ser conetado com ca-
bos de núcleo simples com resistência de isolamento não inferior
a PVC T105°C.
FR
GUIDE D’UTILISATION ET DE SÉCURITÉ
SHELLY PLUS 1
Ce document contient des informations techniques et de sécurité
importantes concernant l’appareil, son utilisation et son installa-
tion en toute sécurité. Avant de commencer l’installation, veuillez
lire attentivement et complètement ce guide et tout autre docu-
ment accompagnant l’appareil. Le non-respect des procédures
d’installation peut entraîner un dysfonctionnement, un danger
pour votre santé et votre vie, une violation de la loi ou le refus
de la garantie légale et/ou commerciale (le cas échéant). Allterco
Robotics n’est pas responsable de toute perte ou dommage en
cas d’installation incorrecte ou de mauvais fonctionnement de ce
dispositif en raison du non-respect des instructions d’utilisation
et de sécurité de ce guide.
Introduction à Shelly
Shelly® est une ligne de Dispositifs innovants, qui permettent le
contrôle à distance d’appareils électriques à travers un téléphone
mobile, une tablette, un PC ou un système domotique. Shelly®
peut fonctionner de manière autonome sur le réseau local WiFi,
sans être géré par un contrôleur domotique, ou il peut également
fonctionner à travers des services domotiques sur le Cloud. Les
dispositifs Shelly® peuvent être utilisés, contrôlés et surveillés
à distance depuis n’importe quel endroit où l’utilisateur dispose
d’une connexion Internet, à condition que les dispositifs soient
connectés à un routeur WiFi et à Internet. Shelly® a un serveur
web intégré, par lequel l’Utilisateur peut ajuster, contrôler et sur-
veiller le Dispositif. La fonction cloud pourrait être utilisée, si elle
est activée par le serveur web de l’Appareil ou les paramètres de
l’application mobile Shelly Cloud. L’Utilisateur peut s’inscrire et
accéder à Shelly Cloud en utilisant l’application mobile Android
ou iOS, ou avec n’importe quel navigateur Internet à
https://my.shelly.cloud/.
Les Dispositifs Shelly® ont deux modes WiFi - point d’accès (AP)
et mode client (CM). Pour fonctionner en mode client, un routeur
WiFi doit être situé dans le rayon d’action de l’appareil. Les Dispo-
sitifs peuvent communiquer directement avec d’autres dispositifs
WiFi par le biais du protocole HTTP. Une API peut être fournie par
le fabricant.
Img. 1 Img. 2
Img. 3
Légende
• N - Entrée neutre (zéro)
• L - Entrée ligne (110-240V)
• O - Sortie relais
• I - Entrée relais
• SW - Interrupteur (Entrée)
contrôlant O
• 12V - CC stabilisée
INSTRUCTIONS D’INSTALLATION
L’interrupteur relais WiFi Shelly® PLUS 1 peut contrôler 1 circuit
électrique jusqu’à 3,5 kW. Il est destiné à être monté dans une
console murale standard, derrière des prises de courant et des
interrupteurs d’éclairage ou dans d’autres endroits où l’espace est
limité. Shelly peut fonctionner en tant que dispositif autonome ou
en tant qu’accessoire d’un autre contrôleur domotique.
⚠ ATTENTION! Danger d’électrocution. Le montage/installation de
l’Appareil doit être effectué par une personne qualiée (électricien).
⚠ ATTENTION! Ne pas connecter l’appareil à des appareils dé-
passant la charge maximale indiquée !
⚠ ATTENTION! Connectez l’Appareil uniquement de la manière
indiquée dans ces instructions. Toute autre méthode pourrait cau-
ser des dommages et/ou des blessures.
⚠ ATTENTION! N’utilisez l’Appareil qu’avec un réseau électrique
et des appareils conformes à toutes les réglementations appli-
cables. Un court-circuit dans le réseau électrique ou tout appareil
connecté à l’Appareil peut endommager ce dernier.
⚠ RECOMMANDATION! Le Dispositif peut être connecté et peut
contrôler des circuits et appareils électriques uniquement s’ils sont
conformes aux normes et standards de sécurité respectifs.
⚠ RECOMMANDATION! Le dispositif peut être connecté avec
des câbles unipolaires solides dont la résistance thermique accrue
à l’isolation n’est pas inférieure à PVC T105°C.
trica está sin tensión (interruptores automáticos desconectados).
Conecte el relé a la red eléctrica e instálelo en la consola detrás
del interruptor/enchufe según el esquema que se adapte al uso
previsto:
Conexión a la red con alimentación de 110-240V CA (Img. 1) o
conexión a la red de 24-240V DC (Img.3) o alimentación de 12V
CC (Img. 2).
Para los dispositivos inductivos, aquellos que provocan picos de
tensión cuando se encienden: motores eléctricos, como ventila-
dores, aspiradoras y similares, se debe cablear un snubber RC
(amortiguador) (0,1µF / 100Ω / 1/2W / 600V CA) entre la Salida
y el Neutro del circuito.
Antes de iniciar, compruebe que los disyuntores están desconec-
tados y que no hay tensión en ellos. Esto puede hacerse con un
medidor de fase o un multímetro. Cuando esté seguro de que no
hay tensión, puede empezar a cablear los cables como se muestra
en la imagen 1. Conecte la señal que desea conmutar a “I” con
un cable. Instale un cable de “O” a la carga. Conecte un cable del
fusible a “L”.
Conecte el neutro al dispositivo. El último paso es instalar un ca-
ble desde el interruptor hasta el terminal SW.
Para más información, visite
http://shelly-api-docs.shelly.cloud/#shelly-family-overview o
póngase en contacto con nosotros en developers@shelly.cloud.
INCLUSIÓN INICIAL
Puede elegir si desea utilizar Shelly con la aplicación móvil She-
lly Cloud y el servicio Shelly Cloud. En la “Guía de la aplicación”
encontrará instrucciones sobre cómo conectar su dispositivo
al Cloud y controlarlo a través de la aplicación Shellly. También
puede familiarizarse con las instrucciones de gestión y control a
través de la interfaz web integrada.
CARACTERÍSTICAS
• Contacto seco: Sí
• Alimentación de CA 110-240 V
• Fuente de alimentación CC 12V estabilizada
• Fuente de alimentación CC 24-240 V
• Carga máxima 16A/240V
• Temperatura de funcionamiento 0°C a 40°C
• Fuerza de la señal de radio 1mW
• Protocolo de radio WiFi 802.11 b/g/n
• RF output Wi-Fi: 13.45 dBm
• RF output Bluetooh: 4.78 dBm
• Frecuencia Wi-Fi: 2412-2472 МHz; (Max. 2495 MHz)
• Frecuencia Bluetooh TX/RX: 2402- 2480 MHz; (Max. 2483,5 MHz)
• Alcance operativo (según la construcción local) - hasta 50 m en
exteriores, hasta 30 m en interiores.
• Dimensiones (HxAxA) 41x36x16 mm
• Consumo de energía < 1.2 W
• Montaje Caja mural
• Wi-Fi SÍ
• Bluetooth - v.4.2
• Basic/EDR: YES
• Modulación bluetooth: GFSK, π/4-DQPSK, 8-DPSK
• Protección de la temperatura SÍ
• Scripting (mjs) SÍ
• Compatibilidad con HomeKit SÍ
• MQTT SÍ
• URL Acciones 20
• Programación 50
• CPU ESP32
• Flash 4MB
INFORMACIÓN TÉCNICA
• Control por WiFi desde un teléfono móvil, un PC, un sistema de
automatización o cualquier otro dispositivo que soporte el proto-
colo HTTP y/o UDP.
• Gestión del microprocesador.
• Elementos controlados: 1 circuito/dispositivo eléctrico.
• Elementos de control: 1 relé.
• Shelly puede ser controlado por un botón/interruptor externo.
⚠ ¡ATENCIÓN! Peligro de descarga eléctrica. Hay que tener cuida-
do al conectar el aparato a la red eléctrica.
⚠ ¡ATENCIÓN! No permita que los niños jueguen con el botón/
interruptor conectado al aparato. Mantenga los dispositivos que
permiten el control remoto de Shelly (teléfonos móviles, tabletas,
PC) fuera del alcance de los niños.
Declaración de conformidad
Allterco Robotics EOOD declara por la presente que el equipo
de radio tipo Shelly Plus 1 cumple con la Directiva 2014/53/UE,
2014/35/UE, 2014/30/UE, 2011/65/UE. El texto completo de la de-
claración de conformidad de la UE está disponible en la siguiente
dirección web
https://shelly.cloud/knowledge-base/devices/shelly-plus-1/
Fabricante: Allterco Robotics EOOD
Dirección: Bulgaria, Soa, 1407, 103 Cherni vrah Blvd.
Tel: +359 2 988 7435
Correo electrónico: support@shelly.cloud
Web: http://www.shelly.cloud
Los cambios en la información de contacto son publicados por el
fabricante en el sitio web ocial del dispositivo
http://www.shelly.cloud.
Todos los derechos de las marcas Shelly®, y otros derechos de
propiedad intelectual asociados a este dispositivo pertenecen a
Allterco Robotics EOOD.
Antes de instalar/montar o Dispositivo, certique-se de que a
rede elétrica está desligada (desligue os disjuntores). Ligue a
Relé à rede elétrica e instale-a na consola por trás do interrup-
tor/conector tal como ilustrado no esquema adequado à função
desejada:
1.Ligação à rede elétrica com a fonte de alimentação 110-240V
CA(g. 1) ou ligação à rede elétrica com 24-240V CC (g.3) ou
fonte de alimentação 12V CC (g. 2).
Com eletrodomésticos de indutância, e todos os que possam
causar picos de tensão ao serem acionados: motores elétricos,
ventoinhas, aspiradores e similares, deve ligar-se um condensa-
dor “snubber” (0.1µF / 100Ω / 1/2W / 600V AC) entre a Saída e
o Neutro do circuito.
Antes de começar, verique se os disjuntores estão desligados
e se não existe qualquer voltagem nos seus terminais. Isto pode
ser vericado com um medidor de tensão ou um multímetro.
Quando tiver certeza de que não existe qualquer voltagem, pode
então iniciar as ligações conforme a g.1. Ligue ao “I” um cabo
com o sinal que quer interromper. Conecte um cabo desde o “O”
até à carga. Conecte um cabo desde o “L” até ao Fusível .
Conecte o Neutro ao dispositivo. O último passo será ligar um
cabo desde o interruptor até ao terminal SW.
Para mais informação, por favor visite:
http://shelly-api-docs.shelly.cloud/#shelly-family-overview ou
contate-nos através de: developers@shelly.cloud
INCLUSÃO INICIAL
Poderá escolher se quer utilizar o Shelly com a app móvel Shelly
Cloud e o serviço Shelly Cloud. Instruções sobre como conec-
tar o seu dispositivo à Cloud e como controlá-lo através da App
Shelly podem ser encontradas no “Guia da App”. Poderá também
familiarizar-se com as instruções de Gestão e Controlo através
do interface de internet embutido no dispositivo.
ESPECIFICAÇÕES
• Contacto seco: Sim
• Alimentação CA 110-240 V
• Alimentação CC 12V estabilizada
• Alimentação CC 24-240 V
• Carga máx. 16A/240V
• Temperatura de funcionamento 0°C a 40°C
• Potência do sinal rádio 1mW
• Protocolo de rádio WiFi 802.11 b/g/n
• RF output Wi-Fi: 13.45 dBm
• RF output Bluetooh: 4.78 dBm
• Frequência Wi-Fi: 2412-2472 МHz; (Máx. 2495 MHz)
• Frequência Bluetooh TX/RX: 2402- 2480 MHz (Máx. 2483,5 MHz)
• Alcance de funcionamento (dependendo da construção local)
- até 50 m ao ar livre, até 30 m no interior
• Dimensões (AxLxP) 41x36x16 mm
• Consumo elétrico < 1.2 W
• Montagem de parede
• Wi-Fi SIM
• Bluetooth - v.4.2
• Basic/EDR: YES
• Modulação Bluetooth: GFSK, π/4-DQPSK, 8-DPSK
• Proteção de Temperatura SIM
• Scripting (mjs) SIM
• Suporte HomeKit SIM
• MQTT SIM
• Ações URL 20
• Programação 50
• CPU ESP32
• Flash 4MB
INFORMAÇÃO TÉCNICA
• Controlo por WiFi através de um telefone móvel, PC, sistema
de domótica ou qualquer outro dispositivo que suporte protoco-
lo HTTP e/ou UDP.
• Gestão do Microprocessador.
• Elementos controlados: 1 circuito elétrico/eletrodoméstico.
• Elementos de controlo: 1 relé.
• Shelly pode ser controlado por um interruptor externo.
⚠ATENÇÃO! Perigo de eletrocussão. A ligação do Dispositivo na
rede elétrica tem de ser executada com precaução.
⚠ATENÇÃO! Não deixe que crianças briquem com o botão/
interruptor ligado ao Dispositivo. Mantenha os Dispositivos de
controlo de Shelly (telemóveis, tables, PCs) longe do alcance das
crianças.
Declaração de conformidade
A Allterco Robotics EOOD declara por este meio que o equipa-
mento rádio Shelly Plus 1 opera conforme a Diretriz 2014/53/
EU, 2014/35/EU, 2014/30/EU, 2011/65/EU. O texto completo
da declaração da UE sobre a conformidade está disponível no
seguinte endereço de internet
https://shelly.cloud/knowledge-base/devices/shelly-plus-1/
Fabricante: Allterco Robotics EOOD
Endereço: Bulgaria, Soa, 1407, 103 Cherni vrah Blvd.
Tel.: +359 2 988 7435
E-mail: support@shelly.cloud Web: http://www.shelly.cloud
Alterações nos endereços de contato são publicados pelo Fabri-
cante no website ocial do Dispositivo http://www.shelly.cloud
Todos os direitos sobre as marcas registadas Shelly®, e quais-
quer outros direitos de propriedade intelectual sobre este Dispo-
sitivo pertencem a Allterco Robotics EOOD.
Avant d’installer/monter le Dispositif, assurez-vous que le réseau
soit hors tension (disjoncteurs coupés). Connecter le relais au
réseau électrique et l’installer dans la console derrière l’inter-
rupteur/la prise de courant en suivant le schéma qui convient à
l’usage souhaité :
Raccordement au réseau électrique avec alimentation 110-240V
CA (Img. 1) ou 24-240V CC Raccordement au réseau électrique
(Img.3) ou alimentation 12V CC (Img. 2).
Pour les appareils inductifs, ceux qui provoquent des pics de
tension lors de la mise en marche : moteurs électriques, comme
les ventilateurs, aspirateurs et similaires, un snubber RC (amor-
tisseur) (0.1µF / 100Ω / 1/2W / 600V CA) doit être câblé entre la
Sortie et le Neutre du circuit.
Avant de commencer, vériez que les disjoncteurs soient bien
éteints et qu’il n’y ait pas de tension sur leurs bornes. Ceci peut
être fait avec un phasemètre ou un multimètre. Lorsque vous êtes
sûr qu’il n’y a pas de tension, vous pouvez commencer à câbler
les câbles comme indiqué sur l’image 1. Connectez avec un l le
signal que vous voulez commuter sur «I». Installez un l de «O» à
la charge. Installez un l du fusible à «L».
Connectez le Neutre à l’appareil. La dernière étape consiste à ins-
taller un câble de l’interrupteur à la borne SW.
Pour plus d’informations, veuillez consulter le site
http://shelly-api-docs.shelly.cloud/#shelly-family-overview ou
nous contacter à l’adresse developers@shelly.cloud.
INCLUSION INITIALE
Vous pouvez choisir si vous voulez utiliser Shelly avec l’applica-
tion mobile Shelly Cloud et le service Shelly Cloud. Vous trouverez
des instructions sur la manière de connecter votre appareil au
Cloud et de le contrôler via l’application Shellly dans le «Guide de
l’application». Vous pouvez également vous familiariser avec les
instructions de gestion et de contrôle via l’interface Web intégrée.
CARACTÉRISTIQUES
• Contact sec : Oui
• Alimentation en courant alternatif 110-240 V
• Alimentation en courant continu 12V stabilisée
• Alimentation en courant continu 24-240 V
• Charge maximale 16A/240V
• Température de fonctionnement 0°C à 40°C
• Puissance du signal radio 1mW
• Protocole radio WiFi 802.11 b/g/n
• RF output Wi-Fi: 13.45 dBm
• RF output Bluetooh: 4.78 dBm
• Fréquence Wi-Fi: 2412-2472 МHz; (Max. 2495 MHz)
• Fréquence Bluetooh TX/RX: 2402-2480 MHz; (Max. 2483,5 MHz)
• Portée opérationnelle (selon la construction locale) - jusqu’à 50
m à l’extérieur, jusqu’à 30 m à l’intérieur.
• Dimensions (HxLxL) 41x36x16 mm
• Consommation électrique < 1.2 W
• Montage Boîtier mural
• Wi-Fi OUI
• Bluetooth - v.4.2
• Basic/EDR: YES
• Modulation Bluetooth: GFSK, π/4-DQPSK, 8-DPSK
• Protection contre la Température OUI
• Scénarisation (mjs) OUI
• Support HomeKit OUI
• MQTT OUI
• Actions URL 20
• Planication 50
• PCU ESP32
• Flash 4MB
INFORMATIONS TECHNIQUES
• Contrôle par WiFi depuis un téléphone mobile, un PC, un sys-
tème d’automatisation ou tout autre dispositif supportant le pro-
tocole HTTP et/ou UDP.
• Gestion du microprocesseur.
• Éléments contrôlés: 1 circuits/appareils électriques.
• Eléments de contrôle: 1 relais.
• Shelly peuvent être commandés par un bouton/Interrupteur
externe.
⚠ ATTENTION! Danger d’électrocution. Le montage de l’appareil
sur le réseau électrique doit être effectué avec précaution.
⚠ ATTENTION! Ne laissez pas les enfants jouer avec le bouton/
interrupteur connecté à l’Appareil. Tenir les Dispositifs permettant
de commander à distance le Shelly (téléphones mobiles, tablettes,
PC) hors de portée des enfants.
Déclaration de conformité
Par la présente, Allterco Robotics EOOD déclare que l’équipement
radio de type Shelly Plus 1 est conforme à la directive 2014/53/
UE, 2014/35/UE, 2014/30/UE, 2011/65/UE. Le texte complet de
la déclaration de conformité de l’UE est disponible à l’adresse
Internet suivante
https://shelly.cloud/knowledge-base/devices/shelly-plus-1/
Fabricant: Allterco Robotics EOOD
Adresse: Bulgarie, Soa, 1407, 103 Cherni vrah Blvd.
Tél: +359 2 988 7435
Email: support@shelly.cloud Web: http://www.shelly.cloud
Les modications des coordonnées sont publiées par le fabricant
sur le site ociel de l’appareil http://www.shelly.cloud.
Tous les droits sur les marques Shelly®, et autres droits intellec-
tuels associés à ce dispositif appartiennent à Allterco Robotics
EOOD.


